airbag off ASTON MARTIN DB7 1997 Workshop Manual
[x] Cancel search | Manufacturer: ASTON MARTIN, Model Year: 1997, Model line: DB7, Model: ASTON MARTIN DB7 1997Pages: 421, PDF Size: 9.31 MB
Page 108 of 421
^7
Electrics
Component Index Sheet 1-97 MY
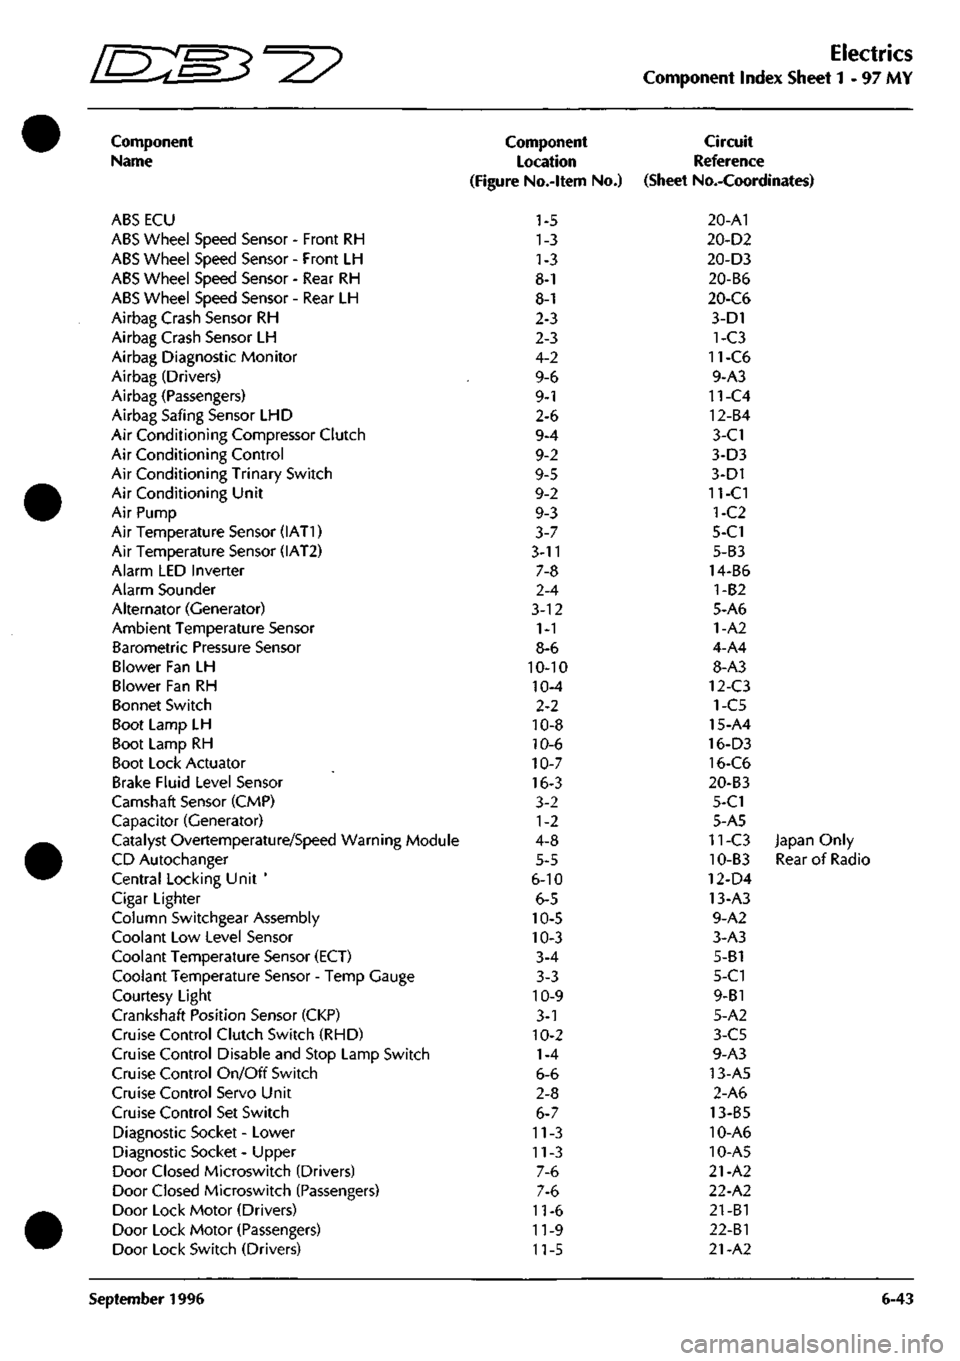
Component
Name
ABS ECU
ABS Wheel Speed Sensor - Front RH
ABS Wheel Speed Sensor - Front LH
ABS Wheel Speed Sensor - Rear RH
ABS Wheel Speed Sensor - Rear LH
Airbag Crash Sensor RH
Airbag Crash Sensor LH
Airbag Diagnostic Monitor
Airbag (Drivers)
Airbag (Passengers)
Airbag Safing Sensor LHD
Air Conditioning Compressor Clutch
Air Conditioning Control
Air Conditioning Trinary Switch
Air Conditioning Unit
Air Pump
Air Temperature Sensor (IAT1)
Air Temperature Sensor (IAT2)
Alarm LED Inverter
Alarm Sounder
Alternator (Generator)
Ambient Temperature Sensor
Barometric Pressure Sensor
Blower Fan LH
Blower Fan RH
Bonnet Switch
Boot Lamp LH
Boot Lamp RH
Boot Lock Actuator
Brake Fluid Level Sensor
Camshaft Sensor (CMP)
Capacitor (Generator)
Catalyst Overtemperature/Speed Warning Module
CD Autochanger
Central Locking Unit '
Cigar Lighter
Column Switchgear Assembly
Coolant Low Level Sensor
Coolant Temperature Sensor (ECT)
Coolant Temperature Sensor - Temp Gauge
Courtesy Light
Crankshaft Position Sensor (CKP)
Cruise Control Clutch Switch (RHD)
Cruise Control Disable and Stop Lamp Switch
Cruise Control On/Off Switch
Cruise Control Servo Unit
Cruise Control Set Switch
Diagnostic Socket - Lower
Diagnostic Socket - Upper
Door Closed Microswitch (Drivers)
Door Closed Microswitch (Passengers)
Door Lock Motor (Drivers)
Door Lock Motor (Passengers)
Door Lock Switch (Drivers)
Component
Location
(Figure No.-ltem No.)
1-5
1-3
1-3
8-1
8-1
2-3
2-3
4-2
9-6
9-1
2-6
9-4
9-2
9-5
9-2
9-3
3-7
3-11
7-8
2-4
3-12
1-1
8-6
10-10
10-4
2-2
10-8
10-6
10-7
16-3
3-2
1-2
4-8
5-5
6-10
6-5
10-5
10-3
3-4
3-3
10-9
3-1
10-2
1-4
6-6
2-8
6-7
11-3
11-3
7-6
7-6
11-6
11-9
11-5
Circuit
Reference
(Sheet No.-Coordinates)
20-A1
20-D2
20-D3
20-B6
20-C6
3-D1
1-C3
11-C6
9-A3
11-C4
12-B4
3-C1
3-D3
3-D1
11-CI
1-C2
5-C1
5-B3
14-B6
1-B2
5-A6
1-A2
4-A4
8-A3
12-C3
1-C5
15-A4
16-D3
16-C6
20-B3
5-C1
5-A5
11-C3 Japan Only
10-B3 Rear of Radio
12-D4
13-A3
9-A2
3-A3
5-B1
5-C1
9-B1
5-A2
3-C5
9-A3
13-A5
2-A6
13-B5
10-A6
10-A5
21-A2
22-A2
21-B1
22-Bl
21-A2
September 1996 6-43
Page 187 of 421
^=2?
Electrics
Airbag System
Eye Protection
Chemical protective goggles are recommended
where there is a possibility of eye contact with the
propellant. Safety glasses with side shields are
recommended for all other operations.
Protective Clothing
Approved protective gloves, overalls and shoes/
boots should be worn.
Handling and Storage Precautions
Do not store airbag modules near live electrical
equipment or circuitry. Store in a dry environment
at ambient temperatures.
Good housekeeping and engineering practices
should be employed to prevent the generation and
accumulation of
dusts.
Store in compliance with all
local state and federal regulations.
Driver and Passenger Airbag Modules
Assembly/Removal/Service Instructions
WARNING: In the event of a vehicle impact where the
airbags and the seatbeltpretensioner (if fitted) are
deployed, the following actions MUST be
performed:
Check the condition of the seatbelts, steering
wheel,
steering column, all connections to airbags,
and the column switchgear connectors for integrity
and damage. If in any
doubt,
replace suspected
parts for new parts.
Replace both crash
sensors,
the
safing sensor
and
the seatbelt pretensioner module (if fitted).
On completion of all repair procedures, switch on
the ignition and check that the
Airbag/SRS
warning
light comes on when the ignition is switched on
and extinguishes after approximately six seconds
indicating satisfactory completion of the airbag
and pretensioner
system
self
tests.
WARNING: Before starting
work,
ensure
that the ignition
switch is in position 'O' and the ignition key is
removed.
Disconnect the battery negative lead
within 12 seconds of switching off the ignition to
prevent the alarm system triggering.
As the airbag control module is equipped with a
back-up power source and due to the risk of the
airbag being inadvertently deployed, wait one
minute or longer after disconnecting the battery
before starting work on the airbag module.
• Disconnectingthe battery negative cable cancels
the memory for the 'one-touch' window down
system and stops the vehicle clock. Reset the
window memory and the clock when work is
completed.
• Never use airbags from other vehicles, always
use new parts.
• After work is completed, reconnect the battery
and perform the airbag warning light check
• Never use electrical probes to check voltage or
electrical resistance of the airbag modules.
• Disconnect the airbag before carrying out any
work on, or in the vicinity of the module, or
when using electric welding equipment.
• Always ensure that the battery negative lead has
been disconnected for at least one minute before
commencing any removal procedure.
September 1996 6-71
Page 191 of 421
'=2?
Electrics
Airbag System
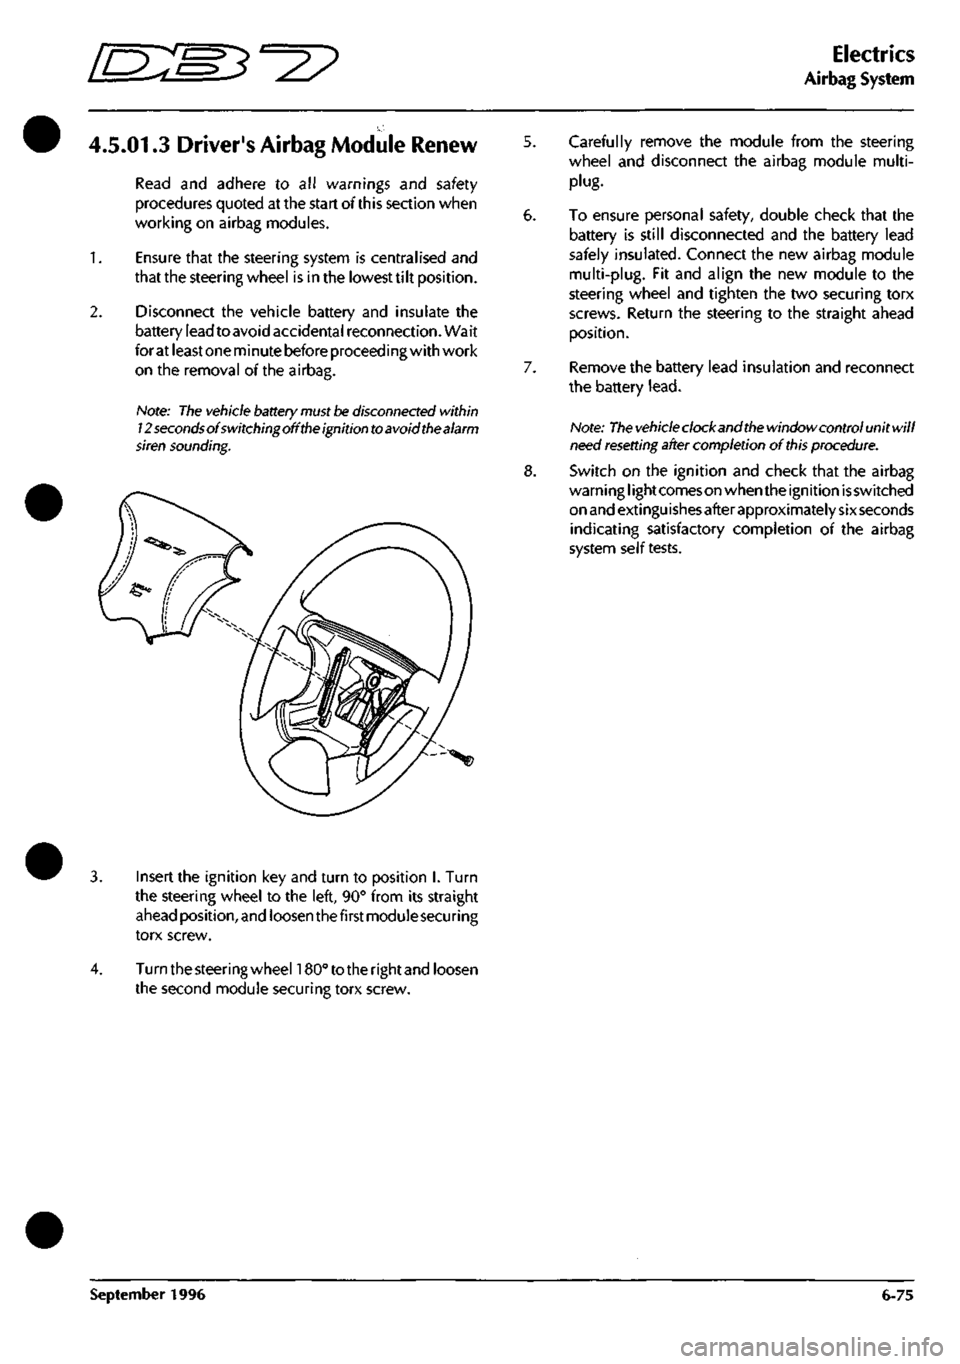
4.5.01.3 Driver's Airbag Module Renew
Read and adhere to all warnings and safety
procedures quoted at the start of this section when
working on airbag modules.
1.
Ensure that the steering system is centralised and
that the steering wheel is in the lowest tilt position.
2.
Disconnect the vehicle battery and insulate the
battery lead to avoid accidental reconnection. Wait
for at least one minute before proceeding with work
on the removal of the airbag.
Hote: The vehicle battery
must be
disconnected within
12 seconds of switching off
the
ignition to avoid the alarm
siren sounding.
5. Carefully remove the module from the steering
wheel and disconnect the airbag module multi-
plug.
6. To ensure personal safety, double check that the
battery is still disconnected and the battery lead
safely insulated. Connect the new airbag module
multi-plug.
Fit and align the new module to the
steering wheel and tighten the two securing torx
screws. Return the steering to the straight ahead
position.
7. Remove the battery lead insulation and reconnect
the battery
lead.
Note:
The vehicle
clockandthe window control unitwill
need
resetting
after completion of
this
procedure.
8. Switch on the ignition and check that the airbag
warni ng
I
ight comes on when the ignition is switched
on and extinguishes after approximately sixseconds
indicating satisfactory completion of the airbag
system self tests.
Insert the ignition key and turn to position I. Turn
the steering wheel to the left, 90° from its straight
ahead position, and loosen thefirstmoduiesecuring
torx screw.
Turn the steering wheehSO" to the rightand loosen
the second module securing torx screw.
September 1996 6-75
Page 192 of 421
Electrics
Airbag System ^^?
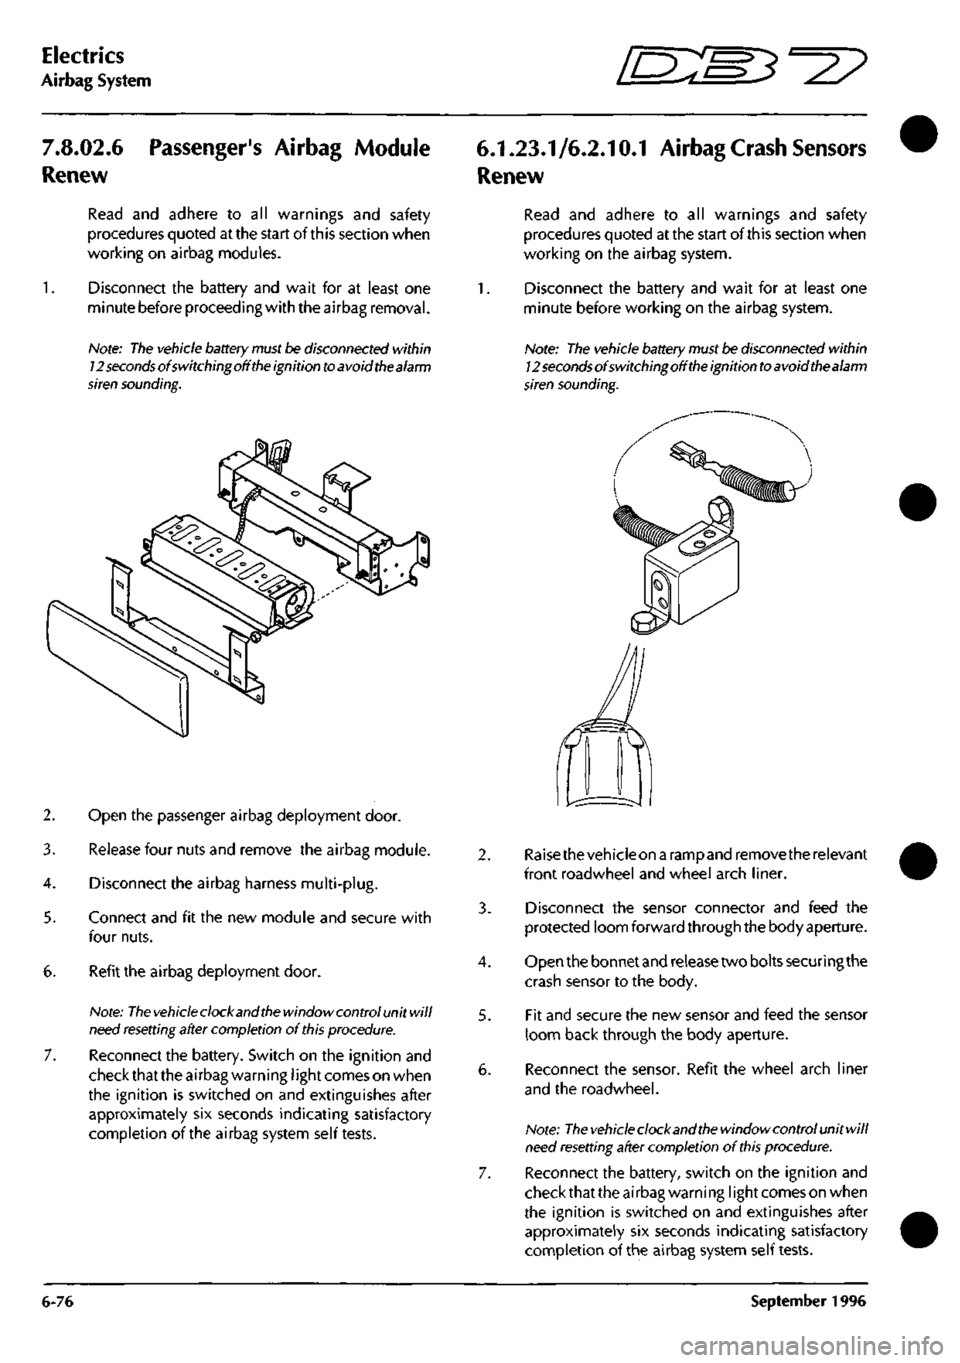
7.8.02.6
Renew
Passenger's Airbag Module
Read and adhere to all warnings and safety
procedures quoted at the start of this section when
working on airbag modules.
Disconnect the battery and wait for at least one
minute before proceeding with the airbag removal.
Note:
The
vehicle battery
must
be disconnected within
12
seconds
of switchingoff
the
ignition
to
avoid the alarm
siren sounding.
2. Open the passenger airbag deployment door.
3. Release four nuts and remove the airbag module.
4.
Disconnect the airbag harness multi-plug.
5. Connect and fit the new module and secure with
four nuts.
6. Refit the airbag deployment door.
Note:
The vehicle
clock and
the
window control unit will
need
resetting
after completion of
this
procedure.
7. Reconnect the battery. Switch on the ignition and
check that the airbag warning
I
ight comes on when
the ignition is switched on and extinguishes after
approximately six seconds indicating satisfactory
completion of the airbag system self tests.
6.1.23.1/6.2.10.1 Airbag
Crash
Sensors
Renew
Read and adhere to all warnings and safety
procedures quoted at the start of this section when
working on the airbag system.
1.
Disconnect the battery and wait for at least one
minute before working on the airbag system.
Note: The vehicle
battery
must be disconnected within
12
seconds
of switchingoff
the
ignition
to
avoid thealarm
siren sounding.
4.
5.
Raisethevehicleon a rampand remove the relevant
front roadwheel and wheel arch liner.
Disconnect the sensor connector and feed the
protected loom forward through the body aperture.
Open the bonnet and release two bolts securing the
crash sensor to the body.
Fit and secure the new sensor and feed the sensor
loom back through the body aperture.
Reconnect the sensor. Refit the wheel arch liner
and the roadwheel.
Note:
The vehicle
clock and
the
window control unit will
need
resetting
after completion of
this
procedure.
Reconnect the battery, switch on the ignition and
check that the airbag warning
I
ight comes on when
the ignition is switched on and extinguishes after
approximately six seconds indicating satisfactory
completion of the airbag system self tests.
6-76 September 1996
Page 193 of 421
^7
Electrics
Airbag System
6.4.21.2
Airbag 'Safing' Sensor Renew
Read and adhere to all warnings and safety
procedures quoted at the start of this section when
working on the airbag system.
1.
Disconnect the battery and wait for at least one
minute before working on the airbag system.
Note:
The
vehicle battery must be disconnected within
12 secondsofswitchingoffthe ignition to avoid the alarm
siren sounding.
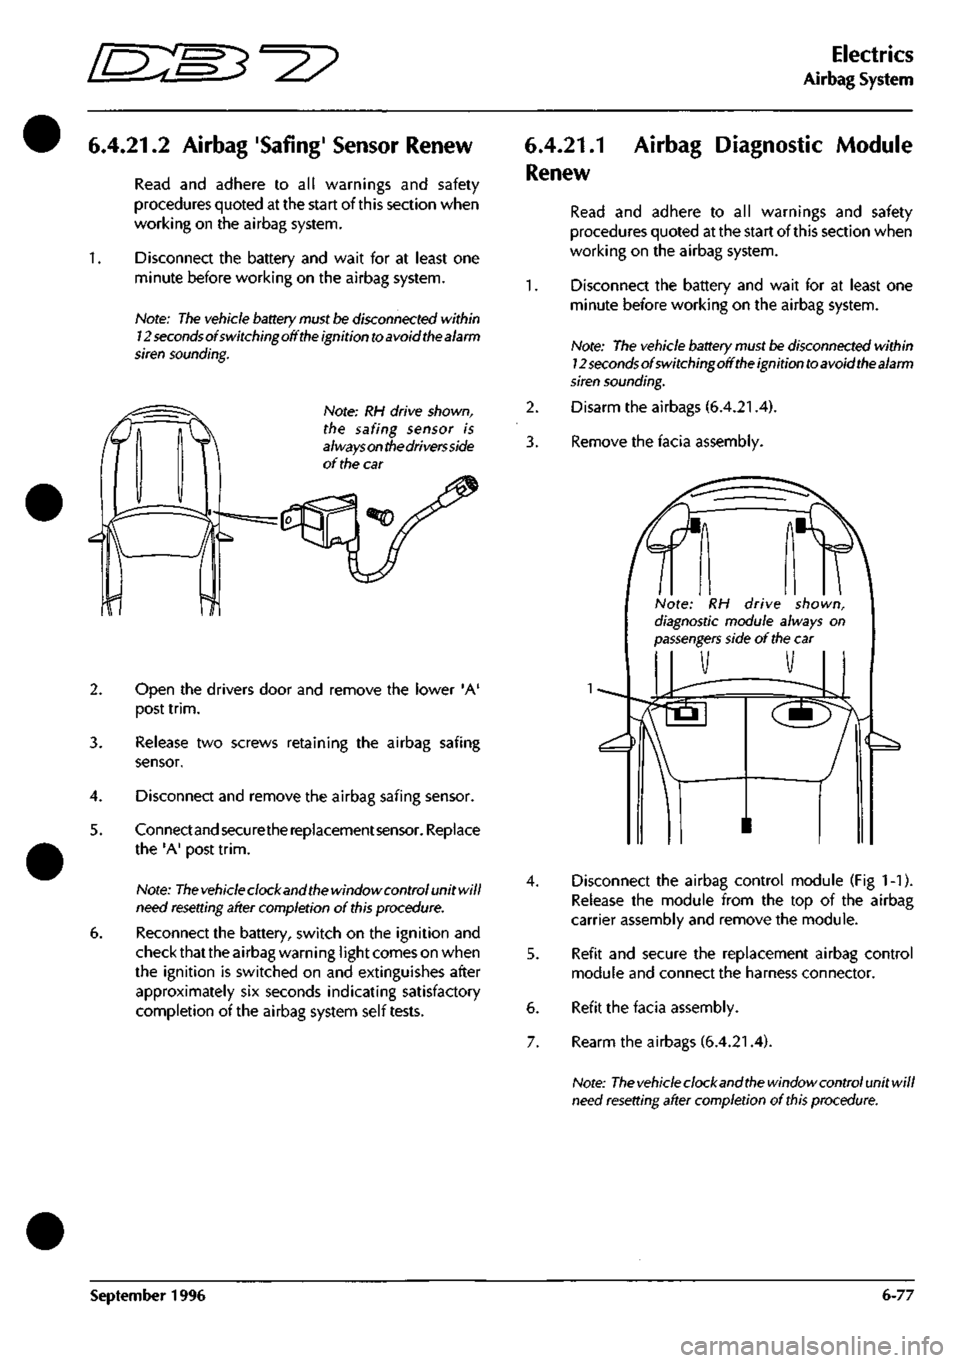
^h
Note: RH drive shown,
the safing sensor is
always
on
the drivers side
of the car
2. Open the drivers door and remove the lower 'A'
post
trim.
3. Release two screws retaining the airbag safing
sensor.
4.
Disconnect and remove the airbag safing sensor.
5. Connectand securethe replacement sensor. Replace
the 'A' post
trim.
Note:
The
vehicle clock and
the
window control unit will
need
resetting
after completion of
this
procedure.
6. Reconnect the battery, switch on the ignition and
check that the airbag warning
I
ight comes on when
the ignition is switched on and extinguishes after
approximately six seconds indicating satisfactory
completion of the airbag system self tests.
6.4.21.1
Renew
Airbag Diagnostic Module
1.
2.
3.
4.
6.
7.
Read and adhere to all warnings and safety
procedures quoted at the start of this section when
working on the airbag system.
Disconnect the battery and wait for at least one
minute before working on the airbag system.
Note: The vehicle battery must
be
disconnected within
l2secondsofswitchingofftheignitiontoavoidthealarm
siren
sounding.
Disarm the airbags (6.4.21.4).
Remove the facia assembly.
Note: RH drive shown,
diagnostic module always on
passengers
side of
the
car
Disconnect the airbag control module (Fig 1-1).
Release the module from the top of the airbag
carrier assembly and remove the module.
Refit and secure the replacement airbag control
module and connect the harness connector.
Refit the facia assembly.
Rearm the airbags (6.4.21.4).
Note:
The
vehicle clock and
the
window control unit will
need
resetting
after completion of this procedure.
September 1996 6-77
Page 196 of 421
Electrics
Airbag System ^2?
6.4.21.4
Airbag Disarming/Arming
Procedures
WARNINGS AND CAUTIONS:
WARNINGS:
Disarm the airbags by disconnecting the battery
ground (black)
lead,
waiting one minute and then
removing the airbag modules before servicing of
any airbag or steering column component.
After disconnecting the battery ground
lead,
allow
a minimum of one minute delay for the back-up
power supply to discharge before servicing the
airbag system.
The system components are non-serviceable, if
faults are
suspected,
change components for new
items
only.
Failure to observe the above procedures may
result in accidental deployment of the airbags.
Always wear safety
glasses
when working on airbag
equipped vehicles.
Personnel carrying an airbag module must ensure
that the module and trim cover are pointing away
from the
body.
When positioning on a bench or
work surface, ensure that the airbag module and
trim cover face upwards to limit motion on
accidental deployment.
Always wear
gloves
when handling deployed airbag
modules. Deposits of sodium hydroxide may be
presenton the module surface. If sodium hydroxide
contacts any area of the skin, wash the affected
area immediately with mild soap and
water.
Dispose of the deployed airbag using the correct
procedures referred to in this section.
Cautions:
When scrapping vehicles,
ensure
that the
airbags
have
been deployed (see
Scrapping Vehicles
with Live
Airbags).
If a component
has been
renewed and the fault
does
not
clear,
refit the original item and repeat the diagnostic
procedure.
After
servicing,
repeatthe diagnostic
procedures
to ensure
correct
system
operation.
Renew
the airbag module if the surrounding trim
panels
are
damaged.
Do not attempt to repaint trim covers as
paint may
damage
cover material.
Disarming the Airbags
3.
4.
WARNING: Carry out the following disarming
procedure before attempting any work on the
vehicles electrical
systems.
Note: The battery ground (black) lead must be
disconnected within 12 seconds of switching off the
ignition to avoid the alarm siren sounding.
Disconnect the battery ground
lead.
Allow a
minimum of one minute delay for the back-up
power supply to discharge.
Remove the drivers side airbag module and replace
it with an airbag simulatorfrom the simulator kit (Pt
No.
43.27028).
Remove the passengers airbag module and replace
it with an airbag simulator from the simulator kit.
Reconnect the battery ground.
Rearming the Airbags
WARNING: Carry out the following procedure to
rearm and check the airbags after completing all
work on the vehicles electrical
systems.
Note: The vehicle battery
must be
disconnected within
12
seconds
of switching off
the
ignition
to
avoid the alarm
siren sounding.
^. Disconnect the battery ground
lead.
Allow a
minimum of one minute delay for the back-up
power supply to discharge.
2.
Removethedriverssideairbagsimulatorand replace
it with the drivers airbag module. Secure the airbag
module with the two captive torx screws.
3. Remove the passengers side airbag simulator and
replace it with the passenger side airbag module.
Secure the module with four nuts and washers.
Close the passenger side airbag door.
4.
Reconnect the battery ground.
5. Switch on the ignition and check for correct
indications from the SRS/AIRBAG warning light.
TheSRS/AIRBAC lamp should come on after
a
brief
delay and remain on for approximately six seconds
during the airbag system self check. The lamp will
extinguish upon satisfactory completion of the self
check, or will flash a diagnostic code if an airbag
system fault is detected. Continuous illumination of
the warning lamp may indicate a seatbelt
pretensioner fault
Note:
Reset the
clock and window
ECUs
on completion.
6-80 September 1996
Page 199 of 421
"^p
Electrics
Airbag System
No Airbag Warning Lamp
I
noperative lamp, lamp ci rcu it or no ign ition voltage
to the diagnostics module
Normal Operation
The airbag warning lamp is designed to illuminate
for approximately six seconds when the ignition is
switched
on.
This period
is
allocated for satisfactory
performance of the airbag system self test.
Note: The a irbag warning lamp is
driven
by
the instrument
pack and not directly by the airbag diagnostic module.
The airbag diagnostic module requires an ignition
supply to pin
1
to energise the airbag warning lamp
circuit. If the warning lamp circuit is open, or the
diagnostic module does not receive an ignition
voltageatpini, the warning lamp will not illuminate.
Open circuit in the warning lamp supply, in
conjunction with another system fault, will cause
the diagnostic module to emit five tones every 30
minutes while the ignition is switched on. Repair
the faulty circuit before further diagnosis.
Note:
The
diagnostic module will not emit
the
five tone
signal if the warning lamp
is
open circuit and
there
is no
system
fault.
Possible Causes
Defective airbag warning lamp
Faulty wiring in the airbag warning lamp circuit
Loss of ignition voltage at diagnostic module pin 1.
Loss of ground at diagnostic module pin 3
Instrument pack fault
Fault Analysis
WARNING: Read and adhere to all warnings and
safety procedures at the start of this section when
working on the airbag
systent.
1.
Remove the instrument pack and check the airbag
warning lamp.
If the lamp is good, go to step 2.
If the lamp is defective, replace it, switch on the
ignition and check that the lamp is now on for
approximately six seconds after ignition on.
2.
Disarm the airbag system and fit airbag simulators
(6.4.21.4).
9.
Connect the PDU. Switch on the ignition. Measure
the 12V ignition supply voltage from airbag
diagnostic connector pin
1 -1
{+) to chassis ground.
If ignition voltage is present, go to step 6. If ignition
voltage is not present, go to step 4.
Checkfuse F15passengersidefuseboxRHDorF17
passenger side fusebox LHD (Ignition supply to the
diagnostic module pin
1
-1). If the fuse is good, go
to step 5. If the fuse is replaced, go to step 6.
Check for an open circuit on the YW wire from fuse
F15 passenger sidefusebox(F17 LHD)todiagnostic
module pin 1-1. If continuity is good, isolate the
fault in the 12V supply to fuse Fl 5 (Fl 7) and then
go to step 9.
Measure the voltage from diagnostic module pin
1
-
1 to diagnostic module pin 1-3. If 12V is not
present, isolate and service the open circuit in the
diagnostic module ground to pin 1-3. Then go to
step 7.
Switch the ignition off. Set up to measure the
voltage from DM pin
1
-4 to DM pin
1
-5 during the
first six seconds after ignition on.
Switch on the ignition, the warning light signal to
the instrument pack should switch for six seconds
after a brief delay.
If the signal does not switch, the diagnostic module
is
fau Ity. Replace the modu
le,
switch on the ign ition
and check that the airbag warning lamp does light
for six seconds after ignition on.
If the signal does switch for approx. six seconds
after ignition on, the fault is in the instrument pack
or wiring, go to step 8.
Check continuity of the YW wire from diagnostic
module pin
1
-4 to instrument pack 16 way plug pin
2.
If continuity is good, service the instrument pack
and then retesttoensure correct indication from the
airbag warning lamp at ignition on.
If continuity is defective, service the wire and then
retest to ensure correct indication from the airbag
warning lamp at ignition on.
Disconnect the PDU, and rearm the airbags
(6.4.21.4). Switch on the ignition and check for
correct indications from the airbag warning lamp.
September 1996 6-83
Page 200 of 421
Electrics
Airbag System [EE:^^^?
Continuous Airbag Warning Lamp
Inoperative lamp circuit or no ignition supply to the
airbag diagnostic module.
Normal Operation
The airbag warning lamp is designed to illuminate
for approximately six seconds when the ignition is
switched
on.
This period isallocated for satisfactory
performance of the airbag system self test. If after
this period, the diagnostic module detects a fault
within the system, the airbag warning lamp will
begin to flash.
Note:
The seat
belt
pretensioner system
(if fitted)
shares
the
airbag/SRS
warning lamp with
the airbag
system.
If a
seat belt pretensioner fault is
detected,
the
Airbag/SRS
warning lamp will be permanently illuminated. Ensure
thata permanently lit
lamp
is nottheresultof a pretensioner
fault before carrying out fault analysis on the airbag
system.
Poor connection or disconnection of the diagnostic
module harness may cause a short circuit from DM
pin 4 (warning lamp control) to pin 5 (ground) and
cause permanent illumination ofthe warning lamp.
Faulty operation of the diagnostic module internal
logic may fail to turn off the warning lamp control
circuit and cause constant illumination of the
warning lamp.
Fault Analysis
WARNING: Read and adhere to all warnings and
safety procedures at the start of this section when
working on the airbag system.
1.
Disarm the airbag system and fit airbag simulators
(6.4.21.4). Reconnect the battery.
2.
Inspectthe instrument pack and diagnostic module
connectors for damaged, pushed out pins, proper
location etc.
If any defects are identified, service as necessary.
Retest to ensure correct operation of the airbag
warning light.
If the connector condition and security are good,
reconnect the connectors and go to step 3.
5.
Connect the PDU to the upper diagnostic socket
and monitorthe airbag warning lamp
signal.
Switch
on the ignition.
If the signal is permanently low, suspect a short
circuit to ground on the airbag warning lamp
control line within the diagnostic module or from
diagnostic module pin
1
-4 to earth. Co to step 4.
If the signal switches low for six seconds after
ignition on but the airbag warning lamp is
permanently illuminated, suspect a fault in the
output side of the instrument pack to the airbag
warning lamp.
Disconnect diagnostic module plug 1 (slate) and
withdraw the plastic locking wedge to prevent
shorts to other circuits. Check continuity from pin
1-1 to ground.
If a short circuit to ground is detected, service the
wiring
as
necessary. Replacethe locking
wedge,
re
insert the connector. Switch on the ignition and
check that the airbag warning lamp signal atpin 1-
4 goes high six seconds after switching on the
ignition and that the warning lamp extinguishes.
If no short circuitto ground isdetected,thediagnostic
module is faulty. Replace the diagnostic module.
Switch on the ignition and check that the airbag
warning lamp signal at pin
1
-4 goes high six seconds
after switching on the ignition and that the warning
lamp extinguishes.
Switch off the ignition. Disconnect the battery.
Rearm the airbags (6.4.21.4). Switch on the
ign
ition
and check for correct indications from the airbag
warning lamp.
6-84 September 1996
Page 201 of 421
^^?
Electrics
Airbag System
Airbag DM Fault Code 12
Low battery voltage
Normal Operation
The airbag diagnostic module (DM) monitors the
voltage at pin 1-7 which should be equal to the
battery voltage. If a voltage lower than 9 volts is
detected at pin 1-7, the airbag warning lamp will be
illuminated and fault code 12 will be flashed.
Possible Causes
Drop in battery voltage to DM pin 1-7 caused by:
• Open circuit to pin
1
-7 from the battery
• Short circuit to ground on the battery feed
circuit
• Safing sensor feed shorted to ground
• Safing sensor internal short to ground
• Faulty charge system draining the battery
Fault Analysis
WARNING: Read and adhere to all warnings and
safety procedures at the start of
this
section when
working on the airbag system.
1.
Complete a battery voltage test as follows:
a) Measure the battery voltage at the battery under
KOEO and KOER conditions.
If the battery voltage is below 10.5 volts during
KOEO or below 12.5 volts during the KOER tests,
service the battery
and
charging system
as
necessary.
Retest for airbag system fau
It
code 12 and go to step
2 if the fault recurs.
2.
Complete a 12 volts supply check at the diagnostic
module:
a) Disarm the airbag system and fit airbag simulators
(6.4.21.4)
b) Disconnect the airbag diagnostic module.
c) Switch on the ignition.
d) Measurethevoltagebetween DM hamessconnector
pin 1-7 (+) and harness connector pin 1-3 (-).
e) If battery voltage is not present, go to step 3.
If battery voltage is present at pin 1-7, renew the
diagnostic module. Rearm and verify the airbag
system.
3. Check the supply fuse as follows:
a) Check fuse F16 in the passenger side fusebox RHD
(or F18 in passenger fusebox LHD).
If the fuse has not blown, check for an open circuit
between battery positive and diagnostic module
connector pin
1
-7.
If the fuse has blown. Renew the fuse and/or repair
the wiring and go to step 4.
4.
Check for a short circuit as follows:
a) Switch off the ignition. With the airbag diagnostic
module disconnected, measure the continuity to
earth from diagnostic module connector pin
1
-7 to
ground.
If no short circuit is detected, go to step 5.
Ifashortto ground isdetected, service the wiring as
necessary. Reconnect the diagnostic module and
retest to ensure that code 12 is cleared.
5. Check for a short circuit to ground on the safing
sensor wiring as follows:
a) Check for a short circuit to ground at diagnostic
module pin 1-9.
b) If a short is detected, disconnect the safing sensor
and repeat the check at diagnostic module pin
1
-9.
If a short is still detected, service the wiring from
diagnostic module pin
1
-9 to safing sensor pin 7.
c) If no short circuit is detected, change the airbag
diagnostic module. Reconnect the diagnostic
module and retest to ensure that code 12 does not
recur.
6. Rearm the airbags (6.4.21.4)
September 1996 6-85
Page 203 of 421
mxm^^^?
Electrics
Airbag System
Airbag DM Fault Code 14
Primary crash sensor circuit short to ground
Airbag DM Fault Code 21
Safing sensor insecure mounting.
Normal Operation
The diagnostic module measuresthevoltage at pins
1
-2 and
1
-6. The normal voltage at these pins is 10
volts (±1 volt) with the ignition on, and battery
voltage with the ignition off.
If the voltage at the airbag diagnostic module
connector pins
1
-2 or
1
-6 drops below 5 volts, fault
code 14 will be generated and the airbag warning
lamp will be switched on. When generating a code
14 the diagnostic module also generates a signal to
blow its own internal thermal fuse. This action
disables the airbag deployment circuit. The airbag
diagnostic module fuse is non-repairable and the
module must be replaced after removing the short
circuit. If the voltage at pins 1-2 and 1-6 returns to
normal,
fault code 51 (blown thermal fuse) will be
logged.
Fault Analysis
WARNING: Read and adhere to all warnings and
safety procedures at the start of
this
section when
working on the airbag system.
1.
Disarm the airbag system and fit airbag simulators
(6.4.21.4)
2.
Disconnect the airbag diagnostic module and
remove the plastic wedge from plug
1
(slate).
Note:
The
plastic wedge contains a shorting bar which
would
short
together pins
1-3
(gnd),
1-11
and 1-2 when
the plug is disconnected.
3 Measure the continuity to ground at the following
pins on the diagnostic module harness connector:
1-2 RH crash sensor monitor
1-11 LH crash sensor feed
1
-6 LH crash sensor monitor
1-12 RH crash sensor feed
If no short circuit is detected, go to step 4.
If a short circuit
is
detected, disconnect the relevant
crash sensorandrepeatthecontinuity measurement
to isolate the circuit fault. Service the wiring or
replace the crash sensor as necessary. Refit the
plastic wedge to the diagnostic module connector.
Fit a new airbag diagnostic module and rearm the
airbags (6.4.21.4).
Normal Operation
The diagnostic module measures the resistance
between pins
1
-10 (safing sensor case ground) and
1-3 (monitor reference ground) at the diagnostic
module connector. If the resistance is greater than
2Q
a
fault code
21
will be generated and the airbag
warning lamp will be switched on.
Note:
a
good ground connection is vital.
The
wire from
pin
1-1
is riveted to the safing
sensor case
and the
case
must
be securely
grounded to the vehicle
body.
Fault Analysis
WARNING: Read and adhere to all warnings and
safety procedures at the start of this section when
working on the airbag system.
Disarm the airbag system and fit airbag simulators
(6.4.21.4).
Disconnect the diagnostic connector and check for
continuity from pin 1-3 to chassis ground.
If continuity is good, go to step 3.
If the resistance reading is 2Q or more, service the
diagnostic module ground circuit to pin 1-3 as
necessary. Confirm a good ground path between
pins 1-10 and 1-3.Clearthecode21 and rearm the
airbags (6.4.21.4).
Check for continuity between pins
1
-10 and chassis
ground at the safing sensor.
If the resistance is above 2Q, check for continuity
from the safing sensor connector pin 5 to chassis
ground.
Also check the safing sensor mounting for
corrosion,
dirt or loose fixings. Service the wiring
and/or clean and secure the sensor mounting as
necessary, if a satisfactory ground is not achieved,
replace the safing sensor.
Make
a
final continuity test from diagnostic module
connector pin
1
-3 to
1
-10 to ensure a satisfactory
ground
path.
Reconnect the diagnostic module.
Clear the code
21.
Rearm the airbags (6.4.21.4).
September 1996 6-87