handbrake ASTON MARTIN V8 VANTAGE 2010 User Guide
[x] Cancel search | Manufacturer: ASTON MARTIN, Model Year: 2010, Model line: V8 VANTAGE, Model: ASTON MARTIN V8 VANTAGE 2010Pages: 947, PDF Size: 43.21 MB
Page 447 of 947
Shock Absorber System (04.03)
Suspension (04.00)
May 2007 Workshop Manual 4-3-7
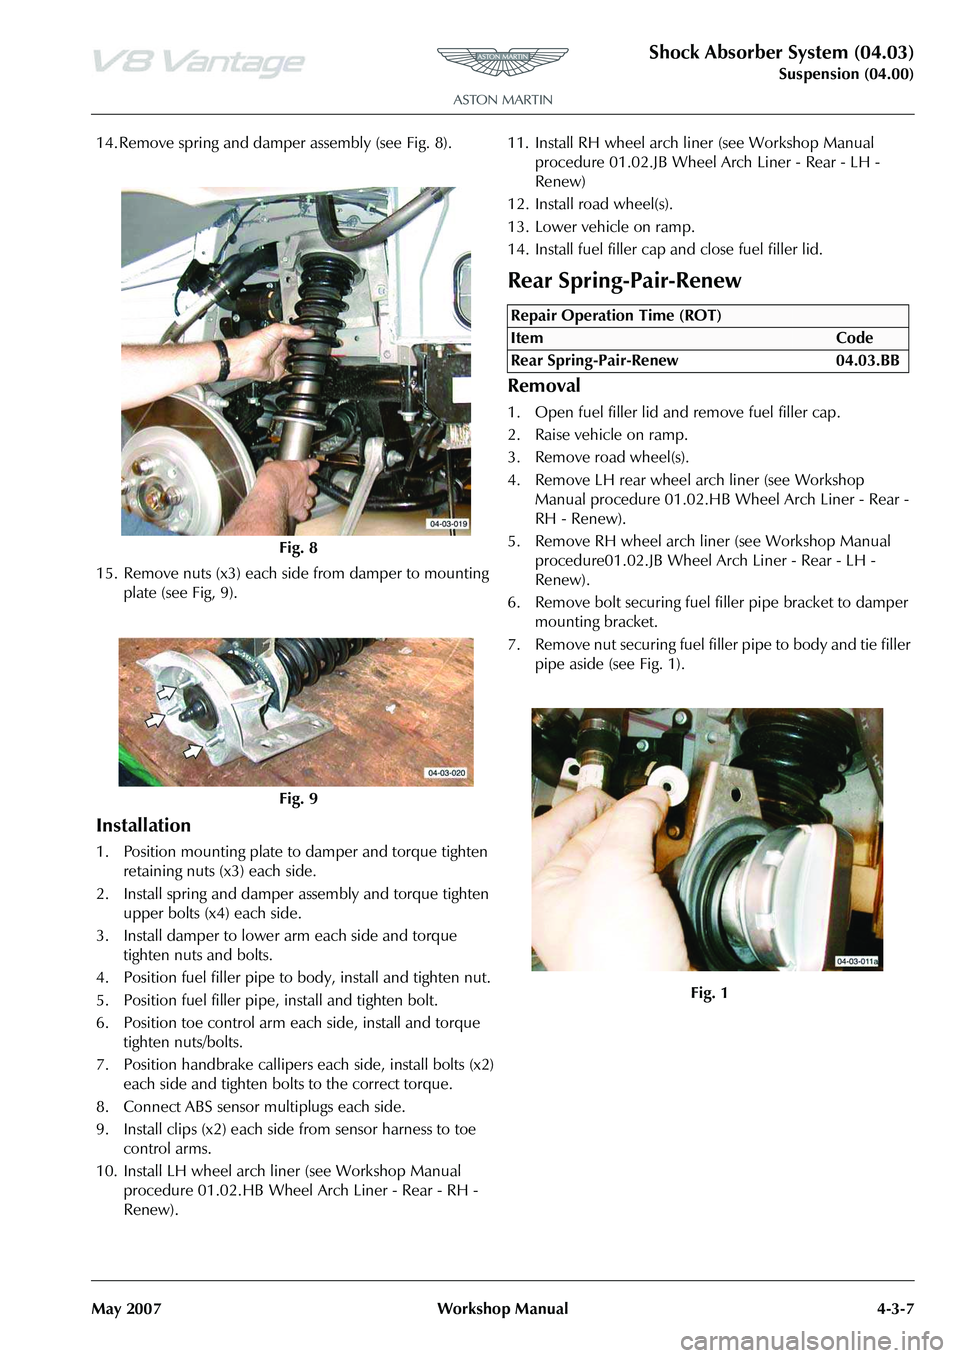
14. Remove spring and damper assembly (see Fig. 8).
15. Remove nuts (x3) each side from damper to mounting plate (see Fig, 9).
Installation
1. Position mounting plate to damper and torque tighten retaining nuts (x3) each side.
2. Install spring and damper assembly and torque tighten upper bolts (x4) each side.
3. Install damper to lower arm each side and torque tighten nuts and bolts.
4. Position fuel filler pipe to body, install and tighten nut.
5. Position fuel filler pipe, install and tighten bolt.
6. Position toe control arm each side, install and torque tighten nuts/bolts.
7. Position handbrake callipers each side, install bolts (x2) each side and tighten bolts to the correct torque.
8. Connect ABS sensor multiplugs each side.
9. Install clips (x2) each side from sensor harness to toe control arms.
10. Install LH wheel arch liner (see Workshop Manual procedure 01.02.HB Wheel Arch Liner - Rear - RH -
Renew). 11. Install RH wheel arch li
ner (see Workshop Manual
procedure 01.02.JB Wheel Arch Liner - Rear - LH -
Renew)
12. Install road wheel(s).
13. Lower vehicle on ramp.
14. Install fuel filler cap and close fuel filler lid.
Rear Spring-Pair-Renew
Removal
1. Open fuel filler lid and remove fuel filler cap.
2. Raise vehicle on ramp.
3. Remove road wheel(s).
4. Remove LH rear wheel arch liner (see Workshop Manual procedure 01.02.HB Wheel Arch Liner - Rear -
RH - Renew).
5. Remove RH wheel arch liner (see Workshop Manual procedure01.02.JB Wheel Arch Liner - Rear - LH -
Renew).
6. Remove bolt securing fuel filler pipe bracket to damper
mounting bracket.
7. Remove nut securing fuel fille r pipe to body and tie filler
pipe aside (see Fig. 1).
Fig. 8
Fig. 9
Repair Operation Time (ROT)
Page 448 of 947

Shock Absorber System (04.03)
Suspension (04.00)4-3-8 Workshop Manual May 2007
8. Disconnect ABS sensor multiplug (see Fig. 2).
9. Release sensor harness clips (x2) from toe control arm (see Fig. 3).
10. Remove bolts (x2) each side from handbrake calliper to rear hub and release calliper an d position aside (see Fig.
4)
.
11. Remove nuts and bolts both sides from toe control arms (see Fig. 5).
12. Remove nuts and bolts each side from lower damper mountings (see Fig. 6).
Fig. 2
Fig. 3
Fig. 4
Fig. 5
Fig. 6
Page 449 of 947
Shock Absorber System (04.03)
Suspension (04.00)
May 2007 Workshop Manual 4-3-9
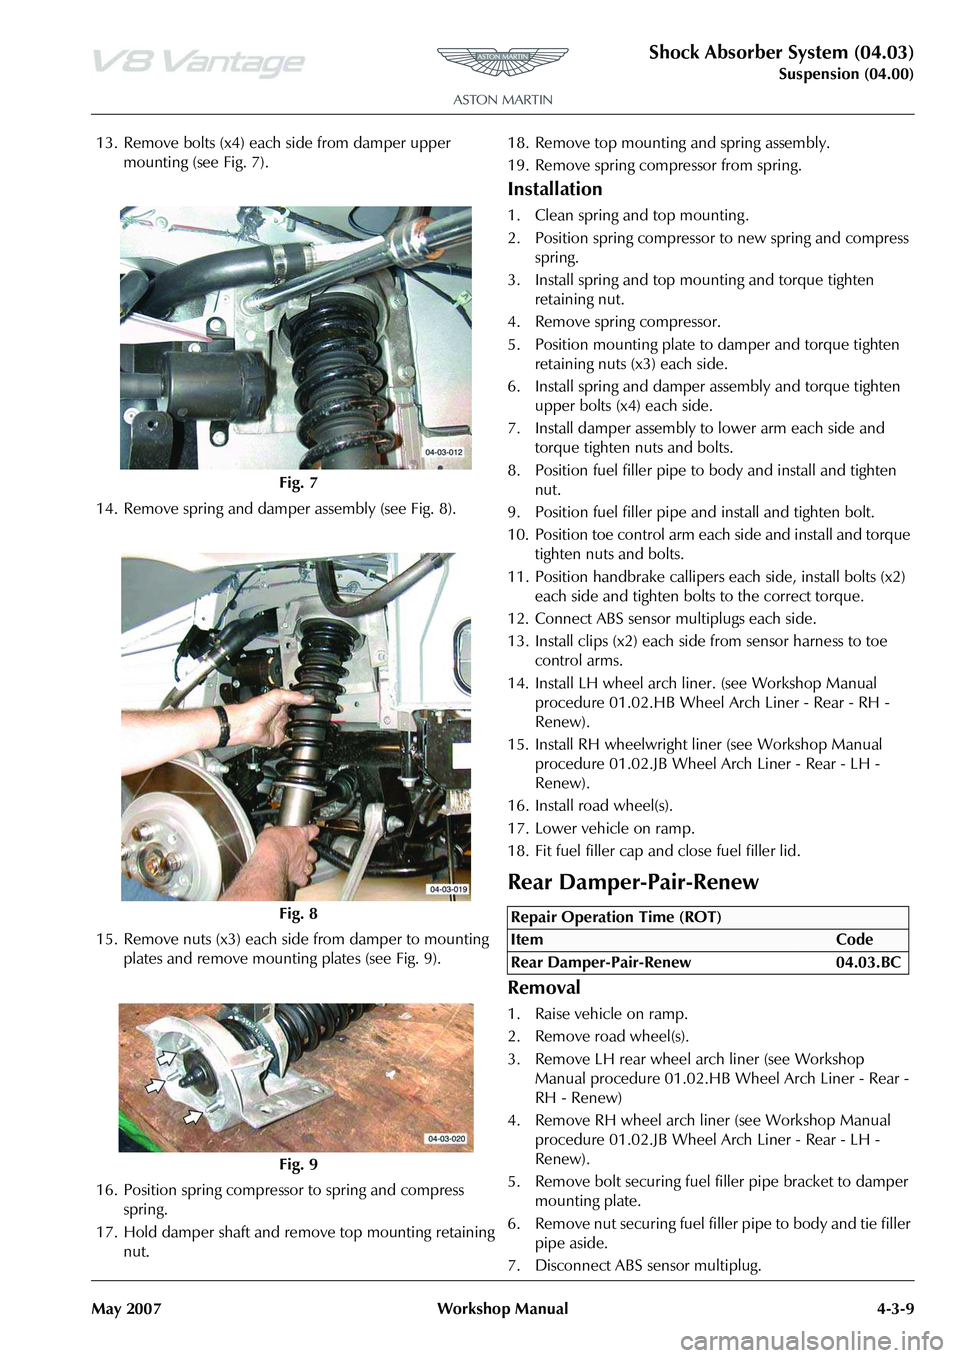
13. Remove bolts (x4) each side from damper upper mounting (see Fig. 7).
14. Remove spring and damper assembly (see Fig. 8).
15. Remove nuts (x3) each side from damper to mounting plates and remove mounting plates (see Fig. 9).
16. Position spring compresso r to spring and compress
spring.
17. Hold damper shaft and remove top mounting retaining nut. 18. Remove top mounting and spring assembly.
19. Remove spring compressor from spring.
Installation
1. Clean spring and top mounting .
2. Position spring compressor to new spring and compress
spring.
3. Install spring and top mounting and torque tighten retaining nut.
4. Remove spring compressor.
5. Position mounting plate to damper and torque tighten
retaining nuts (x3) each side.
6. Install spring and damper assembly and torque tighten upper bolts (x4) each side.
7. Install damper assembly to lower arm each side and torque tighten nuts and bolts.
8. Position fuel filler pipe to body and install and tighten nut.
9. Position fuel filler pipe and install and tighten bolt.
10. Position toe control arm each side and install and torque tighten nuts and bolts.
11. Position handbrake callipers each side, install bolts (x2) each side and tighten bolts to the correct torque.
12. Connect ABS sensor multiplugs each side.
13. Install clips (x2) each side from sensor harness to toe control arms.
14. Install LH wheel arch li ner. (see Workshop Manual
procedure 01.02.HB Wheel Arch Liner - Rear - RH -
Renew).
15. Install RH wheelwright li ner (see Workshop Manual
procedure 01.02.JB Wheel Arch Liner - Rear - LH -
Renew).
16. Install road wheel(s).
17. Lower vehicle on ramp.
18. Fit fuel filler cap and close fuel filler lid.
Rear Damper-Pair-Renew
Removal
1. Raise vehicle on ramp.
2. Remove road wheel(s).
3. Remove LH rear wheel arch liner (see Workshop Manual procedure 01.02.HB Wheel Arch Liner - Rear -
RH - Renew)
4. Remove RH wheel arch liner (see Workshop Manual procedure 01.02.JB Wheel Arch Liner - Rear - LH -
Renew).
5. Remove bolt securing fuel filler pipe bracket to damper
mounting plate.
6. Remove nut securing fuel fille r pipe to body and tie filler
pipe aside.
7. Disconnect ABS sensor multiplug.
Fig. 7
Fig. 8
Fig. 9
Repair Operation Time (ROT)
Page 450 of 947
Shock Absorber System (04.03)
Suspension (04.00)4-3-10 Workshop Manual May 2007
8. Release sensor harness clips (x2) from toe control arm.
9. Remove bolts (x2) each side from handbrake calliper to rear hub.
10. Release calliper and position aside.
11. Remove nuts and bolts both sides from toe control arms.
12. Remove nuts and bolts each side from lower damper mountings.
13. Remove bolts (x4) each side from damper upper mounting.
14. Remove spring and damper assembly.
15. Remove nuts (x3) each side from damper to mounting plates and remove mounting plates.
16. Position spring compressor to spring and compress spring.
17. Hold damper shaft and remove top mounting retaining nut.
18. Remove top mounting and spring assembly.
19. Remove dust shield, rebound bumper and spring seat flange.
Installation
1. Clean spring, spring seat flange, rebound bumper, dust
shield and top mounting .
2. Install spring seat flange, rebound bumper and dust shield onto damper.
3. Install spring and top mounting and fit and tighten retaining nut.
4. Remove spring compressor.
5. Position mounting plate to damper and torque tighten retaining nuts (x3).
6. Install spring and damper assembly and torque tighten upper bolts (x4) each side.
7. Install damper assembly to lower arm each side and torque tighten nuts and bolts.
8. Position fuel filler pipe to body and install and tighten nut.
9. Position fuel filler pipe and install and tighten bolt.
10. Position toe control arm each side and install and torque tighten nuts and bolts.
11. Position handbrake callipers each side, install bolts (x2) each side and tighten bolts to the correct torque.
12. Connect ABS sensor multiplugs each side.
13. Install clips (x2) each side from sensor harness to toe control arms.
14. Install LH wheel arch liner (see Workshop Manual procedure 01.02.HB Wheel Arch Liner - Rear - RH -
Renew).
15. Install RH wheel arch liner (see Workshop Manual procedure 01.02.JB Wheel Arch Liner - Rear - LH -
Renew)
16. Install road wheel(s).
17. Lower vehicle on ramp.
Page 473 of 947
Version 6, March 2010 Workshop Manual 6-3-1
Brake System (06.00)
Contents
Front Disc Brake (06.03)........................................ 6-3-2Description ............................................................. 3-2
Specifications.......................................................... 3-2
Maintenance ........................................................... 3-3Front Brake Disc Set - Renew ................................. 3-3
Front Caliper-Renew .............................................. 3-4
Front Pad Kit - Renew ............................................ 3-5
Front Brake Hose Assembly - Renew ...................... 3-5
Rear Disc Brakes (06.04) ....................................... 6-4-1 Description ............................................................. 4-1
Specifications.......................................................... 4-1
Maintenance ........................................................... 4-2Rear Brake Disc Set-Renew .................................... 4-2
RH/LH Rear Caliper-Renew ................................... 4-2
Rear Pad Kit-Renew ............................................... 4-3
Rear Brake Hose Assembly-Renew ......................... 4-4
Hand Brake (06.05) ................ ............................... 6-5-1
Description ............................................................. 5-1
Specifications.......................................................... 5-1
Maintenance ........................................................... 5-2 RH/LH Handbrake Caliper-Re new ......................... 5-2
Handbrake Lever Assembly-Renew ........................ 5-2
Handbrake Pad Set-Renew .................................... 5-2
Handbrake Cable Assembly-Adjust......................... 5-3
Handbrake Cable Assembly-Vehicle Set-Renew ..... 5-3
Brake Actuation System (06.06)............................. 6-6-1 Description ............................................................. 6-1
Tandem Master Cylinder ........................................ 6-1
Specifications.......................................................... 6-1
Maintenance ........................................................... 6-2Pedal Box Assembly - Renew ................................. 6-2
Installation ............................................................. 6-2
RHD-Brake Master Cylinder Assembly-Renew........ 6-2
LHD-Brake Master Cylinder Assembly-Renew ........ 6-3
Clutch Master Cylinder Assembly-Renew ............... 6-3
RH/LH Front Caliper Hose Assembly-Renew .......... 6-4
RH/LH Rear Brake Caliper Tube Assembly-Renew . 6-5
Brake Master Cylinder to Modulator Secondary
Tube Assembly-Renew ........................................... 6-6
Brake Master Cylinder to Modulator Primary
Tube Assembly-Renew ........................................... 6-7
Rear Wheel Brake Front to Rear Tube Assembly
-Renew .................................................................. 6-8
RH Front Caliper to Modulator Tube Assembly
-Renew .................................................................. 6-9
Rear Wheel Brake Tube Assembly-Renew ............ 6-10
Dynamic Stability Control Module-Renew............ 6-11
Power Brake System (06.07) .................................. 6-7-1 Brake Booster ......................................................... 7-1
Emergency Brake Assist .......................................... 7-1
Specifications.......................................................... 7-2
Maintenance ........................................................... 7-2Brake Booster-RHD-Renew.................................... 7-2
Brake Booster-LHD-Renew .................................... 7-2 Brake Fluid Reservoir-Renew ................................. 7-3
Brake Bleeding - AMDS ......................................... 7-3
Brake Master Cylinder and Vacuum Booster
-Renew .................................................................. 7-4
Brake Master Cylinder-Renew ................................ 7-5
Anti-lock Braking System (ABS) (06.09)................. 6-9-1 Dynamic Stability Control ...................................... 9-1Concept ................................................................ 9-1
System Overview ................................................... 9-2
Operation Summary .............................................. 9-2
Traction Control ..................................................... 9-2 Functional Description ........................................... 9-2
Engine Intervention ................................................ 9-3
Brake Intervention ................................................. 9-3
ABS / DSC Circuit .................................................. 9-3
Specifications ......................................................... 9-3 Maintenance ......................................................... 9-4
ABS Modulator - Remove and Install ...................... 9-4
Page 474 of 947

Front Disc Brake (06.03)
Brake Systems (06.00)6-3-2 Workshop Manual Version 6, March 2010
Brake Systems (06.00)
Front Disc Brake (06.03)
Description
The front, four piston, brak e caliper is attached to the
vertical link with two bolts. The caliper is a monobloc
assembly. The steel brake discs are ventilated and grooved.
They are attached to the hub by two attachment bolts.
The two-pairs of opposed pistons operate directly on the
brake pads that are installed one each side of the disc.
Specifications
Oils/Greases
Brake Fluid Castrol Response SuperDOT 4 (Not silicon based brake fluid)
Brake pads
New pad thickness 9.4 mm
Minimum lining
thickness 2.5 mm
Torque Figures
DescriptionNm.lb. / ft.
Brake Hose Unions 22 16.5
Brake Hose Bracket to
Body 9 6.6
Brake Caliper to Vertical
Link 20 + 66°-70° 15 + 66°-70°
Handbrake Caliper to
Vertical Link 15 +90°-94° 11.5 + 90°-94°
Brake Disc Screws 10.5 8
Page 479 of 947
Rear Disc Brakes (06.04)
Brake system (06.00)
May 2007 Workshop Manual 6-4-1
Brake system (06.00)
Rear Disc Brakes (06.04)
Description
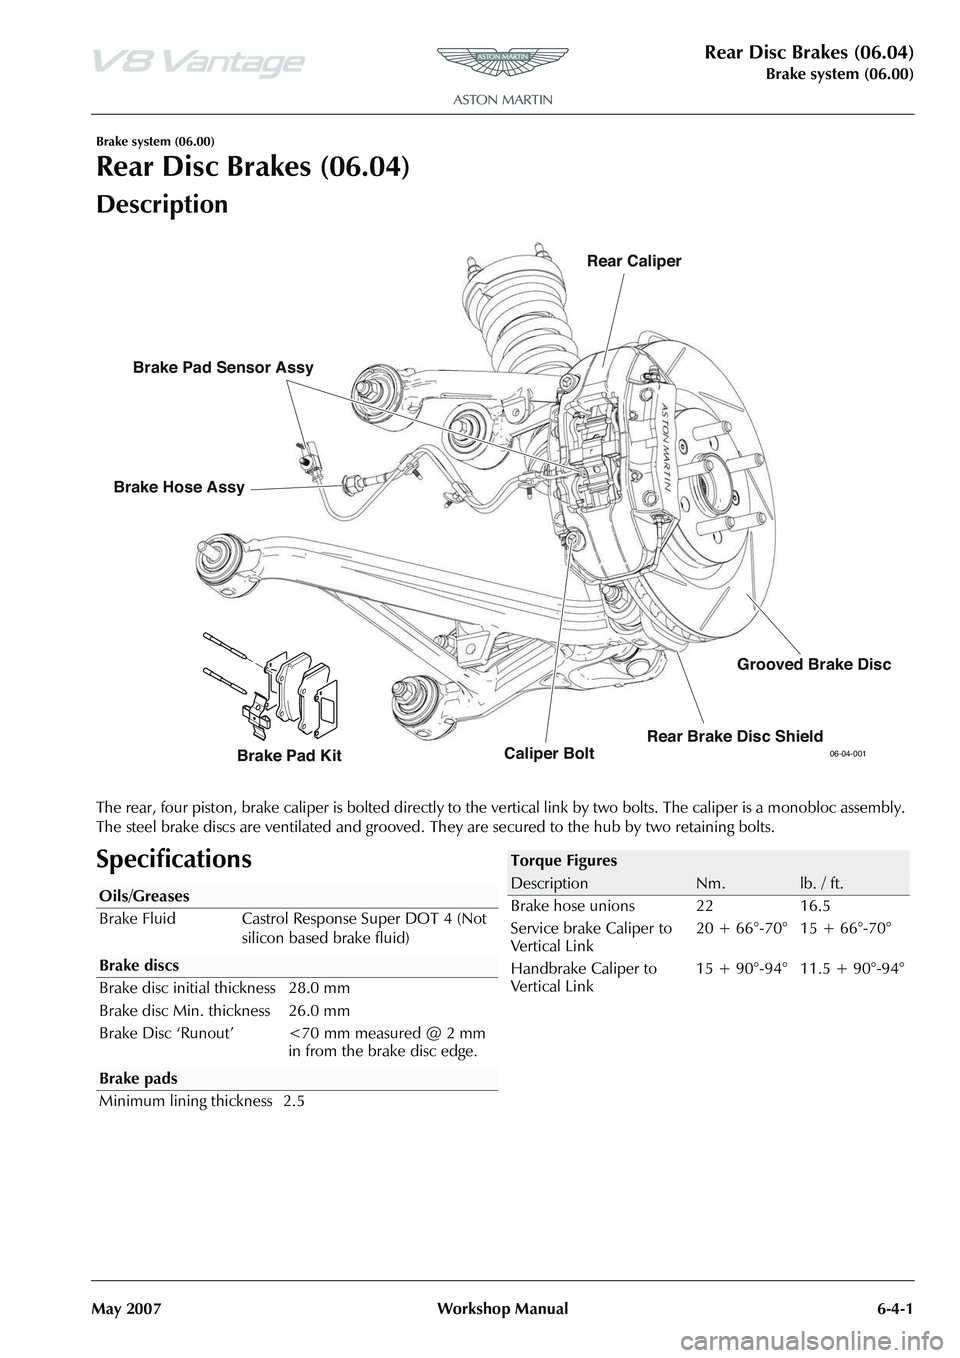
The rear, four piston, brake caliper is bolted directly to the ve rtical link by two bolts. The caliper is a monobloc assembly.
The steel brake discs are ventilated and grooved. Th ey are secured to the hub by two retaining bolts.
Specifications
06-04-001Caliper BoltRear Caliper
Brake Hose Assy
Brake Pad Kit
Brake Pad Sensor Assy
Rear Brake Disc ShieldGrooved Brake Disc
Oils/Greases
Brake Fluid Castrol Response Super DOT 4 (Not
silicon based brake fluid)
Brake pads
Minimum lining thickness 2.5
Torque Figures
DescriptionNm.lb. / ft.
Brake hose unions 22 16.5
Service brake Caliper to
Vertical Link 20 + 66°-70° 15 + 66°-70°
Handbrake Caliper to
Vertical Link 15 + 90°-94° 11.5 + 90°-94°
Page 480 of 947
Rear Disc Brakes (06.04)
Brake system (06.00)6-4-2 Workshop Manual May 2007
Maintenance
Rear Brake Disc Set-Renew
Removal
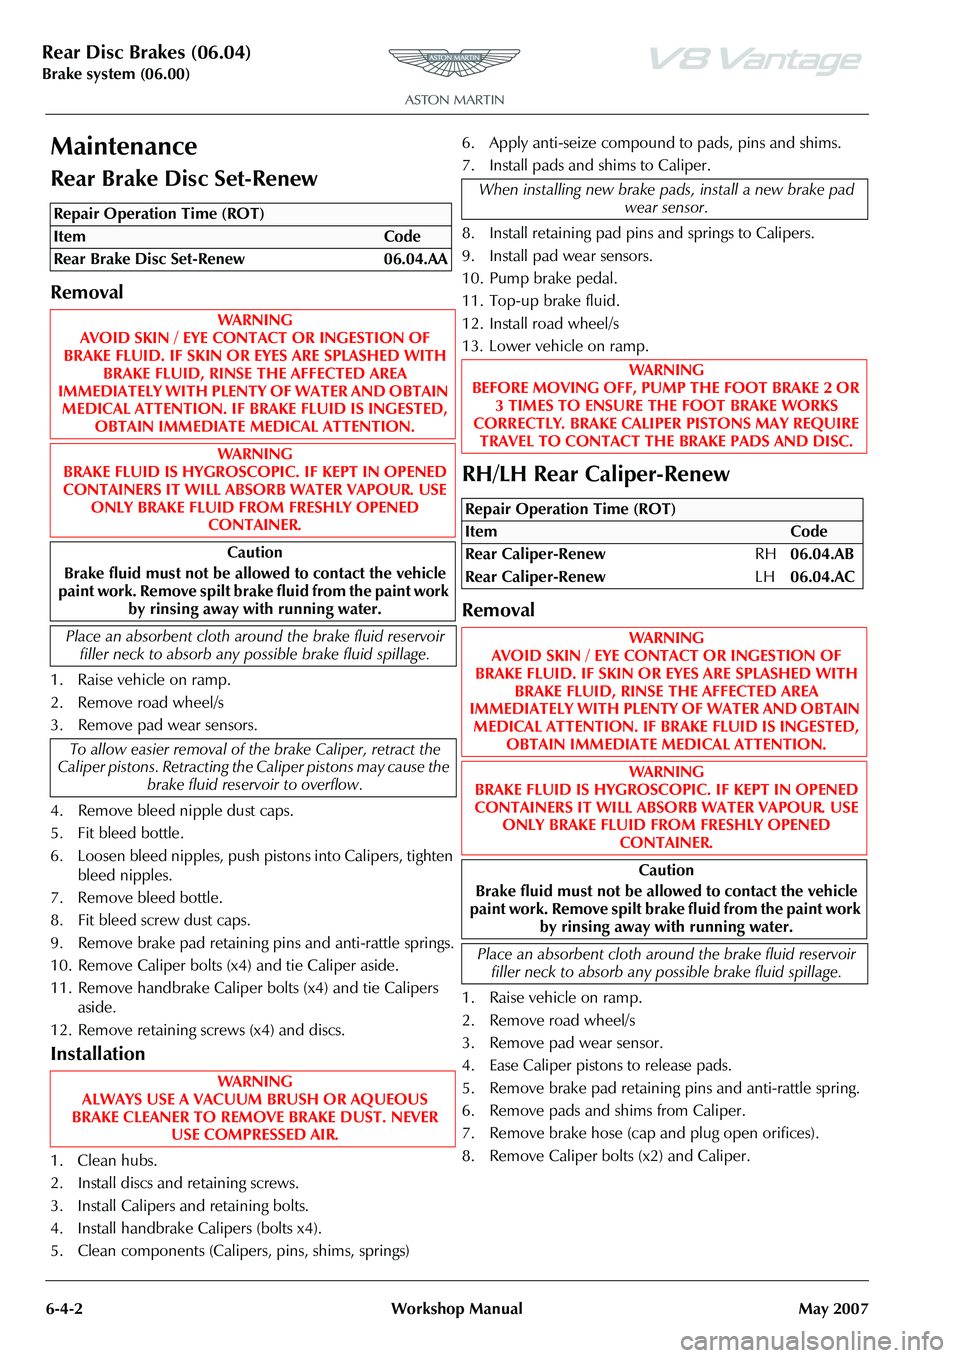
1. Raise vehicle on ramp.
2. Remove road wheel/s
3. Remove pad wear sensors.
4. Remove bleed nipple dust caps.
5. Fit bleed bottle.
6. Loosen bleed nipples, push pistons into Calipers, tighten bleed nipples.
7. Remove bleed bottle.
8. Fit bleed screw dust caps.
9. Remove brake pad retaining pins and anti-rattle springs.
10. Remove Caliper bolts (x4) and tie Caliper aside.
11. Remove handbrake Caliper bolts (x4) and tie Calipers aside.
12. Remove retaining screws (x4) and discs.
Installation
1. Clean hubs.
2. Install discs and retaining screws.
3. Install Calipers and retaining bolts.
4. Install handbrake Ca lipers (bolts x4).
5. Clean components (Caliper s, pins, shims, springs)6. Apply anti-seize compound to pads, pins and shims.
7. Install pads and shims to Caliper.
8. Install retaining pad pins
and springs to Calipers.
9. Install pad wear sensors.
10. Pump brake pedal.
11. Top-up brake fluid.
12. Install road wheel/s
13. Lower vehicle on ramp.
RH/LH Rear Caliper-Renew
Removal
1. Raise vehicle on ramp.
2. Remove road wheel/s
3. Remove pad wear sensor.
4. Ease Caliper pistons to release pads.
5. Remove brake pad retaining pins and anti-rattle spring.
6. Remove pads and shims from Caliper.
7. Remove brake hose (cap and plug open orifices).
8. Remove Caliper bolts (x2) and Caliper.
Repair Operation Time (ROT)
When installing new brake pads, install a new brake pad wear sensor.
WAR NI NG
BEFORE MOVING OFF, PUMP THE FOOT BRAKE 2 OR
3 TIMES TO ENSURE THE FOOT BRAKE WORKS
CORRECTLY. BRAKE CALIPER PISTONS MAY REQUIRE TRAVEL TO CONTACT THE BRAKE PADS AND DISC.
Repair Operation Time (ROT)
ItemCode
Rear Caliper-Renew RH06.04.AB
Rear Caliper-Renew LH06.04.AC
WAR NI NG
AVOID SKIN / EYE CONTACT OR INGESTION OF
BRAKE FLUID. IF SKIN OR EYES ARE SPLASHED WITH BRAKE FLUID, RINSE THE AFFECTED AREA
IMMEDIATELY WITH PLENTY OF WATER AND OBTAIN
MEDICAL ATTENTION. IF BR AKE FLUID IS INGESTED,
OBTAIN IMMEDIATE MEDICAL ATTENTION.
WAR NI NG
BRAKE FLUID IS HYGROSCOPIC. IF KEPT IN OPENED CONTAINERS IT WILL ABSORB WATER VAPOUR. USE ONLY BRAKE FLUID FROM FRESHLY OPENED
CONTAINER.
Caution
Brake fluid must not be allowed to contact the vehicle
paint work. Remove spilt brake fluid from the paint work
by rinsing away with running water.
Place an absorbent cloth around the brake fluid reservoir filler neck to absorb any possible brake fluid spillage.
Page 483 of 947
Hand Brake (06.05)
Brake Systems (06.00)
May 2007 Workshop Manual 6-5-1
Brake Systems (06.00)
Hand Brake (06.05)
Description
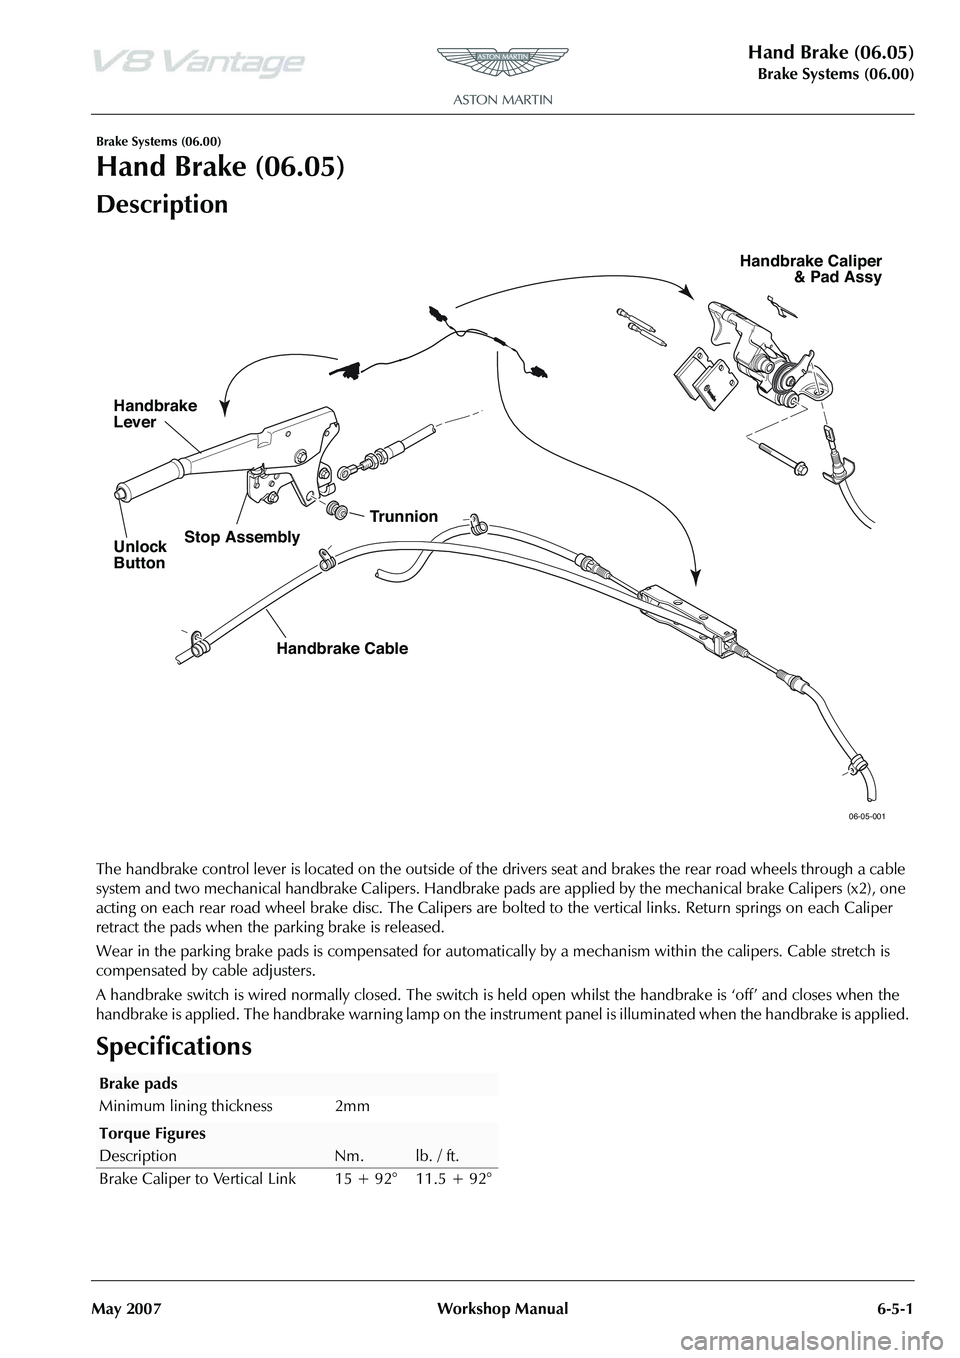
The handbrake control lever is located on the outside of the drivers seat and brakes the rear road wheels through a cable
system and two mechanical handbrake Calipers. Handbrake pads are applied by the mechanical brake Calipers (x2), one
acting on each rear road wheel brake disc. The Calipers are bo lted to the vertical links. Return springs on each Caliper
retract the pads when the parking brake is released.
Wear in the parking brake pads is compensated for automati cally by a mechanism within the calipers. Cable stretch is
compensated by cable adjusters.
A handbrake switch is wired normally closed. The switch is he ld open whilst the handbrake is ‘off’ and closes when the
handbrake is applied. The handbrake warning lamp on the instrument panel is illuminated when the handbrake is applied.
Specifications
06-05-001
Unlock
Button
Handbrake
Lever
Trunnion
Handbrake Cable
Stop Assembly
Handbrake Caliper
& Pad Assy
Brake pads
Minimum lining thickness 2mm
Torque Figures
DescriptionNm.lb. / ft.
Brake Caliper to Vertical Link 15 + 92° 11.5 + 92°
Page 484 of 947
Hand Brake (06.05)
Brake Systems (06.00)6-5-2 Workshop Manual May 2007
Maintenance
RH/LH Handbrake Caliper-Renew
Removal
1. Raise vehicle on ramp.
2. Remove road wheel/s.
3. Ensure handbrake leve r is fully released.
4. Release handbrake adjustment (both sides).
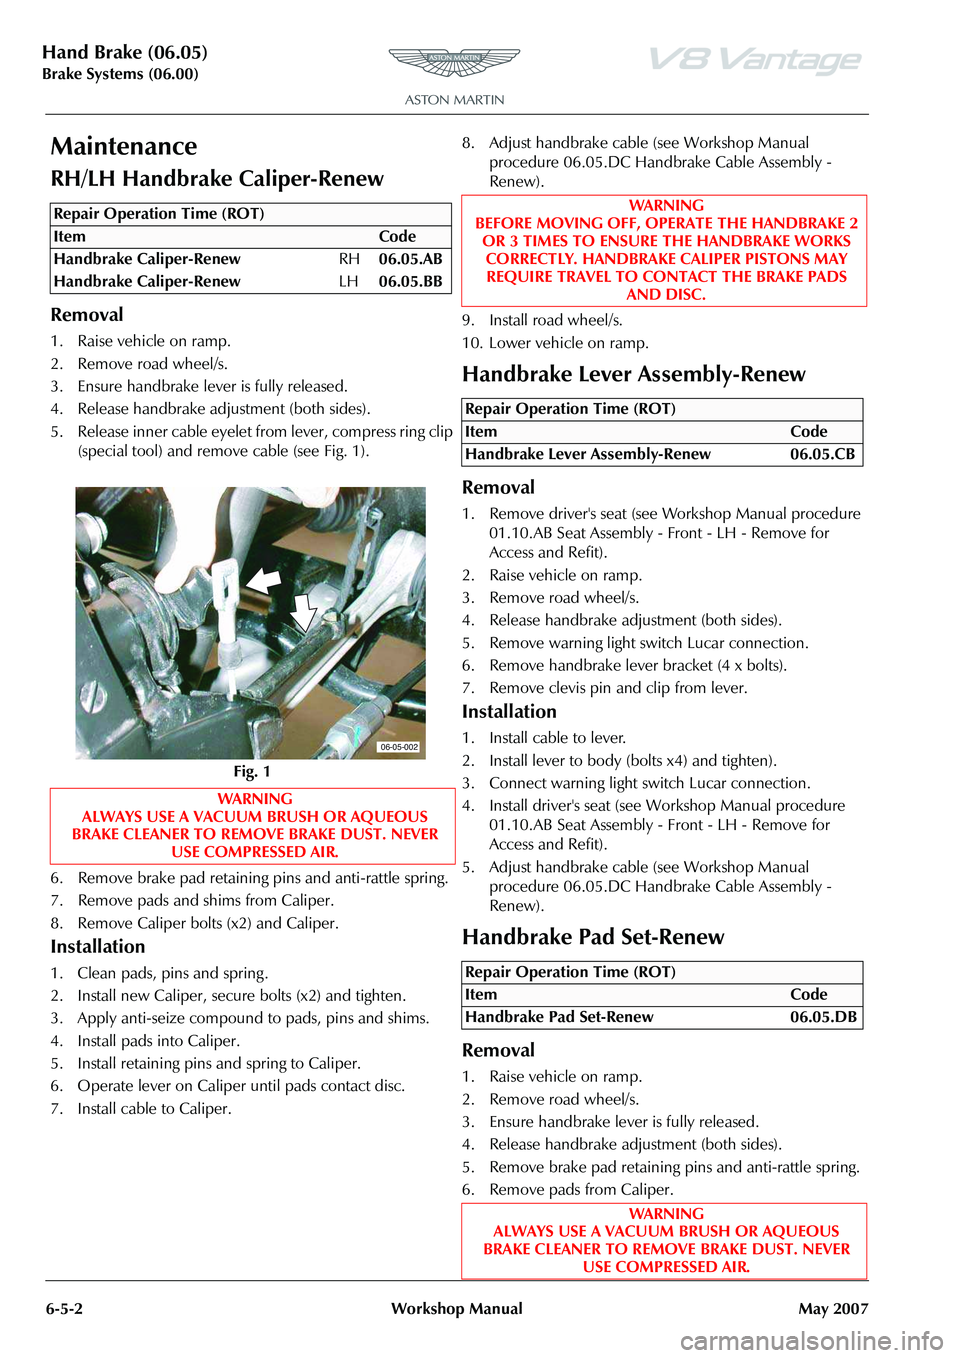
5. Release inner cable eyelet from lever, compress ring clip (special tool) and remove cable (see Fig. 1).
6. Remove brake pad retaining pins and anti-rattle spring.
7. Remove pads and shims from Caliper.
8. Remove Caliper bolts (x2) and Caliper.
Installation
1. Clean pads, pins and spring .
2. Install new Caliper, secu re bolts (x2) and tighten.
3. Apply anti-seize compound to pads, pins and shims.
4. Install pads into Caliper.
5. Install retaining pins and spring to Caliper.
6. Operate lever on Caliper until pads contact disc.
7. Install cable to Caliper. 8. Adjust handbrake cable (see Workshop Manual
procedure 06.05.DC Handbrake Cable Assembly -
Renew).
9. Install road wheel/s.
10. Lower vehicle on ramp.
Handbrake Lever Assembly-Renew
Removal
1. Remove driver's seat (see Workshop Manual procedure 01.10.AB Seat Assembly - Front - LH - Remove for
Access and Refit).
2. Raise vehicle on ramp.
3. Remove road wheel/s.
4. Release handbrake adjustment (both sides).
5. Remove warning light switch Lucar connection.
6. Remove handbrake lever bracket (4 x bolts).
7. Remove clevis pin and clip from lever.
Installation
1. Install cable to lever.
2. Install lever to body (bolts x4) and tighten).
3. Connect warning light switch Lucar connection.
4. Install driver's seat (see Workshop Manual procedure 01.10.AB Seat Assembly - Front - LH - Remove for
Access and Refit).
5. Adjust handbrake cable (see Workshop Manual procedure 06.05.DC Handbrake Cable Assembly -
Renew).
Handbrake Pad Set-Renew
Removal
1. Raise vehicle on ramp.
2. Remove road wheel/s.
3. Ensure handbrake lever is fully released.
4. Release handbrake adjustment (both sides).
5. Remove brake pad retaining pins and anti-rattle spring.
6. Remove pads from Caliper.
Repair Operation Time (ROT)
06-05-002
WAR NI NG
BEFORE MOVING OFF, OPERATE THE HANDBRAKE 2
OR 3 TIMES TO ENSURE THE HANDBRAKE WORKS CORRECTLY. HANDBRAKE CALIPER PISTONS MAY REQUIRE TRAVEL TO CONTACT THE BRAKE PADS
AND DISC.
Repair Operation Time (ROT)
ItemCode
Handbrake Lever Assembly-Renew 06.05.CB
Repair Operation Time (ROT)
ItemCode
Handbrake Pad Set-Renew 06.05.DB
WAR NI NG
ALWAYS USE A VACUUM BRUSH OR AQUEOUS
BRAKE CLEANER TO REMOVE BRAKE DUST. NEVER USE COMPRESSED AIR.