wiring ASTON MARTIN V8 VANTAGE 2010 Workshop Manual
[x] Cancel search | Manufacturer: ASTON MARTIN, Model Year: 2010, Model line: V8 VANTAGE, Model: ASTON MARTIN V8 VANTAGE 2010Pages: 947, PDF Size: 43.21 MB
Page 4 of 947
Contents
0-0-4 Workshop Manual Issue 5, January 2010
Electric Distribution/Electronic Control (18.00)Wiring and Circuit Protection (18.01) ................. 18-1-2
Vehicle Control System (18.08 ) .......................... 18-2-1
Electronic Features (19.00) Active Anti-Theft System (1 9.01)......................... 19-1-2
Electronic Features Modules (19.08)....................19-2-1
Appendix & Glossary (20.00) Diagnostic Ports.................................................. 20-1-2
Fluids/Capacities................... .............................. 20-1-3
Special Tools - Pictorial Index ............................. 20-1-4
Maintenance Schedules .................................... 20-1-12
Torque Figures ................................................. 20-1-15
Page 143 of 947
Convertible Roof (01.17)
Body System (01.00)
May 2007 Workshop Manual 1-12-5
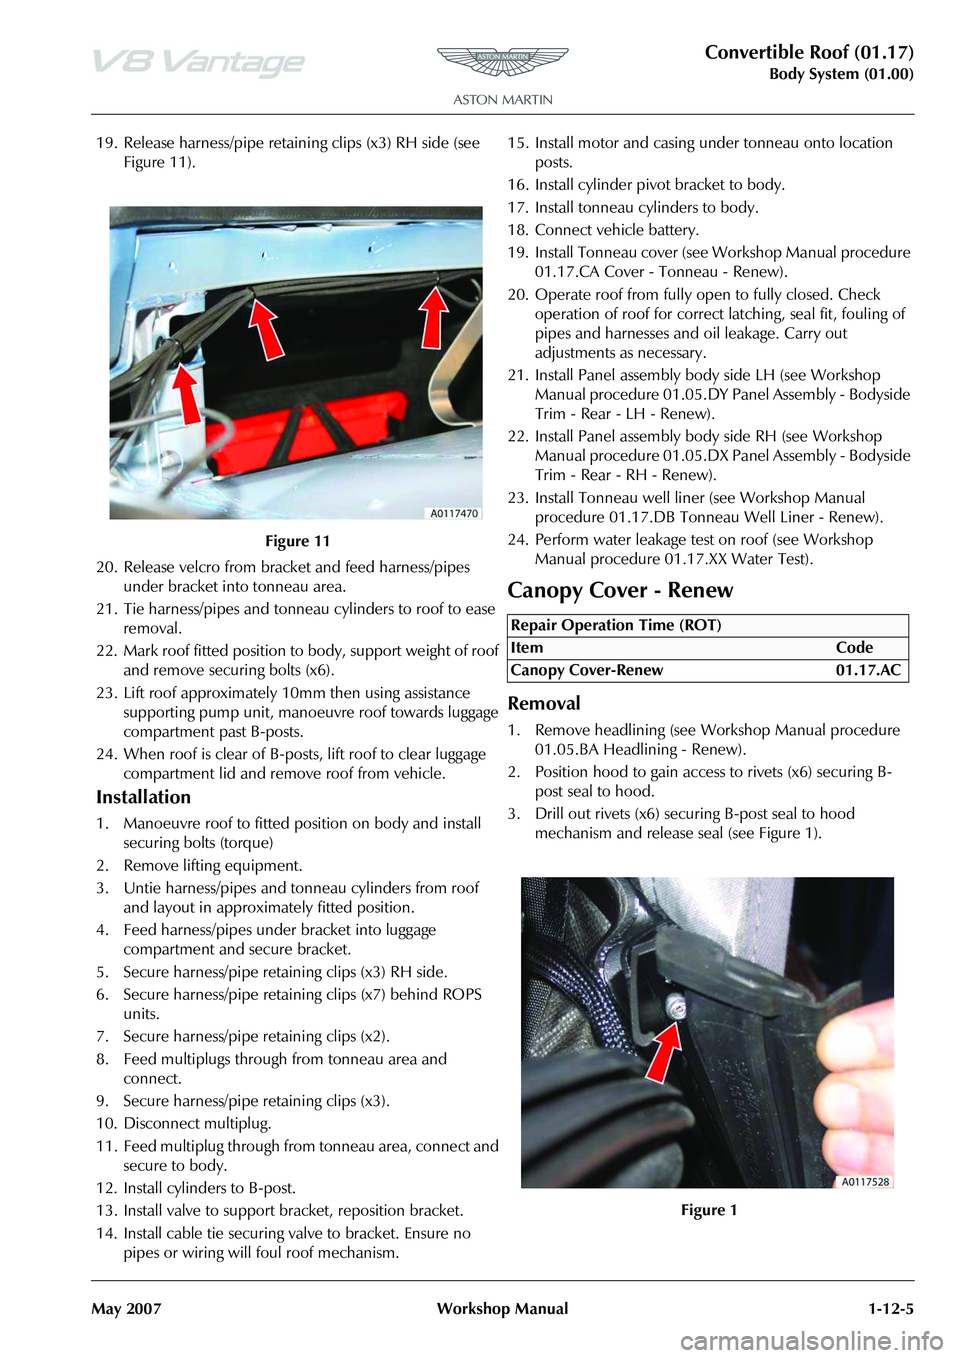
19. Release harness/pipe retaining clips (x3) RH side (see Figure 11).
20. Release velcro from bracket and feed harness/pipes under bracket into tonneau area.
21. Tie harness/pipes and tonneau cylinders to roof to ease removal.
22. Mark roof fitted position to body, support weight of roof and remove securing bolts (x6).
23. Lift roof approximately 10mm then using assistance
supporting pump unit, manoeuvre roof towards luggage
compartment past B-posts.
24. When roof is clear of B-post s, lift roof to clear luggage
compartment lid and remove roof from vehicle.
Installation
1. Manoeuvre roof to fitted position on body and install securing bolts (torque)
2. Remove lifting equipment.
3. Untie harness/pipes and tonneau cylinders from roof and layout in approximately fitted position.
4. Feed harness/pipes under bracket into luggage compartment and secure bracket.
5. Secure harness/pipe retaining clips (x3) RH side.
6. Secure harness/pipe retaining clips (x7) behind ROPS units.
7. Secure harness/pipe retaining clips (x2).
8. Feed multiplugs through from tonneau area and connect.
9. Secure harness/pipe retaining clips (x3).
10. Disconnect multiplug.
11. Feed multiplug through from tonneau area, connect and secure to body.
12. Install cylinders to B-post.
13. Install valve to support bracket, reposition bracket.
14. Install cable tie securing valve to bracket. Ensure no pipes or wiring will foul roof mechanism. 15. Install motor and casing under tonneau onto location
posts.
16. Install cylinder pivot bracket to body.
17. Install tonneau cylinders to body.
18. Connect vehicle battery.
19. Install Tonneau cover (see Workshop Manual procedure 01.17.CA Cover - Tonneau - Renew).
20. Operate roof from fully open to fully closed. Check operation of roof for correct latching, seal fit, fouling of
pipes and harnesses and oil leakage. Carry out
adjustments as necessary.
21. Install Panel assembly bo dy side LH (see Workshop
Manual procedure 01.05.DY Panel Assembly - Bodyside
Trim - Rear - LH - Renew).
22. Install Panel assembly body side RH (see Workshop Manual procedure 01.05.DX Pa nel Assembly - Bodyside
Trim - Rear - RH - Renew).
23. Install Tonneau well line r (see Workshop Manual
procedure 01.17.DB Tonneau Well Liner - Renew).
24. Perform water leakage test on roof (see Workshop Manual procedure 01.17.XX Water Test).
Canopy Cover - Renew
Removal
1. Remove headlining (see Workshop Manual procedure
01.05.BA Headlining - Renew).
2. Position hood to gain access to rivets (x6) securing B- post seal to hood.
3. Drill out rivets (x6) secu ring B-post seal to hood
mechanism and release seal (see Figure 1).
Figure 11
Repair Operation Time (ROT)
Page 147 of 947
Convertible Roof (01.17)
Body System (01.00)
May 2007 Workshop Manual 1-12-9
20. Secure canopy straps to third cross bar using screws.
21. Position hood to gain access to B-post seal fixings.
22. Remove self tapping screws and secure B-post seal to hood mechanism using rivets starting with the lowest
hole first.
23. Restore roof to original position, raise door glass and
check alignment of front seals.
24. Install headlining (see Workshop Manual procedure
01.05.BA Headlining - Renew).
25. Check operation and fit of hood.
Header Latch Motor - Renew
Removal
1. Remove left-hand header latch flex shaft (see Workshop Manual procedure 01.17.EF Flex Shaft - LH - Renew).
2. Remove right-hand header latch flex shaft (see Workshop Manual procedure 01.17.EG Flex Shaft - RH
- Renew).
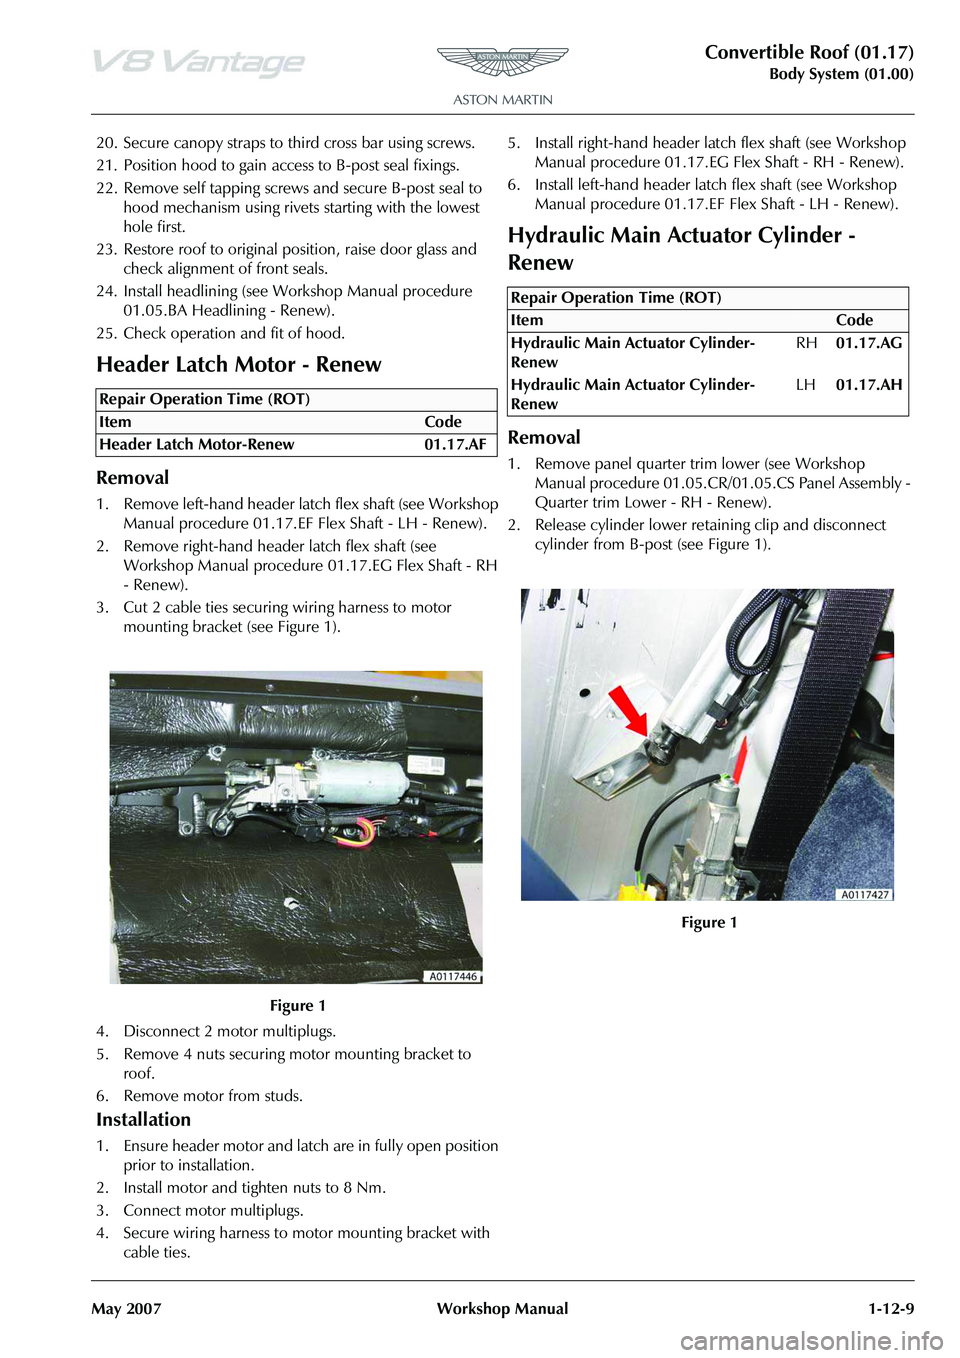
3. Cut 2 cable ties securing wiring harness to motor mounting bracket (see Figure 1).
4. Disconnect 2 motor multiplugs.
5. Remove 4 nuts securing motor mounting bracket to roof.
6. Remove motor from studs.
Installation
1. Ensure header motor and latch are in fully open position prior to installation.
2. Install motor and tighten nuts to 8 Nm.
3. Connect motor multiplugs.
4. Secure wiring harness to motor mounting bracket with cable ties. 5. Install right-hand header la
tch flex shaft (see Workshop
Manual procedure 01.17.EG Flex Shaft - RH - Renew).
6. Install left-hand header latc h flex shaft (see Workshop
Manual procedure 01.17.EF Flex Shaft - LH - Renew).
Hydraulic Main Actuator Cylinder -
Renew
Removal
1. Remove panel quarter trim lower (see Workshop
Manual procedure 01.05.CR/01.05.CS Panel Assembly -
Quarter trim Lower - RH - Renew).
2. Release cylinder lower retaining clip and disconnect cylinder from B-post (see Figure 1).
Repair Operation Time (ROT)
Repair Operation Time (ROT)
Page 149 of 947
Convertible Roof (01.17)
Body System (01.00)
May 2007 Workshop Manual 1-12-11
2. Remove lower cover (scr ew x1) (see Figure 2).
3. Release cylinder upper retaining clip and disconnect cylinder from roof mech anism (see Figure 3).
4. Release cylinder lower retaining clip and disconnect cylinder from roof mechanis m (move cylinder to access
pipes and wiring).
5. Cut cable tie securing pipes to cylinder.
6. Release clips securing pipes to cylinder and disconnect
pipes.
Installation
1. Position pipes to cylinder and secure with clips.
2. Secure pipes to cyli nder with cable ties.
3. Move cylinder into position and install cylinder to roof.
4. Install cylinder to roof.
5. Install lower cover.
6. Restore roof and tonneau to original position
Hydraulic Tonneau Cylinder - Renew
Removal
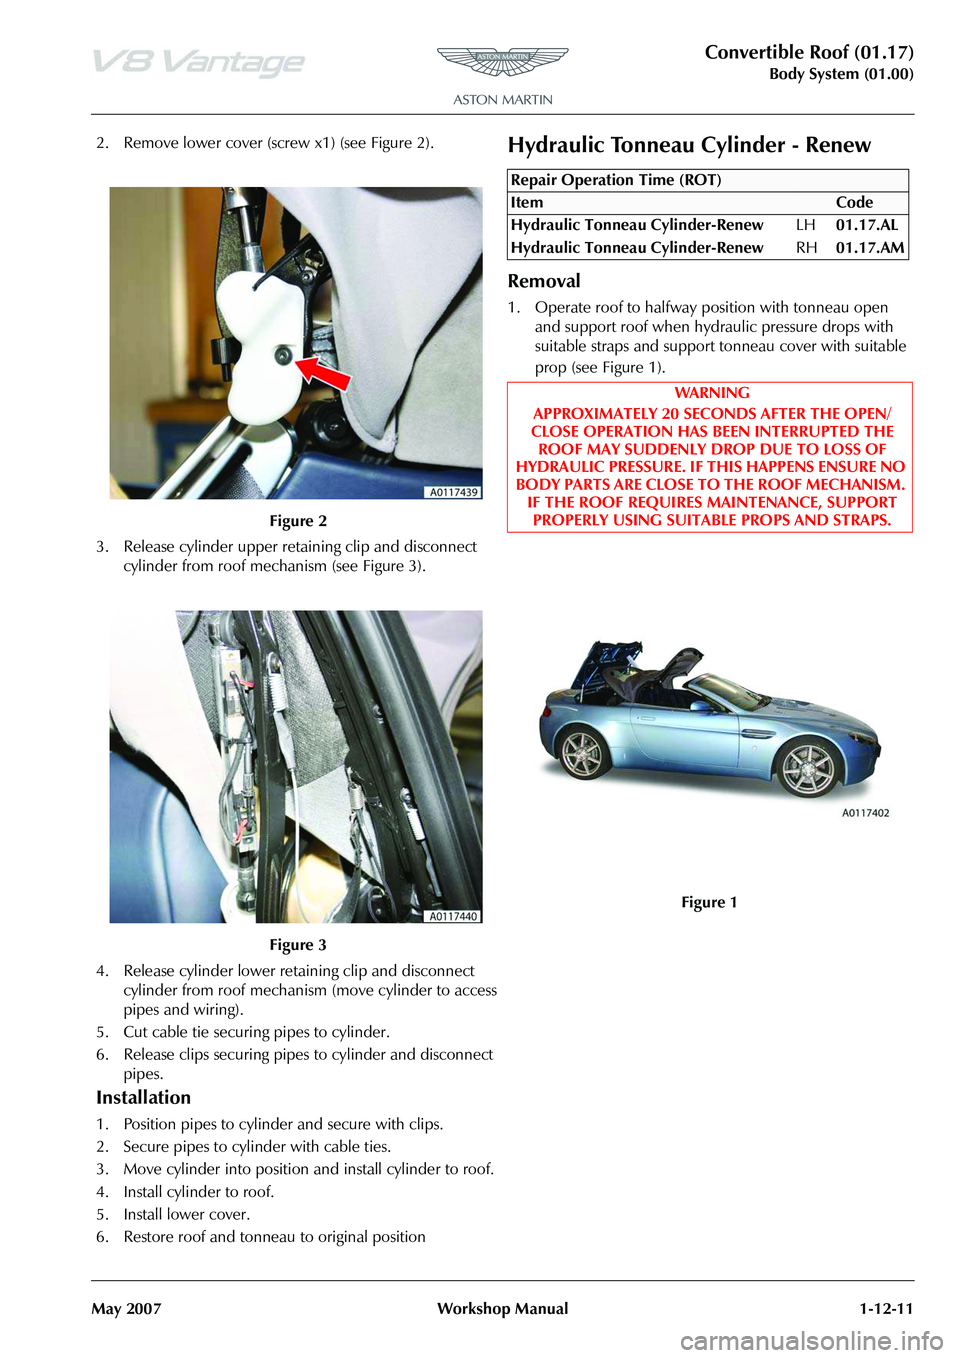
1. Operate roof to halfway position with tonneau open and support roof when hydraulic pressure drops with
suitable straps and support tonneau cover with suitable
prop (see Figure 1).
Figure 2
Figure 3
Repair Operation Time (ROT)
Page 155 of 947
Convertible Roof (01.17)
Body System (01.00)
May 2007 Workshop Manual 1-12-17
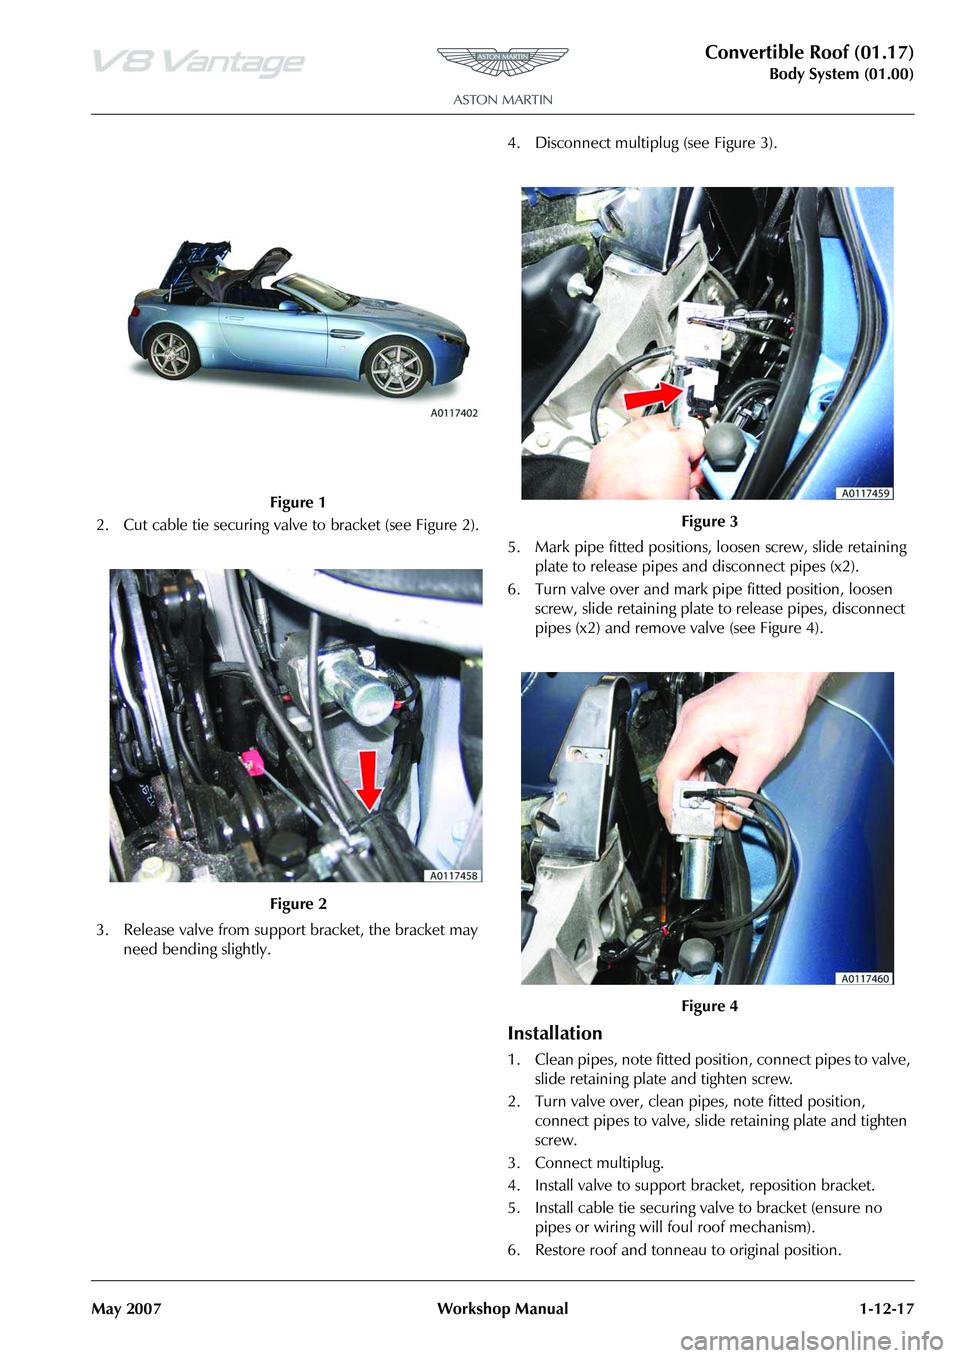
2. Cut cable tie securing valve to bracket (see Figure 2).
3. Release valve from support bracket, the bracket may need bending slightly. 4. Disconnect multiplug (see Figure 3).
5. Mark pipe fitted positions, loosen screw, slide retaining
plate to release pipes and disconnect pipes (x2).
6. Turn valve over and mark pipe fitted position, loosen screw, slide retaining plate to release pipes, disconnect
pipes (x2) and remove valve (see Figure 4).
Installation
1. Clean pipes, note fitted posi tion, connect pipes to valve,
slide retaining plate and tighten screw.
2. Turn valve over, clean pipes, note fitted position, connect pipes to valve, slide retaining plate and tighten
screw.
3. Connect multiplug.
4. Install valve to support br acket, reposition bracket.
5. Install cable tie securing valve to bracket (ensure no pipes or wiring will foul roof mechanism).
6. Restore roof and tonneau to original position.
Figure 1
Figure 2
Figure 3
Figure 4
Page 182 of 947
Convertible Roof (01.17)
Body System (01.00)1-12-44 Workshop Manual May 2007
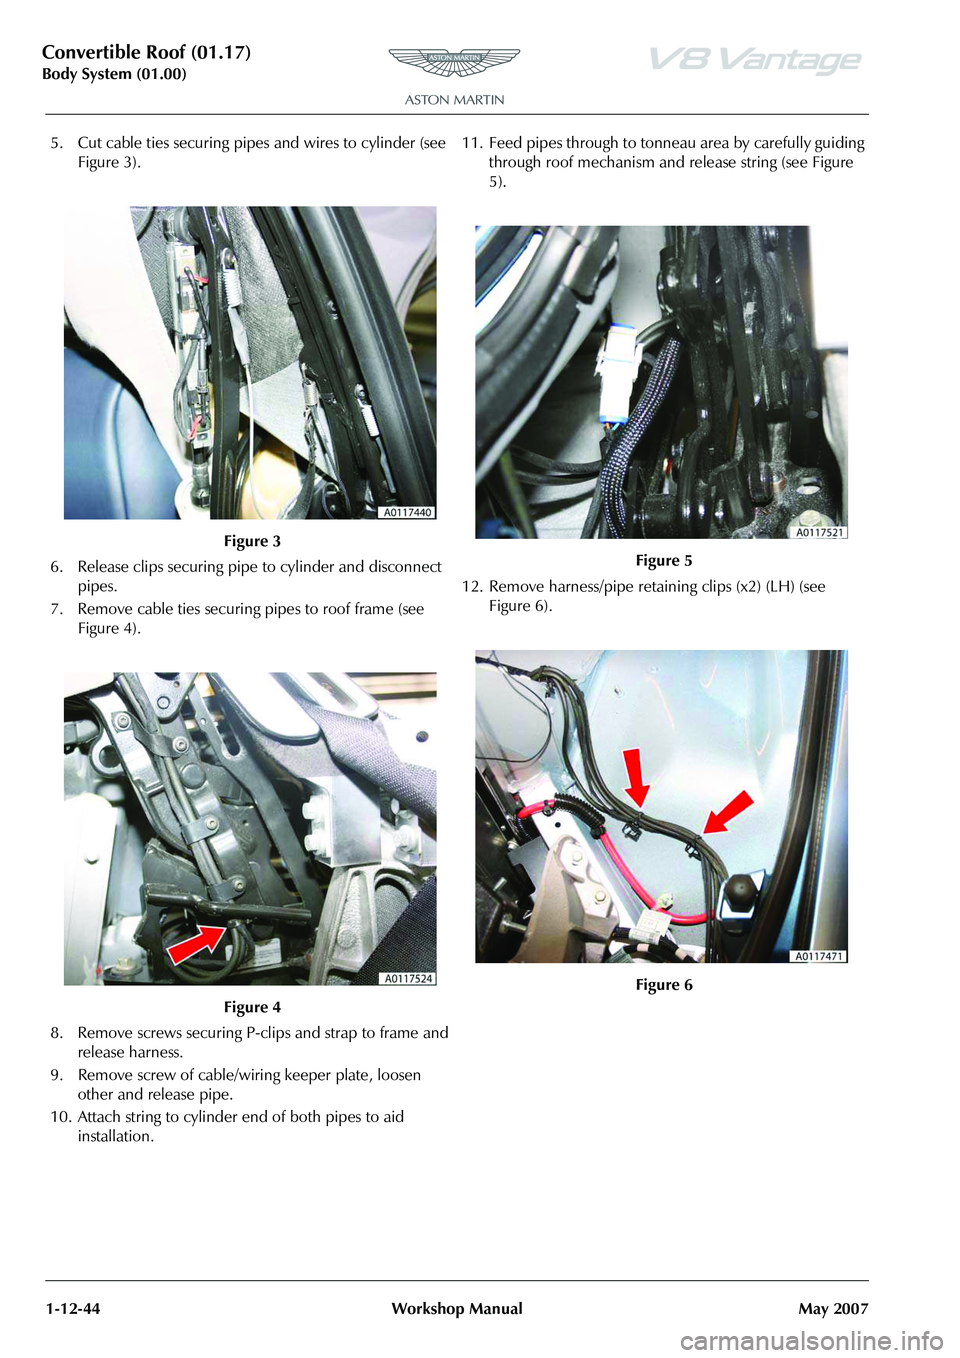
5. Cut cable ties securing pipes and wires to cylinder (see Figure 3).
6. Release clips securing pipe to cylinder and disconnect pipes.
7. Remove cable ties securing pipes to roof frame (see Figure 4).
8. Remove screws securing P-clips and strap to frame and release harness.
9. Remove screw of cable/wiring keeper plate, loosen other and release pipe.
10. Attach string to cylinder end of both pipes to aid installation. 11. Feed pipes through to tonneau area by carefully guiding
through roof mechanism and release string (see Figure
5).
12. Remove harness/pipe reta ining clips (x2) (LH) (see
Figure 6).
Figure 3
Figure 4
Figure 5
Figure 6
Page 184 of 947
Convertible Roof (01.17)
Body System (01.00)1-12-46 Workshop Manual May 2007
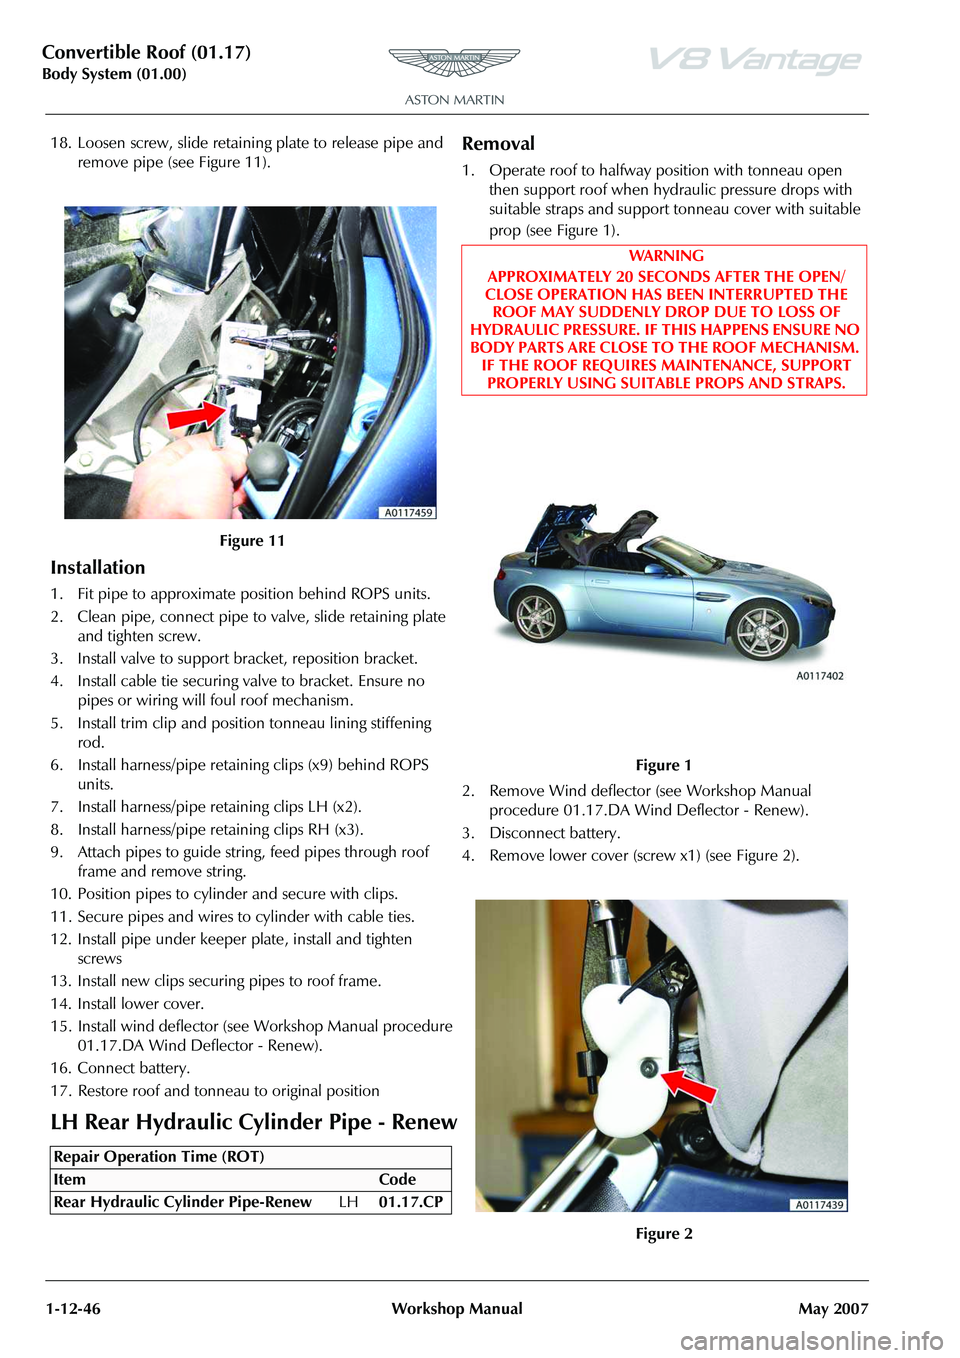
18. Loosen screw, slide retainin g plate to release pipe and
remove pipe (see Figure 11).
Installation
1. Fit pipe to approximate po sition behind ROPS units.
2. Clean pipe, connect pipe to valve, slide retaining plate
and tighten screw.
3. Install valve to support bracket, reposition bracket.
4. Install cable tie securing valve to bracket. Ensure no
pipes or wiring will foul roof mechanism.
5. Install trim clip and positi on tonneau lining stiffening
rod.
6. Install harness/pipe retaining clips (x9) behind ROPS units.
7. Install harness/pipe retaining clips LH (x2).
8. Install harness/pipe retaining clips RH (x3).
9. Attach pipes to guide stri ng, feed pipes through roof
frame and remove string.
10. Position pipes to cylinder and secure with clips.
11. Secure pipes and wires to cylinder with cable ties.
12. Install pipe under keeper plate, install and tighten
screws
13. Install new clips securing pipes to roof frame.
14. Install lower cover.
15. Install wind deflector (see Workshop Manual procedure 01.17.DA Wind Deflector - Renew).
16. Connect battery.
17. Restore roof and tonneau to original position
LH Rear Hydraulic Cylinder Pipe - Renew
Removal
1. Operate roof to halfway position with tonneau open then support roof when hydraulic pressure drops with
suitable straps and support tonneau cover with suitable
prop (see Figure 1).
2. Remove Wind deflector (see Workshop Manual procedure 01.17.DA Wind Deflector - Renew).
3. Disconnect battery.
4. Remove lower cover (screw x1) (see Figure 2).
Figure 11
Repair Operation Time (ROT)
WAR NI NG
APPROXIMATELY 20 SECONDS AFTER THE OPEN/
CLOSE OPERATION HAS BEEN INTERRUPTED THE ROOF MAY SUDDENLY DROP DUE TO LOSS OF
HYDRAULIC PRESSURE. IF THIS HAPPENS ENSURE NO
BODY PARTS ARE CLOSE TO THE ROOF MECHANISM. IF THE ROOF REQUIRES MAINTENANCE, SUPPORT
PROPERLY USING SUITABLE PROPS AND STRAPS.
Figure 1
Figure 2
Page 189 of 947
Convertible Roof (01.17)
Body System (01.00)
May 2007 Workshop Manual 1-12-51
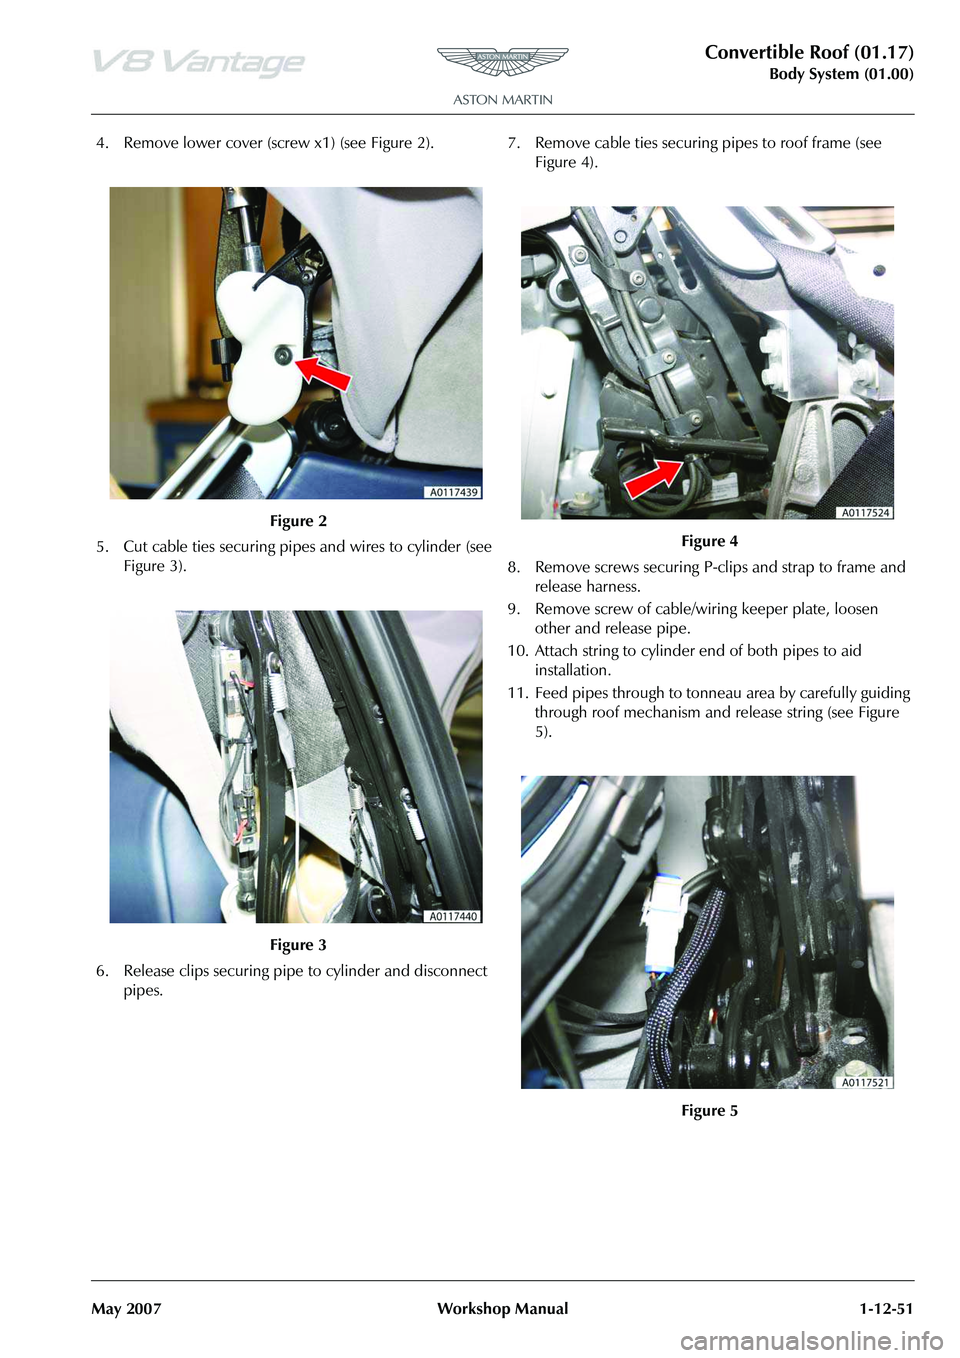
4. Remove lower cover (screw x1) (see Figure 2).
5. Cut cable ties securing pipes and wires to cylinder (see Figure 3).
6. Release clips securing pipe to cylinder and disconnect pipes. 7. Remove cable ties securing
pipes to roof frame (see
Figure 4).
8. Remove screws securing P- clips and strap to frame and
release harness.
9. Remove screw of cable/wiring keeper plate, loosen other and release pipe.
10. Attach string to cylinder end of both pipes to aid
installation.
11. Feed pipes through to tonneau area by carefully guiding through roof mechanism and re lease string (see Figure
5).
Figure 2
Figure 3
Figure 4
Figure 5
Page 190 of 947
Convertible Roof (01.17)
Body System (01.00)1-12-52 Workshop Manual May 2007
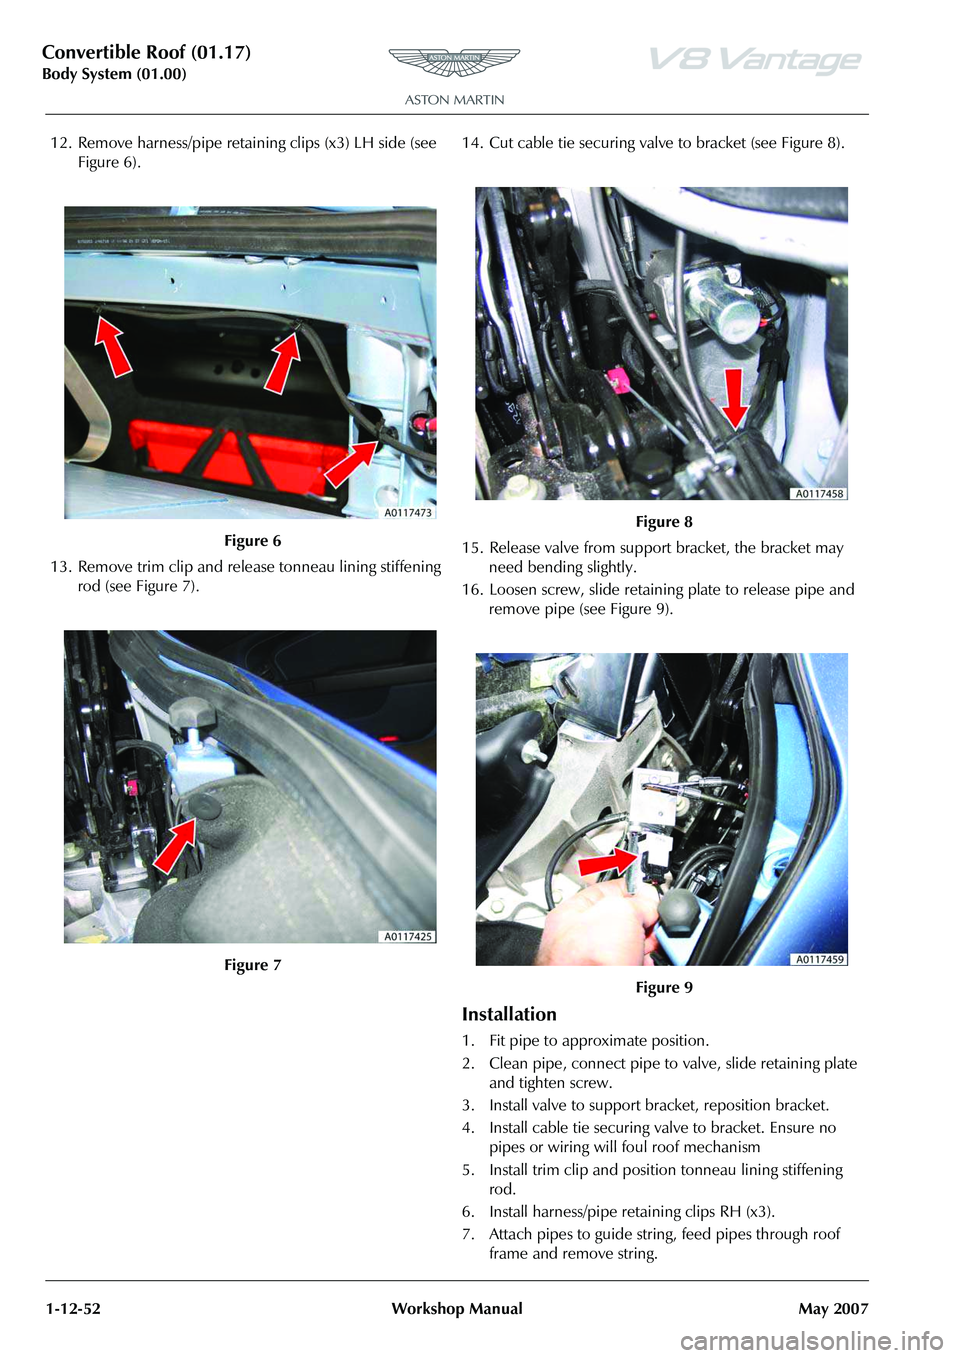
12. Remove harness/pipe retaining clips (x3) LH side (see Figure 6).
13. Remove trim clip and releas e tonneau lining stiffening
rod (see Figure 7). 14. Cut cable tie securing valve to bracket (see Figure 8).
15. Release valve from support bracket, the bracket may
need bending slightly.
16. Loosen screw, slide retaining plate to release pipe and remove pipe (see Figure 9).
Installation
1. Fit pipe to approximate position.
2. Clean pipe, connect pipe to valve, slide retaining plate
and tighten screw.
3. Install valve to support bracket, reposition bracket.
4. Install cable tie securing valve to bracket. Ensure no pipes or wiring will foul roof mechanism
5. Install trim clip and position tonneau lining stiffening rod.
6. Install harness/pipe retaining clips RH (x3).
7. Attach pipes to guide string, feed pipes through roof frame and remove string.
Figure 6
Figure 7
Figure 8
Figure 9
Page 192 of 947
Convertible Roof (01.17)
Body System (01.00)1-12-54 Workshop Manual May 2007
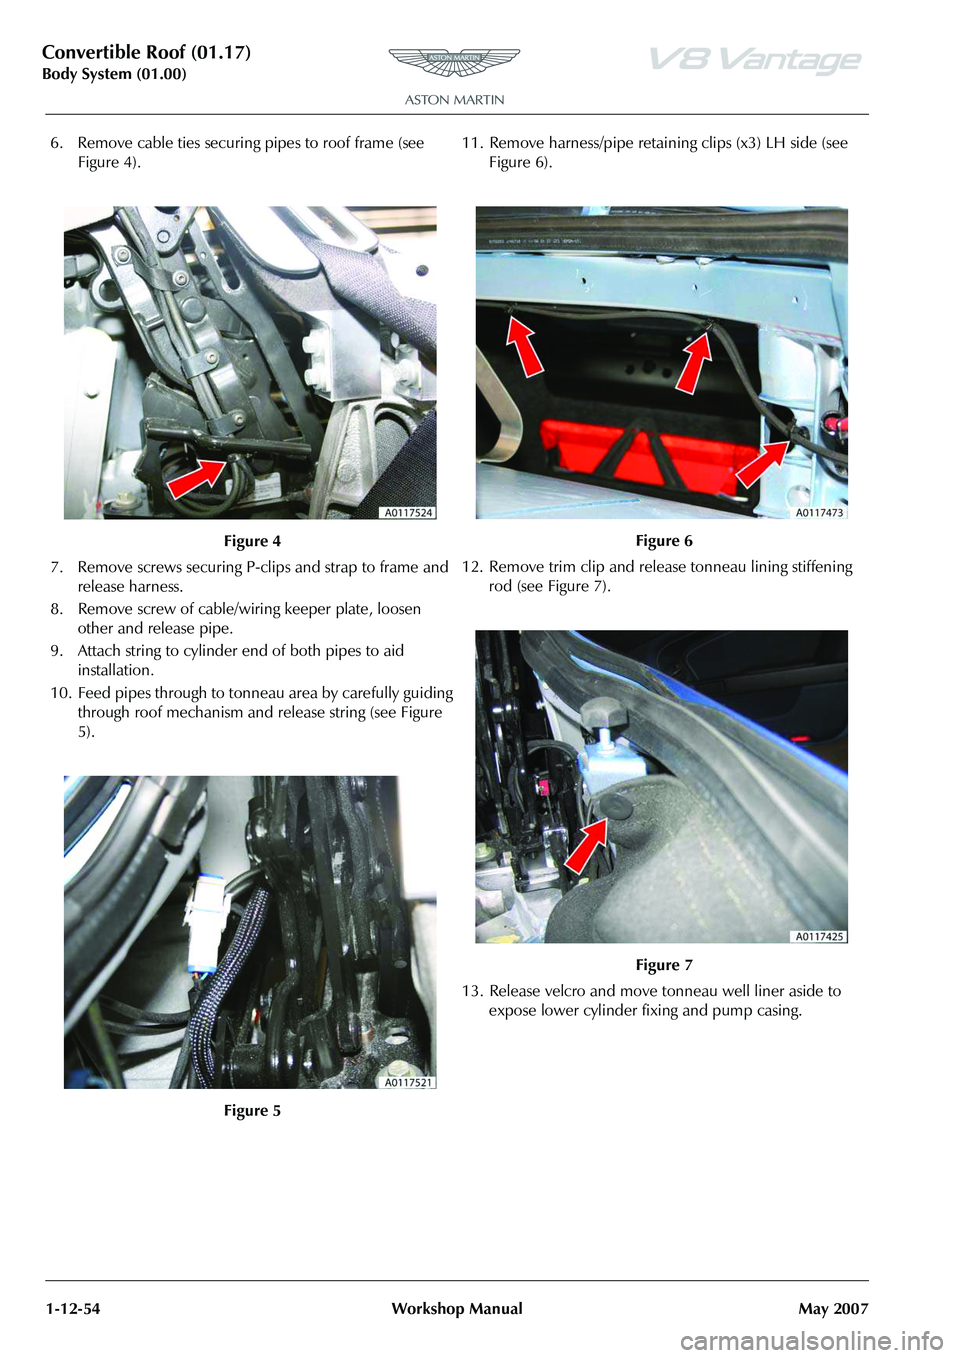
6. Remove cable ties securing pipes to roof frame (see Figure 4).
7. Remove screws securing P-clips and strap to frame and release harness.
8. Remove screw of cable/wiring keeper plate, loosen other and release pipe.
9. Attach string to cylinder end of both pipes to aid installation.
10. Feed pipes through to tonneau area by carefully guiding through roof mechanism and release string (see Figure
5). 11. Remove harness/pipe retaining clips (x3) LH side (see
Figure 6).
12. Remove trim clip and releas e tonneau lining stiffening
rod (see Figure 7).
13. Release velcro and move tonneau well liner aside to expose lower cylinder fixing and pump casing.
Figure 4
Figure 5
Figure 6
Figure 7