AUDI A3 1997 8L / 1.G AEB ATW Engines Valvetrain Servicing Service Manual
Manufacturer: AUDI, Model Year: 1997,
Model line: A3,
Model: AUDI A3 1997 8L / 1.G
Pages: 51, PDF Size: 0.8 MB
AUDI A3 1997 8L / 1.G AEB ATW Engines Valvetrain Servicing Service Manual
A3 1997 8L / 1.G
AUDI
AUDI
https://www.carmanualsonline.info/img/6/960/w960_960-0.png
AUDI A3 1997 8L / 1.G AEB ATW Engines Valvetrain Servicing Service Manual
Trending: tow, transmission, oil temperature, wheel torque, ignition, oil filter, wheel
Page 41 of 51
15-65
Installing
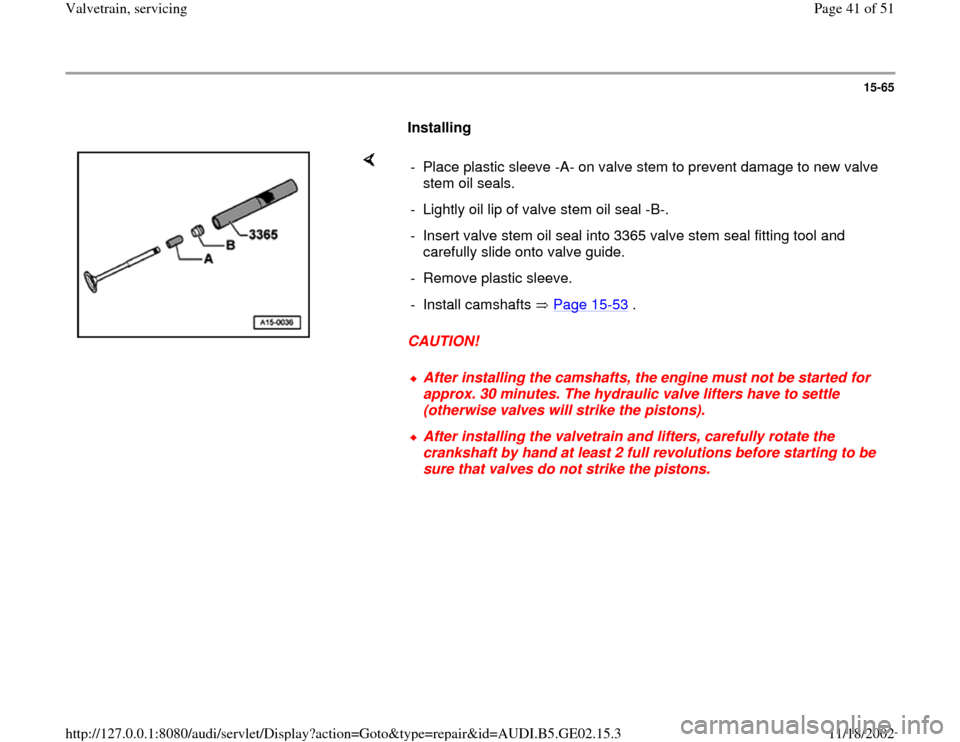
CAUTION! - Place plastic sleeve -A- on valve stem to prevent damage to new valve
stem oil seals.
- Lightly oil lip of valve stem oil seal -B-.
- Insert valve stem oil seal into 3365 valve stem seal fitting tool and
carefully slide onto valve guide.
- Remove plastic sleeve.
- Install camshafts Page 15
-53
.
After installing the camshafts, the engine must not be started for
approx. 30 minutes. The hydraulic valve lifters have to settle
(otherwise valves will strike the pistons). After installing the valvetrain and lifters, carefully rotate the
crankshaft by hand at least 2 full revolutions before starting to be
sure that valves do not strike the pistons.
Pa
ge 41 of 51 Valvetrain, servicin
g
11/18/2002 htt
p://127.0.0.1:8080/audi/servlet/Dis
play?action=Goto&t
yp
e=re
pair&id=AUDI.B5.GE02.15.3
Page 42 of 51
15-66
Valve guides, checking
Special tools and equipment
VW387 dial gauge holder
Dial indicator
CAUTION!
Due to differences in valve stem diameter, make sure that only intake
valves are used to check intake guides, and only exhaust valves are
used to check exhaust guides.
Wear limit
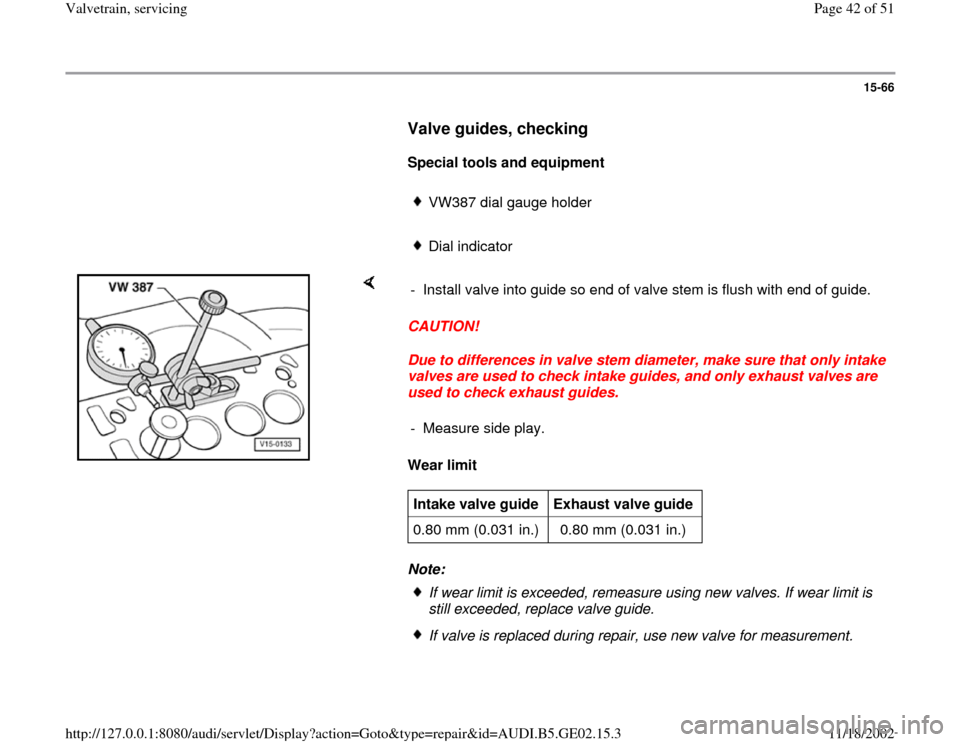
Note: - Install valve into guide so end of valve stem is flush with end of guide.
- Measure side play.Intake valve guide
Exhaust valve guide
0.80 mm (0.031 in.) 0.80 mm (0.031 in.)
If wear limit is exceeded, remeasure using new valves. If wear limit is
still exceeded, replace valve guide. If valve is replaced during repair, use new valve for measurement.
Pa
ge 42 of 51 Valvetrain, servicin
g
11/18/2002 htt
p://127.0.0.1:8080/audi/servlet/Dis
play?action=Goto&t
yp
e=re
pair&id=AUDI.B5.GE02.15.3
Page 43 of 51
15-67
Valve guides, replacing
Special tools and equipment
VW411 punch
3120 reamer (7mm) and cutting fluid
3360 driver
3361 press-in pad
Removing
- Clean cylinder head and check.
Note:
Cylinder heads with valve seats that cannot be
refaced or cylinder heads that have been
resurfaced to the minimum dimension are not
suited for valve guide replacement.
Pa
ge 43 of 51 Valvetrain, servicin
g
11/18/2002 htt
p://127.0.0.1:8080/audi/servlet/Dis
play?action=Goto&t
yp
e=re
pair&id=AUDI.B5.GE02.15.3
Page 44 of 51
15-68
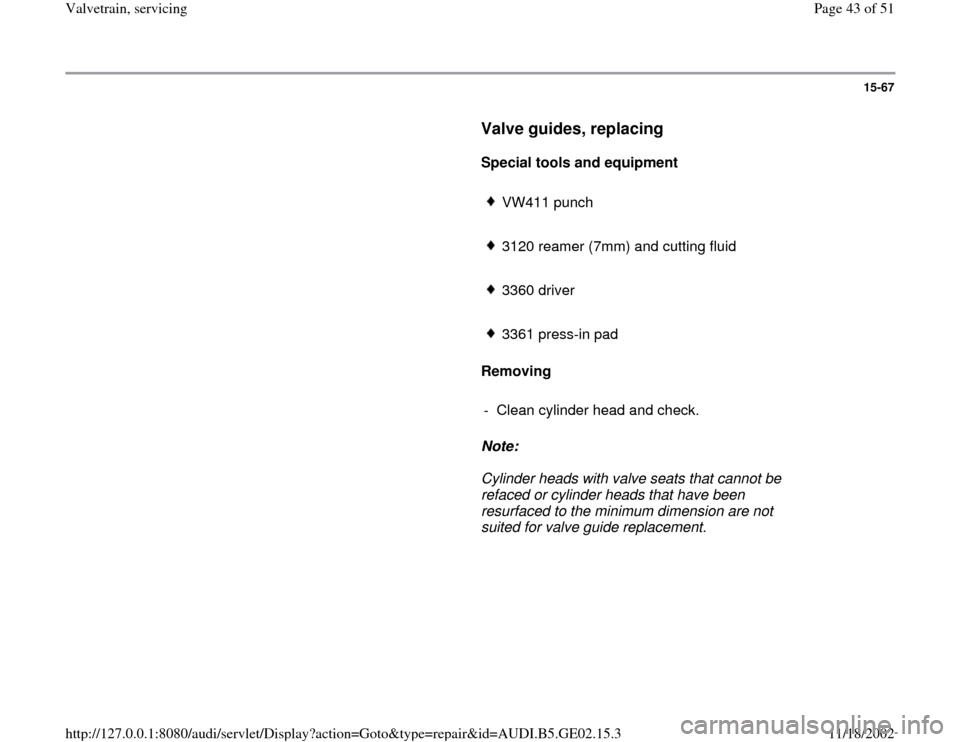
- Insert 3361 press-in pad as follows:
- Install mounting pins for cylinder head bolt holes -A- into threaded hole
position -2- and -3-.
- Install pin -B- into relevant hole for valve angle.
Outer intake valves: 21.5
Center intake valve: 15
Exhaust valves: 20
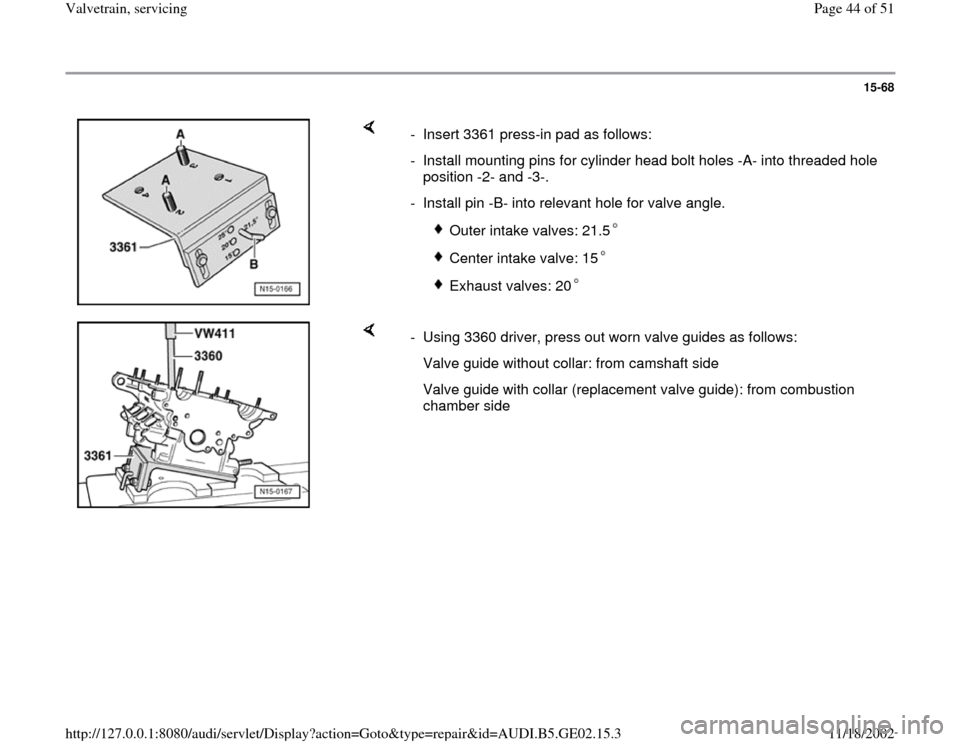
- Using 3360 driver, press out worn valve guides as follows:
Valve guide without collar: from camshaft side
Valve guide with collar (replacement valve guide): from combustion
chamber side
Pa
ge 44 of 51 Valvetrain, servicin
g
11/18/2002 htt
p://127.0.0.1:8080/audi/servlet/Dis
play?action=Goto&t
yp
e=re
pair&id=AUDI.B5.GE02.15.3
Page 45 of 51
15-69
Installing
- Using 3360 driver, press new, oiled valve guides
from camshaft side to collar into cold cylinder
head.
Note:
After valve guide with collar is seated, insertion
pressure may not exceed 10kN (2248 lbs =
approx 1.0t), as collar may break off.
- Using 3363 reamer -7 mm, ream valve guide.
Use cutting fluid.
- Reface valve seats Page 15
-71
.
- Replace valve stem oil seals Page 15
-62
.
Pa
ge 45 of 51 Valvetrain, servicin
g
11/18/2002 htt
p://127.0.0.1:8080/audi/servlet/Dis
play?action=Goto&t
yp
e=re
pair&id=AUDI.B5.GE02.15.3
Page 46 of 51
15-70
WARNING!
Valves must not be refaced by cutting or
grinding.
Only hand lapping is permitted.
WARNING!
Sodium-filled exhaust valves must not be
scrapped without first being properly treated.
The valves must be cut open using a
hacksaw, by hand, between the valve head
and the middle of the stem.
The valves must not come into any contact
with water while being cut.
After cutting open the valves, throw not more
than 10 at a time into a bucket of water and
step back. A sudden chemical reaction will
occur during which the sodium filling is
consumed.
Valves that have been treated in this way can
be disposed of as normal waste.
Pa
ge 46 of 51 Valvetrain, servicin
g
11/18/2002 htt
p://127.0.0.1:8080/audi/servlet/Dis
play?action=Goto&t
yp
e=re
pair&id=AUDI.B5.GE02.15.3
Page 47 of 51
15-71
Valve seats, refacing
Note:
If a perfect contact pattern isn't obtained after
hand lapping valves, reface valve seats.
Special tools and equipment
Depth gauge
Valve seat refacing tool
Note:
When servicing engines with low compression
due to leaking valves, it is not sufficient to
reface or replace the valve seats and valves. It
is especially important to check valve guides for
signs of wear on high-mileage engines Page 15
-66
.
Only reface valve seats enough until a perfect
contact pattern is obtained.
Before refacing, determine maximum refacing
dimension.
If refaced dimension is exceeded, hydraulic
Pa
ge 47 of 51 Valvetrain, servicin
g
11/18/2002 htt
p://127.0.0.1:8080/audi/servlet/Dis
play?action=Goto&t
yp
e=re
pair&id=AUDI.B5.GE02.15.3
Page 48 of 51
valve lifter function is no longer guaranteed and
cylinder head must be replaced.
Pa
ge 48 of 51 Valvetrain, servicin
g
11/18/2002 htt
p://127.0.0.1:8080/audi/servlet/Dis
play?action=Goto&t
yp
e=re
pair&id=AUDI.B5.GE02.15.3
Page 49 of 51
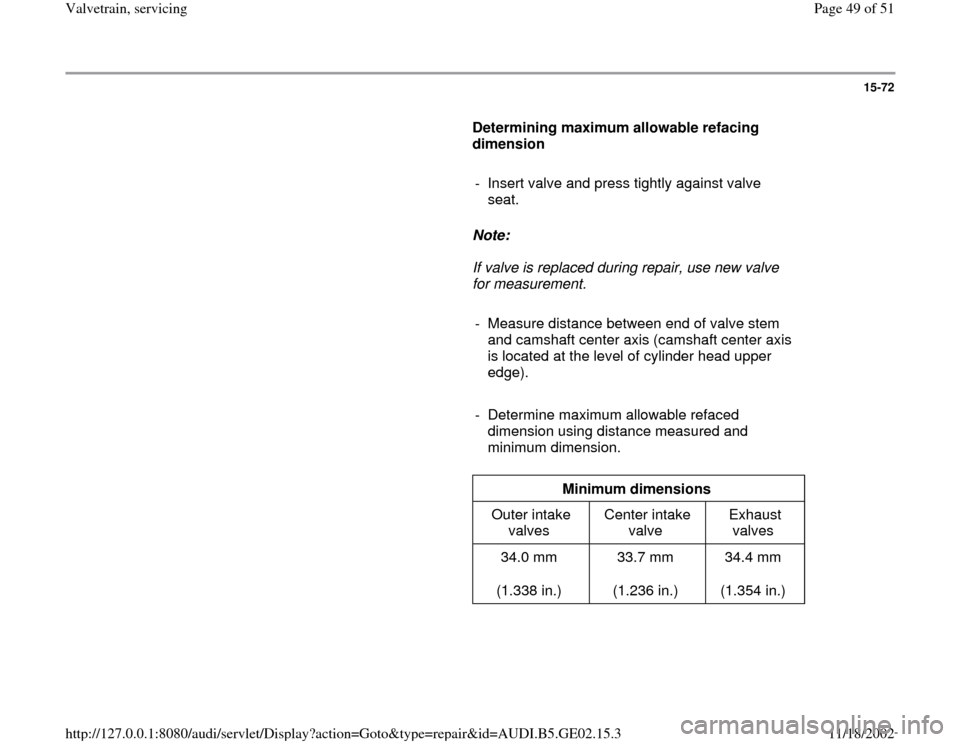
15-72
Determining maximum allowable refacing
dimension
- Insert valve and press tightly against valve
seat.
Note:
If valve is replaced during repair, use new valve
for measurement.
- Measure distance between end of valve stem
and camshaft center axis (camshaft center axis
is located at the level of cylinder head upper
edge).
- Determine maximum allowable refaced
dimension using distance measured and
minimum dimension.
Minimum dimensions
Outer intake
valves Center intake
valve Exhaust
valves
34.0 mm
(1.338 in.) 33.7 mm
(1.236 in.) 34.4 mm
(1.354 in.)
Pa
ge 49 of 51 Valvetrain, servicin
g
11/18/2002 htt
p://127.0.0.1:8080/audi/servlet/Dis
play?action=Goto&t
yp
e=re
pair&id=AUDI.B5.GE02.15.3
Page 50 of 51
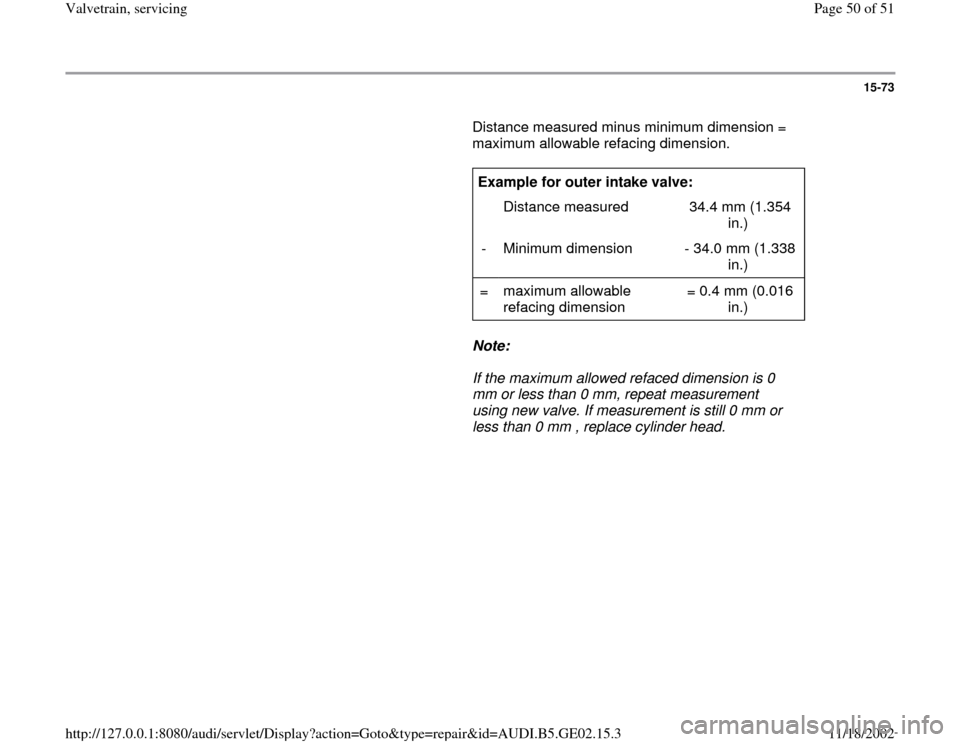
15-73
Distance measured minus minimum dimension =
maximum allowable refacing dimension.
Example for outer intake valve:
Distance measured 34.4 mm (1.354
in.)
- Minimum dimension - 34.0 mm (1.338
in.)
= maximum allowable
refacing dimension = 0.4 mm (0.016
in.)
Note:
If the maximum allowed refaced dimension is 0
mm or less than 0 mm, repeat measurement
using new valve. If measurement is still 0 mm or
less than 0 mm , replace cylinder head.
Pa
ge 50 of 51 Valvetrain, servicin
g
11/18/2002 htt
p://127.0.0.1:8080/audi/servlet/Dis
play?action=Goto&t
yp
e=re
pair&id=AUDI.B5.GE02.15.3
Trending: automatic transmission, oil filter, oil change, service, ignition, ESP, timing belt
