stop start AUDI A3 2011 Owner´s Manual
[x] Cancel search | Manufacturer: AUDI, Model Year: 2011, Model line: A3, Model: AUDI A3 2011Pages: 320, PDF Size: 75.79 MB
Page 116 of 320
llffl..__T_ r _a_ n_s_ m_ i_ s _s_ i_ o _ n _________________________________________________ _
Transmission
Manual transmission
Applies to ve hicle s: w ith manual tra nsm is s io n
Gearshift lever
The clutch pedal must be depressed all the way before
you can start the engine.
The manual transmission in your Audi is equipped w ith an
interlock-feature.
- Depress the clutch pedal all the way .
- Start the eng ine with the gears hift lever in Neutral and the
clutch peda l depressed .
0 Note
Always depress the clutch pedal fully when changing gears. Do not
hold the veh icle on a hill with the clutch peda l part ia ll y depressed.
T hi s may cause prem ature clutch wear or damage .
[I) Tips
• Resting your hand on the gearshift lever knob while driving will
cause pr emature wea r in the transm ission.
• The back -up lights go on when you sh ift into Reve rse with the igni
tion on. •
Applies to v eh icl es : w ith 6 -s pe ed manual tr ansm iss ion
Gearshift pattern (6-speed manual
transmission)
ra ...
-0:. ., m
F ig. 11 3 Gea rshift
p att ern: 6 -s pee d
m anu al tra n smi ssion
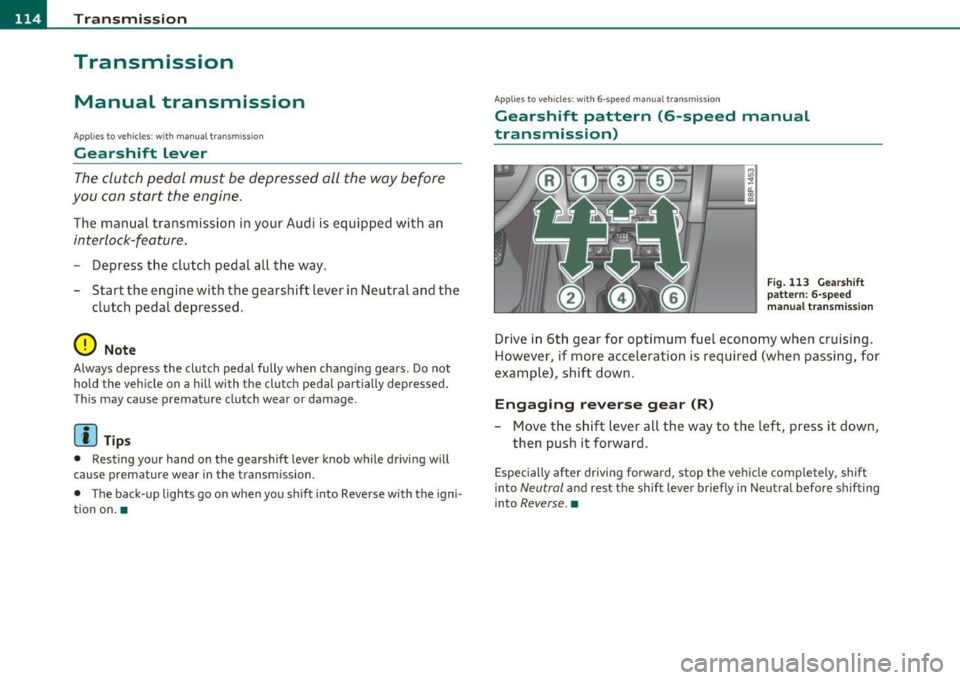
Drive in 6 th gear for opt im um fue l econo my when cruising .
However , if more accelera tion is required (when passi ng, for
exa mple), shift dow n.
Engaging reverse gear (R)
- Move the s hift lever alt the way to the left, press it down ,
then push it forward .
Especially after driv ing forward , stop th e veh icle completely , shift
into
Neutral and rest t he shift leve r briefly in Neut ral befo re s hifting
i nto
Reverse .•
Page 119 of 320

____________________________________________________ T _r_a _n_ s_m _ i_s _s_ i_ o _ n _ ___.fflll
The selector lever lock is effective only when the vehicle is stationary
and at speeds below 5 km/h. At highe r speeds, the lock in the N posi
tion is automatically switched off.
The selector lever is not locked when rapid shifts are made through
the N position (e.g . from R to D) . T h is allows you to "rock" the vehicle
if it becomes stuck. If the lever is in the N position for more than
1 second with the brake pedal not depressed, the selector lock
engages automatically.
Release button
The release button in the selector lever handle prevents accidental
shifts into certain selector lever pos itions. When you press the
release button, the selector lever lock is cancelled. In the illustration,
the positions in which the release button has to be pressed are h igh
lighted in color::::>poge
116, fig . 115 .
Ignition k ey remo val l ock
The ignition key can only be remove after the ignition is switched off
if the selector lever is in P. As long as the ignit ion key is removed, the
selector lever is locked in P.
[ i ) Tips
If the selector lever does not engage, there is a malfunction . The
eng ine is disabled to prevent the vehicle from driv ing off unintention
ally. To allow the selector lever to engage again, proceed as follows:
Press and release the brake pedal.•
Contro ls a nd e quip
m en t Vehicle
OP-eration
Applies to vehicles : w ith S tronic®
Driving Notes
The forward gears are shifted up or down automatically .
Starting from stop
-Step on and hold the brake pedal.
Fig. 116 Section from
ce nter conso le:
Selector lever with
r elease button
- Hold the release button (button in selector lever) down,
move the selector lever to the desired position, for
example D =:;,
page 115, and relea.se the button.
- Release the brake pedal and accelerate=:;,& .
Stopping temporarily
-Bring the vehicle to a full stop with the brake, e.g . at
traffic signals.
- Do not accelerate .
Parking
-Step on and hold the brake pedal=:;,&.
- Apply the parking brake firmly.
- Hold the release button down, move the selector lever to
P and release the button. .,.
Vehicle care Do-it-yourselt service iTechnical data
Page 120 of 320
lffll.___T_ r_a _n_ s_m _ i_s _s _ i_o _n ___________________________________________________ _
Stopping on an incline
- Always
hold t he vehicle with the footbrake or parking
b rake in order to preve nt "ro llback "=> & . Do not try to
p reve nt t he v ehicle from ro lli ng back by re vving th e e ngine
whi le it is in gea r.
Starting on a hill
- Apply the hand bra ke fi rmly.
- With t he eng ine in gear , gra dually acce lerate a nd release
the hand bra ke.
T he eng ine c an only be started with the selector leve r in P or N
=>
page 107 . At low amb ient temperatures (14 °F /-10 °(), it i s only
possible to start the engine with the selector lever in P.
W hen pa rking on leve l grou nd , it is suff ic ient to p lace the se lector
lever in P. On a steeply sloping road, you shou ld f irst app ly the
par king brake firmly and then p lace t he selecto r leve r in P. T his way,
you do not overload the paw l mechanism and it is easier to move the
selector lever out of P.
& WARNING
• Never leave your vehicle with the engine running while in ge ar.
If you must lea ve your vehicle with the engine running, set the
parking brake and engage the park lo ck .
• When the eng ine i s running and the transmi ssio n is in gear (D ,
Sor R ) or in "tiptronic " mode, it is ess ential that you stop the
v ehicle with the footbrake. When idling , the transmiss ion of
power doe s not stop completely -the vehicle "creeps".
• Do not a ccelerate when you change the selector leve r position
with th e vehicle stationary and the engine runn ing -risk of an acci
dent!
• Never place the selector lever in the R or N position wh ile the
v ehicle is moving -risk of a n accident!
& WARNING (continued )
• If you have to bring your vehicle to a stop while on an incline ,
keep the foot brake depressed all the way down so that the vehicle
does not start to roll backward. You should never hold the veh icle
using the clutch if you are going to b e stopped on an incline. If you
do , the clutch will start to slip when it o verheats c aused by the
c onstant overload . Thi s is danger ous be cau se if the vehicl e start s
to roll backward , you could cause an accident. If the clutch should
s tart to slip, you will fee l the vehicle "jerk " and the selector lever
d isplay w ill start blinking.
• Befor e driving down a st eep slope, reduc e your speed and shift
i nto a lower gear w ith "tipt ronic ".
• Do not ride the brakes or apply the brake pedal too often or too
long . Constant b raking causes the brakes to overheat and
s ub stantially reduces braking performan ce, in creases braking
d istance or causes complete failure of the b rake system . •
A pplie s to v eh icl es: wit h S tro nic transm iss ion and Hi ll De scen t A ss ist
Hill Descent Assist
Hill Descent Assist helps the driver when driving down
inclines.
H ill Descent Assist is activated by pressing the brake while
descending when the se lector lever is in
D /S . The S tronic transmis
sion a utomat ically s hifts down to a gear s uitable fo r the in cl ine. H ill
Descent Assist attempts to mainta in the cu rrent vehicle speed when
t he br aking oc curs, as far as physical and technical l imi ts allow.
It
may be necessary to adjust the speed using the brakes .
Hi ll Descent Assist switches off w hen the incline levels out or when
the gas pedal is pressed.
On vehicles with cruise control*=>
page 110, Hill Descent Assist is
also activa ted when the speed is set.
~
Page 200 of 320
Driving and environment
New brake pads have to be "burnished in" before they have optimal
grab ~& .
Dur ing the break-in period, you should avoid putting severe loads on
the bra kes. Severe loads incl ude, for example, sudden hard braking,
in part icu lar at very high speeds or, for examp le, on mountain passes .
& WARNING
Until they develop th e ma ximum "bite " for b est stopp ing pow er,
the surfaces on new brake pads require some "breaking-in" during
the in itial 100 to 150 mile s (150 to 200 kilometers ) of normal
city dr iving. You can compensate for this by p ress ing the brake
pedal more firml y. Thi s applies whenever n ew pads are in stalled .•
Driving through water on roads
---
N ote the following to avoid vehicle damage when driving through
water, fo r example on flooded roads:
• Th e wate r mus t not be any higher th an the bottom of the ve hicl e
body.
• Do not dr ive faster t han wal king speed.
& WARNING
After driving through water, mud , slush, etc ., th e brak es may be
slow to take effect because of wet brake rotors and pads . Dry the
brakes first by braking carefully to restore the full braking effect .
0 Note
Vehicle components such as the engine, transmission, suspension or
electrical system can be severely damaged by driving thro ugh water.
W Tips
• Check t he dept h of the wa ter before dr iv in g thro ugh it.
• Do not stop the vehicle, drive in reverse or sw itch the engine off
when driving through wate r.
• Keep in m ind t hat on coming vehicles may cre ate w aves t hat raise
the water level and make it too deep for your vehicle to drive thro ugh
safe ly.
• Avoid dr iv in g through sa lt water because it can cause corros ion. •
Catalytic converter
It is very important that y our emiss ion con trol system
(ca talyti c converte r) is func tioning pr operly to ensure
that your vehicle is running i n an environm entally sou nd
manner.
- Always use lead-fre e gasoline => page 219, "Fu el supply".
- Never run the ta nk down a ll the way to empty .
- Never p ut too much mo tor o il in your engine=>
pag e 232,
"Adding engine oil~" -
- Neve r try to pu sh- or tow-start you r vehicle.
T he catalytic converter is an efficient "clean- up" device b uilt into the
exhaust system of the veh icle. The cata lytic converter b urns many of
t he poll uta nts in the e xhaust g as before they are released in to the
atmosphe re.
Th e ex clusive use o f unleaded fuel is c ritic ally impor tant for the life of
the cata lytic converte r and proper f unction ing of the engi ne. ..,
Page 206 of 320
Trailer towingL _____________________________________________ _
ment of the tow vehicle while observing tongue load requirements
and vehicle loading considerations.
Speed
The higher the speed, the more difficult it becomes for the driver to
control the rig. Do not drive at the maximum permissible speed. Reduce your speed even more under unfavorable load, weather or
wind conditions -particularly when going downhill.
Reduce vehicle speed
immediately if the trailer shows the slightest
sign of swaying .
Do not try to stop the swaying by accelerating.
Observe speed limits . In some areas speeds for vehicles towing
trailers are lower than for regular vehicles .
Always apply brakes early . When driving downhill, shift into lower
gear to use the engine braking effect to slow down the vehicle. Use of
the brakes alone can cause them to overheat and fail.
Coolant temperature
The coolant temperature gauge~ page 9 must be observed care
fully. If the needle moves close to the upper end of the scale, reduce
speed immediately and/or switch off the air conditioner .
If the coolant temperature warning light in the instrument cluster
starts flashing
-t-, pull off the road , stop and let the engine idle for
about two minutes to prevent heat build-up.
& WARNING
Anyone not properly restrained in a moving vehicle is at a much
greater risk in an accident. Never let anyone ride in your car who is
not properly wearing the restraints provided by Audi. •
Trailer towing tips
Important to know
-------------
Your vehicle handles differently when towing a trailer because of the
additional weight and weight distribution. Safety, performance and
economy will greatly depend on how carefully you load your trailer
and operate your rig.
Before you actually tow your trailer, practice turning, stopping and
backing up in an area away from traffic. Keep practicing until you have
completely become familiar with the way your vehicle-trailer combi
nation behaves and responds.
Backing up is difficult and requires practice. Backing up with a trailer
generally requires steering action opposite of that when backing up
your vehicle without a trailer.
Maintain a greater distance between your vehicle and the one in front
of you. You will need more room to stop.
To compensate for the trailer, you will need a larger than normal
turning radius .
When passing, remember that you cannot accelerate as fast as you normally would because of the added load. Make sure you have
enough room to pass. After passing, allow plenty of room for your
trailer before changing lanes again.
Avoid jerky starts, sharp turns or rapid lane changes.
[I] Tips
• Do not tow a trailer during the break-in period of your vehicle .
• If you tow a trailer, your Audi may require more frequent mainte
nance due to the extra load~
page 299. •
Page 207 of 320
Parking on a slope
Do not park with a trailer on a slope. If it cannot be
avoided, do so only after doing the following:
When parking:
-Apply the foot brake.
- Have someone place chocks under both the vehicle and the
trailer wheels.
- With chocks in place, slowly release the brakes until wheel
blocks absorb the load.
- Turn the wheels towards the curb.
- Apply the parking brake.
- Place an automatic transmission in
P, respectively a
manual transmission in first or reverse gear.
When restarting after parking:
- Start the engine .
- Shift transmission into gear .
- Release the parking brake and slowly pull out and away from the wheel blocks .
- Stop and have someone retrieve the wheel blocks.
[I] Tips
If you move the selector lever of the automatic transmiss ion to P
before applying the parking brake and before blocking the wheels,
you may have to use more force later to move the leve r out of the
P
position. •
Controls and equip ment Safety first Vehicle operation
Vehicle care Do-it-yourself service Technical data
Page 228 of 320

___ C_ h_ e_c _k _i _ n _g ~ a_n _d_ f_il _l_in _ g _________________________________________ _
Closing the engine hood
- Pull the hood down until the pressure from the strut is
reduced.
- Let the hood
drop down and latch in place . Do not try to
push it shut;
it may fail to engage=> &.
& WARNING
A hood that is not completely latched could fly up and block your
view while driving.
• When you close the engine hood, check it to make sure the
safety catch has properly engaged. The hood should be flush with
the surrounding vehicle body parts.
• If you notice while driving that the hood is not secured prop
erly, stop at once and close it. •
Working in the engine compartment
Be especially careful whenever you work in the engine
compartment!
Whenever you must perform any work in the engine compartment,
for example checking and filling different fluids, there is a risk of
injury, burns and accidents. To prevent personal injury always
observe the following WARNINGS. The engine compartment of any
vehicle is a hazardous area!~
&
& WARNING
To help avoid injury, before you check anything under the hood :
• Turn off the engine.
• Remove the ignition key.
• Set the parking brake fully.
& WARNING (continued)
• Move selector lever of automatic transmission to "P" (Park);
put manual transmission in Neutral.
• Always let the engine cool down. Hot components will burn
skin on contact.
• To reduce the risk of being burned, never open the hood if you
see or hear steam or coolant escaping from the engine compart
ment. Wait until no steam or coolant can be seen or heard before
carefully opening the hood.
• Keep children away from the engine compartment.
• Never spill fluids on hot engine components. They can cause a
fire.
• Never touch the radiator fan. The auxiliary electric fan is
temperature controlled and can switch on suddenly.
• Never open the coolant reservoir cap when the engine is still
warm. The coolant system is pressurized and hot coolant could
spray out!
• Protect your face, hands and arm from steam or hot engine
coolant by placing a thick rag over the cap when you open the
coolant reservoir.
• If work on the fuel system or the electrical system is necessary:
-Always disconnect the battery .
- Never smoke or work near heaters or open flames. Fluids in
the engine compartment could start a fire.
- Keep an approved fire extinguisher immediately available.
• To avoid electrical shock and personal injury while the engine is
running or being started, never touch:
- Ignition cables
- Other components of the high voltage electronic ignition
system.
• If you must perform a check or repair with the engine running: .,_
Page 255 of 320
Tires and wheels -________________ l'fFI
• The tire p ress ure s s ho uld onl y be chec ked and adjus ted whe n the
ti res are col d. T he sli ghtly rais e d pre ssu res o f w arm t ires must not b e
r e d uced .
• Adju st the tire p re ssu re to t he lo ad you are ca rry ing .
• Reinstall the valve stem cap o n the valve .
When should I check the tire pressure?
The corre ct tire press ure is especially importa nt at high speeds. The
pressu re s ho uld t heref ore be chec ked at least onc e a month an d
always be fore start ing a journey . Do not fo rget to check t he t ire p res
s u re for the spar e w hee l~
pag e 2 71.
When should I adjust the tire pressures?
Ad jus t the tire pr ess ur e to th e load you ar e carry ing . Af ter chang ing a
w hee l
or replac ing w heels yo u have to adjust the t ire press ures on all
w heels. In addi tion, you must th en ini tia lize the ne w tire press ures in
the t ire pressure monito ring system *~
page 264 .
& WARNING
Incorrect tire pressures and/or underinflation can lead sudden tire
failure, loss of control, collision, serious personal injury or even death.
• When the warning symbol{__, appears in the instrument
cluster , stop and inspect the tires.
• Incorrect tire pressure and/or underinflation can cause
increased tire wear and can affect the handling of the vehicle and
stopping ability.
• Incorrect tire pressure s and/or underinflation can also lead to
sudden tire failure, including a blowout and sudden deflation,
causing loss of vehicle control.
• The driver is responsible for the correct tire pressures for all
tires on the vehicle. The applicable pressure values are located on
a sticker on the driver 's side 8-pillar or on the inside of the fuel
filler flap .
Safety first
& WARNING (cont inued )
• Only when all tires on the vehicle are filled to the correct pres
sure, the tire pressure monitoring system* can work correctly.
• The use of incorrect tire pressure values can lead to accidents or
other damage . Therefore it is essential that the driver observe the
specified tire pressure values for the tires and the correct pres
sures for the function of the tire pressure monitoring system*.
• Always inflate tires to the recommended and correct tire pres
sure before driving off .
• Driving with underinflated tires bend more, letting them get
too hot resulting in tread separation, sudden tire failure and loss
of control.
• Excessive speed and/overloading can cause heat build-up,
sudden tire failure and loss of control.
• If the tire pressure is too low or too high, the tires will wear
prematurely and the vehicle will not handle well.
• If the tire is not flat and you do not have to change a wheel
immediately, drive at reduced speed to the nearest service station
to check the tire pressure and add air as required .
0 Note
Driving witho ut valve stem caps can cause damage to the tire valves.
T o preven t this, always ma ke sure that fa ctor y in sta lled val ve s te m
caps on all wheels a re secure ly mounted on the va lve.
c£> For the sake of the environment
Under infla ted ti res will also increase t he fue l cons umption .•
Tires and vehicle Load Limits
T he re are limits to the amo unt of load or weight that a ny vehicle and
any tire c an car ry. A veh icle t hat is ove rload ed w ill not handle well and ..,_
Vehicle care Technical data
Page 267 of 320
________________________________________________ T_ i_ re _ s_ a_ n_d_ w_ h_ e_ e_l _s _ ........
As an added safety feature, your vehicle has been equipped with a tire
pressure monitoring system (TPMS) that ill uminates a low tire pres
sure telltale when one or more of your tires is signif icantly under
inflated . Accordingly, when the low tire pressure telltale illuminates,
you should stop and check your tires as soon as possible, and inflate them to the proper pressure. Driving on a significantly under-inflated
ti re causes the tire to overheat and can lead to tire fa ilure. Unde r
inf lation also reduces fuel efficiency and tire tread life, and may
affect the vehicle's handling and stopping ability.
Please note that the TPMS is not a substitute for proper tire mainte
nance, and it is the driver's responsibility to maintain correct tire
pressure, even if under -inflation has not reached the level to trigger
illumination of the TPMS low tire pressure te lltale.
Your vehicle has also been equipped with a TPMS malfunction ind i
cator to indicate when the system is not operating properly. The
TPMS malfunction indicator is combined w ith the low tire pressure
telltale . When the system detects a malfunction, the telltale will
flash for approximate ly one minute and then remain continuously
illuminated. This sequence will continue upon subsequent vehicle
start -ups as long as the malfunction exists.
When the ma lfunction indicator is illum inated, the system may not
be able to detect or signa l low tire pressure as intended. TPMS
ma lfunctions may occur for a var iety of reaso ns, includ ing the instal
lation of replacement or alternate tires or wheels on the vehicle that
prevent the TPMS from functioning properly. Always check the TPMS
malfunction telltale after replacing one or more tires or wheels on
yo ur vehicle to ensure that the replacement or alternate tires and
wheels allow t he TPMS to continue to funct io n properly .•
Vehicle OP-eration
App lies to vehicl es: wi th t ire p ress ure m onit ori ng syst em
Tire pressure indicator appears
The tire pressure indicator in the instrument cluster
informs you if the tire pressure is too low or if there is a
system malfunction.
Fig. 176 Display:
under inflation
warning
Fig . 17 7 Display:
System malfunction
Using the ABS sensors, the tire pressure monitoring system compares
the tire tread circumference and vibration characteristics of the indi
vidual tires.
If the pressure decreases in one or more tires, this is indi-
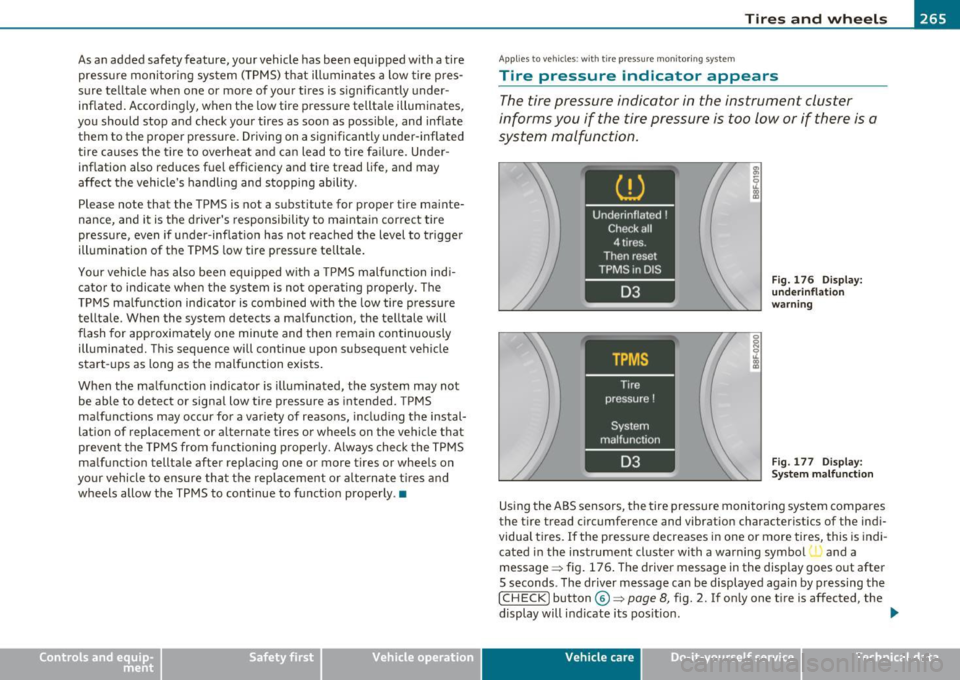
cated in the instrument cluster with a warning symbol and a
message ~ fig. 176 . The driver message in the display goes out after
5 seconds . The driver message can be displayed again by pressing the
I CHECK) button©~ page 8, fig. 2. If on ly one tire is affected, the
display will i ndicate its pos it ion. ._
Vehicle care Do-it-yourselt service iTechnical data
Page 290 of 320
IJll.,___E_ m_ e_ r=g '--e _n_ c -'y_ s_ i_ t _u _ a_ t_ i_ o _ n_ s __________________________________________ _
Use of jumper cables
Make sure to connect the jumper cable clamps in exactly
the order described below!
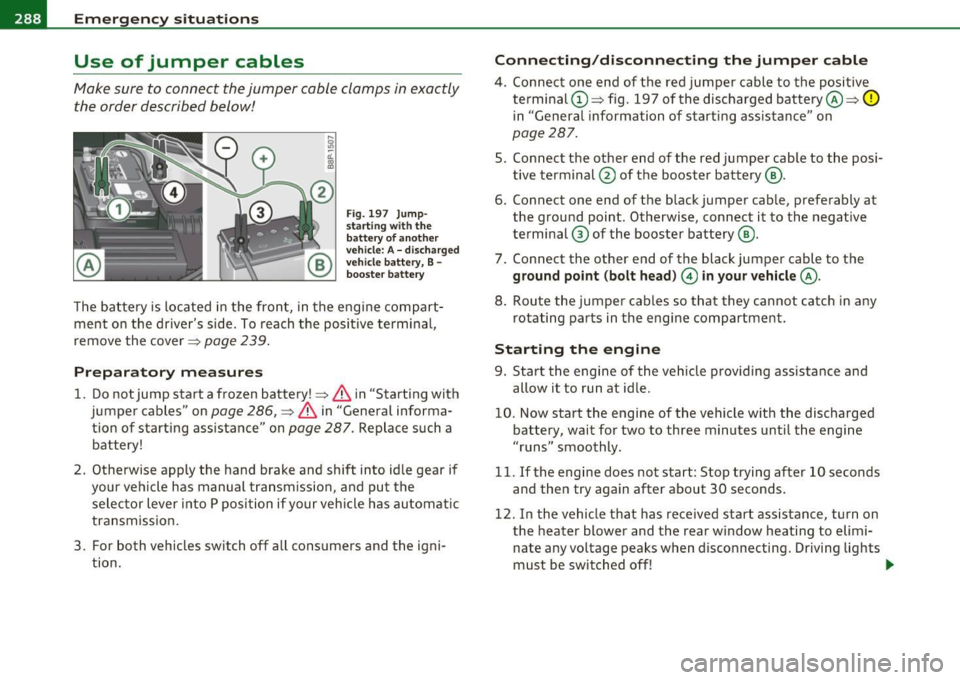
Fig. 197 Jump·
s tar ting w ith th e
ba ttery of a nothe r
vehicle: A -dischar ged
vehicle b attery, B -
booster ba ttery
The battery is located in the front, in the engine compart
ment on the driver's side. To reach the positive terminal,
remove the cover=>
page 239 .
Preparatory measures
1. Do notjump start a frozen battery!=> & in "Starting with
jumper cables" on
page 286, => & in "General informa
tion of starting assistance" on
page 287. Replace such a
battery!
2. Otherwise apply the hand brake and shift into idle gear if
your vehicle has manual transmission, and put the selector lever into P position if your vehicle has automatic
transmission.
3. For both vehicles switch off all consumers and the igni tion.
Connecting /disconnecting the jumper cable
4. Connect one end of the red jumper cable to the positive
terminal ©=> fig. 197 of the discharged battery@=>
0
in "General information of s tarting assista nce" on
page 287.
5. Connect the other end of the red jumper cable to the posi
tive terminal @ of the booster battery @.
6. Connect one end of the black jumper cable, preferably at the ground point. Otherwise, connect it to the negative
terminal ® of the booster battery @.
7 . Connect the other end of the black jumper cable to the
ground point (bolt head ) 0 in your vehicle @.
8. Route the jumper cables so that they cannot catch in any
rotating parts in the engine compartment.
Starting the engine
9. Start the engine of the vehicle providing assistance and
allow it to run at idle.
10. Now start the engine of the vehicle with the discharged battery, wait for two to three minutes until the engine
"runs" smoothly.
11. If the engine does not start: Stop trying after 10 seconds and then try again after about 30 seconds .
12. In the vehic le that has received start ass istance, turn on
the heater blower and the rear window heating to elimi
nate any voltage peaks when disconnecting. Driving lights
must be switched off! -.,,