window AUDI A3 2011 Owner´s Manual
[x] Cancel search | Manufacturer: AUDI, Model Year: 2011, Model line: A3, Model: AUDI A3 2011Pages: 320, PDF Size: 75.79 MB
Page 101 of 320

Manual air recirculation mode c::%)
The recirculation mode preve nts polluted outside air
from entering the vehicle interior.
Switching on air recirculation
- Press the button l~l =:> page 97, fig. 101 =:> & .
Switching off air recirculation
- Press th e button l~ l aga in , or
- Press the
[ A UTO I button, or
- Press the
I®] button .
I n air recirculation mode, air is drawn from the ve hicle interior and
rec ircul ated. We recom mend that you use the man ual air r ecircula
tion mode under the following conditions:
W hen d riving throug h a t unnel o r in a traffic jam so t hat ex haust
fumes cannot enter the ve hicle inter ior .
& WARNING
Do not use thi s setting for e xtended periods of time. The windows
c ould fog up sin ce no fre sh air can enter the vehi cle. If the
windows fog up, press the air recirculation button again immedi·
atel y to switch off the air recirculation function or selec t defro st. •
Automatic air recirculation I~ ]
If outside air is polluted, an air quality sensor in the
vehicle will aut omatically switch on the air recirculation .
Switching on air recirculation
-Press l~]=:> page97, fig.101.
Controls and equip ·
ment Safety first
Warm and cold
Switching off air recirculation
- Press@again, or
- press
I A UT O], or
- press
I®] .
The au tomatic a ir recircu lation mode should no rma lly be left
sw itched on at all times.
Th e sys tem is ready to operate approximately 30 seconds a fter yo u
t u rn on t he ignit ion or start the ve hicle . Fres h air ente rs the vehicle
only during this in it ia lizat ion period .
T he air q ual ity senso r fo r de tect ing d ie se l and gasoline exhaust fumes
switches automat ically to air recirculation mode if the o uts ide a ir is
heavily po lluted. The supp ly of outside air is closed o ff.
As soon as the poll ution level d rops, fresh air is automat ically
supplied to the vehicle interior again.
Th e air re ci rculat ion ope ra tes fo r a m ax im um o f 12 mi nutes . If the
windows start to fog up w hile the air recirculation is on, press I@ ]
U nder certain operating condit ions (for examp le, if(@ ] or Ice:,] are
pressed) the a ir recircu lation a utomatically sw itches off. If the air
conditioner is switched off, or if the temperature is below 18 °F (-
8 °(), the a ir recirculation wi ll ope rate only for 12 seconds .•
Switching between Fahrenheit and
Centigrade
Y ou can change the tempera ture display from °F (Fahren
heit) to °C (Centigrade ) and vi ce ve rsa .
- Hold th e [¢.:>] butto n down =:> page 97, fig. 101.
- Tu rn the rotary switch ( driver's side)@for
3 seconds +.•
Vehicle care Technical data
Page 102 of 320
![AUDI A3 2011 Owner´s Manual llffl!l.___w __ a _r_ m __ a_n_ d_ c_ o _ l_d _______________________________________________ _
Air recirculation [a:i ]
The air recirculation prevents exhaust fumes or other
pollution fr AUDI A3 2011 Owner´s Manual llffl!l.___w __ a _r_ m __ a_n_ d_ c_ o _ l_d _______________________________________________ _
Air recirculation [a:i ]
The air recirculation prevents exhaust fumes or other
pollution fr](/img/6/40268/w960_40268-101.png)
llffl!l.___w __ a _r_ m __ a_n_ d_ c_ o _ l_d _______________________________________________ _
Air recirculation [a:i ]
The air recirculation prevents exhaust fumes or other
pollution fr om entering the vehicle .
Switching air recirculation on
-Press lo;;, ]~ page 97, fig . 101 ~ &
Switching air recirculation off
- Press 0 agai n, or
- p ress [AUTO], or
- press[@] .
In the air recirculation mode, the air in the passenger compartment
is rec irculated to preven t exhaus t fu mes and othe r po llution from
enter ing the veh icle . We recommend that you use the manua l air
reci rcul atio n under the followi ng conditions:
• when driving through tunnels
• in a traffic jam.
& WARNING
Do not use thi s setting for extended periods of time . The window s
c ould fog up since no fresh air can enter the vehicle. If the
window s fog up, pre ss the air recir culation button again immedi
ately to swit ch off the air recirculation function or select defrost .•
Adjusting the fan speed G G
The automati cally selected fan speed can be increased or
de creased.
- Press the (:) or G butto ns in t he center o f the con tro l
panel ~
page 97, fig. 10 1 to adjus t the fa n sp ee d to your
comfort .
The air condit ion ing system a utomat ically regulates t he fan speed in
response to the interior temperature . However, you can also adjust
the fan speed manua lly . A line of small ba rs in the cen ter display
above the fan contro l buttons w ill retreat or extend to reflect your
adjustments to the fan speed. •
Air distribution
The automatically controlled air distribution can be
changed manually .
You can use the l~I. l~I or l~ I buttons separate ly or together in
combination . To switch back to the automatic air distribut ion setting,
either sw itc h off the butto ns you previo usly se lected, or press
[AUTO I.
Each of the three buttons has its own specific f unct ion (the re ference
numbers refer to the air outlets):::::,
page 101, fig. 102.
Air directed to the windows ik,,
All the air is directed to outlets (D,@ and @. Contrary to when [@ I
is pressed, the amo unt of air rem ain s the same.
Air di rected to the dri ver /front passenger[ ~]
All the air is directed to outlets @,@ and © in the i nstr ument
panel. Air also is directed throug h the center console in the rear.
Page 103 of 320
_________________________________________________ W_ a_ r_m _ a_ n_d_ c_ o_ ld _ ___._
Air directed to th e footw ells ~
All the air is directed to outlets ® and to the outlets under the front
seats. •
Air outlets
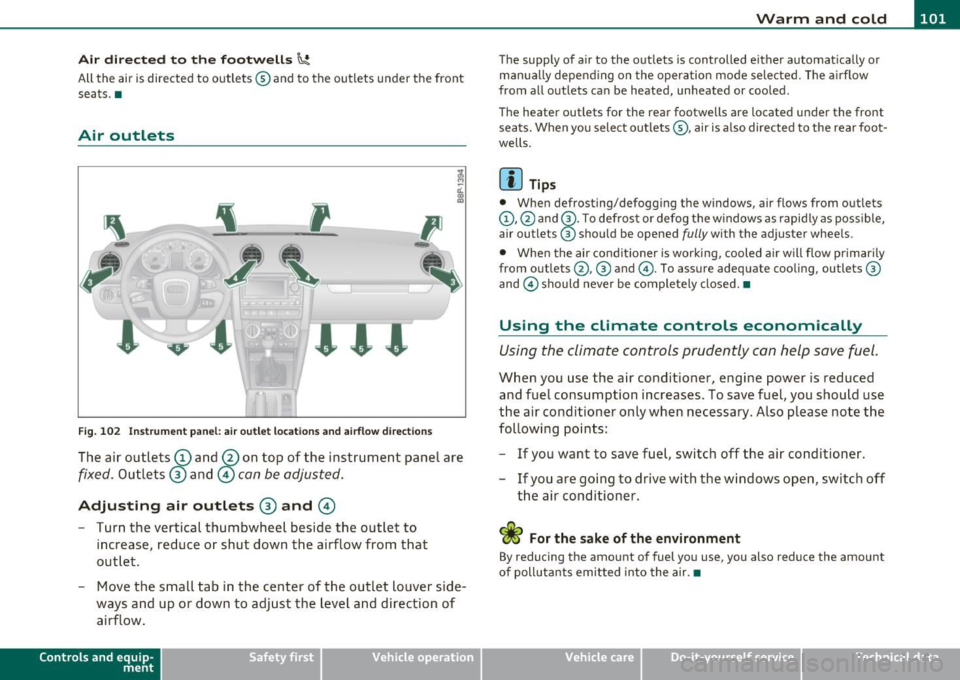
,
'''
Fig. 102 Instrument panel: air outlet locations and airflow directions
The air outlets (D and @on top of the instrument panel are
fixed. Outlets ® and © can be adjusted.
Adjusting air outlets ® and ©
-Turn the vertical thumbwheel beside the outlet to
increase, reduce or shut down the airflow from that
outlet.
- Move the small tab in the center of the outlet louver side
ways and up or down to adjust the level and direction of
airflow .
Contro ls a nd e quip
m en t Vehicle
OP-eration
The supply of a ir to the outlets is controlled either automat ically or
manually depend ing on the operation mode selected. The airflow
from all outlets can be heated, unheated or cooled .
The heater outlets for the rear footwells are located under the front
seats. When you select outlets@, air is also directed to the rear foot
wells.
[I) Tips
• When defrosting/defogging the windows, air flows from outlets
(D ,@ and @. To defrost or defog the windows as rapidly as poss ible,
air outlets ® should be opened
fully with the adjuster wheels.
• When the air conditioner is working, cooled air w ill flow primarily
from outlets @,® and @. To assure adequate cooling, outlets ®
and © should never be completely closed.•
Using the climate controls economically
Using the climate controls prudently can help save fuel .
When you use the air conditioner, engine power is reduced
and fuel consumption increases. To save fuel, you should use
the air conditioner only when necessary. Also please note the
following points:
- If you want to save fuel, switch off the air conditioner .
- If you are going to drive with the windows open, switch off
the air conditioner.
of polluta nts emitted into the air. •
Vehicle care Do-it-yourselt service iTechnical data
Page 104 of 320
ffl..__w __ a _r _m __ a_n _ d_ c_ o_ ld ________________________________________________ _
Key coded settings
When the ignition is switched on, the air conditioner
settings are automatically assigned to the key being used .
The air conditioner settings selected are automatically stored and
assigned to the key being used . When the vehicle is started, the air
conditioner automatically selects the settings assigned to that key.
Th is way every driver will maintain his/her own personal settings and
does not have to reset them manually.
[ i J Tips
If a different driver uses your key and changes the a ir conditioner
sett ings, the latest adjustments wi ll erase and replace the settings
you have stored. •
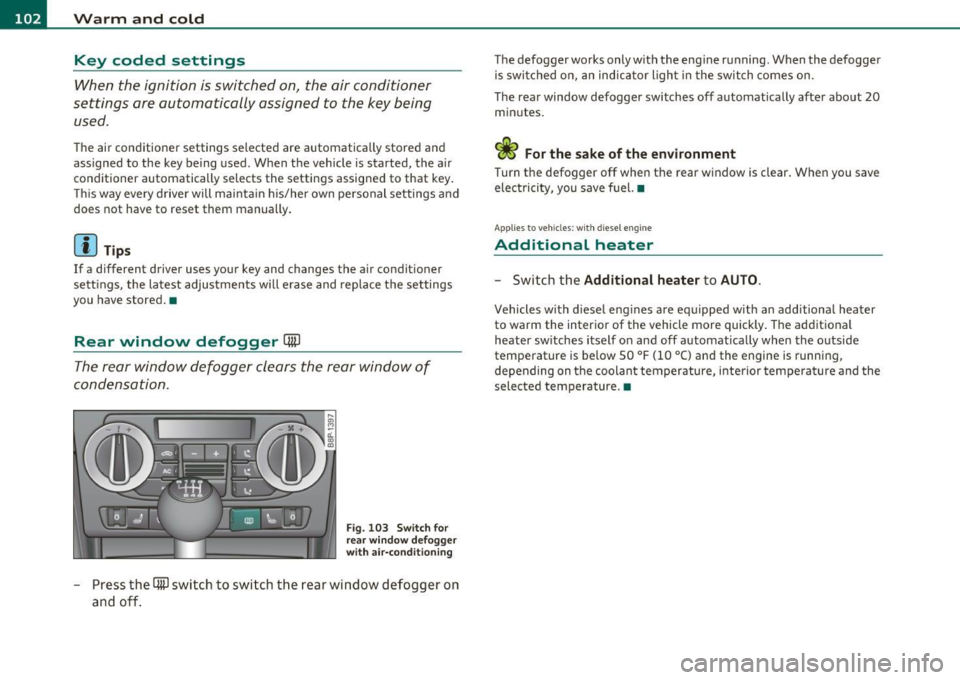
Rear window defogger [ffi)
The rear window defogger clears the rear window of
condensation.
F ig. 103 Swi tch for
rea r w in dow defogg er
wit h air -conditioni ng
- Press the [ml switch to switch the rear window defogger on
and off.
The defogger works only with the eng ine running . When the defogger
is switched on, an indicator ligh t in the switch comes on .
The rear window defogger switches off automatically after about 20 min utes.
elec tricity, you save fuel. •
Applies to veh icles: wit h diesel eng ine
Additional heater
- Switch the
Additional heater to AU TO .
Vehicles w ith d iesel eng ines are equipped with an additional heater
to warm the interior of the vehicle more quickly . T he additional
heater sw itches itself on and off automatically when the outside
temperature is be low 50 °F (10 °C) and the engine is running,
depending on the coolant temperature, i nterior temperature a nd the
selected temperature. •
Page 108 of 320
ffl..__O_ n_ t_h _e_ r_o _ a_ d _________________________________________________ _
Ignition Lock and ignition switch
Ignition lock
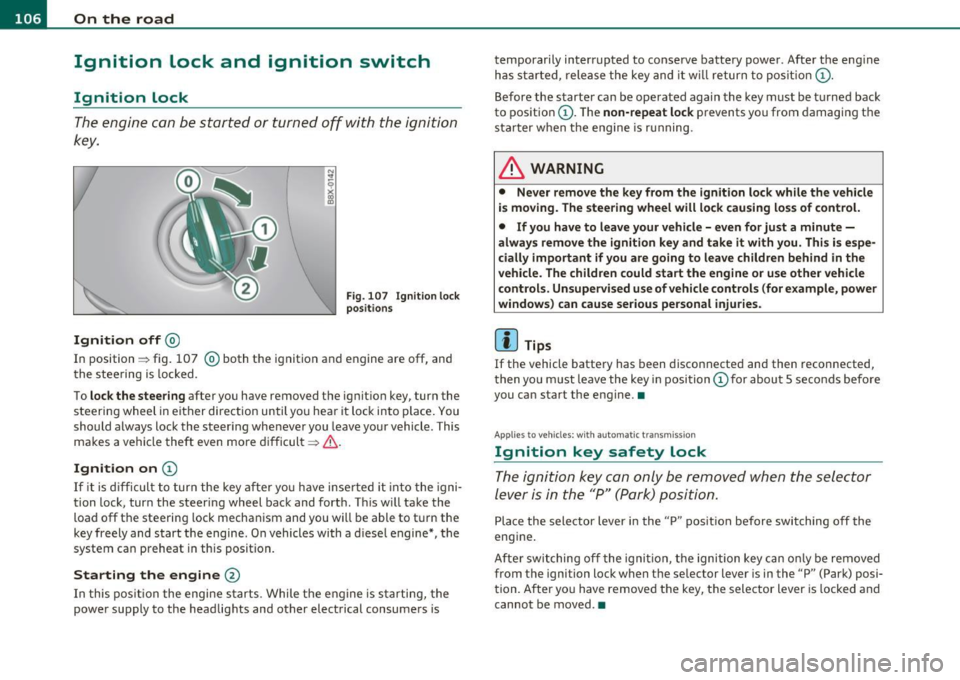
The engine can be started or turned off with the ignition
key.
Ignition off@
Fig. 107 Ignition l ock
p ositions
In position => fig. 107 @ both the ignition and engine are off, and
the stee ring is locked .
To
lock the stee ring after you have removed the ig nit io n key, turn the
steeri ng wheel in either direction until yo u hear it lock into place . You
should always lock the steering whenever you leave your vehicle . This
makes a vehicle theft even more difficult=> & .
Ignition on (D
If it is d ifficul t to turn the key af ter yo u have inse rted it in to the igni
tion lock, tur n the steering wheel back and forth . T hi s w ill take the
load off the steering lock mechanism and you wi ll be able to t urn the
key freely and start the engine . On vehicles with a d iese l engine *, t he
system ca n preheat in this position .
Starting the engine@
In this pos it ion the engi ne s tarts. While the e ngine is s ta rting, the
power supply to the headlights and other electrical consume rs is temporarily interrupted to conserve ba
ttery power . Afte r th e eng ine
h as st arted, relea se the key and it w ill retur n to posit io n (D .
Before the starter can be operated again the key must be t urned back
to positio n (D . T he
non-repeat lock prevents you from damaging the
s ta rt er when t he e ng ine is running .
& WARNING
• Never remove the key from the ignition lock while the vehicle
i s moving . The steering wheel will lock causing loss of control.
• If you have to leave your v ehicle -even for ju st a minute -
always remove the ignition key and take it with you. This is espe·
cially important if you are going to leave children behind in the
vehicle. The children could start the engine or use other vehicle
control s. Unsupervised use of vehicle controls (for example, power
windows ) can cause serious personal injuries .
(I) Tips
If the vehicle battery has been disconnected and then reconnected,
t hen yo u m ust leave the key in posi tion (Dfor abou t
5 seco nds befo re
you can start the eng ine. •
App lies to vehicles: with automat ic transmission
Ignition key safety lock
Th e ignition k ey can only b e removed when the selector
lever is in the "P" (Park) position.
Pla ce the selector lever i n the "P " pos it ion before swit ching off the
eng ine .
Afte r sw itching of f the igni tion , th e ignition key can o nly be re moved
from the ignition lock when t he selector lever is in the "P" (Park) posi
t ion. After yo u have remove d the key, t he selector lever is locked a nd
cannot be moved .•
Page 127 of 320
Driving Safely ---------------------"~'---
Important things to do before driving
Safety is everybody's job! Vehicle and occupant safety
always depends on the informed and careful driver.
For your safety and the safety of your passengers, before
driving always:
- Make sure that all lights and signals are operating
correctly.
- Make sure that the tire pressure is correct.
- Make sure that all windows are clean and afford good visi-
bility to the outside.
- Secure all luggage and other items carefully::::>
page 91.
-Make sure that nothing can interfere with the pedals.
- Adjust front seat, head restraint and mirrors correctly for your height .
- Instruct passengers to adjust the head restraints according to their height.
- Make sure to use the right child restraint correctly to
protect children ::::,
page 167, "Child Safety".
- Sit properly in your seat and make sure that your passen gers do the same::::,
page 73, "General recommenda
tions".
- Fasten your safety belt and wear it properly. Also instruct
your passengers to fasten their safety belts properly
=:> page 135. •
Controls and equip
ment Safety first Vehicle operation
What impairs driving safety?
Safe driving is directly related to the condition of the
vehicle, the driver as well as the driver's ability to concen
trate on the road without being distracted .
The driver is responsible for the safety of the vehicle and all
of its occupants. If your ability to drive is impaired, safety
risks for everybody in the vehicle increase and you also
become a hazard to everyone else on the road::::,,& . There
fore:
Do not let yourself be distracted by passengers or by using
a cellular telephone.
NEVER drive when your driving ability is impaired (by
medications, alcohol, drugs, etc.).
- Observe all traffic laws, rules of the road and speed limits
and plain common sense .
- ALWAYS adjust your speed to road, traffic and weather
conditions.
- Take frequent breaks on long trips. Do not drive for more than two hours at a stretch.
- Do NOT drive when you are tired, under pressure or when
you are stressed .
& WARNING
Impaired driving safety increases the risk of serious personal
injury and death whenever a vehicle is being used.•
Vehicle care Do-it-yourself service Technical data
Page 129 of 320
______________________________________________ D_ ri_v _ i_n _,,g ,c.._ S_a_ f_ e_ l..:: y __ lR
& WARNING (continued)
• Always sit in an upright position and never lean against or
place any part of your body too close to the area where the airbags
are located.
• Before driving, always adjust the front seats and head
restraints properly and make sure that all passengers are properly
restrained.
• Never adjust the seats while the vehicle is moving. Your seat
may move unexpectedly and you could lose control of the vehicle.
• Never drive with the backrest reclined or tilted far back! The
farther the backrests are tilted back, the greater the risk of injury
due to incorrect positioning of the safety belt and improper
seating position. • Children must always ride in child safety seats~
page 167.
Special precautions apply when installing a child safety seat on
the front passenger seat~
page 145. •
Proper seating position for the front
passenger
The proper front passenger seating position is important
for safe, relaxed driving .
For your own safety and to reduce the risk of injury in the
event of an accident, we recommend that you adjust the seat
for the front passenger to the following position:
- Adjust the angle of the seatback so that it is in an upright
position and your back comes in full contact with it when
ever the vehicle is moving.
- Adjust the head restraint so the upper edge is as even as
possible with the top of your head. If that is not possible,
try to adjust the head restraint so that it is as close to this
position as possible=>
page 128.
Controls and equip
ment Safety first Vehicle operation
-
Keep both feet flat on the floor in front of the front
passenger seat.
- Fasten and wear safety belts correctly::::>
page 139.
For detailed information on how to adjust the front passenger's seat,
see ~
page 73.
& WARNING
Front seat passengers who are unbelted, out of position or too
close to the airbag can be seriously injured or killed by the airbag
as it unfolds. To help reduce the risk of serious personal injury:
• Passengers must always sit in an upright position and never
lean against or place any part of their body too close to the area
where the airbags are located.
• Passengers who are unbelted, out of position or too close to
the airbag can be seriously injured by an airbag as it unfolds with
great force in the blink of an eye.
• Always make sure that there are at least 10 inches (25 cm)
between the front passenger's breastbone and the instrument
panel.
• Each passenger must always sit on a seat of their own and
properly fasten and wear the safety belt belonging to that seat.
• Before driving, always adjust the front passenger seat and
head restraint properly.
• Always keep your feet on the floor in front of the seat. Never rest them on the seat, instrument panel, out of the window, etc.
The airbag system and safety belt will not be able to protect you properly and can even increase the risk of injury in a crash.
• Never drive with the backrest reclined or tilted far back! The
farther the backrests are tilted back, the greater the risk of injury
due to incorrect positioning of the safety belt and improper
seating position.
II>
Vehicle care Do-it-yourself service Technical data
Page 131 of 320

______________________________________________ D_ ri _v _ i_n _,,g ,c.._ S_a_ f_ e_ l..:: y __ _
- If there are passengers in the rear seat , slide the head
restra ints u pward at least to the next notch on the occu
p ied seats .
Adjusting head restraints ~ page 77.
& WARNING
Driving without head restraints or with head restraint s that are
not properly adjusted increases the risk of serious o r fatal neck
injury dramatic ally . To help reduce the ri sk of injury:
• Always drive with the head rest raints in place and prope rly
adju sted.
• Every person in the vehicle must have a prope rly adjusted head
restraint .
• Always make sure each per son in the vehicle properly adjusts
their head restraint. Adjust the head restraints so the upp er edge
is as even a s possible with the top of you r head . If that is not
possible, try to adjust the head re straint so that it is as close to
this position as possible.
• Never attempt to adjust head restraint while driving. If you
have driven off and mu st adjust the driver headrest for any reason,
first stop the vehicle safely before attempting to adjust th e head
restraint.
• Children must alway s be properly restrained in a child re straint
that is appropriate for their age and size~
page 167. •
Examples of improper seating positions
The occupant r estraint system con only reduce th e risk o f
injury if vehicle occupants ore properly seated.
Improper seat ing positio ns can cause se rious injury o r death.
Safety belts can only work w hen t hey are properly posi tione d
on t he body . Improper seating positio ns re duce the effective-
Controls and equip
ment Safety first Vehicle operation
ness of s
afe ty belts an d wi ll even increase the risk of injury
and deat h by moving the safety b elt to c rit ica l areas of t he
bo dy. Imp roper seating pos itions also i ncrease the risk of
serious inju ry and dea th w hen an ai rbag deploys a nd strikes
an occ upant who is not in t he proper seati ng pos ition . A
d river is respons ib le for t he safety o f all vehicle occupants
and especia lly for ch ildren. Therefore:
- Nev er a llow anyone to assume an incorrect seating pos i-
t io n whe n the vehic le is bei ng used=> &.
The follow ing b ulletins list only some samp le posi tions that will
increase the risk of se rious injury and death . O ur hope is that these
examples will ma ke you more aware o f seating positions t hat are
dange ro us.
Therefore , whenever the vehicle is moving:
• never stand up in the vehicle
• never stand on the seat s
• never knee l on t he seats
• never ride with the seatback reclined
• never lie down on the rear se at
• never lean up against the instrument panel
• never sit o n the edge of the seat
• never sit s ideways
• never lean out the w indow
• never p ut yo ur fee t out the window
• never p ut yo ur feet on the instrument panel
• never rest your feet on the seat c ush io n or back of the seat
• never ride in the footwe ll
• never ride in the cargo area
Vehicle care Do-it-yourself service Technical data
Page 134 of 320
-L_!:D~ r!:_! i~v ~in ~ g~S~ a.!_fe ~ LyL __________________________________________ _
& WARNING (conti nu ed )
• Never tran sport object s larger than those fitting completely
into the luggage are a because the rear lid cannot be fully clos ed.
• If you absolutely must dri ve with the rear lid open , observe the
following note s to reduce the risk of po isoning:
- Clo se all windows,
- Close the power roof*,
- Open all air outlets in the instrument panel,
- Switch off the air recirculation ,
- Set the fresh air fan to the h ighest speed.
& WARNING
Always make sure that the doors , all windows, the power roof*
and the read lid are securely closed and lo cked to redu ce the ri sk
of inju ry when the vehicle is not being used.
• After closing the r ear lid, always make sure that it is properly
closed and locked.
• Never leave your vehicle unattended especially with the rear lid
left open. A child could crawl into the vehicle through the luggage
compartment and close the rear lid becoming trapped and unable
to get out. Being trapped in a vehicle can lead to serious personal
injury.
• Never let children play in or around the vehicle.
• Never let passengers ride in the luggage compartment . Vehicl e
occupants must alway s be properly restrained in one of the
vehicle 's seating positions.
00 Tips
• The tire pressu re mus t cor respond to the load - see the tire pres
sure st icker on th e fuel filler doo r. •
The tire pressure must correspo nd to the load . The tire p ressure is
shown on t he tire press ure label. O n USA ve hicl es, t he tire press ure
label is located on the d river's s ide B-pillar. On Canada vehicles, the
tire press ure label is located either on the driver 's side B -pillar or
inside the fuel fille r flap . The t ire pressure labe l lists the recom
mended co ld ti re inflation pressures for t he ve hicle at its maximum
c apacity weight and the tires that were on yo ur vehicle at the ti me it
was manufactured. For recommended tire pressures for normal load
c ondi tions, p le ase see cha pte r=>
page 249. •
Tie-downs
The lugg ag e co mportment is equipped with four tie
downs to secure lugga ge and other items.
Use the t ie-downs to sec ure your ca rgo prope rly=> page 131,
"Loading the luggage compartment" .
In a co lli sion, t he laws of phys ics mean tha t even sma ller i tems th at
are loose in the vehicle will become heavy m issi les t hat can cause
ser ious injury. Items in the vehicle pos sess energy whi ch v ary wi th
vehicle speed and t he weight of the item. Vehicle speed is the most
significant factor .
For exampl e, in a fron tal col lis io n at a speed of 30 mp h (4 8 k m/h),
the forces actin g on a 10 -lb (4.S kg) o bject are about 20 times t he
normal weight o f the item. This means that the weig ht of the item
wou ld suddenly be abo ut 200 lbs. (90 kg) . You can imagine the inju
r ies tha t a 200 lbs. (90 kg) i tem flying freely thro ugh t he p assenge r
compartment could cause in a collision like this.
& WARNING
Weak , damaged or improper straps used to secure items to t ie
downs can fail during hard braking or in a collision and cause
ser ious personal injury.
Page 141 of 320

& WARNING (continued)
• Never let any person ride with their feet on the instrument
panel or sticking out the window or on the seat.
• Never remove a safety belt while the vehicle is moving. Doing
so will increase your risk of being injured or killed.
• Never wear belts twisted.
• Never wear belts over rigid or breakable objects in or on your
clothing, such as eye glasses, pens, keys, etc., as these may cause
injury.
• Never allow safety belts to become damaged by being caught
in door or seat hardware.
• Do not wear the shoulder part of the belt under your arm or
otherwise out of position .
• Several layers of heavy clothing may interfere with correct
positioning of belts and reduce the overall effectiveness of the
system.
• Always keep belt buckles free of anything that may prevent the
buckle from latching securely.
• Never use comfort clips or devices that create slack in the
shoulder belt. However, special clips may be required for the
proper use of some child restraint systems.
• Torn or frayed safety belts can tear, and damaged belt hard
ware can break in an accident. Inspect belts regularly. If webbing, bindings, buckles, or retractors are damaged, have belts replaced
by an authorized Audi dealer or qualified workshop.
• Safety belts that have been worn and loaded in an accident
must be replaced with the correct replacement safety belt by an
authorized Audi dealer. Replacement may be necessary even if
damage cannot be clearly seen. Anchorages that were loaded
must also be inspected.
• Never remove, modify, disassemble, or try to repair the safety
belts yourself.
Safety first Vehicle OP-eration
Safety belts
& WARNING (continued)
• Always keep the belts clean. Dirty belts may not work properly
and can impair the function of the inertia reel=>
page 217,
"Safety belts". •
Safety belts
Fastening safety belts
Seat first -everybody buckle up!
Fig. 131 Belt buckle
and tongue on the
driver's seat
To provide maximum protection , safety belts must always be
positioned correctly on the wearer's body.
- Adjust the front seat and head restraint properly
=>
page 73 , "General recommendations" .
- Make sure the seatback of the rear seat bench is in an
upright position and securely latched in place before using
the belt =>& .
- Hold the belt by the tongue and pull it evenly across the
chest and pelvis=>& . _,.
Vehicle care Do-it-yourselt service iTechnical data