light AUDI A3 2011 Owner´s Manual
[x] Cancel search | Manufacturer: AUDI, Model Year: 2011, Model line: A3, Model: AUDI A3 2011Pages: 320, PDF Size: 75.79 MB
Page 99 of 320

Controls
This overview will help you to familiarize yourself with the
air conditioning controls.
F ig . 1 01 Air co nditi onin g co ntro ls
Th e d isp lay shows the temperature selected a nd the blowe r setting .
You can set the temperatu re for the driver's side us ing the left rota ry
switch @and the tempe rature for the passenger's s ide with the right
switch @.
Functions are turned on and off by touching the buttons . The diode in
t he b uttons illumina tes when the f unction is active .
The grille between the buttons
G / G and !AUTO I must remain
unobstructed ; there are measurement sensors beh ind it.
• Do not seal off the grille.
• Do not clean the gr ille with a vacuum cleaner, otherwise the
senso rs could be damaged .
Contro ls a nd e quip
m en t Vehicle
OP-eration
Warm and cold
But- Function
ton(s )
@ Switching t he cooling system on/off
!AUTO] Automatic operation
G G B lower speed setting
( in the
center)
Manual recirculation mode
Automatic rec irculat ion mode
Defrost
Air directed to the w indows
Air from the outlets
Air directed to the footwe ll
Rear window defogger
Page
=;, page 97
:> page 98
=;,page 100
=;, page99
=> page 99
=>page 98
=> page 100
=> page 100
=> page 100
=> page 102
The buttons for setting the air f low direction~,~ and~ can also be
pushed in combination .•
A pp lies to ve hicl es: wit h auto matic a ir cond it ioner
Switching the air conditioner on /off [AC]
- P ress the [AC] button to switch the air cond itioner on or
off.
When the air condi tioner is switched on, the indicator light in the
bu tton is l it .
Whe n the air conditioner is swi tched off, the cooling system is
switched off -the heating and ventilation system is regu lated auto
matically. Sw itching off the coo ling syst em (compressor) saves fuel. .,
Vehicle care Do-it-yourselt service iTechnical data
Page 100 of 320

Warm and cold
Please keep in mind that with the air conditioner switched off, the
interior temperature cannot be lower than the outside temperature.
There is no cooling and the air is not dehumidified (danger of the
windows becoming fogged).
[I] Tips
If there is a defect in the air conditioner, the air conditioner cannot be
switched on. In this case, the diode in the button does not light after
being switched on. In the event of a system fault, please contact an
Audi or specialist garage. •
Automatic mode [AUTO]
The automatic mode is the standard setting for all
seasons.
Switching on AUTO
- Select temperature between 64 °F (+18 °() and 84 °F
(+28 °().
- Press!AUTO]=>page97,fig.101.
AUTO only works when you set the inside temperature between 64 °F
(18 °C) and 84 °F (28 °C). If you select a temperature below 64 °F
(18 °(), LO will appear in the display. If you select a temperature
above 84 °F (28 °C),
HI will appear in the display.
The system automatically compensates for changes in outside
temperature and for the intensity of the sunlight.
[I] Tips
By keeping the
(AUTO] button on the driver's side pressed for several
seconds, the temperature of the passenger's side can be set to the
temperature of the driver's side or vice versa. The new temperature
setting will be shown in the display. •
Setting the temperature !
Separate temperatures can be selected for the driver's
and front passenger's side.
- Turn the rotary switch @ on the driver's side and the
rotary switch @on the passenger's side left(-) or right(+)
to control the temperature=>
page 97, fig. 101.
There is a time delay before the selected temperature is reached.
[I] Tips
Th e temperature setting for the driver's side can be transferred to the
passenger's side=>
page 98. •
Defrosting/defogging the windshield~
The windshield and side windows are quickly defrosted or
defogged
-Press(@]=> page 97, fig. 101.
- Press!@] again or press [AUTO] to switch off the
defroster.
Th e temperature is automatically controlled. Maximum airflow is
primarily blown in through outlets©, @ and ®=>
page 101.
Outlets @can be opened and closed with the controls behind them.
Outlets @and ® must be opened so the windows can be defrosted
as quickly as possible.
By pressing(@) and air recirculation are switched off.•
Page 108 of 320
ffl..__O_ n_ t_h _e_ r_o _ a_ d _________________________________________________ _
Ignition Lock and ignition switch
Ignition lock
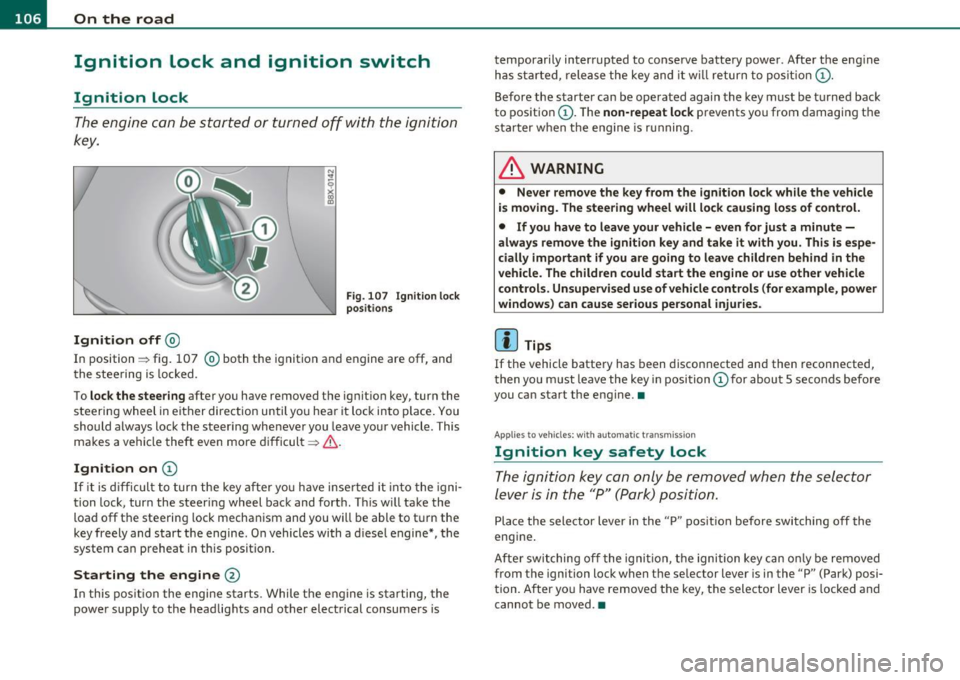
The engine can be started or turned off with the ignition
key.
Ignition off@
Fig. 107 Ignition l ock
p ositions
In position => fig. 107 @ both the ignition and engine are off, and
the stee ring is locked .
To
lock the stee ring after you have removed the ig nit io n key, turn the
steeri ng wheel in either direction until yo u hear it lock into place . You
should always lock the steering whenever you leave your vehicle . This
makes a vehicle theft even more difficult=> & .
Ignition on (D
If it is d ifficul t to turn the key af ter yo u have inse rted it in to the igni
tion lock, tur n the steering wheel back and forth . T hi s w ill take the
load off the steering lock mechanism and you wi ll be able to t urn the
key freely and start the engine . On vehicles with a d iese l engine *, t he
system ca n preheat in this position .
Starting the engine@
In this pos it ion the engi ne s tarts. While the e ngine is s ta rting, the
power supply to the headlights and other electrical consume rs is temporarily interrupted to conserve ba
ttery power . Afte r th e eng ine
h as st arted, relea se the key and it w ill retur n to posit io n (D .
Before the starter can be operated again the key must be t urned back
to positio n (D . T he
non-repeat lock prevents you from damaging the
s ta rt er when t he e ng ine is running .
& WARNING
• Never remove the key from the ignition lock while the vehicle
i s moving . The steering wheel will lock causing loss of control.
• If you have to leave your v ehicle -even for ju st a minute -
always remove the ignition key and take it with you. This is espe·
cially important if you are going to leave children behind in the
vehicle. The children could start the engine or use other vehicle
control s. Unsupervised use of vehicle controls (for example, power
windows ) can cause serious personal injuries .
(I) Tips
If the vehicle battery has been disconnected and then reconnected,
t hen yo u m ust leave the key in posi tion (Dfor abou t
5 seco nds befo re
you can start the eng ine. •
App lies to vehicles: with automat ic transmission
Ignition key safety lock
Th e ignition k ey can only b e removed when the selector
lever is in the "P" (Park) position.
Pla ce the selector lever i n the "P " pos it ion before swit ching off the
eng ine .
Afte r sw itching of f the igni tion , th e ignition key can o nly be re moved
from the ignition lock when t he selector lever is in the "P" (Park) posi
t ion. After yo u have remove d the key, t he selector lever is locked a nd
cannot be moved .•
Page 109 of 320
_________________________________________________ O_ n_ t_ h_ e_ r _o_ a_d _ __.fflll
Starting and stopping the engine
Starting the engine
The engine can only be started with your original Audi
key.
N ... q
i
Vehicles with a gasoline engine:
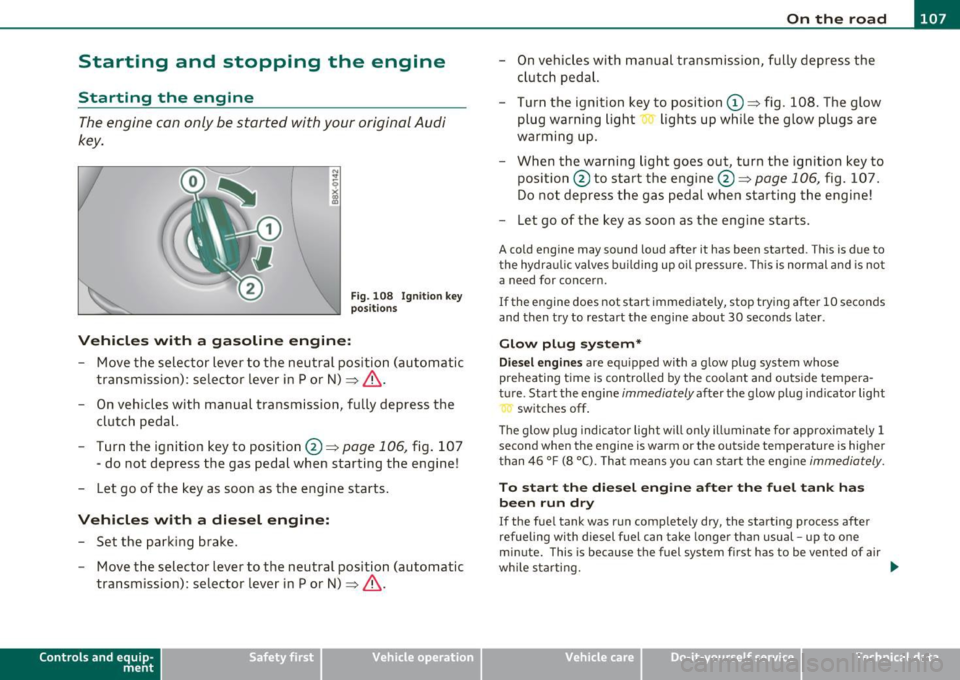
Fig . 10 8 Ignition key
p osit ion s
- Move the selector lever to the neutra l position (automatic
transmission): selector lev er in P or N) =>
& .
- On vehicles with manual transmission, fully depress the
clutch pedal.
- Turn the ignition key to position@ =>
page 106, fig. 10 7
- do not depress the gas pedal when star ting t he engine!
- Let go of the key as soon as the engine starts .
Vehicles with a diesel engine:
- Set the park ing b rake .
- Move the selector lever to the neutral position (automatic
transmission): selector lever in P or N) =>
& .
Con tro ls a nd e quip
m en t Vehicle
OP-eration
- On vehicles with manual transmission , fu lly depress the
cl utch peda l.
- Turn the ignition key to posi tion
(D => fig . 108. The g low
plug warning light lights up whi le the glow plugs are
warming u p.
- When the warning light goes out, turn the ig nition key to
posi tion @to start the engine @ =>
page 106, fig. 107 .
Do not depress t he gas pedal when starting t he engine!
- Let go o f the key as soon as the engi ne starts.
A cold engine may sound loud after it has been started . Th is is due to
t he hydra ulic valves buil ding up oil p ress ure. This is normal and is not
a need for concern.
If the engine does not start immediately, stop try ing after 10 seconds
and then try to restart the engine about 30 seconds later .
Glow plug system*
Diesel engines are equipped with a glow p lug system whose
preheating t ime is con trolled by the coo la nt and outs ide tempera
t u re . Start the engine
immediately af ter the glow p lug ind icator light
sw itches off .
Th e g low pl ug indica tor light w ill only ill uminate fo r approximately 1
second when the engine is warm or the outs ide temperature is higher
than 46 °F (8 °C). Tha t means yo u ca n sta rt the engi ne
immediately.
To start the diesel engine after the fuel tank has
been run dry
If the fue l tank was run complete ly dry, the start ing process after
refueling with diesel fuel can take longe r than usual -up to one
minute. This is because the fuel system first has to be vented of air
wh ile starting. _,.
Vehicle care Do-it-yourselt service Technical data
Page 110 of 320

ffl..__O_ n_ t_ h_e _ ro_ a_d _______________________________________________ _
& WARNING
Never start or let the engine run in a confined or enclosed area.
Exhau st fume s from the engine contain carbon monoxide, a color
less and odorless gas. Carbon monoxid e can be fatal if inhal ed.
• Never leave the engine idling unattended . An unattended
vehicle with a runn ing engine poses a danger of personal injury or
theft .
0 Note
• Avoid high engine speeds, fast acceleratio n or heavy engine loads
w hile the engine is still cold. This cou ld damage the eng ine .
• Th e engine c annot be sta rted by p ush ing or tow ing the veh icle .
~ For the sake of the environment
To avoid unnecessary engine wear and to reduce e xhaust emissions,
do not let your vehicle stand and warm up . Be ready to dr ive off imme
diately after starting your vehicle. Maintain moderate speed unti l the
eng ine is comp letely warm . Remember, the engine performs best at
operat ing temperature. •
Stopping the engine
-Turn the ignition key to position @~poge 106, fi g. 107 .
& WARNING
• Nev er turn off the engine until the vehicle has come to a
c omplete stop.
• The brake booster and servotronic only work when the eng ine
i s running . With the ignition turned off , you have to apply more
force when steering or bra king. Since you cannot st eer and stop
normally , thi s can lead to accident s and serious injuries.
& WARNING (contin u ed )
• The radiator fan can continue to run for up to 10 minute s even
a fter you have turned off the engine and removed the ignition key.
The radi ator fan can also tur n on agai n if the engine coolant heats
up be cause of intense sunlight or heat build-up in the engine
compartment.
0 Note
Do not stop the engine immed iately after hard or extended driving.
Keep t he engine run ning for approximate ly two minutes to prevent
excessive hea t build-up. •
Parking brake
Parking brake
When the parking brake is set, it prevents the vehicle
from rolling a way unintentionally .
Setting the parking brake
Fig. 109 Cente r
c o ns ole : Pa rk ing brak e
s et
- Pull t he park ing b rak e l eve r all the way up .
Page 113 of 320
________________________________________________ ..::O :::.:.,: n:...t~ h :...!.::: e:...!.. ro~ a:_::d!..,_ __
- Drive at the sp eed yo u wish to set.
- Press button © to set that speed .
The disp lay=> page 110, fig . 111 w ill show the set speed. T he d is p lay
may vary depending on the type of display in your veh icle. The ind i
cator light
CRUISE (US mode l) I 0" (Canadian model) w ill also light up
in the instr ument cluster .
& WARNING
• Alway s pay attention to traffi c even wh en the cruise control i s
switch ed on. You are always responsible for your speed and the
distance between your vehicle and other vehicle s.
• For safety reasons , the cruise control should not be used in the
city, in stop-and-go traffi c, on twi sting road s and when road
conditions are poor (such as ice , fog, gravel, heavy rain and hydro
planing ) · risk of accident .
• Turn off the cruise control temporarily when entering turn
lanes, highway exit lane s or in con struction zone s.
• Please note that inadvertently "resting" your foot on the accel ·
erator pedal cau ses the crui se control not to brake . This i s becau se
the cruise control is ove rridden by the driver 's accele rat ion .
[ i ] Tips
• Vehicles with manual transmission : You can atta in the set speed
only if the curren tly engaged gear allows i t and the eng ine is no t
stressed . Shift ing to a higher or lowe r gear promptly w ill allow the
eng ine to run smooth ly .
• The cru ise contro l cannot ma inta in a constant speed when driving
downhil l. The vehi cle will accelerate under its own weigh t. Downshift
to a lower gear or use the brakes to slow down .•
Controls and equip
ment Safety first
Changing speed
- Press lev
er i n t he 0 or O directio n=:::;, page 110, fig. 110
to inc rease or d ecr eas e yo ur sp eed.
- Release the lever to save t hat speed .
Change speed in increments o f 1 mph (1 km/h) by lightly pressing the
lever. If you keep the leve r presse d down, yo u will alte r your s peed in
S mph (10 km/h) increments .
You can also press t he accelerator pedal down to increase your s peed,
e .g . if you want to p ass someone. The speed you save d earlier wi ll
resume as soon as yo u re lease the accelerator pedal.
If, however, you exceed yo ur saved speed by 5 mph (1 0 km/h) fo r
longer than S m inutes, the cruise contro l will turn off temporarily .
Th e symbo l will go out b ut the save d speed will be retaine d.•
Presetting your speed
You can preset your d esir ed sp eed whil e the vehicle is not
moving.
- Turn on the ignition.
- Pull leve r into positio n
CD~ page 110, fig . 110.
- Press the lever in the
0 or O di rec tion to increase or
d ecr eas e y our sp eed.
- Release the lever to save t hat spe ed .
Thi s fu nction makes it possible, for example, to save the speed yo u
w ant befo re drivi ng on the highway . Once on t he highw ay, act ivate
the cruise contro l by pu lling the leve r toward
(D . •
Vehicle care Technical data
Page 115 of 320
On the road -
----------------
[I) Tips
The wa rn in g/i nd ic a tor light I in the inst rument cluste r comes on in
the event of a malfunction. Drive to the closest authorized Audi
dealer as soo n as possi ble and have the malfunction rep air ed. •
Controls and equip
ment Safety first
Vehicle care Technical data
Page 116 of 320
llffl..__T_ r _a_ n_s_ m_ i_ s _s_ i_ o _ n _________________________________________________ _
Transmission
Manual transmission
Applies to ve hicle s: w ith manual tra nsm is s io n
Gearshift lever
The clutch pedal must be depressed all the way before
you can start the engine.
The manual transmission in your Audi is equipped w ith an
interlock-feature.
- Depress the clutch pedal all the way .
- Start the eng ine with the gears hift lever in Neutral and the
clutch peda l depressed .
0 Note
Always depress the clutch pedal fully when changing gears. Do not
hold the veh icle on a hill with the clutch peda l part ia ll y depressed.
T hi s may cause prem ature clutch wear or damage .
[I) Tips
• Resting your hand on the gearshift lever knob while driving will
cause pr emature wea r in the transm ission.
• The back -up lights go on when you sh ift into Reve rse with the igni
tion on. •
Applies to v eh icl es : w ith 6 -s pe ed manual tr ansm iss ion
Gearshift pattern (6-speed manual
transmission)
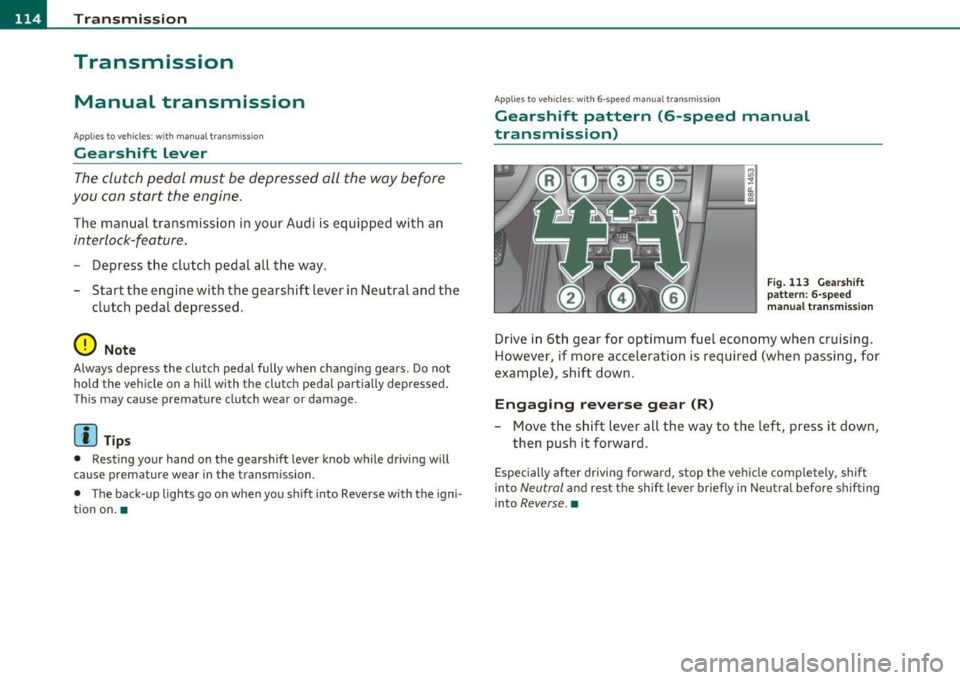
ra ...
-0:. ., m
F ig. 11 3 Gea rshift
p att ern: 6 -s pee d
m anu al tra n smi ssion
Drive in 6 th gear for opt im um fue l econo my when cruising .
However , if more accelera tion is required (when passi ng, for
exa mple), shift dow n.
Engaging reverse gear (R)
- Move the s hift lever alt the way to the left, press it down ,
then push it forward .
Especially after driv ing forward , stop th e veh icle completely , shift
into
Neutral and rest t he shift leve r briefly in Neut ral befo re s hifting
i nto
Reverse .•
Page 117 of 320
Transmission Ill
----------------
S tronic transmission
Applies to veh icles: w ith S tron ic ®
Introduction
Your vehicle is equipped with a S tronic transmission, also called a
double-clutch system/transmiss ion.
Power is transferred between the engine and the transm ission by
means of two independent clu tches. They replace the torq ue
converter of conventional automat ic transmiss ions and allow the
vehicle to a cce le rate witho ut a no ticeable b reak in the powe r flow .
With the a id of tiptroni c, the gears can optionally be shifted
manu
ally ~ page 119 . •
A ppli es to ve hicles : with S tro nic ®
Selector lever positions
All the selector lever positions are explained in this
section.
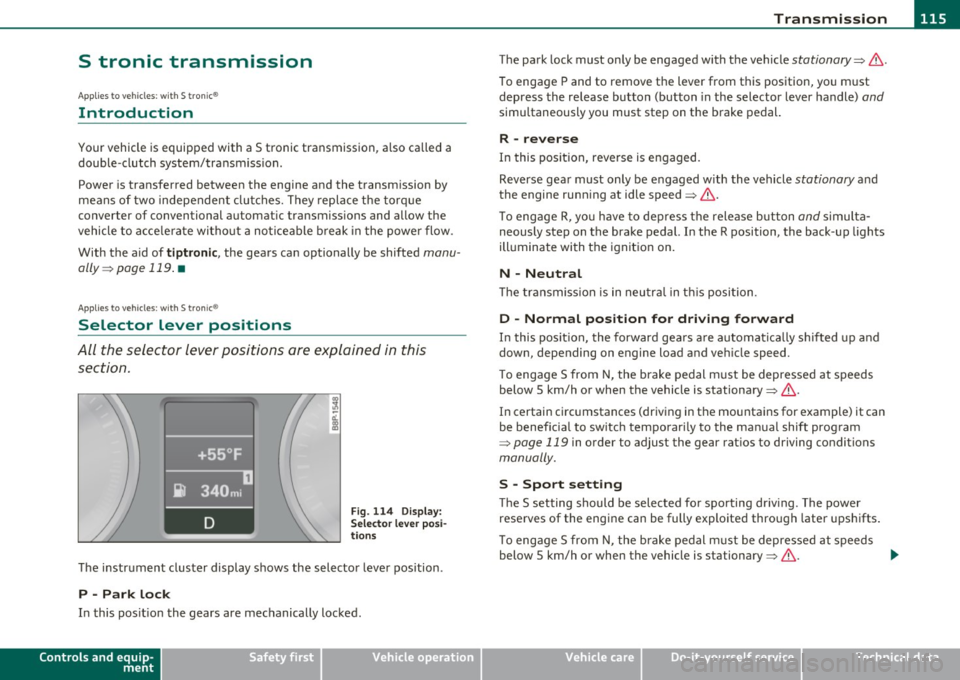
Fig. 114 D ispl ay:
Sel ect or le v er po si
t io ns
T he instr ument cluster display shows the selecto r lever position .
P -Park lock
In this pos it ion the gears are mechanically locked.
Controls and equip
ment Safety first The park
lock must on ly be engaged with the veh icle
stationary~ &.
To engage P and to remove the lever from this position, yo u m ust
depress the release bu tton (button in the selector lever handle)
and
simu ltaneously you must step on the brake pedal.
R -reverse
In this pos it ion, reverse is engaged.
Reverse gear must only be engaged with the vehicle
stationary a nd
the engine runn ing at idle speed~& .
T o engage R, yo u ha ve to dep ress t he release b utton
and s imulta
neously step on the brake pedal. In the R position, the back -up lights
ill uminate with the ign it ion on.
N -Neutral
Th e tra nsmiss ion is in neu tral in t his posi tion.
D -Normal position for driving forward
In this pos it ion, the forward gea rs a re a utoma tic a lly s hif ted up and
down, depending on engine load and ve hicle speed.
T o engage S from N, the brake pedal m ust be depressed at speeds
below 5 km/h or when the vehicle is stationary~&.
In certain circ umstances (driving in the mountains for example) it can
be benefic ia l to sw itc h t emporar ily to the ma nual shift prog ram
~ page 119 in order to adjust the gear rat ios to driving conditions
manually.
S -Spo rt setting
Th e S setting should be selected fo r spo rting dr iv ing. The power
reserves of the engine can be fully exploited through later upshifts .
T o engage S from N, the b rake pedal m ust be depresse d at speeds
below 5 km/h or when the vehicle is stationary~&. .,_
Vehicle care Technical data
Page 119 of 320

____________________________________________________ T _r_a _n_ s_m _ i_s _s_ i_ o _ n _ ___.fflll
The selector lever lock is effective only when the vehicle is stationary
and at speeds below 5 km/h. At highe r speeds, the lock in the N posi
tion is automatically switched off.
The selector lever is not locked when rapid shifts are made through
the N position (e.g . from R to D) . T h is allows you to "rock" the vehicle
if it becomes stuck. If the lever is in the N position for more than
1 second with the brake pedal not depressed, the selector lock
engages automatically.
Release button
The release button in the selector lever handle prevents accidental
shifts into certain selector lever pos itions. When you press the
release button, the selector lever lock is cancelled. In the illustration,
the positions in which the release button has to be pressed are h igh
lighted in color::::>poge
116, fig . 115 .
Ignition k ey remo val l ock
The ignition key can only be remove after the ignition is switched off
if the selector lever is in P. As long as the ignit ion key is removed, the
selector lever is locked in P.
[ i ) Tips
If the selector lever does not engage, there is a malfunction . The
eng ine is disabled to prevent the vehicle from driv ing off unintention
ally. To allow the selector lever to engage again, proceed as follows:
Press and release the brake pedal.•
Contro ls a nd e quip
m en t Vehicle
OP-eration
Applies to vehicles : w ith S tronic®
Driving Notes
The forward gears are shifted up or down automatically .
Starting from stop
-Step on and hold the brake pedal.
Fig. 116 Section from
ce nter conso le:
Selector lever with
r elease button
- Hold the release button (button in selector lever) down,
move the selector lever to the desired position, for
example D =:;,
page 115, and relea.se the button.
- Release the brake pedal and accelerate=:;,& .
Stopping temporarily
-Bring the vehicle to a full stop with the brake, e.g . at
traffic signals.
- Do not accelerate .
Parking
-Step on and hold the brake pedal=:;,&.
- Apply the parking brake firmly.
- Hold the release button down, move the selector lever to
P and release the button. .,.
Vehicle care Do-it-yourselt service iTechnical data