check engine AUDI A3 2012 Owner´s Manual
[x] Cancel search | Manufacturer: AUDI, Model Year: 2012, Model line: A3, Model: AUDI A3 2012Pages: 280, PDF Size: 70.11 MB
Page 24 of 280
22 Instruments and warning /indicator lights
When this symbo l ml illuminates, it means
that Adaptive Light is defective. Go to a quali
fied workshop to have the headlights or the
control unit for the Adaptive L ight repaired.
@, o Light/rain sensor defective
App lies to vehicles: with automat ic headlights
The indicator light indicates a defect in the
automatic headlights/automatic wiper sys
tem .
If the symbo l illuminates, the light sensor has
failed. For safety reasons , the low beams are
turned on permanently with the switch in
AU
TO . However, you can continue to turn the
lights on and off using the light switch . In the
case of a defect in the rain sensor , the w ind
sh ield wiper lever functions are st ill available .
H ave the light/ra in sensor checked as soon as
possible at an authorized Audi dealer.
; Audi magnetic ride
Appl ies to vehicles: with Audi magnetic ride
The indicator light monitors vehicle damping.
The indicator light E illuminates when the ig
nition is switched on as a function check.
@ Tips
If the indicator lamp illuminates while you
are driving, there is a malfunct ion in the
veh icle damping. The chass is should be in
spected immediately by an authorized Au
di dealer.
~ Diesel particulate filter clogged
Applies to vehicles: with diesel engine and diesel particu
late fi lter
1/1 Particulate filter ! See owner's manual
If the indicator light II in the instrument
cluster comes on, the diesel particulate filter has become blocked with soot as the result of
constant short-distance driving. When the
II symbol illuminates, you can alter your
driving style to assist the filter self-clean ing
p rocess. Drive for approximately 15 minutes
in 4th or 5th gear (automatic transmission with the se
lector lever in the S position) at a
minimum speed of 37 mph (60 km/h) and an
engine speed of approx imately 2,000 RPM .
The temperature increase that will result from
this can burn off the soot in the filter. The
symbol will switch off when the cleaning is
successful. After a successful cleaning, there
is no need to bring the car to an authorized
dealer or qualified workshop because this is
part of normal vehicle operation .
If the symbol
DI does not switch off, see
your autho rized dea ler or other qualified
workshop to have the problem corrected .
As long as the indicator light
11!1 remains on
(diesel part iculate filte r plugged), you ca n ex
pect increased fuel consumption and possibly
also a loss of engine performance.
For more information on the diesel particu
late filter, refer to~
page 171 .
A WARNING ,__
Always adapt your speed to the current
weather, road and traffic conditions. You
should never disobey traffic laws in order
to follow driving recommendations .
¢ ¢Turn signals
-
The indicator light blinks when you use either
turn signal.
Whenever you use the left B or the right fl
turn s ignal, the indicato r light blinks . When
you use the emergency f lasher, both indicator
lights flash.
If one of the turn signal light bulbs burn out,
the turn signal will blink twice as fast as nor
mal.
Additional information on the turn s ignals
Q page SO.
CRUISE/ vf Cruise control
T he
(ijjll j~i~ (USA models)/. (Canada models)
warning/indicator light illuminates when the
cruise control is activated .
Page 25 of 280
Driver information
display
Introduction
Introduction
The Driver information display inside the in
strument cluster provides you, the driver,
with important information.
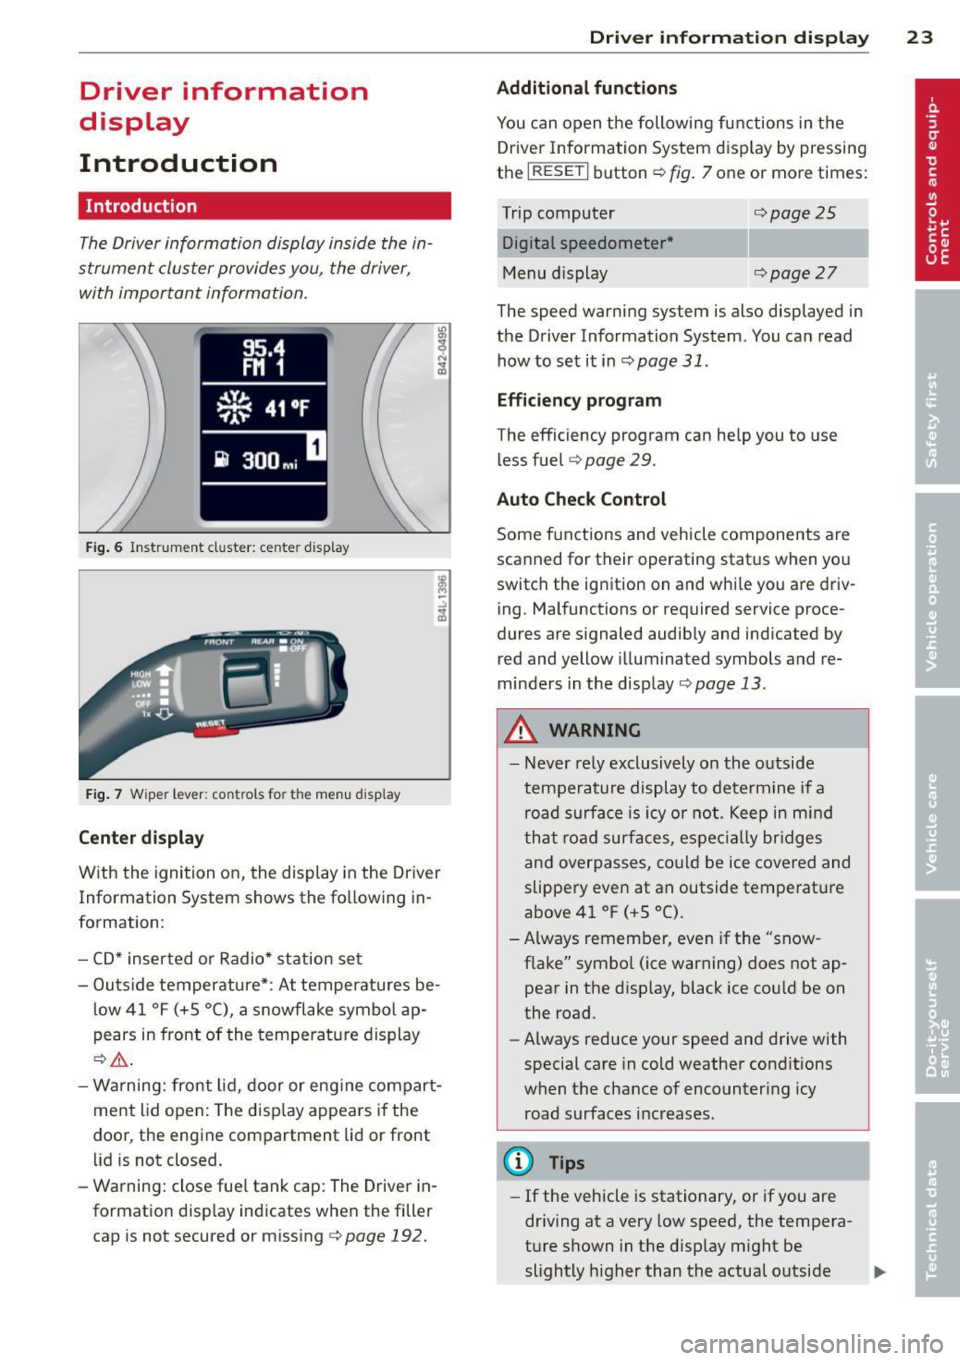
Fig. 6 Instr ument cluster: ce nte r dis play
Fig. 7 Wiper lever: controls fo r the menu d ispl ay
Center display
With the ignition on, the display in the Dr iver
Information System shows the fo llowing in
formation:
- CD* inserted or Radio* station set
- Outs ide temperature*: At temperatures be-
low 41 °F (+5 °C), a snowflake symbol ap
pears in front of the temperature display
¢_&. .
-Warning: front lid, door or eng ine compart
ment lid open: The disp lay appears if the
door, the engine compartment lid or front
lid is not closed.
- Warning: close fue l tank cap: The Driver in
formation disp lay indicates when the filler
cap is not secured or missing c>
page 192.
Driver information display 23
Additional functions
You can open the following functions in the
Driver Information System display by pressing
the
I RESETI button ¢ fig. 7 one or more times:
Trip computer Digital speedometer *
Menu display
¢page25
¢page27
The speed warning system is also displayed in
the Driver Information System. You can read
how to set it inc>
page 31.
Efficiency program
The efficiency program can help you to use
les s fuel
c> page 29.
Auto Check Control
Some f unctions and veh icle components are
scanned for their operating status when you
switch the ignition on and while you are driv
ing. Malfunctions or required service proce
dures are s ignaled audibly and indicated by
red and yellow illuminated symbols and re
minders in the display
¢page 13.
A WARNING
- Never rely exclusively on the outside
temperature display to determine if a
road surface is icy or not . Keep in mind
that road surfaces, especially bridges
and overpasses, could be ice covered and
slippery even at an outside temperature
above 41 °F (+S °C).
- Always remember, even if the "snow
f lake" symbo l (ice warning) does not ap
pear in the display, black ice could be on
the road.
- Always reduce your speed and drive with
special care in cold weather conditions
when the chance of encountering icy
road surfaces increases.
(D Tips
-If the vehicle is stationary, or if you are
driving at a very low speed, the tempera
ture shown in the display might be
slightly h igher than the actual outside .,,.
Page 26 of 280
24 Driver information d isplay
temperature. This is caused by the heat
being radiated from the engine .
- On vehicles with S tronic, the reminders
do not appear in the display until you se
l ect a gear .
- On vehicles with Audi Navigation sys
tem*, the displays may differ from their
norma l appearance during navigation.
Gearshift recommendation
App lies to vehicles: with gearshift ind icator and manual
transmiss ion
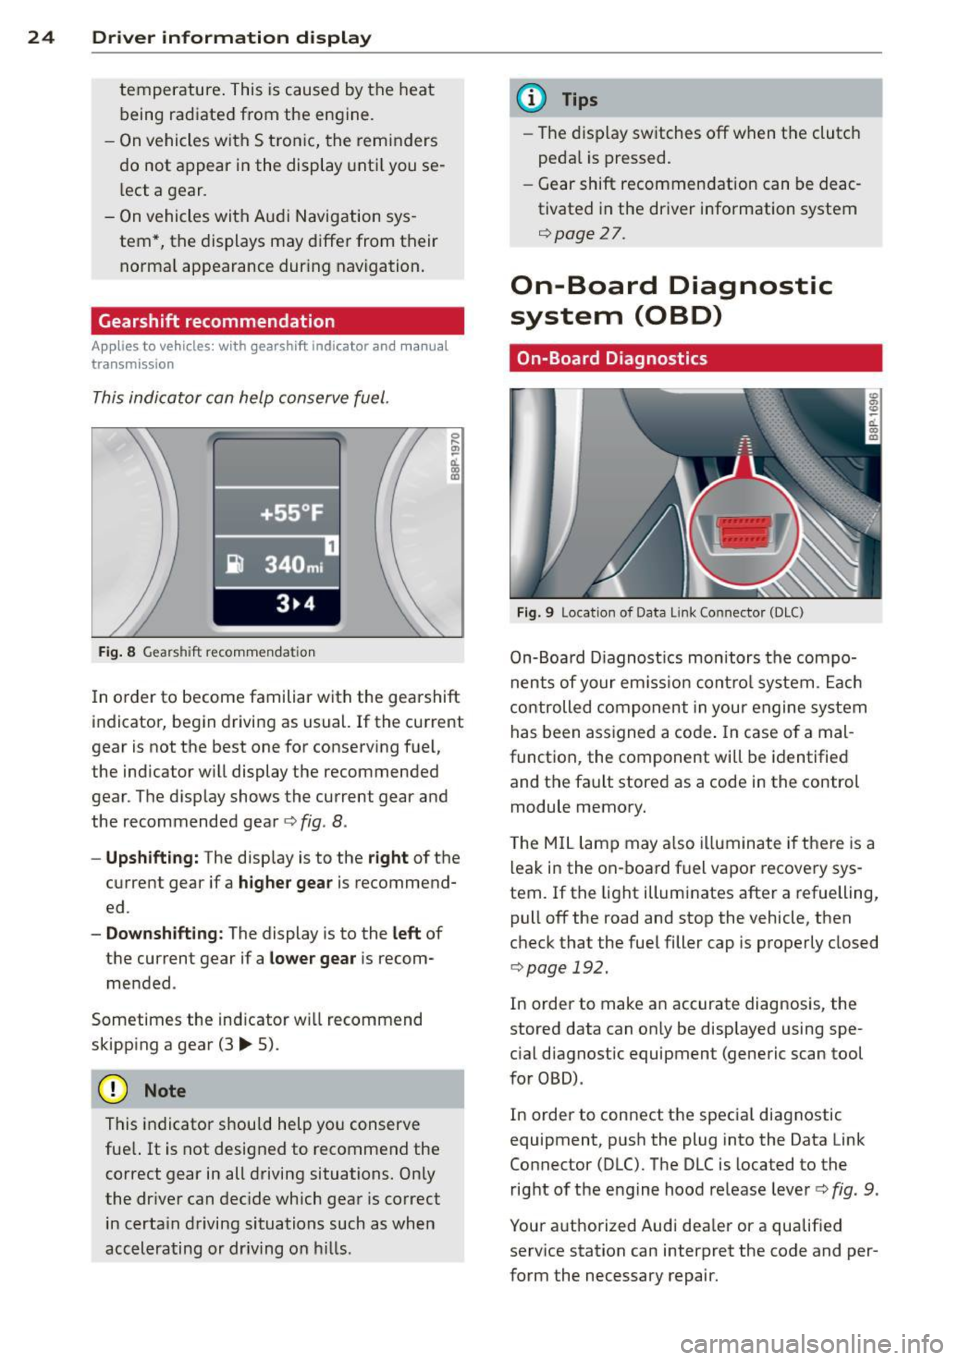
This indicator can help conserve fuel.
Fig. 8 Gears hi ft recommenda tion
In order to become familiar with the gearshift
indicator, begin driving as usual.
If the current
gear is not the best one for conserving fuel,
the indicator will display the recommended
gear . The display shows the current gear and
the recommended gear
c:> fig . 8 .
- Upshift ing: The display is to the right of the
current gear if a
higher gear is recommend
ed .
-Downshift ing: The display is to the left of
the current gear if a
lower gear is recom
mended .
Sometimes the ind icator w ill recommend
skipping a gear (3..,. 5).
(D Note
This indicator should help you conserve
fue l. It is not designed to recommend the
correct gear in all driving situations. Only
the dr iver can dec ide which gear is correct
in certa in driving situations such as when
accelerating or dr iving on h ills.
(D Tips
- The display switches off when the clutch
peda l is pressed.
- Gear shift recommendation can be deac
tivated in the driver information system
c:>page 27.
On-Board Diagnostic
system (OBD)
On-Board Diagnostics
Fig. 9 Locat ion of Data Link Connector (DLC)
On-Boa rd Diagnostics monitors the compo
nents of your em iss ion control system. Each
controlled component in your engine system
has been assigned a code . In case of a mal
function, the component wi ll be identified
and the fault stored as a code in the control
module memory.
The MIL lamp may a lso illuminate if there is a
leak in the on-board fuel vapor recovery sys
tem. If the light illuminates after a refuelling,
pull off the road and stop the vehicle, then
check that the fuel filler cap is properly closed
c:> page 192.
In order to make an accurate diagnosis, the
stored data can only be displayed using spe
cial diagnostic equipment (generic scan tool
for 080) .
In order to connect the special diagnostic
equipment, push the plug into the Data Link
Connector (DLC). The DLC is located to the
right of the engine hood release lever
c:> fig. 9.
Your authorized Audi dealer or a qualified service station can interpret the code and per
form the necessary repair.
Page 29 of 280
-All stored va lues wi ll be lost if the veh i
cle battery is disconnected.
Menu display
Introduction
F ig . 12 Wiper lever: Controls for the men u display
Fig . 13 Display: Sta rt me nu
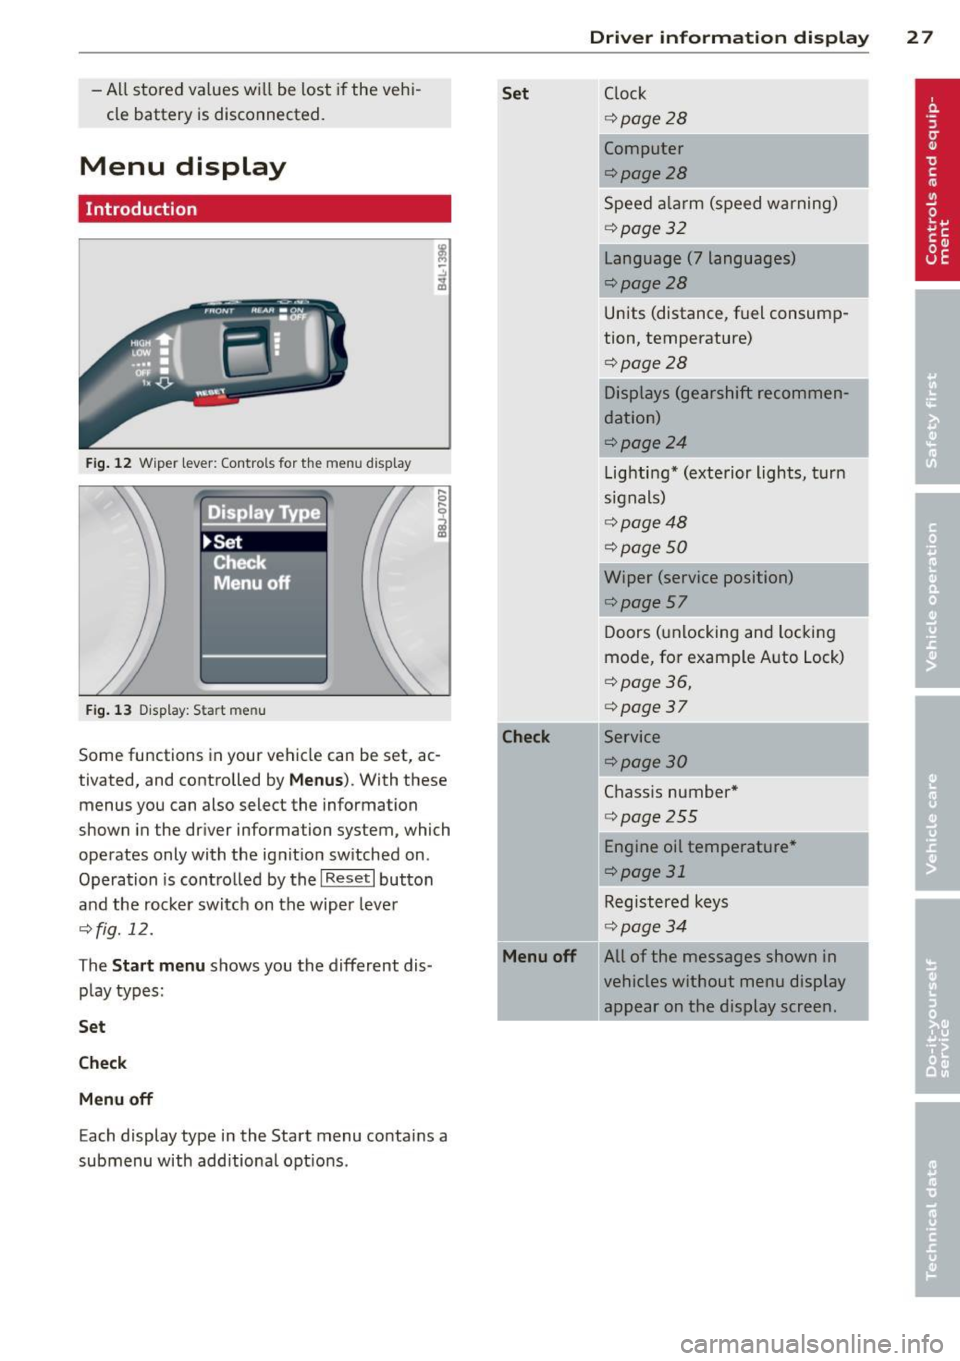
Some functions in your vehicle can be set, ac
tivated, and controlled by
Men us). With these
menus you can also select the information
shown in the driver information system, which
operates only with the ignition switched on .
Operation is contro lled by the
I Reset I button
and the rocker switch on the wiper lever
¢fig. 12.
The
S tart m enu shows you the different dis
play types:
Se t
Ch eck
M enu off
Each display type in the Start menu contains a
submenu with additiona l opt ions .
Set
-Check
Menu off
Dri ver inform ation di spl ay 2 7
Clock
¢ page28
Computer
¢page28
Speed a larm (speed warning)
¢ page32
Language (7 languages)
¢page28
Units (distance, fuel consump
tion, temperature)
¢page28
Displays (gearshift recommen
dation)
¢page24
Lighting* (exterior lights, turn
signals)
¢ page48
¢page 50
Wiper (service position)
¢page57 Doors (unlocking and locking
mode, for example Auto Lock)
¢ page 36,
¢ page37
Service
¢page30
Chass is number*
¢ page255
-Engine oil temperatu re*
¢page 31
-Registered keys
¢ page34
All of the messages shown in
vehicles without menu display
appear on the display screen.
.
I
Page 36 of 280
34 Openin g and clo sing
Opening and closing
Keys
Key set
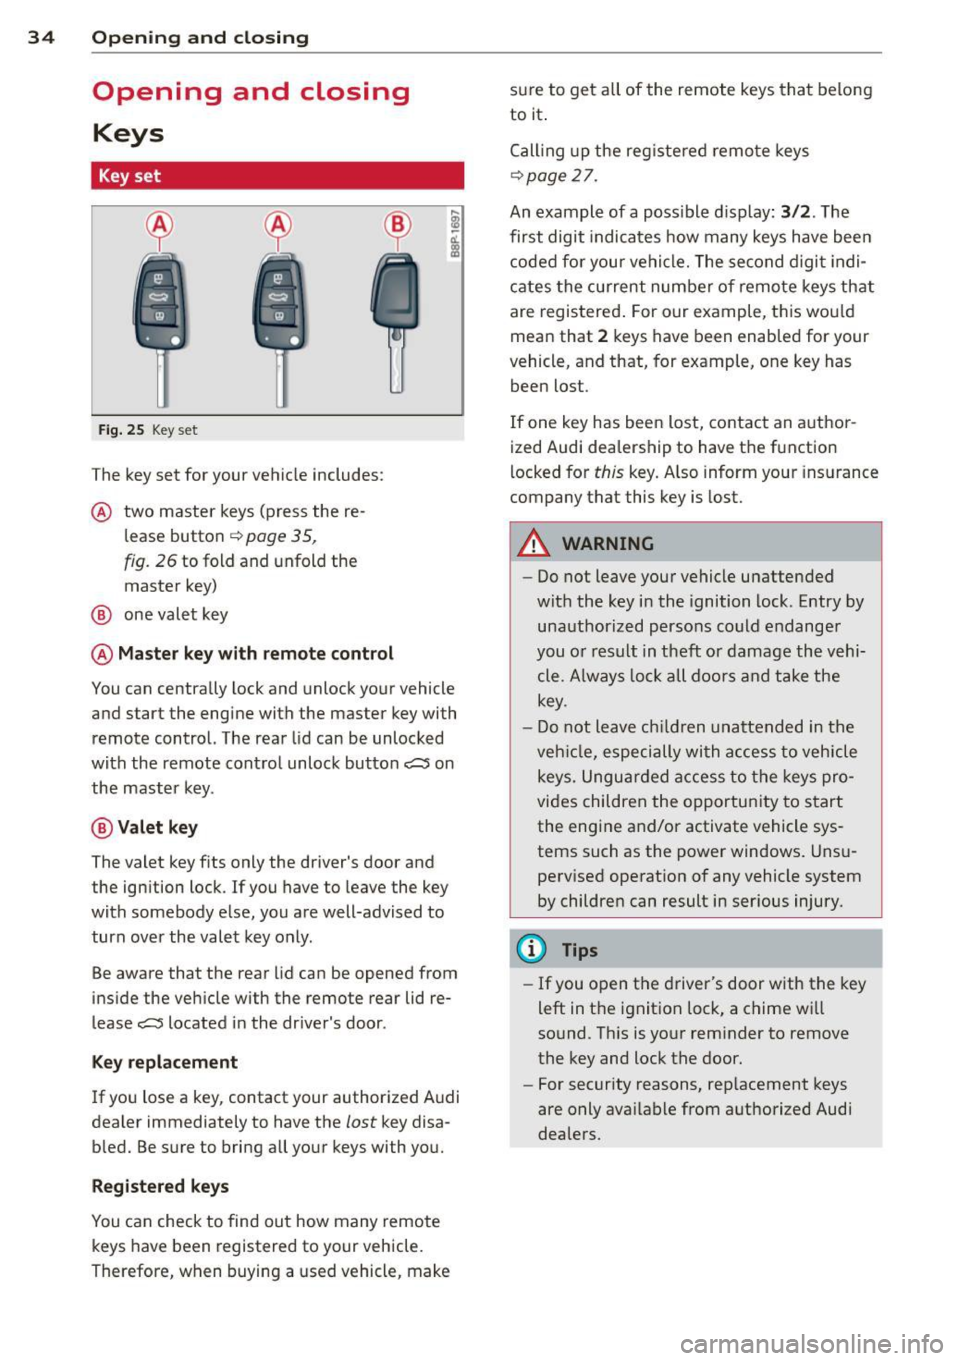
Fig . 25 Key set
The key set for your vehicle includes:
@ two master keys (press the re
l ease button
~ page 35,
fig. 26 to fold and unfold the
master key)
@ one valet key
@ M as ter ke y wit h remo te control
You can centrally lock and unlock your vehicle
and start the engine with the master key with
remote control. The rear lid can be unlocked
with the remote control unlock button
c:::::5 on
the master key.
@Valet ke y
The valet key fits only the driver's door and
the ignition lock. If you have to leave the key
with somebody else, you are well-advised to turn over the valet key only .
Be aware that the rear lid can be opened from
inside the vehicle with the remote rear lid re
lease
c:::::5 located in the dr iver's door .
Key replac em ent
If you lose a key , contact your authorized A udi
dealer immediately to have the
lost key disa
b led. Be sure to bring all your keys with you.
Re gister ed keys
You can check to find out how many remote
keys have been registered to your vehicle.
Therefore, when buying a used vehicle, make sure to get all of the remote keys that belong
to it .
Calling up the reg istered remote keys
~page 27.
An example of a poss ible d isplay: 3/2 . The
first digit indicates how many keys have been
coded for your vehicle. The second digi t indi
cates the current number of remote keys that
are registered . For our example, this wou ld
mean that
2 keys have been enabled for your
vehicle, and that, for example, one key has been lost .
If one key has been lost, contact an a uthor
ized Audi dealership to have the function
locked for
this key. A lso inform your insurance
company that this key is lost.
A WARNING
-
-Do not leave your vehicle unattended
wit h the key in the ignition lock . Entry by
unauthorized persons could endanger
you or result in theft or damage the vehi cle. A lways loc k all doors and take the
key .
- Do not leave ch ildren unattended in the
veh icle, especially with access to vehicle
keys. Unguarded access to the keys pro
vides children the opportunity to start
the engine and/or activate vehicle sys
tems such as the power windows. Unsuperv ised operation of any vehicle system
by children can result in serious injury.
(D Tips
- If you open the driver's door with the key
left in the ignition lock, a chime wi ll
sound. Th is is your rem inder to remove
the key and lock the door.
- For security reasons, rep lacement keys
are only ava ilable from authorized Audi
dealers.
Page 45 of 280
How is the anti-theft alarm switched off
when triggered?
The alarm system is switched off when you
un lock the vehicle using the remote-control
key or when the ignition is switched on. The
alarm will also switch itself off when it comes
to the end of its cycle .
Emergency flasher
The emergency flasher will blink briefly when
the doors, engine hood and rear lid are prop
erly closed .
If the emergency flashers do not blink, check
the doors, engine hood and rear lid to make
sure they are properly closed. If you close a
door, the hood or the rear lid with the anti
theft alarm switched on, the emergency flash
ers will blink only after you have closed the
door or lid .
(D Tips
For the anti-theft alarm system to func
tion properly, make sure all vehicle doors
and windows are closed before leaving the
veh icle.
Power windows
Controls
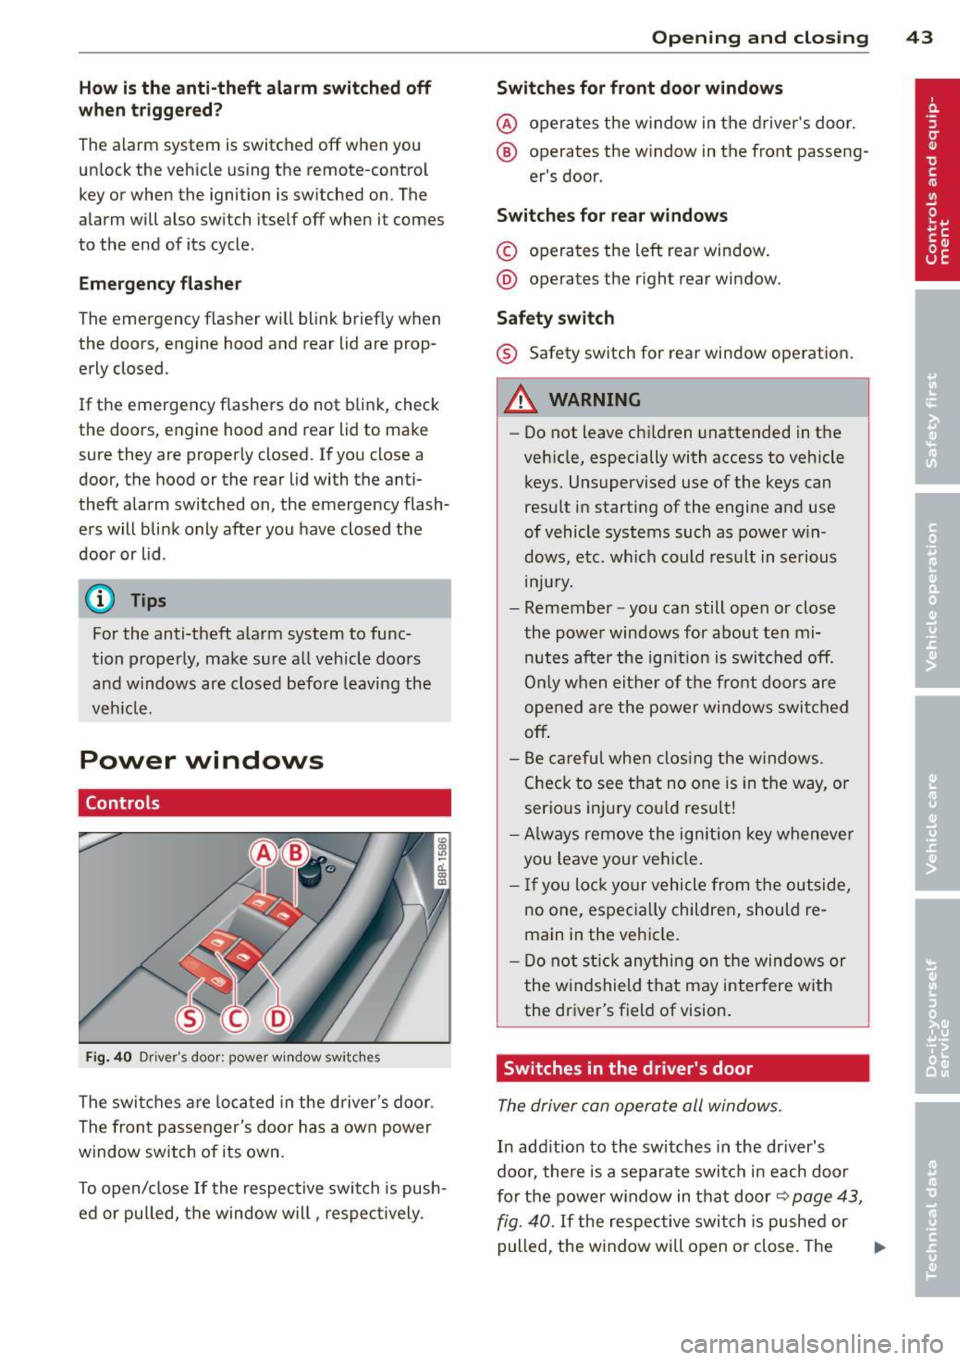
Fig. 40 Dr iver 's door: powe r w ind ow sw itches
The switches are located in the driver's door.
The front passenger's door has a own power
window switch of its own.
To open/close If the respective switch is push
ed or pulled, the window will, respectively.
Opening and closing 43
Switches for front door windows
@ operates the window in the driver's door.
® operates the window in the front passeng -
er 's door.
Switches for rear windows
© operates the left rear window.
@ operates the right rear window.
Safety switch
® Safety switch for rear window operation .
A WARNING
-Do not leave chi ldren unattended in the
veh icle, especially with access to vehicle
keys. Unsupervised use of the keys can
result in starting of the engine and use
of vehicle systems such as power win
dows, etc. wh ich could result in serious
mJury.
- Remember -you can still open or close
the power windows for about ten mi nutes after the ign ition is switched off.
On ly when either of the front doors are
opened are the power windows switched
off .
- Be careful when clos ing the windows .
Check to see that no one is in the way, or
serious injury could result!
-Always remove the ignition key whenever
you leave your vehicle .
- If you lock your vehicle from the outside,
no one, especially children, should re
main in the vehicle.
- Do not stick anything on the windows or
the windshield that may interfere with
the driver's field of vision.
Switches in the driver's door
The driver can operate all windows .
In addition to the switches in the driver's
door, there is a separate switch in each door
for the power window in that door~
page 43,
fig. 40.
If the respective switch is pushed or
pulled, the window will open or close. The
Ill>
Page 58 of 280
56 Clear vis ion
as rain or drizz le re duces visibi lity
through th e windshield.
- The windshie ld must not be treated with
water-repe llent materials. They can in
crease glare under poor visibility condi
t ions such as wetness, darkness, or when
the sun is low on the horizon . In addi
t ion, they can cause th e windshield wip
ers to chatter.
(D Note
- In the case of frost, check whether the
windsh ield wiper b lades are frozen to
the windshield. Switching on the wind
shield wipers can damage the wiper
blades!
- Do not use the wipers to clear a frosted
window . U si ng the w ipers as a conven
i en t ice s craper will destroy the wiper
blades .
- Prior to using a car wash, the windshield
wiper system m ust be switched off (lever
i n position 0) . This helps to prevent unin
tentiona l switching on and damage to
the windshie ld wiper system.
(D Tips
- The w indshield wipers are swi tched off
when the ignition is turned off. Activate
the windshie ld wipers after the ignition
i s sw itched back on by mov ing the w ind
shield wiper lever to any pos it ion.
- Worn or dirty windshie ld wiper blades
cause smearing, which can affect the op
eration of the light/rain sensor*. Check
the condition of your windshie ld w iper
blades regularly.
- The rai n sensor is part of the interval
wiping system. Tur ning off the ignition
will a lso deact ivate the rain sensor. To re
activate t he senso r, switch off the inter
val w iping function, then sw itch it ba ck
on aga in.
- Applies to vehicles with lig ht/ rain sen
sor: When the wipers are swi tched on
manu ally and in rain condi tions, the au
tomatic head lights* turn on¢
page 47,
·'t!.-Switching the headlights on and off
or off during the day when the wipers are
no longer operating. The automatic
head lights* funct ion is available in th is
case on ly when the light switch is in the
"A UTO" position¢
page 47, fig. 43.
-Make s ure the washer fluid reservoir in
the engine compartment is topped off
before going on a long trip. Look up
¢
page 211 for check ing and filling the
washer co nta iner .
- The wipers only operate with the hood
completely closed .
is;J Rear window wiper
The wiper lever is also used to operate the
rear window wiper and the automatic wiper/ washer function .
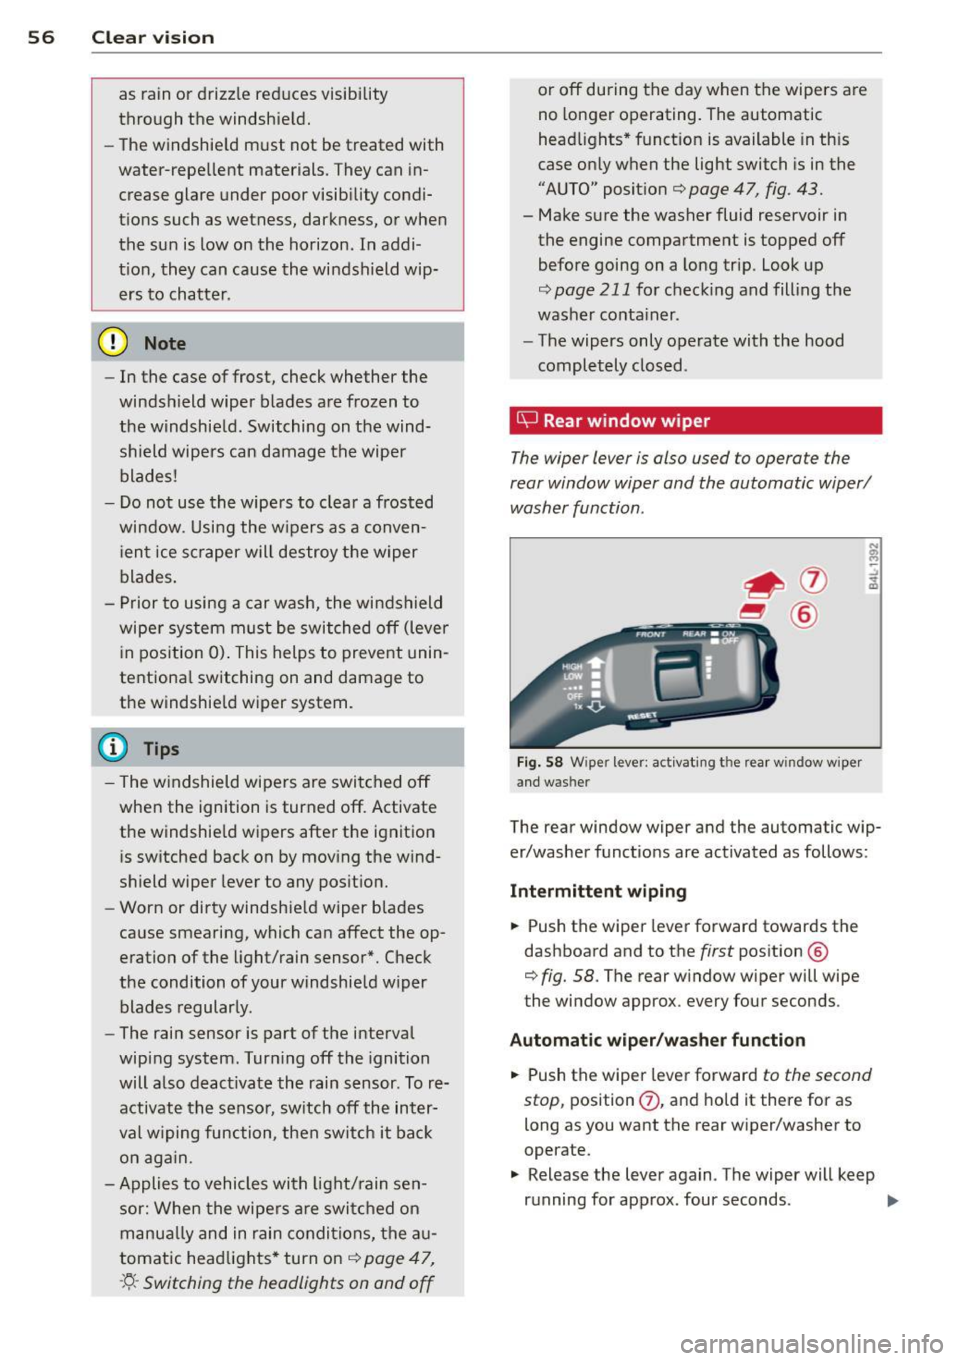
Fig. 5 8 W iper lever: activat ing the rear w indow w iper
and washer
The rear window wiper and the automatic wip
er/washer functions are activated as follows :
Intermittent wiping
.,. Push the wiper leve r forward towards the
dashboard and to the
first position @
¢
fig. 58. The rear w indow wiper will wipe
the window approx. every four seconds .
Automatic wiper /washer function
.,. Push the wiper lever forward to the second
stop,
position (j) , and hold it there for as
long as you want the rear w iper/washer to
operate.
.,. Release the lever again. The wiper will keep
running for approx. four seconds . .,,_
Page 88 of 280
86 Warm and cold
(D Note
To prevent possible damage to the heating
elements, do not kneel on the seats or ap
ply a heavy load to relatively small areas of
the seat.
Engine preheater
Applies to vehicles: with engine p reheate r
Use of the engine pre heater is recommended
when the ambient temperature is below
-5 °F
(-20 °C) .
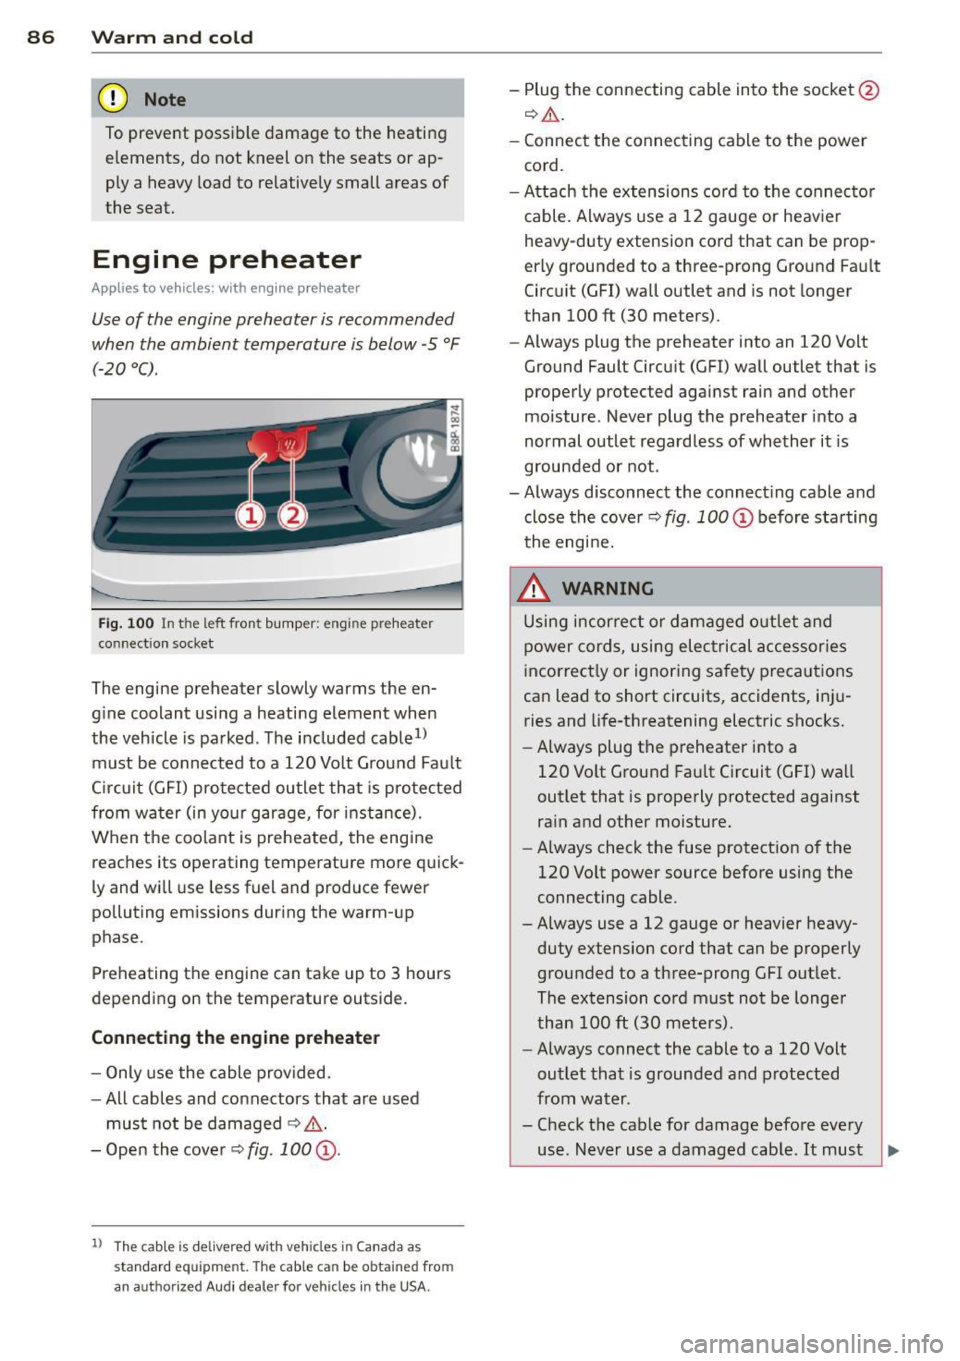
Fig. 100 In t he l eft fron t bump er: en gine preheater
co nn ect ion socket
The engine preheater slowly w arms the en
gine coolant using a heating element when
the vehicle is parked. The included cable
1>
must be connected to a 120 Volt Ground Fault
Circuit (GFI) protected outlet that is protected
from water (in your garage, for instance).
When the coolant is preheated, the engine
reaches its operating temperature more quick
ly and will use less fuel and produce fewer
polluting emissions during the warm-up
phase.
Preheating the engine can take up to 3 hours
depending on the temperature outside.
Connecting the engine preheater
- Only use the cable provided.
-All cables and connectors that are used
must not be damaged
¢ .&.
-Open the cover Q fig. 100 @.
l) Th e cabl e is de live red w it h veh icles i n Canada a s
s tandard e quipmen t. The cable c an be o btain ed fro m
an a uth orize d Au di d ea le r fo r veh icl es in the USA.
- Plug the connecting cable into the socket @
Q.ii_.
-Connect the connecting cable to the power
cord.
- Attach the extensions cord to the connector
cable. Always use a 12 gauge or heavier
heavy -duty extension cord that can be prop
erly grounded to a three-prong Ground Fault
Circuit (GFI) wall outlet and is not longer
than 100
ft (30 meters).
- Always plug the preheate r into an 120 Volt
Ground Fault Circuit (GFI) wall outlet that is
properly protected against rain and other
moisture. Never plug the preheater into a
normal outlet regardless of whether it is
grounded or not .
- Always disconnect the connecting cable and
close the cover
Q fig . 100 @ before starting
the engine.
_&. WARNING
-
Using incorrect or damaged outlet and
power cords, using electrical accessories
incorrectly or ignoring safety precautions
can lead to short circuits, accidents, inju ries and life-threatening electric shocks.
- Always plug the preheater into a
120 Volt Ground Fault Circuit (GFI) wall
outlet that is properly protected against
rain and other moisture.
- Always check the fuse protection of the
120 Volt power source before using the
connecting cable .
- Always use a 12 gauge or heavier heavy
duty extension cord that can be properly
grounded to a three-prong GFI outlet .
The extension cord must not be longer
than 100
ft (30 meters).
- Always connect the cable to a 120 Volt
outlet that is grounded and protected
from water .
- Check the cable for damage before every
use . Never use a damaged cable.
It must ~
Page 165 of 280

As soon as the test is completed, the system
is in normal operating mode.
Switching off
E SP should normally be activated at all times
because this ensures optimum vehicle stabil i
ty. In certa in situations, it might make sense
to a llow some slip . For example:
- Rocking the vehicle to free it when it is stuck
- Driving in deep snow or on loose ground
- Driving with snow cha ins
Press the
[!I button . The ESP indicator light I)
turns on and S tabil isat ion prog ram off ap
pears in the d isp lay. ASR deact ivates com
pletely and the stab ilizat ion effects from the
ESP system are lim ited.
S wi tc hing on
Press the [!I button again. The message S tab i·
li sa tion p rogram on
appears briefly in the dis
play.
A WARNING
You should only sw itch the ESP off if your
driving ability and the traffic s ituation per
m it. Please note that when ESP/ASR is de
act ivated, the drive whee ls can sp in on icy
and slippe ry roads and the vehi cle can
break away - danger of skidding!
(j) Tips
If A udi magnetic ride* is malfunctioning,
the ESP may not switch off or it may
sw itch off automatically.
Braking
General information
What affects braking efficiency?
Operating condit ions and d riving habit s
The brakes on today's automobi les are st ill
subject to wear, depending largely on operat
ing cond itions and dr iving habits
q .&. . On ve
hicles that are either driven mostly in stop
and -go city traffic or are driven hard, the
brake pads should be checked by your author-
Int ellig ent technolog y 163
ized Audi dea ler more often than specified in
the
W arra nty & M aintenance booklet. Failure
to have your brake pads inspected can result
in reduced brake performance.
On steep slopes, you sho uld use the b raking
effect of the engine. This way, you prevent un
necessary wear on the brake system. If you
must use your brakes, do not hold the brakes
down cont inuously. Pump the brakes at inter
vals.
Noises may occur when braking depending on
speed, braking force and outs ide cond it ions
such as temperature and humidity.
Mo isture o r road sal t
If you are driving faster than SO mph (80 km/
h) and the windshield wipers are on, the brake
pads will briefly touch the brake discs in regu
lar intervals so as to improve react ion time
when brak ing on wet surfaces. You, the driver,
will not not ice anything.
Under certain conditions, for example, when
driv ing through water or very heavy ra in, or
even after washing your veh icle, the braking
effect can be reduced due to moisture (or in
freez ing cond itions ice) on the brake pads. A
few cautious brake applications should dry off
the b ra ke pads or remove any ice coatings.
The effectiveness of the brakes ca n be reduced
when the vehicle is driven on a salt-cove red
road and the brakes are not used. l ikewise,
you clean off accumulated salt coating from brake d iscs and pads w ith a few cautio us ap
plications o f the b ra ke
¢ .&, .
Corrosion
T here may be a tendency for di rt to b uild up
o n the brake pads and corros ion to fo rm on
the d iscs if the car is not d riven regu larly or
o nly for short tr ips w ith litt le use of the
brakes.
If the brakes a re not used frequently, o r if cor
ros ion has formed on the discs, it is adv isable
to clean off t he pads and d iscs by braking
firmly a few times from a moderately high
speed ~.&. . .,.
•
•
Page 166 of 280
164 Intelligent technolog y
Faults in the bra ke sys tem
If you should notice a sudden increase in
b rake peda l travel, then one of the two brake
circuits may have failed¢.& .
Low brake flu id le vel
Malfunct ions can occur in the brake system if
the brake fluid level is too low . T he brake fluid
l eve l is moni to red electronica lly .
Bra ke lining w ear st atu s
Brake l ining wear may be checked by visual in
spection of the condition of the brake pads
through the openings in the whee l. If neces
sa ry, the wheel may be removed for this in
spection
¢page 236, Wheel change.
A WARNING
-You should perform braking maneuvers
for the purpose of cleaning the brake
system on ly if road conditions permit.
Other road users must not be put at risk -
you may cause an acc ident!
- Before descending a steep grade, reduce
speed and shift transmiss ion into a lower
gear or lower driving range . Do not ride
the brakes or hold the pedal down too long or too often. This cou ld cause the
brakes to get hot and dimin ish braking
efficiency.
- Do not "r ide the brakes" by resting your
foot on the pedal when yo u do not intend
to bra ke . This may cause the brakes to
overheat, premature wear and increased
stopping distance .
- Under certain climat ic and operating
condit ions such as passing through wa
ter, driving in heavy rain or after washing
the vehicle, the effectiveness of the brakes can be reduced. In winter, ice can
accumulate on the brake pads, linings,
discs and drums . Carefully apply brakes
for a test . Brakes will dry and ice coat
ings will be cleaned off after a few care
ful brake applications.
- Driv ing for an extended period of time on
salt-covered roads w ithout us ing your
brakes can also affect braking efficiency . Clean off accumulated salt coating from
brake discs and pads with a few careful
brake applications.
- If you damage the front spoiler, or if you
install a different spoiler, be sure the a ir
flow to the front brakes is not obstruct ed. Otherwise the brake system could
overheat reducing the effectiveness of
the entire brake system.
- Failure of one brake circuit will impa ir
the braking capab ility result ing in an in
creased stopping distance. Avoid driving
the vehicle and have it towed to the near
est a utho rized Audi dea le r or q ualified
wo rkshop.
Brake booster '
The brake booster adds extra broking power.
The brake booster works with vacuum pres
sure which is created only when the eng ine is
run ning ¢.&_ .
_&. WARNING
-Never let the vehicle roll to a stop with
the engine shut off.
- I f the b rake booster is not working, for
examp le when towing yo ur vehicle, or
because the brake booster has somehow
been damaged, the brake pedal must be
pressed conside rably harder to make up
for the lack of booster assistance.
Functioning of Anti-Lock Brake System
(ABS)
ABS prevents the wheels from locking up un der broking.
.
The ABS contributes effectively to vehicle con
trol since it prevents the whee ls from
locking
when the brakes are applied. This means that
the vehicle remains steerable and is less likely
to sk id .
With ABS you do not need to pump th e
brake. Ju st hold the b ra ke pedal down.