instrument panel AUDI A3 2012 Owner´s Manual
[x] Cancel search | Manufacturer: AUDI, Model Year: 2012, Model line: A3, Model: AUDI A3 2012Pages: 280, PDF Size: 70.11 MB
Page 186 of 280
184 Cleaning and protection
Fabrics and fabric coverings
Fab rics and fabr ic coveri ngs (e.g. seats, door
tr im panels, etc.) should be cleaned at reg ular
inte rva ls with a vacuum cleaner. This removes
sur face dirt particles which could become em
bedded in the fabric through use. Steam
cleaners shou ld not be used, because the
steam tends to push the dirt deeper into the
fabric and lock it there.
Normal cleaning
Generally, we recommend using a soft sponge
or a lint-free microfiber cloth to the clean fab
ric. Brushes should on ly be used for carpets
and floor mats, s ince other fabric surfaces
could be harmed by brushes.
Normal surface stains can be cleaned using a
commercially available foam cleaner. Spread
the foam on the surface of the fabric with a
soft sponge and work it in gently. Do not satu
rate the fabric. Then pat the foam d ry using
absorbent, dry cloths (e.g . microfiber cloth)
and vacuum it afte r it has dried comp lete ly.
Cleaning stain s
Stains caused by beverages (e.g. coffee, fruit
ju ice, etc.) can be treated with a mild deter
gent solut ion. App ly the detergent so lution
with a sponge. In the case of stubbor n stains,
a detergent paste can be applied directly to
the sta in and wor ked into the fabric. Afte r
wards, use copio us amo unts o f cle an water to
remove t he remaining dete rgent. Apply the
water with a damp cloth or sponge and pat
the fabric d ry w ith an absorbent, dry cloth.
S tains from chocola te or make up s hou ld have
detergent paste (e .g. ox -gall soap) r ubbed in
to them. Afterwards, remove the soap with
water (damp sponge).
A lcohol can be used to t rea t stains from
g rease, oi l, lips tick or a ballpo in t pen . Me lted
grease or dye must be patted off using ab
sorbent materia l. It may be necessary to re
treat the areas with dete rgent paste and wa
ter. In the case of gene
ra l soiling o f the uphols
tery and cover material, we recommend hiring
a spec ia list that has the equipment to clean
the seat covers and other fabr ic surfaces by
shampooing and spray extraction.
A WARNING '"--
A lways read and heed all WARNINGS and
the information
~ page 178.
(D Tips
Open Ve lcro fasteners on yo ur clothing can
damage the seat cover. Please make sure
that Velcro fasteners are closed.
Plastic parts and instrument panel
~ Always use a clean cloth moistened in clear
wate r.
Always use a clean cloth moistened in clear
water to clean these areas. For pe rsisten t dirt
use an Aud i approved
solvent -free p lastic
cl eaner/p rotec tant.
A WARNING
S olven ts ca n ch ange the prope rties of
some p lastics and make it harde r fo r the
a ir ba g to de ploy .
-
- N ever cle an the in st rument p anel or the
sur face of Ai rbag modu les with cleaning
prod ucts t hat conta in solvents .
- P roduc ts containing solven ts will make
the surface of this part poro us.
- Ser ious inju ries c an resu lt if p lastic parts
come loose when t he ai rbag is deployed.
- Always re ad and heed a ll WAR NIN GS and
t he information¢
page 178 .
(J) Note
Cleaning agents conta ining so lvents w ill
a ttack t he mate rial and can ch ange the
w ay it behaves.
Page 196 of 280

194 Checking and filling
Checking and filling
Engine hood
Releasing the engine hood
The engine hood is released from inside the
vehicle .
Fig. 155 Driver' s side footwe ll: e ngin e hood release
lever
.. Open the driver's door.
.. Pull the release lever on the left under the
instrument panel
c> fig . 155 in direction of
the a rrow .
The hood pops up slight ly under spring pres
sure.
Opening the engine hood
Fig . 156 Engine hood releas e le ve r
Before opening the eng ine hood, make sure
that the windshie ld wipers are folded flat
against the windshield . Otherwise, they could
damage the paint on the hood.
.. Pull the release lever
r=;,fig . 156 in the direc
tion indicated by the arrow . This release the
hook under the hood .
.. Open the hood all the way.
A WARNING
-Hot engine coolant can burn you!
- To reduce the risk of being burned, never
open the hood if you see or hear steam
or coo lant escaping from the eng ine
compartment . Wait unt il no steam or
coolant can be seen or heard before care
fu lly opening the hood.
Closing the engine hood
.. Pull the hood down until the pressure from
the strut is reduced .
.. Let the hood
drop down and latch in p lace.
Do not try to push it shut; it may fail to en
gage
c> .&, .
A WARNING
--
A hood that is not completely latched
could fly up and b lock your view while dr iv
i ng.
- When you close the engine hood, check it
to make sure the safety catch has properly engaged . The hood shou ld be flush
with the surrounding vehicle body parts.
- If you notice while dr iv ing that the hood
is not secured properly, stop at once and
close it .
Working in the engine compartment
Be especially careful whenever you work in
the engine compartment!
Whene ve r you must pe rform any wo rk in the
eng ine compartment, for e xample chec king
and filling differ ent fluid s, the re i s a risk of
injury , burns and accident s. T o pr event p er
s onal injury alwa ys observe the foll owing
WARNING S. Th e engin e c ompartm ent of an y
v e hicl e is a hazardou s area!
r=;, .&.
A WARNING
To help avoid injury, before yo u check any
thing under the hood:
- Turn off the engine .
- Remove the ignition key.
Page 245 of 280
Fuses and bulbs
Electrical fuses
Replacing fuses
A problem in the electrical system may be caused by a blown fuse .
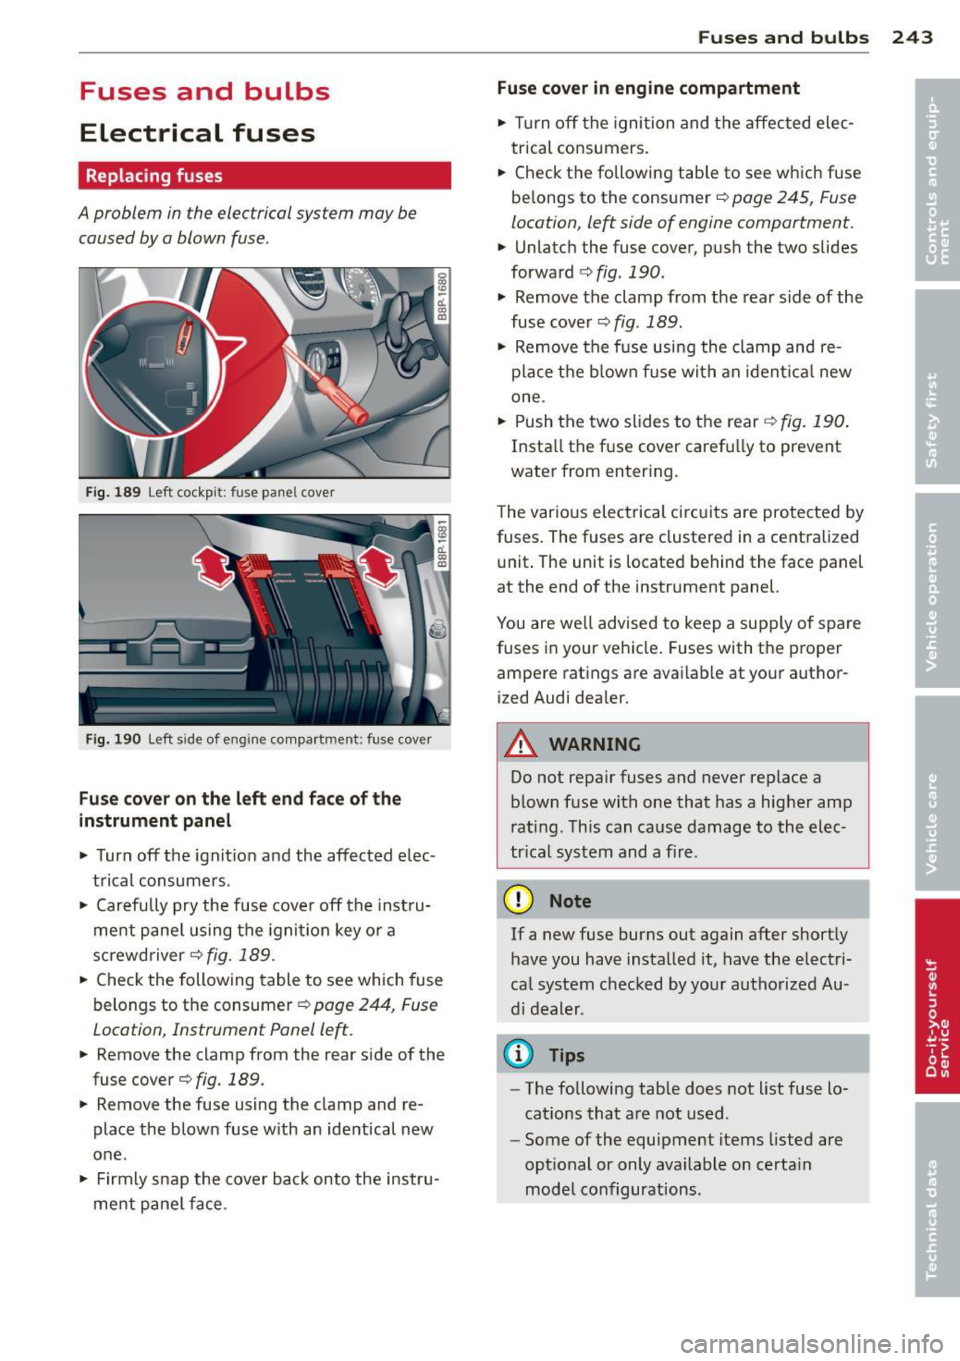
Fig. 189 Left cockpit: fuse pane l cover
Fig. 190 Left side of eng ine compartment: fuse cover
Fuse cover on the left end face of the
instrument panel
.. Turn off the ignition and the affected elec
trical consumers .
.. Carefully pry the fuse cover off the instru
ment panel using the ignit ion key or a
screwdriver
c;> fig. 189 .
.. Check the following table to see which fuse
belongs to the consumer
c;> page 244, Fuse
Location, Instrument Panel left.
.. Remove the clamp from the rear side of the
fuse cover ¢
fig. 189.
.. Remove the fuse using the clamp and re
place the blown fuse w ith an identical new
one.
• Firmly snap the cover back onto the instru
ment panel face .
Fuses and bulbs 243
Fuse cover in engine compartment
.. Tur n off the ignition and the affected elec
trical consumers .
.. Check the following tab le to see which fuse
be longs to the consumer
c;> page 245, Fuse
location, left side of engine comportment .
.. Unlatch the fuse cover, push the two slides
forward ¢
fig. 190.
• Remove the clamp from the rear side of the
fuse cover
c;> fig . 189.
• Remove the fuse using the clamp and re
place the blown fus e with an ident ical new
one .
.. Push the two slides to the rear¢
fig. 190.
Insta ll the f use cover caref ully to prevent
water from entering.
T he var ious electrical circ uits are protected by
fuses. The fuses are clustered in a centralized
unit. The unit is located behind the face panel
at the end of the instrument panel.
You are well advised to keep a supply of spare
fuses in your vehicle . Fuses with the proper
ampere rat ings are avai lab le at your author
ized Audi dealer.
_& WARNING
= -
Do not repair fuses and never replace a
blown fuse with one that has a higher amp
rating. This can cause damage to the elec
trical system and a fire .
(D Note
If a new fuse burns out again after shortly
have you have installed it, have the electri
ca l system checked by your authorized Au
di dealer .
(D Tips
-The following table does not list fuse lo
cat ions that are not used .
- Some of the equipment items listed are
optional or only available on certain
model configurations.
Page 246 of 280
244 Fuses and bulbs
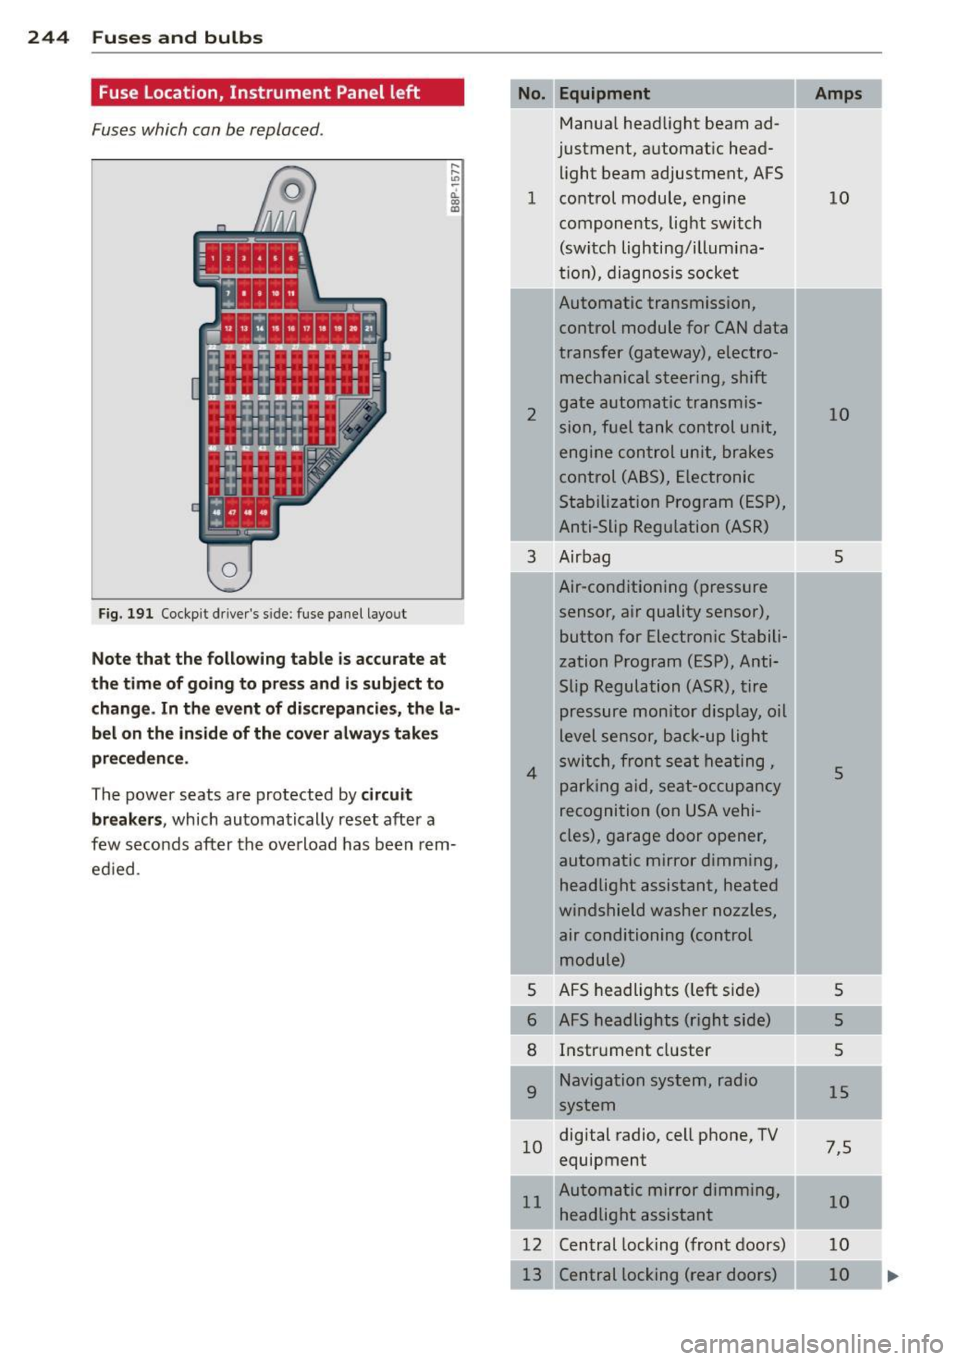
Fuse Location, Instrument Panel left
Fuses which can be replaced.
Fig. 191 Cockp it driver 's s ide: fuse pane l layout
Note that the following table is accurate at
the time of going to pr ess and i s subject to
change . In the event of d iscrepancies, the la
bel on the in side of the cover always take s
pr eceden ce .
The power seats are protected by circuit
break ers,
which automatically reset after a
few seconds after the ove rload has been rem
ed ied .
Equipment
Manua l head light beam ad
justment, a utomat ic head
light beam adjustment, AFS
1 co ntrol m odule, engine
components, light switch
(switch lighting/illumina
ti on), diagnosis socke t
2
3
4
5
6
8
9
Automatic transmission,
control module for CAN data
transfer (gateway), electro
mechanical steering, shift
gate automatic transmis
sion, fuel tank control unit,
engine control unit, brakes
control (A BS), Electronic
Stabili zation Program (ESP) ,
Anti-Slip Regulation (ASR)
Air bag
Air-conditioning (pressure
sensor, air quality sensor), button for Electronic Stabili
zation Program (ESP), Anti
Slip Regulat ion
(ASR), tire
pressure monitor display, oil
level senso r, back-up ligh t
s w itch, front se at he ati ng ,
p ark ing aid, sea t-occupancy
recognition (on USA vehi
cles), garage door opener,
automa tic mirror dimming,
headlight assistant, heated
windshield washer nozzles, air conditioning (control
module)
AFS headlights ( left si de)
AFS headlights (right side) Instr ument cluster
Navigation system, radio
system
1 0 digital
radio, cell phone, TV
equipment
11 Automatic mirror dimming,
headlight assistant
12 Central lock ing (front doors)
Central locking ( rear doors)
Amps
10
10
5
5
5
5
5
15
7 ,5
10
10
10
Page 272 of 280
270 Index
Heated
exterior mirrors . . . . . . . . . . . . . . . . . . . . 53
rear w indow . . . . . . . . . . . . . . . . . . . . . . . 85
H eated washe r jets
W iper and washer system .. .. .. .... .. 55
H eavy clothing and safety belts .... .... 116
High beam ... ... . ...... ... .. .. .. 47, SO
H igh voltage warn ing label .. .. .. .... . 255
H ill Descen t A ss ist .. ........... .. .. .. 99
H ill hold assist
Starting on hills .. ..... ... .. .. .... .. 92
hood
refer to Engine hood .. .... .. .. .... . 194 Installing the upper te
ther st rap on the
anchorage . ..... .. .. ... .. ..... ... .. 159
Instrument pane l
Illum ina tion ... .. ....... ..... ... .. . 49
Instrument panel and controls .. .. .. .. . 10
Inst ruments and controls
Gen era l illustration . . . . . . . . . . . . . . . . . . 8
Interior light
Re ar . .. .. .. .. .. .. ....... ...... .. . 52
Interior light s . . . . . . . . . . . . . . . . . . . . . . . S 1
Amb ient lig hti ng . . . . . . . . . . . . . . . . . . . 52
luggage compartment . . . . . . . . . . . . . . 53
H ood re le as e ... ... ..... ..... .. .. .. . 194
J
Horn ..... .. ... .. ..... ... .. .. .... .. . 8
H ow are child restra int system anchors re-
l ated to child safety . ....... .. .. .. .. . 155
H ow m any airb ags doe s my veh icle h ave? 129
H ow often sho uld I check my tire pres -
su res? .... .. ... .. ..... ... .. .. .... . 219
H ow safety belt pretensione rs wo rk . .. . 120
Hydroplaning .. .... .... ..... .. .. .. . 223
I
Ignit ion key . . . . . . . . . . . . . . . . . . . . . . . . . 89
I gnition lock . . . . . . . . . . . . . . . . . . . . . . . . 89
Ign ition lock po sit ions . . . . . . . . . . . . . . . . 89
I mmobilizer .... .. ..... ... .. .. .... .. 1 2
I mportant informat ion for veh icles w ith
D iese l eng ine when add ing o r changing en -
g ine oi l ... .. .... .. .. ... .. .. .. .. .. . 20 2
Important thing s to do before driving .. 103
I mproperly worn safety be lts ... .. .... . 119
I ndicator light
A irbag sys tem .... .... .... ... .. .. . 133
Audi magnetic ride ........ .. .. .... .. 2 2
C lutch ove rheating ... ... .. .. .. .. .. . 10 1
P ASSENGER A IR BAG OFF . ... .. .... . 133
Indicator lights . . . . . . . . . . . . . . . . . . 10, 13
Red symbol s in the center d isp lay .. .... 13
Yellow symbols in the cen ter disp lay . .. 14
also refer to Warn ing/ indicator lights . . 13
Infant seats ................... .... 148
Install ing chi ld safety s eats
Safety belts . . . . . . . . . . . . . . . . . . . . . . 1S2 Jack and tools
Jump-starting
234
248
Jumper cables . .. .. ... .. .. .. .. .. .. .. 249
Jump s ta rt ing . .. .. .... ... .. .. .. .. .. 249
K
Key ... .. ... .. .. .. .. .... .. .... ... .. . 34
Batte ry replacement .... ....... .... . 35
Coded se ttings . ...... ... .. .. .. .. .. . 84
Co nvenience openi ng and clos ing of win -
dows . ....... ... .................. 44
Key r eplacement . . . . . . . . . . . . . . . . . . . 34
Master key . . . . . . . . . . . . . . . . . . . . . . . . 34
Vale t key . . . . . . . . . . . . . . . . . . . . . . . . . . 34
Key-coded settings Climate co ntrols . . . . . . . . . . . . . . . . . . . . 84
Kick-down Automat ic transmiss ion . ....... .... 101
L
LATCH ... .. .... .. ... .. ..... .... . .. 155
D esc ription . ..... .. ... ..... ... .. .. 156
I ns talling a c hild re stra int ....... .... 157
location .. .. .. .. ....... ..... ..... 156
Mounting and releasing the anchorage
hook ........ ... ................ . 157
La unch Control Prog ram . ..... ... .. .. 101
L eathe r . . . . . . . . . . . . . . . . . . . . . . . . . . . 185
Cleaning .. .. .. .. ....... ...... .. .. 186
leav ing home ... .. ... .. .. ... ..... .. . 48
Lifting/raisi ng the vehicle ..... ... .. .. 252
Page 273 of 280
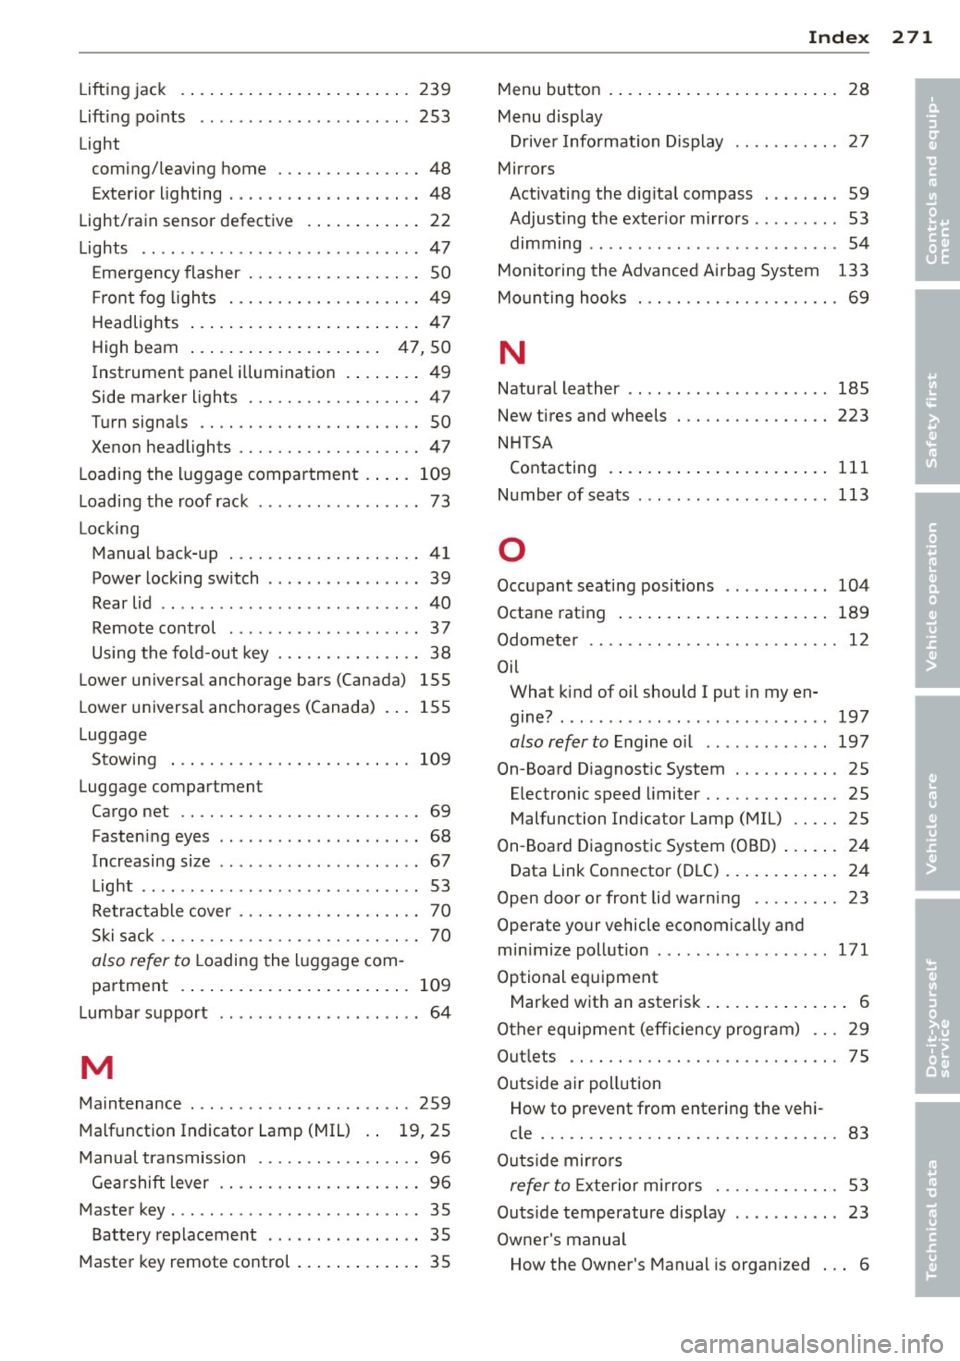
Lifting jack .... .... .... ... .. .. .. ... 239
Lifting po ints ...................... 253
Light coming/leaving home ............... 48
Exterior lighting .......... .......... 48
Light/ra in sensor defective . ... .. .. .. .. 22
Lights .. .. ..... ........... ...... ... 47
E mergency flasher . . . . . . . . . . . . . . . . . . SO
Fr ont fog l igh ts .......... .... .. .. .. 49
H eadlig hts ... .... .... ... .. .. .. .... 47
High beam . . . . . . . . . . . . . . . . . . . . 47, 50
Instrument panel i llum ination . ... .. .. 49
Side marker lights ........ ...... .... 47
Turn signals .. ........... .. .. .. .... 50
Xeno n headlights ................... 47
L oading the l uggage compartment . ... . 109
L oading the roof rack . . . . . . . . . . . . . . . . . 73
Locking Manual back-up .......... .. .. .. .. .. 41
Power locking switch . . . . . . . . . . . . . . . . 39
Rear lid .. ..... ........... ...... ... 40
Remote control . . . . . . . . . . . . . . . . . . . . 3 7
Using the fo ld-out key . . . . . . . . . . . . . . . 38
Lower universa l anchorage bars (Canada) 155
L ower universa l anchorages (Canada) 155
L uggage
Stowing . .. ..... ....... .... ... .. . 109
Luggage compartment
Cargo net .. ............. .... .. .... 69
Fasten ing eyes .................. ... 68
Increasing size ... .. ... ... .. .. .. .. .. 67
L ight . . . . . . . . . . . . . . . . . . . . . . . . . . . . . 53
Re tractable cover . . . . . . . . . . . . . . . . . . . 70
Ski sack . . . . . . . . . . . . . . . . . . . . . . . . . . . 70
also refer to Loading the l uggage com
partment . . . . . . . . . . . . . . . . . . . . . . . . 109
L umbar support ..................... 64
M
Maintenance ............... ...... .. 259
M alfunction Indicator Lamp (MIL) . . 1 9, 25
M anual tra nsmission ................. 96
G ea rshift lever ........... .. .. .. .. .. 96
Master key . ................ ...... ... 35
Battery replacement ................ 35
Master key remote control ... .. .. .. .. .. 35
Inde x 271
Menu bu tton . ..... .. . .. .. ..... ... .. . 28
Menu display Drive r Infor mation Display ........... 27
Mirrors Activating the dig ital compass ........ 59
Adjus ting the exterior m irrors . . . . . . . . . 53
dimming ........ .. ................ 54
Monitoring the Advanced Airbag System 133
Mo unti ng hoo ks . . . . . . . . . . . . . . . . . . . . . 69
N
Natura l leather .. .. .. ..... .......... 185
New t ires and wheels ................ 223
N HT SA
Co ntacting . ... .... . ... ...... ... .. 111
Number of sea ts ... .. ............... 113
0
Occupant seating positions .......... . 104
Octane rating ....... . .. .. ..... ... .. 189
Odometer . . . . . . . . . . . . . . . . . . . . . . . . . . 12
Oil Wha t kind of oil should I put in my en-
gine? ........ ... .. ............... 197
also refer to Engine o il ... ... ..... .. 197
On-Board D iagnost ic System ........... 25
E lectronic speed limiter .............. 2S
Malfunction Indicator Lamp (MIL) ..... 25
On-Boa rd Diagnostic System (OBD) ... .. . 24
Data Link Connector ( DLC) .... ... .. .. . 24
Open door o r fron t lid wa rn ing ......... 23
Operate your vehicle economically and
minimize pollution ... . .. .... ...... .. 171
Optional eq uipment
Marked with an asterisk . . . . . . . . . . . . . . . 6
O ther equ ipment (e fficiency program) ... 29
Out lets ............................ 75
Outside ai r poll ution
How to prevent from entering the vehi-
cle ............................... 83
Outs ide mir ro rs
refer to E xterio r mi rro rs . . . . . . . . . . . . . 53
Outs ide temperature disp lay ......... .. 23
Owner's manual How the Owner 's Manual is organ ized ... 6
•
•