AUDI A3 2012 Owner´s Manual
Manufacturer: AUDI, Model Year: 2012, Model line: A3, Model: AUDI A3 2012Pages: 280, PDF Size: 70.11 MB
Page 51 of 280

:l:D Front fog lights
Use the light switch to turn on the front fog
lights.
Fig. 45 Fog light act ivat ion: light sw itc h pos it ion o n ve
h icles WITHO UT sensor light
}D Switching on the front fog lights
.. Do not turn the light switch -"t;.. -<=> fig. 45 to-
ward the fog light symbol
.. Turn the light switch to
coo: or to @:D.
.. Pull the light switch to the first stop (D.
When the front fog lights are on, the sym
bol
:iO next to the light switch will illuminate.
C:t:t Instrument panel illumination
The illumination of the instruments, displays
and the center console can be adjusted .
Fig. 46 In st rum ent pa nel illum inat ion
0
"' d. .. m
You regulate the brightness of the instru
ments with the left thumbwhee l
Co/<=> fig. 46 .
@ Ignition ON, light switch.
With the ignition switched ON, the glow of in
strument needles
can be adjusted to appear
brighter or d immer.
Clear vision 49
:oo: or io Ignition ON, light switch.
With the lights swit ched on, the brightness of
instrument cluste r (i.e. needles, gauges and
displays) and center console illumination can
be adjusted.
(D Note
The instrument cluster and center console
ill umination (gauges and need les) comes
on when you switch on the ignition and the
vehicle headlights are off . Be aware of the
follow ing difference between models built
to US or Canadian specifications:
-USA models: illumination of the instru
ment cluster (gauges and needles),
dash and center console around the
gearshift lever is controlled by a light
sensor located in the instrument panel.
The instrument panel illumination will
automatically become dimmer as the
daylight fades away and eventually will
go out completely when outside light is
very low. This is to remind you, the driv
er, to switch on the headlights before it
gets too dark.
- Canada models: instrument panel illu·
mination will stay bright regardless of
the intensity of ambient light. Always be aware of changes in outside light
conditions while you are driving. Re
spond in time to fading daylight by
turning the light switch to position
gD
(or "AUTO " if your car is equipp ed with
th is feature)
to turn on your headlights.
Page 52 of 280
50 Clear vis ion
Emergency flasher
The emergency flasher makes other motorists
aware that you or your vehicle are in an emer
gency situation .
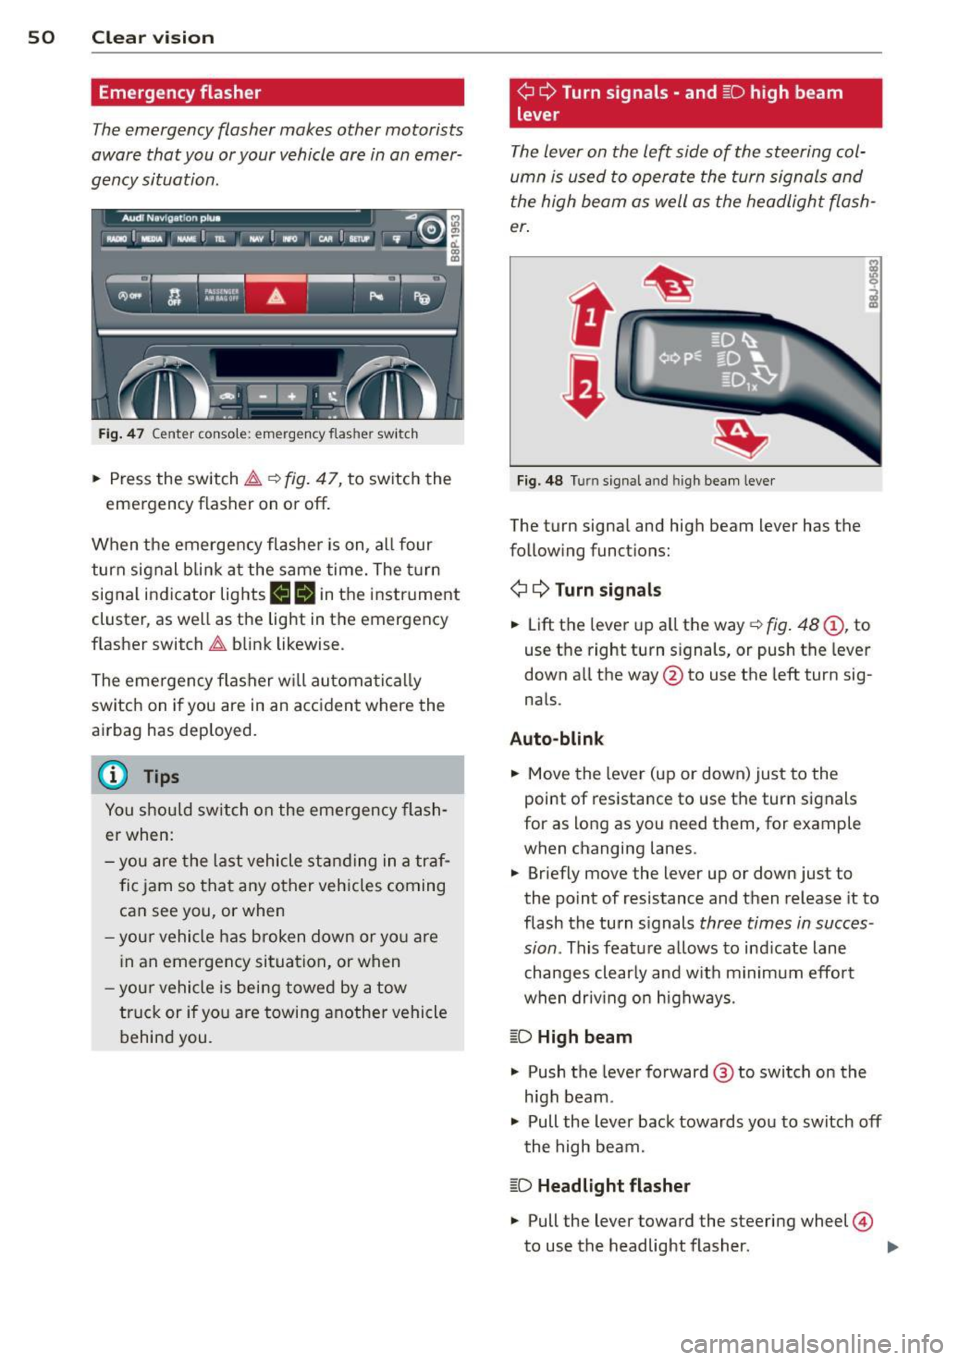
Fig. 47 Center console: emergency flasher switch
.. Press the switch ~ c:> fig. 47, to switch the
emergency flasher on or off.
When the emergency flasher is on, a ll four
turn signal b link a t the same time. The t urn
signal indicator lights
liliN in the instrument
cluster, as we ll as the light in the emergency
f lasher switch ~ blink likewise .
The emergency f lasher w ill automa tica lly
switch on if you are in an accident where the
ai rbag has deployed.
(D} Tips
You shou ld switch on the emergency flash
er when:
- you are the last vehicle st anding in a tr af
fic jam so that any other veh icles coming
can see you, or when
- you r vehicle has broken down or yo u are
i n an emergency situation, or when
- you r vehicle is being towed by a tow
truck or if yo u are towing a nothe r vehicle
behind you.
¢ Q Turn signals - and ~D high beam
lever
The lever on the left side of the steering col
umn is used to operate the turn signal s and
the high beam as well as the headlight flash
er .
t
'
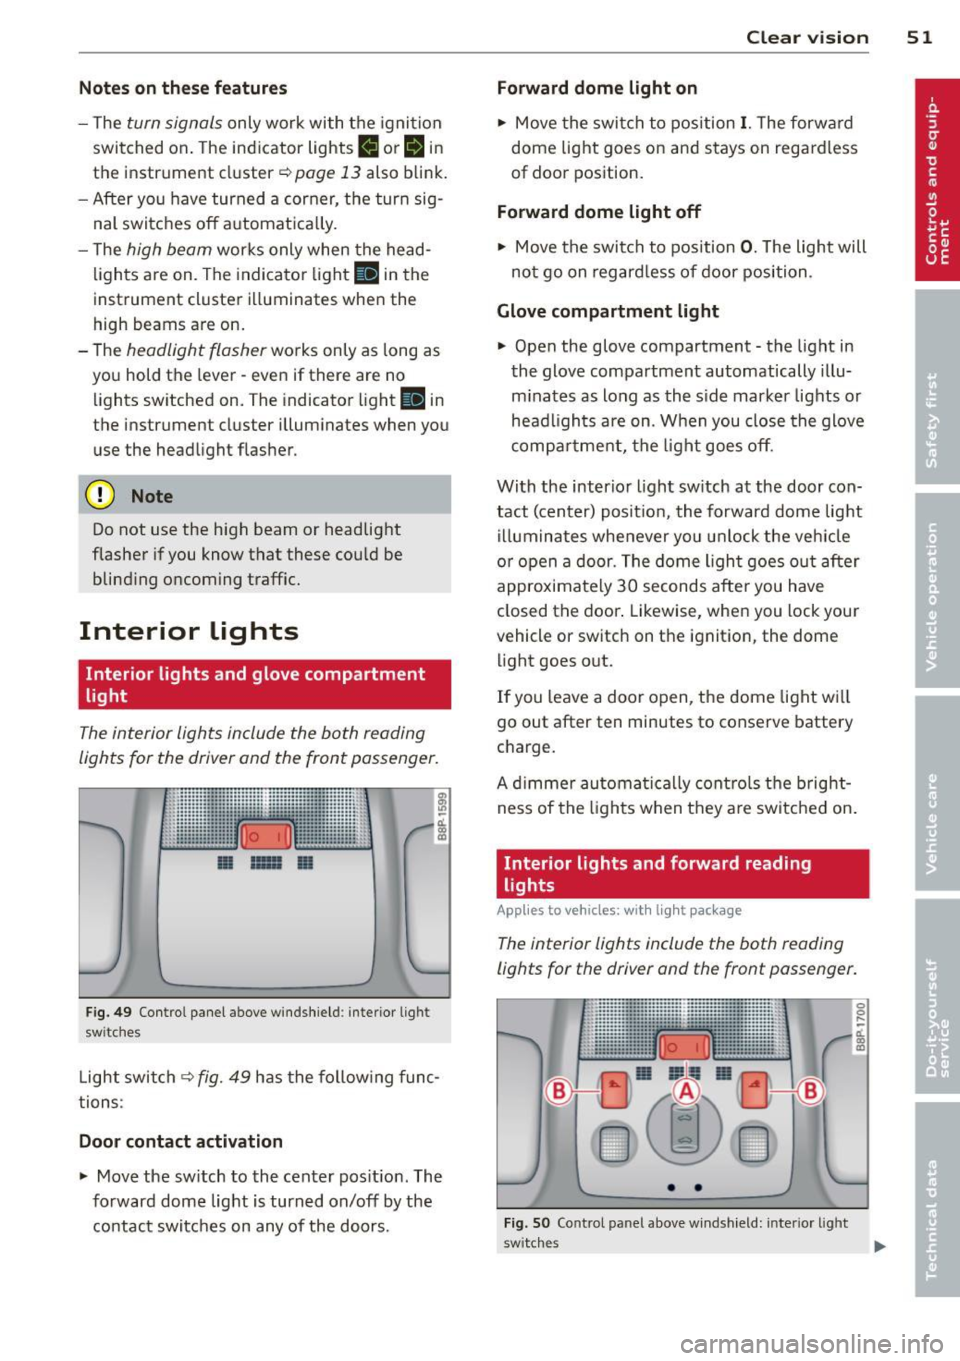
F ig. 48 Tu rn signal and high beam lever
The turn signal and high beam lever has the
following functions:
¢ Q Turn signals
.. Lift the lever up a ll the way c:> fig. 48 (D , to
use the right turn signals, or push the leve r
down all the way @to use the left turn sig
nals.
Auto -blin k
.. Move the lever (up or down) just to the
point of resistance to use the turn signals
for as long as you need them, for example
when changing lanes.
.. Briefly move the lever up or down just to
the point of resistance and then release it to
flash the turn s ignals
three times in succes
sion .
This featu re allows to ind icate lane
changes clearly and w ith minimum effo rt
when driv ing on highways.
~D High beam
.. Push the lever forward @ to switch on the
h igh beam .
" Pull the lever back towards you to switch off
the high beam.
~D Headlight flasher
" Pull the lever toward the steering wheel@
to use the headlight flasher. ..,_
Page 53 of 280
Notes on these featur es
- The turn signals only work with t he ignition
switched on. The indicator lights
B or IN in
the instrument cluster¢
page 13 also b link.
- After yo u have turned a corner, the turn sig-
nal switches off a utomatica lly.
- The
high beam works only when the head
lights are on. The indicato r light
II in the
instrument cluster illuminates when the
high beams a re on.
- The
headlight flasher wo rks only as long as
you hold the lever -even if there are no
lights switched on. The indicator light
II in
the instrument cluster illuminates when you
use the headlight f lasher.
(D Note
Do not use the high beam or headlight
flasher if you know that these could be
blind ing oncoming traffic.
Interior lights
Interior lights and glove compartment
light
The interior lights include the both reading
lights for the driver and the front passenger.
............. ...... ... ........... ... J :·:::: ::::::::: : :: :::::::::::: . :: : .. :: ::::::::···· .......... ::::::::: :: ::: :! mmr ·::::m :: mu
... mmi ~ mim g gm,
II IIGI II
Fig. 49 Control pa nel above winds hield : interior light
switches
L ight switch¢ fig. 49 has the follow ing func
tions:
Door cont act activation
• Move the sw itch to the center pos it io n. The
forward dome light is turned on/off by the contact switches on any of the doors.
Clear vi sion 51
Forward dome light on
• Move the swit ch to position I. The forwa rd
dome light goes on and stays on regardless
of door position.
Forward dome light off
• Move the swi tch to position 0 . The light will
no t go on regard less of door position .
Glove compartment light
• Open the glove compartment -the light in
the glove compartment automatically illu
m inates as long as the side marker lights or
head lights are on. When you close the glove
compa rtme nt, the light goes off.
Wi th the interio r light sw itch at the door con
tact (center) posit ion, the forward dome light
i ll uminates whenever you u nlock the veh icle
or open a door. The dome ligh t goes out after
approximately 30 seconds after you have
closed the door . Likewise, when you lock your
vehicle or switch on the ignition, the dome
li ght goes out.
If you leave a door open, the dome light w ill
go out after ten minutes to conserve battery
charge.
A d immer automa tica lly contro ls t he b rig ht
ness of the lights when they a re switche d on .
Interior lights and forward reading
lights
App lies to vehicles: wit h lig ht pac kage
The interior lights include the both reading
lights for the driver and the front passenger.
• •
Fi g. 50 Control panel above w inds hield: inter ior ligh t
switc hes
0 0 ....
~ CJ) a,
Page 54 of 280

52 Clear vis ion
Light switch @c:::> page 51, fig . 49 has the fo l
lowing functions:
Door cont act activ ation
.. Move t he sw itch to the center posit ion. The
f orward dome light is turned on/off by the
contact switches on any of the doors.
Forw ard dom e light on
.. Move the sw itch to position I. The forward
dome light goes on and stays on regard less
of door position.
Forw ard dome light off
.. Move th e sw itch to position 0 . The light will
not go on regardless of door position.
~ F o rward re a ding light s
.. Press the left or right switch @ to switch
the left or right forward reading light on or
off.
Glove compartment light
.. Open the glove compartment -the light in
the g love compartment automatically illu
mi nates as long as the side marker lights or
headlights are on. When you close the g love
compartment, the light goes off.
With the interior lig ht switch at the door con
tact (center) position, the forward dome light illum inates whenever you unlock the vehicle
or open a door. The dome light goes out after
approximately 30 seconds after you have
closed the door. L ikewise, when you lock your
vehicle or switch on the ign ition, the dome
l ight goes out.
If you leave a door open, the dome light will
go out after ten minutes to conserve battery
cha rge.
A dimmer automatically controls the bright
ness of the lights when they are sw itched on .
Ambient lighting
Applies to vehicles: with light package
The ambient lighting illuminate important
controls for you .
0 0
Fig . 51 Contro l panel above w inds hield: positio n of
amb ient light bulbs
0 ,..
cL
m a,
When you switc h on the ignition, the lights in
t h e door handles illum inate .
When the side marker lights or headlig hts are
switched on, the center conso le is i lluminated
from the ambient light located above the
windshield .
You cannot manua lly turn off these lights.
Rear reading light
Fig. 52 Rear reading light
Rear reading light
Press the sw itch ~ to turn on and off the
readi ng lig ht.
N
0 ,..
-cL m a,
Page 55 of 280
Luggage compartment light
A dome light in the rear roof liner illuminates
the luggage comportment. An additional
light is provided on the inside of the rear lid.
The light is located on the left side of the
trunk.
With the switch at the center position, the
rear dome light is automatically switched on
as soon as the rear lid is opened. The rear
dome light goes out 30 seconds after the rear
lid is closed .
If the rear lid is left open for more than 10 mi
nutes, both the rear dome light and the light
i n rear lid are switched off to conse rve the
battery charge.
Vision
Sun visors
Applies to vehicles: with lig ht package o r ill umin ated va n
ity m irror
Using the sun visors makes driving safer.
l
-
Fig. 5 3 Sun visor
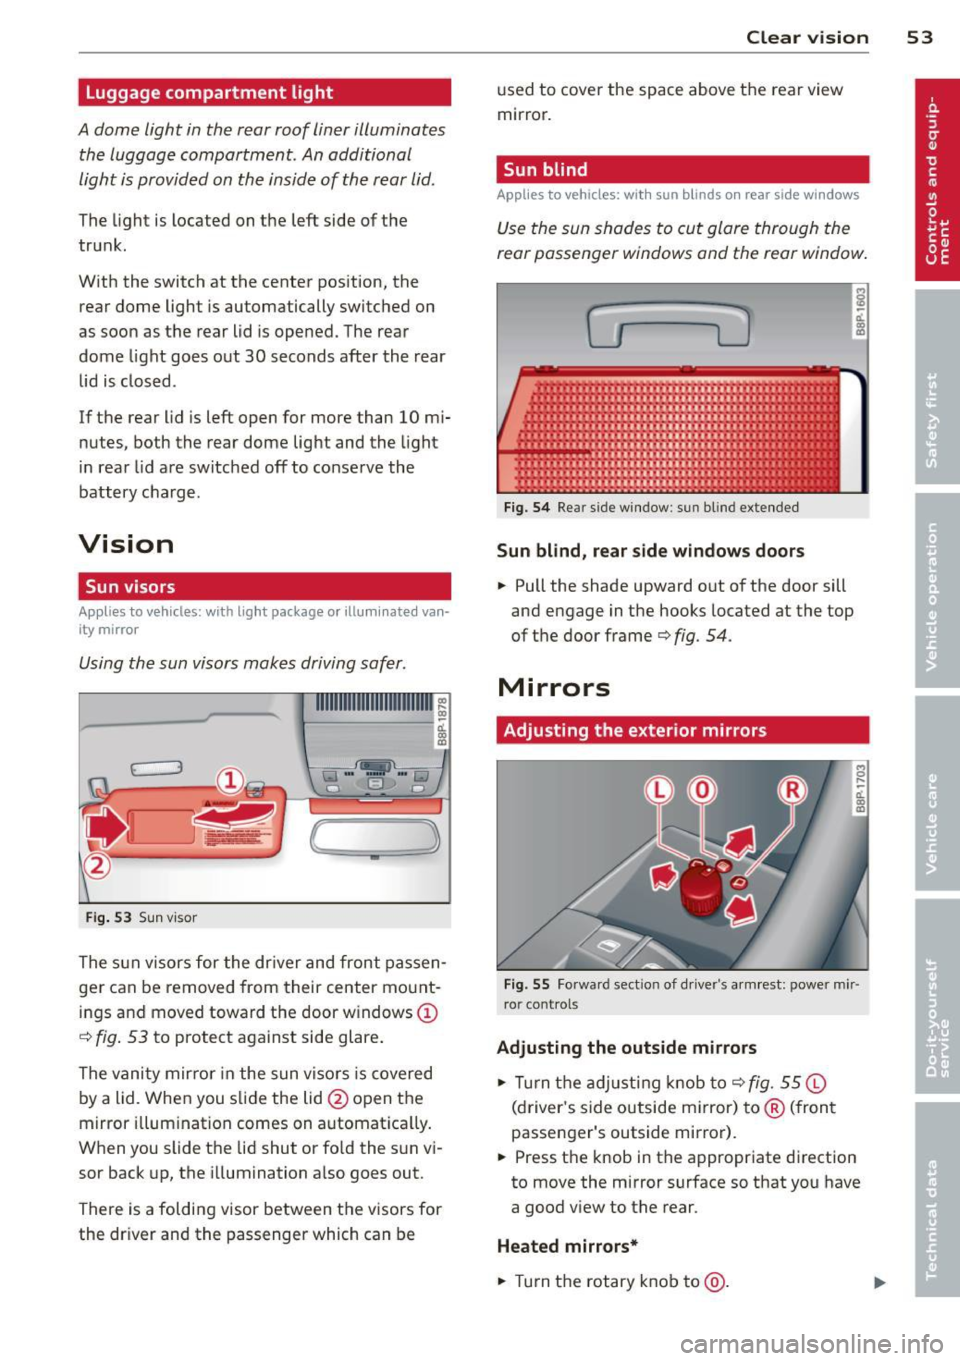
The s un visors for the dr iver and front passen
ger can be removed from their center mo unt
ings and moved toward the door w indows
(D
~ fig . 53 to protect against side glare .
The vani ty mir ror in the sun viso rs is covered
by a lid. When you s lide the lid @open the
mirror illum ination comes on automat ica lly.
W hen you slide the lid shut or fold the su n vi
sor back up, the illumination also goes out.
There is a folding visor between the visors for
the driver and the passenger which can be
Clear vi sion 5 3
used to cover the space above the rear view
mirror.
Sun blind
Applies to veh icles: w ith sun blinds o n rear side windows
Use the sun shades to cut glare through the
rear passenger windows and the rear window .
.,
F ig. 5 4 Rear side window : sun blind extended
Sun blind, rear side windows door s
.. Pull the shade upward out o f the door sill
and engage in the hooks located at the top
of the door frame
q fig. 54.
Mirrors
Adjusting the exterior mirrors
Fig. 55 Fo rwa rd sect ion of d river's a rm rest: power mir
ror cont rols
Adjusting the outside mirrors
.. Tur n the ad justing knob to q fig. 55 ©
(driver's s ide outside m irror) to ® (fron t
passenger's outside mirror).
.. Press the knob in the appropriate direction
to move the mirror surface so that you have
a good view to the rear.
Heated mirrors*
.. Tur n the rotary k nob to @.
Page 56 of 280
54 Clear vis ion
Depending on outside temperature and vehi
cle speed, the mirror surfaces are heated until
the ignition is switched off -even if the rotary
knob is no longer in position@.
You are well-advised to fold the exterior mir
rors in when maneuvering in tight spaces or
when leaving the car parked close to other ve
hicles.
(D Note
- Cu rved mirror surfaces (convex or spheri
ca l*) increaseyourf ield of view. Remem
ber that vehicles or other objects wi ll ap
pear smaller and farther away than when
seen in a flat mirror. If yo u use this mir
r or to est imate distances of following ve
hicles when changing lanes, you could
estima te incorrect ly and cause an acci
dent.
(D Tips
I f the re should be a malfunction in the
e lec trical system, you can still adjust the
exterior m irrors by pres sing the edge of
the mirror.
Dimming the mirrors
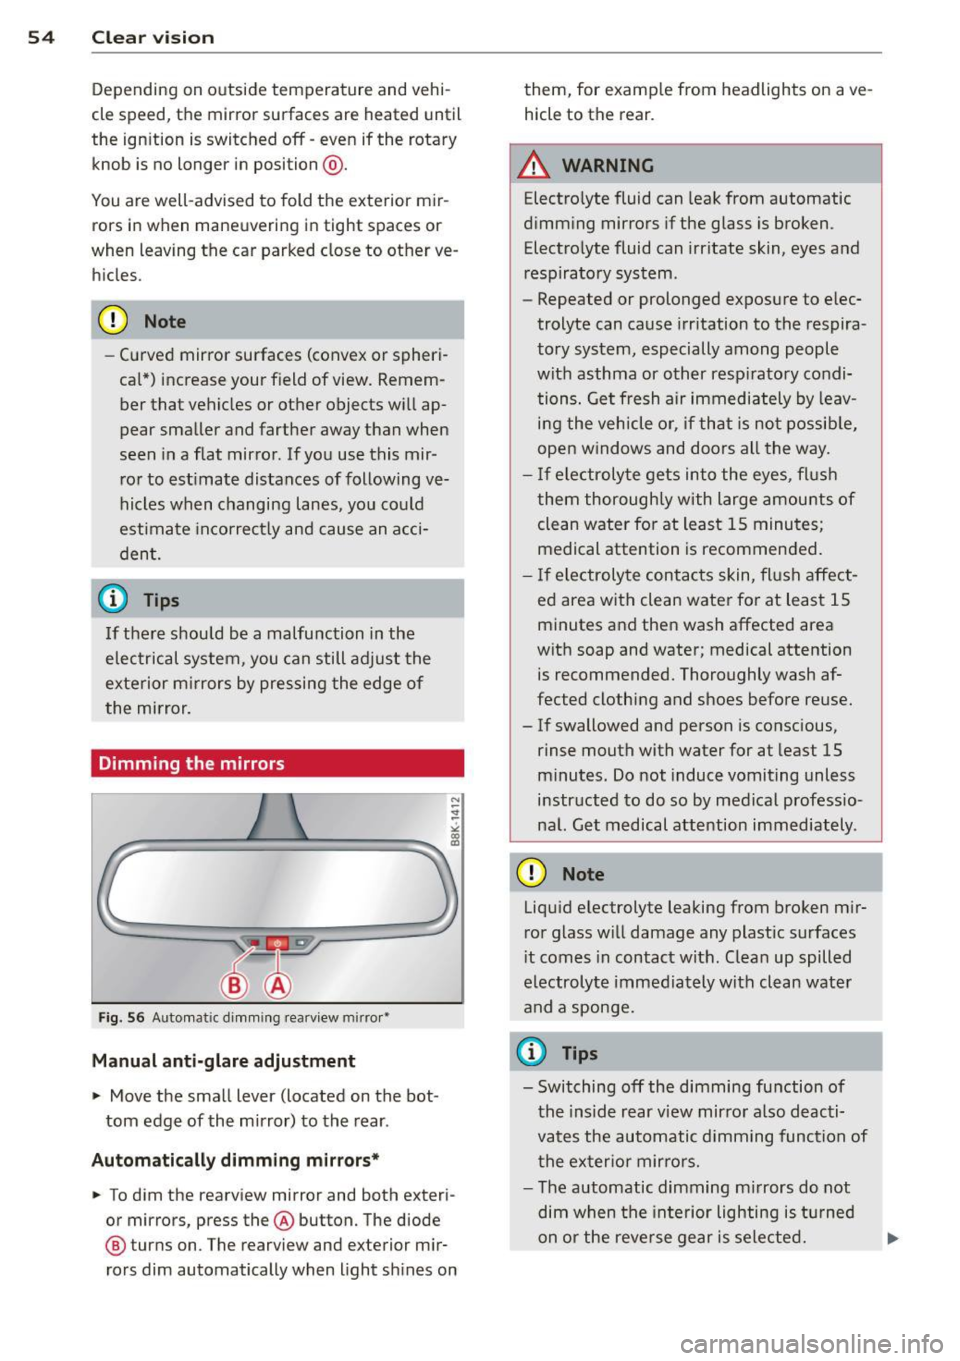
F ig. 56 Automatic dimm ing rearview mirror•
Manual anti-glare adjustment
• Move the small lever (located on the bot
tom edge of the mirror) to the rear.
Automatically dimm ing mirror s*
• To dim the rearview mirror and both exteri
or mirrors, press the® button. The diode
@ turns on. The rearview and exterior m ir
rors dim automatically when light sh ines on them, for
example from headlights on ave
hicle to the rear.
A WARNING
Electro lyte fluid can leak from automatic
dimming mirrors if the glass is broken.
Electro lyte fluid can irr itate skin, eyes and
respiratory system.
- Repeated or prolonged exposure to elec
trolyte can cause irr itation to the respira
tory system, especially among people
with asthma or other resp iratory condi
tions. Get fresh air immediately by leav i n g the vehicle o r, if that is not possib le,
open windows and doors all the way.
- I f electrolyte gets into the eyes, flus h
them thoroughly with large amounts of clean water fo r at least 1 5 minutes;
medical attention is recommended.
- I f electrolyte contac ts skin, fl ush affect
ed area with clean water for at least 15
minutes and the n wash affected area
with soap and water; medical attention
is recommended. Thoroughly wash af
fected clothing and shoes before reuse.
- If swallowed and person is conscious,
rinse mouth with water for at least 15
minutes. Do not induce vomiting unless
instructed to do so by medical professio
nal. Get medical attention immediately.
(D Note
Liqu id electrolyte leaking from broken m ir
r or glass w ill damage any plastic surfaces
i t comes in contact with. Clean up spilled
electrolyte imme diately with clean water
and a sponge.
(D Tips
- Switching off the dimming function of
the ins ide rear view mir ro r also deacti
vates the automatic dimming function of
the exter io r mir ro rs.
- The automatic dimming m irrors do not
dim when the inte rior lighting i s tur ned
on or the reverse ge ar is sele cted. .,.
Page 57 of 280
-Automat ic dimming for the m irror only
operates p roperly if the lig ht striking the
i ns ide mirror is not hindered in any way.
Wiper and washer
system
{sf) Windshield wiper
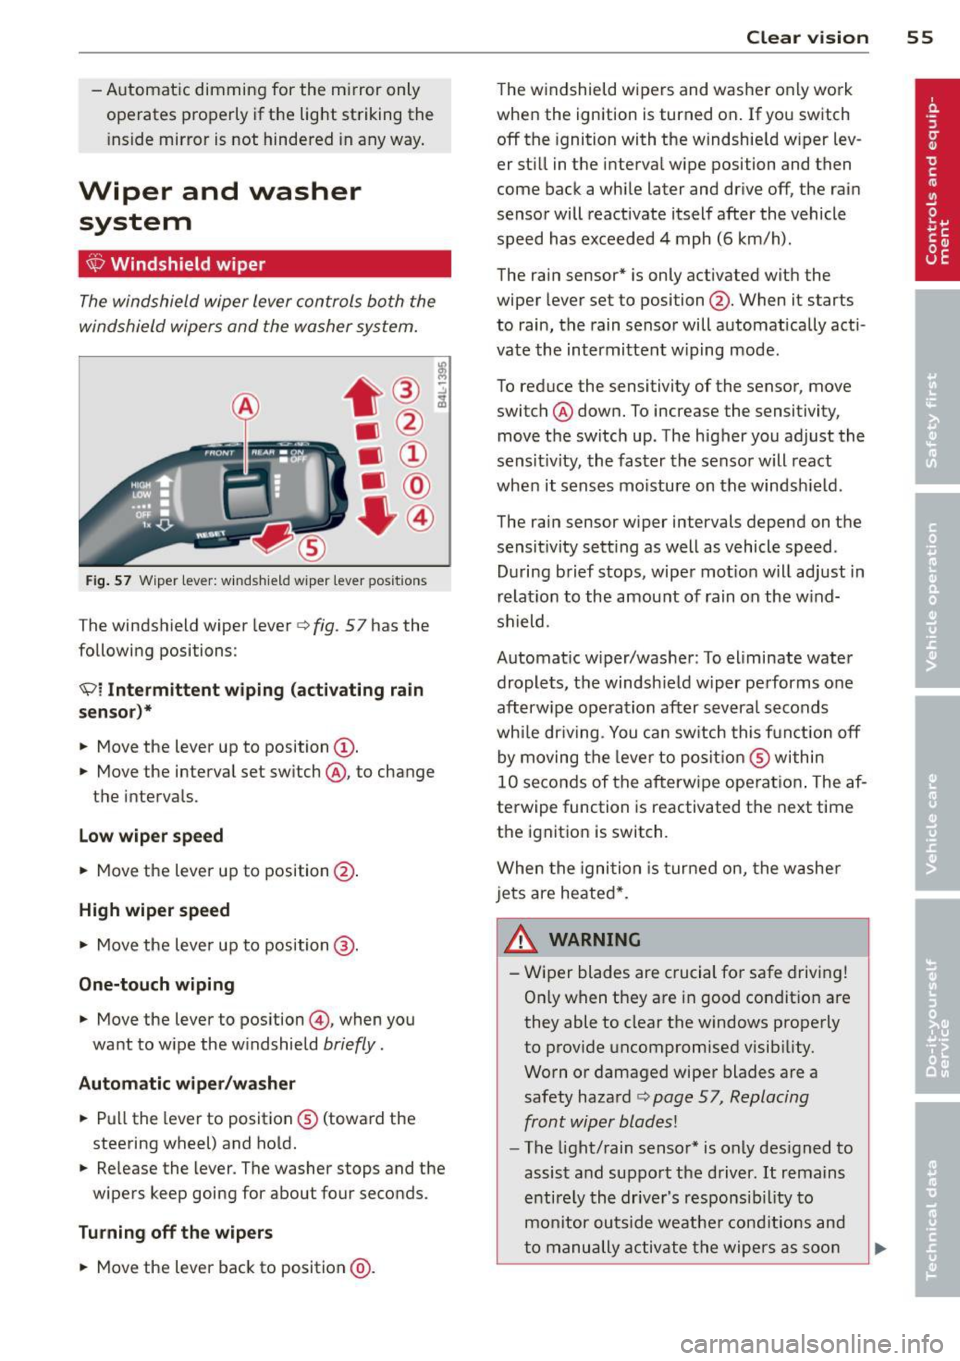
The windshield wiper lever controls both the
windshield wipers and the washer system.
F ig . 57 Wiper lever: w inds hie ld w iper lever positions
The windshield wiper lever c> fig. 57 has the
following positions:
Ql Intermittent wiping (activating rain
senso r)*
.. Move the lever up to position@.
.. Move the interval set sw itch @, to change
t h e interva ls.
Low wiper speed
.. Move the lever up to position@.
High wiper speed
.,. Move the lever up to position @.
One-touch wiping
.. Move the lever to position @, when you
want to w ipe the w indshield
briefly .
Automatic wiper /w asher
.. Pu ll the lever to posit ion ® (toward the
steering wheel) and ho ld.
.. Re lease the lever . The washer stops and the
wipers keep going for about four seconds.
Turning off th e wiper s
.. Move the lever back to position @ .
Clear vi sion 55
The w indshield wipers and washe r only work
whe n the ignition is turned on . If you switch
off the ignition with the w indshie ld w iper lev
er st ill in the interva l wipe position and then
come back a whi le later and drive off, the rai n
senso r will reactivate itsel f after the vehicle
speed has exceeded 4 mph (6 km/h) .
The rain sensor* is only activated with the
wiper lever set to position @. When it starts
to rain, the rain sensor will automat ically acti
vate the intermittent w iping mode.
To reduce the sensitivity of the sensor, move
switch ® down. To increase the sensitivity,
move t he switch up. The h igher you adjust the
sens it ivity, the faster the senso r will react
when it senses mo isture on the windsh ield .
The rain sensor w iper intervals depend on the
sensit ivity sett ing as well as vehicle speed.
D uring brief s tops, wipe r mot io n will adjust in
r elat ion to the amou nt of rain on the w ind
shield .
Automat ic w iper/was her : To eliminate water
drople ts, t he windsh ield wiper pe rforms o ne
afterw ipe ope ra tion after severa l seconds
whi le dr iv ing . You ca n sw itch this f unct ion off
by moving the leve r to posit io n ® within
10 seconds of the afterw ipe operat io n. The af
terwipe function is reactivated the next time
the ignitio n is switch.
When the igni tio n i s tur ned on, the washe r
jets are heated*.
& WARNING ~
- Wiper blades are crucial for safe drivi ng!
On ly when they are in good condit io n are
they able to clear the windows properly
to prov ide uncompromised visib ility.
Worn o r damaged wiper blades are a
safety haza rd
c> page 57, Replacing
front wip er blades!
- The light/rain senso r* is only des igned to
assis t and suppo rt the driver.
It rema ins
e ntire ly th e drive r's respo nsib il ity to
m onitor outside weathe r cond itions and
t o manu ally a ctiv ate the wipe rs as soo n
Page 58 of 280
56 Clear vis ion
as rain or drizz le re duces visibi lity
through th e windshield.
- The windshie ld must not be treated with
water-repe llent materials. They can in
crease glare under poor visibility condi
t ions such as wetness, darkness, or when
the sun is low on the horizon . In addi
t ion, they can cause th e windshield wip
ers to chatter.
(D Note
- In the case of frost, check whether the
windsh ield wiper b lades are frozen to
the windshield. Switching on the wind
shield wipers can damage the wiper
blades!
- Do not use the wipers to clear a frosted
window . U si ng the w ipers as a conven
i en t ice s craper will destroy the wiper
blades .
- Prior to using a car wash, the windshield
wiper system m ust be switched off (lever
i n position 0) . This helps to prevent unin
tentiona l switching on and damage to
the windshie ld wiper system.
(D Tips
- The w indshield wipers are swi tched off
when the ignition is turned off. Activate
the windshie ld wipers after the ignition
i s sw itched back on by mov ing the w ind
shield wiper lever to any pos it ion.
- Worn or dirty windshie ld wiper blades
cause smearing, which can affect the op
eration of the light/rain sensor*. Check
the condition of your windshie ld w iper
blades regularly.
- The rai n sensor is part of the interval
wiping system. Tur ning off the ignition
will a lso deact ivate the rain sensor. To re
activate t he senso r, switch off the inter
val w iping function, then sw itch it ba ck
on aga in.
- Applies to vehicles with lig ht/ rain sen
sor: When the wipers are swi tched on
manu ally and in rain condi tions, the au
tomatic head lights* turn on¢
page 47,
·'t!.-Switching the headlights on and off
or off during the day when the wipers are
no longer operating. The automatic
head lights* funct ion is available in th is
case on ly when the light switch is in the
"A UTO" position¢
page 47, fig. 43.
-Make s ure the washer fluid reservoir in
the engine compartment is topped off
before going on a long trip. Look up
¢
page 211 for check ing and filling the
washer co nta iner .
- The wipers only operate with the hood
completely closed .
is;J Rear window wiper
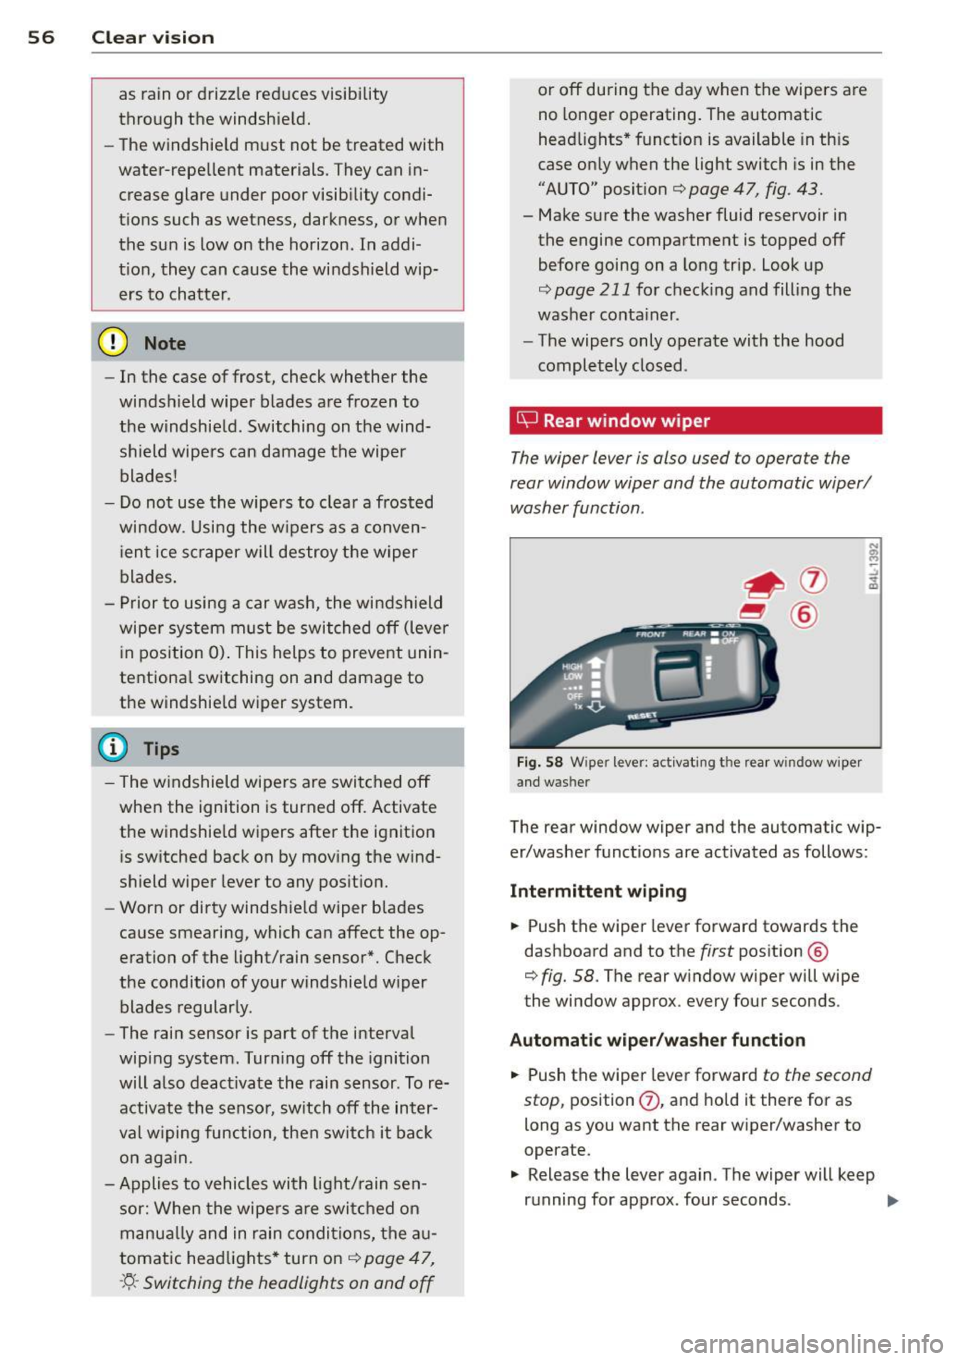
The wiper lever is also used to operate the
rear window wiper and the automatic wiper/ washer function .
Fig. 5 8 W iper lever: activat ing the rear w indow w iper
and washer
The rear window wiper and the automatic wip
er/washer functions are activated as follows :
Intermittent wiping
.,. Push the wiper leve r forward towards the
dashboard and to the
first position @
¢
fig. 58. The rear w indow wiper will wipe
the window approx. every four seconds .
Automatic wiper /washer function
.,. Push the wiper lever forward to the second
stop,
position (j) , and hold it there for as
long as you want the rear w iper/washer to
operate.
.,. Release the lever again. The wiper will keep
running for approx. four seconds . .,,_
Page 59 of 280
Switching intermittent wiper acti on off
• Pull the lever all the way back to the or igi
nal position.
A WARNING
Wiper blades are crucial for safe driving!
On ly in good condition are they able to
clear the windows properly to provide un
restricted visibility. Worn or frayed wiper
blades are a safety hazard!
r::;, page 5 7,
Replacing front wiper blades
Q) Note
In freezing or near freez ing cond itions:
- Always check t hat the wiper blades are
not frozen to the glass before yo u turn
the wiper on. loosen a wiper blade which i s frozen in p lace before operating the
wipe r to preve nt damage to the wiper
blade o r the w ip er motor .
-
-Do not use the wiper to clear a frosted
window . Using the wipers as a conven
i ent ice sc raper will destroy the w iper
blades .
(D Tips
For better rea rward vision whe n pa rking,
the r ear w indow w ip e r is automat ica lly ac
t iva ted one time when the windshield wip
ers are sw itche d on and reve rse gear is en
gaged.
Service position
Replacing the windshield wiper blades is only
possib le when you move the wiper arms into
the service position. In order to use the wind
shie ld w ipers, the hood must be complete ly
closed . When there is a risk of frost, make
sure that the w iper blades are not frozen to
the windshield .
• Switc h the ignition on .
• Switch the ignition off aga in and move the
wipe r lever
r::;, page 55, fig . 57 from position
0 to 1 within 10 seconds . The w iper arms
now move in to the fie ld of v iew in t he wind
shield .
Clear vision 5 7
The service pos ition can a lso be selected in
the d river information system*
r::;, page 27 .
(D Note
Neve r dr ive y our veh icle w hen the w ind
shield wiper a rms are in the se rvice posi
tion and pulled away from the winds hield.
W hen yo u drive faster than 4 mph (6 km/
h), the wiper arms automatically return
back to the park position and could ca use
paint damage to the eng ine hood!
(D Tips
- Yo u can also turn on t he service posit ion,
for example, if yo u want to p rotect the
w indshield from icing by using a cover.
- The service posit io n moves to
off auto
matically whe n yo u operate the w ind
shield wiper lever, or speed exceeds
4 mph (6 km/h).
Replacing front wiper blades
Wiper blades in good condition help keep the
windshi eld clear .
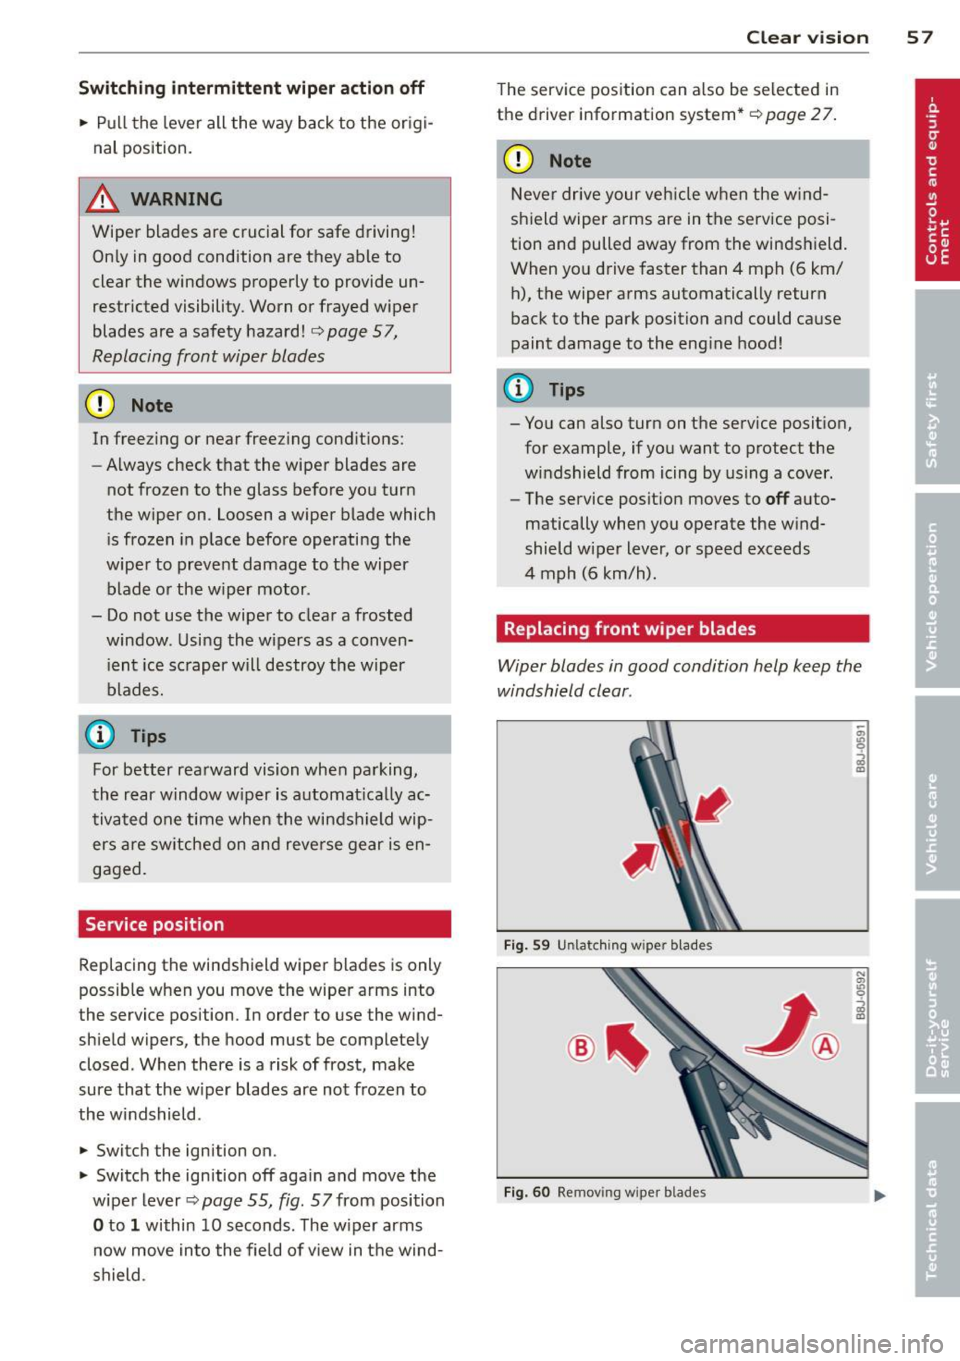
Fig. 5 9 Unlatching w ipe r blades
®"
Fig. 60 Remov ing w iper blades
Page 60 of 280
58 Clear vis ion
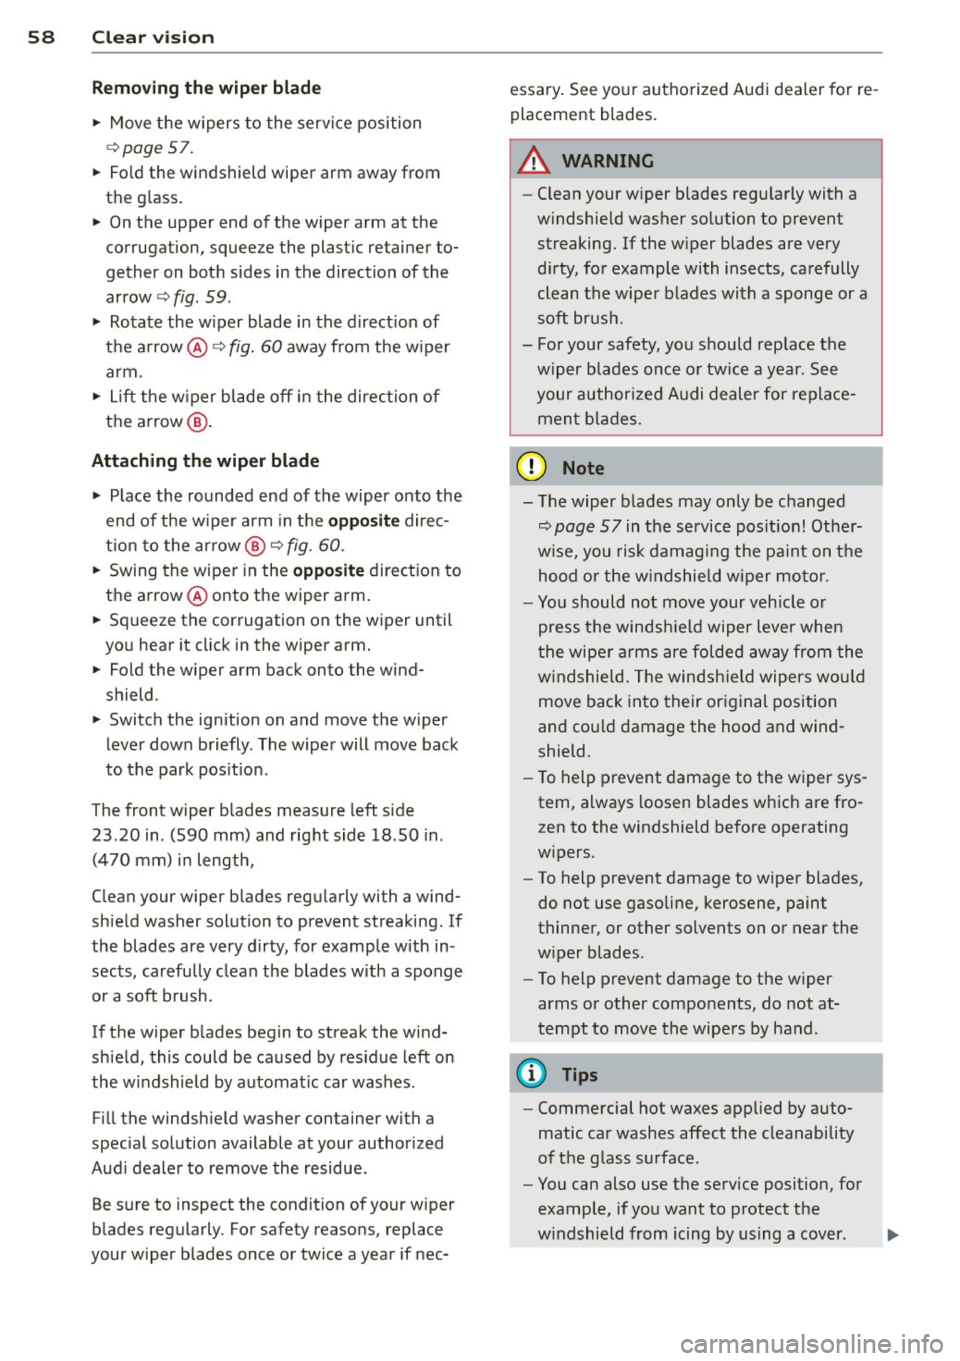
Removing the wiper blade
.. Move the wipers to the service position
c::>page 57.
.. Fo ld the windshield wiper arm away from
the g lass.
.. On the upper end of the wiper arm at the
corrugation, squeeze the plast ic retainer to
gether on both sides in the direction of the
arrow
c::> fig. 59 .
.. Rotate the w iper blade in the direct ion of
the arrow @c::>
fig. 60 away from the w iper
arm.
.. Lift the w iper blade
off in the direc tion of
the arrow @.
Attaching the wiper blade
.. Place the rounded end of the wiper onto the
end of the w iper arm in the
oppo site direc
t ion to the ar row @
c::> fig. 60.
.. Swing the wipe r in the oppo site direct io n to
the arrow @onto the wiper arm.
.. Sq ueeze the corrugation on the w iper until
yo u hear it click in the wiper arm.
.. Fold the wiper arm back onto the wind
shield .
.. Switch the ignition on and move the w iper
lever down briefly . The wiper will move back
to the park pos it ion .
The front wiper b lades measure left s ide
23 .20 in . (S90 mm) and rig ht side 18 .SO in.
(470 mm) i n length,
C lean your wiper blades regu larly with a wind
shie ld washer solution to prevent streaking . If
the blades are very d irty, for example with in
sects, carefu lly clean the blades w ith a sponge
or a soft b rush.
If the wiper b lades beg in to streak the wind
shield, this could be caused by res idue left on
the w indshield by automat ic car washes .
F ill the windsh ield washer container with a
specia l so lution available at your author ized
Aud i deale r to remove the residue .
Be s ure to inspect the condition of your w iper
b lades regularly. For safety reasons, replace
your w iper blades once or twice a year if nee- essa
ry . See yo ur authorized Aud i dea ler for re
placement blades .
A WARNING
-- Clean your w iper blades reg ularly with a
w indshie ld washer so lution to prevent
streaking. If the w iper blades are very
d irty, fo r example with insects , ca refully
clean the wiper blades wi th a sponge or a
soft brus h .
- For your safety , you should replace the
wiper blades onc e or twice a year . Se e
your aut hor ized Audi dealer for replace
men t blad es.
0 Note
-The wiper b lades may only be c hanged
c::> page 57 in the service posit ion! Ot he r
w ise, you risk damag ing the pa int on t he
hood or the w indshie ld wi per mo to r.
- Yo u should not move your veh icle o r
press t he winds hield wiper leve r when
t he wipe r arms are folded away from the
w indshield. The windsh ield wipers wo uld
move back into their or iginal position
and co uld damage the hoo d and wind
shield.
- To help prevent dama ge to the w iper sys
tem, always loosen blades which are fro
zen to the windshield before operating
w ipers.
- To help prevent damage to wiper b lades,
do not use gaso line, kerosene, paint
thinner, or other solvents on o r near the
w iper blades .
- To help prevent damage to the w iper
arms or other components, do not at
tempt to move the wipe rs by hand .
(D Tips
-Commercial hot waxes applied by auto
matic ca r washes affect the cleanability
of the g lass s urface .
- Yo u can also use the service position, for
examp le, if yo u want to p rotect the
w indshield from icing by using a cover. ..,_