start stop button AUDI A3 2012 Owner´s Manual
[x] Cancel search | Manufacturer: AUDI, Model Year: 2012, Model line: A3, Model: AUDI A3 2012Pages: 280, PDF Size: 70.11 MB
Page 13 of 280

Instrument s and warning /indicator lights 11
If the engine RPMs drop below 1 500, you
should downshift to the next lowe r gear . The
red area at the end of the scale indicates max
imum permissible engine RPMs after the
break-in per iod. Before reaching this area, you
should either shift i nto the next h igher gea r or
ease your foot off the accelerator pedal.
(D Note
The tachometer needle¢ page 10, fig. 3
@shou ld not move into the red range. If
it does, then o nly for a very sho rt period of
t ime. You cou ld damage yo ur eng ine by
driving at high RPM !
@ For the sake of the environment
Upshift ing early saves fuels and red uces
eng in e no ise.
Digital clock with date display
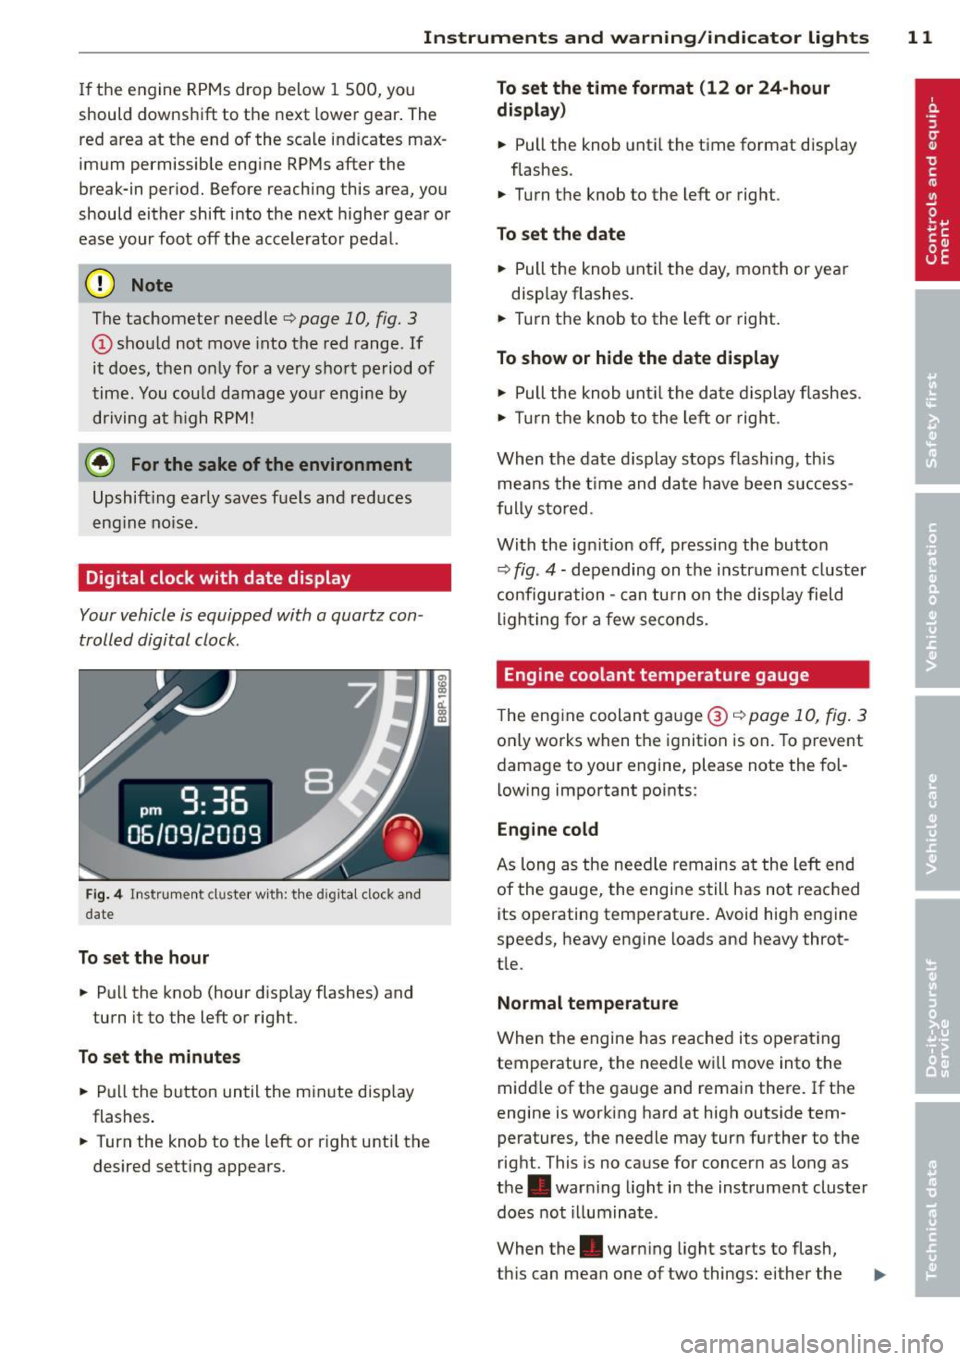
Your vehicle is equipped with a quartz con
trolled digital clock .
Fig. 4 In strume nt cl uste r w it h : th e d ig ita l clock and
da te
To set the hour
.. Pu ll the knob (hour d isplay flashes) and
turn it to the left or rig ht.
To set the minutes
.. Pull the button until the min ute disp lay
flashes .
.. Turn the knob to the left or r ight unt il the
desired sett ing appears.
To set the time format (12 or 24-hour
di splay )
.. Pull the knob unti l the time format disp lay
flashes .
.. Turn the knob to the left or right .
To set the date
.. Pull the knob unt il t he day, mon th or yea r
disp lay flashes .
.. Turn t he knob to the left or rig ht.
To show or hide the date display
.. Pull the knob until t he da te display flashes .
.. Tur n the knob to the left o r right.
When the date d isp lay stops f lash ing , th is
means the t ime and da te have been s uccess
f ully s to red.
Wi th the ig nition off, pressi ng the button
¢
fig . 4 -depending on the instr um ent cluster
c onfiguration -can tu rn on the di sp lay field
li gh ting for a few seconds.
Engine coolant temperature gauge
T he eng ine coolan t ga uge @ ¢ page 10, fig . 3
o nl y works when the ignition is on. To p revent
damage to your engine, please note the fol
l owing important points:
Engine cold
As long as the nee dle remains a t the left end
of the gauge, the engi ne s till has not reac hed
its operatin g tem perat ure. Avoid hig h eng ine
speeds, heavy engine loads and heavy throt
tle .
Normal temperature
When the engine has reache d its ope ra ting
temperature, the need le w ill move into the
midd le of t he gauge and rema in there . If t he
engine is working hard at high outside tem
peratures, the need le may tur n further to the
right. This is no cause for concer n as long as
the . warn ing light i n the instrument cluster
does not illuminate .
When the. war ning light starts to flash,
th is can mean one of two things: either the
Page 93 of 280

@ For the sake of the environment
To avoid unnecessary engine wear and to reduce exhaust emissions, do not let your
vehicle stand and warm up. Be ready to
drive off immediately after start ing your
veh icle. Mainta in moderate speed until the
engine is completely warm . Remember,
the engine performs best at operating
temperature .
Stopping the engine
.. Turn the ignition key to position@
¢page 89, fig. 102.
_& WARNING
-Never turn off the engine unti l the vehi
cle has come to a complete stop.
- The brake booster and servotronic on ly
work when the engine is running . With
the ignition turned off, you have to apply
more force when steering or braking.
Since you cannot steer and stop normal ly, this can lead to accidents and serious
injuries.
- The rad iator fan can continue to run for
up to 10 minutes even after you have
tu rned off the eng ine and removed the
ignition key. The radiator fan can also
turn on again if the engine coolant heats
up because of intense sunlight or heat
build-up in the engine compartment.
(D Note
Do not stop the engine immediate ly after
hard or extended dr iving. Keep the engine
running for approximately two minutes to
prevent excessive heat build-up .
On the road 91
Parking brake
Parking brake
When the parking brake is set, it prevents the
vehicle from rolling away unintentionally .
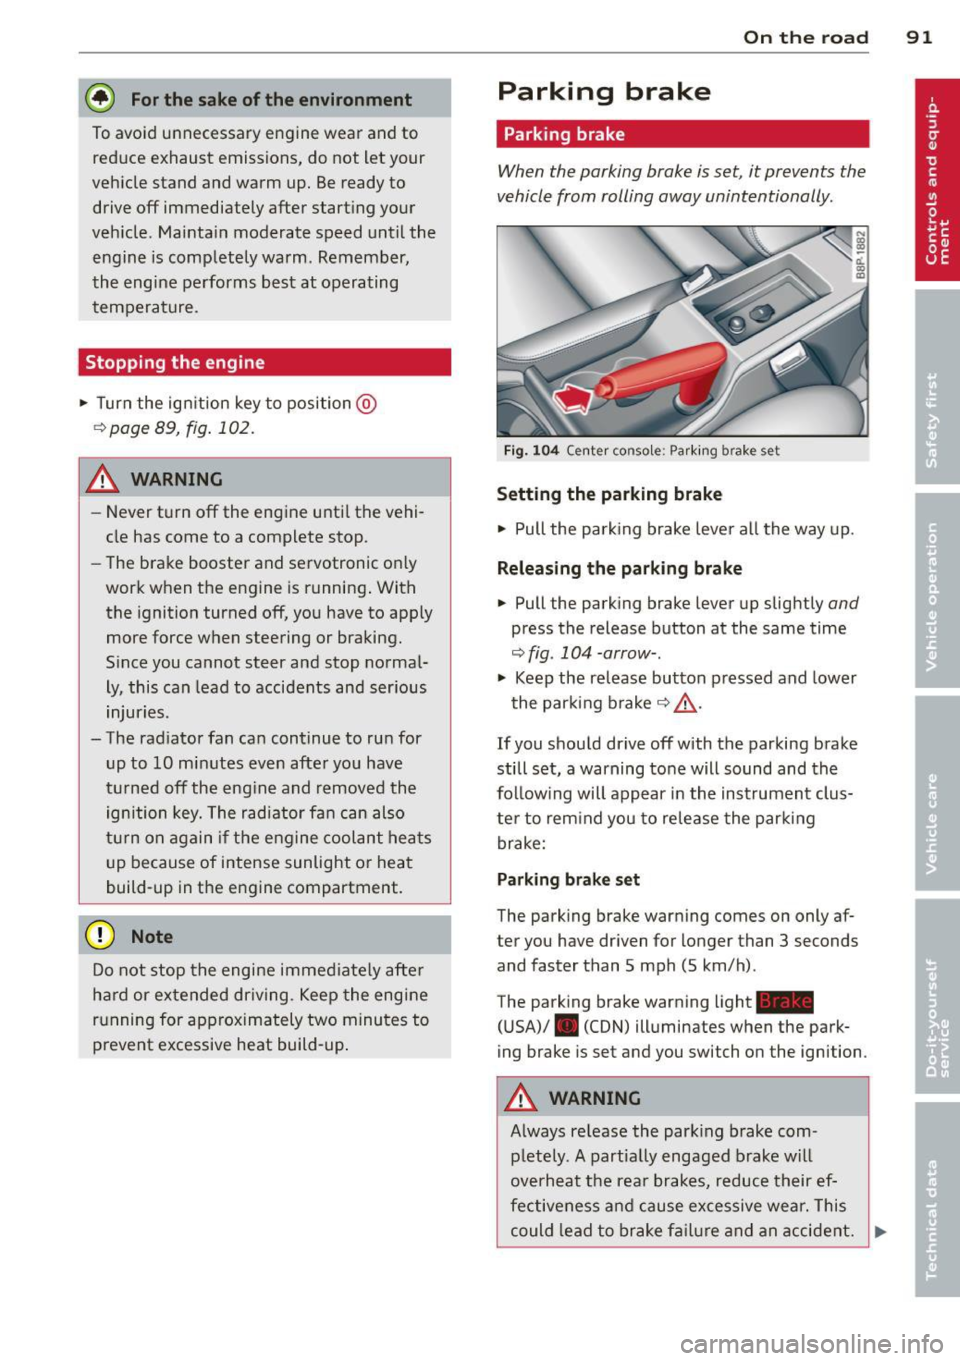
Fig. 104 Cente r co nso le: Park ing b rake set
Setting the parking brake
.. Pull the park ing brake lever all the way up.
Releasing the parking brake
.. Pull the parking brake lever up slightly and
press the release button at the same time
¢fig. 104-arrow-.
.,. Keep the release button pressed and lower
the parking brake¢&_ .
If you should drive off with the parking brake
still set, a warning tone will sound and the
follow ing will appear in the instrument clus
ter to remind you to release the parking
brake:
Parking brake set
The parking brake warning comes on only af
ter you have driven for longer than 3 seconds
and faster than 5 mph (5 km/h) .
The parking brake warning light_
(USA)/ . (CON) illuminates when the park
ing brake is set and you switch on the ignition .
A WARNING
Always release the parking brake com -
pletely. A partially engaged brake will
overheat the rear brakes, reduce their ef
fectiveness and cause excessive wear. This
could lead to brake failure and an accident. .,.
Page 96 of 280

94 On the road
Cruise control
Switching the system on
The cruise control system makes it possible to
drive at a constant speed starting at 20 mph (30 km/h) .
Fig. 105 Control lever wi th set button
Fi g. 106 Disp lay: Se lected speed
• Pull t he lever to posi tion (D ¢ fig . 105 to
switch the sys tem on.
• Drive at the speed you wish to set .
• Press b utton @ to set that speed .
The display
¢fig. 106 will show the set s peed .
The display may v ary depending on t he type o f
display in yo ur vehicle. The indicator
light
[ifj11 )~1~ (US mode l) I. (Canadian mode l)
will also light up in the instrument cluster.
A WARNING
- Always pay attention to traffic even when
the cruise control is switched on . You are
always responsible for your speed and
the distance between yo ur vehicle and
othe r vehicles .
- For safety reasons, the c ruise control
sho uld not be used in the city, in stop
and -go traff ic, on twist ing roads an d
when ro ad conditions are poo r (such as ice,
fog, gravel, heavy rain and hydro
plan ing) -risk of accident.
- Turn off the cruise contro l temporarily
when enter ing turn lanes, highway exit
lanes or in construction zones.
- Please note that inadvertently "resting"
your foot on the accelerator pedal causes
the cruise co ntrol not to brake. This is
because the cruise control is over ridden
by the dr ive r's acceleration.
(D Tips
- Veh icles with man ual transmiss ion: You
can attai n the set speed only if the cur
rently engaged gear allows it and the en
gine is not stressed . Sh ifting to a highe r
o r low er gea r promptly will a llow the en
gine to r un smooth ly.
- The cr uise control can not mainta in a
constant speed when driv ing downhi ll.
T he vehi cle w il l accele rate under i ts own
we ight. Dow nshift to a lower ge ar or use
the brakes to slow down .
Changing speed
• Press lever in the 0 or 0 direct io n
¢ page 94, fig. 105 to increase or decrease
your speed.
• Release the lever to save that speed .
Change speed in increments of 1 mph (1 km/
h) by lightly pressing the lever. I f you keep the
lever pressed down, you will alter your speed
in S mph (10 km/h) increments.
You can also press t he accelerator pedal down
to increase your speed, e.g. if you want to
pass someone. The speed you saved earlier
will resume as soon as you release the acceler
ator pedal.
If, however , you exceed yo ur saved speed by
5 mph (10 km/h) for longer than 5 minutes,
the cru ise control will turn off temporari ly.
T he symbo l will go out but the saved speed
will be reta ined .
Page 100 of 280

98 Transmission
The selector lever lock is released as fo llows:
,. Switch the ign ition on.
,. Step on the brake peda l
and simult aneously
ho ld down the re le ase but ton .
(~ Automatic selector lev er lock
The selector lever is locked in the P and N po
sitions when the ignition is on . To move the
l eve r from these positions the d river must de
p ress the brake pedal. As a reminde r to the
d river, the fo llow ing warning appea rs in t he
instr ument cluster d isp lay when the selecto r
is in P and N :
APPLY BRAKE WHEN ENGAGING GEAR WITH
VEHICLE STATIONARY
I n addition, the symbo l
<
gate.
The selector lever lock is effective only whe n
the vehicl e is stationary and at speeds be low
S km/ h. At higher speeds, the lock i n the N
position is automatic ally swi tched off .
The selector lever is no t locked when rapid
shifts a re made thro ugh the N pos ition (e .g .
from R to D). Thi s allows yo u to "rock " the ve
h icle if i t becomes s tuc k.
If the lever is in the
N pos it ion for mo re tha n 1 second w ith the
b rake peda l not depressed, the se lector lock
e ngages automatica lly.
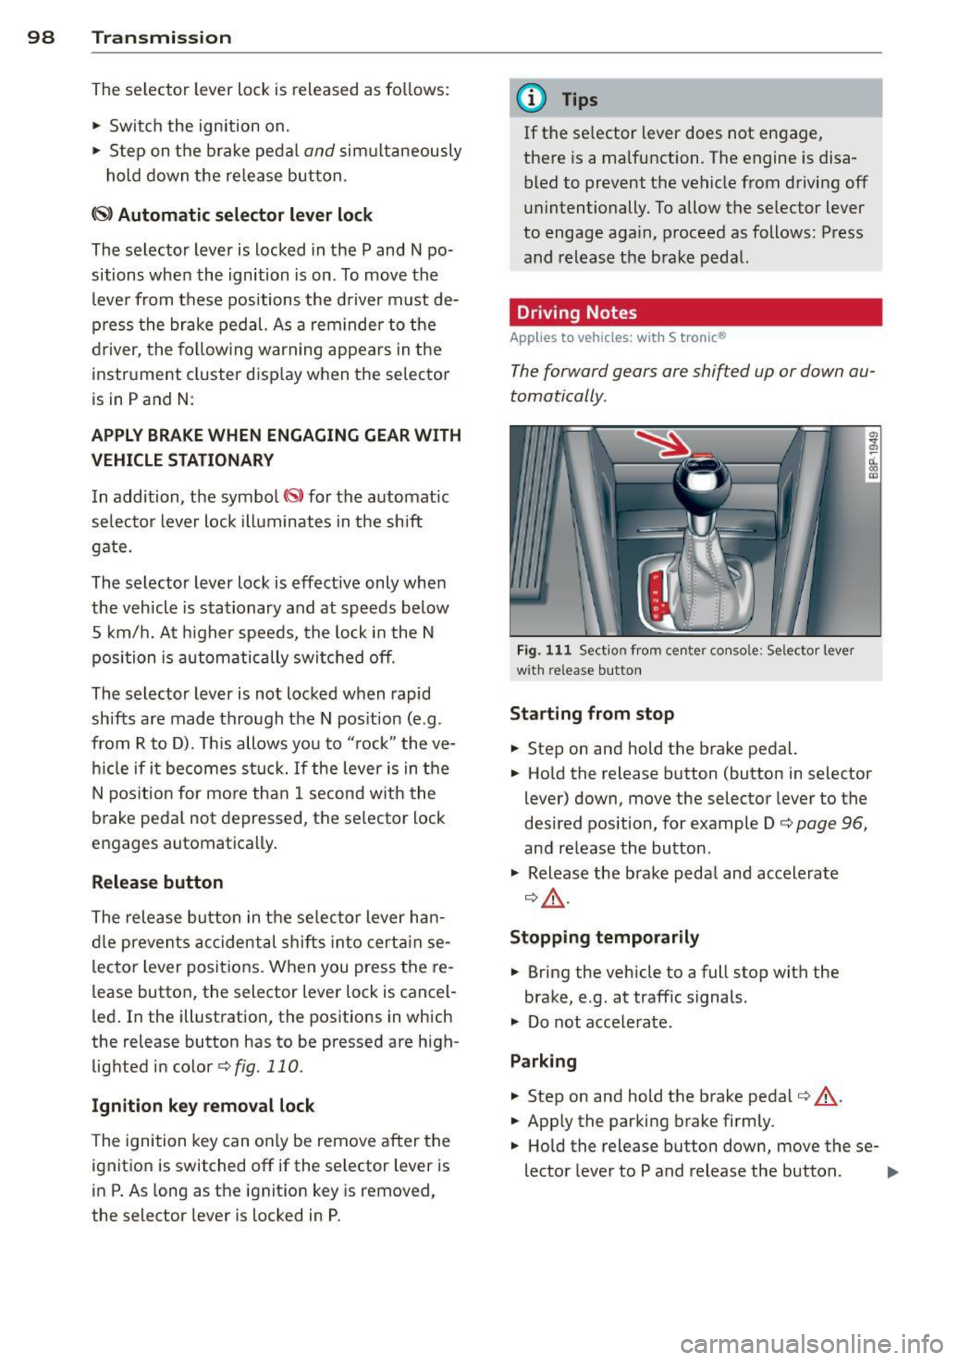
Release button
The release button in the se lector lever ha n
d le preven ts accident al sh ifts in to cer tain se
lector lever posit ions. When you press the re
lease butto n, the selector lever lock is cancel
led . In the illustration, the pos itions in which
the release button has to be pressed are high
lighted in
color c:>fig.110.
Ignition key removal lock
The ignition key can on ly be remove after the
ignitio n is switched off if the selector lever is
in P. As long as the ignit ion key is removed,
the selecto r lever is locked in P.
(D Tips
If the se lector lever does not engage,
the re is a ma lfunction . The engine is disa-
b led to prevent the vehicle from driving off
u nintentionally. To allow t he se lector lever
to engage aga in, p roceed as follows: P ress
and release the b rake pedal.
Driving Notes
Applies to vehicles: wit h S tronic®
The forward gears are shifted up or down au
tomatically .
Fig. 11 1 Sect io n from center co nso le: Se lecto r lever
w it h re lease butto n
Starting from stop
.. Step on and hold the brake peda l.
,. Hold the release button (button in selector
lever) down, move the selector lever to the
desired position , for example D
c:> page 96,
and release the button .
,. Release the brake p eda l and accelera te
c:> &_ .
Stopping temporarily
.,. Bring the veh icle to a full stop with the
brake, e .g. at traff ic signals .
,. Do not acce le rate.
Parking
,. Step on and hold the brake peda l c:> &_.
,. App ly the par king brake firmly .
,. Hold the release button down , move these-
lector leve r to P and release the button . .,.
Page 234 of 280

232 Tires and wheels
maneuvers. Stop as soon as possible and
check the tires and their pressures. In
flate the tire pressure to the proper pres
sure as indicated on the vehicle's tire
pressure label ¢
page 216. Driving on a
significantly under-inf lated tire causes
the tire to overheat and can lead to tire
failure. Under-inflation also is likely to
impair the vehicle's handling and stop
ping ability.
- T he driver is responsible for maintain ing
the correct tire pressures. You must
check the tire pressures regularly.
- Under certain cond itions (such as a spor
ty driving style, winter conditions or un
paved roads), the pressure monitor indi
cator may be delayed.
- Ask your authorized Audi dealer if run
flat tires may be used on your vehicle .
Your vehicle registration becomes invalid
if you use these tires when not permit
ted. Damage to your veh icle or acc idents
could also result .
(D Tips
- The tire pressure monitoring system
stops working when there is an ESP/ABS malfunction .
- Using snow chains may result in a system
malfunction.
- Tires with the identification "AO" or "RO"
have been specially matched with your
Audi. We recommend using only these
tires because they meet the highest
standards regarding safety and driving
characteristics when used correctly. Your
a uthorized Audi dea ler will g ladly pro
v ide you w ith more information.
Reset tire pressure monitoring system
(Stepl)
Applies to veh icles: w ith tire pressure monitoring system
If the tire pressure is adjusted, wheels ore ro
tated or changed, the TPMS must be reset in
the menu display.
----- ®
Fig. 174 Wipe r lever: Contro ls fo r the menu d isplay
Fig. 175 Disp lay: S ta rt m enu
I Rese t I button @ and rocker switch @
¢ fig. 17 4 functions:
To open the menu
" Press the I Reset ! button @ unt il the menu
disp lay¢
fig. 175 appears
Selections and settings
" Press the rocker switch @ to reach a menu
d isp lay. The switch is operated the same as
the display (up/down) .
Entering and confirming
" Press the I Reset I button @.
Returning to the Start menu
" Press the I Rese t I button longer than 2 sec
onds to return from any menu level to the
Start menu.