lamp AUDI A3 2015 User Guide
[x] Cancel search | Manufacturer: AUDI, Model Year: 2015, Model line: A3, Model: AUDI A3 2015Pages: 288, PDF Size: 71.46 MB
Page 262 of 288
260 Emergency situations
@ Tips
The disc har ged battery must be properly
connected to the ve hicle's electrical sys
tem. W hen jump starting or charg ing t he
battery, never connect the negative
grou nd cab le to the batte ry negat ive post
because the batte ry ma nager sys tem must
be ab le to detect th e ba ttery 's state o f
charge. A lways connec t the nega tive
grou nd ca b le to t he neg ative ground pos t
of the batte ry ma nager con trol unit.
Use of jumper cables
Make sure to connect the jumper cable
clamps in exactly the order described below!
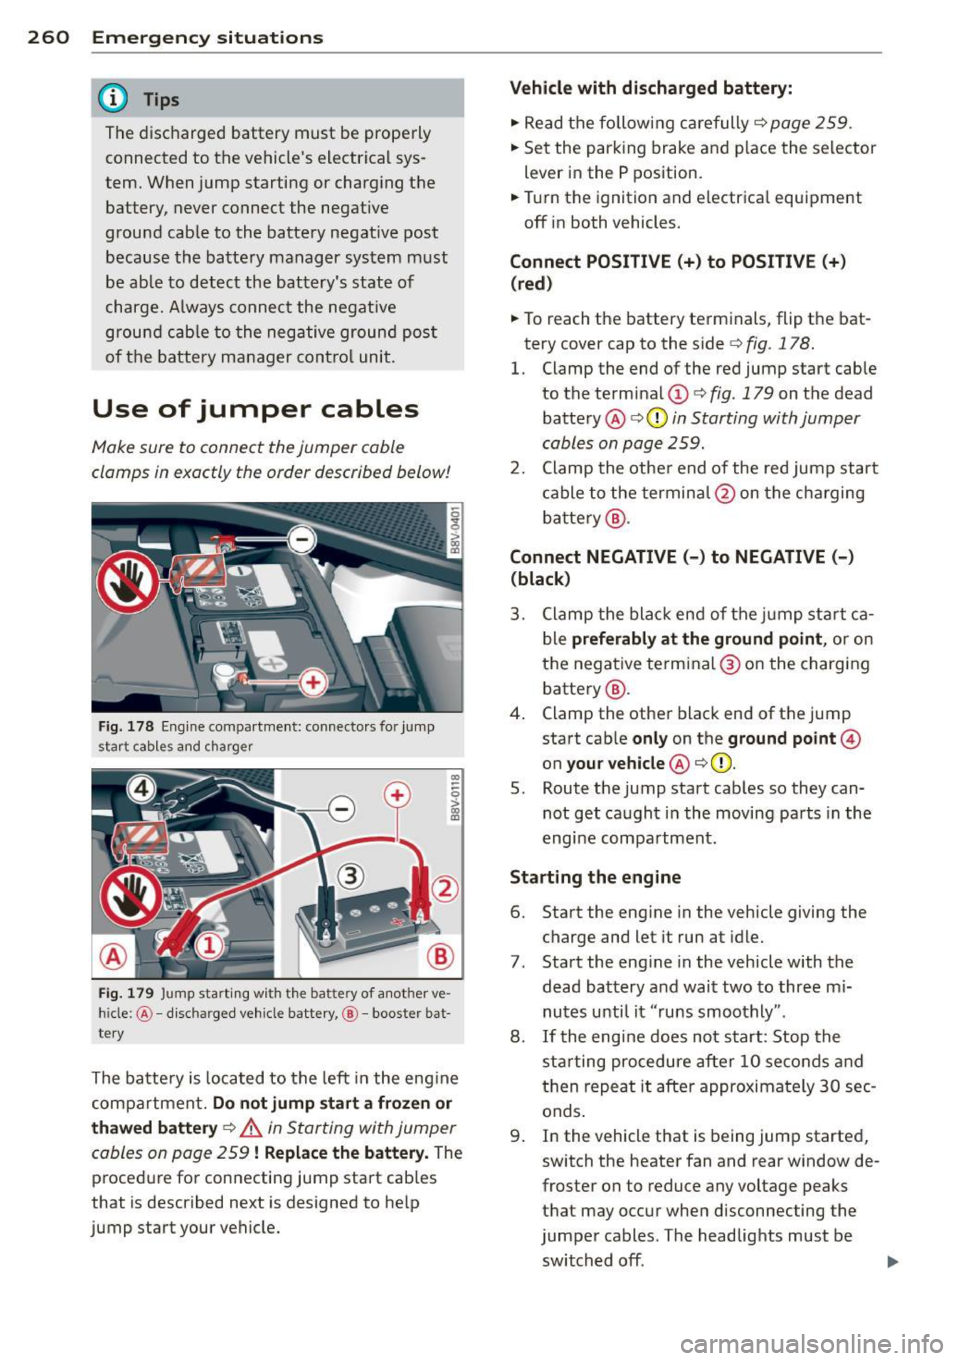
Fi g. 178 Eng ine compar tment: conne ctors for jump
start cables a nd charger
CD
--0 > ~
F ig. 1 79 Jump start ing with the battery of a nother ve·
h ide: @-di scharge d veh icle battery, @-booster bat
te ry
The ba tte ry i s loca ted to the left in the eng ine
compartment.
Do not jump start a frozen or
thawed battery
¢ .&. in Starting wi th jumper
cables on page 259
! Replace the battery. The
p roced ure fo r connecting jump start cab les
that is described next is designed to he lp
jump start your vehicle.
Vehicle with discharged battery:
.,. Read t he followi ng car efully¢ page 259.
.,. Se t the parking brake an d place the selector
lever in the P position.
.,. Tur n the ignition and electr ica l equ ipment
off in both vehicles.
Connect POSITIVE(+) to POSITIVE(+ )
(red )
.,. To reach the battery terminals, flip the bat
tery cover cap to the side¢
fig. 178.
1. Clamp the end of the red jump start cab le
to the term inal
(D ¢ fig. 179 on t he dead
batte ry @
¢ (Din Starting with jumper
cables on page 259.
2 . Clamp the othe r end of the re d jump start
c able to the termin al@ on the cha rging
b atte ry @ .
Connect NEGATIVE (-) to NEGATIVE(-)
(black)
3 . Clamp the bla ck end of the j ump st art ca
b le
preferably at the ground point , or on
the nega tive te rmi na l® on the chargi ng
battery @.
4. Clamp the othe r black end of the jump
start cab le
only on the ground point@
on your vehicle @¢(D.
S. Route the jump start cab les so they can
not get ca ught in the moving pa rts in the
engi ne compa rt m ent.
Starting the engine
6. Start the eng ine in the vehicle giving the
charge and let it run at idle.
7 . Start the eng ine in the vehicle with the
dead battery and wait two to three m i
nutes until it "runs smoothly" .
8.
If t he eng ine does not s tart: Stop the
sta rting procedure after 10 second s and
t h en re p eat it after approximately 3 0 sec
onds .
9 . In the vehicle that is being jump started,
switch the heater fan and rear window de
froster on to reduce any voltage peaks
that may occ ur whe n disconn ecting the
jumpe r cables. The headlights must be
switched off.
IJI,
Page 263 of 288
10. With the engines running, remove the ca
b les in
reverse order of the way they were
installed. Make sure the cables do not get
caught in moving engine components.
11. Switch the heater fan and rear window de-
froster off .
12 . C lose the battery cover.
The battery is vented to the outside to prevent
gases from entering the vehicle interior . Make
sure that the jumper clamps are well connect
ed with their metal parts in full contact with
the battery termina ls.
.&, WARNING
To avoid serious pe rsonal injury and dam
age to the vehicle, heed all warnings and
instructions of the jumper cable manufac
turer. If in doubt, ca ll for road service .
- Jumper cables must be long enough so
that the vehicles do not touch.
- When connecting jumper cables, make
surethattheycannotgetcaughtinany
moving parts in the engine compart
ment.
- Be fore you check anything in the engine
compartment, always read and heed all
WARNINGS
~ page 210.
(D Note
Improper hook-up of jumper cables can ru
in the generator.
- Always connect POSITIVE( +) to POSI
TIV E(+), and NEGA TIVE( -) to NEGATIVE
( - ) ground post of the battery manager
control un it .
- Check that all screw plugs on the battery
ce lls are screwed in firmly. If not, tighten
plugs prior to connecting clamp on nega
tive battery terminal.
- Please note th at the procedure for con
necting a jumper cable as described
above applies specifically to the case of
your vehicle be ing jump started. When
you are giv ing a jump start to another ve
hicle, do
not connect the negat ive( -) ca
ble to the negat ive( -) term inal on the
discharged battery@~
fig. 179. In-
-
Em erg en cy si tuation s 261
stead, secure ly connect the negative( -)
cable to either a solid meta l component
that is firmly bo lted to the engine block
or to the engine block itself. If the bat
tery that is be ing charged does not vent
to the outside, escaping battery gas could ig nite and explode!
- Make sure that the connected positive
terminal clamps have sufficient contact
with metal.
- Do not use the battery negat ive terminal
for jump start ing or a malfunct ion could
occur in the vehicle electrical system .
Emergency towing
with commercial tow
truck
General hints
Your Audi requires special handling for tow
ing.
The following information is to be used by
comme rc ial tow truck operators who know
how to operate their equipment safely.
-Ne ver t ow your A udi. Towing will caus e
da mage to the engin e and tr an smi ssion .
- Nev er wrap the safet y chains or wi nch ca
ble s around the brak e lines.
- To p revent unnecessar y damage , your Aud i
must be t ran spor ted with a flat bed truck.
- To lo ad the vehicle on to the fl at bed , u se
the to w ing loop found in the vehicle tool s
and attach to the front or rear ancho rage
~ page 262 and ~page 262.
.&, WARNING
A veh icle being towed is not safe for pas
sengers. Neve r allow a nyone to ride in a
vehi cle be ing towed, fo r any reason.
-
•
•
•
Page 279 of 288
Exterior mirrors
Adjusting .. .. ... ... .... ... .. .. .... 48
Dimming ... .. .. ........ ... .. .. .. .. 49
folding .. .. ................. .. .... 48
H eating .. .. ................. .. .... 48
F
Fasten ing
Booster seats . . . . . . . . . . . . . . . . . . . . . 17 5
Convertible c hild safety sea ts . .. .. .. . 173
Infant seats . . . . . . . . . . . . . . . . . . . . . . 172
Fl oor mats ... .. .... .... ... .. .. .. ... 126
F og lights/ rear fog light(s) . . . . . . . . . . . . . 4 2
Folding the exterior mirrors Center locking ... .. ... ... .. .. .. .... 36
F oldi ng the rear seats .... ... .. .. .. .. .. 61
F oot pedals .. ... .. ..... ... .. .. .. .. . 126
Footwell light ing .......... .... .. .... 45
F or the sake of the environment
F ue ling .... .... ...... ... .. .. .. ... 208
L eaks . ..... ... .. .. ..... ... .. .. ... 211
Rear window defogger . . . . . . . . . . . . . . . 68
Fr ont airbags
D escr ipt ion . ............. .. .. .. .. . 14 4
How they work . ... .... ... .. .. .. ... 150
F ronta l co llisions and the laws of physics 132
Front armrest . . . . . . . . . . . . . . . . . . . . . . . 54
Fr ont passenger's door emergency locking 3 7
Front seats Ad just ing ..... ........... ... ... .. 123
C hi ld restra ints in the front seat . .... . 142
also refer to Seats . . . . . . . . . . . . . . 5 2, 6 1
Fue l
Addit ives ... ... .. .. ...... .. .. .. .. . 206
Blended gasoline ............ .... .. 206
Current consumpt ion ... ...... .... ... 27
F ue l tank capac ity ........ .. .. .. .. . 266
Gasoline . .. ............. .... .. .. . 206
Gasoline additives ..... ... .. .. .... . 207
Gauge . . . . . . . . . . . . . . . . . . . . . . . . 1 0, 11
Indicator light . . . . . . . . . . . . . . . . . . . . . 24
Octane rating ............ .... .. ... 206
Recommendation ......... .. .. .. .. . 206
Saving fue l .............. .... .. .. . 102
F ue l economy messages (eff iciency pro-
g ram) ..... .. .. ... .. ..... ... .. .. .... 29
Inde x 277
Fueling
Fuel fi ller door emergency re lease 209
Fuel tan k capacity . .. .. ..... ... .. .. 266
Open ing the fue l filler door ........ .. 208
Fuses Ass ignment ... .... . ... ...... ... .. 256
Interior ... .. .... .. . .. .. ..... ... .. 255
replacing . ... .. .. .. .. .. ...... ... .. 255
G
Garment hooks . . . . . . . . . . . . . . . . . . . . . . 58
Gas d ischarge lamps .. .............. . 258
Gear recommendation . . . . . . . . . . . . . . . . 12
G lossary of tire and loading term inology 226
G love compartment . . . . . . . . . . . . . . . . . . 58
Gross Vehicle Weight Rating (GVWR) ... 265
H
Head light range control system ... .. ... 4 2
Indicator light ... .. . ... ...... ... .. . 25
Head lights . . . . . . . . . . . . . . . . . . . . . 42, 44
Head lights cleaning .. .. .. .. .. ............... 202
Head lights
Head light range control system . ... ... 42
Head restra ints .. ...... ......... .. .. 1 25
adjus ting . . . . . . . . . . . . . . . . . . . . . . . . . 55
Adjus ting . .. .. .. .. .. ........... .. 125
removing and insta lling . ..... ... .. .. . 55
Heated exter io r mir ro rs .. .... .... ... .... .. . 48
Rea r window . . . . . . . . . . . . . . . . . . . . . . . 68
Seats ..... .. .. .. ................. . 68
Washe r nozzles . . . . . . . . . . . . . . . . . . . . 46
Heavy clothing and safety be lts ... .... . 134
Hex socket .. .. .. .. ................. 247
Hig h voltage warn ing label ....... .. .. 265
Highway light . .. .... .. ........ ...... 43
Hill descent contro l .. . ... ...... ... .. 109
Hill ho ld . .. .. .. .. .. . ....... ..... .. . 78
Hill ho ld assist
refer to H ill hold . .. ........... .... . 78
Hor n .. .. .. .. .... ... .. .. ..... ... .. .. 8
How are child rest raint system anc ho rs re-
l ated to ch ild safety .... ........... .. 180
•
•
•
Page 281 of 288
Loading the roof rack . . . . . . . . . . . . . . . . . 60
Lackin g/unlocking
by remote control .................. 33
with the central locking switch .. .. .. .. 35
with the convenience key . . . . . . . . . . . . . 34
with the door lock ............ .. .. .. 35
Long-term memory .................. 27
Low beam Indicator light . . . . . . . . . . . . . . . . . . . . . 24
Low beams . ................... ..... 42
Lower universal anchorages (Canada) .. . 180
Lugg age compartment ............ ... . 60
Cargo net .. ................. .. .... 62
Increasing the size ........ .... .. .. .. 61
Loading .. ... .................. .. .. 60
Pass-through . . . . . . . . . . . . . . . . . . . . . . 63
Reversible mat ..................... 62
Socket ... .. ................. .. .... 56
Stowing luggage .................. 127
Tie-downs . . . . . . . . . . . . . . . . . . . . . . . . . 62
Luggage compartment lid
Central locking . . . . . . . . . . . . . . . . . . . . . 3 7
Emergency release ........ .... .. .. . 246
Lumbar suppo rt . . . . . . . . . . . . . . . . . 53, 54
M
Maintenance ................. ..... . 268
Maintenance intervals
with driver information system ........ 13
Malfunction Indicator Lamp (MIL) . . 23, 29
Mirro r
Digital compass switching on and off . .. 50
dimming . .. ................. .. .... 49
Vanity mirror ............ ...... .... 46
Mirror compass .................. .... SO
Mirrors Adjusting the exte rior mirrors . .. .. .. .. 48
Monitoring the Advanced Airbag System 152
Motor
Index 279
Navigation system CD-ROM player . . . . . . . . . . . . . . . . . . . . . 58
New tires and wheels ................ 236
NHTSA Contacting .. .. .. .. ..... .......... 129
Number of seats ..... ............... 131
Number of vehicle keys ............... 31
0
Occupant seating positions ........... 122
Octane rating ... .... ............... 206
Odometer ...... .................... 11
Oil Ind icator light . . . . . . . . . . . . . . . . . 23, 24
also refer to Engine oil . . . . . . . . 212, 215
Oil change interva l
with driver information system . . . . . . . . 13
On-board computer . . . . . . . . . . . . . . . . . . 26
Operation (multifunction steering
wheel) ..... ..... .................. 27
On-Board Diagnost ic System (OBD)
Electronic speed limiter .............. 30
Malfunction Indicator Lamp (MIL) .. .. . 29
Opening ................. ........... 31
Fuel filler door ... .. . .. ... .... ..... 208
Hood ........ ... .. ............... 211
Luggage compartment lid ............ 37
Panorama sunroof .................. 40
Windows ......................... 38
Opening/closing with the central locking switch ........ 35
with the convenience key ........ .. .. . 34
with the door lock .................. 35
Operate your vehicle economically and
minimize pollution .................. 195
Other equipment (efficiency program) . .. 29
Outside air temperature display ........ 11
Overview illustration (cockpit) . . . . . . . . . . . 8
•
•
stopping (driver messages with mechani-p
cal ignition key) ................ .... 75
Multifunction steering wheel . .. .. .. .. .. 27 Paint damage
203
On-board computer ................. 27 Paint No
........................... 265
•
Panorama sunroof ... . .. .. ... ... .... . 40
N
Convenience opening/closing ......... 39
Emergency closing ................ .. 41
Natural leat her care/cleaning .. .. .. .. . 204
Page 285 of 288
Tether anchors ..................... 183
Tether strap . .................. .... 183
T extiles cleaning ........... .... .. .. . 204
The first 1,000 miles (1 ,500 km) and after-
wards ..... .. .. .............. ... ... 193
Tie-downs . . . . . . . . . . . . . . . . . . . . . 62, 128
Tips for the environment Saving fuel . . . . . . . . . . . . . . . . . . . . . . . . 60
tiptronic (automatic transmission) .. .. . 110
Tire pressure ............... ... ... .. 231
Tire pressure monitoring system . ... .. . 243
Tires .. .... .. .. ............. .. .. ... 225
Service l ife . ............. .... .. .. . 235
Speed rating letter code ............ 23 7
Tire manufacturing date ............ 237
Tire pressure monitoring system . ... . 244
Tire specifications ........ .... .. .. . 23
7
Tread depth .. ........... .. .. .. .. . 235
Uniform tire quality grading .. .. .. .. . 239
Winter tires ................ .. .... 240
Tires and vehicle load limits ..... ... .. . 233
Tires and wheels Checking tire pressure ..... .. .. .. .. . 231
Cold tire inflation pressure .......... 229
Dimensions ................. ... .. . 236
General notes ..................... 225
Glossary of tire and loading terminolo-
gy .. .... .. ................. .. ... 226
Low aspect ratio tires ...... .. .. .. .. . 242
New tires and wheels ......... .... .. 236
Replacing .. .. ........ ... .. .. .. .. . 23 7
Snow chains ................ .. .... 241
Tires and vehicle load limits .. .. .. .. . 233
Wheel bolts . . . . . . . . . . . . . . . . . . . . . . 242
Winter tires ................ ... .. . 240
Tire service life ......... .... ... ... .. 235
Tool kit ..... .. .............. ..... . 247
Torn or frayed safety belts ... .. .. .. .. . 134
Towing Tow truck procedures ........... .... 261
Towing loop . ... .............. ... ... 262
TPMS (tire pressure monitor ing system) . 244
Trailer towing ............. .... .. .. . 198
Operating instructions ..... .. .. .. .. . 198
Technical requirements . . . . . . . . 198, 199
Trailer towing tips ........... .... .. 200
Index 283
Transmission malfunction (indicator
light) ....... ... .... ............... 111
T ransport Canada .. ................. 129
Tread Wear Indicator (TWI) ....... .... 235
Trunk
refer to Luggage compartment ........ 60
Turn signals . .. .. .... .. ........ ...... 44
Ind icator light . .. ................. . 25
u
Unfastening safety belts 136
Unidirectional tires .............. .... 225
Uniform tire quality grading ...... .. .. 239
Unlocking/locking by remote control . . . . . . . . . . . . . . . . . . 33
with the centra l locking switch ........ 35
with the conven ience key ........ .. .. . 34
with the door lock .... ............. . 35
V
Vanity mirror ...... .. ................ 46
Vehicle Dimensions .. .. .. .. ............... 266
out of service .. .. .. . .. .... ........ 195
Vehicle care ........................ 201
Vehicle identification label .......... .. 265
Vehicle Identification Number (VIN) .. .. 265
Vehicle jack . . . . . . . . . . . . . . . . . . . 247,251
Vehicle key ....... .. ..... ........... 31
Vehicle literature . . . . . . . . . . . . . . . . . . . . . 5
Vehicle tool kit .. .. ................. 247
w
Warning/indicator lights
Malfunction Ind icator Lamp (M IL) .. .. . 23
Warning/Indicator lights Airbag system . . . . . . . . . . . . . . . 152, 153
PASSENGER AIR BAG OFF ........... 153
Warning lights
refer to Indicator lights . . . . . . . . . . . . . . 14
Warranty coverages .. ........... .... 268
Washer fluid level (indicator light) . .. .. . 24
Washer reservoir .................. . 224
Washing matte finish paint ....... .... 201
Wear indicator .. .. ............. .. .. 235
•
•
•