transmission AUDI A3 2015 Owner's Manual
[x] Cancel search | Manufacturer: AUDI, Model Year: 2015, Model line: A3, Model: AUDI A3 2015Pages: 288, PDF Size: 71.46 MB
Page 115 of 288
Selector lever emergency release
"'Press and hold the yellow release button
with the screwdriver ¢
fig. 97.
"' Press the release button in the selector lever
@ and move the lever into the N position.
"' Clip the shift cover back into the shift gate
after using the emergency release.
If the ve hicle must be pushed or towed due to
a power failure (for example, the battery is
dead), the selector lever must f irst be moved
to the N position using the emergency release
mechanism.
A WARNING
Only move the selector lever out of the P
position when the parking brake is set. If
that does not work, secure the vehicle with
the brake pedal. Otherwise, the vehicle
could start to move unintentiona lly when
the selector lever is moved out of the P po
sition .
Automatic transmission 113
•
Page 190 of 288
188 Smart Technology
by pressing firmly on the brake pedal. Avoid
heavy braking during the break-in period.
Wear Brake pad
wear is largely dependent on the
way the vehicle is driven and on operating
conditions. This is especially true if you are
driving frequently in the city and on curves or
with a sporty driving style.
Operating noise
Noises may occur when braking depending on
the speed, braking force and outside condi
tions such as temperature and humidity.
Effect of water and road salt
In certain situations, for example after driving
through water, in heavy rain, after overnight
condensation or after washing your car, the
braking effect can be reduced by moisture or
ice on the brake rotors and brake pads. The
brakes must be "dried" first with a few careful
brake applications.
At higher speeds and with the windshield wip
ers turned on, the brake pads press against
the brake rotors for a short amount of time.
This action which is not felt by the driver hap
pens at regular intervals and facilitates a bet
ter reaction time for the brakes in wet weath
er.
The braking effect can also be reduced if you
are driving on salted roads and you do not ap ply the brakes for long periods of time. The
layer of salt on the brake rotors and pads
must be worn off first when the brakes are ap
plied.
Corrosion
Leaving the vehicle parked for long periods of
time, low mileage and avoiding heavy braking
can contribute to corrosion on the brake ro
tors and dirty brake pads.
If you usually avoid heavy braking or if there is
corrosion present, occasional heavy braking at
high speeds is recommended to clean the
brake rotors and pads
Q &. .
Brake system malfunction
if you notice that the brake pedal travel has
suddenly gotten larger, then a brake circuit
may have failed. Drive to your authorized Audi
dealer or qualified repair facility immediately
to have the problem corrected. On the way
there, drive with reduced speed and keep in
mind that a long braking distance and in
creased pressure on the brake pedal will be
necessary.
Low brake fluid level
When the brake fluid level is low, malfunc
tions in the brake system may occur. The brake fluid level is electronically monitored .
Brake booster
The brake booster amplifies the pressure you
apply to the brake pedal. It only works when
the engine is running.
A WARNING
-- You should perform braking maneuvers
for the purpose of cleaning the brake
system only if road conditions permit.
Other road users must not be put at risk -
you may cause an accident!
- Before descending a steep grade, reduce
speed and shift transmission into a lower
gear or lower driving range. Do not ride
the brakes or hold the pedal down too
long or too often. This could cause the
brakes to get hot and diminish braking
efficiency.
- Do not "ride the brakes" by resting your foot on the pedal when you do not intend
to brake. This may cause the brakes to
overheat, premature wear and increased
stopping distance.
- Under certain climatic and operating conditions such as passing through wa
ter, driving in heavy rain or after washing
the vehicle, the effectiveness of the brakes can be reduced. In winter, ice can
accumulate on the brake pads, linings,
discs and drums. Carefully apply brakes
Page 195 of 288
Driving and the
environment
The first 1,000 miles (1,500 km) and
afterwards
New engine
The engine needs to be run-in during the first
1,000 miles (1 ,500 km) .
For the fir st 600 mil es
(1,000 kilometers):
.,. Do not use full throttle.
.,. Do not drive at engine speeds tha t are more
than 2/3 of the max imum permitted RPM .
.. Avoid high engine sp eeds .
From 600 to 1,000 mile s (1,000 to
1,500 kilometers):
.. Speeds can gradually be increased to the
max imum pe rm iss ib le road or eng ine speed .
During and after break-in per iod
.,. Do not rev the engine up to high speeds
when it is cold. Th is app lies whether the
transmission is i n N (Ne utra l) or in gear.
After the break- in period
.. Do not exceed maximum engine speed un
der any circumstances.
.,. Upshift into the next higher gear
before
reaching the red area at the end of the tach
ome ter scale
¢ page 10.
During the first few hours of driving, the en
g ine's interna l friction is higher than later
when all the moving parts have been broken
i n. How well this break-i n process is done de
pends to a conside rable extent on the way the
ve hicl e is driven d uring the first 1,0 00 miles
(1 ,5 00 k ilome ters).
(D Note
Extremely h igh engine speeds a re auto
ma tica lly reduced. However, t he se rpm
lim its are pr ogr amme d for an eng ine well
r u n- in, not a new engine .
Driving and the environment 193
@) For the sake of the environment
Do not drive with unnecessar ily hi gh en
g ine speeds -upsh ifting ear ly saves f uel,
r educes noise and protects the environ
ment.
New tires
If your vehicle is running on new tires, drive
particularly caref ul for the first 350 miles
(500 kilomete rs) afte r fitt ing.
.&, WARNING
N ew tires tend to be slippery and mus t al
so be "b roken -in" . Be s ure to remember
this dur ing t he f irst 350 m iles (500 kilo
meters) . Brake gently . Avoid fo llow ing
closely behind other vehicles or other sit
uations that m ight require sudden, hard
b raking .
New brake pads
Remember that new brake pads do not have a
full brak ing effect dur ing the first 250 m iles
(400 kilomete rs) afte r they a re install ed.
New brake pads have to be "burnished in" be
fo re they have optima l grab¢ .&. .
D uring the brea k-in pe riod, you should avo id
putting severe loads on the brakes. Severe
l oads include , for example, sudden hard brak
i ng, in particular at very h igh speeds or, for
example, on mounta in passes .
.&, WARNING
New b rake pa ds don 't have the best stop
p in g p ower a nd must be "b ro ken -in " dur
ing the ini tial 1 00 to 150 miles (15 0 to
2 00 kilometers) o f no rma l ci ty driving . You
can compensate for this by pressing t he
b rake peda l more fi rm ly . This also applies
l ater when new pads are installed.
•
•
•
Page 202 of 288
200 Trailer towing
who is not properly wearing the restraints
provided by Aud i.
Trailer towing tips
Important to know
Your vehicle hand les different ly when tow ing
a trailer because of the additional weight and
different weight distribution. Safety, perform
ance and economy wi ll greatly depend on how
carefully you load your trailer and operate
your rig.
Before you actually tow your trailer, practice
turning, stopp ing and backing up in an area
away from traffic. Keep practicing until you have become completely familiar with the way
your vehicle-trailer combination behaves and responds.
Backing up is difficult and requires practice.
Backing up with a trai ler genera lly requires
steering action opposite to that when backing up your vehicle without a trailer.
Maintain a greater distance between your ve
hicle and the one in front of you. You will need
more room to stop. To compensate for the
trailer, you will need a larger than normal
turn ing radius .
When passing, remember that you cannot ac
celerate as fast as you normally would be
cause of the added load. Make sure you have
enough room to pass . After passing, allow
plenty of room for your tra iler before chang
ing lanes aga in.
Avoid jerky starts, sharp turns or rapid lane
changes .
(D Tips
-Do not tow a tra iler during the break-in
period of your vehicle.
- If you tow a trailer, your Audi may re
quire more frequent maintenance due to
the extra load
q page 268.
Parking on a slope
Do not park on a slope with a trailer . If it can
not be avoided, do so only after doing the fol lowing:
When parking:
.. App ly the foot brake.
.. Have someone place chocks under both the
vehicle and the trailer wheels .
.,. With chocks in place, slowly release the
brakes until the wheel chocks absorb the
load.
.. Turn the whee ls towards the curb.
.. App ly the parking brake.
.. Select the P selector lever position.
When restarting after parking:
.. Apply the foot brake .
.. Start the engine .
.. Select the D/S selector lever position.
.. Release the parking brake and s lowly pull
out and away from the wheel chocks .
.. Stop and have someone retrieve the wheel
chocks .
(D Tips
If you move the selector lever of the auto
matic transmission to P before applying
the parking brake and before blocking the
whee ls, you may have to use more force
later to move the lever out of the P posi
tion.
Page 228 of 288
226 Tire s and wheel s
-Never mount used tires on yo ur vehicle if
you are not sure of their "previous histo
ry." Old used tires may have been dam
aged even though the damage cannot be
seen that can lead to sudden t ire failure
and loss of vehicle control.
- If you notice unusual vibration or if the
vehicle pulls to one side when driving, al
ways stop as soon as it is safe to do so
and check the wheels and tires for dam
age.
(D Note
- Please note that summer and winter
tires are designed for the cond itions that
a re typ ica l in those seasons. Aud i recom
mends using w inter t ires d uring the win-
Glossary of tire and loading terminology
Accessory weight
means t he comb ined we ight (in excess of
those standard items which may be rep laced)
of automatic transmission, power steering,
power brakes, power windows, power seats,
radio, and heater, to the extent that these
items are availab le as factory-installed equip
ment (whether installed or not).
A spect ratio
means th e ratio of the height to the width of
the tire in percent. Numbers of 55 or lower in
d icate a low sidewall for improved steer ing re
sponse and better overall handling on dry
pavement .
Bead
means the part of the tire th at is made of
steel wires, wrapped or reinforced by ply cords
and that is shaped to fit the rim.
Bead s eparation
means a breakdown of the bond between
components in the bead.
Cord
means t he strands forming the plies in the
tire. ter months.
Low tempe ratu res signifi
cantly decrease the elasticity of summer
tires, which affects traction and braking ability. If summer tires are used in very
co ld temperatures, cracks can form on
the tread bars, resu lting in permanent
tire damage that can cause loud driving
noise and unbalanced tires. Aud i is not
responsib le for this type of damage.
- Burn ished, polished or chromed rims
must not be used in winter weather. The
surfa ce of the rims does not have suff i
c ien t cor rosion prote ct io n for this and
co uld be pe rmanen tly damaged by road
salt or simi lar substances. This damage
is not cove red by war ranty.
Cold tire inflat ion pre ssure
mea ns the t ire press ure recommended by the
vehicle manufacturer for a tire o f a des ignated
size that has not bee n driven for more than a
coup le of miles (ki lometers) at low speeds in
the three hour period before the tire press ure
is measured or adjusted.
Curb weight
means the weight of a motor vehicle w ith
standard equipment including the maximum
capacity of fuel, o il, and coolant, air condi
tion ing and additional weight of optional
equipment.
E x tra load tire
means a tire design to operate at higher loads
and at higher inflation pressures than the cor
responding standard tire. Extra load tires may
be identified as "XL", "xl", "EXTRA LOAD", or
"RF" on the sidewall.
Gross A xle Weight Rating ("GAWR")
means the load-carrying capacity of a single
axle system, measured at the tire-ground in-
terfaces.
IJ>,
Page 258 of 288
256 Fuses and bulbs
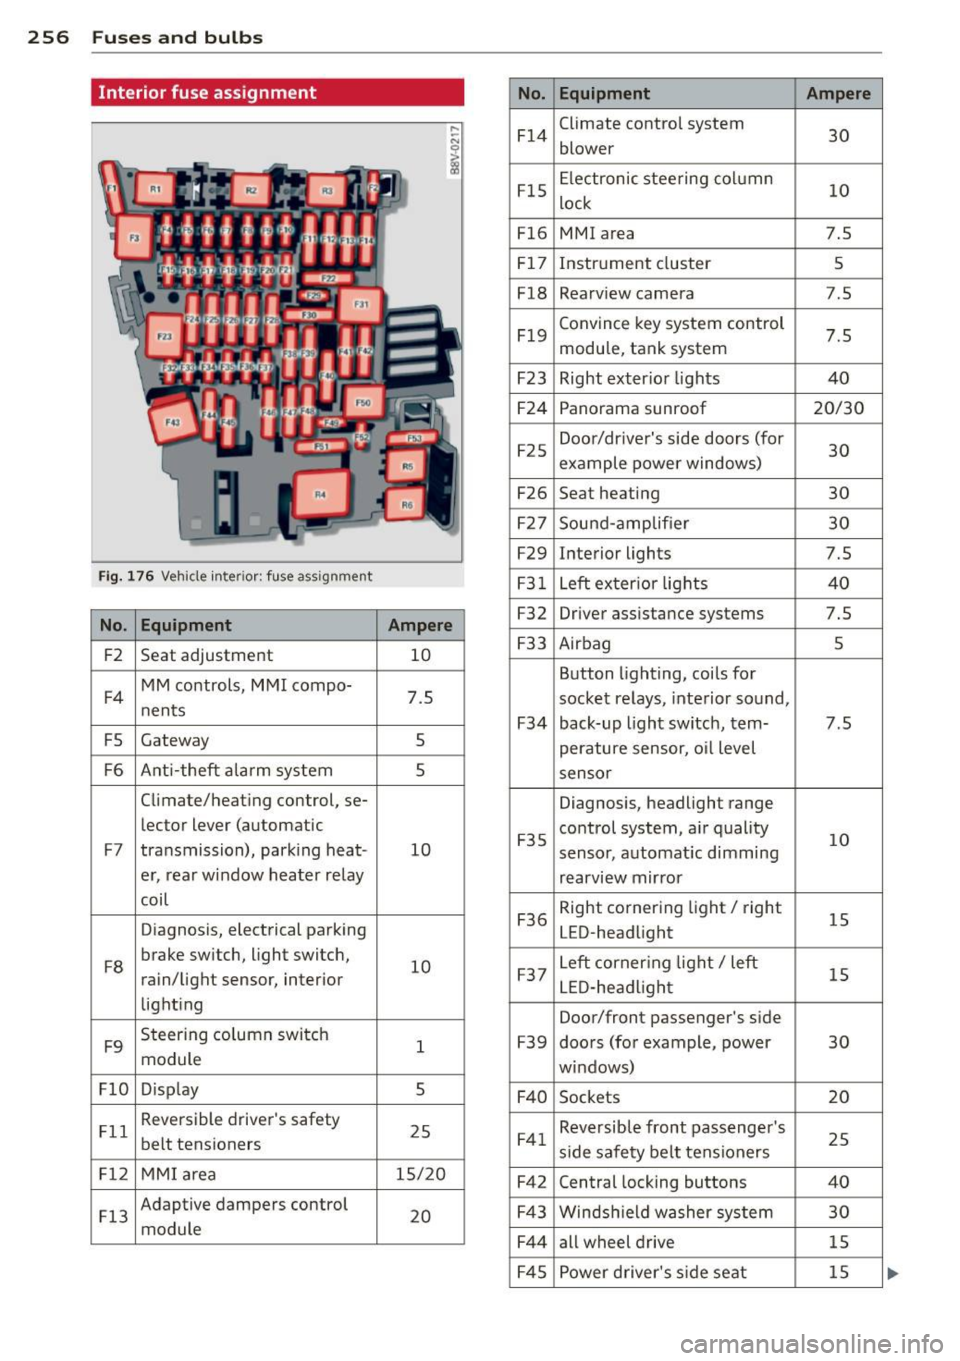
Interior fuse assignment
No. Equipment Ampere
F14
Climate control system
30 blower
F15
Electronic steering column
10 lock
F16 MMI area 7.5
F17
Instrument cluster 5
F18
Rearv iew camera 7 .5
F19
Convince key system control
7.5 module, tank system
F23 Right exter ior lights 40
F24
Panorama sunroof 20/30
F25
Door/driver's side doors (for
30 example power windows)
F26 Seat heating 30
F27
Sound-amp lifier 30
F29
Interior lights 7.5
Fig. 176 Vehicle inte ri or : fuse assignment F31 Left exter ior lights 40
No . Equipment Ampere F32 Driver assista nce systems 7.5
F2
Seat adjustment 10 F33 Airbag 5
F4
MM controls, MMI compo-
7.5 nents
F5 Gateway 5
Button lighting, coils for
socket relays, interior sound,
F34 back-up light switch, tern-7.5
perature sensor, o il level
F6 Ant i-theft alarm system 5 sensor
Climate/heating control, se-
Diagnosis, headlight range
le ctor lever (automatic
F7 transmission), parking heat -10 F35
control system, air quality
10 sensor,
automat ic dimming
er, rear window heater relay
rearview mirror
coil
Diagnosis, electrical parking
F36
Right cornering light/ right
15 LED-headlight
F8
brake switch, light switch,
10 rain/light sensor, interior
lighting
F9
Steering column switch
1 module
F37
Left corner ing light/ left
15 LED-headlight
Door/front passenger's side
F39 doors (for example, power 30
windows)
Fl0 D isp lay 5
F40 Sockets 20
Fll
Reversible driver's safety
25 belt tensioners F41 Reversible front passenger 's
25 side safety belt tensioners
Fl2 MMI area 15/20
F42 Central locking buttons 40
Fl3
Adaptive dampers control
20 module
F43 Windsh ield washer system 30
F44
all wheel drive 15
F45
Power driver's side seat 15
Page 261 of 288
Emergency situations
General
This chapter is intended for trained emer
gency crews and working personnel who have the necessary tools and equipment to
perform these operations.
Starting by pushing or
towing
(D Note
Vehicles with an automatic transmission
cannot be started by pushing or towing.
Starting with jumper
cables
If necessary, the engine can be started by
connecting it to the battery of another vehi
cle.
If the engine should fail to start because of a
discharged or weak battery, the battery can be
connected to the battery of
another vehicle,
using a
pair of jumper cables to start the en
gine.
Jumper cables
Use only jumper cables of sufficiently large
cross section to carry the starter current safe
ly. Refer to the manufacturer's specifications.
Use only jumper cables with
insulated termi
nal clamps which are distinctly marked :
plus(+) cable in most cases colored red
minus(-) cable
in most cases colored black.
A WARNING
Batteries contain electricity, acid, and gas.
Any of these can cause very serious or fatal
injury. Follow the instructions below for
safe handling of your vehicle's battery.
- Always shield your eyes and avoid lean
ing over the battery whenever possible.
- A discharged battery can freeze at tem
peratures just below 32 °F (0 °C). Before
Emergency situations 259
connecting a jumper cable, you must
thaw the frozen battery completely, oth
erwise it could explode.
- Do not allow battery acid to contact eyes
or skin. Flush any contacted area with
water immediately .
- Improper use of a booster battery to start a vehicle may cause an explosion.
- Vehicle batteries generate explosive gas
es. Keep sparks, flame and lighted ciga
rettes away from batteries.
- Do not try to jump start any vehicle with a low acid level in the battery.
- The voltage of the booster battery must
also have a 12-volt rating. The capacity
(Ah) of the booster battery should not be
lower than that of the discharged bat
tery . Use of batteries of different voltage
or substantially different "Ah" rating
may cause an explosion and personal in
JU ry.
- Never charge a frozen battery. Gas trap
ped in the ice may cause an explosion.
-Never charge or use a battery that has
been frozen. The battery case may have
be weakened.
- Use of batteries of different voltage or
substantially different capacity (Ah) rat
ing may cause an explosion and injury.
The capacity (Ah) of the booster battery
should not be lower than that of the dis
charged battery.
- Before you check anything in the engine
compartment, always read and heed all
WARNINGS
¢ page 210.
(D Note
-Applying a higher voltage booster bat
tery will cause expensive damage to sen
sitive electronic components, such as
control units, relays, radio, etc.
- There must be no electrical contact be
tween the vehicles as otherwise current
could already start to flow as soon as the
positive(+) terminals are connected. ..,. •
•
•
Page 266 of 288
264 Emergency situations
fall from a lift if there is a change in ve
hicle weight distribution and balance.
This might happen, for example, when
heavy components such as the engine
block or transmission are removed .
- When removing heavy components like
these, anchor vehicle to hoist or add cor
responding weights to maintain the cen
ter of gravity. Otherwise, the vehicle
might tilt or slip off the hoist, causing
serious personal injury.
(D Note
- Be aware of the following points before
lifting the vehicle:
-The vehicle should never be lifted or
jacked up from underneath the engine
oil pan, the transmission housing, the
front or rear axle or the body side
members. This could lead to serious
damage.
- To avoid damage to the underbody or
chassis frame, a rubber pad must be
inserted between the floor jack and
the lift points.
- Before driving over a workshop hoist,
check that the vehicle weight does not
exceed the permissible lifting capacity
of the hoist.
- Before driving over a workshop hoist,
ensure that there is sufficient clear
ance between the hoist and low parts
of the vehicle.
Page 267 of 288
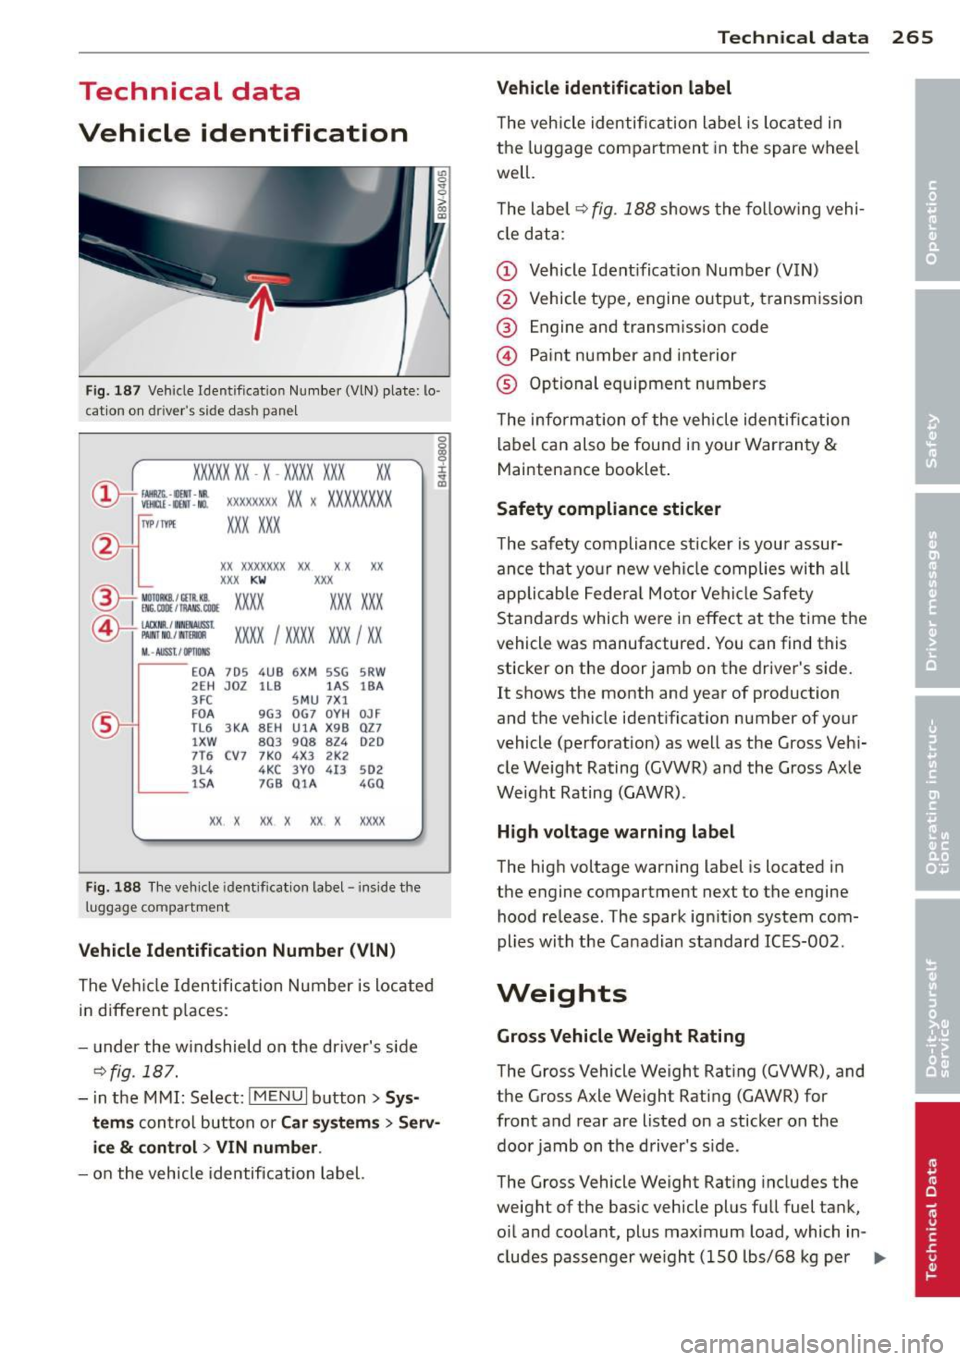
Technical data
Vehicle identification
F ig. 187 Veh icle Identificat ion Number (VlN) plate: lo·
cat ion on driver's side dash pane l
XXXXX XX · X -XXXX XXX
~ fAllftlli. -llllll · NR. ~ W!ru -llllll -NO.
xx
XXXX XXXX XX X XXXXXXXX
XXX XXX
IYP /TYPE
XX XXXX XXX XX X X XX
XXX
KW XXX
®i ~W.::·f :l~~ XXXX XXX XXX
©+ ::rw= xxxx I xxxx XXX I xx
M. · AUSSt I IJ'IIDIIS
EOA 7D5 4UB 6XM SSG SR W
2EH JOZ 1LB lAS
18A
3FC SMU 7Xl
FDA 9G3 OG7 OYH
OJF
TL6 3KA 8EH
UlA X98 027
l XW 803 908 824 D2D
7T6 CV7 7KO 4X3 2K2
3L4 4KC 3YO 413 502
1SA 7GB 01A 4GO
XX . X XX X XX X XXXX
Fig. 188 The vehicle identification label- in side the
l uggag e compartme nt
Vehicle Identification Number (VlN)
The Veh icle Identifica tion Number is located
in different p laces :
- under the w indshield on the driver's side
¢fig. 187.
- in the MMI: Select: !MENUI button> Sys
tems
control button or Car systems > Serv
i ce
& co ntrol > VIN number .
-on the vehicle identification label.
Technical data 265
Vehicle identification label
The vehicle identification label is located in
the luggage compartment in the spare wheel
well.
T he label¢
fig. 188 shows the following vehi
cle data:
(D Vehicle Identification Number (VIN)
@ Vehicle type, engine output, transmission
® Engine and transmission code
© Paint number and interior
® Optional equipment numbers
The information of the veh icle identification
label can also be found in your Warranty
&
Maintenance booklet .
Safety compliance sticker
The safety compliance sticker is your assur
ance that your new vehicle complies with all
applicable Federal Motor Vehicle Safety
Standards which were in effect at the time the
vehicle was manufactured . You can find this
sticker on the door jamb on the driver's side.
It shows the month and year of production
and the vehicle ident ification number of your
vehicle (perforation) as well as the Gross Vehi
cle Weight Rating (GVWR) and the Gross Axle
Weight Rating (GAWR) .
High voltage warning label
The high voltage warning label is located in
the engine compartment next to the engine
hood release. The spark ignition system com
plies with the Canadian standard ICES-002 .
Weights
Gross Vehicle Weight Rating
The Gross Vehicle Weight Rating (GVWR), and
the Gross Axle Weight Rating (GAWR) for
front and rear are listed on a sticker on the
door jamb on the driver's side.
The Gross Vehicle Weight Rating includes the
weight of the basic vehicle plus full fuel tank,
o il and coolant, plus maximum load, which in
cludes passenger we ight (150 lbs/68 kg per
II>--
Page 271 of 288
complexity of today's automobi les, have
steadi ly reduced the scope of maintenanc e
and repairs which can be carried out by vehicle
owners.
Also, safety and env ir onm ental con
cerns p lace very strict limits on the nature of
repairs and adjustments to engine and trans
miss ion pa rts which an owner can perform .
Maintenance, adjustments and repa irs usua lly
require special tools, testing dev ices and oth
er equipment avai lab le to specially trained
workshop personnel in order to assure prope r
performance, reliab ility and safety of the vehi
cle and its many systems .
Improper ma intenance, adjustments and re
pa irs can impair the operation and reliability
of your vehicle and even vo id your vehicle war
ranty. The refo re, p roof of servic ing in accord
ance w ith the ma intenance sched ule may be a
condition for upholding a poss ible war ranty
claim made within the warranty period.
Above all, operational safety can be adversely
affected, crea ting unnecessary risks for you
and your passengers.
I f in doubt about any servicing , have it done
by your authorized Audi dealer or any other
p roperly equipped and q ualified workshop .
We strong ly urge you to give your aut horized
Audi dealer the opportunity to perfo rm all
schedu led maintenance and necessary repairs .
Your dea ler has the facilities, or iginal parts
and trained spec ialists to keep your vehicle
running properly .
Performing limit ed m aintenance you rself
The fo llowing pages describe a limited num
ber of procedures which can be performed on
your vehicle with ordinary too ls, should the
need arise and trained personnel be unavaila
b le. Before performing any of these proce
dures, always thoroughly read all of the app li
cable text and carefully follow the instruc
tions given. Always rigorously obse rve the
WARNINGS provided .
Before you check anything in th e engine
compartment, a lways re ad and heed all
WARNINGS ~&. and
~page 210 .
Con sumer In formation 269
_& WARNING
- Ser ious personal injury may occur as a re
sult of improperly performed mainte
nance, adjustments or repa irs .
- Always be extremely careful when work
ing on the vehicle . Always follow com
monly accepted safety pract ices and gen
era l common sense. Never r isk personal
injury.
- Do not attempt any of the maintenance,
checks or repairs descr ibed o n the fol
lowing pages if you are not fully fam ilia r
with these or other procedures with re
spect to the vehicle, or are uncertain how
to p roceed .
- Do not do any work without the proper
too ls and equipment. Have the necessary
wo rk done by your authorized A udi deal
er or another proper ly equipped and
qualified workshop.
- The engine compartment of any motor
veh icle is a potentially ha zardous area.
Never reach into t he area around or
touch the rad iator fan . It is temperature
contro lled and can switch on suddenly -
even when the engine is off . T he radiato r
fan switches on automat ically when the
coo lant reaches a certain tempera ture
and will cont inue to run until the coo lant
temperature drops .
- Always sw itch o ff the ignition before any
one gets under the vehicle.
- Always support your veh icle with safety
s tands if it is necessary to work under
neath the vehicle. The jack s upplied with
the vehicle is not adequate for this pu r
pose and cou ld collapse causing serio us
personal injury.
- If you m ust wor k underneath the vehicle
with the wheels on the g round, a lways
make sure the vehicle is on leve l ground,
that the wheels are a lways securely
blocked and that the engine cannot be
started.
- Always make sure the transmission se lecto r lever (automatic transmission) is •
•