cooling AUDI A3 2015 Owners Manual
[x] Cancel search | Manufacturer: AUDI, Model Year: 2015, Model line: A3, Model: AUDI A3 2015Pages: 288, PDF Size: 71.46 MB
Page 14 of 288
12 Instrum ent s and indicator ligh ts
bottom LED illuminates red and the indicator
light
ti appears ¢ page 24 . The bottom
LED blinks red when the fuel level is very low.
The poss ible range based on the current fue l
leve l is shown in the on-board computer
¢ page 2 7, On-board computer display .
The fuel tank capacity of your veh icle is in the
techn ica l data ¢
page 266.
(1) Note
Never drive with the tan k completely emp
ty. An irregu la r fuel supp ly can ca use the
eng ine to misfire. This leads to uncom
busted fuel in the exhaust system. This
can cause overheating and damage to the
catalyt ic converter.
Engine coolant temperature gauge
The engine coolant temperature gauge@
¢
page 10 , fig . 3 only functions when the ig
n ition is switched on . To prevent engine dam
age, observe the follow ing important points
concerning the temperature ranges.
Cold r ange
If only the LEDs at the bottom of the gauge
turn on, the engine has not reached operat ing
temperature yet . Avoid high eng ine speed, full
throttle, and heavy eng ine load.
Norm al ra nge
The engine has reached its operating temper
ature once the LEDs up to the center of the
gauge turn on under normal driving condi
tions . The LEDs higher up may turn on when
the eng ine is under heavy load or the exter ior
temperature is high . Thi s is not a cause for
concern as long as the. indicator light in
the disp lay does not turn on .
Hot range
If the LEDs in the upper area of the display
and the. indicator light in the instrument
cluster display turn on, the coolant tempera
ture is too h igh ¢
page 20.
A WARNING
-Always observe the warn ing in
¢
page 210 before opening the hood
a nd checking the engine coolant level.
- Never open the eng ine hood if you see or
hear steam, or if you see engine coolant
dripping from the engine compartment .
You could bur n yourself. Let the engine
coo l off first u ntil yo u can no longer see
or hear steam or coolant escaping.
([) Note
-Add itional headlights and other compo
nents in front of the a ir intake reduces
affect of the eff iciency of the coolant. At
hig h ou tside air temperat ures and wi th
heavy eng ine load, there is a ris k of the
eng ine overheating .
- T he front spoiler ensures the correct dis
tribution of cooling air while driving . If
the spoi ler is damaged, the effect of the
coolant can be reduced and there is a risk
of the engine overheating. See your au
thorized Audi dealer or qualified repair
facility .
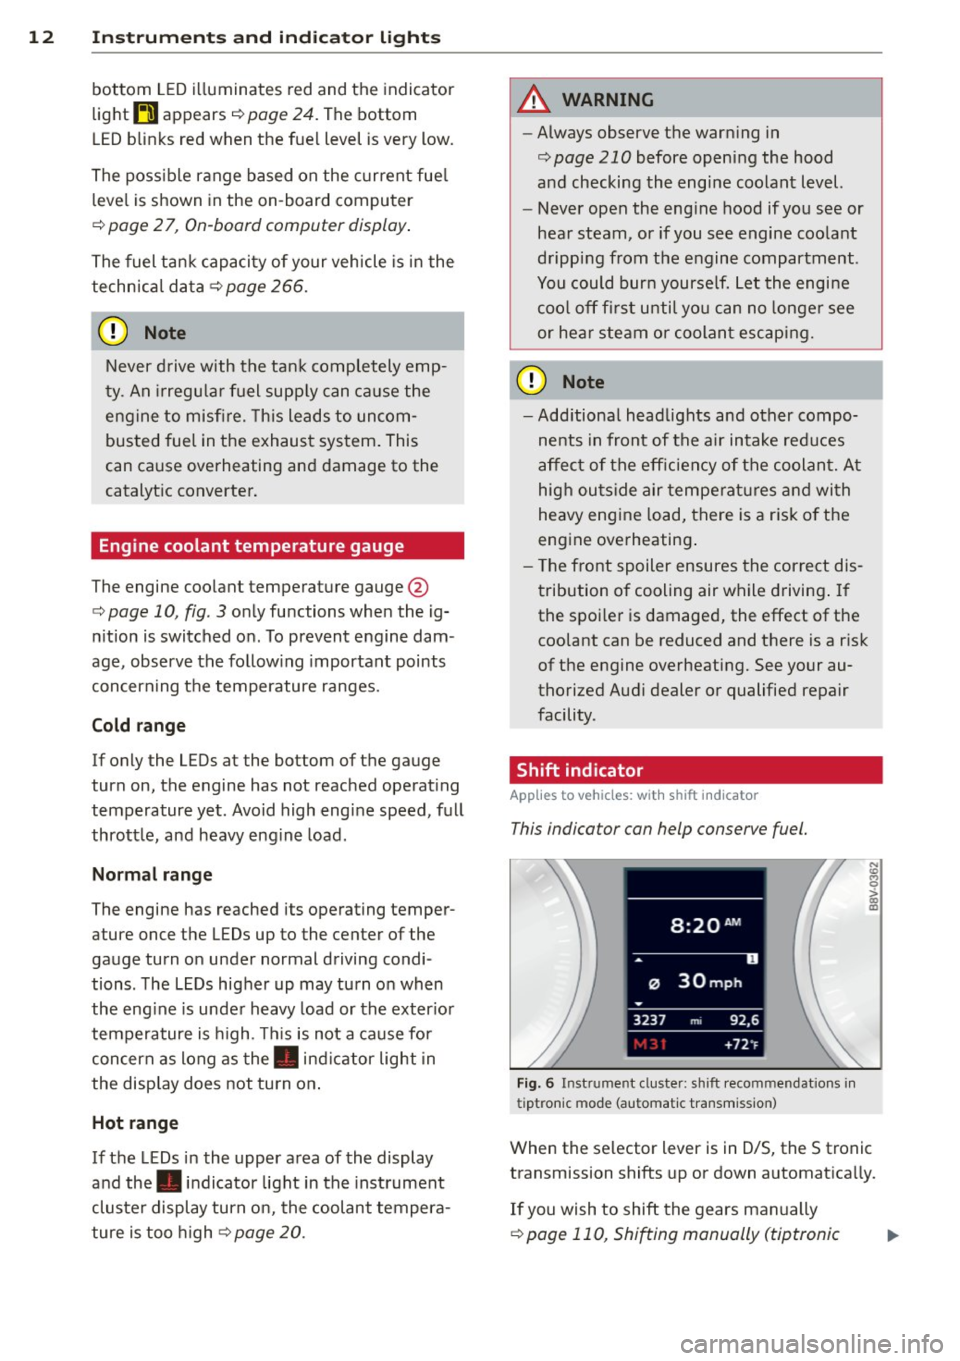
Shift indicator
Applies to veh icles: w ith shift indicator
This indicator can help conserve fuel.
Fig. 6 Inst rume nt cl uster: shift recommendat ions in
t ip tronic mode (a utomatic transmission)
N
"' s > o:> tD
When the selector lever is in D/S, the S tronic
transmission shifts up or down automat ica lly.
If you wish to shift the gears manually
¢ page 110, Shifting manually (tiptronic
Page 17 of 288
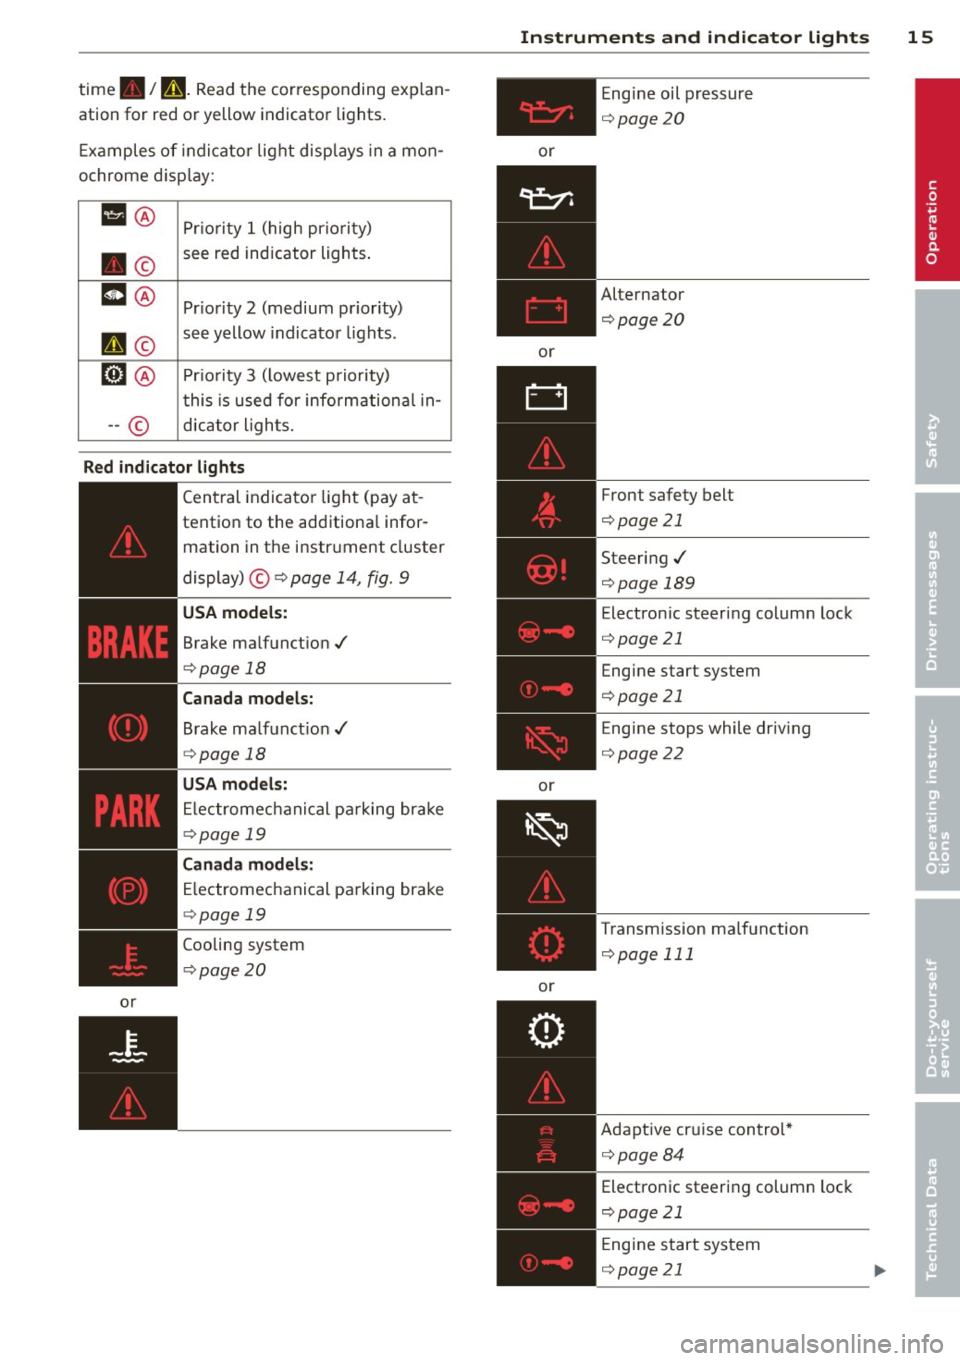
time./ D. Read t he corresponding ex plan
ation for red or yellow indicator lights.
E xamples of in dic ator lig ht disp lays in a mo n
ochrome d isp lay:
1!1 @ Prio rit y 1 (high priori ty)
• © see red ind
icator ligh ts .
m @ Priority 2 (medium priority)
II ©
see yellow indicato r lights .
51@ Prio rity 3 (lowest prio rity)
t his is used for inform ationa l in-
-- © dic
ator ligh ts.
Red indicator l ights
or
-------------
Cen tral indicato r light (pay a t-
tention to the additiona l infor
mation in the instr ument cluster
display) ©¢
page 14, fig. 9
USA models:
Brake ma lfunct ion ./
¢page 18
Canada models:
Brake ma lf u nct io n./
¢ page 18
USA model s:
El ectromec hanical pa rking br ake
¢page 19
Canada models:
Electromechanical pa rking bra ke
¢ page 19
Cooling system
¢page 20
Instrument s and indicator ligh ts 15
or
or
or
or E
ng ine oil pr essure
¢ page20
Alternator
¢page20
Front safety belt
¢page 21
Steering./
¢page 189
Electron ic steeri ng colum n lock
¢ page 21
Engine start system
¢page 21
Engine stops while driv ing
¢ page 22
Transmission ma lf u nction
¢ page 111
Adapt ive cr uise contro l*
¢page84
Electronic steering column lock
c::>page 21
Engine start system
¢page 21
•
Page 22 of 288
20 Instruments and indicator lights
When this message a ppears, first press the
b rake peda l and then release the parking
b rake .
113 (USA models)/K@'A
blocked
Ill ( USA models) t6] (Canada model s) Park
ing brake: not applied!
113 ( USA models) t6J (Canada models) Cau
tion : Vehicle parked too steep
113 (USA models) t6] ( Canada models ) Park
ing brake is applied
When th is message appears, first press the
b rake pedal and then release the parking
brake if necessary .
(D Tips
More information on the pa rking brake
c::;,page 76.
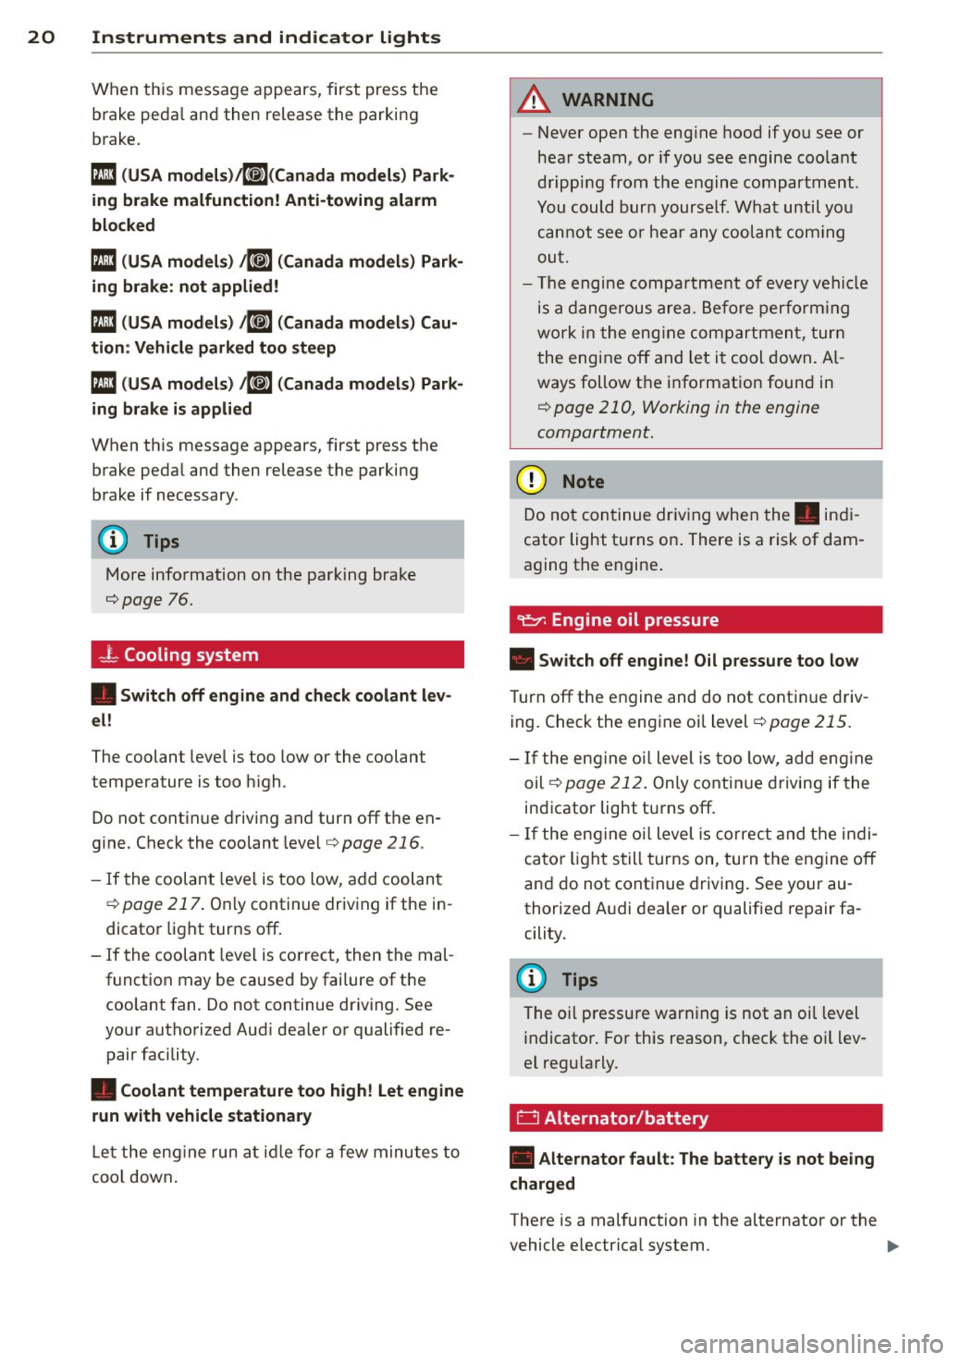
- l Cooling system
• Switch off engine and check coolant lev
el!
The coolant leve l is too low or the coolant
temperature is t oo high .
D o not cont inue driving and turn off t he en
g ine. Check the coolant leve l
c::;, page 216 .
-If the coolant leve l is too low, add coo lan t
c::;, page 217 . Only continue driv ing if the in
dicato r light tur ns off .
- If the coolant leve l is co rrect, then the mal
function may be caused by fai lure of the
coolant fan. Do not continue dr iv ing. See
yo ur authorized Aud i dea le r or qualified re
pair fac ility .
• Coolant temperature too high! Let engine
run with vehicle stationary
L et the eng ine run at idl e for a few minu tes to
coo l down .
A WARNING
-Never open the eng ine hood if y ou see or
hear steam, or if you see engine coo la nt
d ripping from t he e ngine compartment .
You could bur n yourse lf . What until you
ca nno t see or hea r any coolant co min g
ou t.
- T he engi ne compa rtment o f eve ry ve hicl e
is a dange rou s ar ea . B efo re perfo rmin g
wo rk in t he eng ine com par tmen t, tur n
t he eng ine off and let i t co ol d own. A l
ways follow t he i nfo rmat ion foun d in
c::;, page 210 , Working in the engine
compartment .
(D Note
Do n ot con tinue dr iv ing whe n the . indi
cator light turns on . There is a ris k of dam
a g ing t he engine .
Turn off the en gine and do not co nti nu e dr iv
ing. Check the eng ine oil level
c::;, page 21 5.
- If the en gin e o il level is too low, ad d eng in e
oil
c::;, page 212 . Only cont inue drivin g if the
in di cator light tu rns off.
- If the en gine oil level is co rrec t and the in d i
ca to r lig ht still turns on, tu rn t he engine off
an d do not cont inue driv ing . See your au
thorized A udi deale r or qualifie d repair fa
cility.
(D Tips
The oi l press ure warn ing is not an oil level
i ndicato r. For this reas on, chec k th e o il lev
e l reg ularly .
D Alternator/battery
• Alternator fault: The battery is not being
charged
There is a malfunction in the al ternator or the
vehicle e lectr ica l system .
Page 66 of 288
64 Warm and cold
Warm and cold
Climate control system
Description
Different systems cou ld be installed.
- manual climate control system* or
- automatic climate control system*
The
clim ate co ntrol system * cools and re
moves humidity from the air in the vehicle in
terior. It is the most effective when the win
dows and panorama sunroof* are closed. If
there is a build-up of heat inside the vehicle,
ventilation can help to speed up the cooling process . For this reason, the windows and
panorama sunroof can be opened from the
outside
r::} page 3 9, Convenience opening/
closing.
The pollutant filter removes pollutants such
as dust and pollen from the air .
A WARNING
Reduced visibility is dangerous and can
cause accidents.
-
- For safe dr iv ing it is very important that
all windows be free of ice, snow and con
densation.
- Completely fami liarize yourself with the
proper use and function of the heating
and ventilation system and especia lly
how to defog and defrost the windows .
- Never use the windshie ld w iper/w asher
system in freezing weather until you
have warmed the windshield first, using
the heat ing and ventilation system . The washer sol
ution may freeze on the wind
shie ld and reduce visib ility.
@ Note
- If you suspect that the air conditioner
has been damaged, switch the system
off to avoid further damage and have it
inspected by a q ualified dealership.
- Repairs to the Audi air conditioner re
quire specia l technical know ledge and
special tools. Contact an authorized Aud i
dealer for ass istance.
@ For the sake of the environment
By reducing the amount of f uel you use,
you also reduce the amount of pollutants
emitted into the air.
(1) Tips
- To prevent interference with the heat ing
and cooling output and to prevent the
w indows from fogging over, the air in
take in front of the windshield must be
free of ice, snow or leaves.
- Condensation from the cooling system*
can drip a nd form a puddle of wa ter un
der the vehicle . This is normal and does
not mean t here is a leak.
- The energy ma nagement system may
switch the seat h eating* or rear window
defroster off temporar ily. These systems
are available again as soon as the energy
balance has been resto red.
- Air escapes through vents under the rear
w indow. When plac ing items of cloth ing
on the luggage compartmen t cover, en
sure t hat the openings are not covered .
Page 67 of 288
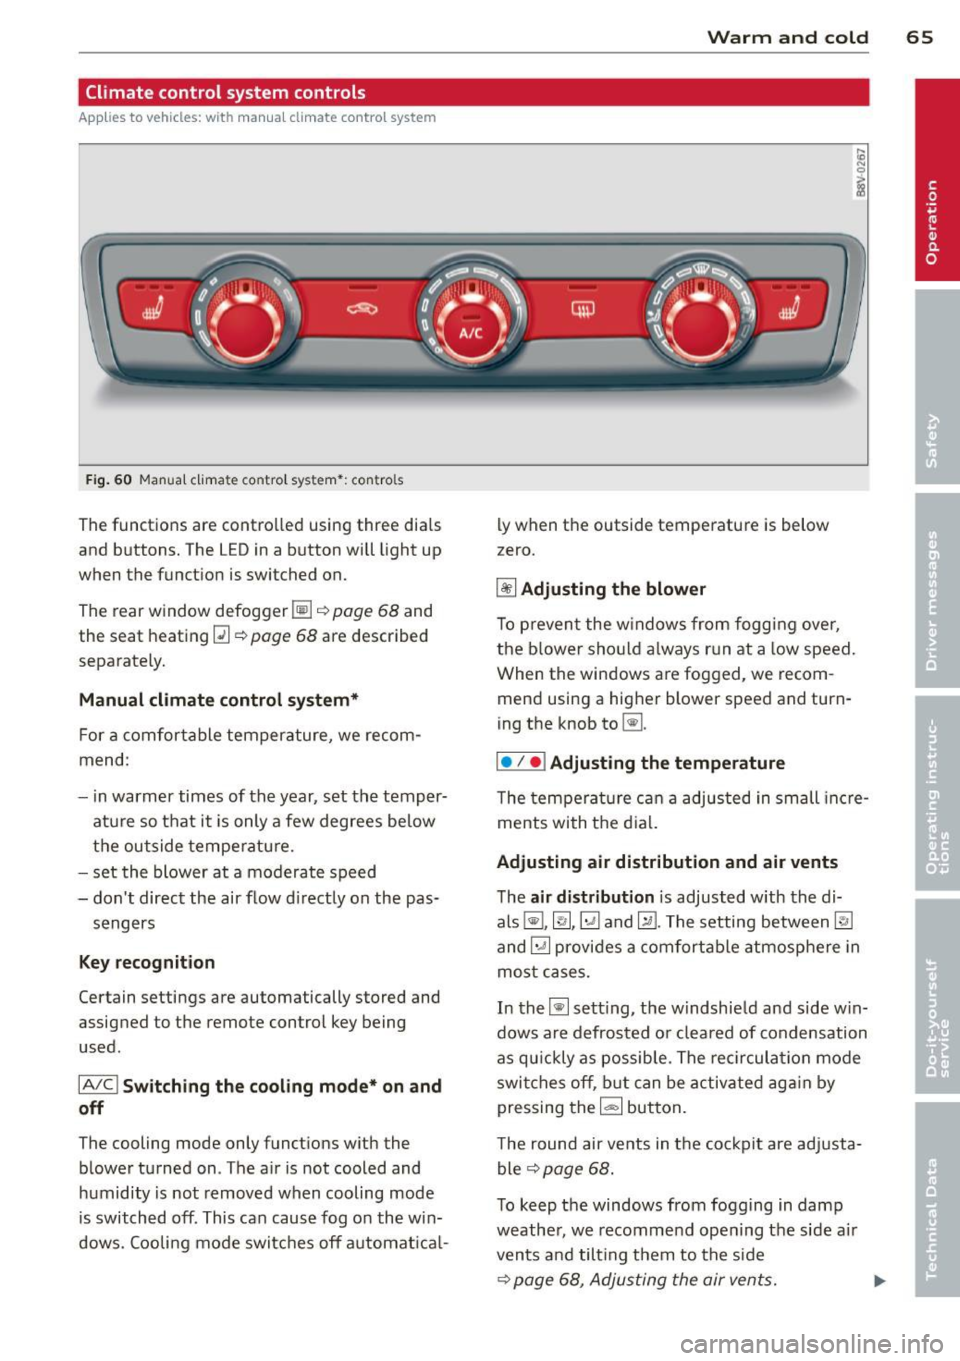
Climate control system controls
Applies to vehicles: with manual climate control system
F ig . 60 Man ual cl ima te con tro l sy ste m•: con tro ls
The functions are contro lled using three dia ls
and buttons. The L ED in a button will light up
when the function is switched on.
The rear window defogger~ ¢
page 68 and
the seat heating~¢
page 68 are described
separate ly.
Manual climat e control system*
For a comfortable temperature, we recom
mend:
- in warmer times of the year, set the temper
atu re so that it is only a few degrees be low
the outside tempe ratu re.
- set the blower at a moderate speed
- don't direct the air flow d irectly on the pas-
sengers
Key recognition
Certain setting s are automatically stored and
assigned to the remote control key being
used.
IA /C l Switching the co oling mode* on and
off
The cooling mode only functions w ith the
b lower turned on . The a ir is not cooled and
h umidity is not removed when cooling mode
is switched off . This can caus e fog on the win
dows. Cooli ng mode switches off a utomat ica l-
W arm and cold 65
ly when the outside temperatu re is below
z ero.
~ Adjusting the blower
To p reven t the w indows from fogg ing over,
the b lower sho uld a lways r un at a low speed.
When the windows are fogged , we recom
mend using a higher blower speed and turn
ing the knob to~ -
I• I • I Adjusting the temperature
T he tem pe ra tu re c an a adjusted in small incre
ments with the d ial.
Adjusting air distribution and air vents
T he air distribution is adjusted w ith the di
als ~, ~,~ and~-The setting between~
and ~ provides a comfortable atmosphere in
mo st cases.
In the~ setting, the w indshie ld and side w in
dows are defrosted o r cleared of condensation
as qu ickly as possib le . The rec ircula tion mode
swi tches off, b ut can be activate d ag ain by
pressing the
1- 1 button.
T he round air ve nts in t he co ckpit are adj usta
ble ¢
page 68.
To keep the windows from fogg ing in damp
weathe r, we recomme nd ope ning t he side a ir
vents and tilt ing them to the side
¢ page 68 , Adjusting the air vents. ..,.
Page 68 of 288
66 Warm and cold
Foot vents are located under the front seats
to heat the rear of the vehicle.
l= I Switching recirculation mode on and
off
I n recirculation mode, the air inside the vehi
cle is circu lated and filtered. This prevents the
unfiltered air outside the vehicle from enter
ing the vehicle interior. We recommend
switching recirculation mode on when driving
through a tunnel or when sitt ing in traffic
~ & .
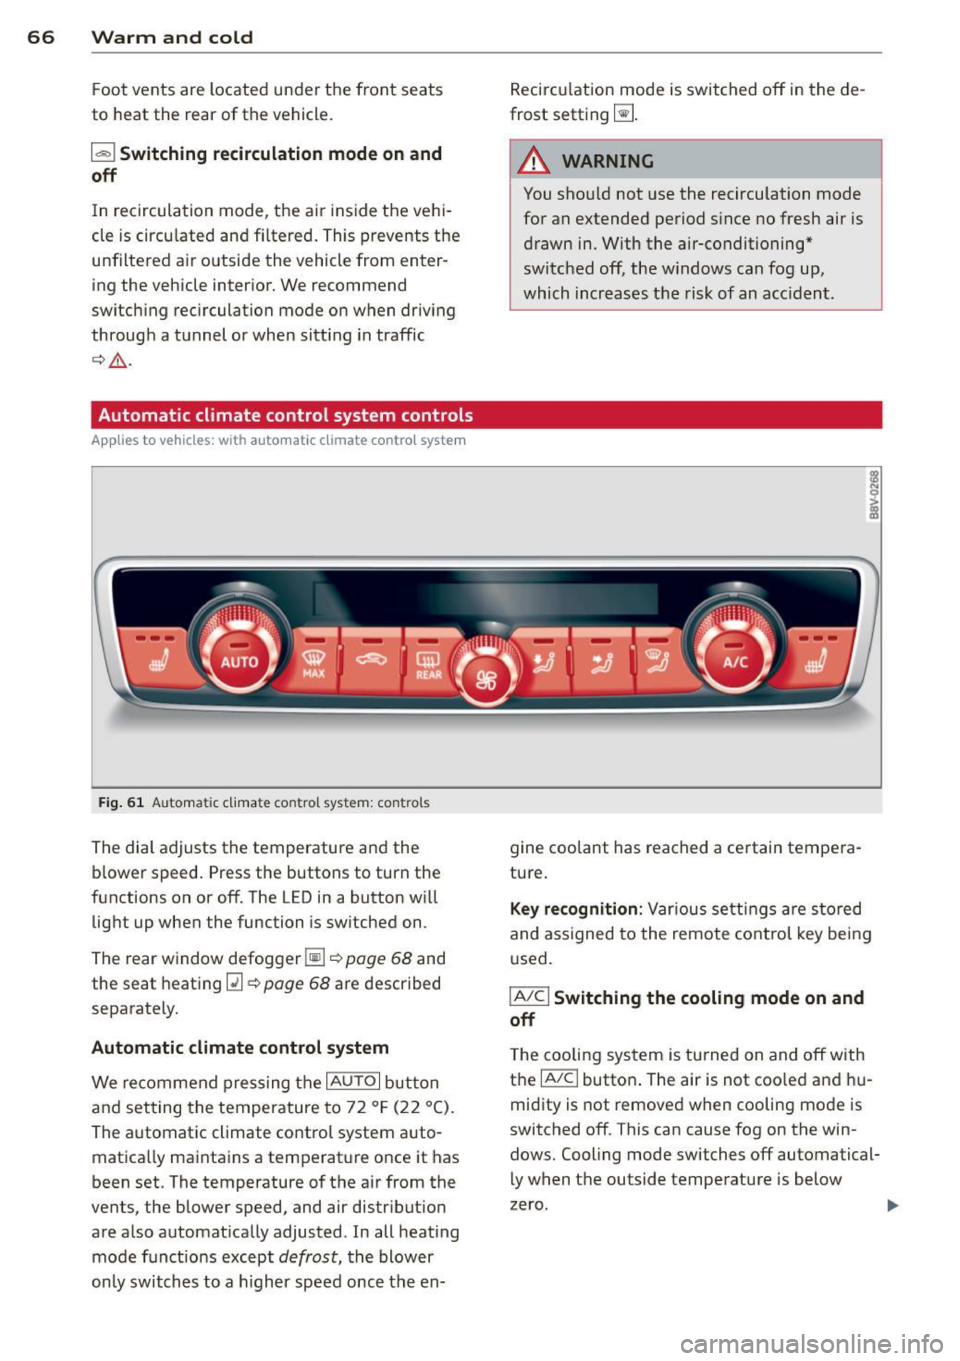
Automatic climate control system controls
Ap plies to vehicles: with a uto mat ic climate contro l system
Fig. 61 Au toma tic climate contro l system : cont rols
The dial adjusts the temperature and the
blower speed. Press the buttons to turn the
functions on or off. The LED in a button will
light up when the function is switched on .
The rear window defogger~~
page 68 and
the seat heating
[ii~ page 68 are described
separately.
Automatic climate control system
We recommend pressing the IAU TO I button
and setting the temperature to 72 °F (22 °C).
The automatic climate control system auto
matically maintains a temperature once it has
been set. The temperature of the air from the
vents, the blower speed, and air distr ibution
are also automatically adjusted . In all heat ing
mode funct ions except
defrost, the blower
only switches to a higher speed once the en- Recirculation
mode is switched off in the de
frost setting ~-
.&_ WARNING
-
You shou ld not use the recirculation mode
for an extended period s ince no fresh air is
drawn in. With the air-conditioning*
switched off, the w indows can fog up,
which increases the risk of an acc ident.
gine coolant has reached a certain tempera
ture.
Key recognition: Var ious settings are stored
and assigned to the remote control key being
used.
IA/CI Switching the cooling mode on and
off
T he cooling system is turned on and off with
the
IA/Cl button . The air is not coo led and hu
midity is not removed when cooling mode is
switched off . This can cause fog on the win
dows. Cooling mode switches off automatical
ly when the outside temperature is below
zero .
Page 69 of 288
IAUTO I Switching automatic mode on and
off
The automatic mode is turned on using the
IAUTOI button. AUTO mode switches off once
a button in the climate control system is pressed. Automatic mode maintains a con
stant temperature inside the vehicle . Air tem
perature, a irflow and air distribution are con
trolled automat ica lly. When automatic mode
is act ive, p ress ing the
IAUTOI button briefly
activates "eco" mode*
1>. In "eco" mode*, all
settings are lowered slightly to save fue l.
When in "eco" mode*, eco is shown in the dis
p lay. To exit "eco" mode*, press the
!AUTO I
button again.
I• I • I Setting the temperature
The temperature can be adjusted individually
for the driver and front passenger using the
dials . Temperatures between 60 ° F (+16 °C)
and 84 °F (+28 °C) can be set. Outside of this
range,
Lo or Hi will appear in the climate con
trol system display. In both settings, the cli mate control runs with constantly at the max
imum cooling or heati ng level. The tempera
ture is not regu lated .
Synchronization: By pressing the !AU TO I but
ton for two seconds, the temperature setting
for the driver is transferred to the front pas
senger's side. This applies a temperature
change to the front passenge r's side.
~ Adjusting the blower
To prevent the windows from fogging over,
the blower should always run at a low speed.
You can adjust the volume of air generated by
the blower to your preference. To have the
blower regulated automatically, press the
IAUTOI button.
Adjusting the air distribution
The air distribution is adjusted with the 121, ~
and IE:! buttons. To have the air distribut ion
regulated automatically, press the
!AU TO I but
ton .
l) This fu nct io n is not availab le in all coun tries.
Warm and cold 67
T he round air vents in the cockpit are adjusta
ble ¢ page 68.
T o keep the windows from fogging in damp
weathe r, we recommend open ing the side air
vents and tilting them to the side
¢ page 68, Adjusting the air vents .
Foot vents are located under the front seats
and adjustable vents on the end of the center
console to heat the rear of the vehicle.
I "" MAX ! Switching the defroster on and off
The windshield and side windows are defrost
ed or cleared of condensation as quickly as
possible. The maximum amount of air flows
main ly from the vents below the windshield.
Recircu lation mode switches off. The tempera
ture is controlled automatically . In the ~ set
ting, the
! A/C l cooling mode switches on auto
matically, depending on the outside air tem
perature.
The
! AUTO I button switches the defroster off.
l"""I Switching recirculation mode on and
off
The recircu lation mode can be turned on man
ually or automatically* .
- Switching manual rec irculat ion mode on and
off: Press the
1 - 1 button. The LED light up
when switched on .
- Automatic* recircu lation mode: The recircu
lation mode must be activated in the MMI.
Select:
! MENUI button> Systems contro l
button or
Car systems > AC > Auto recircu
lation .
The air quality sensor that is de
signed for diesel and gasoline exhaust auto
matically switches the recirculation mode
on or off depending on the level of pollu
tants in the outside air.
In recirculation mode, the air inside the vehi-
cle is circulated and filtered. This prevents the unfiltered air outside the veh icle from enter-
i ng the veh icle interior . We recommend
switching recirculation mode on when driving
IJ,-•
Page 200 of 288
198 Trailer towing
Trailer towing Driving with a trailer
General information
Your Audi was designed primarily for passen
ger transportation .
If you plan to tow a tra iler, p lease remember
that the addit ional load will affect durability,
economy and performance .
T railer towing not on ly places more stress on
the vehicle, it also calls for more concentra
tion from the driver.
F or this reason, always fo llow the operating
and drivi ng in str uctions provided and use
common sense.
@ Note
If you are going to tow a trai le r, you must
activate the trailer operation mode
c:::> page 198 , Operating instructions.
Technical requirements
Traile r hitch
Use a weight-carrying hitch conforming to the
gross trailer weight. The hitch must be suita
b le for your veh icle and trailer and must be
mo unted secure ly on the ve hicle's chassis at a
technically sound loca tion . Use only a trailer
hi tch with a removab le ball moun t. A lways
check with the tra ile r hitch manufac turer to
make sure that you are using t he cor rect
hitch.
Do not use a bumper hit ch .
The hitch must be installed in such a way that
i t does not interfe re with the impact-absorb
ing bumper system. No modifications should
be made to the vehicle exhaust and brake sys
tems . From time to time, check th at a ll hitch
mo unt ing bo lts remain securely fastened.
When you are not towing a trailer, remove the
tra iler hitch ball moun t. T his prevents the
h itch from causing damage sho uld your veh i
cle be str uck from be hind
c:::> A .
Trailer brake s
If your trailer is equipped wi th a b ra ki ng sys
tem, c heck to be sure t hat i t conforms to all
regulations .
T he trailer hyd rauli c brake system mus t not be
direc tly connec ted to the vehicle's hydraulic
brake system .
Safety chains
Always use safety chains between your veh icle
and the tra ile r.
Trailer lights
Trai ler lights must meet all regulations. Be
sure to check w ith your Audi dealer for correct
wiring, switches and relays .
Mirrors
If you are unable to see the traffic behind you
us ing the regular o utside mirrors, then you
must install extended mirrors. It is important
that you
always have clear v is ion to the rear.
A WARNING
--
Afte r removi ng the trailer hitch, do not
stor e it in your vehicle . In case of sudden
b raking, t he hitch co uld fly forwa rd and i n
j ur e you or your passengers.
Operating instructions
Maximum trailer weight
A tra ile r fo r your vehicle is limited to a typical
class 1 or class 2 tr ailer.
Trailer load distribution
Be sure the load in the tra ile r is held secure ly
i n place to p revent it from shift ing forward,
backward or sideways.
Ne ver allow a pa ssenger to ride in a trailer
c:::> A in Driving instructions on page 199 .
Engine cooling system
Towing a trailer makes the engine work hard
er . It is important that the cooling system's
performance is up to the additional load.
Page 201 of 288
Make sure that the cooling system has enough
f luid .
Tire pressure
When tow ing a trai ler, inflate the t ires of your
veh icle to the cold tire pressure listed under
"Full load" on the label located on the driver's
side B-pillar (visible when the door is open) .
Inflate trailer tires to trai ler and tire manufac
turers' specifications.
Lights
Check to make sure both veh icle and trailer
lights are working properly.
Safety chains Be sure tra iler safety cha ins are properly con
nected from the trailer to the hitch on the ve
hicle. Leave enough slack in the chains to per
mit turning corners . When you install safety
chains, make sure they wi ll not drag on the
road when you are driving.
The chains should cross under the trailer
tongue to prevent it from dropping in case of
sepa ration from the hitch.
Driving instructions
Driving with a trailer always requires extra
care and consideration.
To obta in the best poss ible handling of vehicle
and trai le r, p lease note the following:
.. Do not tow a loaded tra iler when your car it
self is not loaded .
.. Be especially carefu l when passing other
vehicles.
.. Observe speed limits.
.. Do not drive at the maximum permissible
speed .
.. Always apply brakes early.
.. Monitor the temperature gauge.
Weight distribution
Tow ing a loaded trailer with an empty ca r re
sults in a high ly unstable distribution of
weight . If this cannot be avoided, drive at very
Trailer towing 199
low speeds on ly to avoid the risk of losing
steering contro l.
A "balanced " rig is easier to operate and con
trol. This means that the tow vehicle should
be loaded to the extent possible and permissi
ble, while keeping the trailer as light as possi
ble under the c ircumstances. Whenever poss i
ble, transfer some cargo to the luggage com
partment of the tow vehicle while observing
tongue load requirements and vehicle loading
considerations.
Speed
The higher the speed, the more difficu lt it be
comes for the driver to control the rig. Do not
drive at the maximum permissible speed. Re
duce your speed even more if load, weather or
wind conditions are unfavorable -particularly
when going downhill .
Reduce vehicle speed
immediately if the trail
er shows the slightest sign of swaying .
Do not
try to stop the swaying by accelerating .
Observe speed limits. In some areas, speeds
for vehicles towing tra ilers are lower than for
regular veh icles .
Always apply brakes early. When driving
downhill, shift into a lower gear to use the en gine braking effect to slow the vehicle . Use of
the brakes alone ca n cause them to overheat
and fail.
Coolant tempe rature
The coo lant temperature gauge¢
page 12
must be observed carefully. The coolant tem
perature can increase if you drive on long in
cli nes in a low gear at high engine speeds . Re
duce your speed immediately if the LEDs in
the top part of the display turn on.
For more information about ind icator lights,
refer to. ¢
page 20 .
A WARNING
Anyone not properly restrained in a mov
ing vehicle is at a much greate r risk in an
accident. Never let anyone ride in yo ur car
-
•
•
•
Page 216 of 288
214 Checking and Filling
you have your oil changed, ask your author
ized Audi Service Advisor.
Under some circumstances the engine oil
should even be changed more frequently .
Change oil more often if you drive mostly
short distances, operate the vehicle in dusty
areas or mostly under stop-and-go traffic con
ditions, or when you use your vehicle where
temperatures stay below freezing point for
long periods .
Detergent additives in the o il wi ll make fresh
oil look dark after the engine has been run
ning for a short time. This is normal and is not
a reason to change the oil more often than recommended .
Damage or malfunctions due to lack of
maintenance
It is essential that you change your oil at the
recommended interva ls using only engine oil
that complies with Audi oil standard
VW 502 00. Your Lim ited New Vehicle War
ranty does not cover damage or malfunctions
due to fa ilure to follow recommended mainte
nance and use requ irements as set forth in
the Audi Owner's Manual and Warranty
&
Maintenance booklet . Your dea ler will have to
deny warranty coverage un less yo u present to
the dea ler proof in the form of Service or Re
pair Orders that all schedu led maintenance
was performed in a timely manner.
Engine oil consumption
The engine in your vehicle depends on on ade
quate amount of oil to lubricate and cool all
of its moving ports.
In order to provide effective lubrication and
cooling of internal engine components , a ll in
ternal combustion eng ines consume a certain
amount of o il. Oil consumption var ies from
engine to engine and may change significantly
over the life of the eng ine . Typically, engines
with a specif ied break-in period (see
¢
page 193) consume more oil during the
b reak-in period than they consume after oil
consumption has stabilized. Under
normal conditions, the rate o f oil con
s u mption depends on the quality and viscosity
of the oil, the RPM (revolut ions per minute) at
which the engine is operated, the ambient
temperature and road conditions. Further fac
tors are the amount of oil dilut ion from water
co nd ensat ion or fuel residue and the oxida
t ion level of the oil. As any engine is subject to
wea r as mileage builds up, the oil consump
tion may increase over time until replacement
of worn components may become necessary.
With a ll these variab les coming into play, no
standard ra te of oil consumpt io n can be es
tablished or specified. There is no alternative
to regu lar and frequent check ing of the oil lev
el , see
Note.
If the yellow engine oil leve l warning symbo l
Ill in the instr ument cl uster light s up, you
shou ld check the oil leve l as soon as possible
¢
page 215. Top off the oil at your earliest
convenience
~ page 215.
A WARNING
-~
Before you check anything in the engine
compartment, always read and heed all
WARNINGS¢
page 210.
(D Note
Driving wit h an insufficient oil level is like
l y to cause severe damage to the engine.
(D Tips
-The oil pressure warning display. is
not an indicator of the oil level. Do not
rely on it. Instead, check the oil level in
your engine at regular intervals, pref
erably each time you refuel, and always
before going on a long trip .
-If you have the impression your engine
consumes excessive amounts of oil, we
recommend that you consult an author
ized Aud i dea ler to have the cause of
your concern properly diagnosed. Keep in
mind that the accurate measurement of
oil consumption requ ires great care and
may take some time. An authorized Audi ..,.