wipers AUDI A3 2015 Owners Manual
[x] Cancel search | Manufacturer: AUDI, Model Year: 2015, Model line: A3, Model: AUDI A3 2015Pages: 288, PDF Size: 71.46 MB
Page 4 of 288
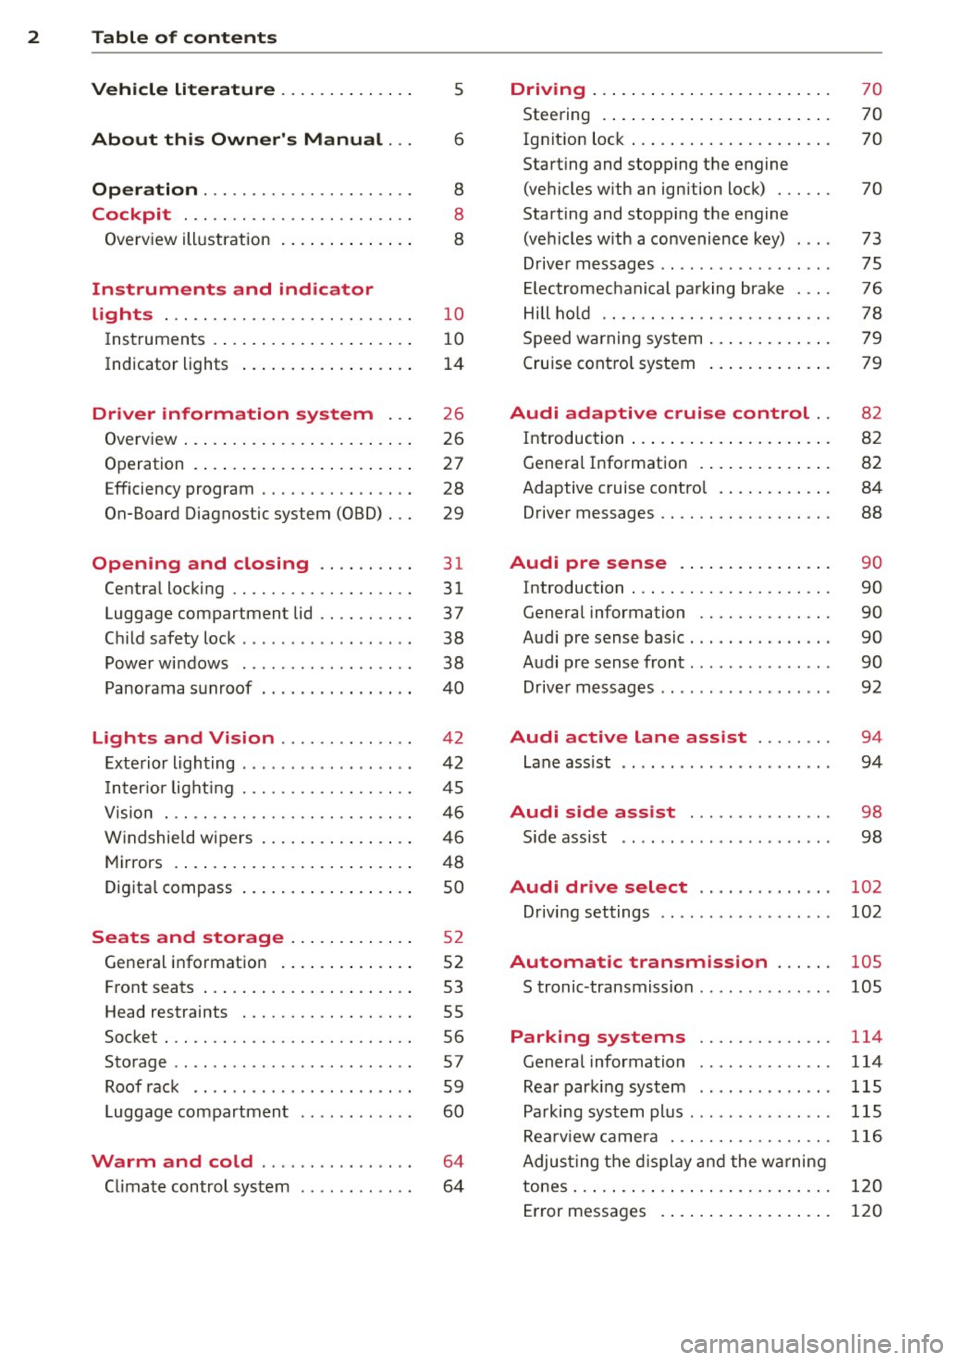
2 Table of contents Vehicle literature . . . . . . . . . . . . . .
5
About this Owner's Manual . . . 6
Operation . . . . . . . . . . . . . . . . . . . . . . 8
Cockpit . . . . . . . . . . . . . . . . . . . . . . . . 8
Overview illustration . . . . . . . . . . . . . . 8
Instruments and indicator
lights . . . . . . . . . . . . . . . . . . . . . . . . . .
1 0
Instruments . . . . . . . . . . . . . . . . . . . . . 10
Indicator lights . . . . . . . . . . . . . . . . . . 14
Driver information system . . . 26
Overview . . . . . . . . . . . . . . . . . . . . . . . . 26
Operation . . . . . . . . . . . . . . . . . . . . . . . 27
Efficiency program . . . . . . . . . . . . . . . . 28
On-Board Diagnostic system (OBD) . . . 29
Opening and closing . . . . . . . . . . 31
Central locking . . . . . . . . . . . . . . . . . . . 31
Luggage compartment lid . . . . . . . . . . 37
Child safety lock . . . . . . . . . . . . . . . . . . 38
Power windows . . . . . . . . . . . . . . . . . . 38
Panorama sunroof . . . . . . . . . . . . . . . .
40
Lights and Vision . . . . . . . . . . . . . . 4 2
Exterior lighting . . . . . . . . . . . . . . . . . . 42
Inter ior light ing . . . . . . . . . . . . . . . . . . 45
V1s 1on . .. ............... .. .. .. . .
Windshie ld wipers .......... .. ... .
Mirrors ......... ......... ... ... .
Digital compass ............ .. ... .
Seats and storage ....... .... . .
General information ....... ... ... .
Front seats ............... ... ... .
Head restraints ............ .. ... .
Socket . ................. .. .. ... .
Storage .............. ........ .. .
Roof rack .. ................ ... . .
Luggage compartment
Warm and cold ............... .
C limate control system .... .. .. .. . .
46
46
48
so
5 2
52
53
55
56
57
59
60
64
64
Driving ....... .. .......... ... ... 70
Steering . . . . . . . . . . . . . . . . . . . . . . . . 70
Ig nition lock . . . . . . . . . . . . . . . . . . . . . 70
Starting and stopping the engine
(vehicles with an ignition lock) . . . . . . 70
Starting and stopping the engine
(vehicles w ith a convenience key) . . . . 73
Driver messages . . . . . . . . . . . . . . . . . . 75
El ectromechani cal parking brake . . . . 76
Hill hold . . . . . . . . . . . . . . . . . . . . . . . . 78
Speed warning system . . . . . . . . . . . . . 79
Cruise control system . . . . . . . . . . . . . 79
Audi adaptive cruise control .. 82
Introduction . . . . . . . . . . . . . . . . . . . . . 82
General Information . . . . . . . . . . . . . . 82
Adaptive cruise control . . . . . . . . . . . . 84
Driver messages . . . . . . . . . . . . . . . . . . 88
Audi pre sense . . . . . . . . . . . . . . . . 90
Introduction . . . . . . . . . . . . . . . . . . . . . 90
General information . . . . . . . . . . . . . . 90
Audi pre sense basic . . . . . . . . . . . . . . . 90
Audi pre sense front . . . . . . . . . . . . . . . 90
Driver messages . . . . . . . . . . . . . . . . . . 92
Audi active lane assist . . . . . . . . 94
Lane assist . . . . . . . . . . . . . . . . . . . . . . 94
Audi side assist . . . . . . . . . . . . . . . 98
S ide assist . . . . . . . . . . . . . . . . . . . . . . 98
Audi drive select . . . . . . . . . . . . . . 102
Driving settings . . . . . . . . . . . . . . . . . . 102
Automatic transmission . . . . . . 105
S tronic -transmission . . . . . . . . . . . . . . 105
Parking systems . . . . . . . . . . . . . . 114
General information . . . . . . . . . . . . . . 114
Rear parking system . . . . . . . . . . . . . . 115
Parking system plus . . . . . . . . . . . . . . . 115
Rearviewcamera .............. .. . 116
Adjusting the display and the warning
tones.... ..... .. .. ..............
120
Error messages . . . . . . . . . . . . . . . . . . 120
Page 19 of 288
or
or
or
or
or
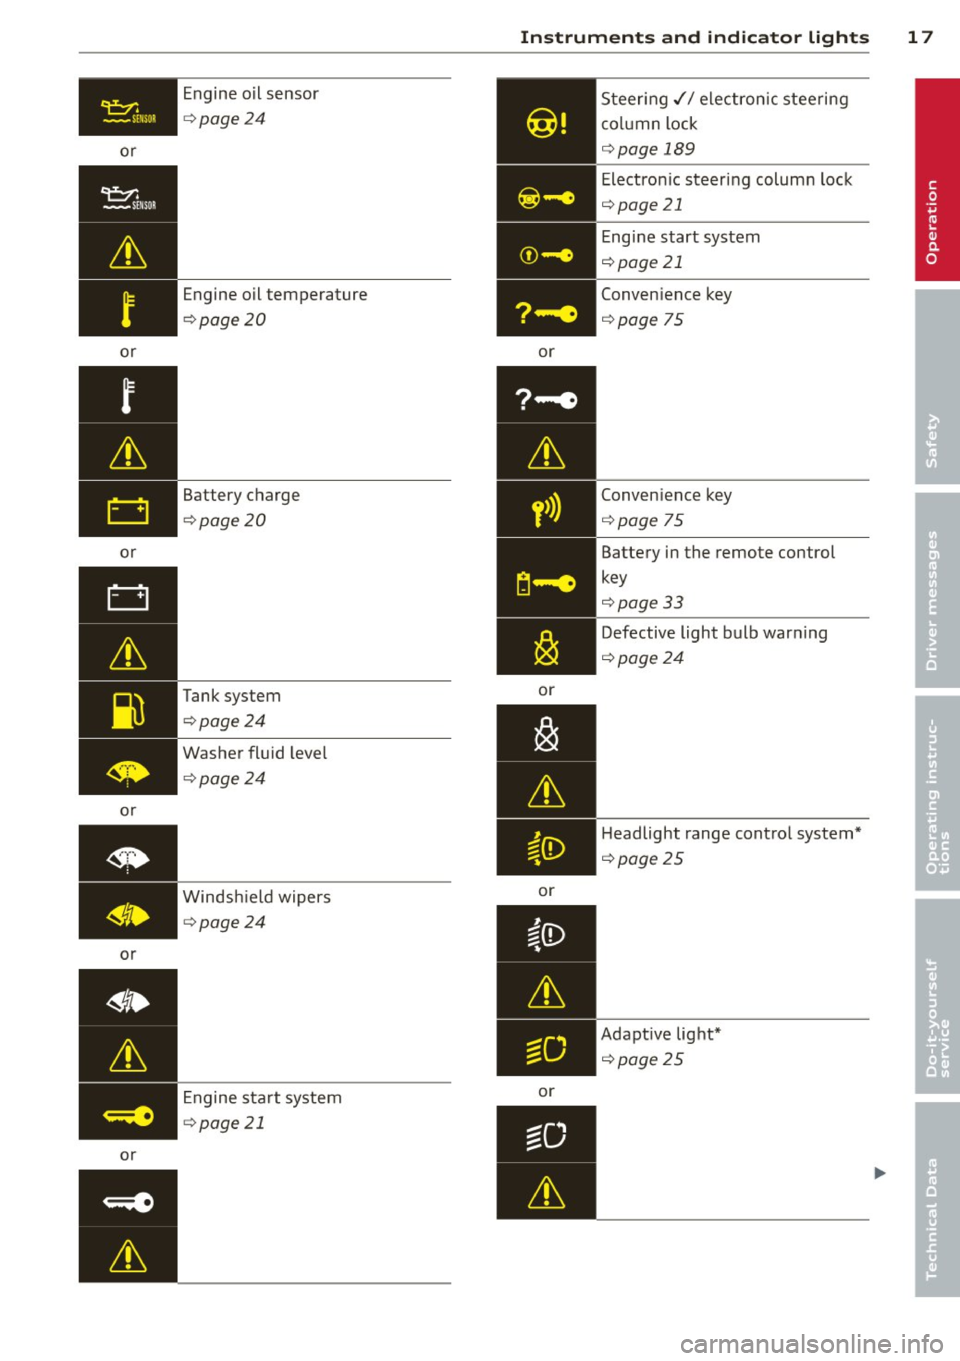
or Engine o
il sensor
9 page 24
Engine oil temperature
9page 20
Battery charge
¢page20
Tank system
9page24
Washer fluid leve l
¢page 24
Windshield wipers
¢page24
Engine sta rt system
¢ page 21
Instrument s and indicator ligh ts 17
or
y>))
or
or
or Steer
ing .// electron ic steering
co lumn lock
¢page 189
Electronic steering column loc k
¢page21
Engine start system
¢page 21
Convenience key
¢ page 75
Conven ience key
¢ page 75
Battery in the remote control
key
¢page33
Defective light bulb war ning
¢page24
Headlight range contro l system*
¢page25
Adapt ive lig ht*
¢page25
•
Page 26 of 288

24 Instruments and indicator lights
You may continue driving for the time being .
Check the oil level as soon as possible
¢ page 212.
-If the engine oil level is too low, add engine
oi l
¢ page 215.
-If the engine oil level is correct and the indi
cator light still turns on, drive at low engine
speed to the nearest authorized Audi dea ler
or qualified repair facility.
_..,. Engine oil sensor
II Oil level sensor: system fault!
The sensor to check the engine oil level has
failed. Drive to an authorized Audi dealer or
qua lified repair faci lity immediately to have
the malfunction corrected.
Q;) Note
Pay attention to the description in the
Owner 's Manual
¢ page 215 and
¢ page 215, Adding engine oil "l::;1:.
Bil Tank system
RD Please refuel
When the indicator light turns first turns on
and this message appears, the tank contains
the following amount of fuel:
- Front wheel drive : approximately 1.8 gal
lons (7 liters)
- All wheel drive: approximately 2.2 gallons
(8 .5 liters)
RD Fuel tank malfunction! Please contact
Service
If the indicator light turns on and this mes
sage appears, there is a ma lfunction in the
tank system.
Drive to your authorized Aud i dealer or quali
fied repair facility immediately to have the
malfunction corrected.
@) For the sake of the environment
Fuel should never enter the sewer system
or come into contact w ith the ground.
(D Tips
More information on refueling is available
on page ¢
page 207.
~ Washer fluid level
m Please add washer fluid
Fill the washer fluid with the ignition switched
off ¢
page 224.
• Windshield wipers
m Windshield wiper: system fault!
There is a malfunction with the windshie ld
wipers .
Drive to your authorized Audi dealer or quali
fied repair facility immediate ly to have the
malfunction corrected.
~ Defective light bulb warning
Applies to vehicles: wit h drive r info rmatio n system
If the S:i indicator light turns on, a bulb has
failed. The message ind icates the location of
the bulb .
Replace the bulb immediately.
Vehicle lights: system fault!
There is a malfunction in the headlights or
light switch. Drive to an author ized Audi deal
er or qualified repair facility immediately to
have the malfunction corrected.
_&. WARNING
- Light bulbs are under pressure and can
explode when bu lbs are replaced -risk of
inj ury.
- With gas-discharge lamps* (xenon head
lights), the high -voltage component
must be hand led appropriate ly. Other
wise, there is a risk of fatal injury.
-
Page 27 of 288
~(D Dynamic headlight range control
system
App lies to vehicles: with Xe non lig hts
II Headlight range control system: system
fault!
There is a malfunct ion i n the dynam ic head
light range con trol system, wh ich may cause
g la re for other drivers.
D rive to you r autho rized Aud i dea le r o r quali
fied repair faci lity immediately to have the
mal funct ion cor rected.
l§O Audi adaptive light
Applies to vehicles: with Audi adaptive light
rDI Audi adaptive light: system fault!
There is a malfunct io n in the adaptive lights.
The headlights still function.
Drive to an authorized Aud i dealer or qualified
repair facility immediately to have the mal
function corrected .
@) Light/rain sensor
Applies to vehicles: with light/ra in se nsor
El Automatic headlights: system fault!
El Automatic wipers: system fault!
The light/rain sensor is not working.
F or safety reasons , the low beams are turned
on permanent ly with the switch in
AUTO. You
can continue to turn the lights on and off us
ing the light switch. You can still control all
wiper functions that are independent of the
rain sensor.
Drive to an authorized Audi dea ler or qualified
repair facility immediately to have the mal
function corrected .
Q Adaptive dampers
Applies to vehicles: with Audi drive select
II Suspension: system fault!
There is an adaptive damper malfunction.
Instruments and indicator lights 25
Drive to an authorized A udi dealer or qualified
repair facility immediately to have the mal
function corrected .
¢i Q Turn signals
If the B or 1B in dicator light blinks, a turn
s ignal is turned on. If both indicator lights are
blinking, the emergency flashers are on.
In an indicator light blinks twice as fast as
usual then a blinker bulb has failed. Carefully
drive to your author ized Audi dealer or quali
fied repa ir facility immed iately to have the
malfu nction corrected . T he indicator light
does not indicate a malfunction if a turn sig
nal on the trailer or on the vehicle fails when
towing a trailer.
(D Tips
For more information on the turn signals,
see
~ page 44.
{d i~ Rear safety belt
App lies to vehicles: with rear safety belt detection
The IJ ;ffl i ndicator light turns on briefly
when you swi tch the ignition on.
An indica tor light turns on briefly when the
safety belt in the rear seat is buckled or un
buckled.
l!I -if the ind icator light turns on briefly, the
r ear seat is not occupied or the safety belt is
not buckled . Th ere is also an audio warning
signal if the be lt is unbuckled whi le driving.
II -if the ind icator light turns on briefly, the
r ear safety belt is buckled.
{D Tips
For additional information on safety belts,
refer to~
page 131.
•
Page 48 of 288
46 Lights and Vi sion
Vision
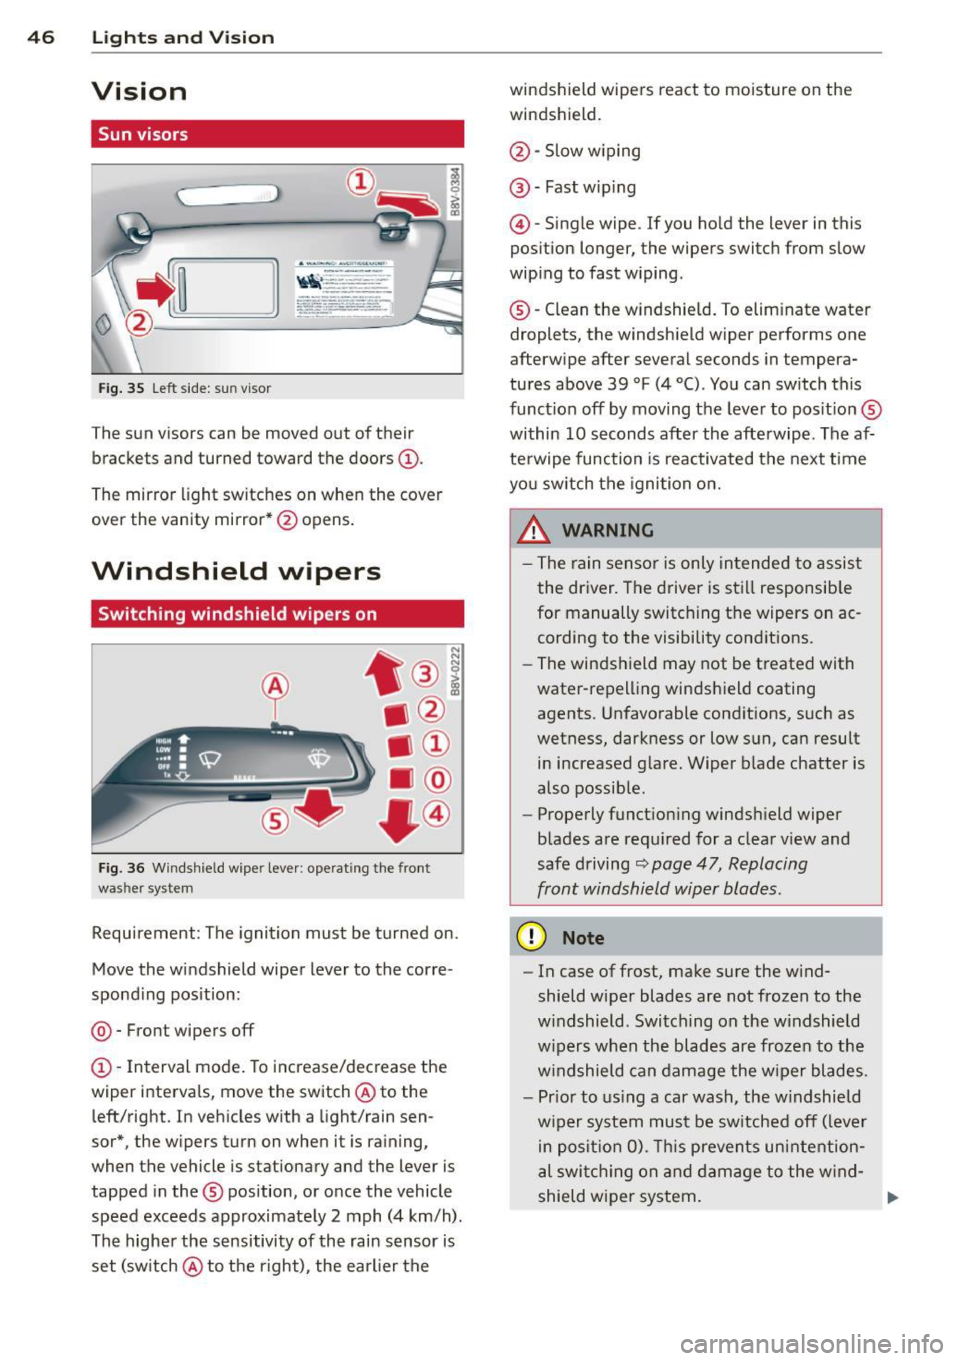
Sun visors
(..___ __ _.)
Fig . 35 Left side: su n visor
The sun visors can be moved out of their
brackets and turned toward the doors
(D .
The mirror l ight switches on when the cover
over the vanity mirror* @opens.
Windshield wipers
Switching windshield wipers on
Fig. 36 Windsh ie ld wipe r lever : operati ng the front
was her system
Requirement : The ignition must be turned on.
Move the windshield wiper lever to the corre
spond ing position:
@ -Front wipers off
(D -Interval mode. To increase/decrease the
wiper intervals , move the switch @ to the
left/right. In vehicles with a light/rain sen
sor*, the wipers turn on when it is raining,
when the vehicle is stationary and the lever is
tapped in the ® position, or once the vehicle
speed exceeds approximate ly 2 mph (4 km/h) .
The higher the sensitivity of the rain sensor is
set (sw itch @ to the right), the earlier the windshield wipers react to moisture on the
windshield.
@ -Slow w iping
@ -Fast wip ing
@ -Single wipe . If you ho ld the lever in this
position longer, the wipers switch from slow
wiping to fast wiping .
® -Clean the windshield. To elim inate water
droplets, the windshield wiper performs one
afterwipe after several seconds in tempera
tures above 39 °F (4 °() . You can switch th is
function off by moving the lever to pos it ion ®
within 10 seconds after the afterwipe . The af
terwipe function is reactivated the next time
you sw itch the ignition on.
_& WARNING
- The rain sensor is only intended to assist
the driver. The driver is still responsib le
for manually switching the wipers on ac
cording to the visibility conditions .
- The windshield may not be treated with
water-repelling windshield coating
agents. Unfavorable conditions, such as
wetness, darkness or low sun, can result in increased glare. Wiper blade chatter is
also possible .
- Properly functioning windshield wiper
blades are requ ired for a clear view and
safe driving
c::> page 47, Replacing
front windshield wiper blades .
(D Note
-In case of frost, make sure the w ind
shield wiper blades are not frozen to the
w indshield . Switching on the windshield
w ipers when the blades are frozen to the
windshield can damage the wiper blades.
- Pr ior to using a car wash, the w indshield
w iper system must be sw itched off ( lever
in posit ion 0). This prevents unintention
al swi tchi ng on and damage to the wind-
shield wiper system. ..,_
Page 49 of 288
-Do not use the wipers to clear a window
that is covered with frost. Using the wip
ers as a convenient ice scraper will
destroy the wiper blades.
@ Tips
- The windshield wipers switch off when
the ignit ion is turned off. You can acti
vate the windshield wipers after the igni
tion is switched back on by moving the
windshield wiper lever to any pos ition.
- Worn or dirty windshield wiper blades
result in streaking. This can affect the
rain sensor funct ion. Check your wind
sh ield wiper blades regularly.
- The washer fluid nozzles in the w ind
sh ield washer system are heated" at low
temperatures when the ignit ion is on.
- When stopping temporarily, such as at a
traff ic light, the speed of the windsh ield
wipers automatically reduces by one lev
el.
- The rain sensor can be switched on or off
i n the MMI in the
Dr iv er a ssistan ce
menu
Cleaning windshield wiper blades
Clean the wiper blades when you see wiper
streaks. Use a soft cloth and a glass cleaner.
... Place the w indshield wiper arms i n the serv
ice position
¢ page 47.
... Fold the w indshield wiper arms away from
the windshie ld .
8_ WARNING
Dirty windshield wiper blades can impa ir
vision, which increases the risk of an acci
dent.
(D Note
If you see streaks again after cleaning the
w iper blades, the b lades must be replaced
¢page 47.
Light s and Visi on 47
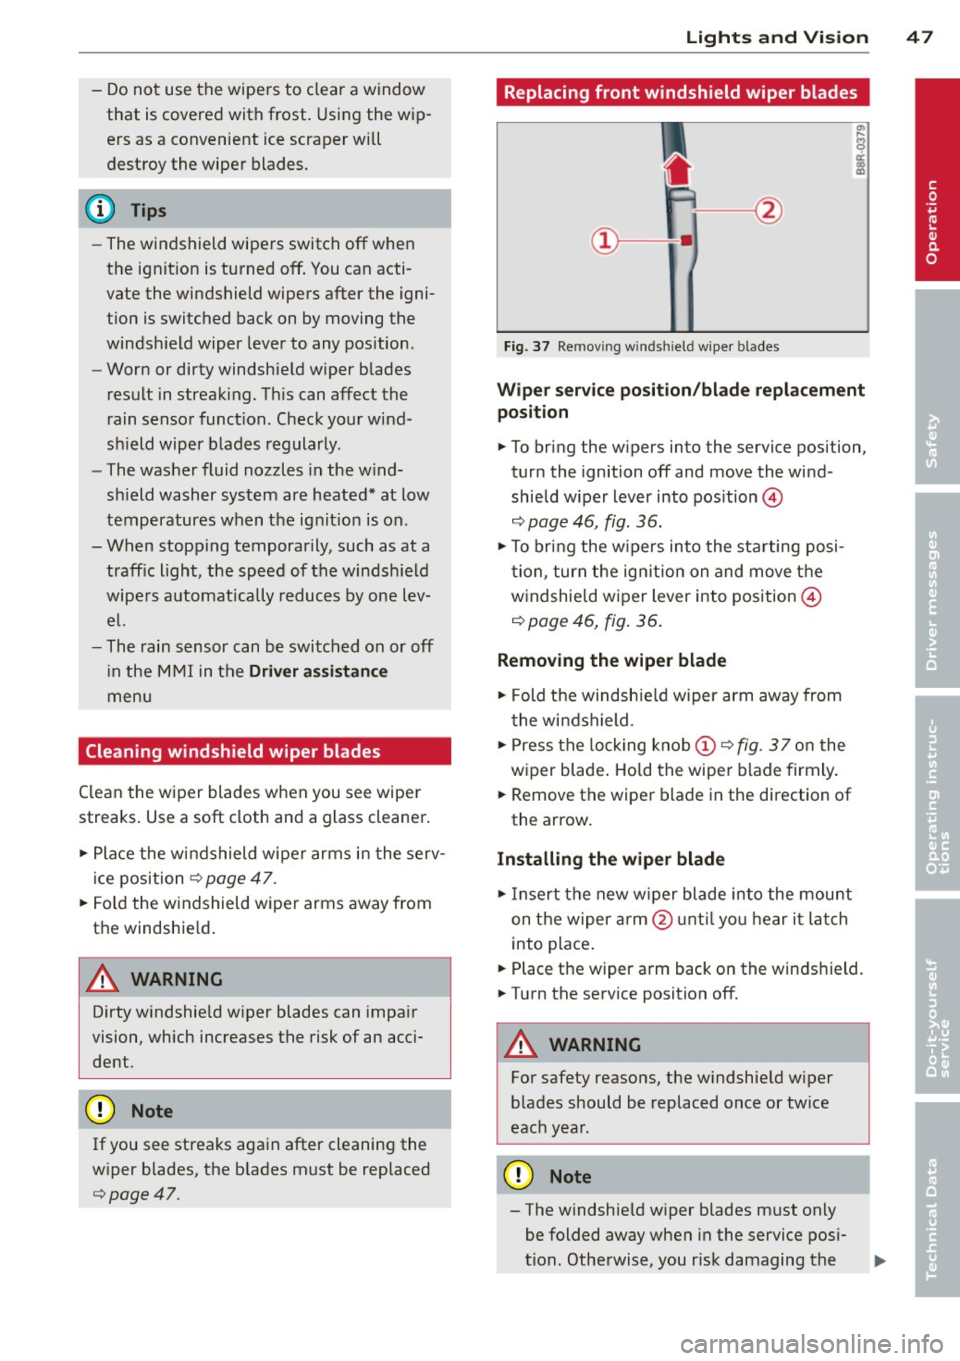
Replacing front windshield wiper blades
Fig. 37 Remov ing windshield wiper blades
Wipe r servic e posit io n/ blade re pla cement
po sition
... To bring the wipers into the service position,
turn the ignition off and move the wind
shield w iper lever into pos ition @
¢ page 46, fig. 36.
... To bring the w ipers into the s tarting posi
tion, turn the ign ition on and move the
windshie ld wiper lever into position @
¢ page 46, fig. 36 .
Removing the wiper blade
... Fold the windshield wiper arm away from
the windshield .
... Press the locking knob
(D ¢ fig . 3 7 on the
wiper blade . Hold the wiper blade firmly .
... Remove the wiper blade in the direction of
the arrow .
Installing the wiper blade
... Insert the new w iper blade into the mount
on the wiper arm @unti l you hear i t latch
into place .
... Place the wiper arm back on the winds hield.
... Turn the service position off.
8_ WARNING
For safety reasons, the windshield w iper
blades should be replaced once or tw ice
each year.
(D Note
- The windshield wiper blades must on ly
be folded away when in the service posi
tion. Otherwise, you r isk damaging the
-
•
Page 50 of 288

48 Lig hts an d Vi sion
paint on the hood or th e windshield wip
er motor.
- You should not drive your vehicle or
press the windshield wiper lever when
the wiper arms are folded away from the
windshield . The windshield wipers would
move back into their original position
and could damage the hood and w ind
shield .
- To help preven t damage to the wiper sys
tem , always loosen blades which are fro
zen to the windsh ield before ope rat ing
wipers .
- To he lp prevent damage to w iper blades,
do not use gasoline, ke rosene, pa int
th inner, or other so lvents on or near the
wiper blades.
- To he lp prevent damage to the wiper
arms or other components , do not at
tempt to move the wipers by hand .
(D Tips
-Commercial hot waxes applied by auto
matic car washes affe ct the cleanability
of the wi ndshield .
- You can also use the servic e pos ition, for
example , if you want to pro tect the
winds hield from i cing by using a cover .
- You cannot activate the service posit ion
when the hood is open.
Mirrors
Adjusting the exterior mirrors
F ig. 38 Driver's door: knob for th e exteri or mirro rs (e x·
amp le )
Turn the knob to the desired position : Q/P
-In this pos ition, yo u can adjust the
driver 's and front passenger 's exter ior mi rrors
by turning the knob in the desi red d irection.
4ill -The m irrors a re heated* depending on the
outside temperature and driv ing speed.
8 -The exter io r mir rors a re fo lded in* .
Front passenger's exterior mirror tilt
function*
T o he lp you see the curb when backing into a
parking space, the surface of the mir ror can
be ti lted s light ly. The knob must be in the P
pos ition for this to happen.
You can adjust the tilted m irror surface by
tu rning the knob in the desired d irect ion.
When you move out of reverse and into anoth
er ge ar, the new m irror position is s tored and
assigned to the key you a re using.
T he m irror goes ba ck into its orig inal position
once you drive forward fas te r than 9 mph
(15 km/h) o r turn the ignition off .
Folding mirrors in and out
To fold the mir ro rs in with the knob, turn the
k nob in the 8 position .
To fold the m irrors ou t, turn the knob in the
Q or P or O pos ition .
Applies to vehicles with MMI: You can adjust if
t h e mirrors fold when locking the vehicle
c> page 36. When you lock the vehicle, the
mir rors fo ld in. When you start the ignition,
t h e mirrors fold out .
A WARNING
-Curved mirror surfaces (convex o r asph e-
r ic *) enlarge the field of v is ion. However,
they ma ke objec ts in the mirror appe ar
smaller and fart her away . Your may es ti
mate incorrect ly when you use t hese mir
rors to gauge yo ur distance from the
vehicles beh ind yo u when changing lanes -
accident r isk!
Page 203 of 288
Caring and cleaning
General information
Regular, proper care helps to maintain your
vehicle's val ue . It can also be a requirement
when submitting warranty claims for corro
sion damage and paint defects on the body.
The necessary care products can be obtained
from your a uthorized Audi dea ler . Read and
follow the instructions for use on the packag
i ng.
A WARNING
- Us ing clean ing and care products incor
rectly can be dangerous to your hea lth .
- Always store cleaning and care products
out of reach of children to reduce the r isk
of po isoning.
-
@ For the sake of the environment
- Preferably use environmentally-friendly
products when buying cleaning agents.
- Do not d ispose of leftover cleaning and
care products with household trash.
Car washes
T he longer that deposits such as insects, bird
droppings, tree sap or road sa lt rema in on the
veh icle, the more the surface can be dam
aged . High tempe ratures such as those
caused by sunlight increase the cor rosive ef
fect .
Before washing, rinse off heavy depos its with
p lenty of water .
Also, was h the underside of your ve hicle once
road salt stops be ing used for the season.
P ressure wash ers
When washing your veh icles w ith a pressure
washer, always fo llow the operating instruc
tions provided with the pressure washe r. T his
is especially important in regard to the pres
sure and spraying d istance. Do not aim the
spray directly at seals on side w indows, doors,
the hood, the rear lid or the sunroof* or at
Caring and cle anin g 201
tires, rubber hoses, insulating material, sen
sors * or camera lenses* . Keep a distance of at
l east 16 inches (40 cm).
Do not remove snow and ice with a p ressure
washe r.
Neve r use rotary nozzles or high pressure noz
z les.
T he wate r temperature must not be above
140
°F (60 °() .
Automatic car washes
Spray off the ve hicle before washing.
Make sure that the windows and roof * are
c losed and the winds hield wipers are off . Fol
l ow instructions from the car wash operator,
especially if there are accessories attached to
your vehicle.
If possible, use car washes that do not have
brushes .
Washing by hand
Clean the ve hicle starting from the top and
working down using a soft sponge or cleaning
brush . Use solvent -free clean ing products.
Washing vehicles with matte finish paint
by hand
T o avoid damaging the paint when washing,
f irst remove dust and large particles from
your vehicle . Insects, grease spots and finger
prints are best removed with a spec ial cleaner
for matte finish paint .
Apply t he p rod uct using a microfiber cloth . To
avo id damaging the paint surface, do not use
too much pressure .
Rinse the vehicle thoroughly with water . Then
clean using a neutra l shampoo and a soft mi
crofiber cloth .
Rinse the ve hicle thoroughly again and le t it
air dry . Remove any water residue using a
shammy.
Stubborn deposits such as bi rd d roppings o r
t ree sap are best removed w it h ple nty o f w a-
ter and a microfiber cloth . .,..
•
•
•
Page 259 of 288
No. Equ ipment Ampere
F49 Starter, clutch sensor
5
FS3 Rear window defogger 30
The power seats* are protected v ia
circ uit
br ea ker s
that automatically sw itch on after a
few seconds after the overload has been re
d uced.
(D Tips
Note that the following table was accurate
at the time of pr int ing and is subject to
change.
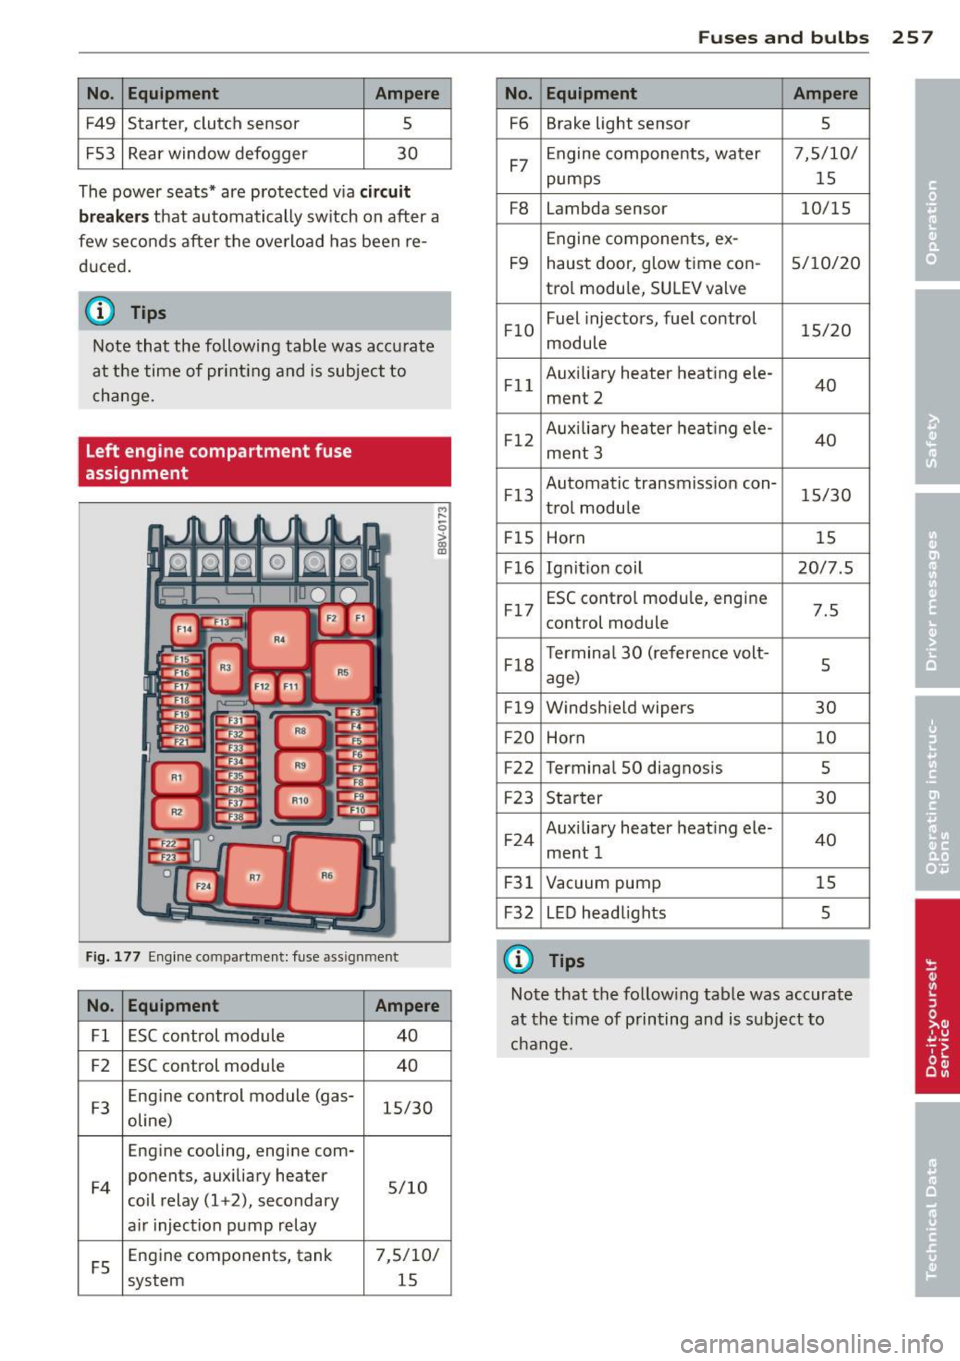
Left engine compartment fuse
assignment
F ig. 177 Eng ine compartment: fuse assignment
M ,.._
-0
!
No. Equ ipment Ampere
Fl ESC control module 40
F2 ESC control module
40
F3 Eng
ine control module (gas-
15/30
oline)
Engine cooling, engine com-
F 4 ponents, auxiliary heater
5/10
coil relay (1 +2), secondary
a ir injection pump relay
FS Eng
ine components, tank
7,5/10/
system 15
Fuse s and bulb s 257
No. Equipment Ampere
F6 Brake light sensor
5
F7 Engine components, water 7,5/10/
pumps
15
F8 Lambda sensor 10/15
Engine components, ex-
F9 haust door, glow time con-
5/10/20
tro l module, SU LEV valve
FlO Fuel
injectors, fuel control
15/20
module
Fl l Auxiliary heater heating ele
-
40
ment 2
F12 Auxilia
ry heater heat ing ele-
40
ment 3
F13 Automatic transmiss
ion con-
15/30
trol module
FIS Horn 15
F16 Ignit ion coil 20/7.5
F17 ESC contro
l modu le, engine
7.5
control module
F18 T
ermina l 30 (reference volt-
5
age)
F19 Windshield wipers
30
F20 Horn 10
F22 Termina
l SO diagnosis
5
F23 Starter 30
F24 Auxiliary heater heating ele-
ment 1 40
F31 Vacuum pump 15
F32 L ED head lights
5
(i} Tips
Note that the follow ing tab le was accurate
at the time of printing and is subject to
change.
Page 280 of 288
278 Index
How many airbags does my vehicle have?
How often should I check my tire pres-148
sures? .. .. .... ............. ...... . 232
How safety belt pretensioners work .... 137
Hydroplaning .............. ... .... . 236
I
Ignition
Indicator light . . . . . . . . . . . . . . . . . . . . .
21
switching on and off (with button) ... .. 73
Ignition key safety interlock . . . . . . . . . . . 70
Ignition lock
mechanical . . . . . . . . . . . . . . . . . . . . . . . .
70
Immobiliz er . . . . . . . . . . . . . . . . . . . . . . . . 31
Important things to do before driving .. 121
Improperly worn safety belts . . . . . . . . . . 13 7
Indicator lights . . . . . . . . . . . . . . . . . . . . . .
14
Infant seats .............. .... .... . 172
Installing child safety seats
Safety belts . . . . . . . . . . . . . . . . . . . . . .
177
Insta lling the upper tether strap on the
anchorage ..... ........... .... .... .
183
Instrument cluster ......... ...... .. .. 10
Instruments ................. ..... .. 10
Adjusting the lighting ........... ... . 45
Interior lighting ..................... 45
Intermittent (windshield wipers) ... .... 46
]
Jump-starting 259
Jump er cables ... .......... .. .. .. .. . 260
K
Key ......... ........ ........ ....... 31
Checking the number ................ 31
Driver messages (mechanical ignition
key) ..... .. ................ ..... ..
75
Dr iver messages (with convenience key). 75
Key not recognized ......... ... .... .. 75
Key replacement . . . . . . . . . . . . . . . . . . . 31
Replacing the battery ....... .. .. .. .. 33
un locki ng/locking . . . . . . . . . . . 33, 34, 35
Key recognition
automatic climate control system ... ..
66
Manual climate contro l system . . . . . . . . 65
Kick-down
Automatic transmission
110
Kn ee air bags ................... .... 157
Description .. .. .. ............. .. .. 157
How they work .................... 158
Important safety instructions ........ 159
L
Lane assist
refer to Active lane assist ........ ... . 94
LATCH ........ .... ............... . 180
Description .... .. .. .............. . 181
Installing a child restraint ........... 182
Location ......................... 181
Mounting and releasing the anchorage
hook ..... .... .. .. .............. .
182
Launch Control-Program (automatic trans-
m1ss1on) ....... .. .. ........... ....
111
Leather care/clean ing ................ 204
Leaving home ..... .................. 44
LED headlights
All-weather lights ..................
42
Lifting jack . .. .. .. ................. 251
Lifting vehicle .................. .... 263
Light
adaptive light .. .................. ..
42
Adjust ing automatic headlights ....... 44
Coming/Leaving home .............. . 44
Fog lights/rear fog light(s) ........... 42
Headlight flasher ................... 44
Headlights . . . . . . . . . . . . . . . . . . . . 42, 44
Highway light .... ................ ..
43
Low beams ..................... ... 42
Parking light .......................
42
Switching daytime running lights on and
off ........... .. .. .............. .. 44
Light/rain sensor
Head lights ....................... . 42
Indicator light .....................
25
Intermittent (windshield wipers) ...... 46
Lighting
Exterior . . . . . . . . . . . . . . . . . . . . . . . . . . . 42
Interior . . . . . . . . . . . . . . . . . . . . . . . . . . .
45
Lights
Ambient lighting ...................
45
Headlight range control system ... ... . 42
Interior/reading . ...................
45