tow AUDI A3 2016 Owner´s Manual
[x] Cancel search | Manufacturer: AUDI, Model Year: 2016, Model line: A3, Model: AUDI A3 2016Pages: 328, PDF Size: 81.78 MB
Page 95 of 328
,....,
N
0 > co ,....,
the clutch is over loaded.
- If the engine must run while you are work
ing in the engine compartment with the
hood open, make sure a gear is not engag
ed. The selector lever must be firmly in the
P position and locked in place and the park
ing brake must be set¢
page 236. Other
w ise, the vehicle could begin moving when
the engine speed is high, even w ith the
par king brake set.
(D Note
- When stopping on a n incline, do not t ry to
ho ld the vehicle in place by press ing the ac
ce le ra to r pedal wh ile a driv ing gear is se
l ected. This can ca u se the au toma tic trans
mission to overheat and can damage it. Set
the pa rking brake or press the brake pedal
to prevent the vehicle from ro lling .
- Allow ing the vehicle to ro ll when the eng ine
is stopped and the se lector lever is in the N
pos ition w ill damage the automatic trans
mission because it is not l ubricated under
those circumstances.
- The transmiss ion can overheat and be dam
aged under certain driving and traffic condi
tions such as frequent starts , creeping for a
l ong time, or stop-and-go traffic. When t he
mJ o r. indicator light tu rns o n, s top the
vehicle at the next oppo rt u nity and let the
transm issio n coo l
¢page 95 .
-Allow ing the ve hicle to ro ll when the eng ine
i s s topped w ill damage the S tro nic trans
mission because it is not lubric ated
¢ page 297, Towing with a tow truck .
(D Tips
For safety reasons, the parking b rake releases
au tomatically on ly w hen the dr iver's door is
closed and driver's sa fe ty belt is fastened.
Autom atic tran sm iss ion
Hill descent control
Applies to vehicles: with S tronic transmission
The hill descent control system assists the driver
when driving down hills.
Hill descent control is act ivated when the se lec
tor lever is in the D or S position and you press
the brake pedal. The transmission automatically
selects a gear that is su itable for the incline . H ill
descent con trol tr ies to maintain the speed ach
i eved a t the time of braking, w it hi n physi cal a nd
technical lim itations . If may s till be necessary to
adjus t the speed w ith the bra kes . Because hill de
scent control cannot shift down farthe r than 3rd
gear, it may be necessary to shift into tiptronic
mode in very steep areas. In this case, shift into 1st or 2nd gear in tiptronic mode to use the en
gine's braking force to relieve the brakes .
Hill descent control switches off once the decline
levels out or you press the accelerator pedal.
On vehicles with a cru ise con trol system*
¢ page 130, hill descent control is a lso activated
when the speed is set.
A WARNING
-Hill descent control cannot overcome physical
limitat ions, so it may not be able to ma intain
a constant speed under all conditions. A lways
be ready to app ly the brakes.
93
Page 97 of 328
,....,
N
0 > co ,....,
Applies to vehicles: with launch control
The Launch Control Program enables maximum
acceleration .
Requirement: the engine must be at operating
temperature and the steering wheel must not be
turned .
.. With the engine running, press the
l~OFF ! but
ton briefly one time
ll .
.. Pull the selector lever back out of the D/S posi
tion briefly to select the S position, or press it
toward the right into the tiptronic pos ition or
select the
D ynami c driving mode in drive se
lect*
~page 148.
.. Press the b rake peda l firmly wi th you r left foot
and hold it all the way down for at least 1 sec
ond.
.. At the same time, press the gas pedal all the
way down with your right foot until the engine
reaches and stays at a high RPM level.
.. Remove your left foot from the brake.
A WARNING
-Always adapt yo ur driv ing to the traffic flow.
- Only use Launch Control when road and traf-
fic cond itions allow it and other dr ivers will
not be endangered or impacted by you r d riv
ing and the vehicle's accele ration.
- Please note that the drive whee ls can sp in
and the vehicle can break away when sport
mode is swit ched o n, especia lly when the
road is s lippery.
- Once t he vehicle has sta rted moving, press
the
I $? OFF ! button briefly to t urn the sport
mode off.
(D Tips
- The transmiss ion temperature may increase
s ignificantly after using the lau nch cont rol
program.
If that happe ns, the program m ay
l) In vehicles w ith a d river information system, an ESC light
in the instrument cluster stays o n continuous ly and the
message
Stabili za tion contro l (E SC ): sport . Warning! Re·
stricted st abi lity
appears temporar ily.
Autom atic tran sm iss ion
not be ava ilab le for a few minutes. It will be
avai lab le again after a cool-down period.
- Whe n accelerating using the launch contro l
program, all vehicle parts a re su bject to
heavy loads. This can lead to increased
wear.
Emergency mode
Applies to vehicles: wit h S tronic transmiss ion
In the event of o system mo/function, there is on
emergency program.
If all of the selector lever positions are hig hlight
ed with a light background in the instrument
cluster disp lay, there is a system malfunction and
the S tronic transmission is running in the emer
gency program. The vehicle can still be driven in
emergency mode, but only with reduced speed
and not in all gears . In some cases, the vehicle
cannot drive in rever se .
(D Note
If the transm ission runs in emergency mode,
drive to an authorized A udi dealer or author
iz ed Audi Se rvice Facility immed iate ly to have
the malfunc tion corrected.
Transmission malfunction
• Tran smi ssion malfunction ! Pl ea se stop the
vehicle and select P
The re is a ma lfunction in the transmission. Park
the vehi cle secure ly and do not cont in u e driv ing.
See a n author ized Audi dealer or au thori zed A udi
Service Facility for assis tance.
• Tran smission overheating! Plea se stop the
vehicle!
The transmiss ion is too hot and can become dam
aged. Stop and let the transmiss ion cool w ith the
engi ne r unning (at idle) in the P se lector lever po
s it ion. Then the ind icator lig ht and the message .,.
95
Page 99 of 328
,....,
N
0 > co ,....,
"' Press and hold the yellow re le a se button wi th
the screwdriver ~
fig. 87.
"' Press the release button in the se lector lever @
and move the leve r into the N position.
"' Clip the shift cove r back into the shift gate a fter
us ing the emergency release.
If t he vehicle m ust be pushed or towed due to a
power fai lure (fo r example, the battery is dead),
the selector lever must f irst be moved to the N
position using the emergency release mecha
ni sm.
A WARNING
On Ly m ove the se lector lever ou t of the P posi
tion when the par king b rake is set.
If that
does not work, se cure the vehicle wi th the
bra ke ped al. Ot herw ise, the vehicle coul d
sta rt to move unintention ally whe n the sele c
to r lever is moved out of the P pos ition .
Automatic transm ission
97
Page 113 of 328
,....,
N
0 > co ,....,
ist.
A WARNING
Incorrect handling of the connector contacts
can cause e lectric shock or fire.
- Do not touch the contacts on the vehicle charging port and on the Audi e-tron charg
ing system .
- Do not insert any objects in the vehicle charg ing port or in the Audi e-tron charging
system .
- Protect the sockets and connectors against
any moisture, water and other flu ids.
A WARNING
Using a damaged or incorrect charging cable
or a damaged or incorrect socket, using the
Audi e-tron charg ing system incorrectly or
disregarding the safety precaut ions could
cause sho rt circu iting, e lectric shoc k, exp lo
sions , fires or burns.
- Do not use the Audi e-t ron c ha rging system
if it is damaged and/or dirty . Check the ca
ble and connector for damage and dirt be
f ore using .
- T he Aud i e-tron charg ing system must only
be connected to sockets that a re insta lled
correctly and that are not damaged as we ll
as to electr ica l installations that have no
faults.
- Do not use any extension cords, cable reels,
power str ips or (travel) adapters.
- Disconnect the Audi e-tron charging system
from the power network during a thunder
storm .
- Do not modify or repair any electrical com
ponents.
- Never immerse the Audi e-tron charging system and connectors in water.
- The Aud i e-tron charging system must only
be cleaned when the control unit is com
pletely disconnected from the power supply
and from the veh icle. Use a dry towel to
clean.
- I f a 110 volt socket is used for charging, on
ly connect one veh icle at a time to the same
e-tron
circuit. Use a different circuit if an add ition
al vehicle needs to be charged at the same
time. Note the maximum permitted current
draw for the c ircuit. Contact a qualified elec
tr ical technician if there is any doubt.
A WARNING '"---
The components in the Audi e-tron charg ing
system can trigger sparks which can cause
flammable or explos ive f umes to ignite .
- To reduce the r isk of explosions, espec ially
in garages, make sure the contro l unit is at
least 19 in ches (SO cm) above the floo r
when charging.
- Do not use the Aud i e-tron charg ing system
in areas at risk for exp losions .
- The Audi e-tron charging system is only suit
ab le for use on Aud i vehicles and veh icles
within the Volkswagen Group. Using the de
vice on vehicles made by another manufac
turer is not authorized .
CI) Note
Make sure that you a lways use the s uitable
power plug prov ided with the A udi e-tron
charging system for the corresponding mar
ket. Contact an authorized Audi dealer o r au
thorized Audi Service Facility for more infor mation.
(D Tips
- For an uninterrupted charging process, we
recommend only charging using sockets
that are connected to a separately protect ed circuit.
- Us ing NEMA sockets w ith a current rat ing of
at least 30 A or industrial sockets in accord
ance with IEC 60309 when charging is rec
ommended .
- When charging the high-voltage battery us
ing household/ industrial sockets, the elec
trical installation can be used at full capaci
ty. Having a qualified electrician regularly inspect the electrical installations that are
used for charg ing is recommended.
111
Page 116 of 328
e-tron
Charging dock
Applies to vehicles: with p lug -in hybrid drive and charging
dock
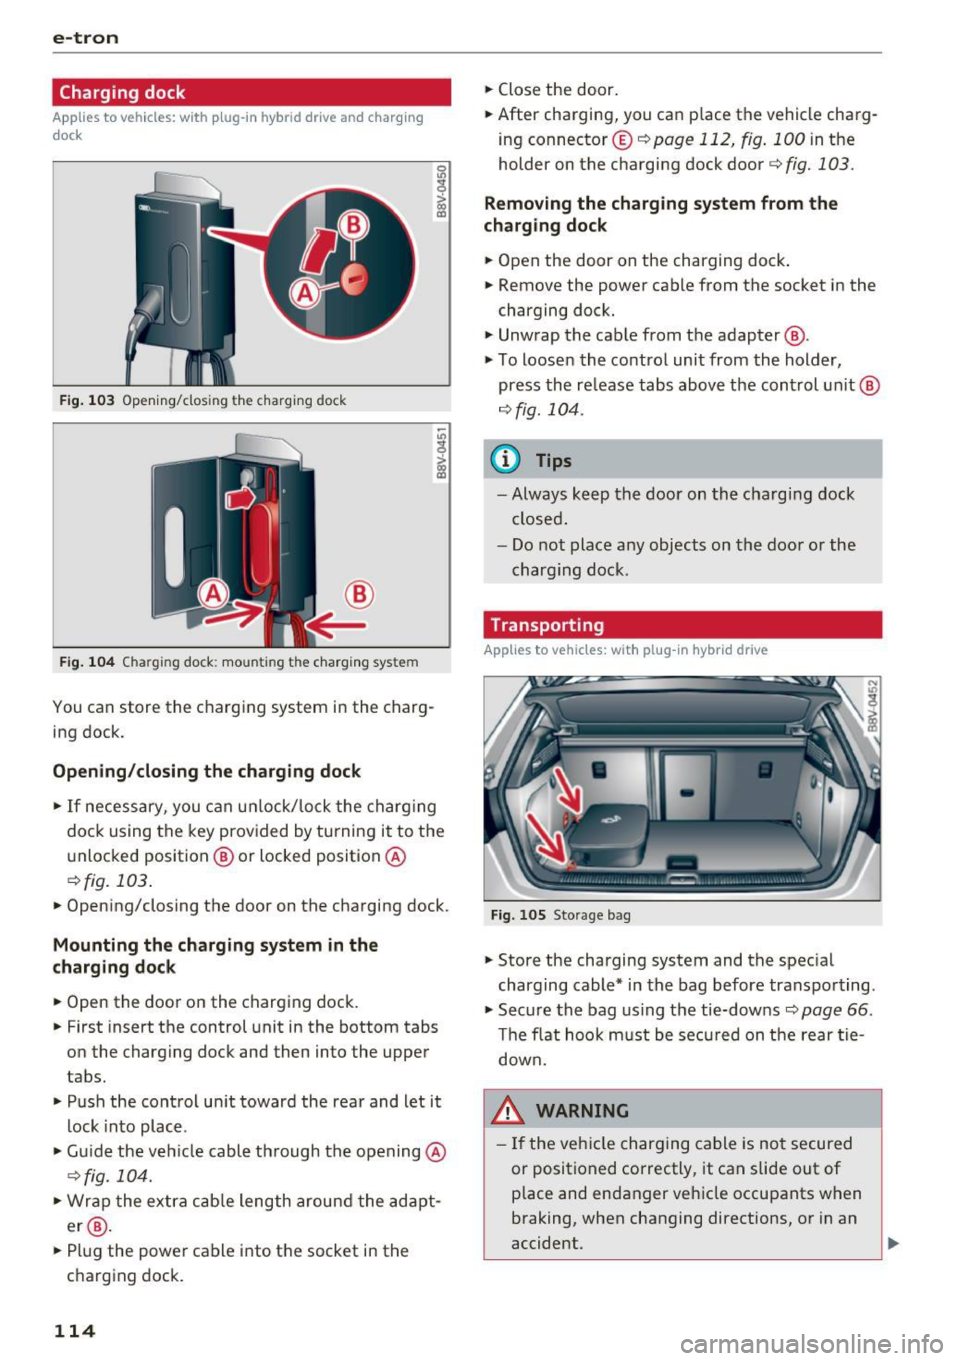
F ig . 1 03 Opening/clos ing t he charg ing dock
®
Fig . 1 04 Charging dock: mounting the ch arging system
You can store the charg ing system in the charg
ing dock.
Opening /closing the charging dock
• If necessary, you can u nlock/lock the charg ing
dock using the key provided by turning it to the
unlocked position @ or locked position @
¢fig. 103.
• Opening/closing the door on the charging dock.
Mounting the cha rging system in the
charging dock
• Open the door on the charging dock.
• First insert the control unit in the bottom tabs
on the charging dock and then into the upper
tabs.
• Push the control un it toward the rea r and let it
lock into place.
• Gu ide the vehicle cable th rough the opening @
¢fig_ 104.
• Wrap the extra c ab le length around the adapt
er @ .
• Plug the power cable into the socket in the
charging dock.
114
• Close the door.
• After charging, you can place the vehicle charg
ing connecto r© ¢
page 112 , fig. 100 in the
holder on the charging dock door¢
fig. 103.
Removing the charging system from the
charging dock
• Open the door on the charging dock .
• Remove the power cable from the socket in the
charging dock.
• Unwrap the cable from the adapter @.
• To loosen the contro l unit from the holder,
press the re lease tabs above the cont rol un it @
r=:> fig. 104.
(D Tips
- Always keep the door on the cha rg in g dock
closed .
- Do not place any objects on the doo r or the
charging dock.
Transporting
Applies to vehicles: with plug-in hybrid drive
Fig. 105 Storage bag
• Store the charging system and the spec ial
charging cable* in the bag before transpo rting.
• Secure the bag us ing the tie-downs¢
page 66.
The flat hoo k m ust be sec ured on t he rear tie
down.
8_ WARNING
- If the veh icle charging cable is no t secured
or positioned correctly, it can slide out of
p lace and endanger ve hicle occupants when
braking, when changing directions, or in an
accident.
Page 127 of 328

,....,
N
0 > co ,....,
as needed after switching the ignition on/
off again.
Vehicle status
Applies to vehicles: with plug- in hybrid drive
You can access various vehicle statuses using the
services, such as:
- high-voltage battery charge level,
- electric range,
- mileage,
- next inspection.
For addit ional information, refer to¢
page 101,
Power meter overview
and ¢ page 102, Range
display.
A WARNING
Do not be misled by the status report displays
by ignor ing messages and/or illuminated
warning and indicator lights in the vehicle.
This could lead to break downs in on the road,
accidents and serious injuries.
@ Tips
- If the high-voltage battery is not charged,
the amount of access requests is limited to
15 after switching off the ignition. This
helps conserve the 12 volt vehicle battery.
You cannot control functions or access in
formation if the charge level of the 12 volt
vehicle battery is too low.
- If at least two minutes have passed after
the last time the ign ition was switched off,
you can reset the access counter back to "0"
as needed after switching the ignition on/
off again .
Vehicle position
Applies to vehicles: with plug -in hybrid drive
The vehicle collects data under certa in conditions
and sends it to a server.
When data is stored, you can data such as the ex
amples listed below using the Audi connect e
tron services:
- Vehicle location display
e-tron
-Display of one's own location
- Route to your vehicle
If your mob ile dev ice also has a navigation func
tion, you can nav igate to your last known parking
location .
For example, you have the option to show the
route to your vehicle and to send the correspond
i ng locations.
(D Tips
- The new parking locat ion cannot be deter
m ined with this service if the vehicle is
moved after shutting the vehicle off and
w ithout switching the ignition on and off
again, for example when being towed or if
the vehicle is stolen .
-If the vehicle is moved and shut off again
using the second key, for example, the new
park position is transmitted to the
server af
ter removing the key.
Charging
Applies to vehicles: with plug- in hybrid drive
You can contro l and access the high-voltage bat
tery ch arging process remotely using these
serv
ices. You have the following options:
- check the battery charge level,
- start/end the charging process,
- program the charging t imer with/without cl i-
mate control,
- deactivate/activate the charging timer.
For additional information, refer to¢
page 112,
Charging the battery with the Audi e-tron charg
ing system.
A WARNING
Only perform charging functions on the high
voltage battery if the vehicle is shut off cor
rectly, is connected to a suitable socket and if
the ignition is switched off.
125
Page 129 of 328
,....,
N
0 > co ,....,
General information
Your Audi was designed primarily for passenger
transportation .
If you plan to tow a trailer, please remember that
the additional load will affect durability, econo
my and performance.
T railer towing not only places more stress on the
vehicle, it also calls for more concentration from
the driver.
For this reason, always follow the operating and
driving instructions provided and use common
sense.
Technical requirements
Trailer hitch
Use a weight-carrying hitch conforming to the
gross trailer weight. The hitch must be suitable
for your vehicle and trailer and must be mounted
securely on the vehicle's chassis at a technically
sound
location . Use only a trailer hitch with a re
movable ball mount . Always check with the trail
er hitch manufacturer to make sure that you are
using the correct hitch.
Do not use a bumper hitch.
The hitch must be installed in such a way that it
does not interfere with the impact -absorbing
bumper system . No modifications should be
made to the vehicle exhaust and brake systems .
From time to time, check that all hitch mounting
bo lts remain securely fastened.
When you are not towing a trailer,
remove the
tra iler hitch ball mount . This prevents the hitch
from causing damage should your vehicle be
struck from beh ind
~ ,&. .
Trailer brakes
If your trailer is equipped with a braking system,
check to be sure that it conforms to all regula
tions .
Trailer mode
The trailer hydraulic brake system must not be
directly connected to the vehicle's hydraulic
brake system.
Safety chains
Always use safety chains between your vehicle
and the trailer.
Trailer lights
T ra iler lights must meet all regulations . Be sure
to check with your Aud i dea ler for correct wiring,
switches and relays .
Mirrors
If you are unable to see the traffic behind you us
ing the regular outside mirrors, then you
must in
stall extended mirrors . It is important that you
always have clear vision to the rear.
,8. WARNING
After removing the trailer hitch, do not store
it in your vehicle. In case of sudden braking,
the hitch could fly forward and injure you or
your passengers.
Operating instructions
Maximum trailer weight
A trailer for your vehicle is limited to a typical
class 1 or class 2 trailer.
Trailer load distribution Be sure the load in the trailer is held securely in
place to prevent it from shifting forward, back
ward or sideways.
Never allow a passenger to ride in a trailer~.&.
in Driving instructions on page 128.
Engine cooling system
Towing a trailer makes the engine work harder. It
is important that the cooling system's perform
ance is up to the additional load. Make sure that
the cooling system has enough fluid.
Tire pressure
When towing a trailer, inflate the tires of your
vehicle to the cold tire pressure listed under "Full ..,.
127
Page 130 of 328
Trailer mod e
load" on the la bel located on the driver's side B
pillar (visib le when the door is open) . Inflate
tra iler tires to trailer and tire manufacturers'
specif ications.
Lights
Check to make sure both vehicle and t railer lights
are working p roper ly.
Safety chains
Be sure t railer safety chains are properly connect
ed from the trai le r to the hi tch on the veh icle.
L eave enough sla ck in the cha ins to permi t turn
ing corners. When yo u install safety chains, ma ke
sure they wi ll not drag on the road when yo u are
driving .
The cha ins s hou ld cross under the trailer tongue
t o prevent it from dropping in case of separation
from the h itch .
Driving instructions
Driving with a trailer always requires extra care
and consideration .
To obtain t he best poss ible handling of vehicle
and traile r, please note the fo llow ing :
.,. Do not tow a loaded trailer when your car itself
is not loaded.
.. Be especi ally ca ref ul when pass ing othe r
vehicles.
.. Observe speed limi ts .
.. Do not d rive at the maximum permissible
speed.
.. Always apply brakes early.
.. Monitor the temperature gauge .
Weight distribution
Towing a loaded t railer w ith an empty car res ults
in a high ly unstable distribution of weight . If this
cannot be avoided, drive at very low speeds on ly
to avoid the risk of losing steering control.
A "balanced" rig is easie r to operate and cont rol.
This means that the tow vehi cle should be loaded
to the extent possible and permissible, while
keep ing the tra iler as light as possib le under the
circumstances. Whenever possible, transfer
some cargo to the l uggage compartment of the
128
tow veh icle wh ile observing tong ue load require
ments and vehicle loading considerations.
Speed
The higher the speed, the mo re diff icu lt i t be
comes for the driver to con trol the r ig. Do not
drive at t he maxim um permissible speed. Reduce
you r speed even more if load, weather or wind
con dit ions are unfavorab le - partic ularly when
go ing downh ill.
Reduce vehicle speed
immediately if the trailer
shows the slightest sign of swaying.
Do not try
to stop the swaying by accelerating.
Observe speed limi ts. In some areas, s peeds fo r
vehicles towing trailers are lower than for regular
vehicles .
A lways apply bra kes early. Whe n driving down
hill, shift in to a lower gea r to use the engine
b raki ng effect to slow the vehi cle. Use of the
brakes alone ca n cause them to over heat and fai l.
Coolant temperature
The coolant temperature gauge 9 page 12 must
be obse rved caref ully. The coolant temperature
c a n incre ase if yo u drive o n long incl ines in a low
gear a t high engine speeds . Red uce your speed
immediately if the LE Ds in the top part of the dis
play turn on .
Fo r more info rm ation abou t indicator lights, re
fer to . ¢
page 20 .
A WARNING
-
Anyone not prope rly restrai ned in a moving
vehicle is at a much greate r risk in an acci
dent. Never let anyone ride in your car who is
not properly wear ing the restraints provided
by Aud i.
Trailer mode notes
Important to know
Your vehicle handles differen tly when towing a
trailer because o f the additiona l weight and di f
ferent weight distribution. Safety, performance
and economy will g reatly depend on how caref ul-
l y you load your trai ler and operate you r rig. ..,_
Page 131 of 328
,....,
N
0 > co ,....,
turning, stopping and backing up in an area away
from traff ic. Keep practicing until you have be
come completely familiar with the way your vehi
cle-trailer combination behaves and responds.
Backing up is difficult and requires practice.
Backing up with a trailer generally requires steer
ing action opposite to that when backing up your
vehicle without a trailer.
Maintain a greater distance between your vehicle
and the one in front of you. You wi ll need more
room to stop. To compensate for the trailer, you
will need a larger than normal turning radius.
When passing, remember that you cannot accel
erate as fast as you norma lly would because of
the added load. Make sure you have enough room
to pass. After passing, allow plenty of room for
your trailer before changing lanes again.
Avoid jerky starts, sharp turns or rap id lane
changes.
@ Tips
- Do not tow a trailer during the break-in peri
od of your vehicle.
- If you tow a trailer, your Audi may require
more frequent maintenance due to the ex
tra load
¢ page 306.
Parking on a slope
Do not pork on a slope with a trailer. If it cannot
be avoided, do so only ofter doing the following:
When parking:
.. Apply the foot brake .
.. Have someone pla ce chocks under both the ve
hicle and the trailer wheels .
.. With chocks in place, slowly release the brakes
until the wheel chocks absorb the load .
.. Turn the wheels towards the curb .
.. Apply the parking brake .
.. Select the P selector lever position.
When restarting after parking :
.. Apply the foot brake.
.. Start the engine.
.. Select the D/S selector lever position.
Trailer mode
.. Release the parking brake and slowly pull out
and away from the wheel chocks.
.. Stop and have someone retrieve the whee l
chocks.
{!) Tips
If you move the selector lever of the automat
ic transmission to P before applying the park
ing brake and before blocking the wheels, you
may have to use more force later to move the
lever out of the P posit ion.
129
Page 133 of 328
.... N
0 > CX)
....
"' U"I
....
"' ....
-Please note that unconsciously "resting"
your foot on the accelerator pedal prevents the cruise control from braking. This is be
cause pressing the accelerator pedal over
rides the cruise control system .
-If there is a brake system malfunction such
as overheating when the speed warning sys
tem is switched on, the braking function in
the system will be deactivated. The remain
ing speed warning system functions will re
ma in active, as long as the~ (USA mod
els) /
fil (Canada models) indicator light is
on.
{i) Tips
- The cruise control system is ideal for
stretches w ith speed limits. The d river is re
sponsible for adhering to the correct speed.
- The cruise control remains active when
shifting gears.
- The brake lights turn on when the brakes
are act ivated.
Switching on
Appl ies to vehicles: with c ru ise control system
0
f
®t
0
Fig. 114 Operat ing lever: cruise contro l system
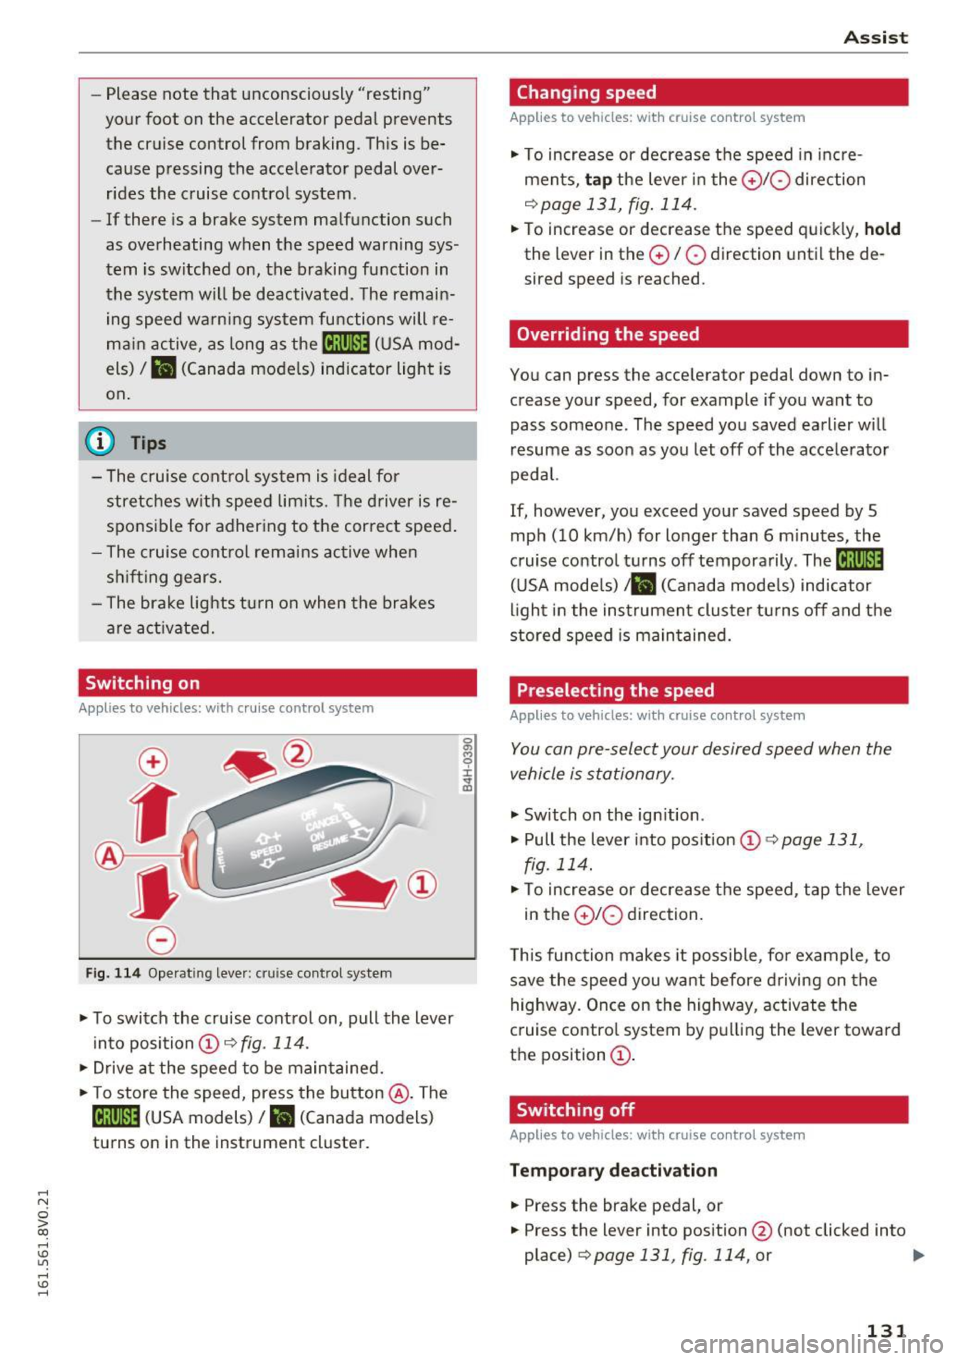
.. To switch the cruise control on, pull the lever
into position @~
fig. 114.
.. Drive at the speed to be maintained .
.. To store the speed, press the button @. The
@;\1)~14 (USA models) / l'I (Canada models)
turns on in the instrument cluster.
Assist
Changing speed
App lies to vehicles: w ith cruise control system
., To increase or decrease the speed in incre
ments,
tap the lever in the 010 direction
~ page 131, fig. 114.
.. To increase or decrease the speed quickly, hold
the lever in the 0 / 0 direction until the de
sired speed is reached.
Overriding the speed
You can press the accelerator pedal down to in
crease your speed, for example if you want to
pass someone. The speed you saved earlier will
resume as soon as you let off of the accelerator
pedal.
If, however, you exceed your saved speed by 5
mph (10 km/h) for longer than 6 minutes, the
cruise control turns off temporarily .
The@;\!)~14
(USA mode ls) ;fil (Canada models) indicator
light in the instrument cluster turns off and the
stored speed is maintained.
Preselecting the speed
Appl ies to vehicles: w it h cruise co ntrol system
You can pre-select your desired speed when the
vehicle is stationary.
., Switch on the ign ition .
.. Pull the lever into position
(D 9 page 131,
fig. 114 .
.. To increase or decrease the speed, tap the lever
in the
010 direction.
This function makes it possible, for example, to
save the speed you want before driving on the
highway. Once on the highway, activate the
cruise control system by pulling the lever toward
the position
(D .
Switching off
Applies to veh icles: w it h cru ise co ntrol system
Temporary deactivation
.. Press the brake pedal, or
.. Press the lever into position@ (not clicked into
place)
~ page 131, fig. 114, or ..,
131