window AUDI A3 2016 Owner´s Manual
[x] Cancel search | Manufacturer: AUDI, Model Year: 2016, Model line: A3, Model: AUDI A3 2016Pages: 328, PDF Size: 81.78 MB
Page 74 of 328
Warm and cold
vehicle interior. We recommend switching recir
culation mode on when driving through a tunne l
or when s itting in traffic¢ &..
Recirculation mode is switched off in the defrost
setting~ .
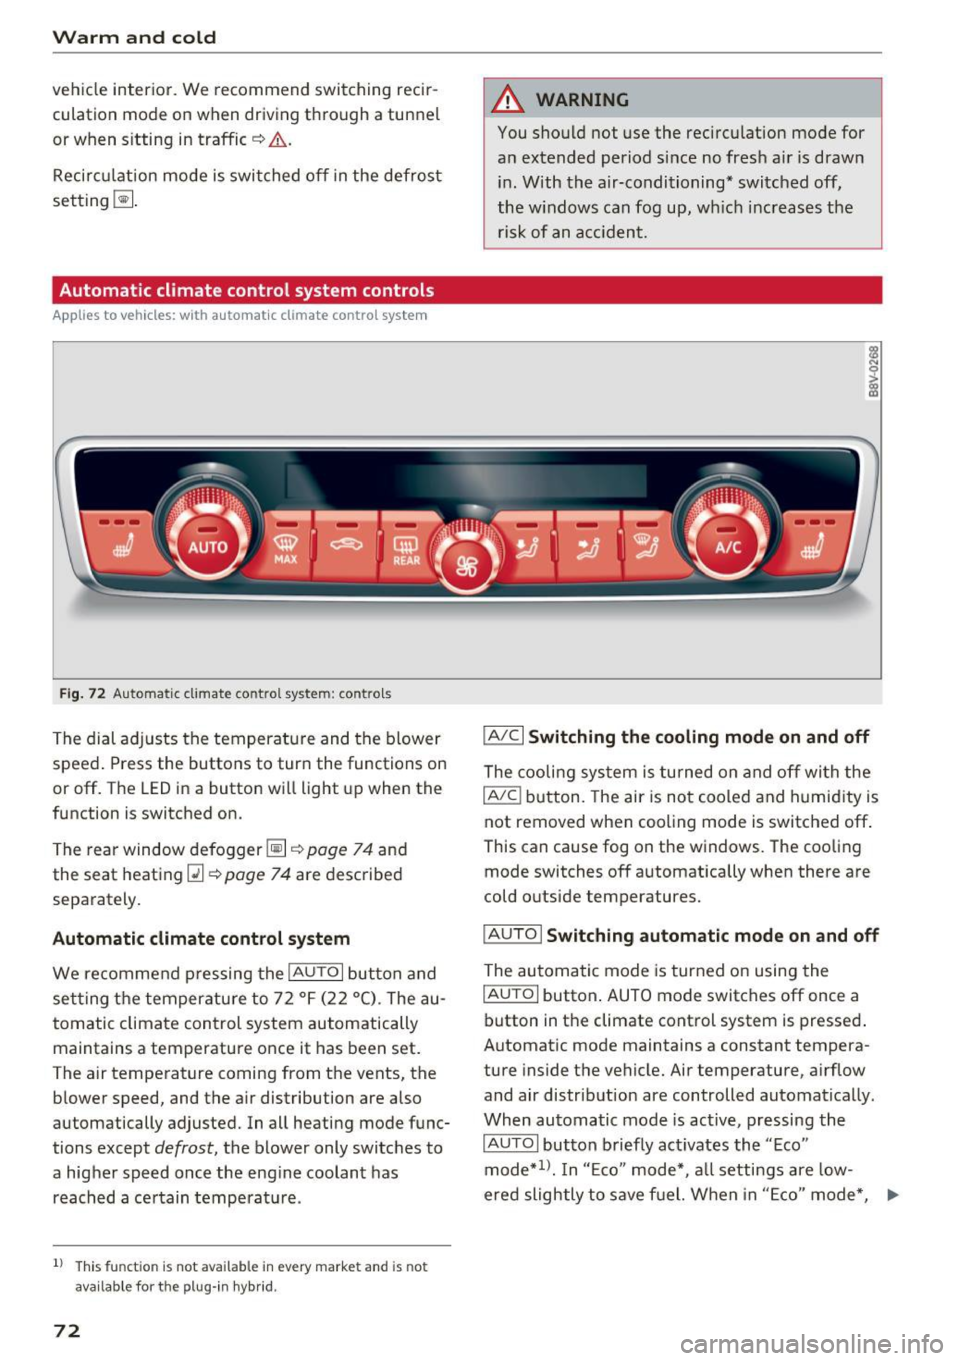
Automatic climate control system controls
Applies to vehicles: with a utomat ic cl imate contro l sys tem
F ig. 72 Automatic climate control system : contro ls
The dial adjusts the temperature and the blower
speed . Press the buttons to turn the functions on
or off. The LED in a button wi ll light up when the
function is switched on.
The rear window defogger
[i] ¢ page 74 and
the seat heat ing
Q] ¢ page 74 are described
separately.
Automatic climate control system
We recommend pressing the IAUTOI button and
se tti ng the temperature to 72 °F (22 °C). The au
tomatic climate control system automatically
maintains a temperature once it has been set.
The air temperature coming from the vents, the
b lower speed, and the a ir distribution are also
automatically adjusted. In all heating mode func
tions except
defrost, the blower only switches to
a higher speed once the eng ine coolant has
reached a ce rtain temperature .
1l This func tio n is not avai lable in every market and is not
ava ilab le for t he plug- in hyb rid .
72
A WARNING
You should not use the recirculation mode for
an extended period since no fresh ai r is drawn
i n . With the air-conditioning* switched off,
the w indows can fog up, whic h increases the
risk of an accident.
IA/C l Switching the cooling mode on and off
The cooling system is turned on and off with the
IAJC I button. The air is not coo led and humidity is
not removed when cooling mode is switched off .
This can cause fog on the windows. The cooling
mode switches off automatically when there are
cold outside temperatures.
I AUTO I Switching automatic mode on and off
The automatic mode is turned on using the
IAUTOI button. AUTO mode switches off once a
button in the climate control system is pressed.
Automatic mode maintains a constant tempera
ture inside the vehicle. Air temperature, a irflow
and air distribution are controlled automatically.
When automatic mode is active, pressing the
IAUTOI button b rief ly act ivates the "Eco"
mode*
1> . I n "Ec o" mode*, all settings are low-
e red slightly to save fu el. When in "Eco" mode*,
Ill-
Page 75 of 328
....
Eco is shown in the display. To exit "Eco" mode*,
press the
I AUTOI button again.
I• I • I Setting the temperature
The temperature can be adjusted individually for
the driver and front passenger using the dials.
Temperatures between 60 °F ( +16 °C) and 84 °F
(+28 °C) can be set. If outside of this range, LO or
HI will appear in the climate control system dis
p lay. In both settings, the climate control runs
with constantly at the maximum cooling or heat ing level. The temperature is not regulated.
Synchronization: by pressing the IAUTOI button
for two seconds, the temperature setting for the
driver's side is transferred to the front passeng
er's side. This applies a temperature change to
the front passenger's side.
~ Adjusting the blower
To prevent the windows from fogging over, the b lower should a lways run at a low speed. You can
adjust the volume of air generated by the blower
to your preference. To have the blower regulated
automatically, press the IAUTO ! button .
Adjusting the air distribution
The air distribution is adjusted with the~, U!J
and ~ buttons. To have the air distribution regu
lated automatically, press the
IAUTOI button.
The round air vents in the cockpit are adjustable
¢page 74.
To keep the windows from fogging in damp
weather, we recommend opening the side air
vents and tilting them to the side¢
page 74,
Adjusting the air vents .
Foot vents are located under the front seats and
adjustable vents on the end of the center console
to heat the rear of the vehicle.
~ Switching the defroster on and off
The winds hield and side windows are defrosted
or cleared of condensation as quickly as possible.
The maximum amount of air flows mainly from
"' the vents below the windshield. Recirculation
0
ii; mode switches off . The temperature is controlled
~ automatically. In the [!] sett ing, the IA/Cl cooling
.... v:, ....
Warm and cold
mode switches on automatically, depending on
the outside air temperature .
T he
IAUTOI button switches the defroster off .
l"""I Switching recirculation mode on and off
The rec irculat ion mode can be turned on manual
ly or automatically* .
- Switching manual recirculation mode on and
off: press
l"""I The LED light up when sw itched
on.
- Automatic* rec irculat ion mode: auto recircula
tion needs to be activated in the
MMI. Select:
the
I MENU I button> Car > Systems* control
button
> AC > Auto recirculation . The air quali
ty sensor that is designed for diesel and gaso
line exha ust automatically switches the recircu
lation mode on or off depending on the level of
pollutants in the outside air .
In rec ircu lation mode, the air inside the vehicle is
circulated and filtered. This prevents the unfi l
tered air outside the vehicl e from enter ing the
vehicle interior. We recommend switching recir
cu lation mode on when driving through a twnnel
or when sitting in traffic¢ .&..
T he
1-1 button, IAUTOI or the [ii button switches
recirculation mode off.
T he system switches to recirculation mode when
driv ing in r everse when the engine is cold.
_&. WARNING
You should not use the recirculation mode for
an extended period since no fresh air is drawn
in. With the air-conditioning switched off, the
windows can fog up, which increases the risk
of an acc ident.
73
Page 76 of 328
Warm and cold
Adjusting the air vents
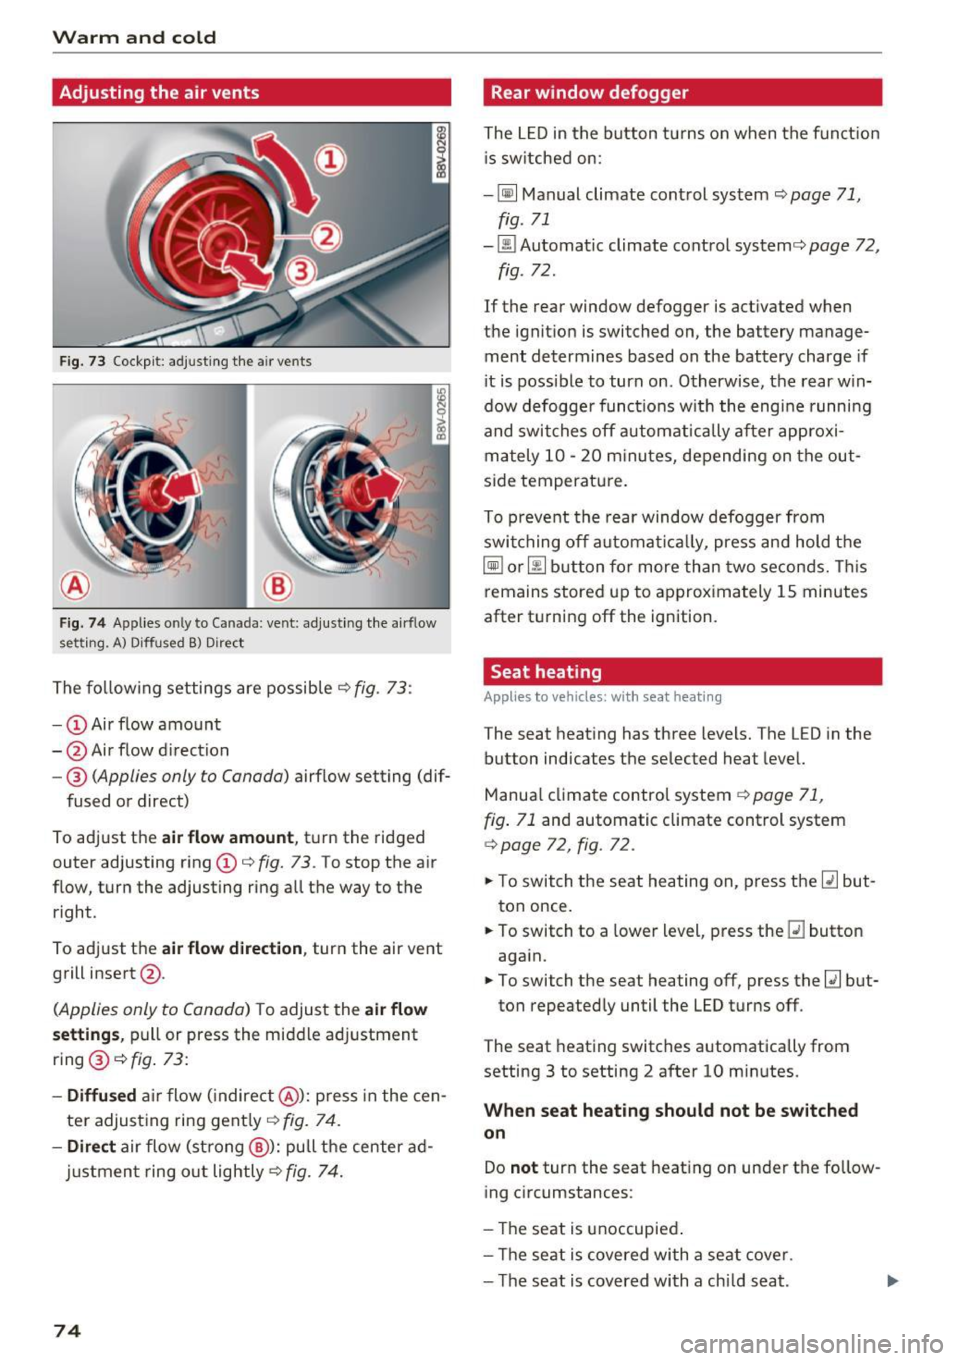
Fig . 73 Cockpit: ad just ing the a ir vents
®
F ig . 74 Applies on ly to Cana da: ve nt: ad just ing the a irfl ow
set ting . A) D iffused B) Direct
The fo llow ing settings are possible ¢ fig. 73 :
-CD Air flow amount
- @ Air flow d irection
- ® (Applies only to Canada) airf low setting (dif-
fused or direct)
To adjust t he
air flow amount , tu rn the ridged
outer adjusting ring CD¢
fig. 73 . To stop the air
f low, turn the adjusting ring a ll th e way to the
right.
To adjust the
air flow direction , turn the air vent
grill insert @.
(Applies only to Canada) To adjust the air flow
setting s,
pull or press the middle adj ustment
ring @¢
fig. 73:
- Diffu sed air f low ( indire ct @ ): p ress in the cen
ter adjusting ring gently ¢
fig. 74 .
-Dire ct air flow (st rong @): pull t he center ad
ju stmen t ring o ut lightly ¢
fig. 74 .
74
Rear window defogger
The LED in the button turns on when the funct ion
i s sw itched on:
- ~ Manual climate cont rol sys tem ¢
page 71,
fig . 71
-00 Automatic climate control systemc:> page 72,
fig. 72.
If the rear window defogger is activated when
the ignit ion is switched on, the battery manage
ment determines based on the battery charge if
i t is possible to turn o n. Otherwise, the rear w in
dow defogge r funct ions w ith the engi ne runni ng
and swit ches off a utomat ica lly af te r approxi
mately 1 0 - 20 m inu tes, depending on the out
s ide temperature.
To p reve nt the rear window defogger from
swi tching off a utoma tically, press and hold the
~ o r [gfil bu tton fo r more th an two se con ds. Thi s
remains stored u p to a pproximately 15 minutes
after t urn ing off the ignition.
Seat heating
Applies to vehicles: with seat heating
The seat heat ing has three levels. The L ED in the
button ind icates the selected heat level.
Manua l clima te contro l system
c::, page 71 ,
fig . 71
and automatic climate control system
r:> page 72, fig . 72.
... To switch t he seat heating on , press t he Ill but
ton once.
... To switch to a lower level, p ress the
Ill button
aga in.
... To switch the seat heating
off , press the Ill but-
ton repeated ly until the LED turns off.
The s eat heating switch es automatically from
setting 3 to setting 2 after 10 min utes.
When seat heating should not be switched
on
Do not turn the seat heating on un der the follow
ing c ircumstances :
- Th e seat is unoccupied .
- Th e seat is covered wi th a se at cove r.
- T he seat is covered with a ch ild s eat .
Page 88 of 328
Driving
brake provides various convenience and safety
functions.
When starting from a stop
- The integral hill start assist helps you when
driving by automatically releasing the parking
brake
c:;, page 87, Starting from a stop.
- When starting on inclines, the hill start assist
prevents the vehicle from unintentionally roll
ing back. The braking force of the parking brake
is not released until the wheels build up
enough driving force.
Emergency brake function
The emergency braking function ensures that the
vehicle can be slowed down even if the
standard
brakes fail c:;, page 87, Emergency braking
function.
A WARNING
- Do not press the accelerator pedal inadver
tently when the vehicle is stationary and the engine is running and a gear is selected.
Otherwise the vehicle will start to move im
mediately and could result in a crash.
- If the power supply fails, the released park
ing brake can no longer engage. In this
case, park the vehicle on level ground and
secure it by placing the selector lever in the
P position . See an authorized Audi dealer or
authorized Audi Service Facility for assis
tance.
(D Note
If the . or .. (USA models) /. (Canada
models) indicator light in the instrument
cluster blinks, there is a malfunction in the
brake system. Refer to the detailed descrip
tion of the indicator lights
c:;, page 18.
-If the - (USA models) /. (Cana-
da models) or
Ill indicator light turns on,
there is a malfunction in the parking brake
c;, page 19.
@ Tips
-If the parking brake is set while the ignition
is switched off, the
¢~jj indicator light in the
button and in the instrument cluster dis-
86
play - (USA models) /. (Canada mod
els) will turn off after a certain amount of
time.
- If driver's door is opened while the ignition
is switched on, the parking brake sets auto
matically. This prevents unintended rolling
of the vehicle.
- Occasional noises when the parking brake is
set and released are normal and are not a
cause for concern.
- When the vehicle is parked, the parking
brake goes through a self-test cycle at regu
lar intervals. Any noises associated with this
are normal.
- If there is a power failure, the parking brake
will not set if it is released, and it will not release if it is set
c:;, I!:::,. . See an authorized
Audi dealer or authorized Audi Service Fa cility for assistance.
· Parking
.,. Press the brake pedal to stop the vehicle.
.,. Pull the switch @
c:;, page 85, fig. 80 to set the
parking brake.
.,. Place the selector lever in the P position.
.,. Turn the engine off
c:;, & -
.,. Turn the steering wheel when parking on in
clines so that the wheels will roll into the curb
if the vehicle starts moving.
A WARNING
- Always take the vehicle key with you when
leaving the vehicle, even for a short period
of time . This applies particularly when chil
dren remain in the vehicle. Otherwise chil
dren could start the engine, release the
parking brake or operate electrical equip
ment such as power windows, which in
creases the risk of an accident.
- When the vehicle is locked, no one -particu
larly not children -should remain in the ve
hicle. Locked doors make it more difficult
for emergency workers to get into the vehi
cle, which puts lives at risk.
Page 107 of 328
,....,
N
0 > co ,....,
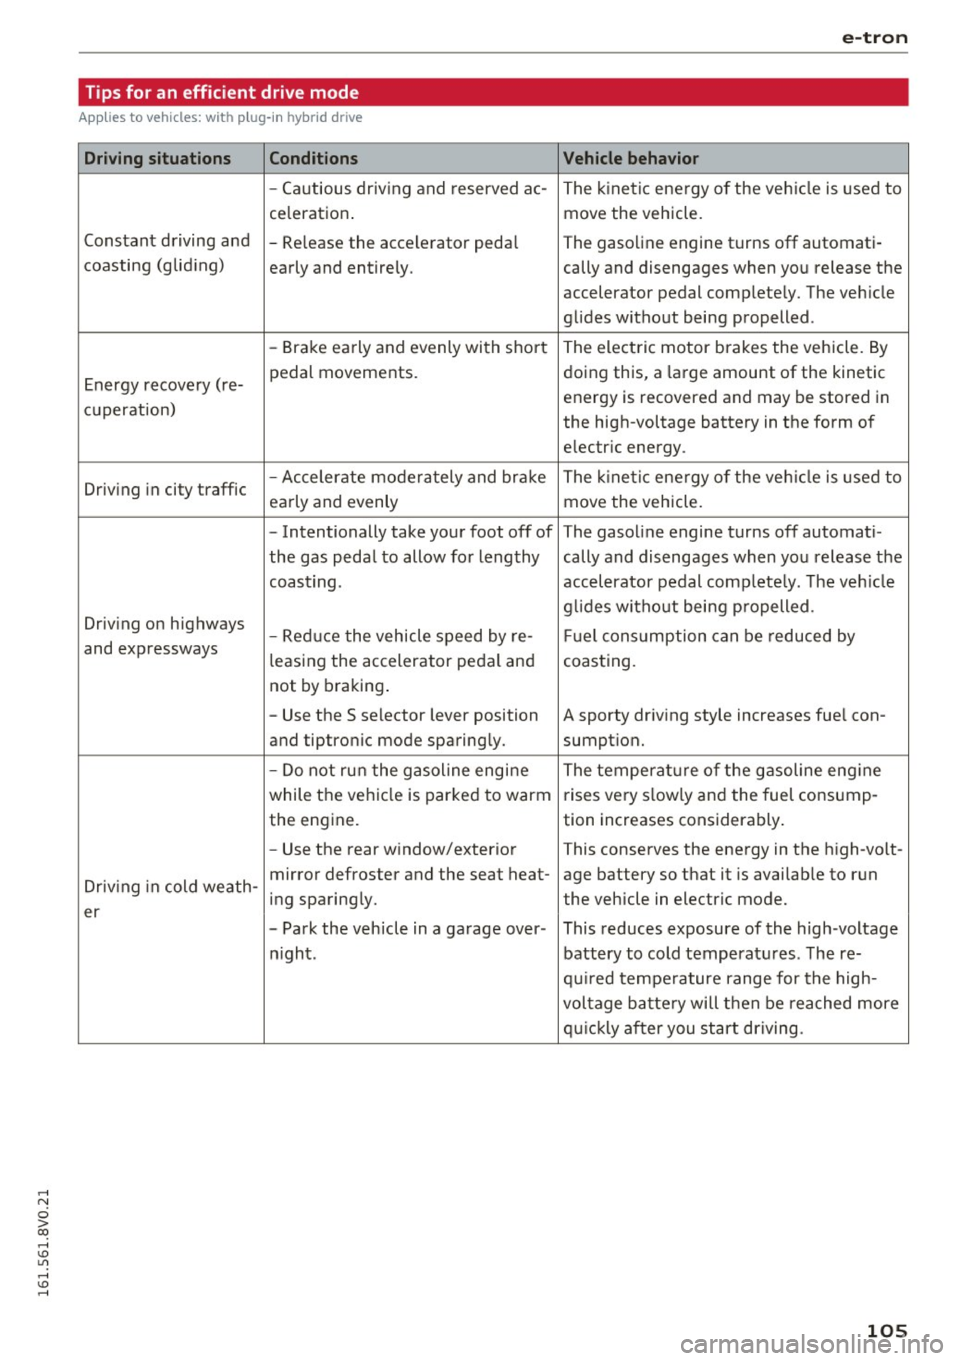
Applies to vehicles: with p lug-in hybrid drive
Driving situations
Conditions
-Cautious driving and reserved ac-
ce leration .
Constant driving and -Release the accelerator peda l
c oasting (glid ing)
early and entirely.
-Brake early and evenly with short
Energy recovery (re- pedal movements.
cu peration)
Driv ing in city traffic -
Accelerate moderately and brake
early and evenly
- Intentionally take your foot off of
the gas peda l to allow for Lengthy
coast ing .
Driv ing on highways
-Reduce the vehicle speed by re-
and expressways leasing the accelerator pedal and
not by braking.
- Use the S selector lever position
and tiptronic mode sparing ly.
- Do not run the gasoline engine
while the vehicle is parked to warm
the engine.
- Use the rear window/exterior
Driving in cold weath -mirror defroster and the seat heat-
ing sparingly.
er
-Park the vehicle in a garage over -
night.
e-tron
Vehicle behavior
The kinetic energy of the vehicle is used to
move the vehicle.
The gasoline engine turns
off automati -
cally and disengages when you release the
accelerator pedal comp letely. The veh icle
glides without being propelled .
The electric motor brakes the vehicle. By
doing this, a large amount of the kinetic
energy is recovered and may be stored in
the high-voltage battery in the form of
electric energy .
The kinetic ene rgy of the veh icle is used to
move the vehicle.
The gasoline engine turns
off automati-
cally and disengages when yo u release the
accelerator pedal comp lete ly . T he veh icle
g lid es without being p ropelled .
Fu el cons umption can be reduced by
coasting .
A sporty driv ing style increases fue l con-
sumpt ion.
The temperat ure of the gasoline eng ine
rises very s lowly and the fuel consump-
tion increases considerably .
This conserves the energy in the high-volt-
age battery so that it is availab le to run
the vehicle in electric mode.
This reduces exposure of the high-voltage
battery to cold temperatu res . The re-
quired temperature range for the high-
voltage battery will then be reached more
quickly after you start driving.
105
Page 141 of 328
,....,
N
0 > co ,....,
switches
off automatically .
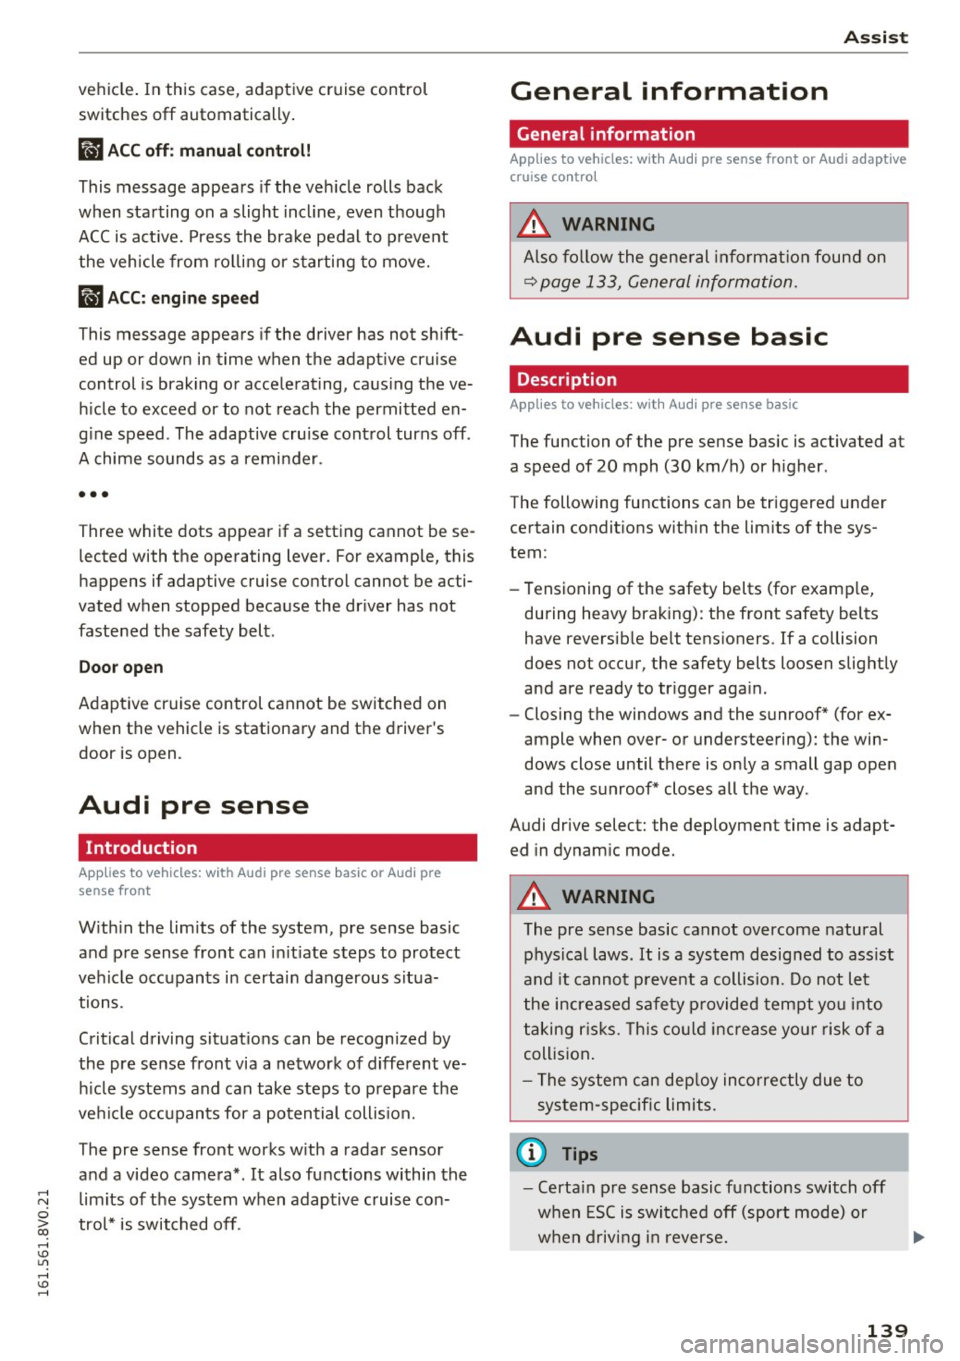
ill ACC off: manual control!
This message appears if the veh icle rolls back
when sta rting on a slight incl ine, even though
ACC is act ive. Press the brake pedal to p revent
the veh icle from ro lling or starting to move.
ill ACC: engine speed
This message appears if the driver has not shift
ed up or down in time when the adapt ive cruise
control is braking or accelerating, caus ing the ve
h icle to exceed or to not reach the permitted en
g ine speed . The adaptive cru ise cont rol turns
off.
A chime sounds as a remi nder.
•••
Three white dots appear if a sett ing cannot be se
lected with the operating lever. For example, this
happens if adaptive cruise control cannot be acti
vated when stopped because the dr iver has not
fastened the safety belt.
Doo r open
Adapt ive cruise control cannot be switched on
when the vehicle is stationary and the driver's
door is open.
Audi pre sense
Introduction
Applies to vehicles: with Audi pre sense basic or Audi pre sense front
With in the limits of the system, p re sense basic
and pre sense front can in it iate steps to protect
vehicle occupants in certain dangerous s itua
tions .
Critical driving situat ions can be recogn ized by
the pre sense front via a network of different ve hi cle systems and can take steps to prepare the
ve hicl e o ccupants for a potential collis ion.
The pre sense front works w ith a radar sensor
and a video camera*. It also functions within the limits of the system when adaptive c ruise con
tro l* is switched off .
Assist
General information
General information
Applies to vehicles: with Audi pre sense front or Audi adaptive
cruise control
_&. WARNING
Also fo llow the gene ral in format ion found on
~ page 133, General information.
Audi pre sense basic
Description
Applies to vehicles: with Audi pre sense basic
The function of the pre sense basic is activated at
a speed of 20 mph (30 km/h) or h igher .
The following functions can be triggered under certain condit ions w ith in the lim its of the sys
tem:
- Tensioning of the safety belts (for examp le,
during heavy braking): the front safety belts have reversib le be lt tens ioners. If a collision
does not occur, the safety belts loosen slightly
and are ready to tr igger aga in.
- Closing the windows and the sunroof* (for ex
ample when over- or understeering): the win
dows close until the re is only a small gap open
and the s unroof* closes all the way .
Audi drive select: the deployment time is adapt ed in dynam ic mode.
_&. WARNING ~
The pre sense basic cannot overcome natural
physical laws. It is a system desig ned to ass ist
and it cannot p revent a collision. Do not let
the increa sed safe ty p rovided tempt you into
t aking r is ks. This co uld in crease yo ur risk of a
collis ion .
- The system can dep loy inco rre ctly due to
system-specif ic limits.
(D Tips
- Certa in p re sense basic functions switch off
when ESC is swi tched off (sport mode) or
w hen driving in reverse. .,.
139
Page 144 of 328

Ass is t
- Switch the pre sense off when you are load
ing the vehicle onto a vehicle carrier, train,
sh ip or other type of transportation. This
can prevent undesired warnings from the pre sense system.
Driver messages
A pp lies to ve hicles: w ith Audi p re se nse or A ud i adapt ive
cr uise con trol
Audi p re sense cu rre ntly una va ilable. N o sensor
visi on
This message appears if the sensor view is ob
structed, fo r example by leaves, snow, heavy
spray or dirt. C lean the sensor~
page 133,
fig. 116.
Audi pre se nse : o ff
This message appears when the ESC is switched
to sport mode, for example
~ page 160 .
Audi pre sen se: sys te m f ault!
This message appears when the pre sense func
tion is aff ected. For example, this could be
caused by a faulty sensor.
If the message stays on , drive to an authorized
Audi dealer or authorized Aud i Service Facility to
have the ma lfunction corrected .
Audi active lane assist
Description
App lies to veh icles: w ith Aud i active lane assis t
Active lane assist detects lane marker lines with
in the l imits of the system us ing a came ra in the
windshie ld. If you are approaching a detected
lane marker line and it appears likely that you
will leave the lane, the system will warn you with
corr ective steering. You can overrid e this st eering
at any time . If you pass over a line, the steering
wheel will vibrate lightly. In order for this warn ing vibration to occur, it must first be switched
on in the MMI. Active lane assist is operable
when the lane marker line is detected on at least
one side of the veh icle.
l) Th is fun ction is not avail able in al l countrie s.
142
The system will not warn you before crossing a
l ane marker line if you have activated the turn
s ignal. In this case, it assumes that you are
changing lanes intentionally.
The system is designed for driving on express
ways and highways and therefore on ly activates
at speeds above approximately 40 mph (65 km/
h).
A WARNING
-
- The system warns the driver that the vehicle
is leaving the lane using correct ive steering .
The driver is always responsible for keeping
the vehicle within the lane .
- The system can help you keep the vehicle in the lane, but it does not drive by itself . Al
ways keep your hands on the steering wheel.
- Corrective steering may not occur in certain
situations, such as du ring heavy braking.
- There may be cases where the camera does
not recognize all lane marker lines. Correc
tive stee ring can only take place on the s ide
of the vehicle where lane marker lines are
detected.
- Other road structures or objects could poss i
bly be identified un intent ionally as lane
marker lines . As a result, corrective steering
may be unexpected or may not occur.
- The camera view can be restricted, for ex
ample by vehicles driving ahead or by rain,
snow, heavy spray light shining into the
camera or by dirt on the window . This can
result in active lane assist not detecting the
lane marker lines or detect ing them incor
rectly .
- In certain situations where visibility is low,
the vehicle may switch from "early" to "late"
corrective steer ing
1> .
- Under certain cond it ions such as ruts in the
road, an inclined roadway or crosswinds, the
corrective steer ing alone may not be enough
to keep the vehicle in the m iddle of the lane .
~
Page 149 of 328

,....,
N
0 > co ,....,
behind very quickly. The display may not
turn on in time.
- In poor weather conditions such as heavy
rain, snow or heavy mist.
- On very wide lanes, in tight curves, or if
there is a rise in the road surface. Vehicles
in the adjacent lane may not be detected
because they are outside of the sensor range.
- Audi side assist cannot detect all vehicles
under all conditions, which can increase the
risk of accidents.
- Please note that side assist only displays ap
proaching vehicles or vehicles in your blind
spot if your vehicle is traveling at least
19 mph (30 km/h).
- In certa in situations, the system may not
work or its function may be limited. For ex
amp le:
- The display may not turn on at the right
time if vehicles are approaching or passing
very quickly.
- In poor weather conditions, such as heavy rain, snow or fog.
- In very wide lanes, in tight curves or when
there are slopes in the roadway, vehicles
in the neighboring lanes may not be de
tected because they are outside of the
sensor range.
(D Note
The sensors can be displaced by impacts or
damage to the bumper, wheel housing and
underbody. This can affect the system. Have
an authorized Audi dealer or authorized Audi
Serv ice Facility check their function .
(Di Tips
-If the window glass in the driver's door or
front passenger's door has been t inted, the
display in the exterior mirror may be misin
terpreted.
- For an explanation on conformity with the
FCC regulations in the United States and the
Industry Canada regu lations, refe r to
r::!> page 309.
Assist
Switching on and off
App lies to vehicles : wi th Audi side ass ist
T he system and be switched on and off in the
MM I*.
"' Select: the I MENU I button> Car> Sys tem s"
control button > Driver a ssistanc e > Audi s ide
a ssis t.
With Off , the system is switched off.
An activated system w ill s ignal every time the ig
nition is switched on by turning the displays in
the exte rior m irro rs on briefly.
Adjusting the display brightness
App lies to vehicles: wi th Audi side ass ist
The display brightness can be adjusted in the
MM!* .
"' Select: the IM ENU I button > Ca r > Sys te m s*
control button > Dri ver assi st a n ce > Au di s ide
a ssis t.
The display br ightness adjusts automatically to
the brightness of the surroundings, both in the
information and in the warning stage. In very
dark or very bright surround ings, the d isp lay is
al ready set to the minimum o r max imum level by
the automatic adjustment. In such cases, you may not ice no change when adjust ing the bright
ness, or the change may only be noticeable once
the surroundings change.
Adjus t the br igh tness to a leve l where the display
in the information stage will not disrupt your
view forward . If you change the brightness, the
display in the exterior mirror will briefly show the
brightness level in the information stage . The
brightness of the warning stage is linked to the
brightness in the information stage and is adjust
ed along with the information stage adjustment .
(D Tips
-Side ass ist is not act ive while you are mak
ing the adjustment.
- Your settings are automatica lly stored and
assigned to the remote control key being
used.
147
Page 169 of 328
.... N
0 > CX)
rl I.Cl U"I
rl I.Cl ....
.. Make sure that all windows are clean and afford
good visibility to the outside .
.. Secure all luggage and other items carefully
r=> page 64, r=> page 63.
.. Make sure that nothing can interfere with the
pedals .
.. Adjust front seat, head restraint and mirrors
correctly for your height .
.,. Instruct passengers to adjust the head re
straints accord ing to their height .
.. Make sure to use the right ch ild restraint cor
rectly to protect children
r=> page 209, Child
safety .
.. Sit properly in your seat and make sure that
your passengers do the same
r=> page 58, Front
seats .
.. Fasten your safety belt and wear it properly . Al
so instruct your passengers to fasten their safe
ty belts properly
r=> page 176.
What impairs driving safety?
Safe driving is directly related to the condition of
the vehicle, the driver as well as the driver 's abili
ty to concentrate on the road without being dis
tracted.
The driver is responsible for the safety of the ve·
h ide and all of its occupants. If your ability to
drive is impaired, safety risks for everybody in the
veh icle increase and you also become a hazard to
everyone else on the road
r=> ,&. . Th erefo re :
.. Do not let yourself be distracted by passengers
or by using a cell ular telephone.
.. NEV ER drive when yo ur dr iv ing abili ty is im
paired (by medications, alcohol, drugs, etc.).
.. Observe all traffic laws, rules of the road and
speed limits and plain common sense.
.. ALWAYS adjust your speed to road, traffic and
weather conditions.
.. Take frequent breaks on long trips. Do not drive
for more than two hours at a stretch.
.,. Do NOT drive when you are tired, under pres
su re or when you are stressed.
Dr iving safety
A WARNING
-Impaired driving safety increases the risk of
serious personal injury and death whenever a
vehicle is being used .
Correct passenger
seating pos itions
Proper seating position for the driver
The proper driver seating position is important
for safe, relaxed driving.
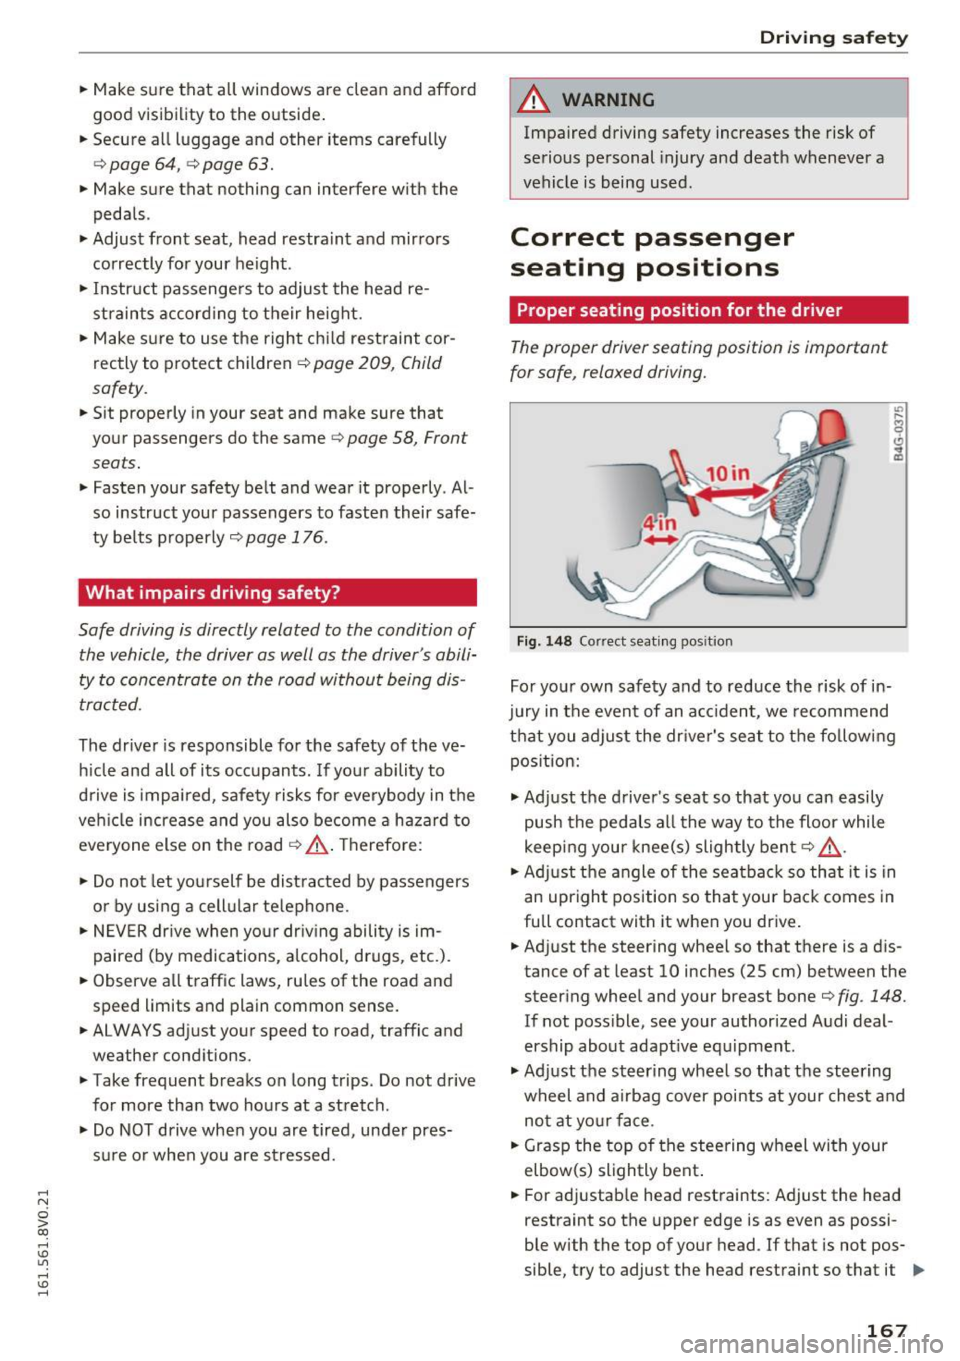
Fig. 148 Correct seating pos ition
For your own safety and to reduce the risk of in·
jury in the event of an accident, we recommend
that you adjust the dr iver's seat to the follow ing
position:
.,. Adjust the driver's seat so that you can easily
push the pedals all the way to the floor while
keep ing your knee(s) slightly bent
r=> ,&. .
.. Adjust the angle of the seatback so that it is in
an upright position so that your back comes in
full contact with it when you drive .
.. Adjust the steering wheel so that there is a d is
tance of at least 10 inches (25 cm) between the
steering wheel and your breast boner=>
fig. 148.
If not poss ible, see your authorized Audi deal·
ership about adapt ive equipment .
.,. Adjust the steering wheel so that the steering
wheel and airbag cover points at your chest and
not at your face .
.. Grasp the top of the steering wheel with your
elbow(s) slightly bent .
.. For adjustab le head restraints: Adjust the head
restraint so the upper edge is as even as possi
ble with the top of your head . If that is not pos
sible, try to adjust the head restraint so that it ..,.
167
Page 171 of 328
,....,
N
0 > co ,....,
unfolds. To help reduce the risk of serious
personal injury:
- Passengers must always sit in an upright po
sition and never lean against or place any
part of their body too close to the area
where the airbags are located .
- Passengers who are unbelted, out of posi
tion or too close to the airbag can be seri ously injured by an a irbag as it unfolds w ith
great force in the blink of an eye.
-Always make sure that there are at least 10 inches (25 cm) between the front pas
senger's breastbone and the instrument
panel.
- Always make sure that there are at least
4 inches (10 cm) between the front passen
ger's knees and the lower part of the instru
ment panel.
- Each passenger must always sit on a seat of
their own and properly fasten and wear the safety belt belonging to that seat.
- Before driving, always adjust the front pas
senger seat properly.
- For adjustable head restraints: befo re driv
ing, always also adjust the head restraints
properly.
- Always keep you r feet on the floor in front
of the seat. Never rest them on the seat, in
strument panel, out of the window, etc. The
airbag system and safety be lt will not be
able to protect you properly and can even in
crease the risk of injury in a crash.
- Never drive with the backrest reclined or
tilted far back! The farther the backrests are
ti lted back, the greater the risk of injury due
to incorrect positioning of the safety belt
and improper seating position .
- Children must a lways ride in child seats
<=> page 209. Special precautions apply
when installing a child seat on the front
passenge r seat¢
page 184 .
Driving safety
Proper seating positions for passengers in
rear seats
Rear seat passengers must sit upright with both
feet on the floor consistent with their physical
size and be properly restrained whenever the ve
hicle is in use.
To reduce the risk of injury caused by an incorrect
seat ing pos ition in the event of a sudden brak ing
maneuver or an accident, your passengers on the
rear bench seat must always observe the fo llow
ing :
.,. For adjustab le head restraints: adjust the head
restraint so the upper edge is as even as possi
ble with the top of your head. If that is not pos
sible, try to adjust the head restraint so that it
is as close to this position as possible
¢page 170 .
.,. Keep both feet flat in the footwell in front of
the rear seat.
.,. Fasten and wear safety belts properly
¢page 179 .
.,. Ma ke sure that ch ild ren are a lways properly re
s trained in a child restra int that is app ropr iate
for their size and age ¢
page 209.
A WARNING
Passengers who are improperly seated on the
rear seat can be serious ly injured in a crash.
- Each passenger must always sit on a seat of
their own and properly fasten and wear the
safety belt belonging to that seat.
- Safety belts only offer maxim um protection
when the safety belts are properly posi
tioned on the body and secure ly latched. By
not sitting upright, a rear seat passenger in
creases the risk of personal injury from im
properly posit ioned safety belts!
- For adjustable head restraints: always ad
just the head restraint properly so that it can give maximum protect ion .
169