language AUDI A3 2020 Owner´s Manual
[x] Cancel search | Manufacturer: AUDI, Model Year: 2020, Model line: A3, Model: AUDI A3 2020Pages: 400, PDF Size: 107.47 MB
Page 164 of 400
Voice recognition system
Voice recognition system
General information
Applies to: vehicles with voice recognition system
You can operate many functions in the vehicle
easily using voice commands.
Using the voice recognition system optimally
> Speak clearly and distinctly at a normal volume.
Speak louder when driving faster.
> Emphasize the words in the commands evenly
and do not leave long pauses.
> Close the doors, the windows, and the sunroof*
to reduce background noise. Make sure that
passengers are not speaking when you are giv-
ing a voice command.
> Do not direct the vents toward the hands-free
microphone, which is in the roof headliner near
the front interior lights.
> Only the driver should speak to the system, be-
cause the handsfree microphone is aimed to-
ward this seating position.
ZA\ WARNING
— Direct your full attention to driving. As the
driver, you have complete responsibility for
safety in traffic. Only use the functions in
such a way that you always maintain com-
plete control over your vehicle in all traffic
situations.
— Do not use the voice recognition system in
emergencies because your voice may change
in stressful situations. The system may take
longer to dial the number or may not be
able to dial it at all. Dial the emergency
number manually.
G) Tips
There are no voice guidance* prompts when a
dialog is active.
Operating
Applies to: vehicles with voice recognition system
Requirement: the ignition and the MMI must be
switched on. A system language supported by
the voice recognition system must be set. There
162
must be no phone calls in progress and the park-
ing aid must not be active.
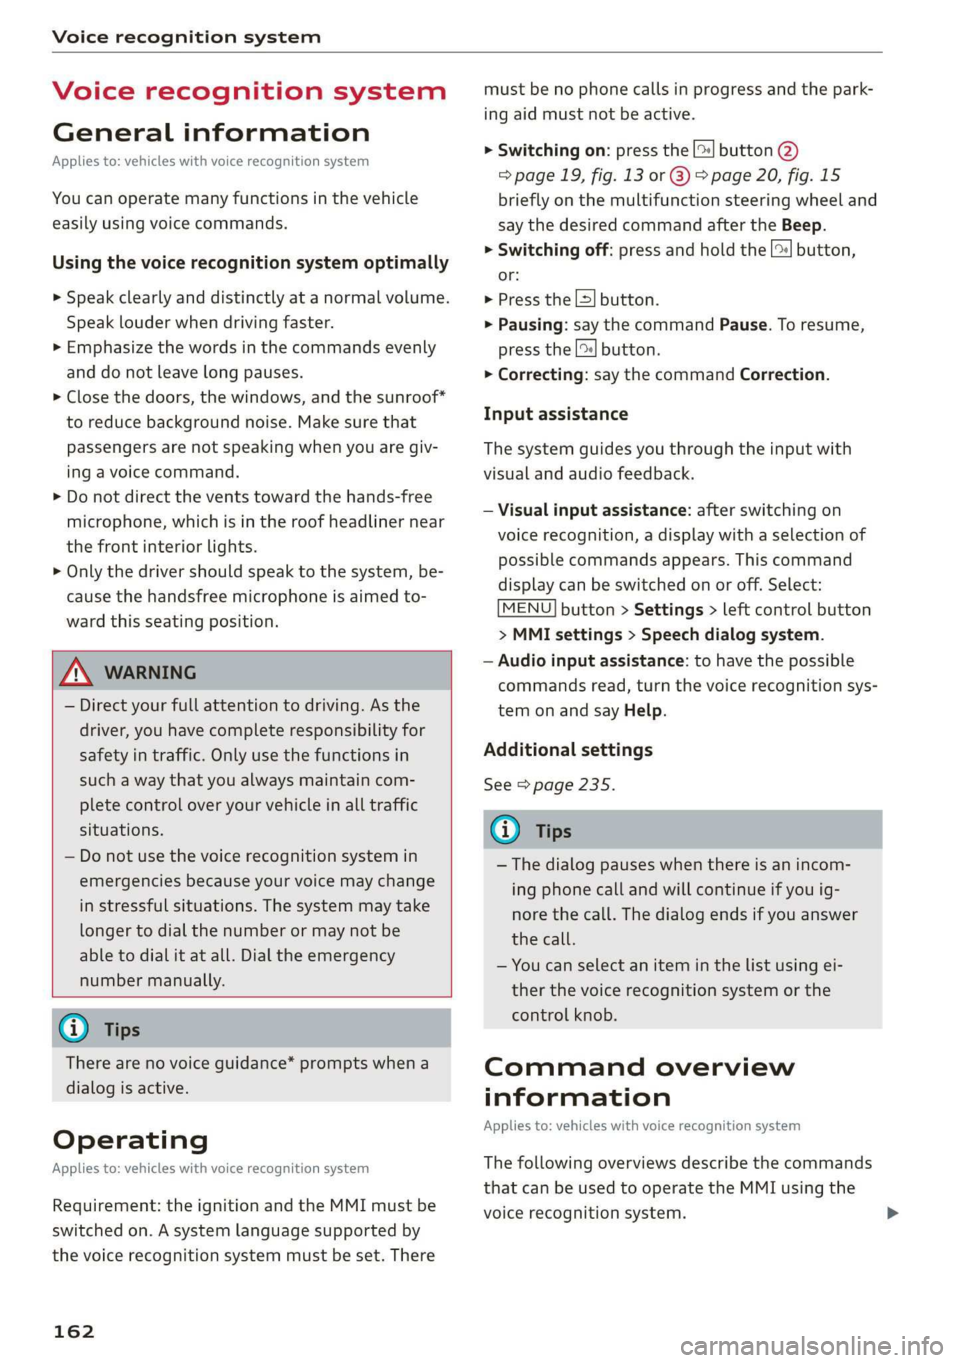
> Switching on: press the [2] button (2)
> page 19, fig. 13 or @) > page 20, fig. 15
briefly on the multifunction steering wheel and
say the desired command after the Beep.
> Switching off: press and hold the |] button,
‘OF:
> Press the |] button.
> Pausing: say the command Pause. To resume,
press the |%] button.
> Correcting: say the command Correction.
Input assistance
The system guides you through the input with
visual and audio feedback.
— Visual input assistance: after switching on
voice recognition, a display with a selection of
possible commands appears. This command
display can be switched on or off. Select:
MENU] button > Settings > left control button
> MMI settings > Speech dialog system.
— Audio input assistance: to have the possible
commands read, turn the voice recognition sys-
tem on and say Help.
Additional settings
See > page 235.
@) Tips
— The dialog pauses when there is an incom-
ing phone call and will continue if you ig-
nore the call. The dialog ends if you answer
the call.
— You can select an item in the list using ei-
ther the voice recognition system or the
control knob.
Command overview
information
Applies to: vehicles with voice recognition system
The following overviews describe the commands
that can be used to operate the MMI using the
voice recognition system.
Page 169 of 400
8V2012721BK
Voice recognition system
@) Note
Read the information about Audi connect, and
be sure to note the connectivity costs section
=@ in General information on page 182.
@) Tips
Destinations may have to be spelled when en-
tered, depending on which region you are in
and which menu language you have selected.
Applies to: vehicles with voice recognition system
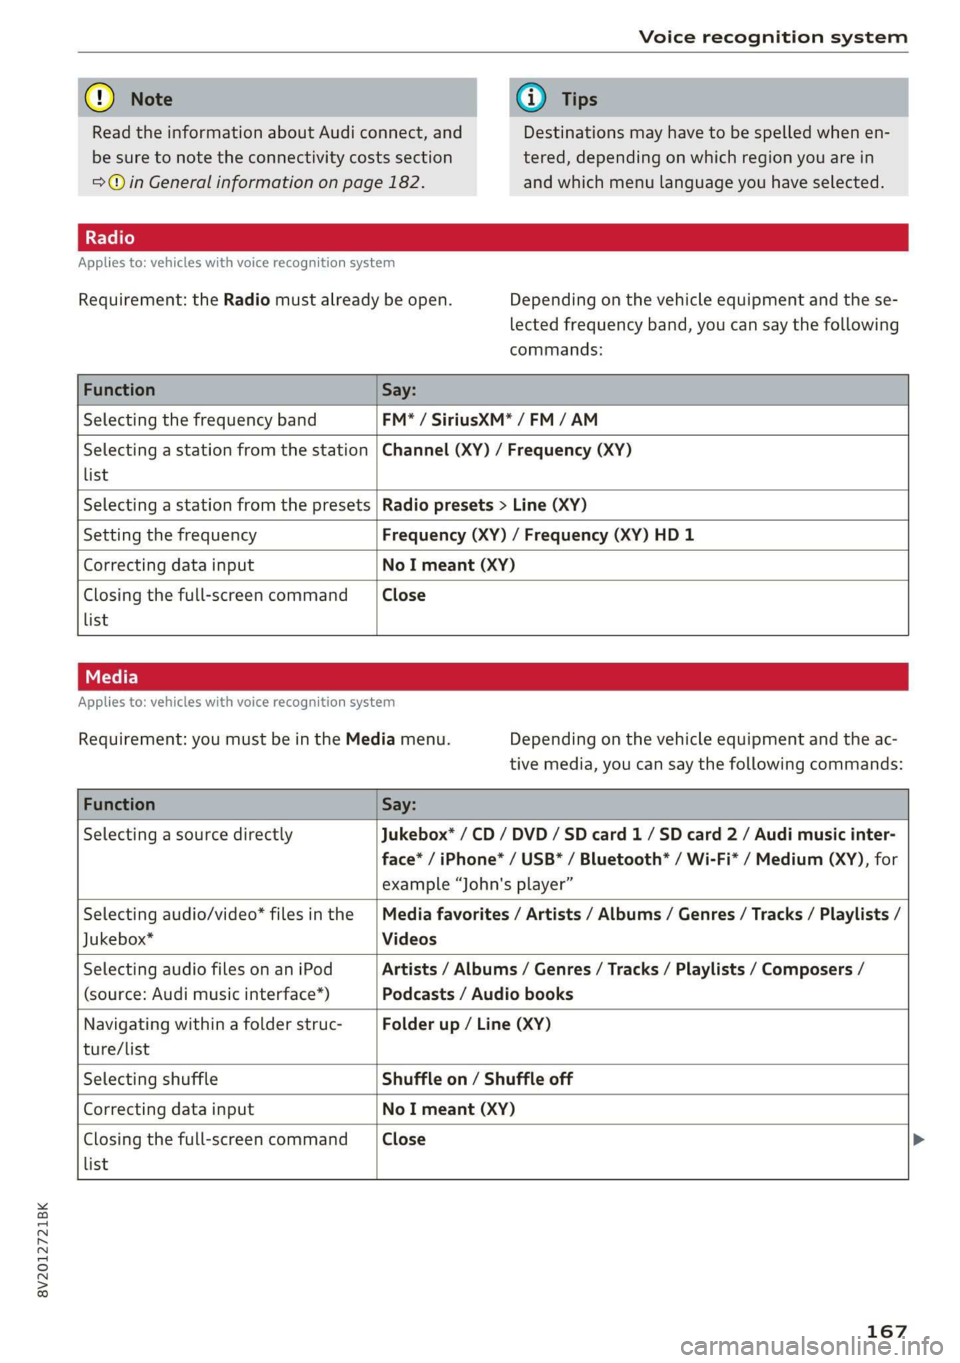
Requirement: the Radio must already be open. Depending on the vehicle equipment and the se-
lected frequency band, you can say the following
commands:
Function Say:
Selecting the frequency band FM* / SiriusXM* / FM / AM
Selecting a station from the station
list
Channel (XY) / Frequency (XY)
Selecting a station from the presets Radio presets > Line (XY)
Setting the frequency Frequency (XY) / Frequency (XY) HD 1
Correcting data input No I meant (XY)
Closing the full-screen command
list
Close
Applies to: vehicles with voice recognition system
Requirement: you must be in the Media menu. Depending on the vehicle equipment and the ac-
tive media, you can say the following commands:
Function Say:
Selecting a source directly Jukebox* / CD / DVD / SD card 1 / SD card 2 / Audi music inter-
face* / iPhone* / USB* / Bluetooth® / Wi-Fi* / Medium (XY), for
example “John's player”
Selecting audio/video* files in the
Jukebox*
Media favorites / Artists / Albums / Genres / Tracks / Playlists /
Videos
Selecting audio files on an iPod
(source: Audi music interface*)
Artists / Albums / Genres / Tracks / Playlists / Composers /
Podcasts / Audio books
Navigating within a folder struc-
ture/list
Folder up / Line (XY)
list
Selecting shuffle Shuffle on / Shuffle off
Correcting data input No I meant (XY)
Closing the full-screen command Close >
167
Page 178 of 400
Telephone
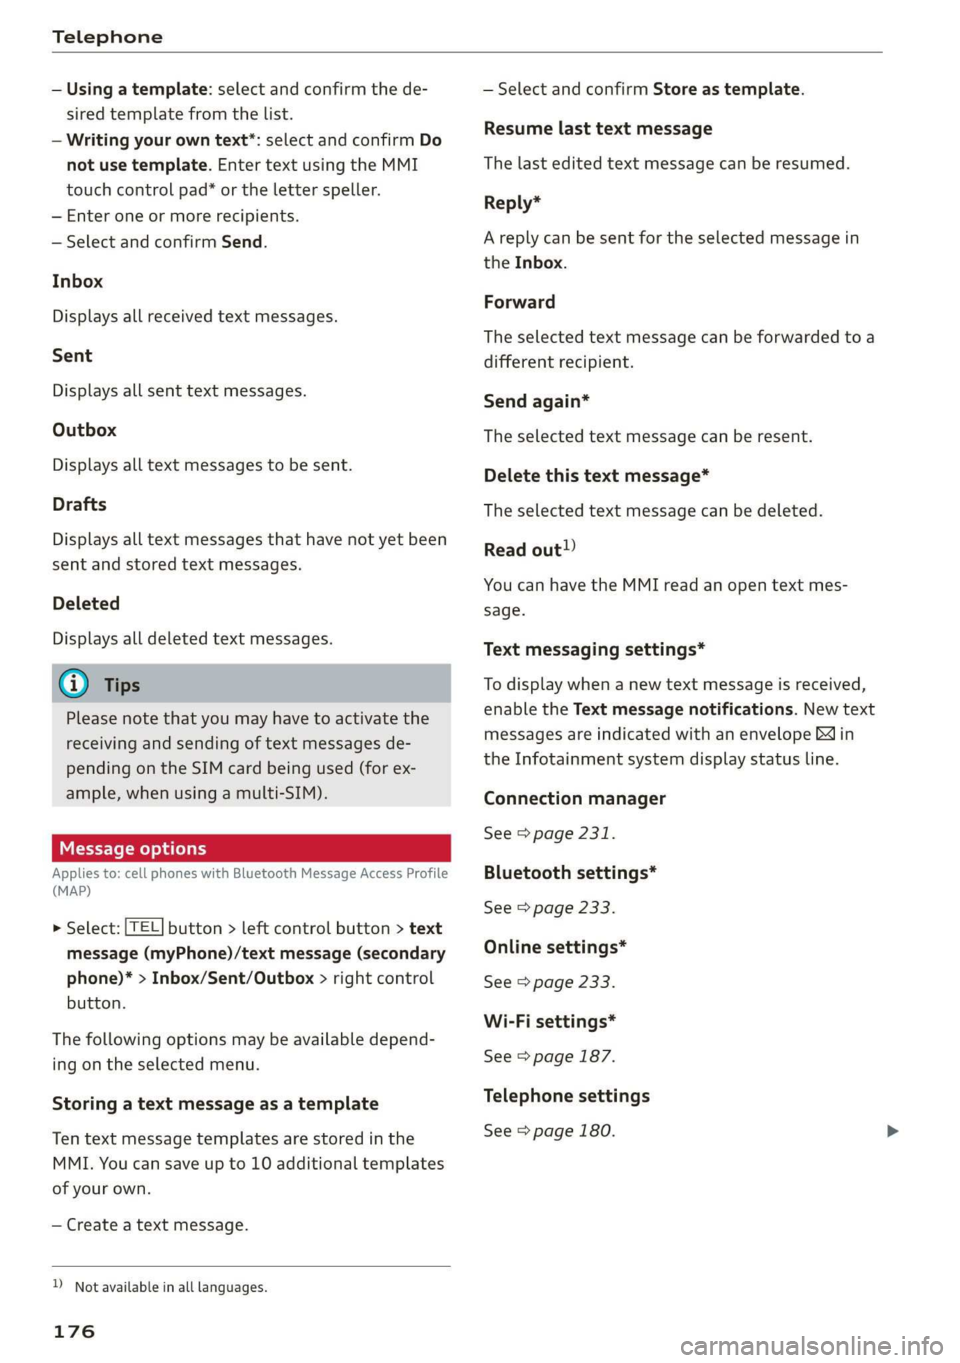
— Using a template: select and confirm the de-
sired template from the list.
— Writing your own text”: select and confirm Do
not use template. Enter text using the MMI
touch control pad* or the letter speller.
— Enter one or more recipients.
— Select and confirm Send.
Inbox
Displays all received text messages.
Sent
Displays all sent text messages.
Outbox
Displays all text messages to be sent.
Drafts
Displays all text messages that have not yet been
sent and stored text messages.
Deleted
Displays all deleted text messages.
@ Tips
Please note that you may have to activate the
receiving and sending of text messages de-
pending on the SIM card being used (for ex-
ample, when using a multi-SIM).
Message options
Applies to: cell phones with Bluetooth Message Access Profile
(MAP)
> Select: [TEL] button > left control button > text
message (myPhone)/text message (secondary
phone)* > Inbox/Sent/Outbox > right control
button.
The following options may be available depend-
ing on the selected menu.
Storing
a text message as a template
Ten text message templates are stored in the
MMI. You can save up to 10 additional templates
of your own.
— Create a text message.
D_ Not available in all languages.
176
— Select and confirm Store as template.
Resume last text message
The last edited text message can be resumed.
Reply*
A reply can be sent for the selected message in
the Inbox.
Forward
The selected text message can be forwarded to a
different recipient.
Send again*
The selected text message can be resent.
Delete this text message*
The selected text message can be deleted.
Read out!)
You can have the MMI read an open text mes-
sage.
Text messaging settings*
To display when a new text message is received,
enable the Text message notifications. New text
messages are indicated with an envelope & in
the Infotainment system display status line.
Connection manager
See > page 231.
Bluetooth settings*
See > page 233.
Online settings*
See > page 233.
Wi-Fi settings*
See > page 187.
Telephone settings
See > page 180.
Page 180 of 400
Telephone
Read out)
You can have the MMI read an open e-mail.
E-mail settings*
To display when a new e-mail is received, activate
the E-mail notifications. New e-mails are indicat-
ed with an envelope & in the Infotainment sys-
tem display status line.
Connection manager
See > page 231.
Bluetooth settings*
See > page 233.
Online settings*
See > page 233.
Wi-Fi settings*
See > page 187.
Telephone settings
See > page 180.
G) Tips
— Messages that are deleted in the MMI are
also automatically deleted in the connected
cell phone.
— You cannot read any messages while driv-
ing.
Listening to voicemail
Applies to: vehicles with telephone
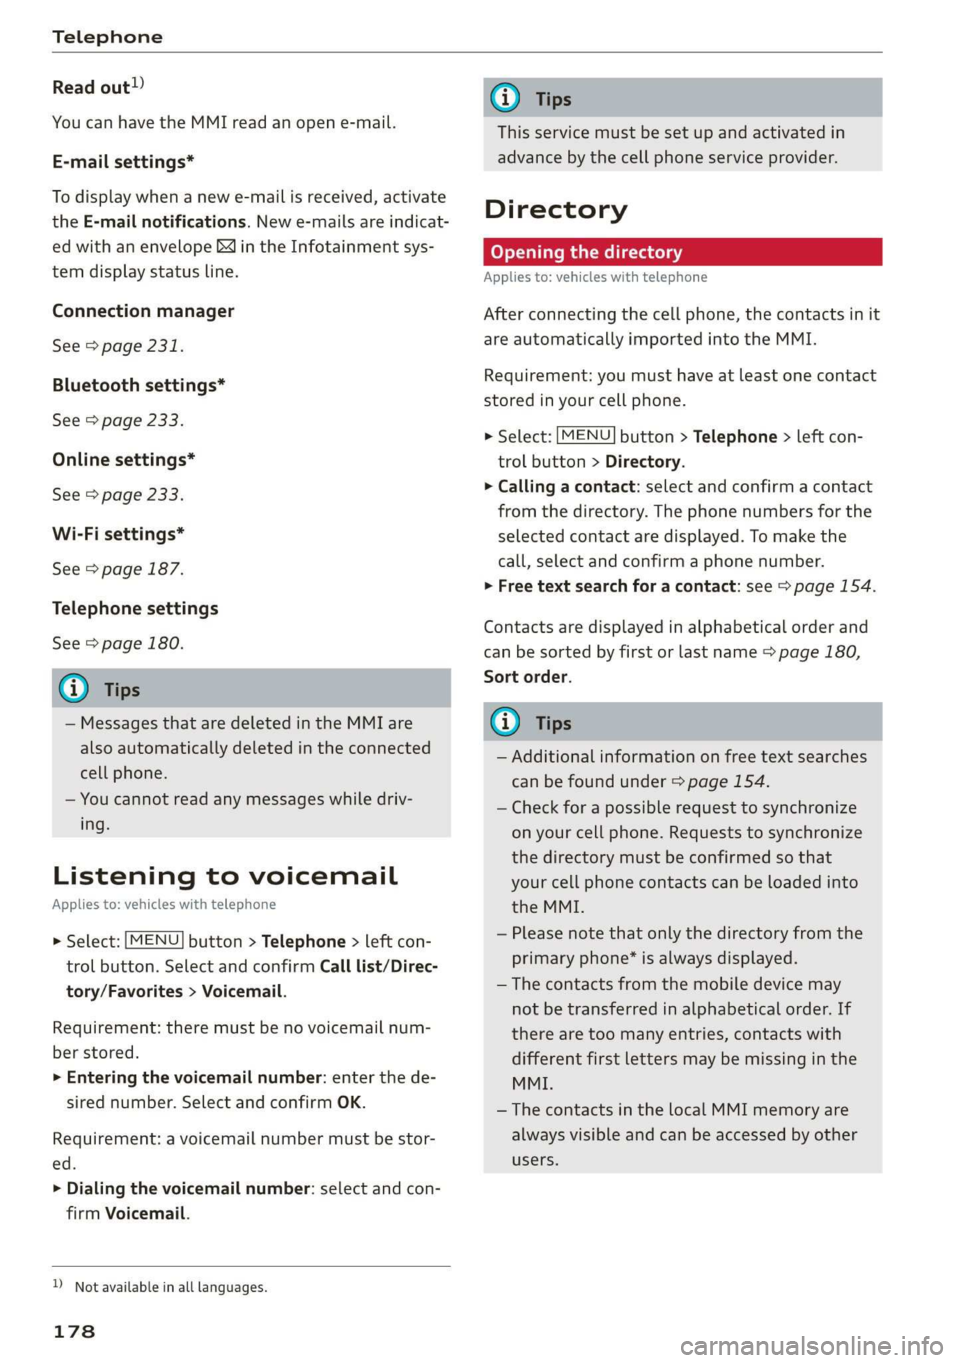
> Select: [MENU] button > Telephone > left con-
trol button. Select and confirm Call list/Direc-
tory/Favorites > Voicemail.
Requirement: there must be no voicemail num-
ber stored.
> Entering the voicemail number: enter the de-
sired number. Select and confirm OK.
Requirement: a voicemail number must be stor-
ed.
> Dialing the voicemail number: select and con-
firm
Voicemail.
) Not available in all languages.
178
G) Tips
This service must be set up and activated in
advance by the cell phone service provider.
Directory
Opening the directory
Applies to: vehicles with telephone
After connecting the cell phone, the contacts in it
are automatically imported into the MMI.
Requirement: you must have at least one contact
stored in your cell phone.
> Select: [MENU] button > Telephone > left con-
trol button > Directory.
> Calling a contact: select and confirm a contact
from the directory. The phone numbers for the
selected contact are displayed. To make the
call, select and confirm a phone number.
> Free text search for a contact: see > page 154.
Contacts are displayed in alphabetical order and
can be sorted by first or last name > page 180,
Sort order.
(i) Tips
— Additional information on free text searches
can be found under > page 154.
— Check for a possible request to synchronize
on your cell phone. Requests to synchronize
the directory must be confirmed so that
your cell phone contacts can be loaded into
the MMI.
— Please note that only the directory from the
primary phone* is always displayed.
— The contacts from the mobile device may
not be transferred in alphabetical order. If
there are too many entries, contacts with
different first letters may be missing in the
MMI.
—The contacts in the local MMI memory are
always visible and can be accessed by other
users.
Page 186 of 400
Audi connect
— Some Audi connect Infotainment services
must be activated at my.audi.com.
— To make logging in easier in the vehicle, you
will receive an 8-digit myAudi PIN as an al-
ternative to your myAudi password after you
have created a myAudi account.
— Depending on the country, you may be able
to use the myAudi app or my.audi.com.
— For detailed information on configuration,
visit my.audi.com.
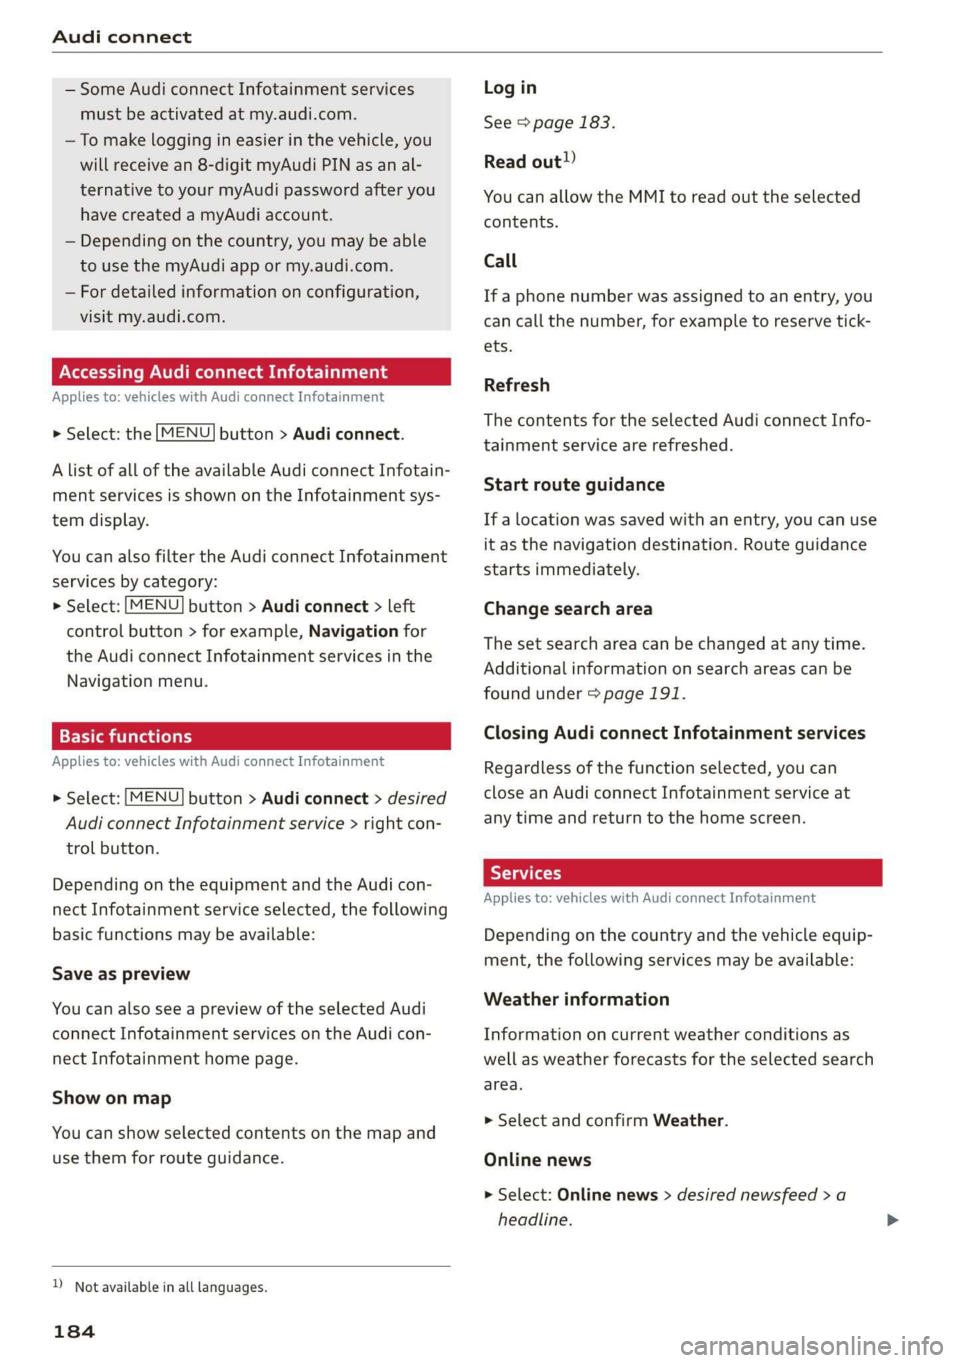
Accessing Audi connect Infotainment
Applies to: vehicles with Audi connect Infotainment
> Select: the [MENU] button > Audi connect.
A list of all of the available Audi connect Infotain-
ment services is shown on the Infotainment sys-
tem display.
You can also filter the Audi connect Infotainment
services by category:
> Select: [MENU] button > Audi connect > left
control button > for example, Navigation for
the Audi connect Infotainment services in the
Navigation menu.
Applies to: vehicles with Audi connect Infotainment
> Select: [MENU] button > Audi connect > desired
Audi connect Infotainment service > right con-
trol button.
Depending on the equipment and the Audi con-
nect Infotainment service selected, the following
basic functions may be available:
Save as preview
You can also see a preview of the selected Audi
connect Infotainment services on the Audi con-
nect Infotainment home page.
Show on map
You can show selected contents on the map and
use them for route guidance.
D_ Not available in all languages.
184
Log in
See > page 183.
Read out)
You can allow the MMI to read out the selected
contents.
Call
If a phone number was assigned to an entry, you
can call the number, for example to reserve tick-
ets.
Refresh
The contents for the selected Audi connect Info-
tainment service are refreshed.
Start route guidance
If a location was saved with an entry, you can use
it as the navigation destination. Route guidance
starts immediately.
Change search area
The set search area can be changed at any time.
Additional information on search areas can be
found under > page 191.
Closing Audi connect Infotainment services
Regardless of the function selected, you can
close an Audi connect Infotainment service at
any time and return to the home screen.
Services
Applies
to: vehicles with Audi connect Infotainment
Depending on the country and the vehicle equip-
ment, the following services may be available:
Weather information
Information on current weather conditions as
well as weather forecasts for the selected search
area.
> Select and confirm Weather.
Online news
> Select: Online news > desired newsfeed > a
headline.
Page 226 of 400
Media
— Selecting a menu item: select and confirm a
menu item, or move your finger on the MMI
touch control pad* and press the control knob.
Audio track!)
You can manually set the audio track (language
and audio format). The language and audio for-
mat options depend on the video DVD.
Subtitles»)
You can manually select subtitles for playback.
The languages available depend on the DVD.
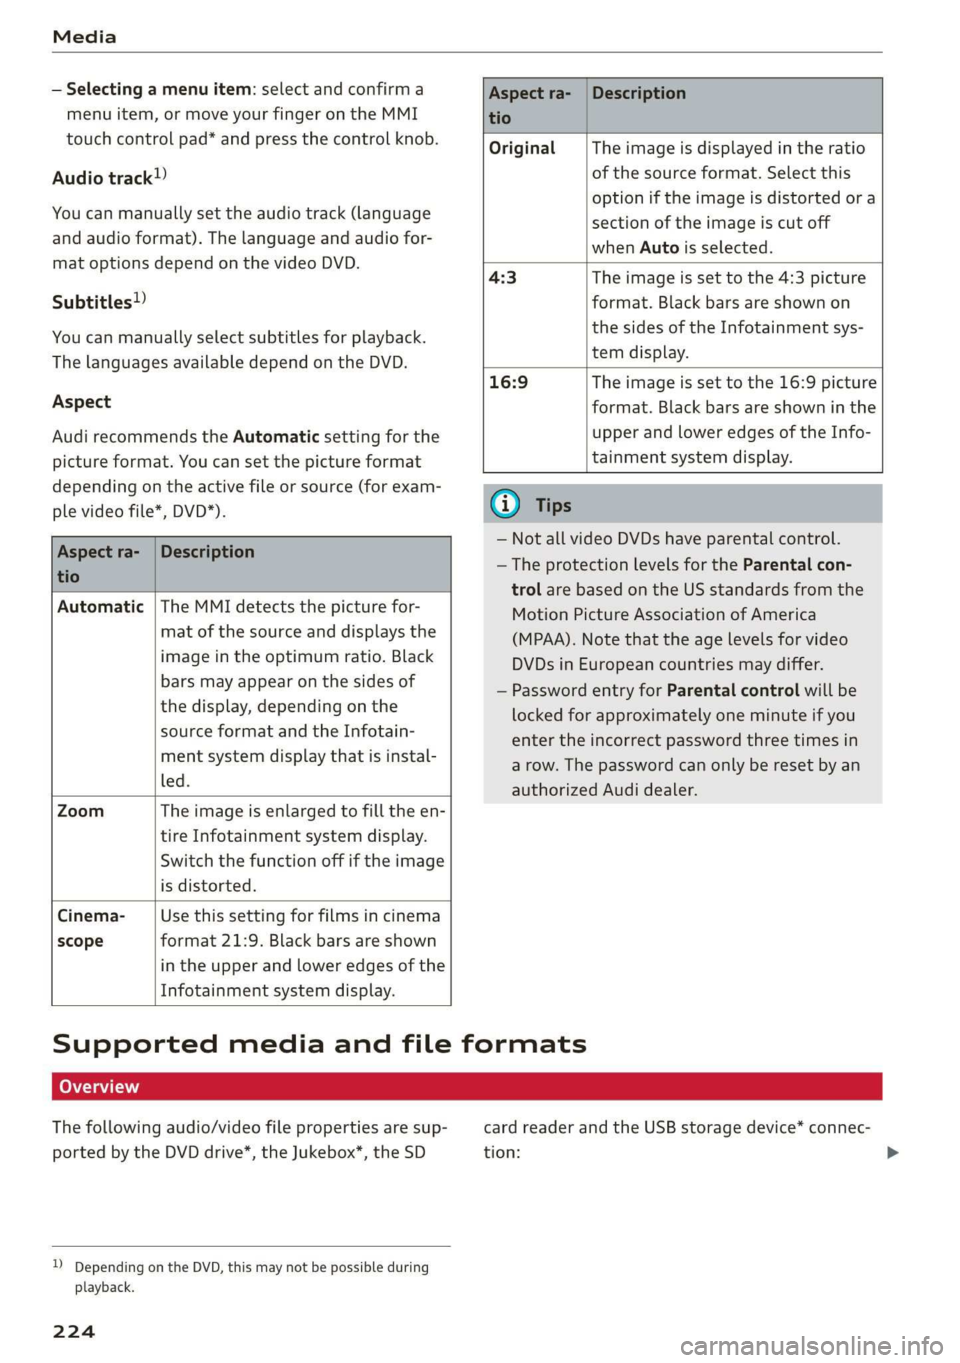
Aspect
Audi recommends the Automatic setting for the
picture format. You can set the picture format
depending on the active file or source (for exam-
ple video file*, DVD*).
Aspect ra-
tio
Description
Original The image is displayed in the ratio
of the source format. Select this
option if the image is distorted or a
section of the image is cut off
when Auto is selected.
4:3 The image is set to the 4:3 picture
format. Black bars are shown on
the sides of the Infotainment sys-
tem display.
16:9 The image is set to the 16:9 picture
format. Black bars are shown in the
upper and lower edges of the Info-
tainment system display.
Aspect ra- |Description
tio
Automatic |The MMI detects the picture for-
mat of the source and displays the
image in the optimum ratio. Black
bars may appear on the sides of
the display, depending on the
source format and the Infotain-
ment system display that is instal-
led.
Zoom The image is enlarged to fill the en-
tire Infotainment system display.
Switch the function off if the image
is distorted.
Cinema- Use this setting for films in cinema
scope format 21:9. Black bars are shown
in the upper and lower edges of the
Infotainment system display.
@) Tips
— Not all video DVDs have parental control.
— The protection levels for the Parental con-
trol are based on the US standards from the
Motion Picture Association of America
(MPAA). Note that the age levels for video
DVDs in European countries may differ.
— Password entry for Parental control will be
locked for approximately one minute if you
enter the incorrect password three times in
a row. The password can only be reset by an
authorized Audi dealer.
Supported media and file formats
LO TaV TN]
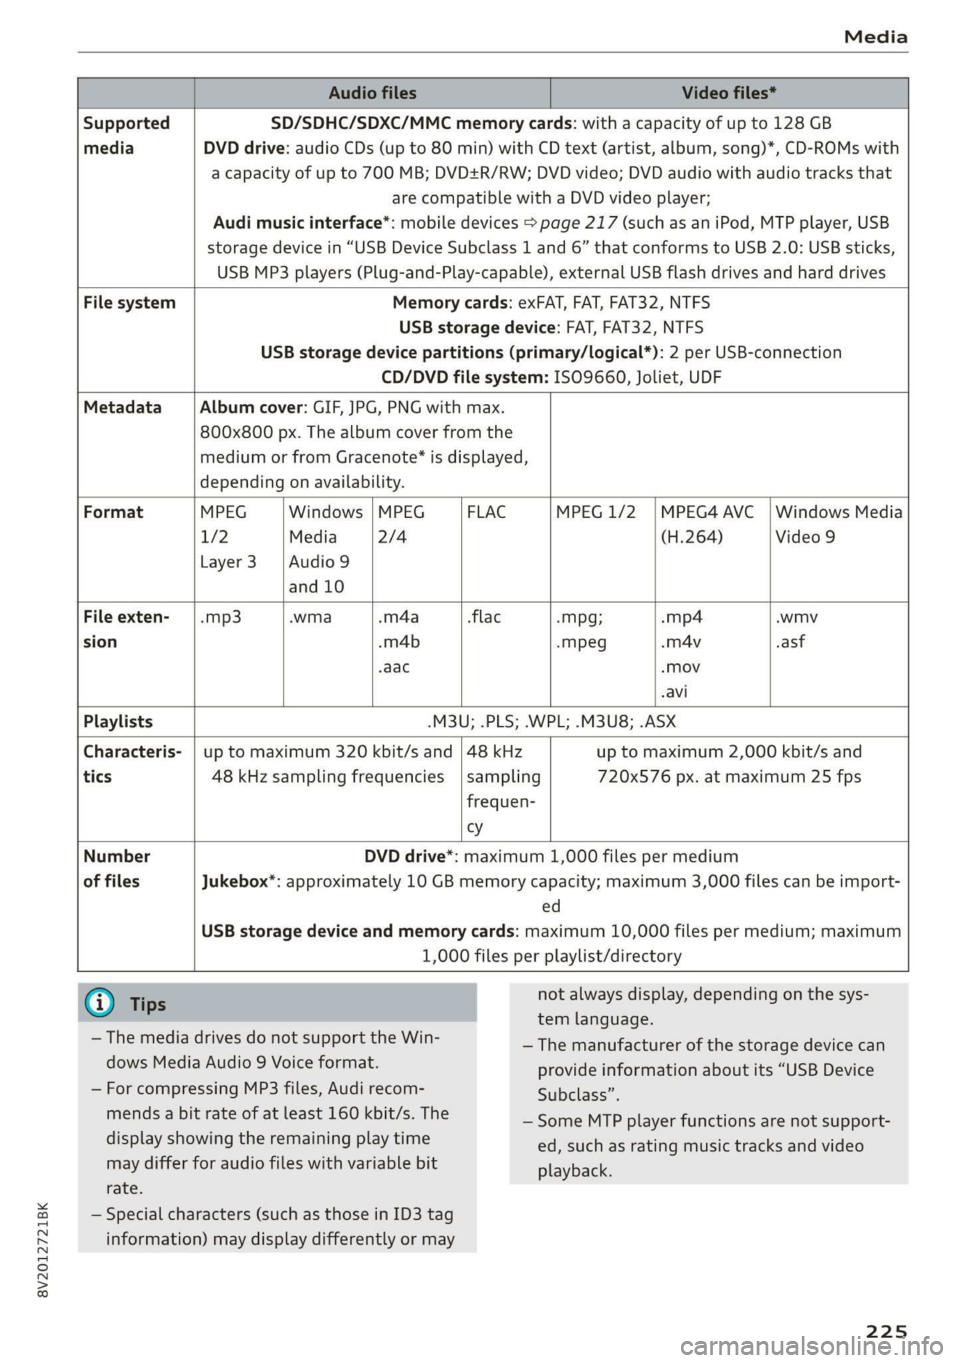
The following audio/video file properties are sup-
ported by the DVD drive*, the Jukebox”, the SD
)) Depending on the DVD, this may not be possible during
playback.
224
card reader and the USB storage device* connec-
tion:
Page 227 of 400
8V2012721BK
Media
Audio files Video files*
Supported SD/SDHC/SDXC/MMC memory cards: with a capacity of up to 128 GB
media DVD drive: audio CDs (up to 80 min) with CD text (artist, album, song)*, CD-ROMs with
a capacity of up to 700 MB; DVD+R/RW; DVD video; DVD audio with audio tracks that
are compatible with a DVD video player;
Audi music interface*: mobile devices > page 217 (such as an iPod, MTP player, USB
storage device in “USB Device Subclass 1 and 6” that conforms to USB 2.0: USB sticks,
USB MP3 players (Plug-and-Play-capable), external USB flash drives and hard drives
File system Memory cards: exFAT, FAT, FAT32, NTFS
USB storage device: FAT, FAT32, NTFS
USB storage device partitions (primary/logical*): 2 per USB-connection
CD/DVD file system: ISO9660, Joliet, UDF
Metadata Album cover: GIF, JPG, PNG with max.
800x800 px. The album cover from the
medium or from Gracenote® is displayed,
depending on availability.
Format MPEG |Windows |MPEG — | FLAC MPEG 1/2 |MPEG4 AVC_| Windows Media
1/2 Media 2/4 (H.264) Video 9
Layer3 |Audio9
and 10
File exten- | .mp3 .wma .m4a flac -Mpg; -mp4 .wmv
sion .m4b -mpeg -m4v .asf
.aac «Mov
-avi
Playlists .M3U; .PLS; .WPL; .M3U8; .ASX
Characteris- | up to maximum 320 kbit/s and | 48 kHz up to maximum 2,000 kbit/s and
tics 48 kHz sampling frequencies |sampling 720x576 px. at maximum 25 fps
frequen-
vy
Number
of files
DVD drive*: maximum 1,000 files per medium
Jukebox*: approximately 10 GB memory capacity; maximum 3,000 files can be import-
ed
USB storage device and memory cards: maximum 10,000 files per medium; maximum
1,000 files per playlist/directory
G) Tips
— The media drives do not support the Win-
dows Media Audio 9 Voice format.
— For compressing MP3 files, Audi recom-
mends a bit rate of at least 160 kbit/s. The
display showing the remaining play time
may differ for audio files with variable bit
rate.
not always display, depending on the sys-
tem language.
— The manufacturer of the storage device can
provide information about its “USB Device
Subclass”.
— Some MTP player functions are not support-
ed, such as rating music tracks and video
playback.
— Special characters (such as those in ID3 tag
information) may display differently or may
225
Page 228 of 400
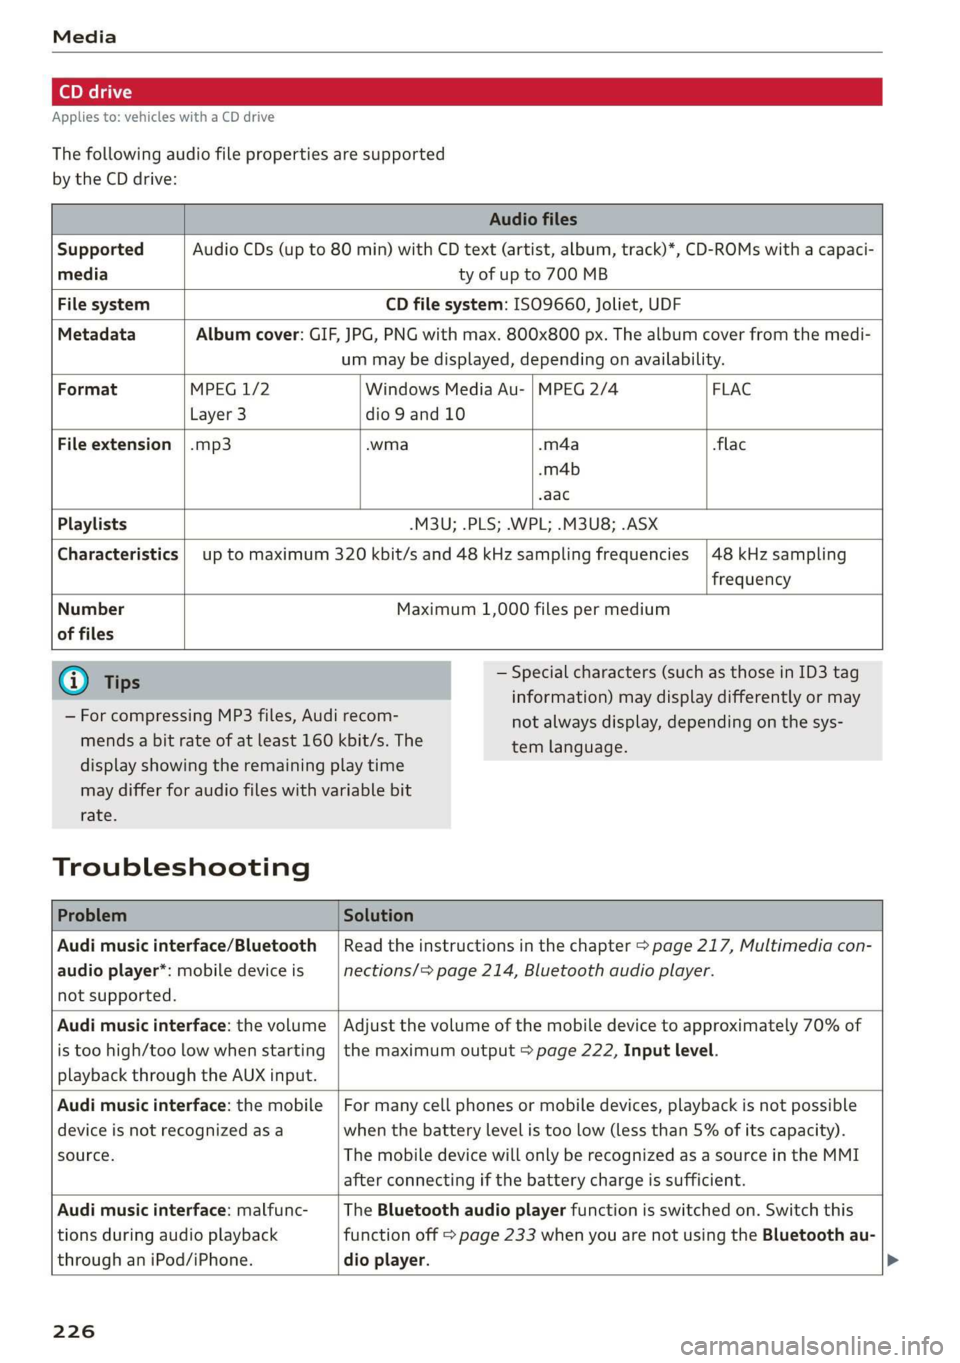
Applies to: vehicles with a CD drive
The following audio file properties are supported
by the CD drive:
Audio files
Supported Audio CDs (up to 80 min) with CD text (artist, album, track)*, CD-ROMs with a capaci-
media ty of up to 700 MB
File system CD file system: ISO9660, Joliet, UDF
Metadata Album cover: GIF, JPG, PNG with max. 800x800 px. The album cover from the medi-
um may be displayed, depending on availability.
Format MPEG 1/2 Windows Media Au- | MPEG 2/4 FLAC
Layer 3 dio 9 and 10
File extension |.mp3 -wma -m4a flac
-m4b
aac
Playlists -M3U; .PLS; .WPL; .M3U8; .ASX
Characteristics up to maximum 320 kbit/s and 48 kHz sampling frequencies 48 kHz sampling
frequency
Number
of files
Maximum 1,000 files per medium
@ Tips
— For compressing MP3 files, Audi recom-
mends a bit rate of at least 160 kbit/s. The
— Special characters (such as those in ID3 tag
information) may display differently or may
not always display, depending on the sys-
tem language.
display showing the remaining play time
may differ for audio files with variable bit
rate.
Troubleshooting
Problem Solution
Audi music interface/Bluetooth
audio player*: mobile device is
not supported.
Read the instructions in the chapter > page 217, Multimedia con-
nections/> page 214, Bluetooth audio player.
Audi music interface: the volume
is too high/too low when starting
playback through the AUX input.
Adjust the volume of the mobile device to approximately 70% of
the maximum output > page 222, Input level.
Audi music interface: the mobile
device is not recognized asa
source.
For many cell phones or mobile devices, playback is not possible
when the battery level is too low (less than 5% of its capacity).
The mobile device will only be recognized as a source in the MMI
after connecting if the battery charge is sufficient.
Audi music interface: malfunc-
tions during audio playback
through an iPod/iPhone.
The Bluetooth audio player function is switched on. Switch this
function off > page 233 when you are not using the Bluetooth au-
dio
player.
226
Page 230 of 400
Audi smartphone interface
Audi smartphone
interface
Setup
Applies to: vehicles with Audi smartphone interface
You can connect your smartphone to the MMI us-
ing the Audi smartphone interface. Certain con-
tent on your smartphone is adapted to the Info-
tainment system display while driving and can
be operated through the MMI control panel.
Requirement
The vehicle must be stationary and the ignition
must be switched on.
An iPhone generation 5 or newer with Lightning
connector and iOS 7.1.2 operating system or
higher is required. Or:
A smartphone with the Android Auto app and An-
droid 5.0 Lollipop operating system or higher is
required.
> Connect your smartphone to the Audi music in-
terface > page 217 using the applicable USB
adapter > page 217, fig. 190.
> Select and confirm Activate Apple CarPlay or
Activate Android Auto now.
> Follow the system instructions.
> Pay attention to any additional system prompts
on your smartphone, if applicable.
If you chose not to use Apple CarPlay or Android
Auto when connecting your smartphone for the
first time, you can start the Audi smartphone in-
terface later on using the Connection manager.
> Select: [MENU] button > Audi smartphone in-
terface > Change to connection manager.
> Connect your smartphone to the Audi music in-
terface using the appropriate USB adapter
=> page 217, fig. 190.
>» Select and confirm Audi smartphone interface
in the Connection manager > page 231. You
can select your smartphone in the list of devi-
ces that are already paired > page 233.
> Follow the system instructions.
sponsibility for safety in traffic. Never operate
mobile devices while driving, because this in-
creases the risk of an accident.
Z\ WARNING
Driving requires your complete and undivided
attention. As the driver, you have complete re-
228
C) Note
Always follow the information found in >@ in
General information on page 182.
@) Tips
— The functions that can be used depend on
the following factors, among others:
— The brand of your smartphone
—The version of the operating system in
your smartphone
— The software version of the app used
— The USB adapter cable and correct connec-
tion
— Your cell phone service provider
— The customized settings on your smart-
phone
— One of the factors above or a combination
of any of them could cause your smart-
phone to be incompatible with the Audi
smartphone interface. Compatibility cannot
be guaranteed for all types of smartphones.
For more information and assistance, refer
to the user guide and the manufacturer of
your smartphone.
— If the connected smartphone has voice con-
trol, you can operate your smartphone using
the external voice recognition system
=> page 168.
— The menu language shown in the MMI is
based on the settings in your smartphone.
— The time displayed in the MMI is based on
the settings in your smartphone.
— Some MMI functions are not available when
Apple CarPlay or Android Auto is active.
— You cannot connect any mobile devices via
Bluetooth when an Apple CarPlay connec-
tion is active.
— When the Apple CarPlay connection is ac-
tive, Tag this song for iTunes* is not availa-
ble > page 207.
Page 232 of 400
![AUDI A3 2020 Owner´s Manual System settings
System settings
Setting the date and
time
You can set the clock time manually or using the
GPS*.
> Select: [MENU] button > Settings > left control
button > MMI settings AUDI A3 2020 Owner´s Manual System settings
System settings
Setting the date and
time
You can set the clock time manually or using the
GPS*.
> Select: [MENU] button > Settings > left control
button > MMI settings](/img/6/40265/w960_40265-231.png)
System settings
System settings
Setting the date and
time
You can set the clock time manually or using the
GPS*.
> Select: [MENU] button > Settings > left control
button > MMI settings > Date & time, or:
> Select: [MENU] button > Vehicle > left control
button > Vehicle settings > Date & time.
Automatic setting
When this function is switched on ¥, the time
and date are automatically set.
Time
Requirement: the Automatic setting must be
switched off.
Press the control knob. You can set the Time
manually by turning and pressing the control
knob.
Date
Requirement: the Automatic setting must be
switched off.
Press the control knob. You can set the Date
manually by turning and pressing the control
knob.
Time zone
When selecting the appropriate time zone, a
sampling of countries in this zone will be listed.
Automatic time zone*
When this function is switched on ¥, the time
will automatically adjust to the corresponding
time zone.
Automatic daylight saving time*
When this function is switched on M, the time
will automatically switch to daylight saving time.
) The Qi standard makes it possible to charge your mobile
device wirelessly.
230
Time format
If you select 24h, the clock will display, for exam-
ple, 13:00. If you select AM/PM, the clock will
display, for example, 1:00 PM.
Date format
If you select DD.MM.YYYY, the date display will
show, for example, 31.03.2019. If you select
MM/DD/YYYY, the date display will show, for ex-
ample, 03/31/2019. If you select YYYY-MM-DD,
the date display will show, for example,
2019-03-31.
MMI settings
> Select: [MENU] button > Settings > left control
button > MMI settings.
Language
You can change the display language as well as
the language for the voice guidance* and voice
recognition system*.
The number of languages available depends on
the country.
Measurement units
The following measurement units can be set de-
pending on availability: Speed, Distance, Tem-
perature, Fuel consumption, Volume, Pressure.
Mobile device reminder signal
Applies to: vehicles with Audi phone box
Requirement: your cell phone must be Qi-capa-
ble ) or connected to the Audi music interface @
with a USB adapter cable > page 171, fig. 162.
When the device reminder signal is switched on,
you will be notified that your mobile device is still
in the Audi phone box when you leave the vehicle.
You can select between Spoken cue, Signal tone
and Off.
Mobile device reminder signal volume: you can
adjust the reminder signal volume by turning the
control knob.