service indicator AUDI A3 2020 Owner´s Manual
[x] Cancel search | Manufacturer: AUDI, Model Year: 2020, Model line: A3, Model: AUDI A3 2020Pages: 400, PDF Size: 107.47 MB
Page 6 of 400
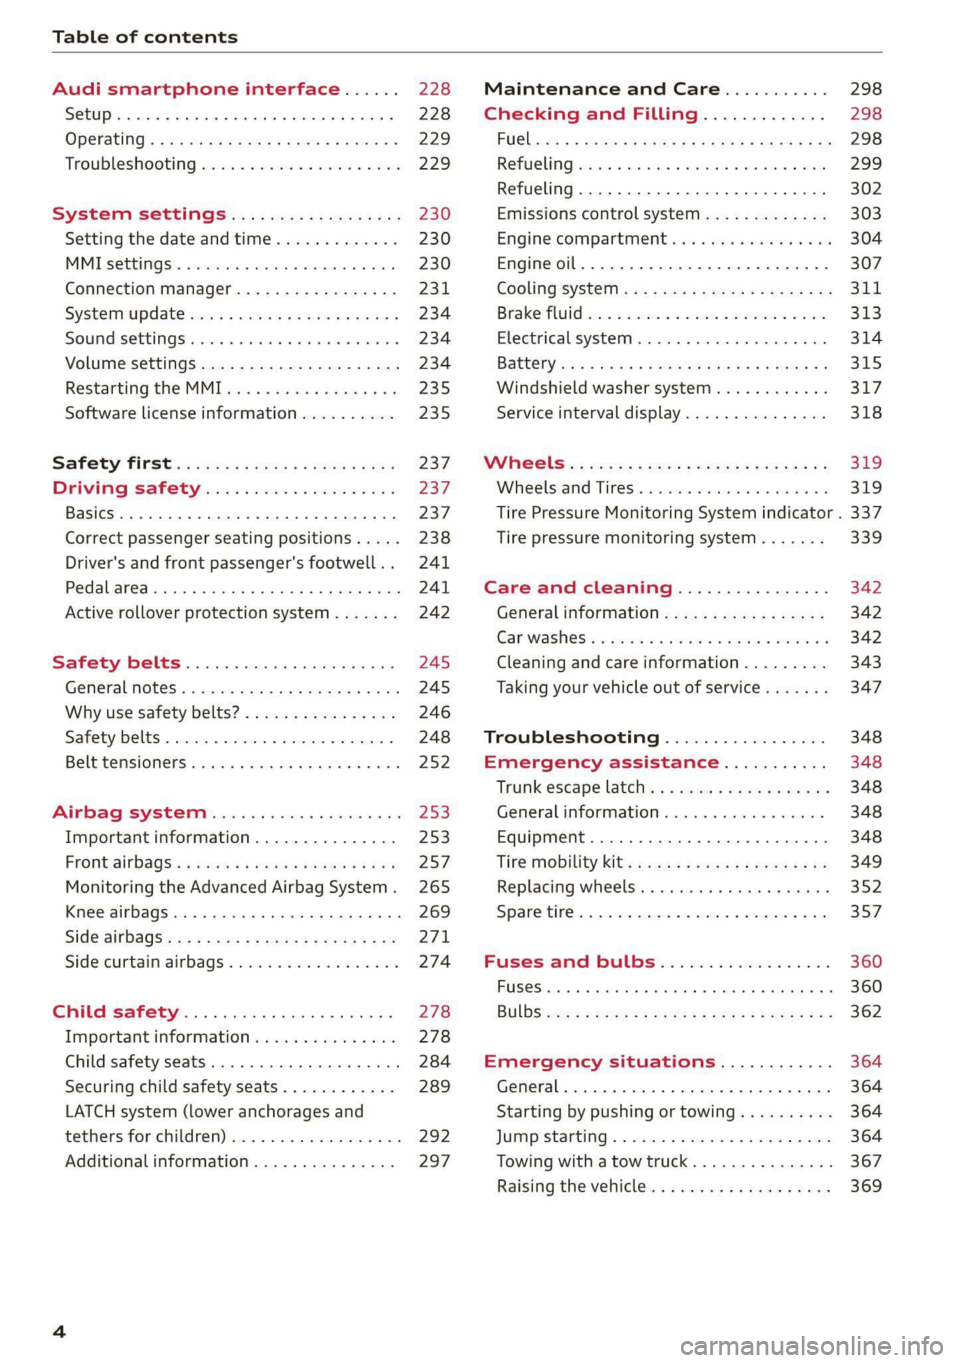
Table of contents
Audi smartphone interface...... 228
Setup... eee eee ee eee 228
OPeratintg’s + ease s x mows « woeE se ow ee 229
Troubleshooting wwii «s wwine ev eee ae eae 229
System settings.................. 230
Setting the date andtime............. 230
MMI SOMOS: » sunses 0 » anexeiae o anseane » 0 exons 230
Connection manager................. 231
System update isis ss wows x ¢ seows a eaves 234
Sound settingS............0 ee eee eee 234
Volume settings ..............000000. 234
Restarting the MMI.................. 235
Software license information.......... 235
237 237 237
Correct passenger seating positions..... 238
Driver's and front passenger's footwell.. 241
Pedal area.......... eee eee eee eee 241
Active rollover protection system....... 242
Safety belts...................0.. 245
General notes.................00005. 245
Why use safety belts?................ 246
Safety belts. ............... 00000005 248
Belt tensioners... 0.02... cece eee eee 252
Airbag system.................00. 253
Important information............... 253
Front:airbags’: = seis s = canes + = esis + oer 257
Monitoring the Advanced Airbag System. 265
Knee airbags...............-0 ee eee 269
Side@:airbags x: < sews se eewes te eee ee oe 271
Sidercurtain airbags « swe ss wei sv woes 274
GAUGES AATEC iss 5 « nee a 5 Baa GE EE Be 278
Important information............... 278
Child safety seats................000. 284
Securing child safety seats............ 289
LATCH system (lower anchorages and
tethers forichildren) sic. o = essere x 3 awmin « 5 aoe 292
Additional information............... 297
Maintenance and Care........... 298
Checking and Filling............. 298
FUGlaves: «2 wows s 2 seems © a meee 4 S oweme a 2 a 298
Reftieling crass « sccswes e neness xe aeiceme x acer 299
Refueling ......... 0... cee ee eee eee 302
Emissions control system............. 303
Engine compartment...........0.500% 304
Engineoil........ 0... eee eee eee 307
Cooling SYSteM . <= sees ic sees be tees we 311
Brake Pluidhise «2 ascii 2 2 soos 2 x comes © x sree 313
Electrical system. ...........002-000 314
Battenysa « 5 news so ASS & ROS TE BaF 315
Windshield washer system............ 317
Service interval display............... 318
Whe6US: « ses ss sess os ees ss eee 2 a 319
Wheelsiand Tiresis « scsinin + « sore © a eneron » 319
Tire Pressure Monitoring System indicator . 337
Tire pressure monitoring system....... 339
Care and cleaning................ 342
General information................. 342
Gar washesi: « sosus so ime a 0 mana + omen 6 342
Cleaning and care information......... 343
Taking your vehicle out of service....... 347
Troubleshooting................. 348
Emergency assistance........... 348
Trunk escape latch............-.0000- 348
General
information................. 348
Equipment............. 00. cece eee 348
Tire Mobility kit’: goss « 2 sewn 2 y eweE a eos 349
Replacing wheels...........00ee eens 352
Sparetire........ 2... eee eee eee 357
Fuses and bulbs.................. 360
FUSES 2... eee ete eee 360
BULDS-
General...............0. 0000 cece 364
Starting by pushing or towing.......... 364
JUIMPESTAREIIG . « suerns 6 & sasnnes » « sanree wo samme 364
Towing with atowtruck............... 367
Raising the vehicle.................-. 369
Page 17 of 400
8V2012721BK
Instrument cluster
SSGOAM’ sx cscsone ov cxexens @ a aomnees vo s8sue 75
— Audi drive select mode ......... 91
ZA WARNING
Applies to: vehicles with Audi virtual cockpit
If there is a severe malfunction in the instru-
ment cluster, the display may turn off. The wa
indicator light may also turn on. Stop the ve-
hicle safely. See an authorized Audi dealer or
authorized Audi Service Facility for assistance.
@ Tips
— The following pages will primarily show il-
lustrations of the multi-color analog instru-
ment cluster*. The display and/or position
of the element shown may vary in mono-
chrome instrument clusters or in the Audi
virtual cockpit*.
— You can select the units used for tempera-
ture, speed, and other measurements in the
Infotainment system > page 230.
— Speeds are displayed in mph (miles per
hour) or km/h (kilometers per hour).
— If there is a malfunction in the instrument
cluster, DEF will appear in the trip odometer
display. Have the malfunction corrected as
soon as possible.
— Depending on vehicle equipment, the in-
strument illumination (needles and gauges)
may turn on when the lights are off and the
ignition is switched on. The illumination for
the gauges reduces automatically and even-
tually turns off as brightness outside in-
creases. This function reminds the driver to
turn the low beams on at the appropriate
time.
Coolant temperature
display
Applies to: vehicles with a coolant temperature indicator
The coolant temperature display @) > page 14
only functions when the ignition is switched on.
To reduce the risk of engine damage, please ob-
serve the following notes about the temperature
ranges.
Cold range
If only the LEDs at the bottom of the gauge turn
on, the engine has not reached operating tem-
perature yet. Avoid high engine speeds, full accel-
erating and heavy engine loads.
Normal range
The engine has reached its operating tempera-
ture once the LEDs up to the center of the gauge
turn on. If the || indicator light in the instru-
ment cluster display turns on, the coolant tem-
perature is too high > page 311.
@) Note
— Auxiliary headlights and other accessories in
front of the air intake impair the cooling ef-
fect of the coolant. This increases the risk of
the engine overheating during high outside
temperatures and heavy engine load.
—The front spoiler also helps to distribute
cooling air correctly while driving. If the
spoiler is damaged, the cooling effect will
be impaired and the risk of the engine over-
heating will increase. See an authorized
Audi dealer or authorized Audi Service Fa-
cility for assistance.
Tachometer
The tachometer (2) > page 14 displays the engine
speed in revolutions per minute (RPM). The be-
ginning of the red zone in the tachometer indi-
cates the maximum permissible engine speed for
all gears once the engine has been broken in and
when it is warm. Before reaching the red zone,
you should shift into the next higher gear, choose
the "D" or "S" selector lever position, or remove
your foot from the accelerator pedal.
Displaying the tachometer
Applies to: vehicles with plug-in hybrid drive
> Open the first vehicle functions tab using the
<1/D button on the multifunction steering
wheel.
> Applies to: vehicles with analog instrument
cluster: Turn the left thumbwheel on the multi-
function steering wheel until the Tachometer
appears in the instrument cluster.
15
>
Page 18 of 400
Instrument cluster
» Applies to: vehicles with Audi virtual cockpit:
Select on the multifunction steering wheel:
right control button > Left dial > Tachometer or
Combination view.
Engine speed limitation
Applies to: vehicles with engine speed limitation
If the BA indicator light turns on, the engine will
be automatically limited to the RPM displayed in
the instrument cluster. This will protect the en-
gine components, for example during a cold start
or from overheating.
The engine speed limitation deactivates once the
engine is no longer in the critical temperature
range and you have released the accelerator ped-
al once.
If the engine speed limitation was activated by
an engine control malfunction, the B or EPC | in-
dicator light also turns on. Make sure the engine
speed does not go above the speed displayed, for
example when downshifting. Drive to an author-
ized Audi dealer or authorized Audi Service Facili-
ty immediately to have the malfunction correct-
ed.
@ Note
The needle in the tachometer (2) may only be
in the red area of the gauge for a short period
of time before there is a risk of damaging the
engine. The location where the red zone be-
gins varies depending on the engine.
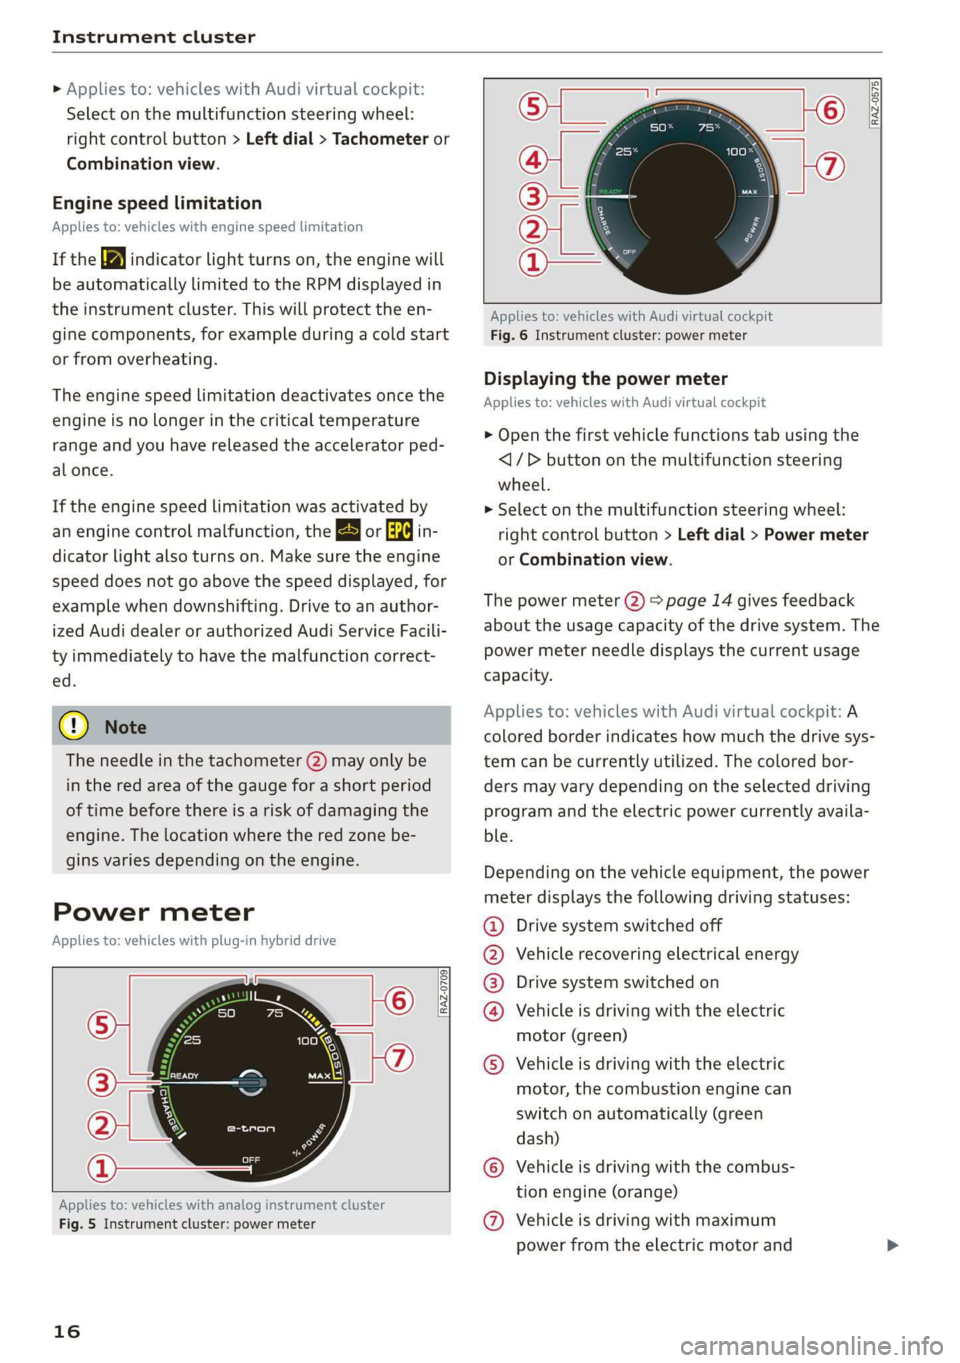
Power meter
Applies to: vehicles with plug-in hybrid drive
RAZ-0709
Applies to: vehicles with analog instrument cluster
Fig. 5 Instrument cluster: power meter
16
[RAZ-0575]
Applies to: vehicles with Audi virtual cockpit
Fig. 6 Instrument cluster: power meter
Displaying the power meter
Applies to: vehicles with Audi virtual cockpit
> Open the first vehicle functions tab using the
<1/D button on the multifunction steering
wheel.
> Select on the multifunction steering wheel:
right control button > Left dial > Power meter
or Combination view.
The power meter (2) > page 14 gives feedback
about the usage capacity of the drive system. The
power meter needle displays the current usage
capacity.
Applies to: vehicles with Audi virtual cockpit: A
colored border indicates how much the drive sys-
tem can be currently utilized. The colored bor-
ders may vary depending on the selected driving
program and the electric power currently availa-
ble.
Depending on the vehicle equipment, the power
meter displays the following driving statuses:
Drive system switched off
Vehicle recovering electrical energy
Drive system switched on
Vehicle is driving with the electric
motor (green)
©
©0800
Vehicle is driving with the electric
motor, the combustion engine can
switch on automatically (green
dash)
Vehicle is driving with the combus-
tion engine (orange)
© © Vehicle is driving with maximum
power from the electric motor and
Page 35 of 400
8V2012721BK
Opening and closing
Child safety lock
Applies to: vehicles with mechanical child safety locks
The child safety lock prevents the rear doors
from being opened from the inside and the rear
power windows from being operated.
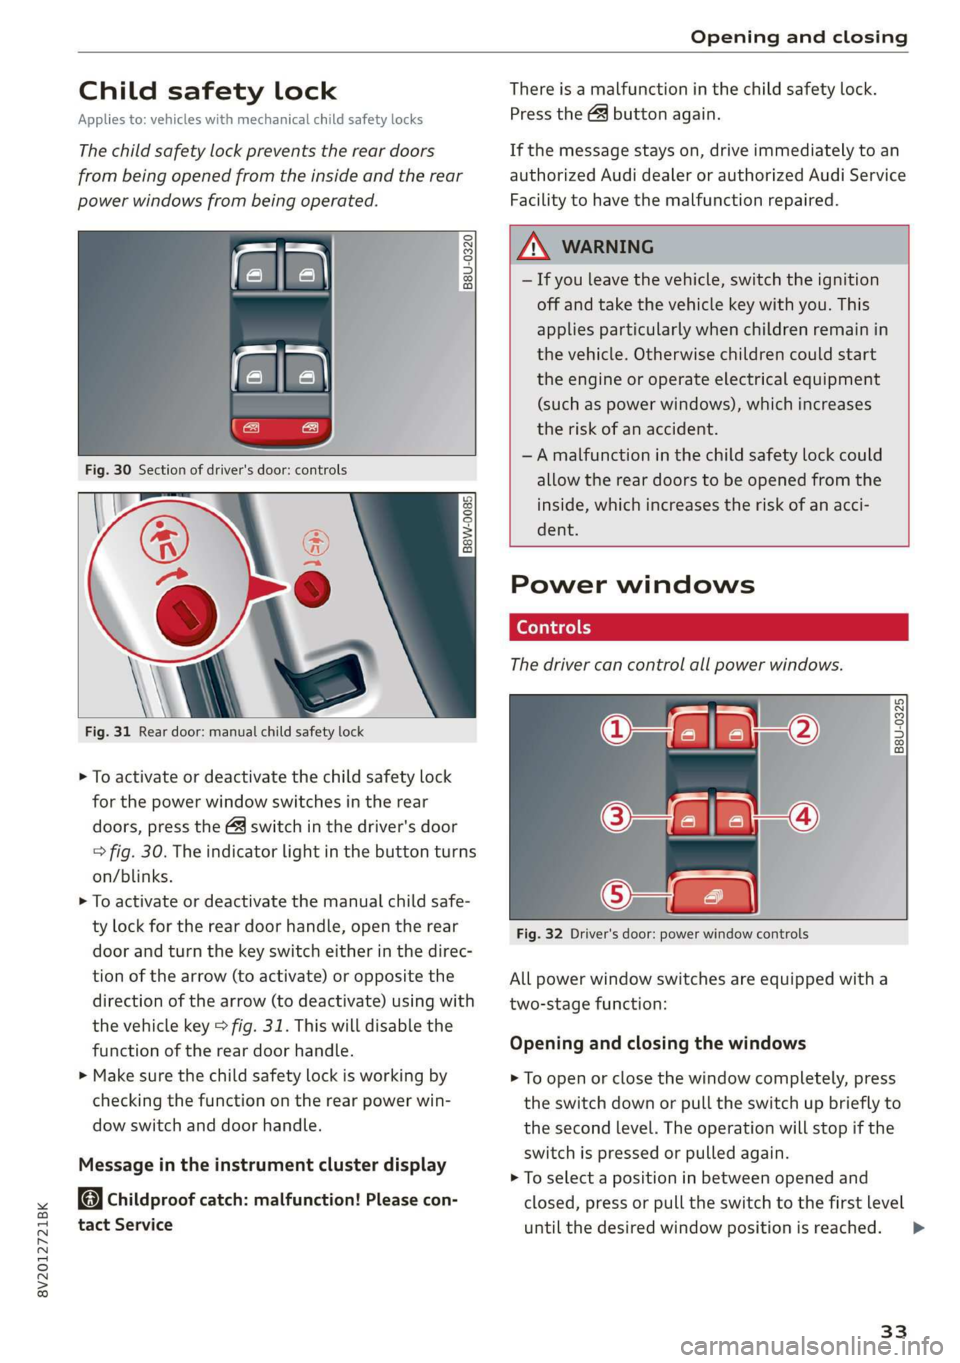
B8U-0320
Fig. 31 Rear door: manual child safety lock
> To activate or deactivate the child safety lock
for the power window switches in the rear
doors, press the 4&3 switch in the driver's door
=> fig. 30. The indicator light in the button turns
on/blinks.
> To activate or deactivate the manual child safe-
ty lock for the rear door handle, open the rear
door and turn the key switch either in the direc-
tion of the arrow (to activate) or opposite the
direction of the arrow (to deactivate) using with
the vehicle key > fig. 31. This will disable the
function of the rear door handle.
> Make sure the child safety lock is working by
checking the function on the rear power win-
dow switch and door handle.
Message in the instrument cluster display
Childproof catch: malfunction! Please con-
tact Service
There is a malfunction in the child safety lock.
Press the GQ button again.
If the message stays on, drive immediately to an
authorized Audi dealer or authorized Audi Service
Facility to have the malfunction repaired.
, WARNING
— If you leave the vehicle, switch the ignition
off and take the vehicle key with you. This
applies particularly when children remain in
the vehicle. Otherwise children could start
the engine or operate electrical equipment
(such as power windows), which increases
the risk of an accident.
—A malfunction in the child safety lock could
allow the rear doors to be opened from the
inside, which increases the risk of an acci-
dent.
Power windows
The driver can control all power windows.
rey q 2
Z| 2
a
Fig. 32 Driver's door: power window controls
All power window switches are equipped with a
two-stage function:
Opening and closing the windows
> To open or close the window completely, press
the switch down or pull the switch up briefly to
the second level. The operation will stop if the
switch is pressed or pulled again.
> To select a position in between opened and
closed, press or pull the switch to the first level
until
the desired window position is reached.
33
>
Page 46 of 400
Lights and Vision
Turn signal and high beam lever
©
»
|
@
Fig. 50 Lever: switching on the turn signal and high beams
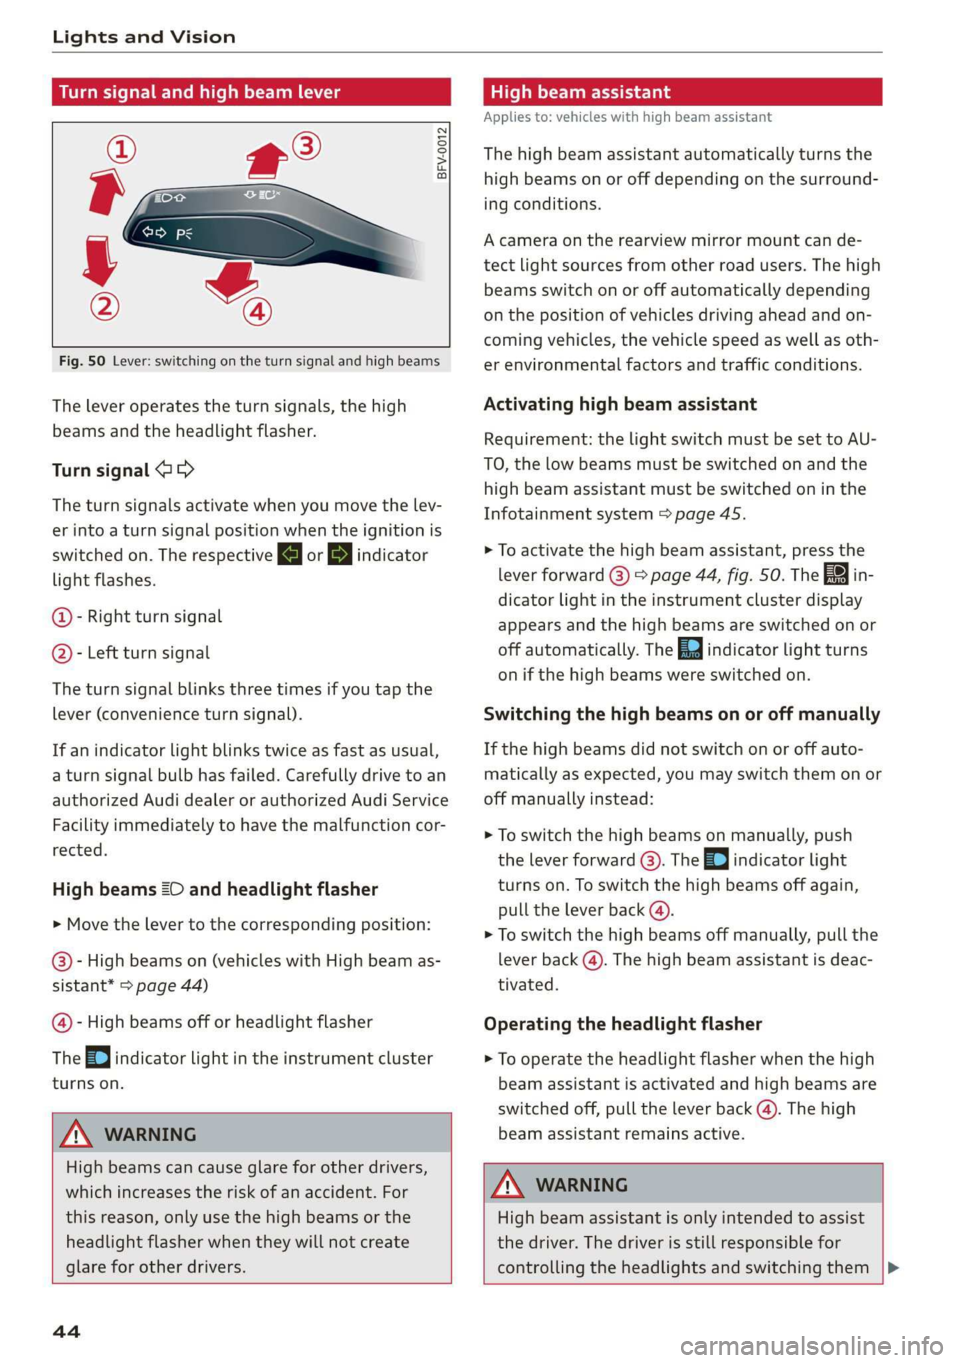
The lever operates the turn signals, the high
beams and the headlight flasher.
Turn signal @ >
The turn signals activate when you move the lev-
er into a turn signal position when the ignition is
switched on. The respective a or B indicator
light flashes.
@- Right turn signal
@- Left turn signal
The turn signal blinks three times if you tap the
lever (convenience turn signal).
If an indicator light blinks twice as fast as usual,
a turn signal bulb has failed. Carefully drive to an
authorized Audi dealer or authorized Audi Service
Facility immediately to have the malfunction cor-
rected.
High beams 2D and headlight flasher
> Move the lever to the corresponding position:
@- High beams on (vehicles with High beam as-
sistant* > page 44)
@- High beams off or headlight flasher
The
=0| indicator light in the instrument cluster
turns on.
Z\ WARNING
High beams can cause glare for other drivers,
which increases the risk of an accident. For
this reason, only use the high beams or the
headlight flasher when they will not create
glare for other drivers.
teh melee lad
Applies to: vehicles with high beam assistant
The high beam assistant automatically turns the
high beams on or off depending on the surround-
ing conditions.
A camera on the rearview mirror mount can de-
tect light sources from other road users. The high
beams switch on or off automatically depending
on the position of vehicles driving ahead and on-
coming vehicles, the vehicle speed as well as oth-
er environmental factors and traffic conditions.
Activating high beam assistant
Requirement: the light switch must be set to AU-
TO, the low beams must be switched on and the
high beam assistant must be switched on in the
Infotainment system = page 45.
> To activate the high beam assistant, press the
lever
forward @) > page 44, fig. 50. Th i
dicator light in the instrument cluster display
appears and the high beams are switched on or
off automatically. The Ea indicator light turns
on if the high beams were switched on.
Switching the high beams on or off manually
If the high beams did not switch on or off auto-
matically as expected, you may switch them on or
off manually instead:
> To switch the high beams on manually, push
the lever forward @). The Ea indicator light
turns on. To switch the high beams off again,
pull the lever back @).
> To switch the high beams off manually, pull the
lever back @). The high beam assistant is deac-
tivated.
Operating the headlight flasher
> To operate the headlight flasher when the high
beam assistant is activated and high beams are
switched off, pull the lever back (). The high
beam assistant remains active.
ZA WARNING
High beam assistant is only intended to assist
the driver. The driver is still responsible for
controlling the headlights and switching them
44
Page 47 of 400
8V2012721BK
Lights and Vision
manually depending on light and visibility
conditions. It may be necessary to operate
them manually in situations such as:
— In adverse weather conditions such as fog,
heavy rain, blowing snow or spraying water.
— On roads where oncoming traffic may be
partially obscured, such as expressways.
— If there are road users with poor lighting,
such as bicyclists.
— In tight curves and on steep hills.
—In poorly lit areas.
— With strong reflectors, such as signs.
— If the area of the windshield near the sensor
is fogged over, dirty, icy or covered with a
sticker.
Adjusting the exterior lighting
You can adjust the exterior lighting separately.
The settings depend on the vehicle equipment.
The functions are adjusted in the Infotainment
system.
> Select in the Infotainment system: [MENU] but-
ton > Vehicle > left control button > Vehicle
settings > Exterior lighting.
Automatic headlights
You can adjust the following settings in the Auto-
matic
headlights menu:
Activation time - You can adjust if the headlights
switch on Early, Medium or Late according to the
sensitivity of the light sensor.
Headlight assistant - You can switch the high
beam assistant* on and off.
Entry/exit lighting
When it is dark, the Entry/exit lighting illumi-
nates the area around the vehicle when unlocking
the vehicle and after switching off the ignition
and opening the driver's door.
The entry/exit lighting only works when it is dark
and the light switch is in the AUTO* position.
)_ This function is not available in all countries.
Daytime running lights!)
The daytime running lights can be turned on and
off. When daytime running lights are turned on,
the lights will stay on continuously whenever the
ignition is switched on.
Emergency flashers
B8V-0210
Fig. 51 Instrument panel: emergency flasher button
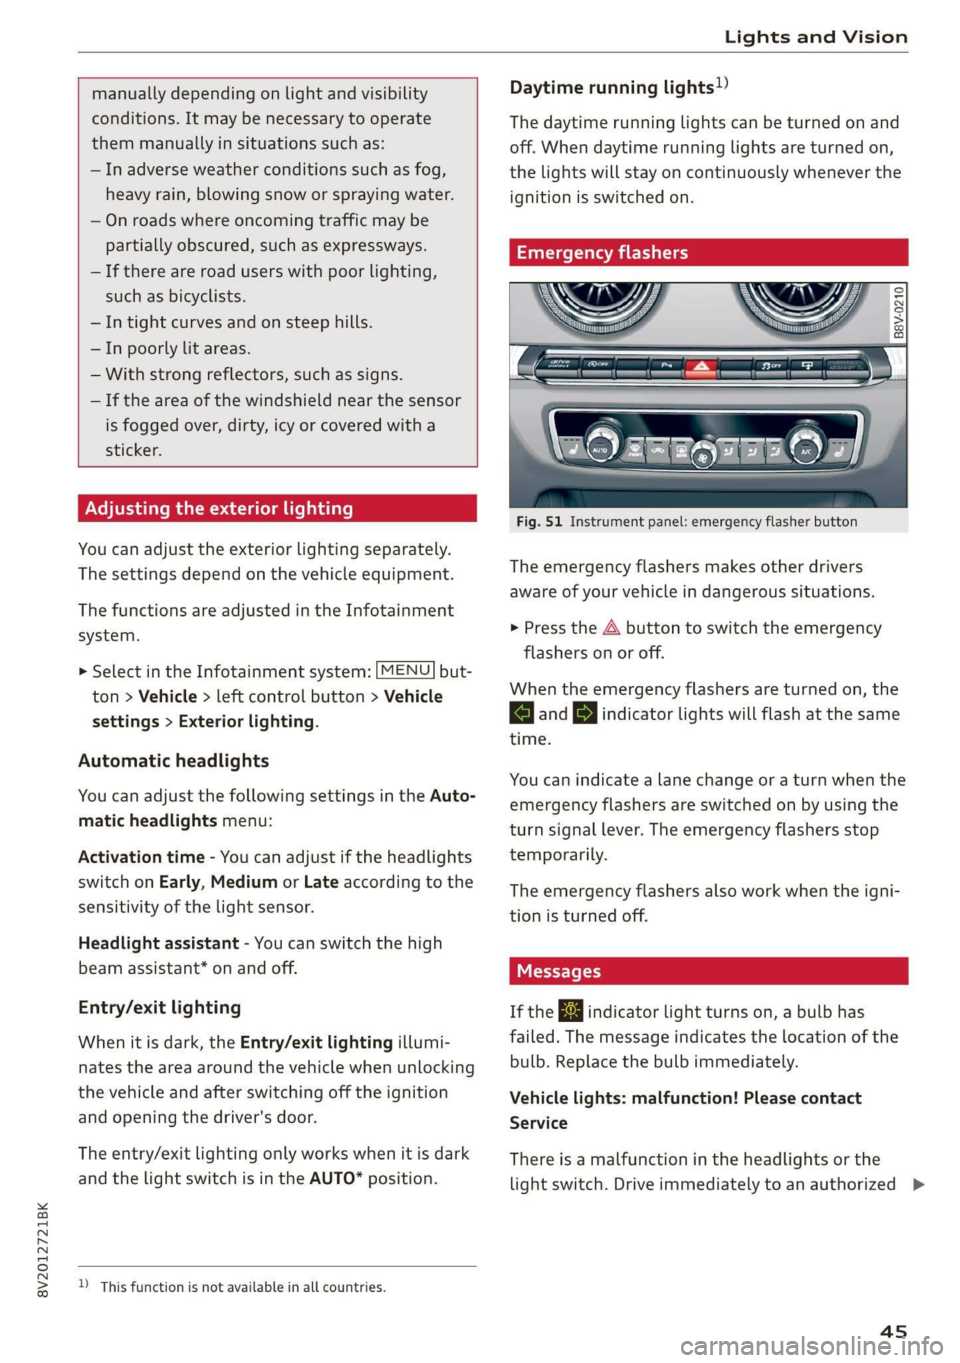
The emergency flashers makes other drivers
aware of your vehicle in dangerous situations.
> Press the A button to switch the emergency
flashers on or off.
When the emergency flashers are turned on, the
a and BY indicator lights will flash at the same
time.
You can indicate a lane change or a turn when the
emergency flashers are switched on by using the
turn signal lever. The emergency flashers stop
temporarily.
The emergency flashers also work when the igni-
tion is turned off.
If the ka indicator light turns on, a bulb has
failed. The message indicates the location of the
bulb. Replace the bulb immediately.
Vehicle lights: malfunction! Please contact
Service
There is a malfunction in the headlights or the
light switch. Drive immediately to an authorized >
45
Page 54 of 400

Lights and Vision
Installing the wiper blade
> Press the wiper blade mount into the retainer.
Securely hold the wiper arm at the upper plas-
tic end.
> Fold the window wiper arm back onto the rear
window.
Z\ WARNING
For safety reasons, the windshield wiper
blades should be replaced once or twice each
year.
Messages
If the & indicator light turns on, then there is a
windshield wiper malfunction. Drive to an au-
thorized Audi dealer or authorized Audi Service
Facility immediately to have the malfunction cor-
rected.
a Automatic wipers: malfunction! See owner's
manual
The light/rain sensor is malfunctioning.
You can still control all functions that are not
controlled by the rain sensor using the wind-
shield wiper lever.
Drive immediately to an authorized Audi dealer
or authorized Audi Service Facility to have the
malfunction repaired.
52
Digital compass
Switching the compass on and off
Applies to: vehicles with digital compass
BFV-0288
Fig. 62 Rearview mirror: digital compass is switched on
> To turn the compass on or off, press the button
@ until the compass display in the mirror turns
on or off.
The digital compass only works when the ignition
is turned on. The directions are indicated with ab-
breviations: N (north), NE (northeast), E (east),
SE (southeast), S (south), SW (southwest), W
(west), NW (northwest).
G) Tips
To prevent inaccurate compass readings, do
not bring any remote controls, electrical devi-
ces or metallic objects near the mirror.
Page 79 of 400

8V2012721BK
Driving
the high-voltage battery and the temperature of
the drive system components, among other
things.
ZA WARNING
The driving wheels could spin and the vehicle
could swerve on slick or slippery road surfaces
when using kick-down, which increases the
risk of an accident.
ET een ace)
Applies to: vehicles with S tronic transmission and Launch
Control
Launch Control provides the best possible accel-
eration when starting from a stop.
Requirements
— The engine must be at operating temperature.
— The steering wheel must not be turned.
— Start/Stop system* must be deactivated
=> page 85.
— ESC must be limited > page 94.
— Driving program “S” > page 75 or the dynamic
Audi drive select* mode must be selected
=> page 91.
Using Launch Control
— Press the brake pedal with your left foot and
hold it all the way down for at least one second.
— With the brake pedal pressed, press the accel-
erator pedal all the way down with your right
foot at the same time.
— Once the engine reaches a constant speed, re-
move your foot from the brake pedal.
Once the vehicle has started moving, reactivate
the ESC so that it is fully functional.
Z\ WARNING
Only use Launch Control when road and traffic
conditions allow it and other road users will
not be endangered or impacted by your driv-
ing and the vehicle's acceleration. The driving
wheels could spin and the vehicle could
swerve, especially on slick or slippery road
surfaces, which increases the risk of an acci-
dent.
CG) Note
When accelerating using Launch Control, all
vehicle components are subject to heavy
loads. This can result in increased wear.
G@) Tips
After accelerating using the Launch Control,
the temperature of some vehicle components
may increase greatly. If that happens, the
function will not be available for a few mi-
nutes to reduce the risk of damage. After a
cool-down period, Launch Control will be
available again.
Messages
& Transmission: malfunction! Safely stop vehi-
cle
Do not continue driving. Stop the vehicle as soon
as possible in a safe location and secure it so it
does not roll. See an authorized Audi dealer or
authorized Audi Service Facility for assistance.
& Transmission: too hot. Please stop vehicle
Do not continue driving. Select "P" and contact an
authorized Audi dealer or authorized Audi Service
Facility for assistance.
fal Transmission: too hot. Please adapt driving
style
The transmission temperature has increased sig-
nificantly. Drive very cautiously or take a break
from driving until the temperature returns to the
normal range and the indicator light turns off.
[Gj Transmission: malfunction! You can contin-
ue driving. See owner's manual
There is a system malfunction in the transmis-
sion. You may continue driving. Drive to an au-
thorized Audi dealer or authorized Audi Service
Facility soon to have the malfunction corrected.
[8] Transmission: malfunction! You can contin-
ue driving with limited function. Please contact
Service
There is a system malfunction in the transmis-
sion. The transmission is switching to emergency
mode. This mode only shifts into certain gears or >
77
Page 84 of 400
Driving
— Turn off electrical equipment that is not need-
ed, for example seat heating*.
— Anticipate upcoming traffic situations while
driving to avoid unnecessary acceleration and
braking.
— Avoid driving at high speeds.
— Avoid adding extra weight to the vehicle if pos-
sible, for example by not leaving roof racks or
bike racks installed when they are not needed.
— Make sure the tire pressure is correct.
— Have maintenance performed regularly on the
vehicle.
— Do not drive with winter tires during the summ-
er.
— Do not let the engine run while the vehicle
parked.
— Use the Start/Stop system.
— Utilize the engine braking effect.
— Avoid driving short distances when possible.
— Plug-in hybrid drive: brake early and evenly to
use the recuperation function.
@) Tips
The amount of noise produced by the vehicle
can increase significantly when driving with a
sporty style. Show respect to others around
you and the environment with the way you op-
erate your vehicle, especially at night.
Energy management
Your vehicle is equipped with an intelligent ener-
gy management system for distributing electrici-
ty. This significantly improves the starting ability
and increases the vehicle battery life.
G) Tips
— If you drive short distances frequently, the
vehicle battery may not charge enough
while driving. As a result, convenience func-
tions for electrical equipment may be tem-
porarily unavailable.
— The vehicle battery will gradually drain if
the vehicle is not driven for long periods of
time, or if electrical equipment is used
when the engine is not running. To ensure
that the vehicle can still be started, the
82
electrical equipment will be limited or
switched off.
S Engine stopped: power steering and brake
booster not possible
There is a malfunction in the engine or the fuel
supply. More force is needed to steer and brake
the moving vehicle when the engine is stopped.
If the vehicle is rolling, try to bring it to a stop off
to the side from moving traffic. See an author-
ized Audi dealer or authorized Audi Service Facili-
ty for assistance.
EB EB Drive system: malfunction! Safely stop
vehicle
There is a malfunction in the plug-in hybrid sys-
tem. The brake booster and the power steering
may stop working. Stop the vehicle immediately
at a suitable location or as soon as possible. Park
the vehicle in a safe place outdoors that is not
near buildings, roof overhangs, carports or simi-
lar structures. Switch the ignition off. Have the
problem corrected by an authorized Audi dealer
or authorized Audi Service Facility.
B i B Electric drive: overheated! Safely stop
vehicle and check coolant
The coolant level is too Low or the coolant tem-
perature is too high. Stop the vehicle in the out-
doors as soon as it is safely possible. Switch the
ignition off.
Read the important safety precautions > A in
Coolant on page 312 and check the coolant level
= page 312. If the coolant level is OK, the mal-
function may be caused by the system overheat-
ing. Let the vehicle's electric drive system cool
down for some time.
— If the message turns off after cooling down and
switching the ignition back on, you can contin-
ue driving. Contact an authorized Audi dealer or
authorized Audi Service Facility immediately to
have the malfunction corrected.
— If the indicator light stays on, contact an au-
thorized Audi dealer or authorized Audi Service
Facility.
Page 85 of 400

8V2012721BK
Driving
B / BI Drive system: malfunction! Please con-
tact Service
There is a malfunction in the drive system. Drive
slowly to an authorized Audi dealer or authorized
Audi Service Facility to have the malfunction cor-
rected.
B / BI Drive system: malfunction! Restart not
possible. Please contact Service
There is a malfunction in the plug-in hybrid sys-
tem. Do not open the hood. Drive to an author-
ized Audi dealer or authorized Audi Service Facili-
ty immediately to have the malfunction correct-
ed.
B / B Battery temperature too low. Vehicle
cannot be started. See owner's manual
The outside temperature is too low. The vehicle
can no longer start at temperatures below -18 °F
(-28 °C). Contact an authorized Audi dealer or au-
thorized Audi Service Facility.
| - POWER LIMIT| Warning! Limited performance
If the indicator light turns on and this message
appears, there may be an engine control mal-
function. The engine output is reduced. Drive to
an authorized Audi dealer or authorized Audi
Service Facility immediately to have the malfunc-
tion corrected.
Drive system: engine must be running.
Please exit EV e-tron mode
It may be necessary for the gasoline engine to
run longer for technical reasons, such as when
condensation accumulates in the engine. Driving
exclusively in electric mode is not possible in this
phase.
Other indicator lights
If the B i Ha indicator light turns on, there may
be an engine control malfunction. Drive slowly to
an authorized Audi dealer or authorized Audi
Service Facility to have the engine checked.
D In certain countries.
ZA WARNING
If the engine stops while driving, you will
need to use more force to brake the vehicle.
This increases the risk of an accident. There
will still be power steering if the ignition is
switched on while the vehicle is rolling and
there is sufficient vehicle battery charge. Oth-
erwise, you must use greater force when
steering.
Start/Stop system
Applies to: vehicles with Start/Stop system
The Start/Stop system can help increase fuel
economy and reduce CO2 emissions.
In Start/Stop mode, the engine shuts off auto-
matically when the vehicle is stopped, such as at
a traffic light. The ignition remains switched on
during this Stop phase. The engine will restart
automatically when needed.
The Start/Stop system is automatically activated
once the ignition is switched on.
Basic requirements for Start/Stop mode
— The driver's door must be closed.
— The driver's seat belt much be fastened.
— The hood must be closed.
— The vehicle must have driven faster than 2 mph
(3 km/h) since the last time it stopped.
@) Note
Always switch the Start/Stop system off when
driving through water > page 85.
@ Tips
The engine stops shortly before the vehicle
comes to astop ). The full function of the
brake booster and the power steering is still
available.
83