towing AUDI A3 CABRIOLET 2015 Owners Manual
[x] Cancel search | Manufacturer: AUDI, Model Year: 2015, Model line: A3 CABRIOLET, Model: AUDI A3 CABRIOLET 2015Pages: 302, PDF Size: 73.83 MB
Page 5 of 302
Safety . . . . . . . . . . . . . . . . . . . . . . . . . 126
Driving safety . . . . . . . . . . . . . . . . . 126
General notes . . . . . . . . . . . . . . . . . . . . 126
Proper occupant seating posit ions . . . 127
Driver and passenger side footwell . . . 131
Pedalarea .. .. .............. ... .. 131
Stowing luggage . . . . . . . . . . . . . . . . . 132
R eport ing Safety Defects . . . . . . . . . . . 134
Active ro llover p rotection system 135
Safety belt s . . . . . . . . . . . . . . . . . . . 138
Gene ral notes . . . . . . . . . . . . . . . . . . . . 138
Why safety be lts? . . . . . . . . . . . . . . . . 139
Safety belts . . . . . . . . . . . . . . . . . . . . . 1 41
Safety bel t pretens ioners . . . . . . . . . . 14 4
Airbag system ......... .. .. .. . .
Impor tant things to know . ... .. .. . .
Fr ont airbags .... ..... ... .. .. .. . .
Monitoring the Advanced Airbag
System .. .. ................. .. . .
Knee airbags .. ........... .. .. .. . .
Side airbags .. .. .. .... .... . .... . .
Ch ild Safety ............... .. . .
Important things to know .. .. .. .. . .
C hi ld safety seats ............ .... .
Install ing a chi ld safety seat .. .. ... .
L A TC H L ower ancho rag es and tethe rs
fo r ch ild ren . ............. .... .. . .
A ddit io nal Informa tion 146
1
46
150
158
163
165
169 169
175
180
183
187
Driver messages . . . . . . . . . . . . . . 188
Smart Technology . . . . . . . . . . . . 188
I nforma tion abo ut data reco rded by
ve hicl e cont ro l mod ules . . . . . . . . . . . 188
Elect ron ic stabilization control (ESC) 188
Brakes . . . . . . . . . . . . . . . . . . . . . . . . . . 190
Electromechanical steering . . . . . . . . . 192
All whee l drive (quatt ro) . . . . . . . . . . . 192
Energy management . . . . . . . . . . . . . . 193
Not ice about data recorded by the
E vent Data R eco rder and ve hicle
con tro l mod ules . . . . . . . . . . . . . . . . . . 194
Table of contents 3
Driving and the environment
196
T he first 1,000 miles (1 ,500 km) and
afterwa rds . . . . . . . . . . . . . . . . . . . . . . 196
Driving through wate r on roads . . . . . 197
Catalytic converter . . . . . . . . . . . . . . . . 197
Plac ing your vehicle out of service . . . 198
Operate your vehicle eco nomically and
min imize poll ution . . . . . . . . . . . . . . . . 198
Trailer towing . . . . . . . . . . . . . . . . . 201
D rivi ng with a trailer . . . . . . . . . . . . . . 201
T ra ile r tow ing t ips . . . . . . . . . . . . . . . . 202
Operating instructions . . . . . . . . 204
Care and cleaning . . . . . . . . . . . . . 204
Genera l infor mation . . . . . . . . . . . . . . 20 4
C ar w ashes .. .. .. .. . ............ .
Cleaning and care information
Checking and Filling ......... .
Fuel tank . ... .... .. . .. .. ..... ... .
Hood ... .. .. .. .... . ... ...... ... .
Engine oi l ... .. .. .... ........... .
Cooling system . .. .. ............. .
Brake fluid .. .. .. .... ........... .
Battery ......... .. ..... ........ .
Windsh ie ld washer container
Tires and wheels ............. .
Tires ... .. .. .. .... .. ........ ... . 2
0 4
20 5
210
210
2 11
214
217
220
222
223
22 7
228
228
T ire pressure mo nitoring system 258
Do-it-yourself service . . . . . . . . . 261
What do I do now? . . . . . . . . . . . . 261
L uggage compartment lid emergency
r elease . . . . . . . . . . . . . . . . . . . . . . . . . 261
Gener al infor mation . . . . . . . . . . . . . . 261
E q uipment . . . . . . . . . . . . . . . . . . . . . . 261
Spare tire . . . . . . . . . . . . . . . . . . . . . . . 262
Changi ng a wheel . . . . . . . . . . . . . . . . . 263
•
•
M a N ,....
> co ,...., \!) 1.1'1 ,...., 1.1'1 ,....,
Page 6 of 302
4 Table of contents
Fuses and bulbs . . . . . . . . . . . . . . .
269
Elect rical fuses . . . . . . . . . . . . . . . . . . . 269
Bulbs . . . . . . . . . . . . . . . . . . . . . . . . . . . 272
Emergency situations ... .. .... 273
General . . . . . . . . . . . . . . . . . . . . . . . . . 273
Starting by push ing or tow ing . . . . . . . 273
Starting with jumper cab les . . . . . . . . 273
Usingjumpstartcables .. .. .. .. .. .. 274
Eme rgency towing with commercial
tow truck . . . . . . . . . . . . . . . . . . . . . . . 275
Lift ing vehicle. ........... .... .... 277
Technical Data . . . . . . . . . . . . . . . . . 279
Technical data . . . . . . . . . . . . . . . . . 279
Vehicle ident ifica tion . . . . . . . . . . . . . . 279
Weights . . . . . . . . . . . . . . . . . . . . . . . . 279
D imensions . . . . . . . . . . . . . . . . . . . . . . 280
Capacities . . . . . . . . . . . . . . . . . . . . . . . 280
Gasoline engines . . . . . . . . . . . . . . . . . 281
Consumer Information . . . . . . . 282
Warranty coverages . . . . . . . . . . . . . . . 282
Operating your vehicle o utside the
U.S.A . or Canada . . . . . . . . . . . . . . . . . 282
Audi Service Repair Manuals and Literature . . . . . . . . . . . . . . . . . . . . . . . 282
Maintenance . . . . . . . . . . . . . . . . . . . . . 282
Addit ional accessories, modifications
and pa rts replacement . . . . . . . . . . . . 284
D eclar ation o f Compliance,
T e lecommunication and Electronic
Systems . . . . . . . . . . . . . . . . . . . . . . . . 285
Inde x ... .. ... ... .... ... .. .. .... 28 6
Page 43 of 302

....,
N
r--. > co
rl I.O
"' rl
"' rl
Power top
Automatic power top
General information
The power top opens and closes automatical ly . When open, the power top is stored com
pletely in the power top compartment. The
power top can be opened or closed at speeds
up to 30 mph (SO km/h).
Under normal conditions, the power top is
wind and waterproof. In rare cases, small
droplets of water may form under extreme
weather conditions such as torrential or pro longed rain. That is normal and no cause for
concern.
Follow the care instructions to keep the power
top free of leaks and to maintain its appear
ance
c::> page 204, Core and cleaning. Also ob
serve the following:
- Op en and stow the power top only when it is
clean and dry . Sharp-edged dirt particles can
cause damage to the rear window and the
power top. Stowing the power top when it is
damp can create imprints in it, and if it is
left that way for long periods of time, mil
dew and other damage can form.
- Do not leave the power top open for several
weeks or the creases in it may become dis
colored.
- Remove ice and snow before opening the
power top. Do not use any sharp edged ob
jects to remove ice and snow or the power
top could be scratched or damaged. The rear
window may be cleared with a standard ice
scraper.
- Do not open the power top when the tem
perature is below 32 °F (0 °C). The fabric in
the power top loses elasticity in sub-ze ro
temperatures.
_& WARNING
- When positioning the power top, avoid
contact with the supports or other mov
ing parts. Make sure all of the windows
.
Power top 41
are lowered. Otherwise you could pinch
your hands.
- Never drive when the power top is not
locked correctly. The wind from driving
could cause the power top to open. This
can result in injuries and damage to the
vehicle.
Opening and closing the power top
Fig. 27 Center console: power top switch
Requirement: The power top storage com
partment must be lowered
c::> page 43 and
the luggage compartment lid must be closed.
.. Switch the ignition on.
.. To open or close the power top, pull or press
the button @during the entire process.
T he status of the power top is shown in the in
strument cluster display when operating the
power top switch.
You can close the power top when the wind
deflector is installed
~ page 44.
A message will appear in the instrument clus
ter if the power top cannot be opened or
closed
c::> page 43.
A WARNING
- When operating the power top, make
sure the function is not affected by wind
or other factors and that it does not in
terfere with other drivers.
- Never drive when the power top is not
locked correctly. The wind from driving
could cause the power top to open. This
can result in injuries and damage to the
vehicle.
-
Page 79 of 302
M N ,....
> co ,...., \!) 1.1'1 ,...., 1.1'1 ,....,
Switchin g th e ig nition on /off
"'T o sw itch the ignition on, turn the ignition
key to position
(D .
"'To switch the ignition off, turn the ignition
key to position @.
Starting the engin e
Your vehicle is equipped w ith launch cont ro l.
As soon as you have turned the ign ition key to
position @, the engine will start automatical
l y.
"' Press the brake peda l and move the se lector
lever to the P or N pos it ion.
"'T urn the key briefly to position @. The igni
t ion key automatically r eturns to posit ion
(D . Do not press the accelerator pedal wh en
doing this .
Major electrical equipment switches off tem
porarily when starting the eng ine.
If the engine does not sta rt immedia tely , stop
the starting procedure by turning the ignition key to position @and repeat after 30 sec
onds .
Automatic start m alfunction
If the ~ indicator l ight turns on (gasoline en
g ine) and the message
Engin e start sys te m
m alfu nction. Ple ase contac t Se rvice
appears ,
there is an automatic start ma lfunction.
To start t he eng ine, hold the ignition key in
position @until the engine runs .
Drive to an authorized Aud i dealer or author
ized Audi Service Facility immed iate ly to have
the ma lfunction corrected .
_& WARNING
-Never allow the engine to run in confined
spaces -there is a risk o f asphyxiation.
- Never remove the ign ition key from the
ignition lock whi le the vehicle is moving .
Otherw ise the steering lock wi ll engage
and you will not be able to steer the vehi
cle.
- Please note that the brake booster and
power steering only work when the en-
Dri vin g 77
gine is running. When the engine off, you
must use more force to steer or brake
the vehicle. Because the usual steering
and brak ing capability is not avai lab le,
the risk of accidents or injur ies increases.
- Always take the vehicle key with you
when leaving the vehicle, even for a
short period of time. This applies part ic
ularly when children remain in the veh i
cle. Otherwise the ch ild ren could start
the engine or operate electrical equip
men t such as power w indows.
(D Note
- Avo id h igh engine speed, full throttle,
and heavy eng ine load as long as the en
gine has no t reached operat ing tempera
t u re yet . You could damage the engine.
- T he engine cannot be started by pushi ng
or towing.
(® For the sake of the environment
Do not let the eng ine run w hile pa rked to
warm u p. Begin driv ing immediately . T his
r educes unne cessary emissions.
(D Tips
- If it is d iff icult to turn the key to position
(D , turn the steering wheel back and
forth slightly to release the s teer ing
wheel lock .
- After s tarting a cold engine, there may
be a brief period of inc reased no ise be
cause the oil press ure must first bui ld up
in the hydraulic va lve adj usters . This is
normal and not a cause for concern.
- If the battery is disconnected and recon
nected, you have to hold the ignition key
in posit ion
(D for five seconds for the en
gine to start.
- After sw itching the ignition off, you can
only remove the key when the selector
lever is in the "P" (Park) position. After
that, the selector lever is locked.
•
Page 81 of 302
M N ,....
> co ,...., \!) 1.1'1 ,...., 1.1'1 ,....,
Switchin g th e ig nition on /off
If the> ,:r- u indicator l ight blinks and the mes
sage
Ple ase move s teering wheel appea rs
when switching the ignition on, the steering is locked by th e steering lock. In this case, turn
the steering wheel slight ly to the left/ right.
.. To switch the ignition on or
off, press the
I S TAR T ENG INE S T OPI button. Do not press
the brake pedal whil e doing this .
Starting the engin e
Your vehicle is equipped with launch cont ro l.
The engine starts automa tically when you
press the
I S T AR T ENG INE S T OP I button brief
l y.
.. Press the brake peda l and move the se lector
lever to the P or N pos ition .
.. Press the
I STAR T ENGINE STOP I button
briefly . The eng ine will star t.
Majo r electrical equ ipment switches
off tem
porarily when starting the eng ine .
I f the engine does not start immediately , stop
the starting procedu re by push ing the
I S TAR T ENGINE ST OP ! button again and re
peat after 30 seconds .
Automatic start m alfunction
If the Ila indicator l ight turns on (gasoline en
g ine) when you start the engine, there is an
automatic sta rt malfunction .
To start the eng ine, press and hold the
!STAR T ENGIN E STOP ! button until the eng ine
runs.
Drive to an authorized Aud i dealer or author
i z ed Audi Service Fac ility immed iately to have
the malfunction corrected .
A WARNING
-Never allow the engine to ru n in confined
spaces -there is a r isk of asphyxiation.
- Always take the veh icle key with you
when leaving the vehicle, even for a
short per iod of t ime . This applies partic
ularly when chi ldren remain in the vehi
cle . Otherwise the children could start
Dri vin g 79
the engine or operate electrical equip
ment such as power w indows.
- Please note that the brake booster and
power steering only work when the en
gine is running. When the engine
off, you
must use more force to steer or brake
the vehicle . Because the usual steer ing
and brak ing capability is not avai lable,
the risk of accidents or injur ies increases .
(D Note
-Avo id h igh engine speed, full throttle,
and heavy eng ine load as long as the en
gine has not reached operat ing tempera
ture yet. You could damage the engine .
- The engine cannot be started by pushing
or towing .
@ For the sake of the environment
Do not let the eng ine run wh ile parked to
warm up . Begin dr iv ing immediately . Th is
reduces unnecessary emissions .
(D Tips
-After starting a cold engine, there may
be a brief period of increased no ise be
cause the oil press ure must f irst bu ild up
in the hydraulic va lve ad justers. This is
normal and not a cause for concern.
- If the . indicator light blinks in the in
st rument cluste r before switching the ig
nition
off, the ignit ion wi ll not switch on
again .
qpoge 192
- If you leave your vehi cle wit h the ignition
switched on, the ign it ion w ill switch
off
after a certain amount of time . Make
sure that electrical equipment such as
the exterior lights are switched
off .
T · th · ff using the
button
App lies to vehicles: wit h convenience key
.. Bring the veh icle to a full stop .
.. Move the se lector lever into the P posit ion .
.. Press the
I STA RT E NGINE ST OP ! button
q page 78, fig. 80. ..,.
•
Page 115 of 302
Stopping /p ar kin g
If the se lector lever is not in the P position
when you open the driver's door, the vehicle
could ro ll. In vehicles with a convenience key* ,
the following message appears:
S hift to P,
othe rwise veh icle c an roll away. Door s do not
lock if leve r is not in P .
You will also hear a
warn ing tone.
~ Press and ho ld the brake pedal c:> _& .
~ Set the parking brake.
~ Select the P selector lever pos ition.
Stopp ing on an inclin e
~ Always press the brake pedal to hold the ve
hicle in p lace and prevent it from "rolling
back"
c:> _& . Do not try to prevent the vehi
cle from "rolling back" when a gear is en
gaged by increasing the eng ine speed
c:> Q).
Starting on an incline in vehicle s wi thout
Hill Hold*
~ Set the parking brake.
~ With the driving gear se lected, press the ac
celerator pedal carefully. The parking brake
will release automat ically if your safety belt
is fastened .
Starting on an incline i n vehicle s with Hill
Hold*
~ With the driving gear selected, remove your
foot from the brake pedal and press the ac
celerato r pedal
c:> page 84, Hill hold.
Under certain circumstances, (such as driving
in the mountains or towing a tra iler), it may
be usefu l to switch temporarily to the manual
shift p rogram in order to adjust the gears to
the dr iving condit ions by hand
c:> page 115.
When parking on a level surface, simply place
the selector leve r in the P pos ition. On in
clines, activate the parking bra ke first and
then move the selector lever to the P posit ion
q page 82. This prevents the loc king mecha
nism from being loaded too heavily and wi ll
~ make it easier to move the selector lever out
" iii of the P position.
,...., \!) 1.1"1 ,...., 1.1"1 ,....,
Automa tic tran sm iss ion 113
A WARNING
- The vehicle can roll even when the en
gine is sw itched off.
- Unintended vehicle movement can lead
to serious injuries.
- Never leave your vehicle with the engine running while in gear. If you must leave
your veh icle when the engine is running,
set the parking brake and move these
lector lever to the P position.
- Power is still transferred to the wheels
when the engine is running at idle . To
prevent the vehicle from "c reeping", you
must keep your foot on the brake when
the engine is running and the se lector
lever is in the D, Sor R position or "tip
tronic" mode is selected .
- Do not inadvertently press the accelera
tor peda l when the vehicle is stationary.
Otherwise the vehicle wi ll start to move
immed iate ly, even if the parking brake is
set. Th is could resu lt in a crash.
- Do not press the accelerator pedal when
changing the selector lever position
while the vehicle is stationary and the engine is running.
- Never engage the R or P selector leve l
positions while dr iv ing. It could cause a
crash.
- Before driving down a steep slope, re
duce your speed and shift into a lower
gear with "tiptronic". -
- Do not ride the brakes or press the brake
pedal too often or too long when driving
downhill . Constant braking causes the
brakes to overheat and substantially re
duces braking pe rformance, increases
b ra ki ng distance or causes complete fa il
ure of the brake system.
- I f you must stop on an in cl ine, always
hold the vehicle in place with the foot
bra ke or parking brake to p reven t it from
rolling back .
- Neve r hold the vehicle on an incline with
a slipping clutch . The clutch opens a uto -
matica lly when it becomes too hot from
~
•
Page 116 of 302
114 Automatic tran smi ssion
the overload. The ml indicator light
turns on and a message appears
¢ page 116 when the clutch is overload
ed .
- If the engine must run while you are
working in the eng ine compartment with
the hood open, make sure a gear is not
engaged. The selector lever must be
firmly in the
P pos it ion and locked in
place and the pa rking brake must be set
¢ page 214. Otherwise, the veh icle
cou ld beg in moving when the eng ine
speed is high, even with the parking
brake set.
@ Note
- When stopping on an incline, do not try
to hold the vehicle in place by pressing
the accelerator peda l while a driving gear
i s selected. This can cause the automatic
transmission to overheat and can dam
age it. Set the park ing brake or press the
brake pedal to prevent t he veh icle from
r o lli ng .
- Allow ing the vehicle to roll when the en
gine is stopped and the selector lever is
i n the N pos ition will damage the auto
matic transmission beca use it is not lu
bricated unde r those circu mstances.
- The transm ission can ove rheat and be
damaged under certa in driving and traf
fic conditions such as frequent starts,
creeping for a long time, or s top-and -go
traff ic. W hen the
ml or . indicator
li ght turns on, stop the vehicle at the
next oppo rtunity and let the transmis
s ion coo l
¢ page 116 .
- Allow ing the ve hicle to roll when the en
gine is stopped w ill damage the 5 tron ic
transmission because it is not lubricated
¢ page 2 75, Emergency towing with
commercial tow truck.
(D Tips
For safety reasons, the park ing brake re
leases automatically only when the driver's
door is closed and dr iver's safety be lt is
fastened.
Hill descent control
Applies to veh icles: w ith S tronic transm iss io n
Hill descent control assists the driver when
driving down hills .
Hill descent contro l is activated when these
lector lever is in the Dor 5 position and you
press the brake pedal. The transm ission auto
matically selects a gear that is su itab le for the
incl ine. Hill descent cont ro l tries to ma inta in
t h e speed ac hieved at the t ime of b raking,
within physica l and tec hni cal limitations. If
may sti ll be necessary to ad just the speed
with the brakes . Because hill descent control
cannot shift down farther than 3rd gea r, it
may be necessary to sh ift into t iptronic mode
i n very steep areas . In this case, shift into 1st
or 2nd gear in t iptron ic mode to use the en
gine's brak ing force to relieve the brakes .
Hill descent contro l sw itches off once the h ill
levels out or you press the accelerator pedal.
On vehicles with a cruise contro l system*
¢ page 85, hill descent control is also activat
ed when the speed is set.
A WARNING
--
H ill descent control cannot overcome
physical lim itations, so it may not be ab le
to maintain a constant speed unde r a ll
conditions. A lways be ready to apply the
b rakes.
Page 134 of 302
132 Driving safety
Fl oor mats used in your vehicle must be at
tached to these fasteners. Properly securing
the floor mats will prevent them from sliding into positions that could interfere with the
pedals or impair safe operation of your vehicle
in other ways .
A WARNING
Pedals that cannot move freely can result
in a loss of vehicle contro l and increase the
r isk of serious personal injury.
- Always make sure that floor mats are
properly secured.
- Never place or install floor mats or other
floor coverings in the vehicle that cannot
be properly secured in place to prevent
them from slipping and interfering with
the pedals or the ability to control the
vehicle.
- Never place or insta ll floor mats or other
floor coverings on top of a lready instal
led floor mats. Additional floor mats and
other coverings will reduce the s ize of
the pedal area and interfere with the pedals.
- Always properly reinstall and secure floor
mats that have been taken out for clean
ing.
- Always make sure that objects cannot
fall into the driver footwell wh ile the ve
hicle is moving. Objects can become
trapped under the brake pedal and accel erator pedal causing a loss of veh icle
control.
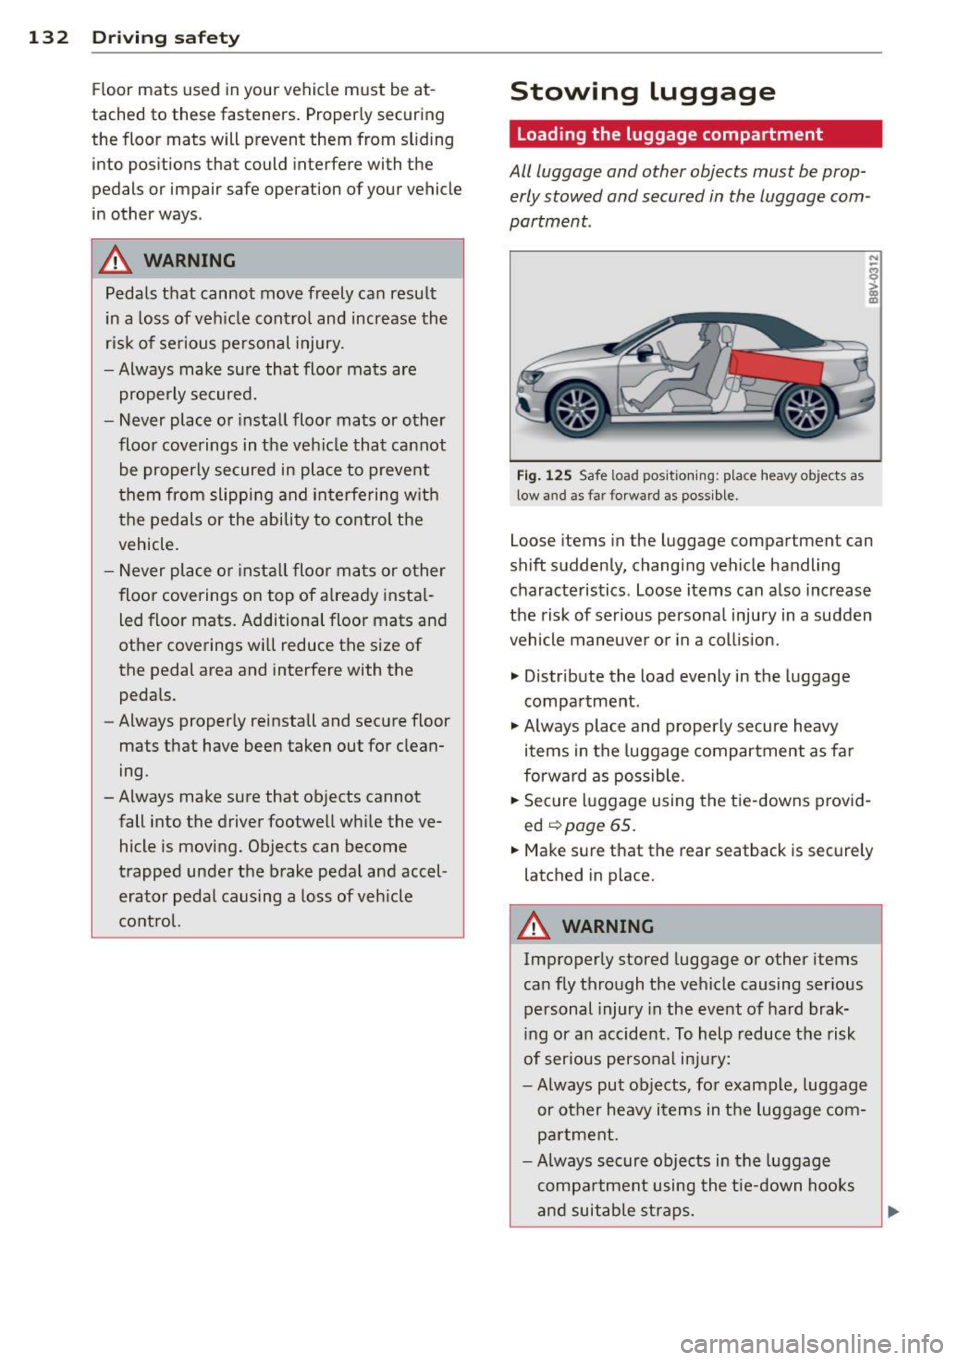
Stowing luggage
Loading the luggage compartment
All luggage and other objects must be prop
erly stowed and secured in the luggage com
partment.
Fig. 125 Safe load positio nin g: place heavy objects as
low and as far forwa rd as possible .
N
-..,
~ C0 m
Loose items in the luggage compartment can
shift suddenly, changing vehicle handling
characteristics. Loose items can also increase
the risk of serious persona l injury in a sudden
vehicle maneuver or in a collis ion.
.,. Distribute the load evenly in the luggage
compartment.
.,. Always place and properly secure heavy
items in the luggage compartment as far
forward as possible.
.,. Secure luggage using the tie-downs prov id
ed
.::,page 65.
.,. Make sure that the rear seatback is securely
latched in place.
A WARNING
-Improperly stored luggage or other items
can fly through the vehicle causing ser ious
personal injury in the event of hard brak
i ng or an accident. To help reduce the risk
of ser ious personal inju ry:
- Always put objects, fo r example, luggage
or other heavy items in the luggage com
partment.
- Always secure objects in the luggage
compartment using the tie-down hooks
and suitable straps.
Page 194 of 302
192 Smart Technology
the brakes. If you need to brake addition
ally, brake in intervals and not continu
ously.
(D Tips
- If the brake booster is not working, you
must press the brake pedal with much
more force then norma l.
- If you retrofit your vehicle with a front
spoiler, wheel covers or similar items,
make sure that the air flow to the front
wheels is not interrupted. Otherwise the
brake system can become too hot.
Electromechanical
steering
The electromechanical steering supports the
driver's steering movements .
Power steering adapts electronically based on
the vehicle speed.
The vehicle still has full steering functionality if the power steering fai ls or when the engine
is stopped (towing). To steer, you must apply
much more force than usual.
Indicator lights and messages
• Do not drive vehicle: steering defective
If this indicator light turns on and stays on
and this message appears, the power steering may have failed.
Do
not continue driving. See an authorized
Audi dea ler or authorized Audi Service Facility
for assistance.
• Do not drive vehicle: steering defective
There is a malfunct ion in the electron ic steer
ing lock. You cannot turn the ign ition on.
Do
not tow your vehicle because it cannot be
steered. See an authorized Aud i dealer or au
thor ized Audi Serv ice Facility for ass istance.
'I j Steering malfunction: you can continue
driving
If the indicator light turns on, the steering
wheel may be more difficult to move or more sensitive than usual.
The stee ring wheel may
also be at an angle when driving straight.
Drive slowly to your authorized Audi dealer or
qualified wo rkshop to have the malf u nct ion
corrected.
II Steering lock : system fault! Please con
tact Service
There is a malfunction in the electronic steer
ing lock .
Drive to an authorized Audi dealer or author
ized Audi Service Facility immediately to have
the malfunction corrected.
A WARNING ,___
Have the system malfunction corrected as
soon as possible by an authorized Aud i
dealer or authorized Audi Service Facility,
as this increases the risk o f an accident.
@ Tips
If the . or ,~ n ind icator light only stays
on for a short tim e, you may continue dr iv
in g.
All wheel drive
(quattro)
Applies to vehicles: with all wheel drive
In all wheel drive, all four wheels are pow
ered.
General information
In all whee l drive, the driving power is divided
between a ll four wheels . This happens auto
matically depending on your driving behavior
as well as the current road conditions. Refer
to
¢ page 188, Electronic stabilization con
trol (£SC) .
The all wheel drive concept is designed for
high engine power. Your vehicle is exception
ally powerful and has excellent driving charac
teristics both under normal driving cond itions
and on snow and ice . Always read and follow
safety p recaut ions
Q ,& . .,.
Page 203 of 302
M N
" > co ,...., \!) ..,.,
,...., ..,., ,....,
Trailer towing Driving with a trailer
General information
Your Audi was designed primarily for passen
ger transportation .
If you plan to tow a tra iler, p lease remember
that the addit ional load will affect durab ility,
economy and performance .
Trailer towing not on ly places more stress on
the vehicle, it also calls for more concentra
tion from the driver.
F or this reason, a lways fo llow the operating
a n d driving instr uctions provided and use
common sense.
Technical requirements
Traile r hitch
Use a weight-carrying hitch conforming to the
gross trailer we ight. The hitch must be suita
b le for your veh icle and trailer and must be
mounted secure ly on t he veh icle's chassis at a
technically sound location . Use only a t railer
h itch w ith a removab le ball moun t. A lways
check with the tr ailer hitch man ufac tur er to
make sure that you are using the correct
hitch.
Do not use a bumper hitch.
T he hitc h must be installed in such a way that
it does not inte rfe re with the impac t-absorb
i ng b umper syst em. No modifica tions should
be made to the vehicle exhaus t and b rake sys
tems . From t ime to time, check that a ll hitch
mo unt ing bolt s remain securely fas tened.
W hen you are not tow ing a trailer, remove the
trai le r hi tch ball moun t. T h is prevents the
hi tch from causing damage sho uld your ve hi
cle be str uck from be hind
¢ &. .
Trailer brakes
If yo ur tra iler is equ ipped w it h a braking sys
tem, check to be su re that it conforms to a ll
r eg ulat io ns .
Trailer towin g 201
The trailer hyd ra ulic bra ke system must not be
direct ly connected to the vehicle's hydraulic
brake system .
Safety chains
Alw ays use saf ety chains between your ve hicle
and t he tra ile r.
Trailer lights
Tra iler lights must meet all reg ulations . Be
su re to check with your Audi dea ler fo r cor re ct
wir ing, swi tches and relays.
Mirrors
If you a re unable to see the traffic behind you
u sing the regula r outside m irrors, then you
must i nsta ll ext ended mir rors . It is important
t h at you
always have clea r vis ion to the rear .
.8, WARNING
-
Afte r removing the trailer hit ch, do no t
s tore i t in yo ur vehicle . In case of sudden
b raking, the h itch cou ld fly forwar d an d in
ju re you or yo ur passengers .
Operating instructions
Maximum trailer weight
A tra ile r fo r you r vehicle is limited to a ty pical
cl ass 1 or class 2 tra ile r.
Trailer load distribution
B e sure the loa d in the tr aile r is held secure ly
i n place to p reven t it from shift ing forw ard,
ba ckward or sideways.
Never allow a passenger to ride in a trailer
¢ &. in Driving instru ctions on page 20 2.
Engine cooling system
Towing a trailer makes the engine work hard
er . It is impo rtant that the cooling system's
perfo rmance is up to the additional load .
Make sure that the coo ling syst em has enough
f lui d.
Tire pressure
When towing a trailer , inflate the tires of your
vehicle to t he cold tire pressure listed under .,..
•
•
•