ESP AUDI A3 CABRIOLET 2016 Owners Manual
[x] Cancel search | Manufacturer: AUDI, Model Year: 2016, Model line: A3 CABRIOLET, Model: AUDI A3 CABRIOLET 2016Pages: 272, PDF Size: 67.88 MB
Page 8 of 272
About this Ow ne r's Manual
This manua l contains important information,
tips, suggestions and warnings for using your ve h icle.
Keep this manua l in yo ur vehicle at all times. This
is especially important if yo u loan your vehicle to
others or sell it.
This owner's manua l describes the
equipment
rang e
specified for this mode l at the time of
printing. Individual equipment options described
may on ly be available at a later date or may on ly
be offered in certain countries.
Some se ct ions in this manua l do not apply to all
vehicles. When this is the case, the beginning o f
the section indicates the
va lidity , for example
"Applies to veh icles: with auxiliary heat ing" . Op
tional or vehicle-spec ific equ ipment is a lso identi
fied with an asterisk"*".
The
illu st ration s are designed as a general guide
and on your vehicle may look s light ly different
than what is illustrated.
There is a
Table of Content s at the beginning of
this owner's manua l that lists a ll of the topics
covered in this book in the order that they ap pear. There is also an alphabetical
Inde x at the
end of this owner's manual.
All
direct ion s, such as "left", "right", "front" and
"rear", are based on the vehicle's direct ion of
travel.
* Optiona l or vehicle -specific equipment
.,._ The section conti nues on the next page.
~ .&. Cross reference to a "WARNING" with in a
section. If a page number is indicated, the
WARN ING is located o uts ide of the section.
&, WARNING
T ex t with this sy mbol con tains info rmation
about safety and how to reduce the risk of se
rious persona l injury or death .
([) Note
6
Text with th is symbol contains info rmation
about reducing the risk of damage to your ve
hicle.
-
® For the sake of the environment
Text with this symbol contains information on protecting the envi ronment .
@ Tips
Text with this symbol contains additional use
ful information.
Page 32 of 272
<( co ..... N
" N ..... 0 r--. > 00
Central locking switch
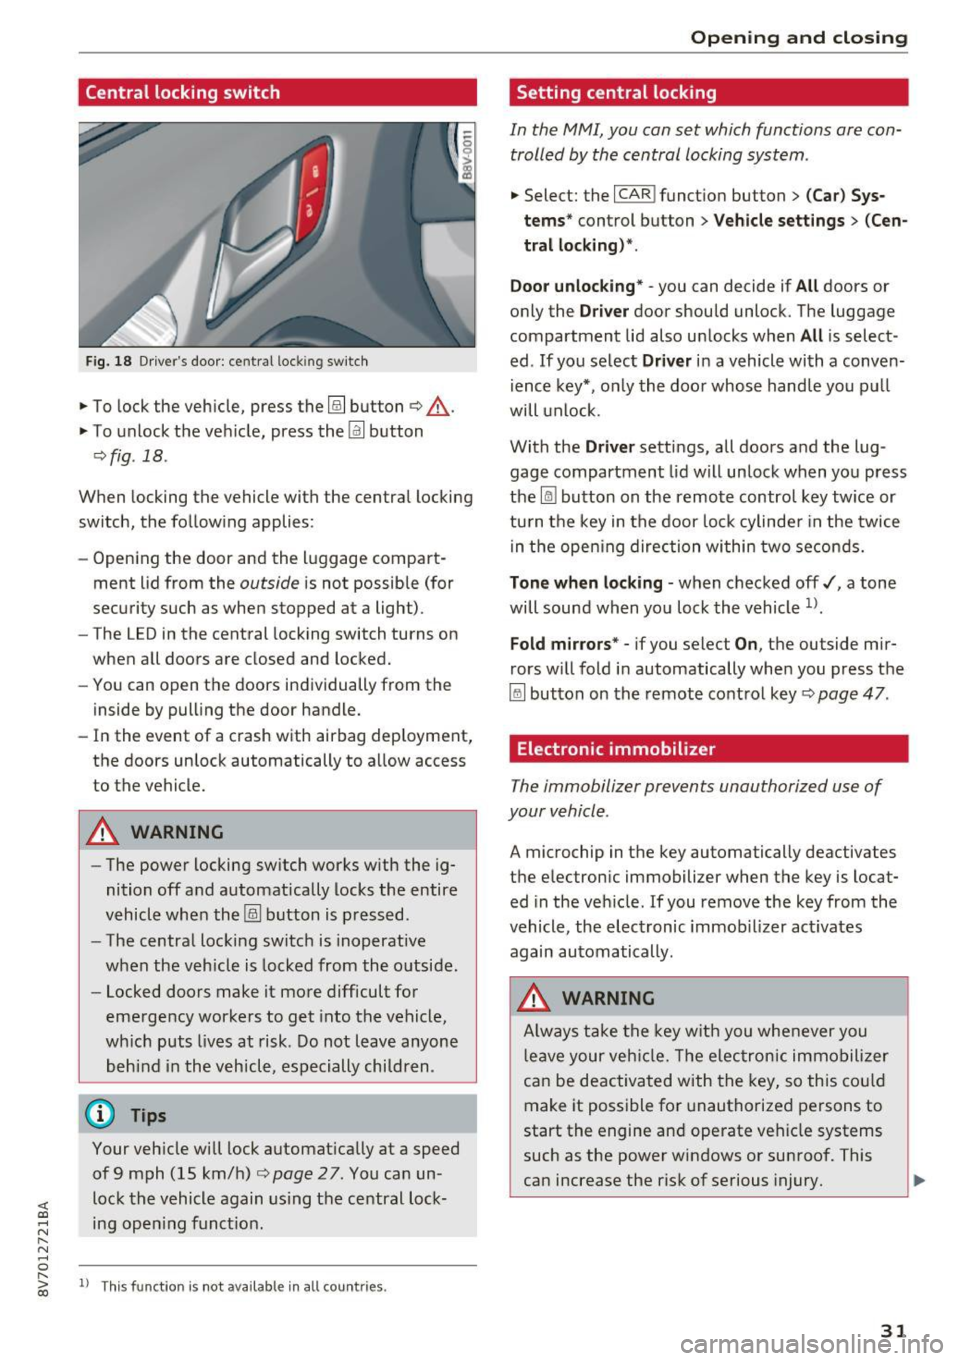
Fig. 18 Dr ive r's door: cent ral loc king sw itch
.,. To lock the veh icle, press the@! button ¢,&. .
.,. To unlock t he ve hicle, press the~ button
qfig . 18 .
When locking the vehicle with the centra l locking
switch, the follow ing applies :
- Open ing the door and the l uggage compart
ment lid from the
outside is not possible (for
security such as when stopped at a light) .
- The LED in the central locking switch turns on
when all doors are closed and locked.
- You can open the doors individually from the
inside by pull ing the door handle.
- In the event of a crash with a irbag dep loyment,
the doors un lock automatically to a llow access
to the vehicle.
A WARNING
- The power locking sw itch works w ith the ig
nition off a nd automatically locks the entire
vehicle wh en the@! button is p ressed.
- The centra l locking switch is inoperative
when the veh icle is locked from the o utside.
- Locked doors make it mo re difficult fo r
eme rgency wor kers to get into the vehicle,
wh ich puts l ives at risk . D o not leave anyone
be hin d in th e veh icl e, especially children .
(!) Tips
Your veh icle w ill lock a utomat ica lly at a speed
of 9 mph (15 km/h)¢
page 27. You can un
loc k the vehicle again using the ce ntral loc k
ing ope ning f unct ion .
ll Thi s fun ctio n is not a vail able in all coun tries.
Open ing and closing
Setting central locking
In the MMI, you can set which functions are con
trolled by the central locking system .
.,. Select: the I CAR ! funct ion button > (Car) Sys
t e ms *
control button > Vehicle settings > (Cen
tral locking)* .
Door unlocking * -
you can decide if All doors or
only the
Driver door shou ld unlock. The luggage
compartment lid also un locks when
All i s select
ed . If you se lect
Driver i n a vehicle wi th a conve n
i ence key*, o nly the doo r whose handle you p ull
will unlock .
Wi th the
Driver settings, all doors a nd the lug
gage compartment lid will un lock when yo u press
the ~ button on the remo te contro l key tw ice or
tu rn t he key in the door lo ck cylinde r in the twice
in the ope ning direc tion wi thin two secon ds.
Tone when locking -when checke d off ,/, a tone
will sound wh en yo u loc k the vehicle
1>.
Fold mirrors * -if you select On , the outside m ir
rors w ill fold in automatically when you press t he
~ but ton on the remote cont ro l key ¢ page 47 .
Electronic immobilizer
The immobilizer prevents unauthorized use of
your v ehicle .
A microchip in the key automatically deactivates
th e e lectron ic immobilizer when the key is locat
ed in the veh icle. If you remove the key from the
vehicle, the elec tronic im m ob ilizer act iva tes
again au tomatically .
A WARNING
Alw ay s t ake t he key w ith y ou whe never y ou
l e ave y our veh icle. The elec tron ic immo bili zer
c an be deactiv ated wit h th e key, so this c ould
make it possible fo r unauthorized persons to
start the engine an d operate veh icle systems
such as the powe r windows or sunroof. This
can increase the risk of se rious injury.
31
Page 34 of 272
<( co ..... N
" N ..... 0
" > 00
A WARNING
Read and follow all WARNINGS¢&. in Key
set on page 2 7
Luggage compartment
Lid
Opening/closing the luggage compartment
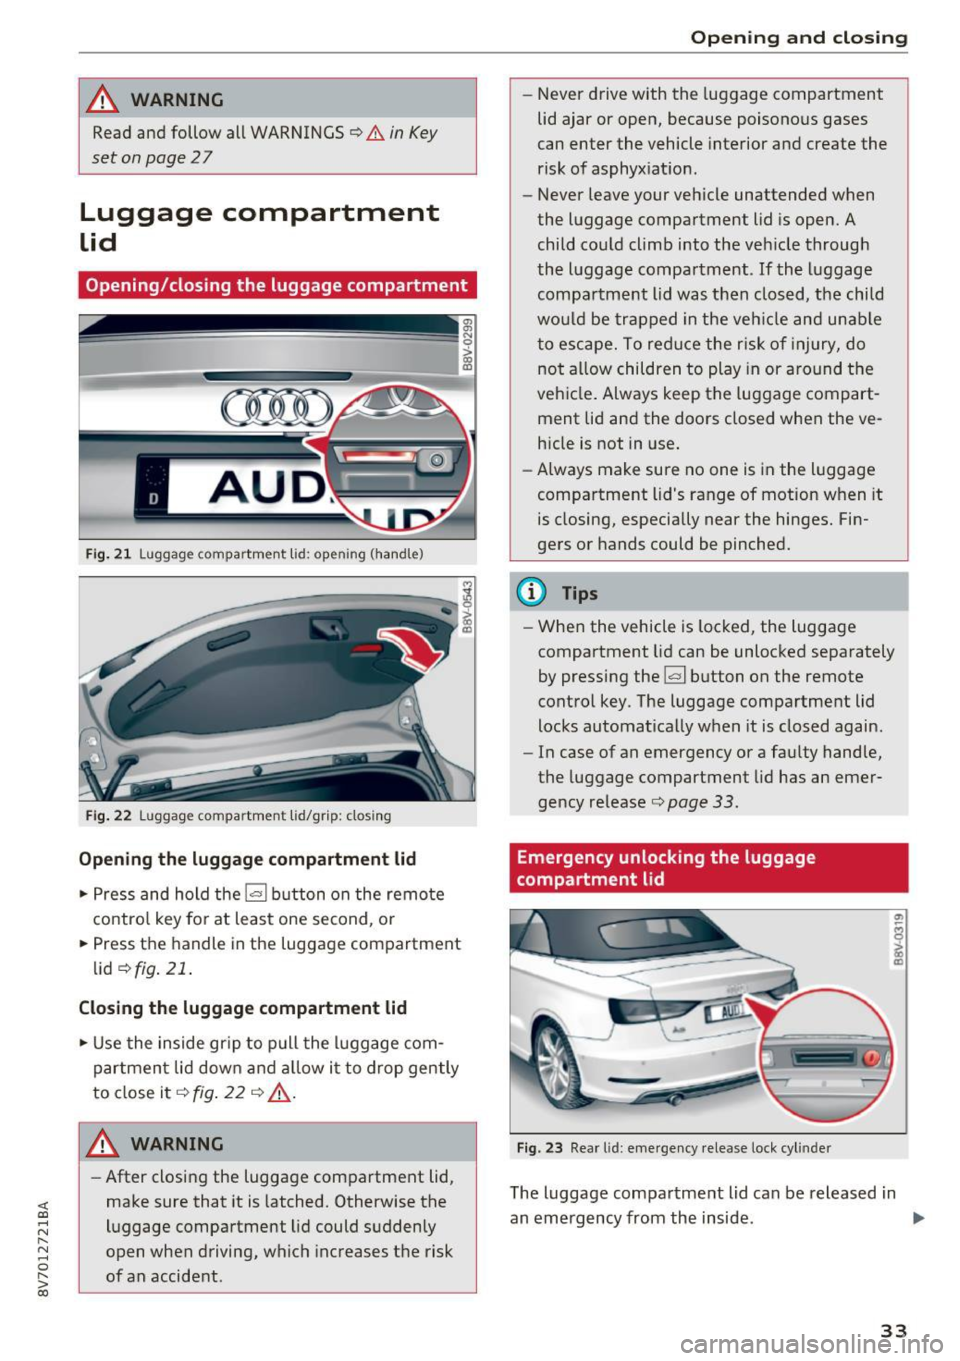
Fig . 21 Luggag e compartm ent lid : op enin g (handle)
Fig . 22 Luggage compartmen t lid/grip: closing
Opening the luggage compartment lid
... Press and hold the l= I button on the remote
control key for at least one second, or
... Press the handle in the luggage compartment
lid
¢ fig . 21.
Closing the luggage compartment lid
... Use the inside gr ip to pull the luggage com
partment lid down and allow it to drop gently
to close it¢
fig . 22 ¢ .&_.
A WARNING 1=
- After closing the luggage compartment lid,
make sure that it is latched. Otherwise the
luggage compartment lid could suddenly
open when driving, which increases the risk
of an accident .
Opening and closing
-Never drive with the luggage compartment
lid ajar or open, because poisonous gases
can enter the vehicle interior and create the
risk of asphyxiation .
- Never leave your vehicle unattended when
the luggage compartment lid is open. A
child could climb into the vehicle through
the luggage compartment .
If the luggage
compartment lid was then closed, the child
would be trapped in the veh icle and unab le
to escape. To reduce the r isk of injury, do
not al low children to play in or around the
vehicle. Always keep the luggage compart
ment lid and the doors closed when the ve hicle is not in use.
- Always make sure no one is in the luggage
compartment lid's range of motion when it
is closing, especially near the hinges. Fin
gers or hands could be pinched.
@ Tips
- When the vehicle is locked, the luggage
compartment lid can be unlocked separately
by pressing the
1£:1 button on the remote
control key. The luggage compartment lid
locks automatically when it is closed again.
- In case of an emergency or a faulty handle,
the luggage compartment lid has an emer
gency release¢
page 33.
Emergency unlocking the luggage
compartment lid
Fig. 23 Rear l id : eme rgency release lock cyl inder
The luggage compartment lid can be released in
an emergency from the inside . ..,_
33
Page 44 of 272
Lights and Vision
Exterior Lighting
Switching lights on and off
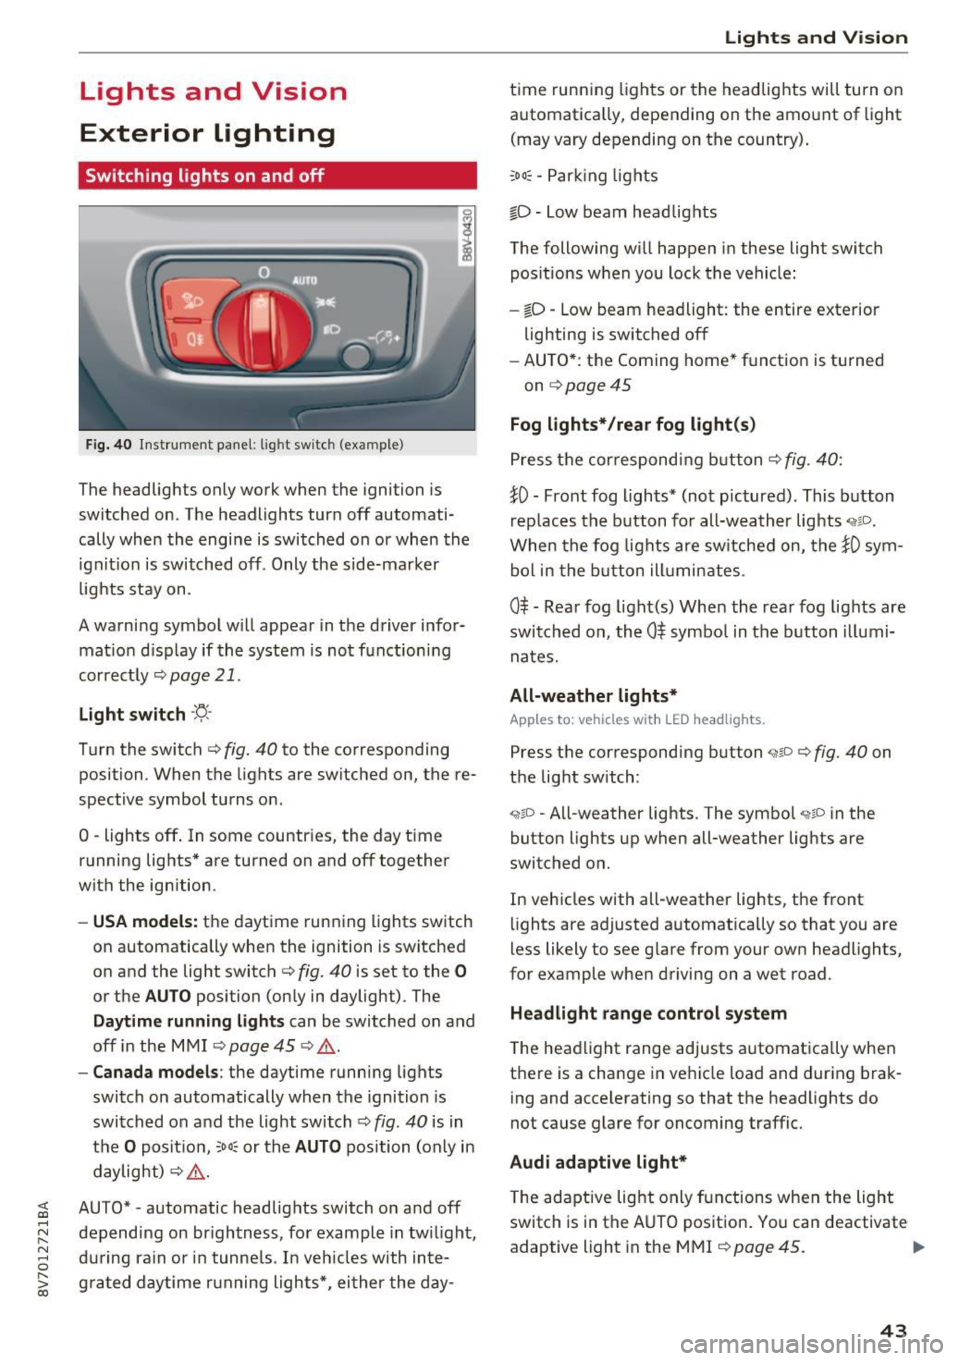
Fig. 40 Instrument panel: l ig ht switc h (example)
The headlights only work when the ignition is
switched on . The headlights turn
off automati
cally when the engine is switched on or when the
i gn it ion is switched off . Only the side-marker
l ights stay on.
A warning symbol will appear in the driver infor mat io n disp lay if the system is not f unction ing
correctly
¢ page 21.
Light s witch ·'ti- ·
Turn the switch c:> fig. 40 to the corresponding
position . When the lights are switched on, the re·
spective symbol turns on .
0 -lights off . In some countries, the day time
running lights* are turned on and
off together
with the ign ition.
- USA model s: the daytime running lights switch
on automatically when the ignition is switched
on and the light switch <=>
fig. 40 is set to the 0
or the AUTO position (only in daylight) . The
Daytim e runn ing ligh ts can be switched on and
off in the MMI ¢ page 45 ¢ .&. .
-Canada model s: the daytime running lights
switch on automatically when the ignition is
switched on and the light switch ¢
fig. 40 is in
the
O posit ion, :oo: or the AUTO position (on ly in
daylight)
c:> ,&. .
;;§ AUTO* -automatic headlig hts switch on and off .....
~ depending on brightness, for example in tw ilight ,
8 during ra in or in tunne ls. In veh icles with inte-
S; g rated day time running lights*, ei ther the day-co
Lights and V ision
t ime running lights or the headlights will turn on
automatica lly, depending on the amo unt of light
(may vary depending on the country) .
:oo: -Par king ligh ts
io -Low beam headlights
The following will happen in these light switch pos itions w hen you lock the vehicle:
- iD -Low beam headlight: the entire exterior
lighting is switched
off
- AU TO *: the Coming home* function is turned
on
¢ page 45
Fog lights* /rear fog light(s )
Press the correspondi ng b utton c:> fig. 40:
tO -Front fog lights* (not pictured) . This b utton
rep laces the b utton for all-wea ther lights
When the fog lights are sw itched on, the tO sym
bol in the b utton ill umin ates .
0$ -Rear fog light(s) When the rea r fog lights are
swi tched on, the
0$ symbo l in the b utton illumi
nates.
All-weather light s*
Apples to : vehicles wit h LED he adlights.
Press the corresponding button ,;ii o ¢ fig. 40 on
the light switch :
"1~D -All-weather lights . The symbol "11D in the
button lights up when all-weather lights are
switched on.
In vehicles with all -weather lights, the front
lights are adjusted automatically so that you are
less likely to see g lare from your own headlights,
for example whe n driving on a wet road.
Headlight range control system
The headlight range adjusts a utomat ically when
t h ere is a change in ve hicle load and during brak
ing and accelerating so that the headlights do
not cause glare for oncoming traffic.
Audi adaptive light*
T he ada ptive lig ht only functions when the light
switch is in the AUTO pos ition . You can deactivate
adaptive light in the MMI
¢ page 45 . ..,.
43
Page 45 of 272
Lights and Vision
When switched on, adaptive light adjusts to
curves depending on the vehicle speed and steer
ing wheel angle. This provides better lighting
through the curve. The system operates in a
speed range from approximately 6 mph (10 km/
h) to 68 mph (110 km/h) .
Static cornering light* -the cornering light
switches on automatically when the steering
wheel is turned at a ce rtain angle at speeds up to
approximately 44 mph (70 km/h) and when the
turn signal is activated at speeds up to approxi
mately 25 mph (40 km/h) . The area to the side of
the vehicle is illuminated better when turning.
Speed dependent light distribution* -The speed
dependent light distribution adapts the light in
towns and on highways or expressways . Intersec
tions can also be illuminated on vehicles with a
navigation system* .
Highway light function*
This function adapts the lighting for highway
driving based on vehicle speed .
A WARNING
-Automatic headlights* are only intended to
assist the driver. They do not relieve the
driver of responsibility to check the head
lights and to turn them on manually accord
ing to the current light and visibility condi
tions. For example, fog cannot be detected by the light sensors . So always switch on the
low beam under these weather conditions
and when driving in the dark ~D.
- Accidents could occur if you can not see the road ahead of you well and if others on the
road cannot see you . Always switch your
headlights on so that you can see the road
ahead of you and others can see your vehicle
from behind.
- The rear fog lights should only be turned on
in accordance with traffic regulations, to
prevent glare for traffic behind your vehicle.
-If the battery has been discharging for a
while, the parking light may switch off auto
matically. Always make sure your vehicle is
parked and adequately lit according to the
44
laws. Avoid using the parking lights for sev
eral hours.
- Please observe legal regulations when using
the lighting systems described.
(D Tips
- The light sensor for the automatic head
lights* is in the rearview mirror mount.
Therefore , do not place any stickers in this
area on the windshield.
- Some exterior lighting functions can be ad
justed
Q page 45.
- If you turn off the ignition while the exterior lights are on and open the door, you will
hear a warning tone.
- In some market-specific versions, the tail
lights do not turn on when switching on the
daytime running lights .
- In cool or damp weather, the inside of the
headlights, turn signals and tail lights can
fog over due to the temperature difference between the inside and outside. They will
clear shortly after switching them on . This
does not affect the service life of the light
ing.
-A message will appear in the instrument
cluster if there is a malfunction in the light
sensor
Q page 21 .
Emergency flasher
Fig. 41 Ins trumen t panel: e merge ncy flasher butto n
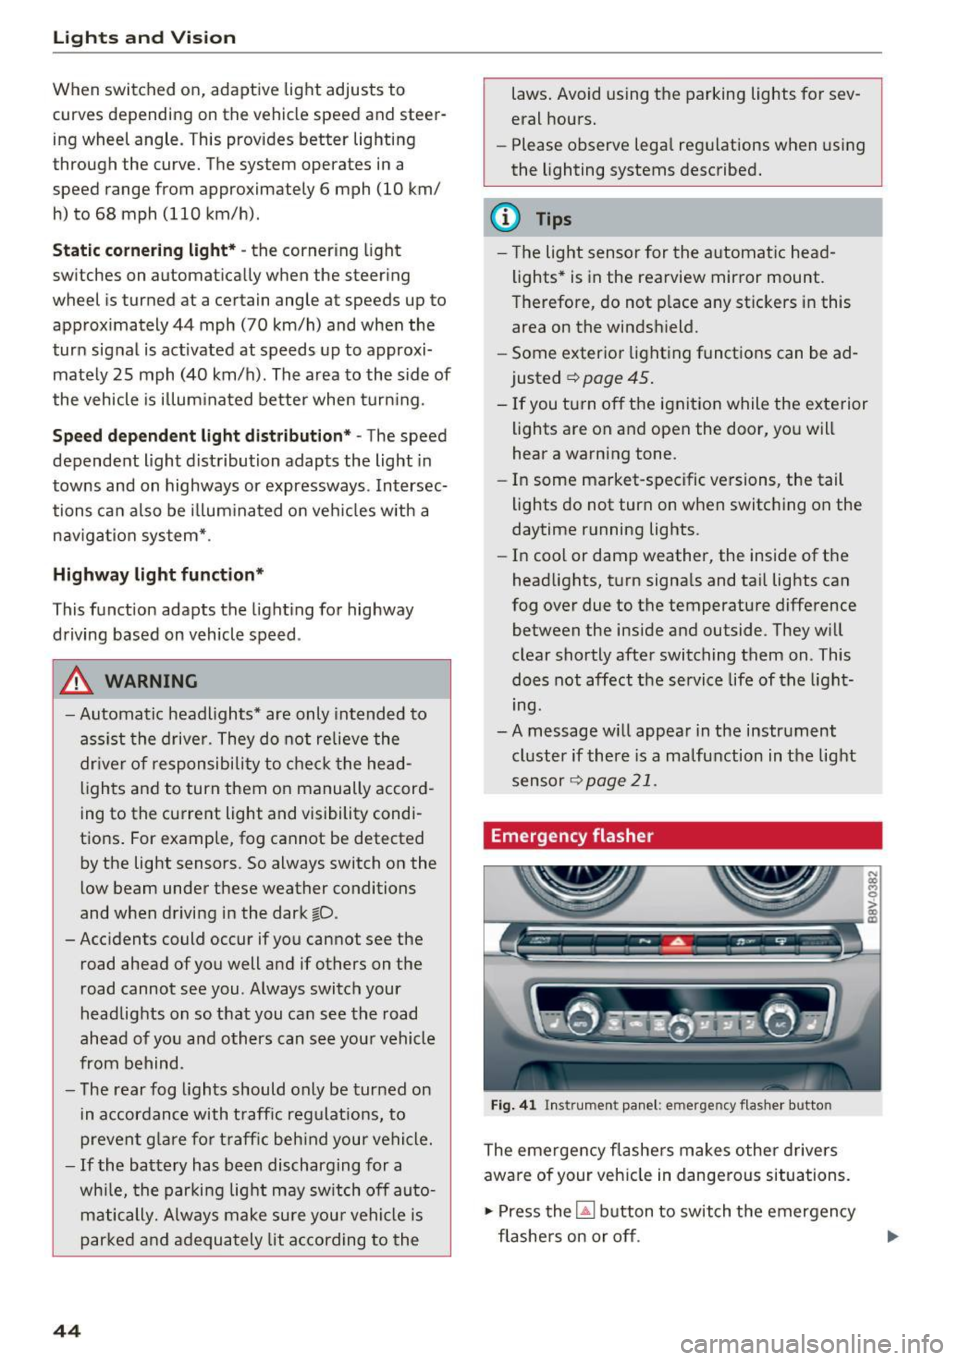
The emergency flashers makes other drivers
aware of your vehicle in dangerous situations.
.,. Press the~ button to switch the emergency
flashers on or off .
Page 46 of 272
<( co ..... N
" N ..... 0 r--. > 00
You can indicate a lane change or a tu rn when the
emergency flas hers are sw itche d on by us ing the
turn sig nal lever . The emergency flashers stop
tempo rarily.
The emergency flashers also work when the igni
tion is tur ned off.
@ Tips
You should s witch the e merge ncy fla shers on
if:
- Y ou a re the la st c ar in a tra ffic j am so th at
a ll ot her vehicles appro ach ing from be hind
ca n see you, or if
- You r vehicle has br oke n do wn or y ou ar e
h aving an eme rgency, or i f
- Y our vehi cle is bei ng towe d or if yo u are
tow ing anot her vehicle.
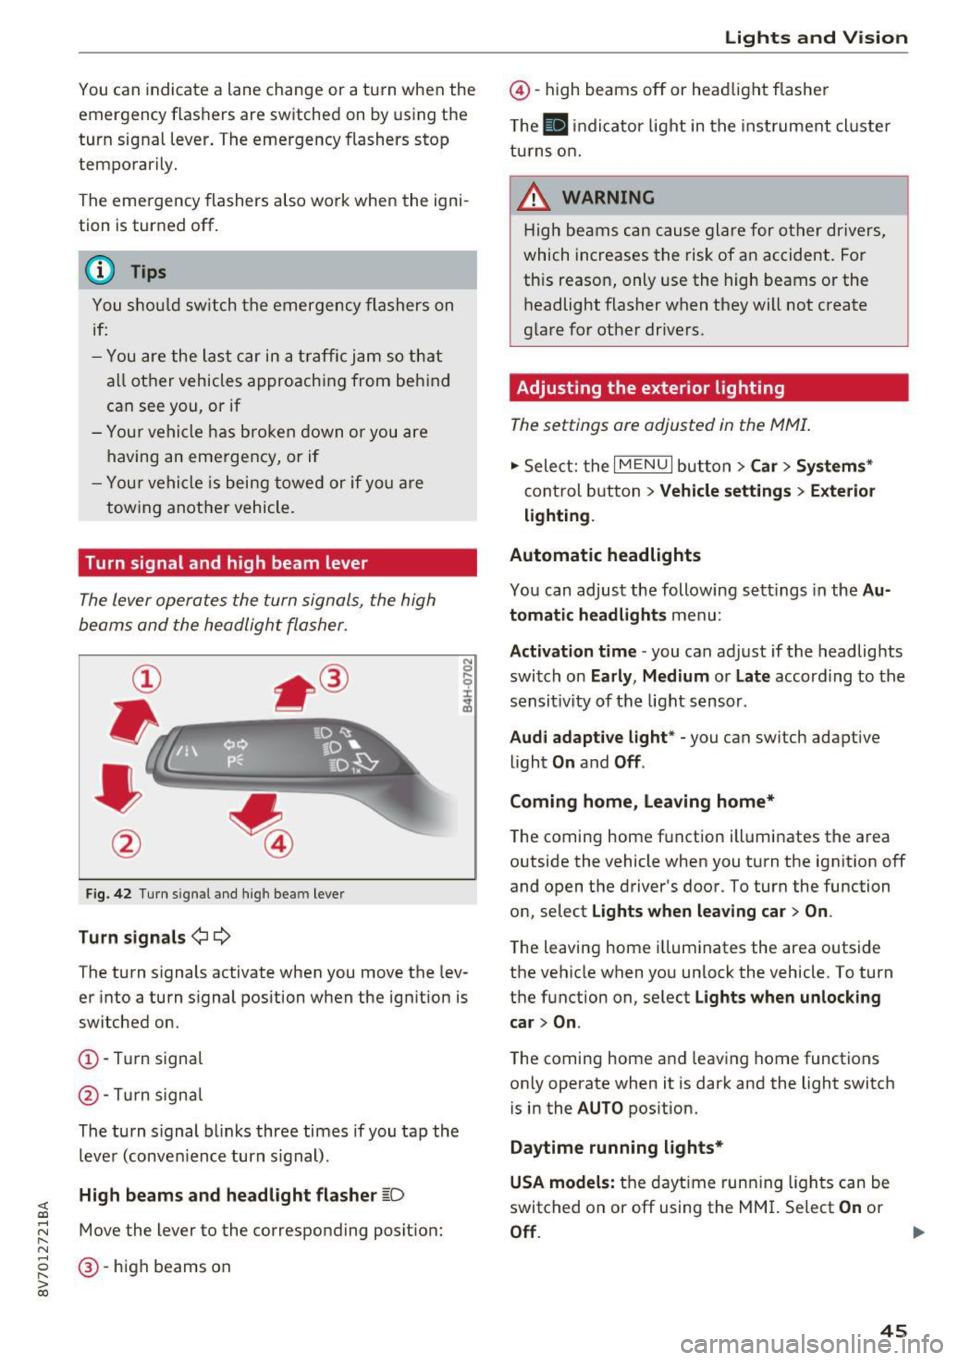
Turn signal and high beam lever
The Lever operates the turn signals, the high
beams and the headlight flasher.
F ig . 42 Turn signal an d high bea m lever
Turn signals ¢i ¢
The turn s ignals activate when you move the lev
er into a turn s ignal position w hen the ignition is
switched on.
(D -Tur n signa l
@-Tur n sign al
The tu rn s ignal bl inks three times if you tap th e
l eve r (conve nience turn s ignal) .
High beams and headlight flasher ~D
Move the lever to the correspond ing posit ion:
@ -high beams on
Lights and V ision
@ -high beams off or he adlight flasher
T he
El in di cato r light in t he inst rument cl uste r
tu rns o n.
_& WARNING
H ig h be ams can cau se gla re fo r ot her dr ivers,
which increases the risk of an accident. Fo r
this reason, only use the high beams or the
h eadlight flasher when they will not create
g la re for ot her dr ivers.
Adjusting the exterior lighting
The settings are adjusted in the MMI.
.,. Sele ct: the I MENU I but to n > Car > Systems *
control b utton > Vehicle settings > Exterior
lighting .
Automatic headlights
Yo u can adjust the following s ettings in the Au
tomatic headlights
menu:
Activation time -you can adjust if the headlights
switch on
Early , Medium or Late accord ing to the
sensit ivity of th e light s ensor .
Audi adaptive light * -you can switch adaptive
li ght
On and Off .
Coming home, leaving home*
T he coming home f unction ill uminates the area
outside the vehicle when you turn the ignit ion off
and open the driver 's door. To turn the function
o n, select
Lights when leaving car > On .
The leaving home i llum inates the area outside
the vehicle when yo u unlock the vehicle. To turn
t h e function on , se lect
Lights when unlocking
car > On .
The coming home a nd leav ing home functions
on ly operate when it is dark and the light switch
is in the
AUTO pos ition.
Daytime running lights*
USA models:
t h e dayt ime run ning lights can be
switched on or off using the MM I. Select
On or
Off . ..,_
45
Page 49 of 272
Lights and Vision
-Applies to vehicles without power folding
outside mirrors: if the mirror housing was
moved by outside forces (such as an impact
when maneuvering), you must move it back
in place by hand.
-If you wash the vehicle in an automatic car
wash, you must fold the exterior mirrors in to reduce the risk of damage to the mirrors.
Never fold power folding exterior m irrors*
by hand . Only fold them in and out using
the power controls.
@ Tips
If the power adjustment fails, both m irrors
can be adjusted by hand by pressing on the
edge of the mirror surface.
Dimming the mirrors
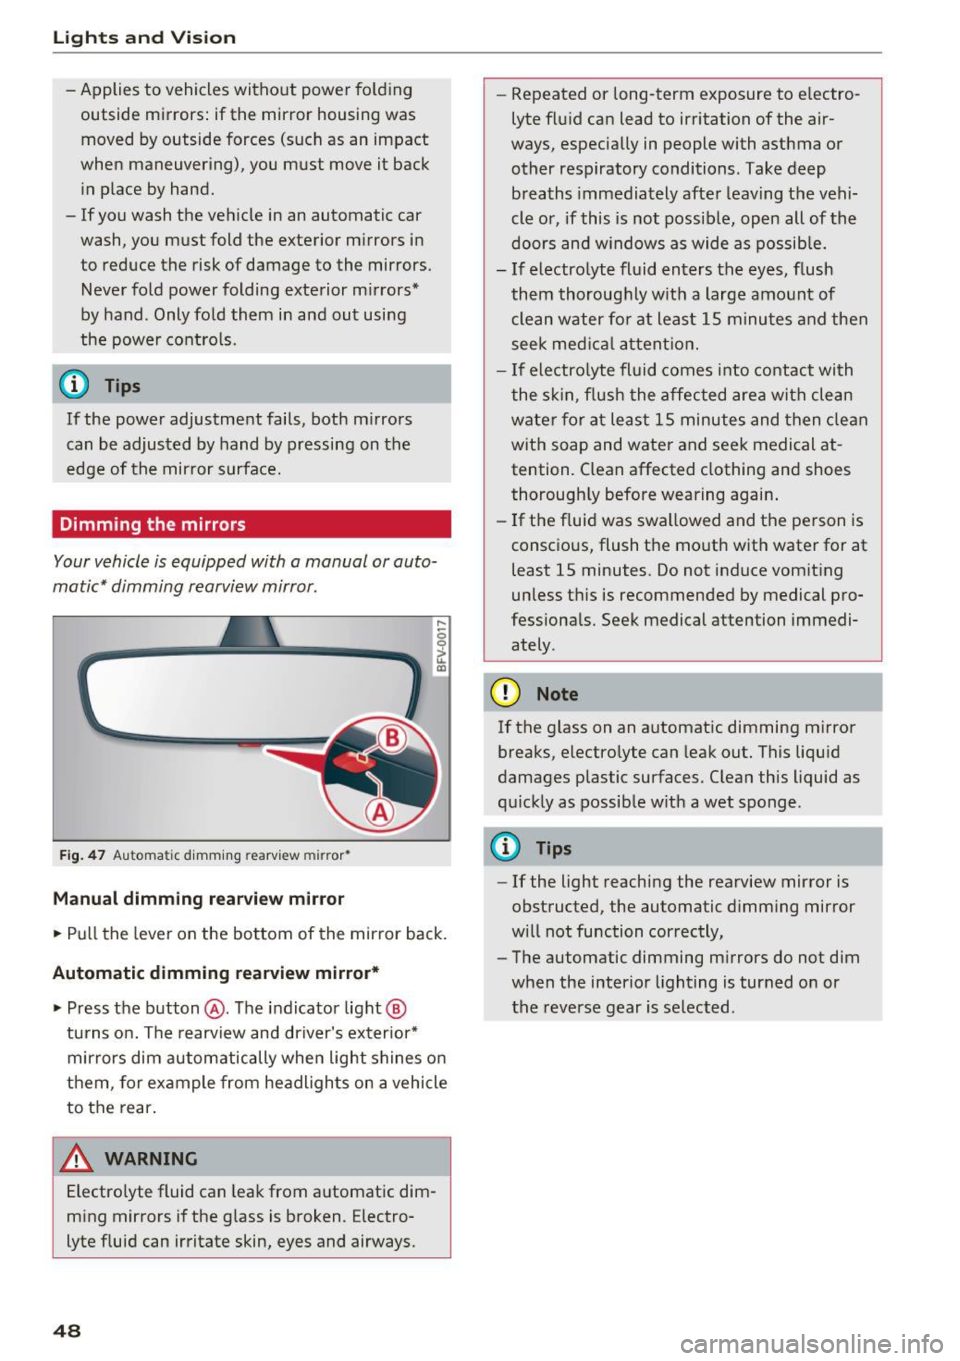
Your vehicle is equipped with a manual or auto
matic* dimming rearview mirror.
F ig . 47 Au toma tic dimming rearv iew mirr or•
Manual dimming rearvi ew mirror
,....
0 0
> u. a,
.. Pull the lever on the bottom of the mirror back.
Automatic dimming rearview mirror* .. Press the button @. The indicator light@
turns on. The rearview and driver's exterior*
mirrors dim automatically when light shines on
them, fo r example from headligh ts on a vehicle
to the rear.
A WARNING
Electrolyte fluid can leak from automatic dim
ming mirrors if the glass is broken. Electro
lyte fluid can irritate skin, eyes and airways.
48
- Repeated or long-term exposure to electro
lyte fluid can lead to irritation of the air
ways, especially in people with asthma or other respiratory conditions. Take deep breaths immediately after leaving the vehi
cle or, if this is not possible, open all of the
doors and w indows as wide as possible.
-If electrolyte fluid enters the eyes, flush
them thoroughly w ith a large amount of
clean water fo r at least 15 m inutes and then
seek medical attention.
- If electro lyte fluid comes into contact with
the skin, flush the affected area with clean
water for at least 15 minutes and then clean
with soap and water and seek medical at
tention. Clean affected clothing and shoes
thorough ly before wearing again .
- If the fluid was swallowed and the person is
consc ious, flush the mouth with water for at
least 15 minutes . Do not induce vomiting
unless th is is recommended by medical pro
fessionals. Seek medical attention immedi ately .
CI) Note
If the glass on an automatic dimming mirror
breaks, electro lyte can leak out. This liquid
damages plastic surfaces. C lean this liquid as
quickly as possible with a wet sponge .
(D Tips
- If the light reaching the rearview mirror is
obstructed, the automatic dimm ing mirror
will not function correctly,
- The automatic dimming m irrors do not dim
when the interior lighting is turned on or
the reverse gear is selected .
Page 50 of 272
<( co ..... N
" N ..... 0 r--. > 00
Sun visors
Fig. 48 Left s ide : sun viso r
The sun visors can be moved out of their brackets
and turned toward the doors
(D.
The mirror light switches on when the cover over
the vanity mirror* @opens.
Windshield wipers
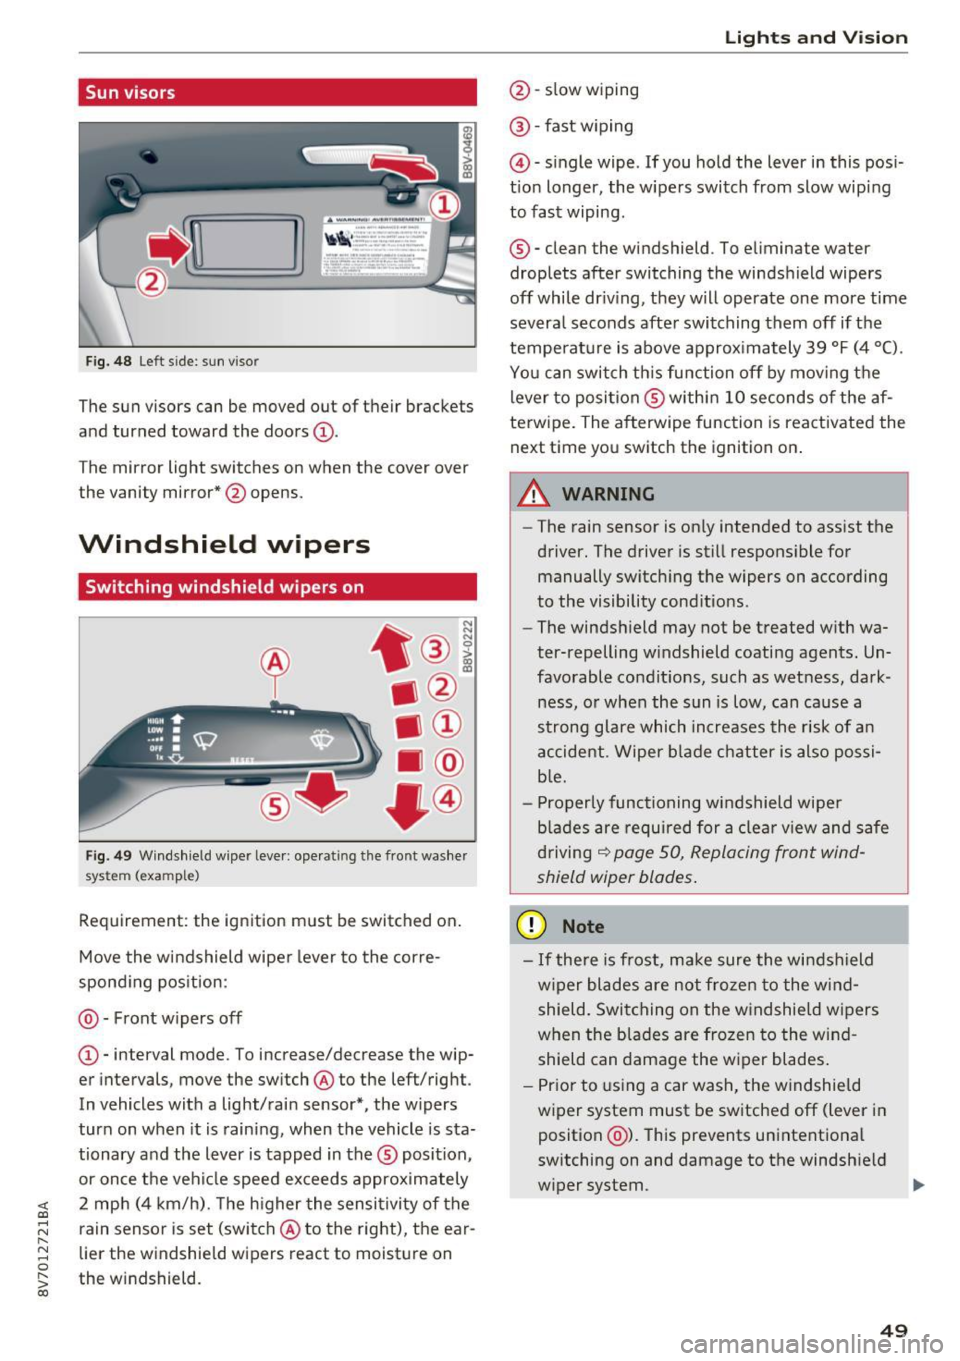
Switching windshield wipers on
Fig. 49 Windshie ld w iper leve r: ope rat ing the front was her
sys tem (exa mple)
Requirement: the ignition must be switched on.
Move the windshield wipe r lever to the corre
spond ing position:
@ - Front w ipers off
@ -interval mode. To increase/decrease the wip
er intervals, move the sw itch @ to the left/right .
In vehicles with a light/rain sensor*, the w ipers
turn on when it is raining, when the vehicle is sta
tionary and the lever is tapped in the ® position ,
or once the vehicle speed exceeds approximately
2 mph (4 km/h). The h igher the sensitivity of the
rain sensor is set (switch @ to the right), the ear
lier the windshield wipers react to moisture on
the w indshield .
Lights and V ision
@ -slow wiping
@ -fast wiping
@ -single wipe . If you hold the lever in this posi
t ion longer, the wipers switch from slow wip ing
to fast wiping .
® -clean the windshield . To e liminate water
droplets after switching the windshield wipers
off while dr iv ing, they w ill operate one more time
severa l seconds afte r switching them off if the
temperature is above approx imately 39 °F (4 °C) .
You can switch this funct ion off by moving the
lever to posi tion ® withi n 10 seconds of the af
terw ipe. The afterwipe function is reactivated the
next time you switch the ignition on.
A WARNING
-
-The rain sensor is on ly intended to assist the
driver. The driver is still respons ible for
manually switching the wipers on according
to the visibility cond itions .
- The windsh ield may not be treated w ith wa
ter-repelling w indshield coating agents. Un
favorable condit ions, such as wetness, dark
ness, o r when the sun is low, can cause a
strong glare which increases the risk of an
accident. Wiper blade chatter is also possi
b le.
- Properly functioning windshield wiper
b lad es are required for a clear view and safe
driving
~ page 50, Replacing front wind
shield wiper blades.
(D Note
-If there is frost, make sure the windshield
w iper blades are not frozen to the wind
shield. Switching on the windshie ld w ipers
when the blades are frozen to the wind
shield can damage the w iper blades.
- Prior to using a car wash, the windshield
w iper system must be switched off (lever in
position @). This prevents unintentional
switching on and damage to the windsh ield
wiper system .
IJIJ.
49
Page 62 of 272

<( co .... N ,.__
N .... 0 ,.__
> co
Warm and cold Climate control system
Description
The climate control system* cools and removes
humidity from the air in the vehicle interior. It is
the most effect ive when the windows and power
top are closed. If there is a build-up of heat in
side the vehicle, ventilation can help to speed up
the cooling process. Because of this, the windows
can be opened from outside.
¢ page 34, Conven
ience opening/closing
Pollutant filter
The pollutant filter removes pollutants such as
dust and pollen from the air.
Key recognition
Different climate control system* settings are
stored and assigned to the remote control key
that is be ing used .
A WARNING
Poor visibility can lead to accidents.
- For safer driving, keep all windows free of
ice, snow and fog.
- Become familiar as quickly as possible with
the correct use and function of the climate
control system, especially with the defrost
ing and defogging function.
- When the temperature is below freezing,
only use the windshield washer system after
the windshield has been warmed by the cli
mate control system. The washer fluid could
Warm and cold
freeze on the windshield and impair visibili
ty.
@ Note
- If you suspect that the climate contro l sys
tem is damaged, switch the system off to
prevent further damage and have it checked
by an authorized Audi dealer or authorized
Audi Service Facility.
- Repairs to the Audi climate control system
require special technical knowledge and
special tools. See an authorized Audi dealer
or authorized Audi Service Fac ility.
@) For the sake of the environment
Reducing the amount of fuel used also re
duces the amount of pollutants that enter the
air.
(D Tips
- To prevent interference with the heating
and cooling output and to prevent the win
dows from fogging over, the air intake in
front of the windshield must be free of ice, snow or leaves.
- Condensation from the cooling system* can dr ip and form a pudd le of water under the
vehicle. This is normal and does not mean
there is a leak.
- The energy management system may switch
the seat heating* or rear window defroster
off temporarily . These systems are available
again as soon as the energy supply has been
restored.
- The flows through the vents under the rear
window. Make sure the openings are not
covered when placing clothing on the lug
gage compartment cover.
61
Page 67 of 272
Driving
If you anticipate what you need to do next and
drive economically, you can easily cut your fuel
consumption by 10-15 percent. This section will
give you some tips on how you can help the envi ronment and your pocketbook.
(D Tips
The consumption estimates as published by ENVIRONMENTAL PROTECTION AGENCY
(EPA) and Transport Canada may not corre
spond to your actual consumption on the
road, which will vary depending upon vehicle
load and speed, road and weather conditions,
trip length, etc.
Drive smoothly and keep a lookout ahead
Vehicles use the most fuel when they are acceler
ating.
.. Avoid unnecessary accelerating and braking .
Vehicles use the most fuel when they are acceler
ating. If you anticipate what is going to happen next, you will need to brake less and, thus, accel
erate less. Let the vehicle coast whenever possi
ble -for example when you see that the next traf
fic light is red.
Avoid full throttle
Driving at moderate speeds saves fuel and im
proves your mileage.
.. Try and keep well below your car's maximum
speed .
Accelerating gently reduces fuel consumption,
engine wear, and does not disturb the environ ment.
Fuel consumption, exhaust emissions and engine
noise increase disproportionately at high speeds.
If you drive at approximately three quarters of
top speed, fuel consumption will be reduced by
one half . Never drive faster than the posted
speed limit and weather conditions permit.
66
· Reducing unnecessary idling
Even when your car is just idling it burns up fuel .
.. Shut the engine off when you are not driving
the vehicle .
.,. Do not warm up the vehicle by letting the en-
gine run at idle .
It is efficient to switch off the engine when stop
ped at railroad crossings and long red lights.
Turning the engine off for just 30 -40 seconds
saves more fuel than is burned by starting the
engine again .
It takes a long time for the engine to warm up
fully when it is running at idle . However, wear
and noxious emissions are especially high when
the engine is warming up . So you should drive
away as soon as you start the engine and avoid running at high rpms while the engine is still
warming up .
@ Note
Do not leave engine idling unattended after
starting. If warning lights should come on to
indicate improper operation, they would go
unheeded. Extended idling also produces
heat, which could result in overheating or
other damage to the vehicle or other proper
ty.
Regular maintenance
A badly tuned engine unnecessarily wastes a lot
of fuel.
.. Have your vehicle serviced at regular intervals.
By having your vehicle regularly serviced by an
Audi dealer helps to ensure that it runs properly
and economically. The condition of your vehicle
not only affects its safety and ability to hold its
value, it also affects
fuel consumption.
Check your oil each time you fill your tank.
The amount of oil used is related to engine load
and speed.
It is normal for the oil consumption of a new en
gine to reach its lowest value after a certain mile -
age has been driven . ..,.