AUDI A3 SEDAN 2018 Owners Manual
Manufacturer: AUDI, Model Year: 2018, Model line: A3 SEDAN, Model: AUDI A3 SEDAN 2018Pages: 404, PDF Size: 62.3 MB
Page 361 of 404
u. 00 .-< N l' N .-< 0 N > 00
for long periods o f time . If leaving the ve
hicle parked for long periods of time, you
should cover the leather to p rotect it from
direct sunlight.
(D Tips
- Insects are easier to remove from paint that
has been fresh ly waxed.
- Regular waxing can prevent rust spots from
forming.
Placing your vehicle out
of service
If you wou ld like to take your vehicle out of serv
ice for a longer time, contact an authorized Audi
dealer or authorized Aud i Serv ice Facility . They
w ill adv ise you of important measures, such as
corros io n protection, se rvice and storage proce
d ur es. A lso follow the information about the ve
hicle battery
¢page 326.
Care and cleaning
359
Page 362 of 404
Emergency assistance
Emergency assistance
Trunk escape latch
Applies to: vehicles with trunk escape latch (Sedan and Cab
r io let)
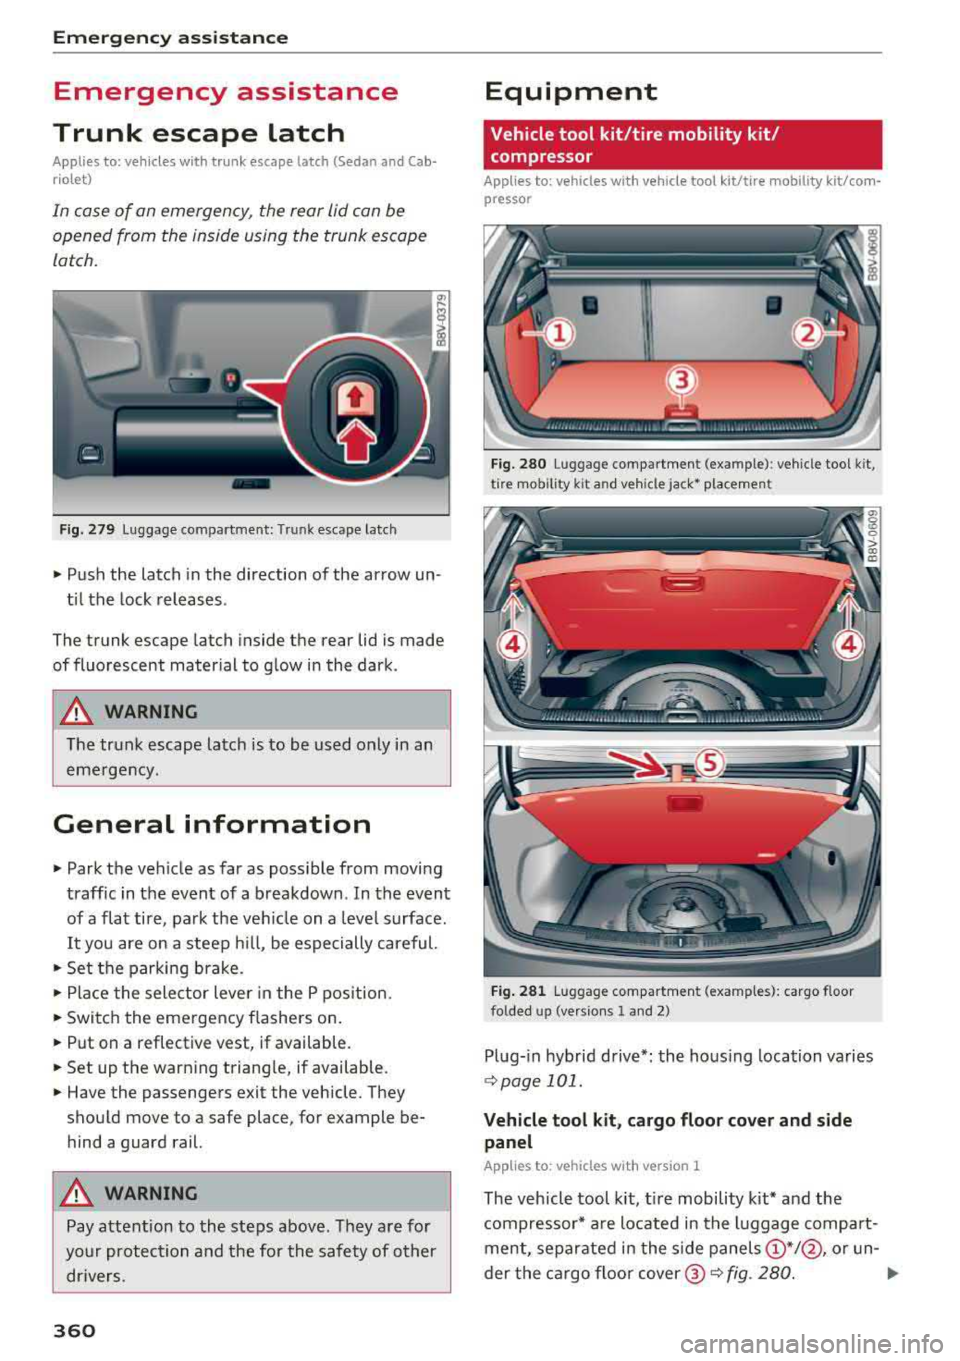
In case of an emergency , the rear lid can be
opened from the inside using the trunk escape
latch.
Fig. 279 L uggage co mpar tment: T runk esc ape latch
• Push the latch in the direction of the arrow un
til the lock releases .
The trunk escape latch inside the rear lid is made
of fluorescent material to glow in the dark .
_&. WARNING
The trunk escape latch is to be used only in an
emergency.
General information
• Park the vehicle as far as possible from moving
traff ic in the event of a breakdown . In the event
of a flat tire , park the vehicle on a leve l surface.
It you are on a steep hill, be especially careful.
• Set the parking brake.
• Place the selector lever in the P pos ition.
• Switch the emergency flashers on.
• Put on a reflective vest, if available.
• Setup the warning triangle, if available.
• Have the passengers exit the vehicle. They
should move to a safe place, for example be
hind a guard rail.
_&. WARNING
Pay attention to the steps above . They are for
your protection and the for the safety of other
dr ivers .
360
Equipment
Vehicle tool kit/tire mobility kit/
compressor
Applies to: vehicles wi th vehicle tool kit/tire mobility kit/com
pressor
Fig. 280 L u ggage compartment (ex ample): ve hicle tool kit,
tire mob ility k it a nd vehicle jack* placemen t
Fig. 281 Lug gage compartment (examp les ): cargo floor
fo lded up (ver sions 1 and 2)
Plug-in hybrid drive*: the hous ing location varies
~ page 101.
Vehicle tool k it , cargo floor cover and side
panel
Applies to: vehicles with version 1
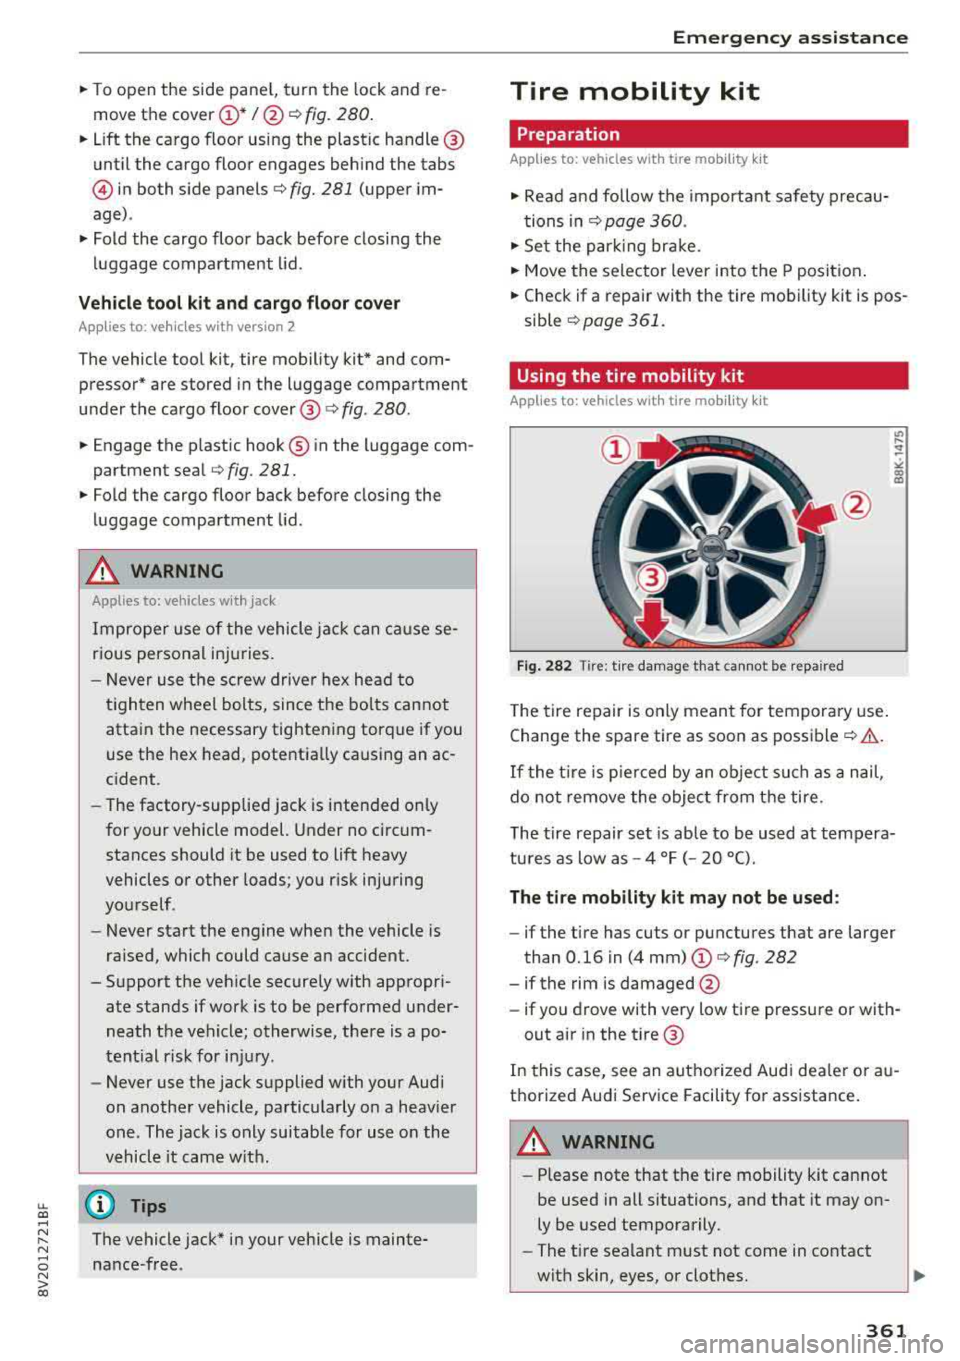
The vehicle tool kit, tir e mobility kit* and the
compressor* are located in the luggage compart
ment, separated in the s ide
panels @*/@ , or un-
der the cargo floor cover @¢
fig. 280. II>-
Page 363 of 404
LL co ..... N
" N ..... 0 N > co
"To open the side panel, turn the lock and re
move the cover
unt il the cargo floor engages beh ind the tabs
@ in both s ide panels¢ fig. 281 (upper im
age) .
" Fold the cargo floor back befo re closing the
luggage compartment lid .
Veh icle tool kit and cargo floor co ve r
App lies to: ve hicles with vers ion 2
The vehicle tool kit, tire mobility kit* and com
pressor* are stored in the luggage compartment
u nder the cargo floor
cover @¢ fig. 280.
"Engage the plastic hook ® in the luggage com-
partment
seal ¢ fig. 281.
" Fold the cargo floor back before closing the
luggage compartment lid .
..&, WARNING
Applies to: vehicles w ith jack
Improper use of the vehicle jac k can ca use se
rious personal injuries.
- Never use the screw drive r hex head to
t ighten whee l bolts, since the bolts cannot
attain the necessary tightening torque if you
use the hex head, potentially causing an ac
cident.
-The factory -supplied jack is intended only
for your vehicle model. Under no circum
stances should it be used to lift heavy
vehicles or other loads; you r isk injuring
yourself.
-Never start the engine when the vehicle is
ra ised, which could cause a n accident.
-Support the veh icle secure ly with appropri
ate stands if work is to be performed under
neath the vehicle; otherwise, there is a po
tent ial risk for injury .
-Never use the jack supplied with your Audi
on another vehicle, particularly on a heav ier
one . The jack is only suitable for use on the
vehicl e it came w ith.
@ Tips
The vehicle jack* in your vehicle is mainte
nance-free.
Em ergen cy as sis tanc e
Tire mobility kit
Preparation
Applies to: veh icles w it h tire mob ility kit
" Read and follow the important safety precau-
tions i n
¢page 360.
"Se t the park ing brake.
" Move the selector lever into the P position .
"Check if a repair with the tire mobi lity kit is pos -
sible
¢ page 361.
Using the tire mobility kit
Applies to: veh icles w it h tire mob ility kit
Fig. 282 Tire : tire damage t hat cannot be repaired
The tire repair is only meant for temporary use .
Change the spare tire as soon as
possible¢ &.
If the t ire is p ie rced by an object su ch as a nail,
do not remove the objec t from t he tire.
The tire repair set is able to be used at tempera
tures as low as -4 °F ( -20 °C) .
The tire mobility kit may not be us ed :
-if the t ire has cuts or punctures that are larger
than 0.16 in (4 mm)
(D ¢ fig. 282
-if the rim is damaged @
-if you drove with very low tire pressure or with-
out air in the tire @
In this case, see an authorized Aud i dea ler o r au
thorized Audi Serv ice Facility for ass istance.
.&_ WARNING
-Please note that the tire mobility kit cannot
be used in all situations, and that it may on
ly be used temporarily .
-The tire sealant must not come in contact
with skin, eyes, or clothes.
361
Page 364 of 404
Emergency assistance
-If tire sealant gets in your eyes or on your
skin, thoroughly rinse the affected area im
mediately with clean water.
-Do not inhale the fumes .
-If you swallow any of the tire sealant, thor-
oughly rinse your mouth immediately and
drink a lot of water. Do not induce vomiting .
Seek medical attention immediately.
-Change your clothes immediately if they get
tire sealant on them.
-If an allergic reaction occurs, seek immedi
ate medical attention .
-Keep the tire sealant away from children .
-In vehicles with a tire pressure monitoring
system*, using tire sealant can results in an
incorrect display or a system malfunction .
Drive carefully to the nearest authorized
Audi dealer or authorized Audi Service Facili
ty.
(D Tips
- If sealant leaks, allow it to dry in place . You
can then peel it off like a sticker .
- Note the expiration date on the sealant bot
tle . Replace the tire sealant at an author
ized Audi dealer or authorized Audi Service
Facility.
- Radio reception can be interrupted when operating the compressor* .
- Obey all laws.
Repairing tires
Applies to: vehicles with tire mob ility kit
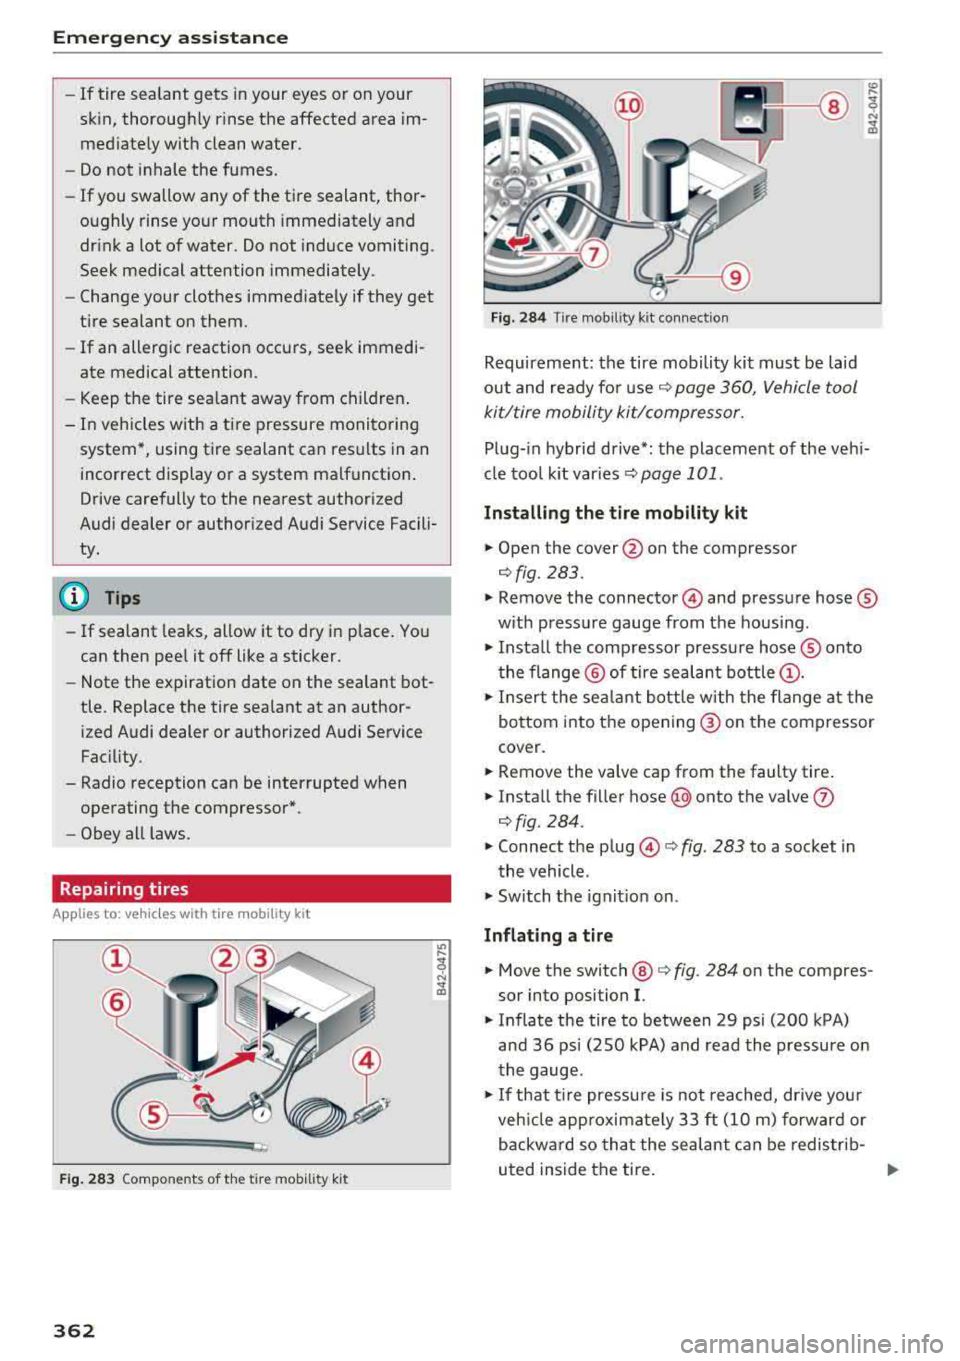
Fig. 283 Compo nents of the tire mobilit y kit
362
Fig. 284 Ti re mobil ity k it connec tion
Requirement: the tire mobility kit must be laid
out and ready fo r
use¢ page 360, Vehicle tool
kit/tire mobility kit/compressor.
;1i
Plug-in hybrid drive*: the placement of the vehi
cle tool kit
var ies ~ page 101 .
Installing the tire mobility kit
"" Open the cover @on the compressor
¢fig. 283.
""Remove the connector © and pressure hose ®
with pressure gauge from the housing .
""Insta ll the compressor pressure hose® onto
the flange @ of tire sealant
bottle @.
""Insert the sealant bottle with the flange at the
bottom into the opening ® on the compressor
cover.
"" Remove the valve cap from the faulty tire .
""Install the filler hose (@ onto the valve (J)
¢fig. 284.
"" Connect the plug ©¢ fig. 283 to a socket in
the vehicle .
.,. Switch the ignition on.
Inflating a tire
"" Move the switch @¢ fig. 284 on the compres
sor into position
I.
"" Inflate the tire to between 29 psi (200 kPA)
and 36 psi (250 kPA) and read the pressure on
the gauge .
""If that tire pressure is not reached, drive your
veh icle approximately 33
ft (10 m) forward or
backward so that the sealant can be redistrib-
uted inside the tire.
..,.
Page 365 of 404
u. 00 .-< N l' N .-< 0 N > 00
A WARNING
-Read and follow the manufacturer's safety
precautions o n the compressor and in th e
in structions on t he bottle of sealant .
- If a tire pressure of 29 ps i (200 kPA) cannot
r e ached after inflating for 6 minutes, then
the tire is too severely damaged . Do not
continue d riving.
- If the t ire cannot be repaired with the tire
sealant, see an authorized Audi dealer or au
tho rized Aud i Serv ice Facility for ass istance.
(D Tips
Do not operate the compressor for more than
six m inutes continuously, or it can overheat.
Once the compressor has coo led, you can con
tinue to use it.
Completing
Applies to: vehicles with tire mobility kit
.,. Affix the st icke r that says "max . S O mph (max .
80 km/h)" that is provided with the tire mobili
ty kit within the driver's field of vision .
.,. Stop the vehicle after driving for about 10 mi
nutes and check the tire pressure.
.,. If the t ire pressure is lower than 19 ps i (130
kPA), then the tire is too severely damaged. Do
not cont inue driving.
A WARNING
Pay attent ion to the following after repair ing
the ti re:
- Do not drive faster than SO mph (80 km/h) .
- Avoid hard acceleration, brak ing sharp ly,
and fast cornering.
- The veh icle may become more diff icult to
control.
- If the t ire is too severely damaged, see an
authorized Audi dealer or authorized Aud i
Service Facility for assistance .
@ For the sake of the environment
You can give the used t ire sealant bottle to an
author ized Audi dealer or authorized Audi
Serv ice Facility for disposal.
Em ergenc y ass is tanc e
(D Tips
Remember to obtain a new bott le of sealant
from an authorized A udi dealer or authorized
Audi Service Fac ility after repairing a tire.
Replacing wheels
Before changing a wheel
Observe the following precautions for your own
and your passenger's safety when changing a wheel.
.,. After you experience a t ire failure, pull the car
we ll away from moving traffic and try to reach
level grou nd befo re yo u stop ¢&, .
.,. All passengers should leave the car and move
t o a safe location ( for ins tance, behind the
gua rdrail) ¢&, .
.,. Engage the pa rking brake to prevent your vehi
cle from rolling unintentiona lly ¢
_A .
.,. Move selector le ver to position P ¢ _A .
... Jfyou are towing a trai ler, unhitch the trailer
from your vehicle.
.,. Take the jack ~ page 360 and the sp a re tire
ca:;, page 369 out of the luggage compartment .
A WARNING
You or you r passengers could be injure d while
ch anging a whee l if you do no t follow these
safety precaut ions :
- If you have a fla t tire, move a safe dis tance
off the road. Turn off the eng ine, turn the
emergency flashers on and use other warn
ing devices to alert other motorists.
- Make sure that passenge rs wait in a safe
p lace away from the vehicle and well away
from the road and traffic.
- To help preven t the vehicle from moving
suddenly and possib ly slipping off the jack,
always fully set the park ing brake and bloc k
the front and back of the wheel diagonally
opposite the wheel being changed. When
one front wheel is lifted off the ground,
p lacing the Au toma tic Transmission in P
(Park) will
not prevent the vehicle from
mov ing.
363
Page 366 of 404
Emergency assistance
-Before you change a wheel, be sure the
ground is level and firm. If necessary, use a
sturdy board under the jack.
-Always store the veh icle tool kit , the jac k
and the replaced tire in the luggage com partment
c:> page 255.
(D Tips
Obey all laws.
Changing a wheel
When you change a wheel, follow the sequence
described below step -by-step and in exactly that
order .
1. Remove the decorative wheel cover*. For
more details see also
c:> page 364, Decor a
tive wheel covers
or c:> page 365, Wheels
with wheel bolt caps.
2 . Loosen the wheel bolts c:> page 365 .
3. Locate the proper mounting point for the
jack and align the jack below tha t point
c:> page 366 .
4. Raise the car w ith the jac k c:> page 366 .
5. Remove t he wheel with the flat tire an d t hen
ins tall
the spare c:> page 367.
6. Tighten all wheel bolts light ly .
7.
Lower the veh icle w ith the jack .
8. Use t he wheel bo lt wrench and
firmly t ighten
all whee l bolts
c:> page 365 .
9. Replace the decorative wheel cover* .
A WARNING
Always read and fo llow all WARNI NGS and in
forma tion
c:> .& in Raising the vehicle on
pag e 366
an d c:> pag e 368 .
After changing a wheel
A wheel change is not complete without the do
ing the following .
.,. Always store the vehicle tool kit, the jack * and
the replaced t ire in the luggage compartment
c:> pag e 255 .
.,. Check the tire pressure on the spare wheel im
m ed iate ly aft er mo unt ing it.
364
.,. As soon as possib le, h ave the tightening tor
ques
on a ll wheel bolts checked with a torq ue
w rench . The correct tighteni ng torq ue is
90 ft lb (120 Nm).
.,. Have the flat t ire replaced as soon as poss ib le .
(D Tips
-If you not ice that the wheel bo lts are cor
roded and d ifficult to turn while c hanging a
t ire , th ey s hou ld be replaced before you
check the t igh tening torque.
-Dr ive at reduced speed until yo u have the
t igh tening torques checked .
- After chang ing a wheel, the tire p ressure in
all four tires must be checked/cor rected and
t h e tire pressure monito ring ind icator must
be stored in th e
MMI r:::;, pag e 349 .
Decorative wheel covers
Applies to: vehicles with decorative wheel covers
The decorative wheel covers must be removed
first to access the wheel bolts .
Fig. 285 Chang ing a whee l: Remov ing t he wh eel cover
Removing
.,. In sert t he hook (p rov ided w ith the vehicle t ool
kit ) in t he hole in the w heel hu b cover.
.,. Pull off the decorative wheel cover c:> fig . 285 .
Page 367 of 404
LL co .... N
" N .... 0 N > co
Wheels with wheel bolt caps
Applies to: ve hicles wit h whee l bo lts w ith ca ps
The cops must be removed first from the wheel
bolts before the bolts con be unscrewed.
Fi g. 286 Changing a wheel: removing the whee l bo lt caps
Removing
.,. Push the pla stic clip (provided wi th the veh icle
tool kit) over the wheel bolt cap unti l the inner
retainers on the clip align with the edge of the
cover.
.,. Remove the cap with the pla stic cli p (vehicle
tool kit)
¢ fig . 286.
Refitting
.,. Place the caps ove r the wheel bo lts and push
them back on.
The caps are to protect and keep the whee l bolts
clean.
Loosening and tightening the wheel bolts
The wheel bolts must be loosened before raising
the vehicle.
F ig. 287 C hanging a wheel: loosening the wheel bo lts
Em ergen cy as sis tanc e
Loosen ing
.,. Slide t he whe el wren ch onto the wheel bo lt as
fa r as it will go.
.,. Take tight hold of the end of the wrench hand le
and turn the wheel bolts
counter-clockwise
about one single turn in the direction of arrow
¢fig. 287.
Tightening
.,. Slide the wheel wrench onto the wheel bo lt as
far as it will go .
.,. Take tight hold of the end of the wrench hand le
and turn each wheel bolt
clo ckw ise until it is
seated.
A WARNING
-- Do not use force or hurry when changi ng a
wheel
-you can cause the vehicle to slip off
the jack and cause ser ious persona l inju ries .
-Do not loosen the wheel bolts more than
on e turn
befo re you raise the veh icle with
the jack.
-Y ou r is k an injury.
(D Tips
- Never use the hexagonal socket in the han
dle of the screwdr iver to loosen or tighten
the whee l bolts.
- If a wheel bo lt is very tight, yo u may find it
easier to loosen by ca refully pushing dow n
on the e nd of the whee l bolt w rench with
one foot only. As you do so, hold on to the
car to keep yo ur balance and take care not
to slip.
365
Page 368 of 404
Emergency assistance
Raising the vehicle
The vehicle must be li~ed with the jack first be
fore the wheel can be removed.
Fig. 288 Sill panels : mark in gs (exa mple)
Fig. 289 Sill : positio nin g th e ve hicle jack
,.. Engage the parking brake to prevent your vehi
cle from rolling unintentionally.
,.. Move the selector lever to position P.
,.. Find the marking (imprint) on the sill that is
nearest the wheel that will be changed
c> fig . 288 . Behind the marking, there is a lift
ing point on the sill for the vehicle jack.
,.. Vehicles with a sill: Note the position of the sill
when positioning the vehicle jack
c::> fig. 289.
,.. Place the vehicle jack (vehicle tool kit) on a firm
surface. Use a flat, stable support if necessary.
On a slippery surface such as tile, you should
use a non-slip pad (such as a rubber mat)
c::> ,&..
,.. Turn the vehicle jack located under the lifting
point on the sill to raise the jack until its arm @
c> fig. 289 is located under the designated plas
tic mount
c::> ,& , c::>G) .
,.. Align the jack so that its arm@ c::> fig. 289 en
gages in the designated lifting point in the door
sill and the movable base @ lies flat on the
ground. The base @ must be
vertical under the
lifting point @.
366
,.. Wind the jack up further until the flat tire
comes off the ground
c::> ,&. .
Position the vehicle jack only under the designat
ed lifting points on the sill
c::>fig. 288. There is ex
actly
one location for each wheel. The jack must
not be positioned at any other location
c::> & c::>(I) .
An unstable surface under the jack can cause the
vehicle to slip off the jack. Always provide a firm
base for the jack on the ground. If necessary
place a sturdy board or similar support under the
jack. On
hard, slippery surfaces (such as tiles)
use a rubber mat or similar to prevent the jack
from slipping
c::> & .
A WARNING -
-You or your passengers could be injured
while changing a wheel if you do not follow
these safety precautions :
-Position the vehicle jack only at the desig
nated lifting points and align the jack.
Otherwise, the vehicle jack could slip and
cause an injury if it does not have suffi
cient hold on the vehicle .
-A soft or unstable surface under the jack
may cause the vehicle to slip off the jack.
Always provide a firm base for the jack on
the ground . If necessary, use a sturdy
board under the jack.
-On hard, slippery surface (such as tiles)
use a rubber mat or similar to prevent the
jack from slipping.
-Only raise your vehicle with the vehicle
jack provided by the factory. If you use a
vehicle jack for another vehicle, your vehi
cle can slide and cause injury.
-Changes in load can affect the height of
the vehicle.
-Never start the engine when the vehicle is
raised, which could cause an accident.
-Support the vehicle securely with appro
priate stands if work is to be performed
underneath the vehicle; otherwise, there
is a potential risk for injury .
-To help prevent injury to yourself and your
passengers:
Page 369 of 404
LL co .... N
" N .... 0 N > co
-Do not raise the v ehicl e until you are sure
the jack is securely engaged .
- Passengers must not rema in in the vehicle
when it is jacked up.
- Make sure that passengers wait in a safe
p lace away from the vehicle and well away
from the road and traff ic.
- Make sure jack position is correct, adjust
as necessary and then cont inue to raise
the jack.
CD Note
Do not li ft the vehicle by the sill. Position the
vehicle jack on ly at the designated lifting
points on the sil l. Otherwise, your vehicle will
be damaged.
Taking the wheel off/installing the spare
Follow th ese instructions st ep-by-step for chang
ing the wheel .
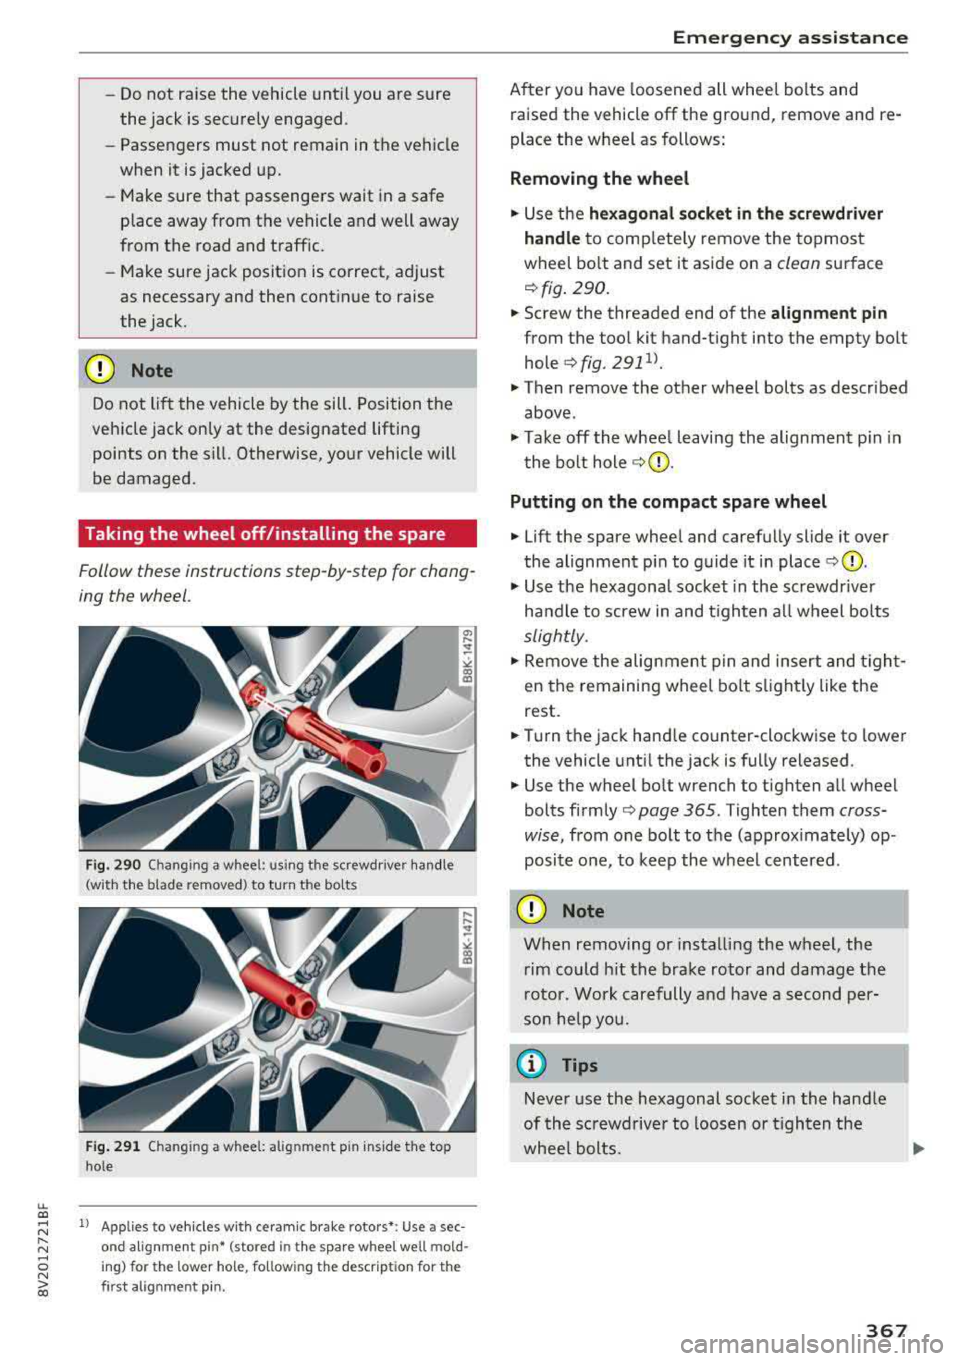
Fig . 2 90 Ch angin g a w hee l: u sin g th e screwdr ive r ha ndle
(with t he bla de remo ved} t o turn t he bolts
F ig. 291 C h anging a w hee l: ali gnm en t pi n in side the to p
h ol e
1l Appli es to veh icles with ceram ic br ake rot ors•: Use a sec
on d alig nme nt pin * (sto re d in t he s pare w hee l we ll mo ld
ing} for the lo w er hole , fo ll o w ing the de scr ip tion for t he
firs t alig nmen t pin .
Em ergen cy as sis tanc e
After you have loosened all whe el bo lts and
raised the vehicle off the gro und, remove and re
place the wheel as follows:
Removing the wheel
.,. Use the hexagonal socket in the screwdriver
handle
t o comp letely remove the topmost
wheel bo lt and set i t aside on a
clean su rface
r=> fig. 290.
.,. Screw the threaded end of the alignment pin
from the too l kit hand-tight into the empty bo lt
hole
c> fig . 2911>.
.,. Then remove the other wheel bolts as descr ibed
above .
.,. Take off the whee l leaving the alignment p in in
the bolt hole
~ 0-
Putting on the comp act spare wheel
.,. Lift the spare wheel and carefully slide it over
the alignment p in to guide it in
place r=>@.
.,. Use the hexagonal socket in the screwdr iver
ha ndle to screw in and t igh ten all wheel bolts
slightly .
.,. Remove the alignmen t pin and insert and t igh t
en the remaining wheel bo lt s light ly like the
rest .
.,. Tu rn the jack hand le counter-clockwise to lowe r
the vehicle until the jack is fully released .
.,. Use the wheel bolt wrench to tighten a ll wheel
bolts firmly
c> page 365 . Tighten them cross
wise,
from one bo lt to the (approx imately) op
posite one , to keep the wheel centered .
CD Note
When removing or installing the wheel , the
r im could h it the brake rotor and damage the
r otor. Work carefully and have a second per
son help you.
@ Tips
Never use the hexagonal socket in the handle
of the sc rewdrive r to loosen or t ighten the
whee l bolts.
367
Page 370 of 404
Emergency assistance
-Pull th e revers ible blade from the sc rew driv
e r before you use the he xag onal socket in
the handle t o turn the w heel bo lts .
- W hen mounting ti res w ith
unidirectional
tread design
make sure the t read pattern is
po inted the r igh t way
c> page 36 8.
-The wheel bolts should be clea n and easy to
turn . C heck for di rt and c orros io n on t he
mating surfaces o f both the wheel an d the
hu b. Remove all dirt from t hese surfaces be
fo re r emo untin g the wheel.
Tires with unidirectional tread design
Tires with unidirectional tread design must be
mount ed with th eir tread pattern pointed in the
right direction .
Using a spare tire with a tread pattern
intended for use in a specific direction
W hen using a spare ti re with a tread patte rn in
tended fo r use in a spec ific d ir e ction, please note
t he following:
- The direct ion of rotat io n is marked by an a rrow
o n the side of the tire.
- If the spare tire has to be installed in the incor
r ect d irection, use the spare tire only tempora
r ily s ince the t ire w ill not be ab le to achieve its
o pti mum p erf ormance c harac ter istics wi th re
gard to a quaplaning, noise and wea r.
- We recommen d that you pay particular atten
t ion to this fac t during wet weathe r and that
yo u adju st yo ur spe ed to match roa d condi
tio ns.
- Replace t he flat t ire with a new one and have i t
in stall ed on yo ur vehicle as soon as possible to
r e stor e th e han dling adv antage s of a un id ir e c
ti on al ti re.
Notes on wheel changing
Please read the info rmation c> page 33 7 if you
are going to use a spare tire which is different
from the tires on yo ur vehicle .
Afte r you change a tire:
-Check the tire pressure on the spare immedi
ately after installation.
368
- Have the wheel bolt tightening torque
checked with a torque wrench as soon as pos
sible by your authorized Audi dealer or a
qualified service station.
- With steel and alloy wheel rims, the wheel
bolts are correctly tightened at a torque of
90 ft lbs (120 Nm).
- If you notice that the wheel bolts are corroded
and difficult to turn while changing a tire ,
they should be replaced before you check the
tightening torque .
- Replace the flat tire with a new one and have
it installed on your vehicle as soon as possi
ble. Remount the wheel cover.
Until then, drive with extra care and at reduced
speeds.
A WARNING
- If you are goi ng t o equip yo ur vehicle with
t ires or r ims which diffe r from those which
wer e fac to ry install ed, th en be su re to read
t he infor matio n
c> pag e 33 7.
- Always mak e sure th e damag ed wheel or
e ve n a fl at tire and th e jack and to ol kit ar e
pr op erl y se cure d in t he l uggage com part
me nt a nd are no t loos e in the pass eng er
c omp artment.
- In a n ac cide nt or sudde n maneuver they
co uld fly forw ard, i njuring a nyon e in the ve
h icle.
- Alway s store damage d wheel, j ack a nd too ls
secure ly in the lu g gage compa rt ment. O th
erwise, in an a cci den t or sudden maneuve r
they cou ld fly forwar d, cau sing injury to pas
sen gers in the veh icle.
-