AUDI A4 1997 B5 / 1.G 01A Transmission Torsen Differential Assembly Workshop Manual
A4 1997 B5 / 1.G
AUDI
AUDI
https://www.carmanualsonline.info/img/6/1258/w960_1258-0.png
AUDI A4 1997 B5 / 1.G 01A Transmission Torsen Differential Assembly Workshop Manual
Page 1 of 13
34-68
Torsen differential,
disassembling and
assembling
Special tools and equipment
VW401 and VW402 thrust plate
VW407 punch
VW412 punch
VW416B tube
VW421 tube
VW439 guide pin
VW519 sleeve
VW681 extractor lever
VW771/15 threaded piece from VW771 slide
hammer-complete set
40-21 sleeve
Pa
ge 1 of 13 Torsen differential, disassemblin
g and assemblin
g
11/19/2002 htt
p://127.0.0.1:8080/audi/servlet/Dis
play?action=Goto&t
yp
e=re
pair&id=AUDI.B5.TM02.34.6
Page 2 of 13
2040 press tube
3002 pressure piece
Kukko 17/2 separating tool
Kukko 21/4 extractor
Pa
ge 2 of 13 Torsen differential, disassemblin
g and assemblin
g
11/19/2002 htt
p://127.0.0.1:8080/audi/servlet/Dis
play?action=Goto&t
yp
e=re
pair&id=AUDI.B5.TM02.34.6
Page 3 of 13
34-69
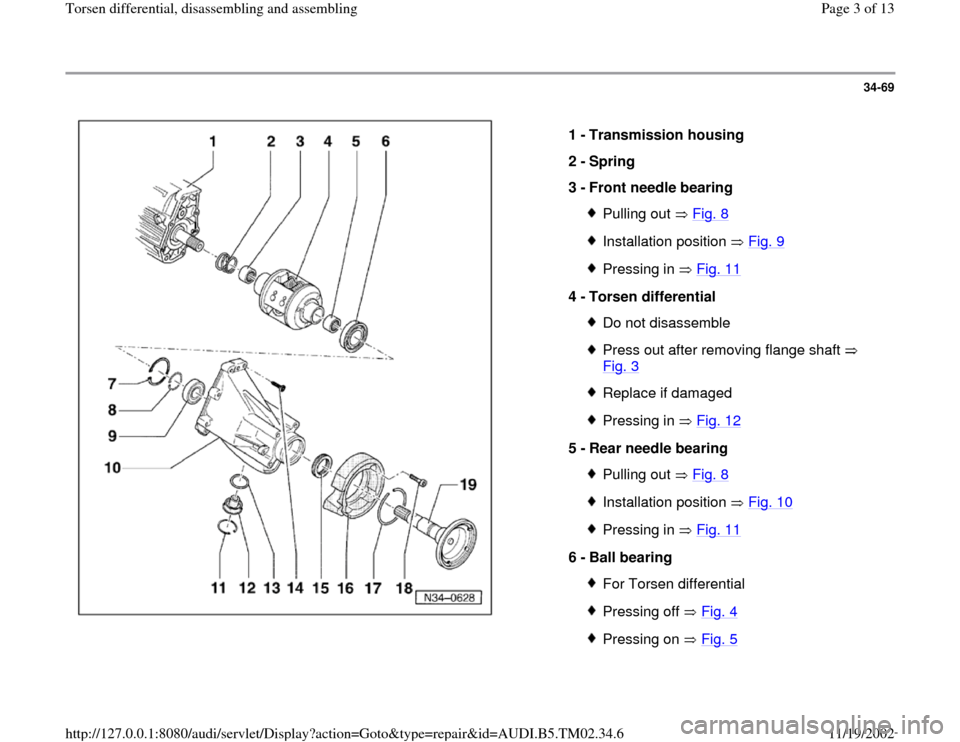
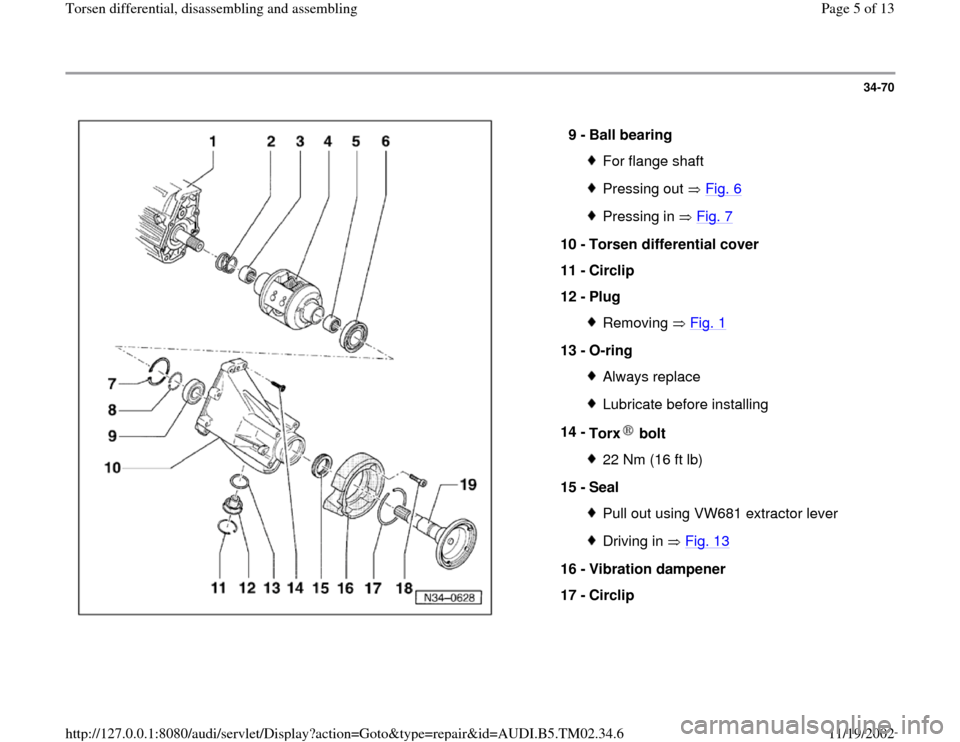
1 -
Transmission housing
2 -
Spring
3 -
Front needle bearing
Pulling out Fig. 8Installation position Fig. 9Pressing in Fig. 11
4 -
Torsen differential
Do not disassemblePress out after removing flange shaft
Fig. 3
Replace if damagedPressing in Fig. 12
5 -
Rear needle bearing
Pulling out Fig. 8Installation position Fig. 10Pressing in Fig. 11
6 -
Ball bearing
For Torsen differentialPressing off Fig. 4Pressing on Fig. 5
Pa
ge 3 of 13 Torsen differential, disassemblin
g and assemblin
g
11/19/2002 htt
p://127.0.0.1:8080/audi/servlet/Dis
play?action=Goto&t
yp
e=re
pair&id=AUDI.B5.TM02.34.6
Page 4 of 13
7 -
Circlip
8 -
Circlip
Remove and install together with flange
shaft Fig. 2
Pa
ge 4 of 13 Torsen differential, disassemblin
g and assemblin
g
11/19/2002 htt
p://127.0.0.1:8080/audi/servlet/Dis
play?action=Goto&t
yp
e=re
pair&id=AUDI.B5.TM02.34.6
Page 5 of 13
34-70
9 -
Ball bearing
For flange shaftPressing out Fig. 6Pressing in Fig. 7
10 -
Torsen differential cover
11 -
Circlip
12 -
Plug
Removing Fig. 1
13 -
O-ring
Always replaceLubricate before installing
14 -
Torx bolt 22 Nm (16 ft lb)
15 -
Seal Pull out using VW681 extractor leverDriving in Fig. 13
16 -
Vibration dampener
17 -
Circlip
Pa
ge 5 of 13 Torsen differential, disassemblin
g and assemblin
g
11/19/2002 htt
p://127.0.0.1:8080/audi/servlet/Dis
play?action=Goto&t
yp
e=re
pair&id=AUDI.B5.TM02.34.6
Page 6 of 13
34-71
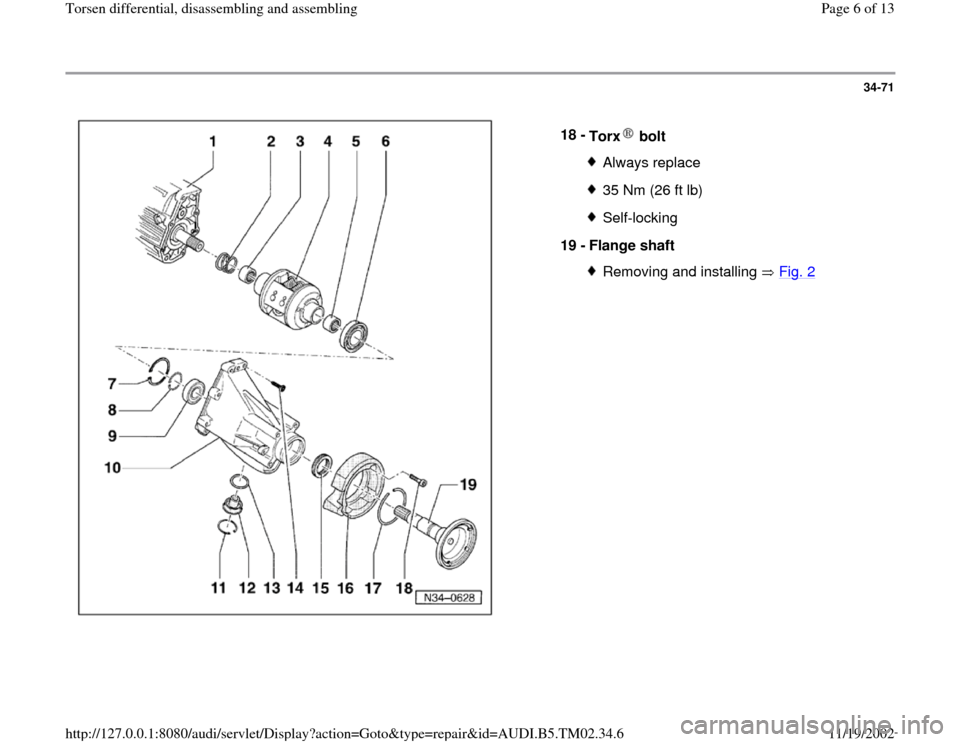
18 -
Torx bolt
Always replace35 Nm (26 ft lb)Self-locking
19 -
Flange shaft Removing and installing Fig. 2
Pa
ge 6 of 13 Torsen differential, disassemblin
g and assemblin
g
11/19/2002 htt
p://127.0.0.1:8080/audi/servlet/Dis
play?action=Goto&t
yp
e=re
pair&id=AUDI.B5.TM02.34.6
Page 7 of 13
34-72
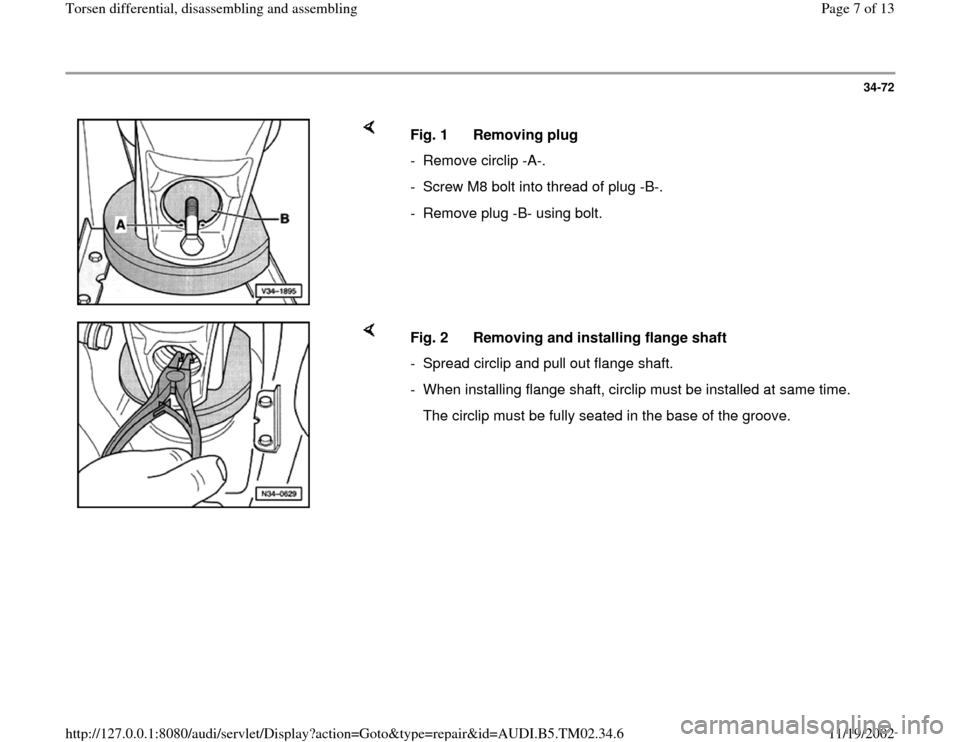
Fig. 1 Removing plug
- Remove circlip -A-.
- Screw M8 bolt into thread of plug -B-.
- Remove plug -B- using bolt.
Fig. 2 Removing and installing flange shaft
- Spread circlip and pull out flange shaft.
- When installing flange shaft, circlip must be installed at same time.
The circlip must be fully seated in the base of the groove.
Pa
ge 7 of 13 Torsen differential, disassemblin
g and assemblin
g
11/19/2002 htt
p://127.0.0.1:8080/audi/servlet/Dis
play?action=Goto&t
yp
e=re
pair&id=AUDI.B5.TM02.34.6
Page 8 of 13
34-73
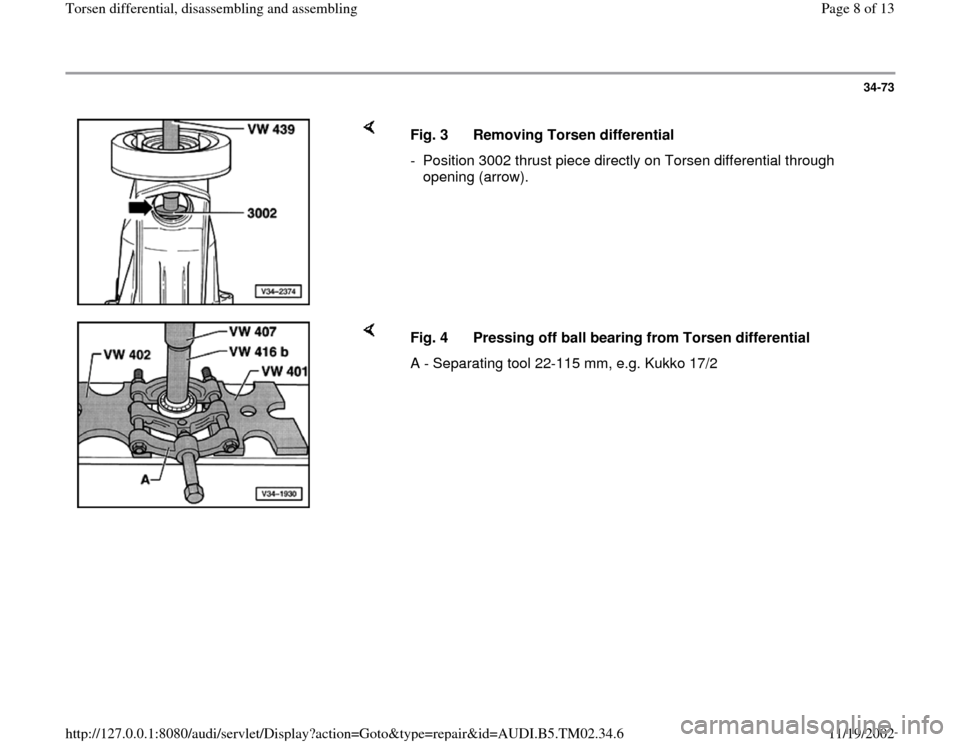
Fig. 3 Removing Torsen differential
- Position 3002 thrust piece directly on Torsen differential through
opening (arrow).
Fig. 4 Pressing off ball bearing from Torsen differential
A - Separating tool 22-115 mm, e.g. Kukko 17/2
Pa
ge 8 of 13 Torsen differential, disassemblin
g and assemblin
g
11/19/2002 htt
p://127.0.0.1:8080/audi/servlet/Dis
play?action=Goto&t
yp
e=re
pair&id=AUDI.B5.TM02.34.6
Page 9 of 13
34-74
Fig. 5 Pressing ball bearing onto Torsen differential
- Press ball bearing on until stop is reached.
Fig. 6 Pressing out ball bearing for flange shaft
- Remove circlip before pressing out bearing.
Pa
ge 9 of 13 Torsen differential, disassemblin
g and assemblin
g
11/19/2002 htt
p://127.0.0.1:8080/audi/servlet/Dis
play?action=Goto&t
yp
e=re
pair&id=AUDI.B5.TM02.34.6
Page 10 of 13
34-75
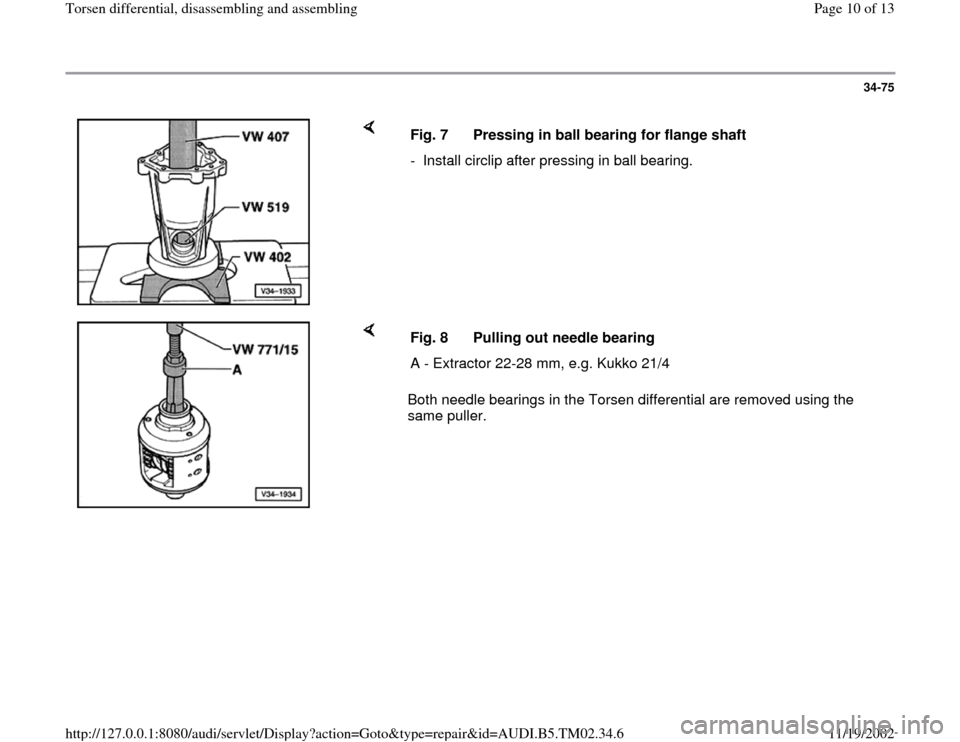
Fig. 7 Pressing in ball bearing for flange shaft
- Install circlip after pressing in ball bearing.
Both needle bearings in the Torsen differential are removed using the
same puller. Fig. 8 Pulling out needle bearing
A - Extractor 22-28 mm, e.g. Kukko 21/4
Pa
ge 10 of 13 Torsen differential, disassemblin
g and assemblin
g
11/19/2002 htt
p://127.0.0.1:8080/audi/servlet/Dis
play?action=Goto&t
yp
e=re
pair&id=AUDI.B5.TM02.34.6
