airbag AUDI A4 1997 B5 / 1.G Airbag Service Repair Manual
[x] Cancel search | Manufacturer: AUDI, Model Year: 1997, Model line: A4, Model: AUDI A4 1997 B5 / 1.GPages: 75, PDF Size: 0.91 MB
Page 61 of 75
69-89
WARNING!
Always follow installation sequence for side
curtain airbag.
WARNING!
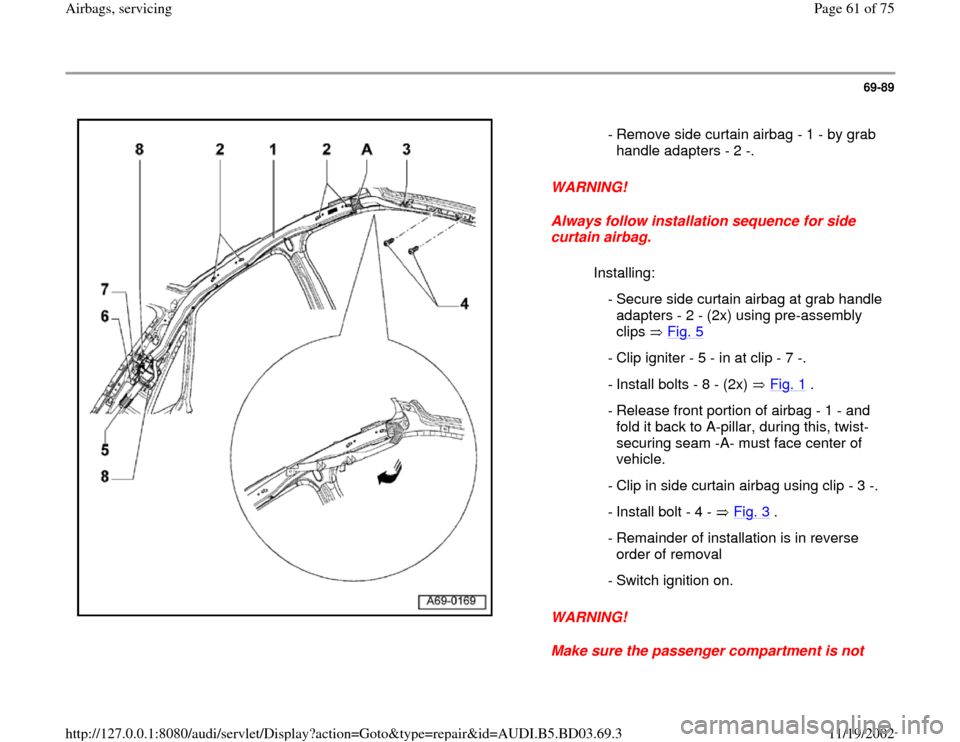
Make sure the passenger compartment is not - Remove side curtain airbag - 1 - by grab
handle adapters - 2 -.
Installing:
- Secure side curtain airbag at grab handle
adapters - 2 - (2x) using pre-assembly
clips Fig. 5
- Clip igniter - 5 - in at clip - 7 -.
- Install bolts - 8 - (2x) Fig. 1
.
- Release front portion of airbag - 1 - and
fold it back to A-pillar, during this, twist-
securing seam -A- must face center of
vehicle.
- Clip in side curtain airbag using clip - 3 -.
- Install bolt - 4 - Fig. 3
.
- Remainder of installation is in reverse
order of removal
- Switch ignition on.
Pa
ge 61 of 75 Airba
gs, servicin
g
11/19/2002 htt
p://127.0.0.1:8080/audi/servlet/Dis
play?action=Goto&t
yp
e=re
pair&id=AUDI.B5.BD03.69.3
Page 63 of 75
69-90
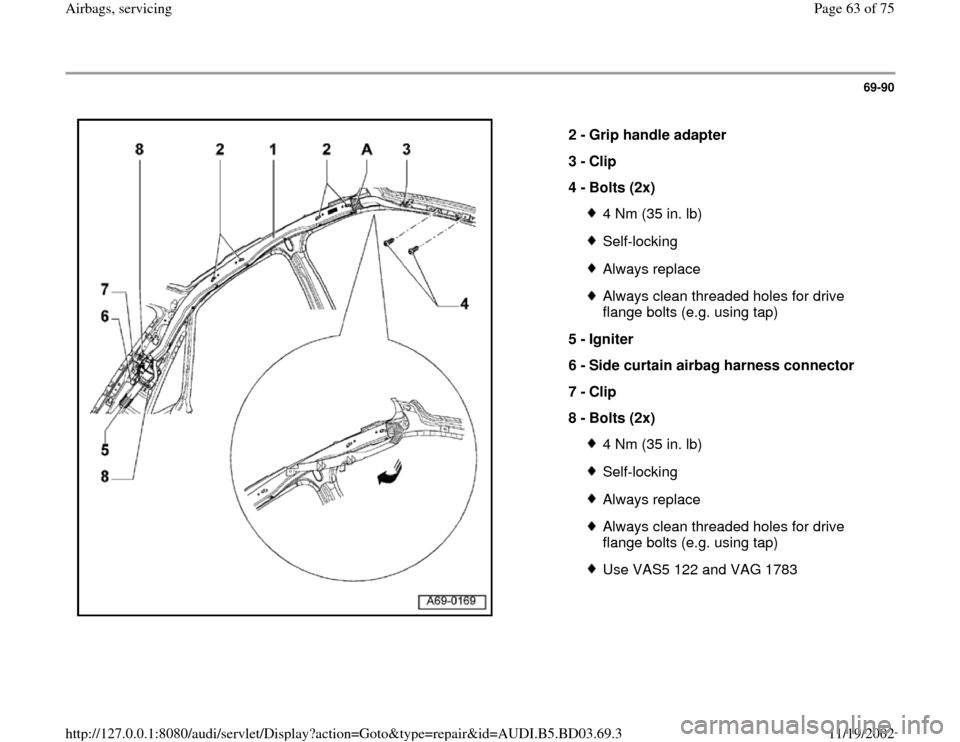
2 -
Grip handle adapter
3 -
Clip
4 -
Bolts (2x)
4 Nm (35 in. lb)Self-lockingAlways replaceAlways clean threaded holes for drive
flange bolts (e.g. using tap)
5 -
Igniter
6 -
Side curtain airbag harness connector
7 -
Clip
8 -
Bolts (2x) 4 Nm (35 in. lb)Self-lockingAlways replaceAlways clean threaded holes for drive
flange bolts (e.g. using tap) Use VAS5 122 and VAG 1783
Pa
ge 63 of 75 Airba
gs, servicin
g
11/19/2002 htt
p://127.0.0.1:8080/audi/servlet/Dis
play?action=Goto&t
yp
e=re
pair&id=AUDI.B5.BD03.69.3
Page 64 of 75
69-91
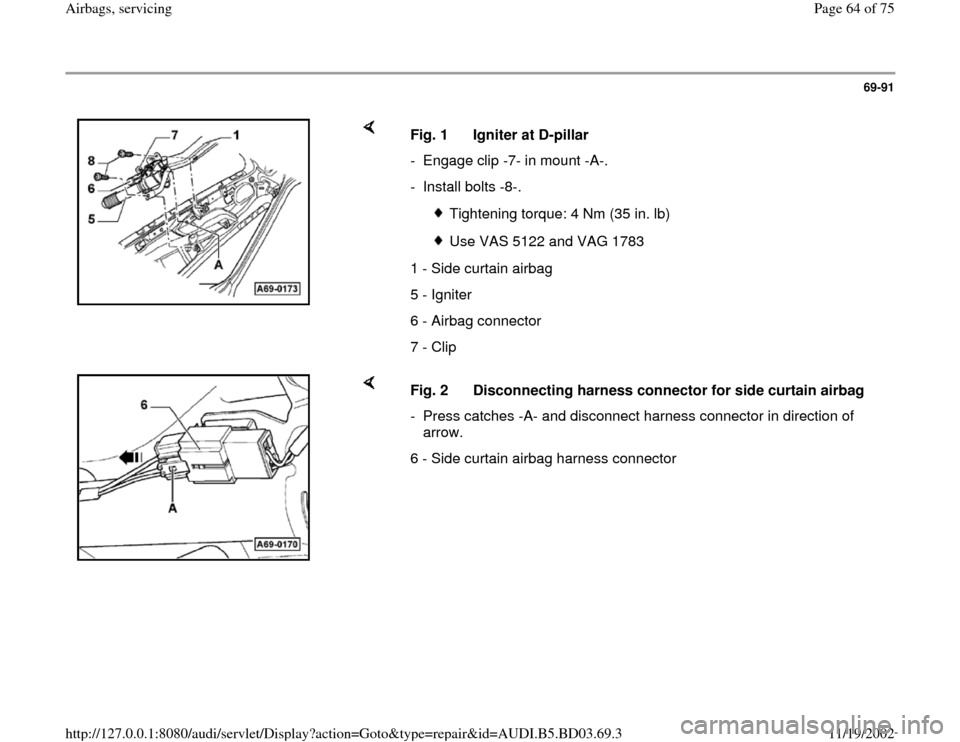
Fig. 1 Igniter at D-pillar
- Engage clip -7- in mount -A-.
- Install bolts -8-.
Tightening torque: 4 Nm (35 in. lb)
Use VAS 5122 and VAG 1783
1 - Side curtain airbag
5 - Igniter
6 - Airbag connector
7 - Clip
Fig. 2 Disconnecting harness connector for side curtain airbag
- Press catches -A- and disconnect harness connector in direction of
arrow.
6 - Side curtain airbag harness connector
Pa
ge 64 of 75 Airba
gs, servicin
g
11/19/2002 htt
p://127.0.0.1:8080/audi/servlet/Dis
play?action=Goto&t
yp
e=re
pair&id=AUDI.B5.BD03.69.3
Page 65 of 75
69-92
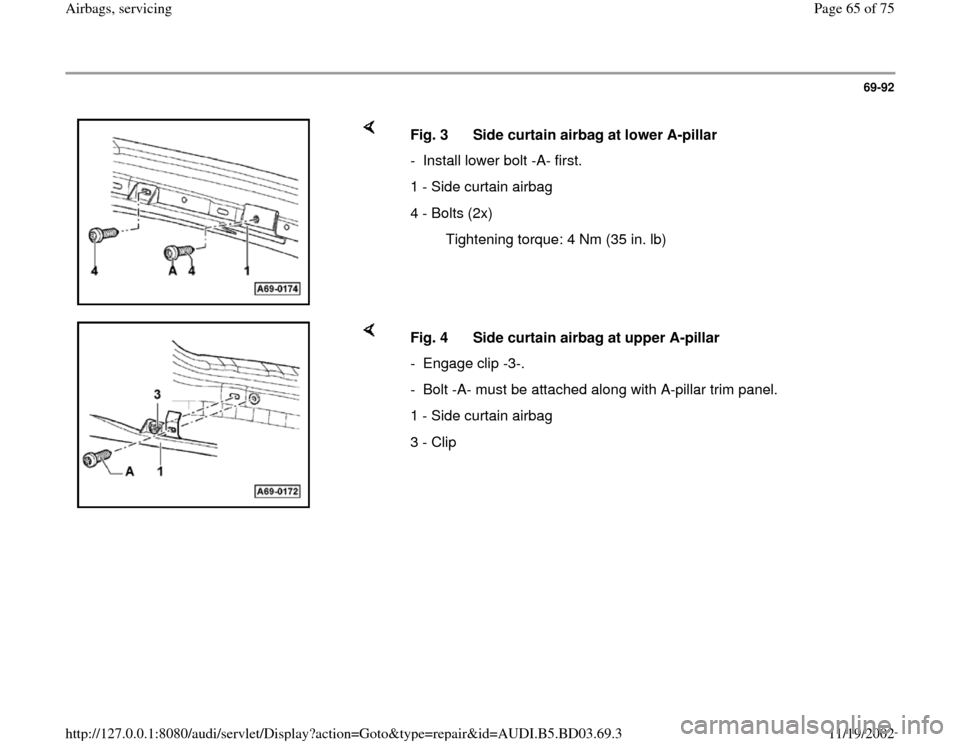
Fig. 3 Side curtain airbag at lower A-pillar
- Install lower bolt -A- first.
1 - Side curtain airbag
4 - Bolts (2x)
Tightening torque: 4 Nm (35 in. lb)
Fig. 4 Side curtain airbag at upper A-pillar
- Engage clip -3-.
- Bolt -A- must be attached along with A-pillar trim panel.
1 - Side curtain airbag
3 - Clip
Pa
ge 65 of 75 Airba
gs, servicin
g
11/19/2002 htt
p://127.0.0.1:8080/audi/servlet/Dis
play?action=Goto&t
yp
e=re
pair&id=AUDI.B5.BD03.69.3
Page 66 of 75
69-93
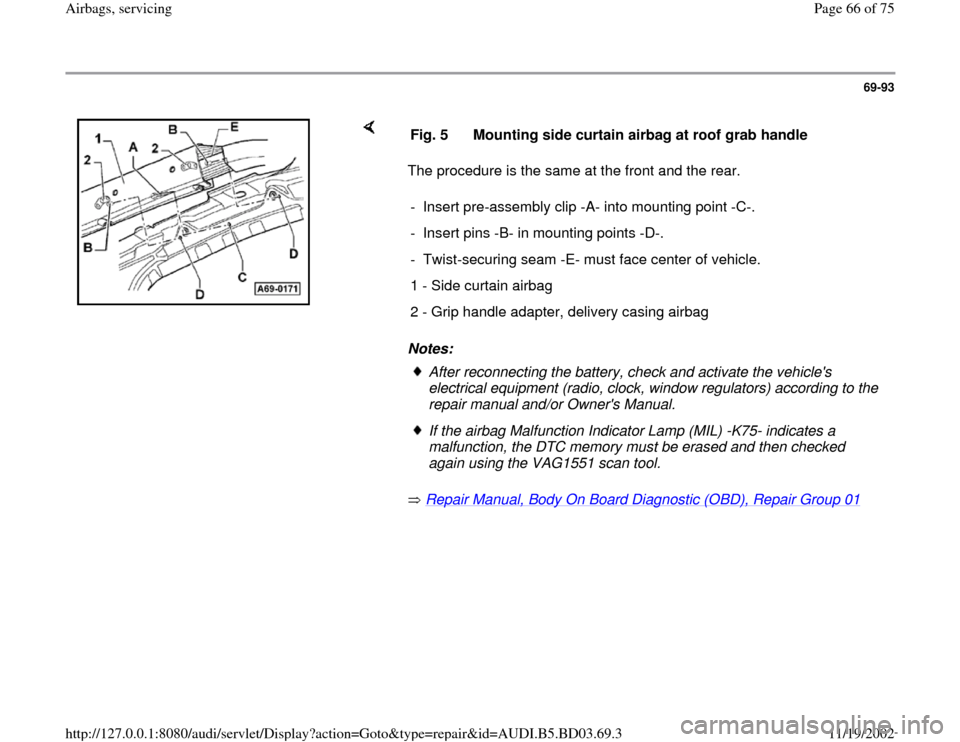
The procedure is the same at the front and the rear.
Notes:
Repair Manual, Body On Board Diagnostic (OBD), Repair Group 01
Fig. 5 Mounting side curtain airbag at roof grab handle
- Insert pre-assembly clip -A- into mounting point -C-.
- Insert pins -B- in mounting points -D-.
- Twist-securing seam -E- must face center of vehicle.
1 - Side curtain airbag
2 - Grip handle adapter, delivery casing airbag
After reconnecting the battery, check and activate the vehicle's
electrical equipment (radio, clock, window regulators) according to the
repair manual and/or Owner's Manual. If the airbag Malfunction Indicator Lamp (MIL) -K75- indicates a
malfunction, the DTC memory must be erased and then checked
again using the VAG1551 scan tool.
Pa
ge 66 of 75 Airba
gs, servicin
g
11/19/2002 htt
p://127.0.0.1:8080/audi/servlet/Dis
play?action=Goto&t
yp
e=re
pair&id=AUDI.B5.BD03.69.3
Page 67 of 75
69-94
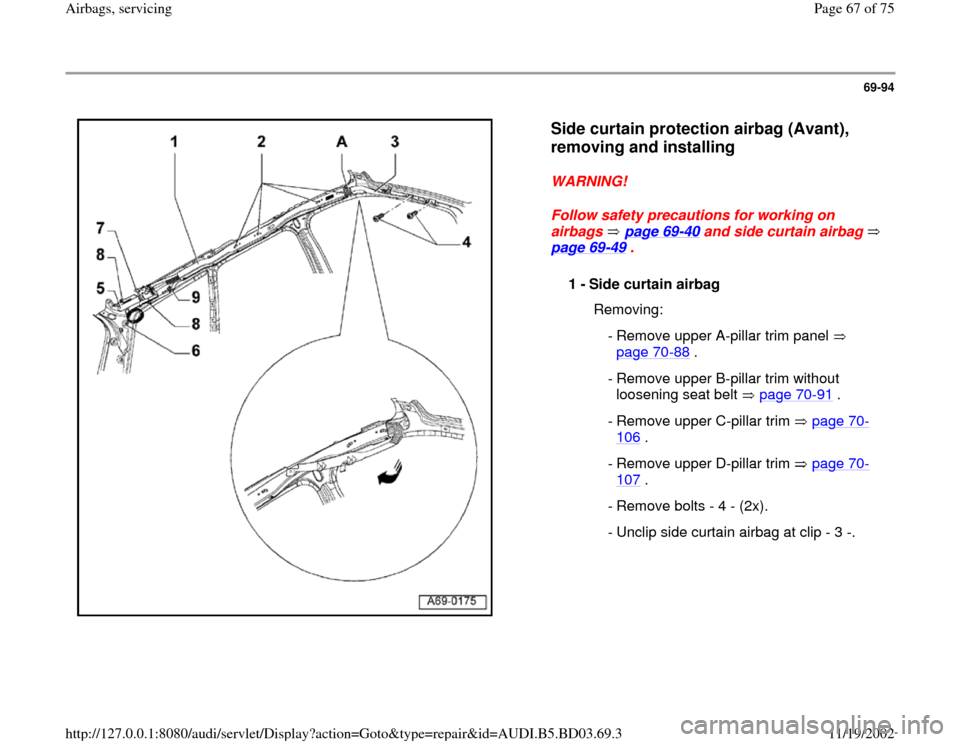
Side curtain protection airbag (Avant),
removing and installing
WARNING!
Follow safety precautions for working on
airbags page 69
-40
and side curtain airbag
page 69
-49
.
1 -
Side curtain airbag
Removing:
- Remove upper A-pillar trim panel
page 70
-88
.
- Remove upper B-pillar trim without
loosening seat belt page 70
-91
.
- Remove upper C-pillar trim page 70
-
106
.
- Remove upper D-pillar trim page 70
-
107
.
- Remove bolts - 4 - (2x).
- Unclip side curtain airbag at clip - 3 -.
Pa
ge 67 of 75 Airba
gs, servicin
g
11/19/2002 htt
p://127.0.0.1:8080/audi/servlet/Dis
play?action=Goto&t
yp
e=re
pair&id=AUDI.B5.BD03.69.3
Page 68 of 75
69-95
WARNING!
NEVER disconnect the yellow 2-pin harness
connector on the side curtain airbag!
WARNING!
Always follow installation sequence for side
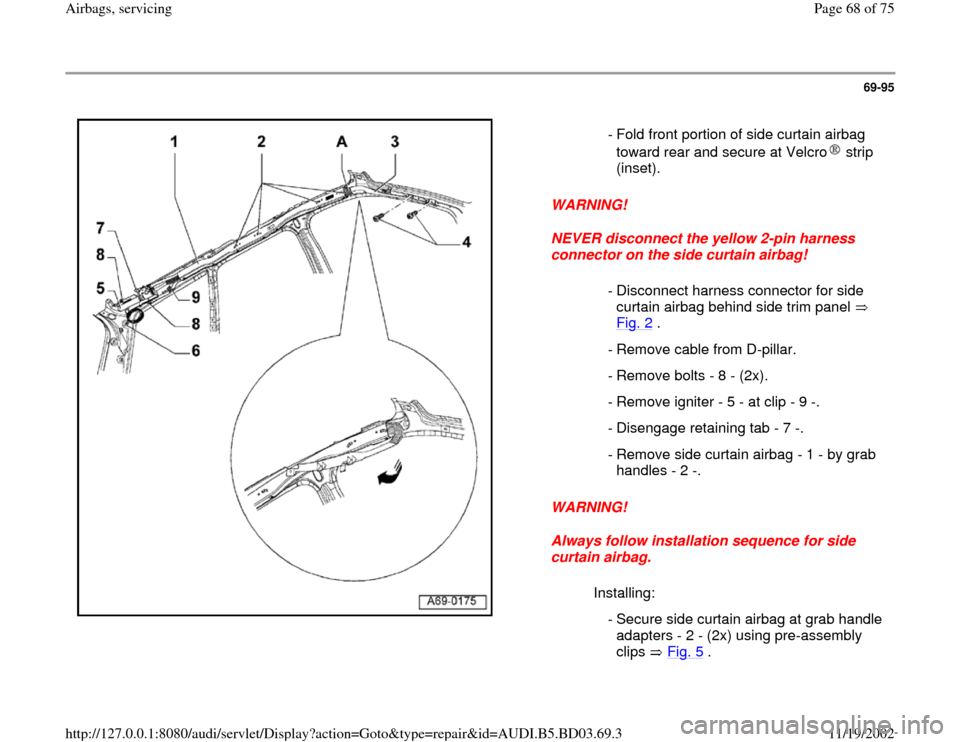
curtain airbag. - Fold front portion of side curtain airbag
toward rear and secure at Velcro strip
(inset).
- Disconnect harness connector for side
curtain airbag behind side trim panel
Fig. 2
.
- Remove cable from D-pillar.
- Remove bolts - 8 - (2x).
- Remove igniter - 5 - at clip - 9 -.
- Disengage retaining tab - 7 -.
- Remove side curtain airbag - 1 - by grab
handles - 2 -.
Installing:
- Secure side curtain airbag at grab handle
adapters - 2 - (2x) using pre-assembly
clips Fig. 5
.
Pa
ge 68 of 75 Airba
gs, servicin
g
11/19/2002 htt
p://127.0.0.1:8080/audi/servlet/Dis
play?action=Goto&t
yp
e=re
pair&id=AUDI.B5.BD03.69.3
Page 70 of 75
69-96
WARNING!
Make sure the passenger compartment is not
occupied before connecting the battery Ground
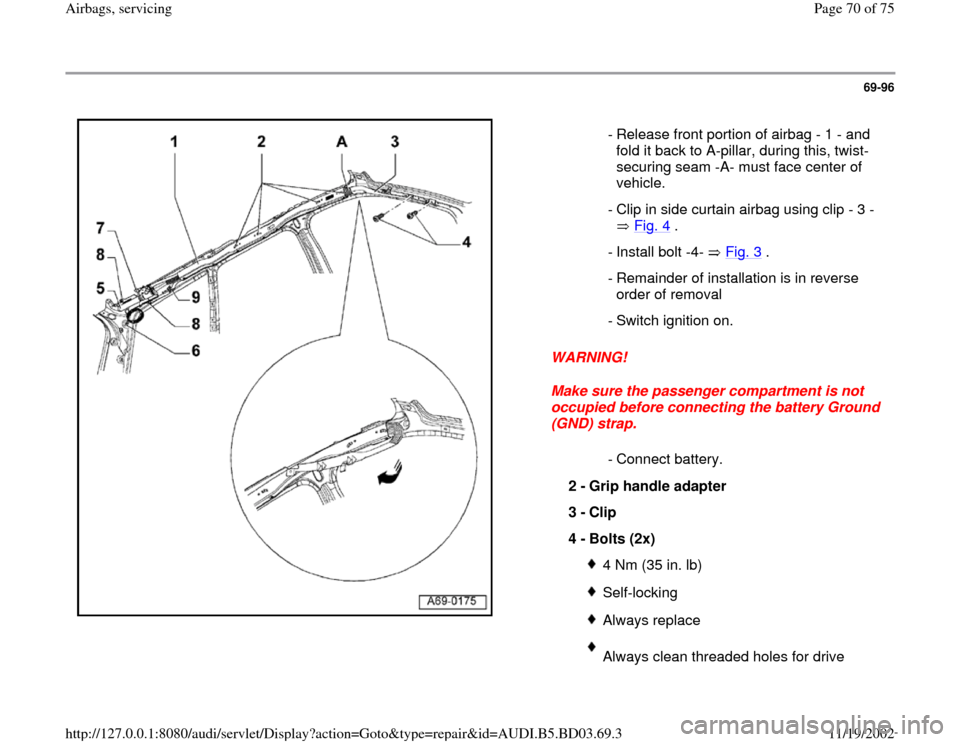
(GND) strap. - Release front portion of airbag - 1 - and
fold it back to A-pillar, during this, twist-
securing seam -A- must face center of
vehicle.
- Clip in side curtain airbag using clip - 3 -
Fig. 4
.
- Install bolt -4- Fig. 3
.
- Remainder of installation is in reverse
order of removal
- Switch ignition on.
- Connect battery.
2 -
Grip handle adapter
3 -
Clip
4 -
Bolts (2x)
4 Nm (35 in. lb)Self-lockingAlways replaceAlways clean threaded holes for drive
Pa
ge 70 of 75 Airba
gs, servicin
g
11/19/2002 htt
p://127.0.0.1:8080/audi/servlet/Dis
play?action=Goto&t
yp
e=re
pair&id=AUDI.B5.BD03.69.3
Page 72 of 75
69-97
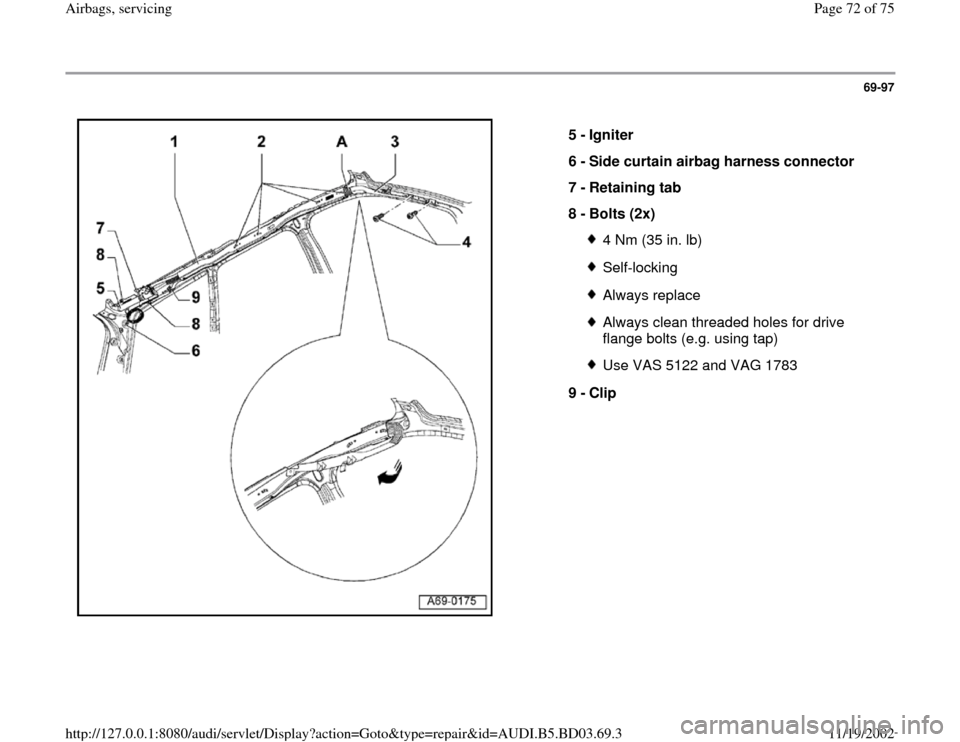
5 -
Igniter
6 -
Side curtain airbag harness connector
7 -
Retaining tab
8 -
Bolts (2x)
4 Nm (35 in. lb)Self-lockingAlways replaceAlways clean threaded holes for drive
flange bolts (e.g. using tap) Use VAS 5122 and VAG 1783
9 -
Clip
Pa
ge 72 of 75 Airba
gs, servicin
g
11/19/2002 htt
p://127.0.0.1:8080/audi/servlet/Dis
play?action=Goto&t
yp
e=re
pair&id=AUDI.B5.BD03.69.3
Page 73 of 75
69-98
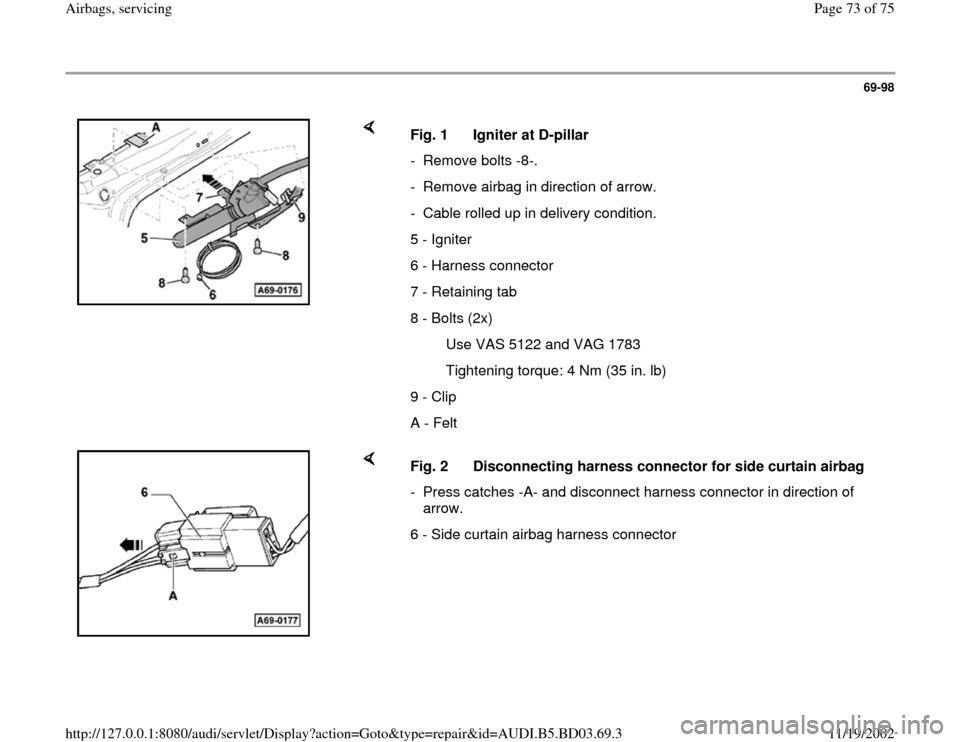
Fig. 1 Igniter at D-pillar
- Remove bolts -8-.
- Remove airbag in direction of arrow.
- Cable rolled up in delivery condition.
5 - Igniter
6 - Harness connector
7 - Retaining tab
8 - Bolts (2x)
Use VAS 5122 and VAG 1783
Tightening torque: 4 Nm (35 in. lb)
9 - Clip
A - Felt
Fig. 2 Disconnecting harness connector for side curtain airbag
- Press catches -A- and disconnect harness connector in direction of
arrow.
6 - Side curtain airbag harness connector
Pa
ge 73 of 75 Airba
gs, servicin
g
11/19/2002 htt
p://127.0.0.1:8080/audi/servlet/Dis
play?action=Goto&t
yp
e=re
pair&id=AUDI.B5.BD03.69.3