boot AUDI A4 1997 B5 / 1.G Suspension Front Axle Components Workshop Manual
[x] Cancel search | Manufacturer: AUDI, Model Year: 1997, Model line: A4, Model: AUDI A4 1997 B5 / 1.GPages: 26, PDF Size: 0.33 MB
Page 6 of 26

40-20
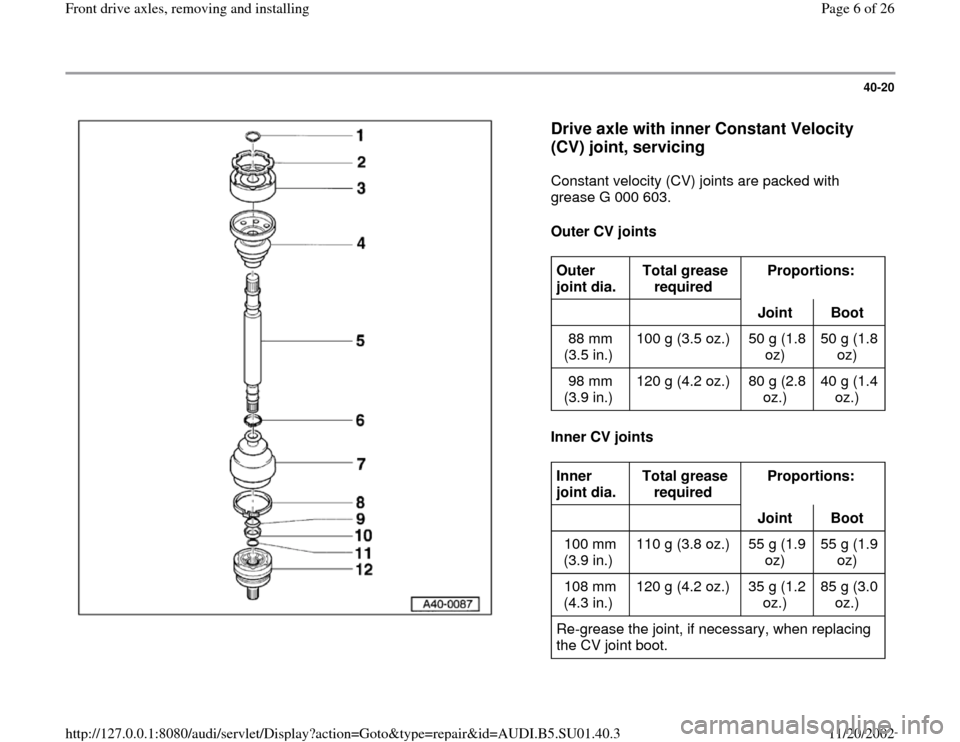
Drive axle with inner Constant Velocity
(CV) joint, servicing
Constant velocity (CV) joints are packed with
grease G 000 603.
Outer CV joints
Inner CV joints
Outer
joint dia. Total grease
required Proportions:
Joint
Boot
88 mm
(3.5 in.) 100 g (3.5 oz.) 50 g (1.8
oz) 50 g (1.8
oz)
98 mm
(3.9 in.) 120 g (4.2 oz.) 80 g (2.8
oz.) 40 g (1.4
oz.) Inner
joint dia. Total grease
required Proportions:
Joint
Boot
100 mm
(3.9 in.) 110 g (3.8 oz.) 55 g (1.9
oz) 55 g (1.9
oz)
108 mm
(4.3 in.) 120 g (4.2 oz.) 35 g (1.2
oz.) 85 g (3.0
oz.)
Re-grease the joint, if necessary, when replacing
the CV joint boot.
Pa
ge 6 of 26 Front drive axles, removin
g and installin
g
11/20/2002 htt
p://127.0.0.1:8080/audi/servlet/Dis
play?action=Goto&t
yp
e=re
pair&id=AUDI.B5.SU01.40.3
Page 7 of 26

40-21
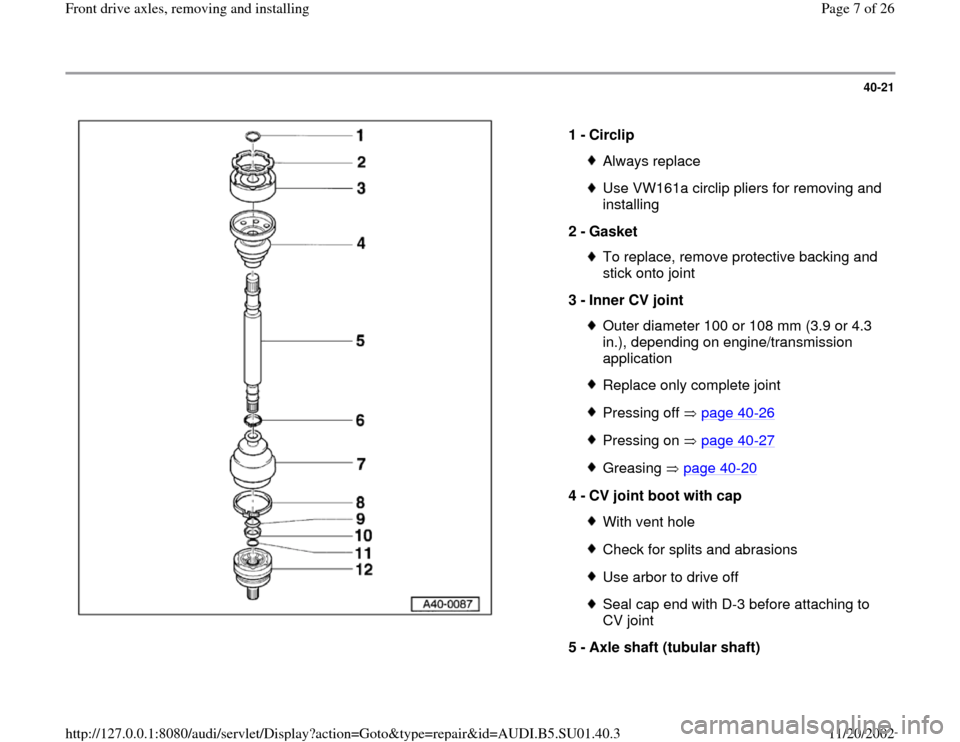
1 -
Circlip
Always replaceUse VW161a circlip pliers for removing and
installing
2 -
Gasket To replace, remove protective backing and
stick onto joint
3 -
Inner CV joint Outer diameter 100 or 108 mm (3.9 or 4.3
in.), depending on engine/transmission
application Replace only complete jointPressing off page 40
-26
Pressing on page 40
-27
Greasing page 40
-20
4 -
CV joint boot with cap
With vent holeCheck for splits and abrasionsUse arbor to drive offSeal cap end with D-3 before attaching to
CV joint
5 -
Axle shaft (tubular shaft)
Pa
ge 7 of 26 Front drive axles, removin
g and installin
g
11/20/2002 htt
p://127.0.0.1:8080/audi/servlet/Dis
play?action=Goto&t
yp
e=re
pair&id=AUDI.B5.SU01.40.3
Page 9 of 26

40-22
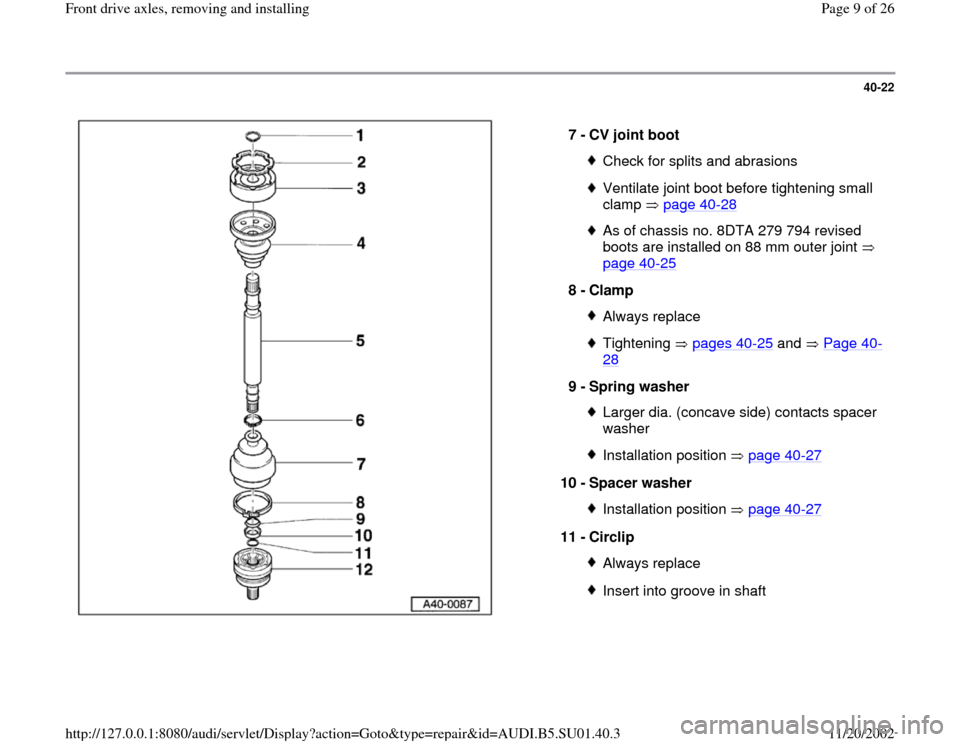
7 -
CV joint boot
Check for splits and abrasionsVentilate joint boot before tightening small
clamp page 40
-28
As of chassis no. 8DTA 279 794 revised
boots are installed on 88 mm outer joint
page 40
-25
8 -
Clamp
Always replaceTightening pages 40
-25
and Page 40
-
28
9 -
Spring washer
Larger dia. (concave side) contacts spacer
washer Installation position page 40
-27
10 -
Spacer washer
Installation position page 40
-27
11 -
Circlip
Always replaceInsert into groove in shaft
Pa
ge 9 of 26 Front drive axles, removin
g and installin
g
11/20/2002 htt
p://127.0.0.1:8080/audi/servlet/Dis
play?action=Goto&t
yp
e=re
pair&id=AUDI.B5.SU01.40.3
Page 11 of 26

40-24
Plastic CV joint boots
Special tools, test equipment and auxiliary
items
VAG1275 3207 VW411
VW401/402 VW412 VW522
40-204 A VAG1682 3340
On the Audi A4, new plastic CV joint boots are
installed on the 88 mm outer joint (wheel end) of
the front axle.
The plastic boots can be identified because they
are made out of a harder material than the
rubber boots.
The harder plastic boots necessitates the use of
stainless steel clamps for attaching the boots.
Pa
ge 11 of 26 Front drive axles, removin
g and installin
g
11/20/2002 htt
p://127.0.0.1:8080/audi/servlet/Dis
play?action=Goto&t
yp
e=re
pair&id=AUDI.B5.SU01.40.3
Page 12 of 26

40-25
Clamps used on rubber joint boots are
tightened using VAG1275 pliers.
The following instructions are only for
stainless steel clamps
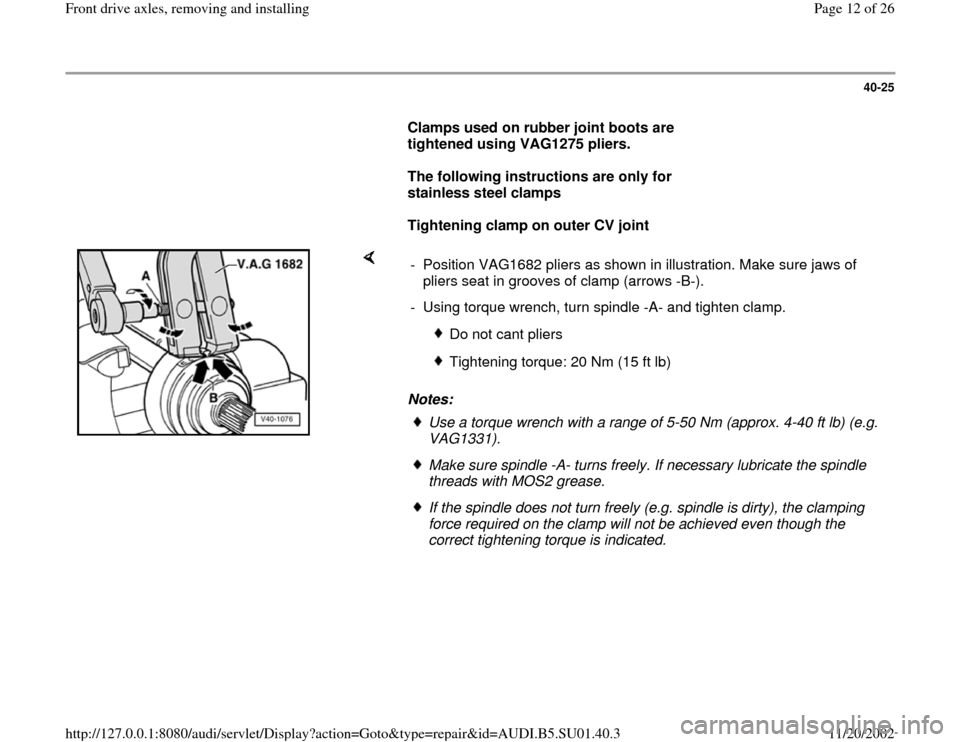
Tightening clamp on outer CV joint
Notes: - Position VAG1682 pliers as shown in illustration. Make sure jaws of
pliers seat in grooves of clamp (arrows -B-).
- Using torque wrench, turn spindle -A- and tighten clamp.
Do not cant pliers
Tightening torque: 20 Nm (15 ft lb)
Use a torque wrench with a range of 5-50 Nm (approx. 4-40 ft lb) (e.g.
VAG1331). Make sure spindle -A- turns freely. If necessary lubricate the spindle
threads with MOS2 grease. If the spindle does not turn freely (e.g. spindle is dirty), the clamping
force required on the clamp will not be achieved even though the
correct tightening torque is indicated.
Pa
ge 12 of 26 Front drive axles, removin
g and installin
g
11/20/2002 htt
p://127.0.0.1:8080/audi/servlet/Dis
play?action=Goto&t
yp
e=re
pair&id=AUDI.B5.SU01.40.3
Page 13 of 26

40-26
Pressing off outer constant velocity joint
- Clamp drive axle in vise using protective jaw covers.
- Remove clamp and slide back boot.
- Thread 3207 pressure spindle (with M16 and M14 threaded sections)
into end of constant velocity joint until joint is pressed off of axle shaft.
Pressing off inner constant velocity joint
Notes:
First use a drift to drive off the boot.Support the ball hub.
Pa
ge 13 of 26 Front drive axles, removin
g and installin
g
11/20/2002 htt
p://127.0.0.1:8080/audi/servlet/Dis
play?action=Goto&t
yp
e=re
pair&id=AUDI.B5.SU01.40.3
Page 15 of 26

40-28
Ventilating joint boot
Only for rubber joint boot.
The joint boot is often pressed in while being installed on the body of the
joint. This creates a vacuum inside the boot which draws it inward with a
fold (arrow) while driving. Therefore after installing, lift the boot at the
small diameter end to equalize pressure.
Pa
ge 15 of 26 Front drive axles, removin
g and installin
g
11/20/2002 htt
p://127.0.0.1:8080/audi/servlet/Dis
play?action=Goto&t
yp
e=re
pair&id=AUDI.B5.SU01.40.3
Page 16 of 26

40-29
Drive axle with triple-rotor joint, servicing
Grease quantity and type
Note:
Pack the outer constant velocity joints with the
following greases:
CAUTION!
Part numbers are listed here for reference only.
Always check with your Parts department for
the latest information.
88 mm joint diameter: G 000 603
98 mm joint diameter: G 000 633Outer
joint dia. Total amt. of
grease Proportions
Joint
Boot
88 mm
(3.5 in.) 100 g (3.5
oz.) 50 g (1.8
oz.) 50 g (1.8
oz.)
98 mm
(3.9 in.) 120 g (4.2
oz.) 80 g (2.8
oz.) 40 g (1.4
oz.)
Pa
ge 16 of 26 Front drive axles, removin
g and installin
g
11/20/2002 htt
p://127.0.0.1:8080/audi/servlet/Dis
play?action=Goto&t
yp
e=re
pair&id=AUDI.B5.SU01.40.3
Page 17 of 26

40-30
1 -
Drive axle with triple-rotor joint
Replacement part supplied with boot and
filled with grease
2 -
Clamp Always replaceTightening Fig.1
3 -
Boot for inner triple-rotor joint
Check for splits and abrasionsOnly 32 mm diameter shafts have
replaceable inner boots To replace, drive off outer constant velocity
joint When slipping onto profiled shaft, apply
small quantity of grease to bead on profiled
shaft and use VAG1474/5 wedge (part of
VAG1474) to carefully position boot Fig. 4
Pa
ge 17 of 26 Front drive axles, removin
g and installin
g
11/20/2002 htt
p://127.0.0.1:8080/audi/servlet/Dis
play?action=Goto&t
yp
e=re
pair&id=AUDI.B5.SU01.40.3
Page 18 of 26

40-31
4 -
Clamps
Always replaceTightening Fig.1
5 -
Boot for outer constant velocity joint
Check for splits and abrasionsBefore tightening clamp, briefly lift end of
boot to equalize pressure (ventilate) Fig. 3 As of chassis no. 8DTA 279 794, new
boots were introduced for 88 mm outer
joint (wheel end) Fig. 1
6 -
Clamp
Always replaceTightening Fig. 1
7 -
Spring washer
Installation position Fig. 5
Pa
ge 18 of 26 Front drive axles, removin
g and installin
g
11/20/2002 htt
p://127.0.0.1:8080/audi/servlet/Dis
play?action=Goto&t
yp
e=re
pair&id=AUDI.B5.SU01.40.3