AUDI A4 1998 B5 / 1.G Airbag Service Owner's Guide
Manufacturer: AUDI, Model Year: 1998,
Model line: A4,
Model: AUDI A4 1998 B5 / 1.G
Pages: 75, PDF Size: 0.91 MB
AUDI A4 1998 B5 / 1.G Airbag Service Owner's Guide
A4 1998 B5 / 1.G
AUDI
AUDI
https://www.carmanualsonline.info/img/6/877/w960_877-0.png
AUDI A4 1998 B5 / 1.G Airbag Service Owner's Guide
Trending: tow, OBD port, wheel bolts, air condition, wheel bolt torque, steering, heater
Page 31 of 75
69-63
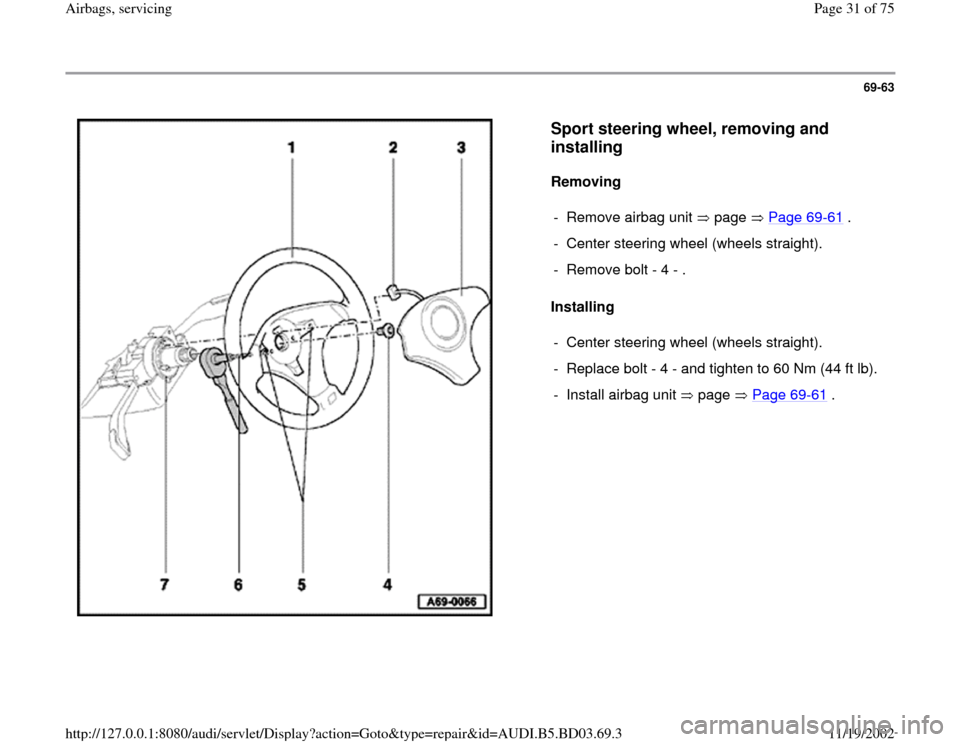
Sport steering wheel, removing and
installing
Removing
Installing - Remove airbag unit page Page 69
-61
.
- Center steering wheel (wheels straight).
- Remove bolt - 4 - .
- Center steering wheel (wheels straight).
- Replace bolt - 4 - and tighten to 60 Nm (44 ft lb).
- Install airbag unit page Page 69
-61
.
Pa
ge 31 of 75 Airba
gs, servicin
g
11/19/2002 htt
p://127.0.0.1:8080/audi/servlet/Dis
play?action=Goto&t
yp
e=re
pair&id=AUDI.B5.BD03.69.3
Page 32 of 75
69-64
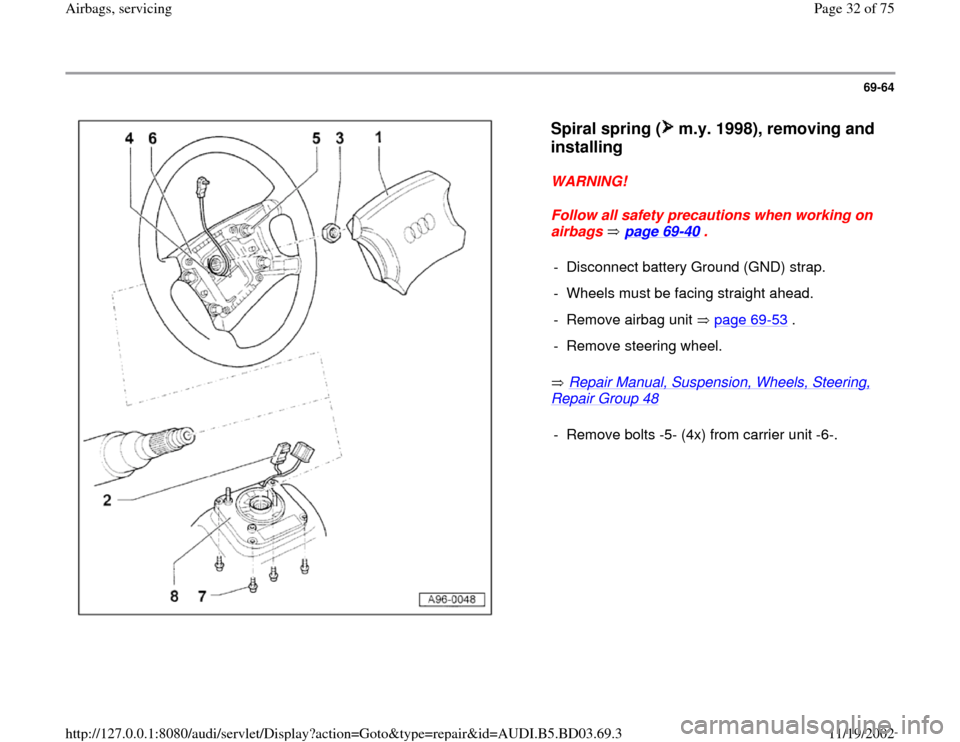
Spiral spring ( m.y. 1998), removing and
installing
WARNING!
Follow all safety precautions when working on
airbags page 69
-40
.
Repair Manual, Suspension, Wheels, Steering,
Repair Group 48
- Disconnect battery Ground (GND) strap.
- Wheels must be facing straight ahead.
- Remove airbag unit page 69
-53
.
- Remove steering wheel.- Remove bolts -5- (4x) from carrier unit -6-.
Pa
ge 32 of 75 Airba
gs, servicin
g
11/19/2002 htt
p://127.0.0.1:8080/audi/servlet/Dis
play?action=Goto&t
yp
e=re
pair&id=AUDI.B5.BD03.69.3
Page 33 of 75
69-65
WARNING!
Steering wheel and spiral spring can only be
removed with the wheel straight-ahead. Do not
rotate spiral spring after it is removed.
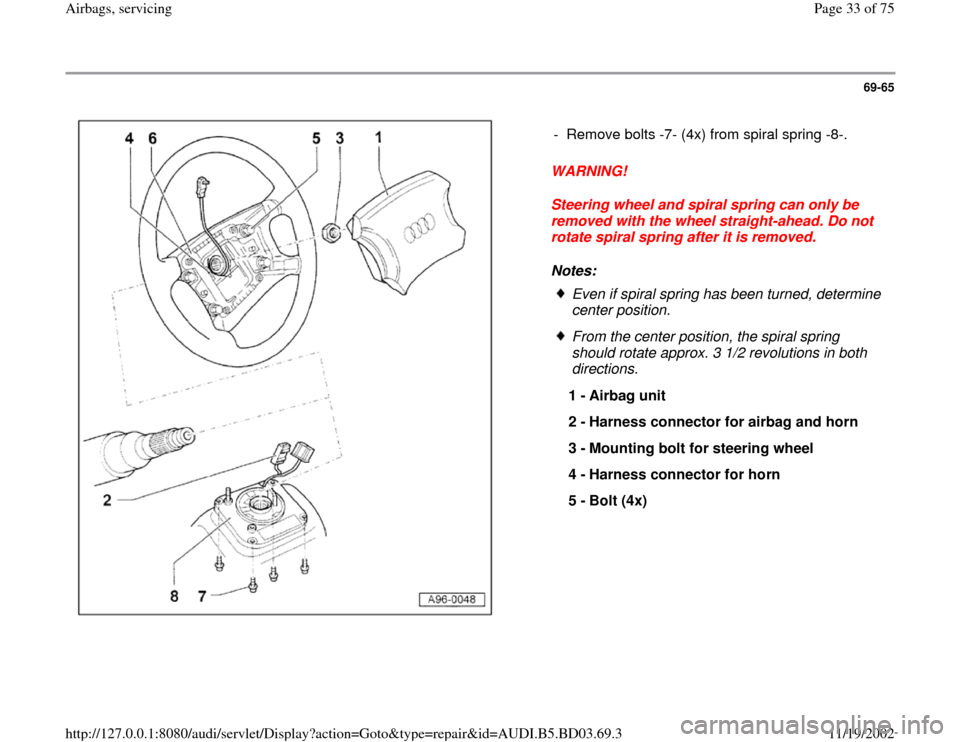
Notes: - Remove bolts -7- (4x) from spiral spring -8-.
Even if spiral spring has been turned, determine
center position.
From the center position, the spiral spring
should rotate approx. 3 1/2 revolutions in both
directions.
1 -
Airbag unit
2 -
Harness connector for airbag and horn
3 -
Mounting bolt for steering wheel
4 -
Harness connector for horn
5 -
Bolt (4x)
Pa
ge 33 of 75 Airba
gs, servicin
g
11/19/2002 htt
p://127.0.0.1:8080/audi/servlet/Dis
play?action=Goto&t
yp
e=re
pair&id=AUDI.B5.BD03.69.3
Page 34 of 75
69-66
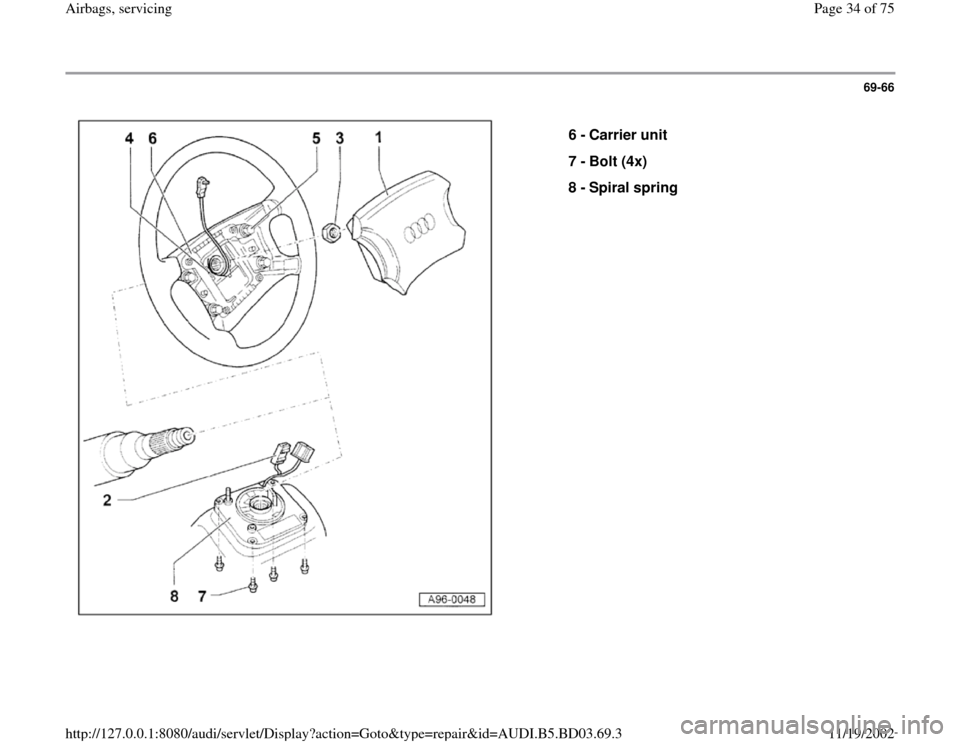
6 -
Carrier unit
7 -
Bolt (4x)
8 -
Spiral spring
Pa
ge 34 of 75 Airba
gs, servicin
g
11/19/2002 htt
p://127.0.0.1:8080/audi/servlet/Dis
play?action=Goto&t
yp
e=re
pair&id=AUDI.B5.BD03.69.3
Page 35 of 75
69-67
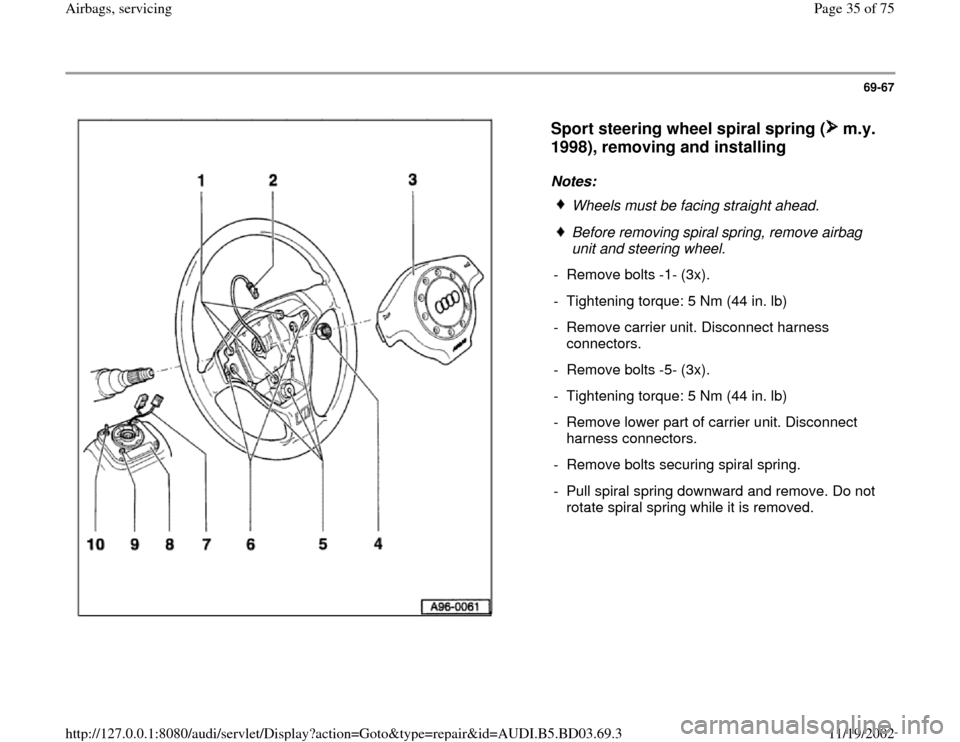
Sport steering wheel spiral spring ( m.y.
1998), removing and installing
Notes:
Wheels must be facing straight ahead.
Before removing spiral spring, remove airbag
unit and steering wheel.
- Remove bolts -1- (3x).
- Tightening torque: 5 Nm (44 in. lb)
- Remove carrier unit. Disconnect harness
connectors.
- Remove bolts -5- (3x).
- Tightening torque: 5 Nm (44 in. lb)
- Remove lower part of carrier unit. Disconnect
harness connectors.
- Remove bolts securing spiral spring.
- Pull spiral spring downward and remove. Do not
rotate spiral spring while it is removed.
Pa
ge 35 of 75 Airba
gs, servicin
g
11/19/2002 htt
p://127.0.0.1:8080/audi/servlet/Dis
play?action=Goto&t
yp
e=re
pair&id=AUDI.B5.BD03.69.3
Page 36 of 75
69-68
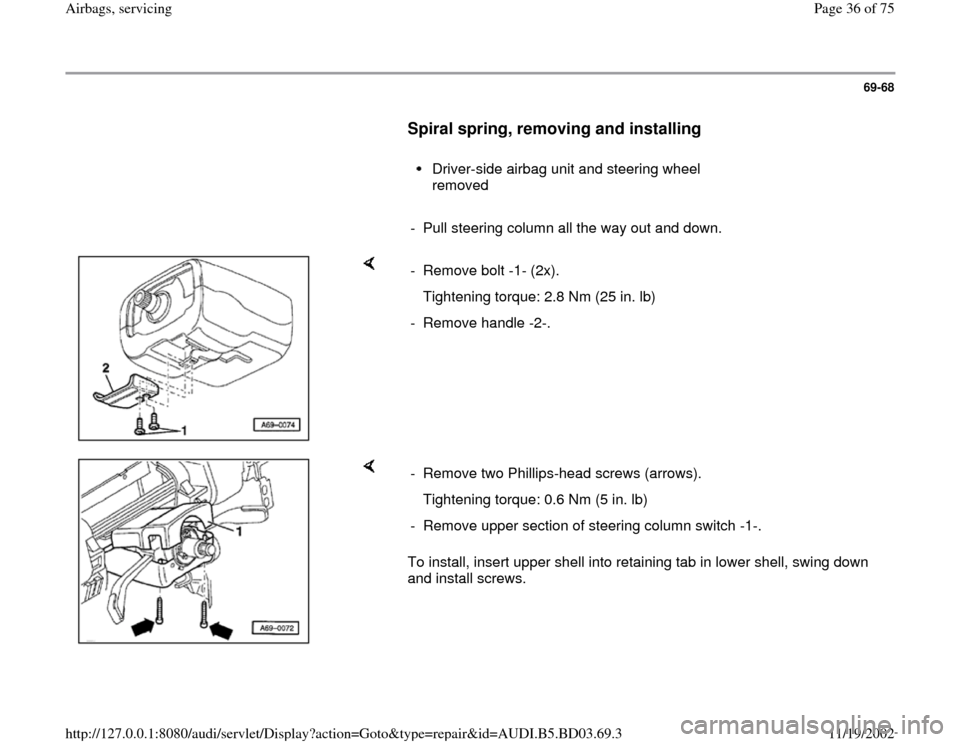
Spiral spring, removing and installing
Driver-side airbag unit and steering wheel
removed
- Pull steering column all the way out and down.
- Remove bolt -1- (2x).
Tightening torque: 2.8 Nm (25 in. lb)
- Remove handle -2-.
To install, insert upper shell into retaining tab in lower shell, swing down
and install screws. - Remove two Phillips-head screws (arrows).
Tightening torque: 0.6 Nm (5 in. lb)
- Remove upper section of steering column switch -1-.
Pa
ge 36 of 75 Airba
gs, servicin
g
11/19/2002 htt
p://127.0.0.1:8080/audi/servlet/Dis
play?action=Goto&t
yp
e=re
pair&id=AUDI.B5.BD03.69.3
Page 37 of 75
69-69
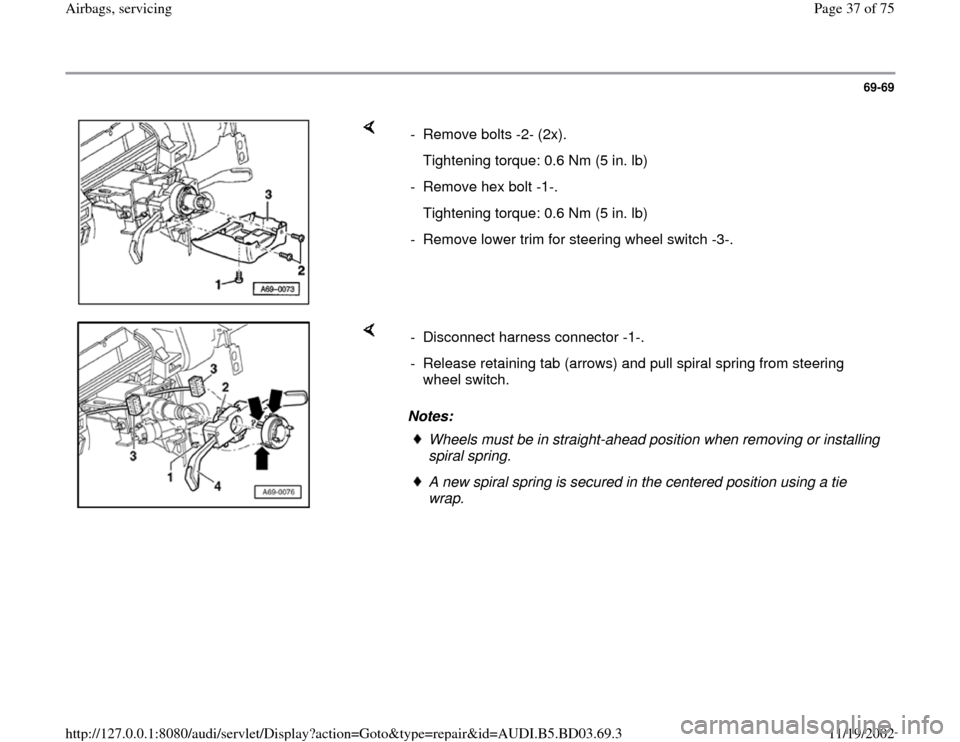
- Remove bolts -2- (2x).
Tightening torque: 0.6 Nm (5 in. lb)
- Remove hex bolt -1-.
Tightening torque: 0.6 Nm (5 in. lb)
- Remove lower trim for steering wheel switch -3-.
Notes: - Disconnect harness connector -1-.
- Release retaining tab (arrows) and pull spiral spring from steering
wheel switch.
Wheels must be in straight-ahead position when removing or installing
spiral spring. A new spiral spring is secured in the centered position using a tie
wrap.
Pa
ge 37 of 75 Airba
gs, servicin
g
11/19/2002 htt
p://127.0.0.1:8080/audi/servlet/Dis
play?action=Goto&t
yp
e=re
pair&id=AUDI.B5.BD03.69.3
Page 38 of 75
69-70
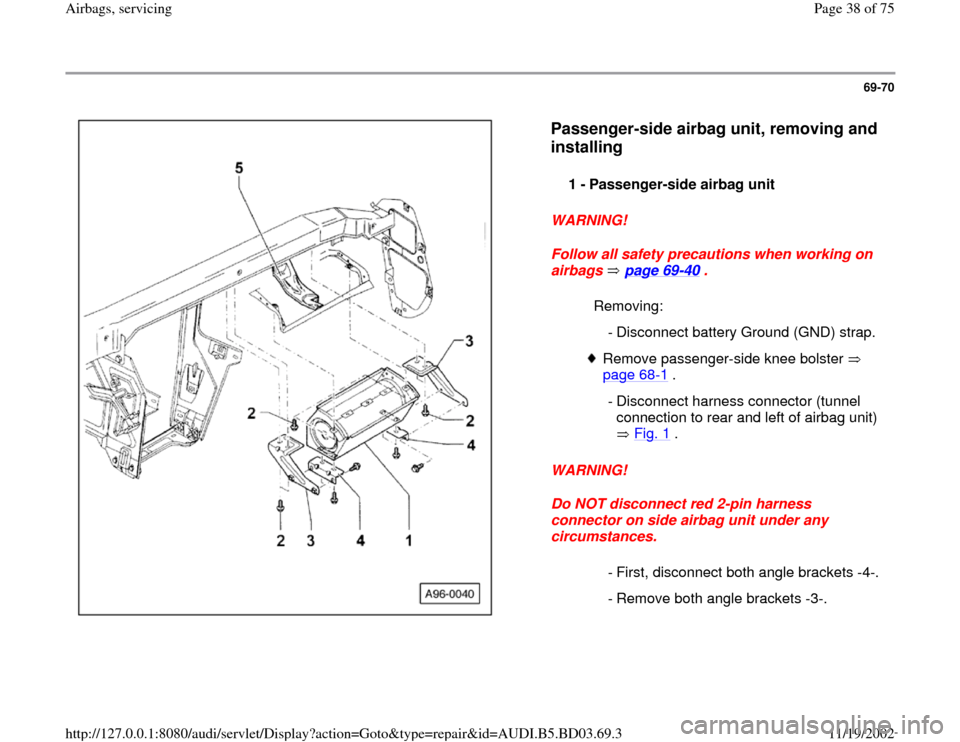
Passenger-side airbag unit, removing and
installing
WARNING!
Follow all safety precautions when working on
airbags page 69
-40
.
WARNING!
Do NOT disconnect red 2-pin harness
connector on side airbag unit under any
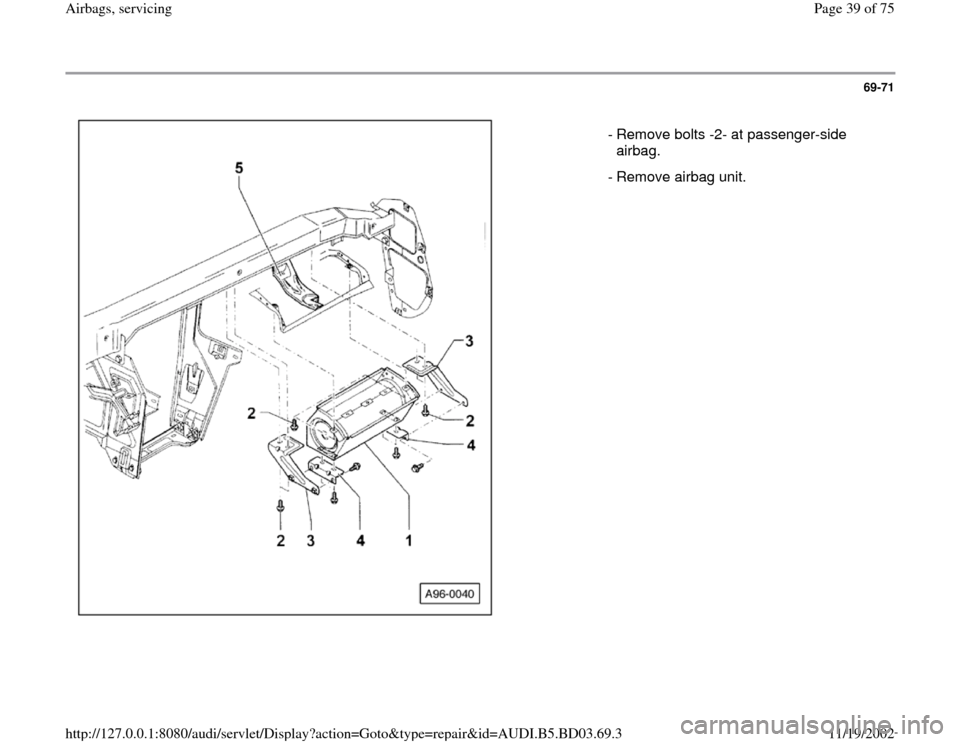
circumstances. 1 -
Passenger-side airbag unit
Removing:
- Disconnect battery Ground (GND) strap.
Remove passenger-side knee bolster
page 68
-1 .
- Disconnect harness connector (tunnel
connection to rear and left of airbag unit)
Fig. 1
.
- First, disconnect both angle brackets -4-.
- Remove both angle brackets -3-.
Pa
ge 38 of 75 Airba
gs, servicin
g
11/19/2002 htt
p://127.0.0.1:8080/audi/servlet/Dis
play?action=Goto&t
yp
e=re
pair&id=AUDI.B5.BD03.69.3
Page 39 of 75
69-71
- Remove bolts -2- at passenger-side
airbag.
- Remove airbag unit.
Pa
ge 39 of 75 Airba
gs, servicin
g
11/19/2002 htt
p://127.0.0.1:8080/audi/servlet/Dis
play?action=Goto&t
yp
e=re
pair&id=AUDI.B5.BD03.69.3
Page 40 of 75
69-72
Note:
Always replace instrument panel after passenger-
side airbag has deployed.
WARNING!
Make sure no one is in vehicle. - Place airbag unit on suitable surface with
impact padding facing up.
Installing:
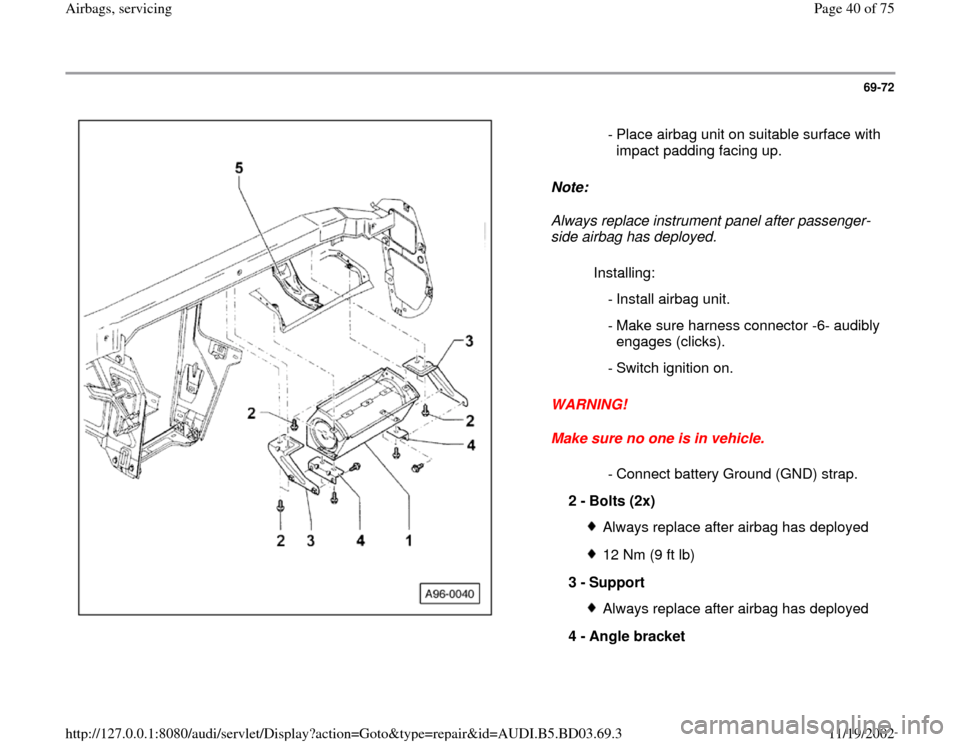
- Install airbag unit.
- Make sure harness connector -6- audibly
engages (clicks).
- Switch ignition on.
- Connect battery Ground (GND) strap.
2 -
Bolts (2x)
Always replace after airbag has deployed12 Nm (9 ft lb)
3 -
Support Always replace after airbag has deployed
4 -
Angle bracket
Pa
ge 40 of 75 Airba
gs, servicin
g
11/19/2002 htt
p://127.0.0.1:8080/audi/servlet/Dis
play?action=Goto&t
yp
e=re
pair&id=AUDI.B5.BD03.69.3
Trending: maintenance, air condition, wheel torque, OBD port, roof, battery location, heater
