bolt AUDI A4 1999 B5 / 1.G AEB ATW Engines Cylinder Head Remove And Install Workshop Manual
[x] Cancel search | Manufacturer: AUDI, Model Year: 1999, Model line: A4, Model: AUDI A4 1999 B5 / 1.GPages: 35, PDF Size: 0.68 MB
Page 1 of 35
15-2
Cylinder head, removing and
installing
Note:
Replace cylinder head bolts.
Always replace self-locking nuts, bolts as well
as gaskets and O-rings.
After installing a replacement cylinder head with
camshafts attached, grease contact surfaces
between valve lifters and cam lubricating
surfaces.
Do not remove plastic covers protecting
exposed valves until immediately before
installing cylinder head.
When replacing the cylinder head or cylinder
head gasket, coolant must be completely
replaced.
Cylinder heads with small cracks between the
valve seats that are less than 0.3 mm (0.012
in.) wide and/or between one valve seat and
only the first 4 threads of the spark plug thread,
can continue to be used without reduced
service life.
Pa
ge 1 of 35 C
ylinder head, removin
g and installin
g
11/18/2002 htt
p://127.0.0.1:8080/audi/servlet/Dis
play?action=Goto&t
yp
e=re
pair&id=AUDI.B5.GE02.15.2
Page 2 of 35
15-3
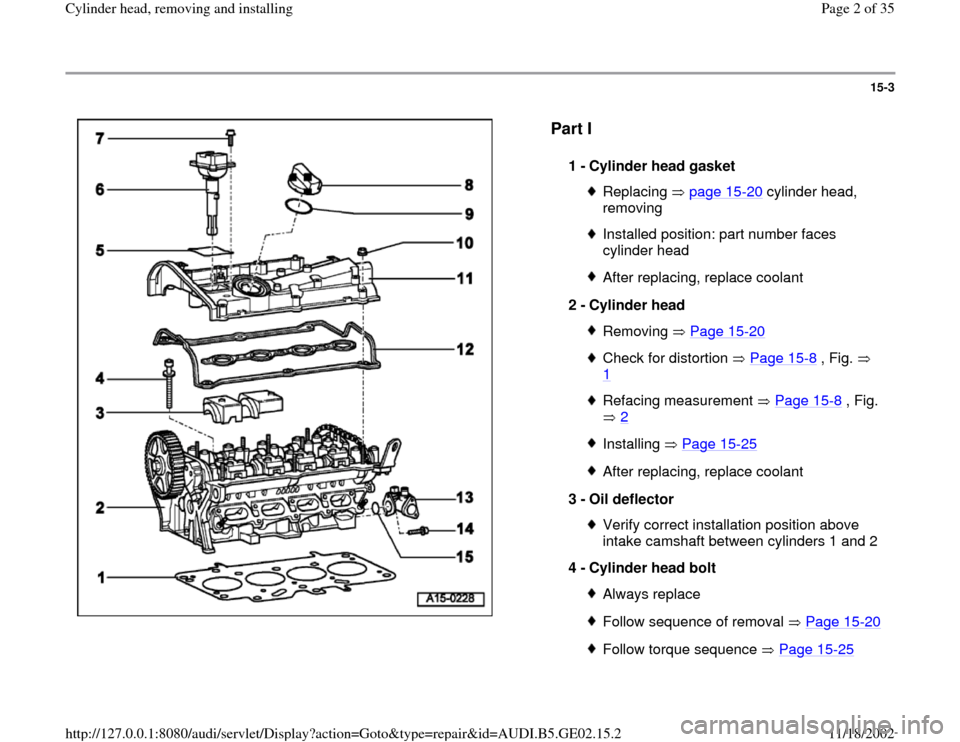
Part I
1 -
Cylinder head gasket Replacing page 15
-20
cylinder head,
removing
Installed position: part number faces
cylinder head After replacing, replace coolant
2 -
Cylinder head Removing Page 15
-20
Check for distortion Page 15
-8 , Fig.
1
Refacing measurement Page 15
-8 , Fig.
2
Installing Page 15
-25
After replacing, replace coolant
3 -
Oil deflector Verify correct installation position above
intake camshaft between cylinders 1 and 2
4 -
Cylinder head bolt Always replaceFollow sequence of removal Page 15
-20
Follow torque sequence Page 15
-25
Pa
ge 2 of 35 C
ylinder head, removin
g and installin
g
11/18/2002 htt
p://127.0.0.1:8080/audi/servlet/Dis
play?action=Goto&t
yp
e=re
pair&id=AUDI.B5.GE02.15.2
Page 3 of 35

15-4
Repair Manual, 1.8 Liter 5V Turbo Fuel Injection
& Ignition, Repair Group 28 5 -
Gasket
For ignition coilReplace if damaged
6 -
Ignition Coil Check
7 -
Bolt
10 Nm (7 ft lb)
8 -
Oil filler cap
9 -
Gasket Replace if damaged or leaking
10 -
Nut 10 Nm (7 ft lb)
11 -
Cylinder head cover Removing and installing Page 15
-17
Pa
ge 3 of 35 C
ylinder head, removin
g and installin
g
11/18/2002 htt
p://127.0.0.1:8080/audi/servlet/Dis
play?action=Goto&t
yp
e=re
pair&id=AUDI.B5.GE02.15.2
Page 4 of 35
15-5
CAUTION!
Part numbers are listed here for reference only.
Always check with your Parts department for
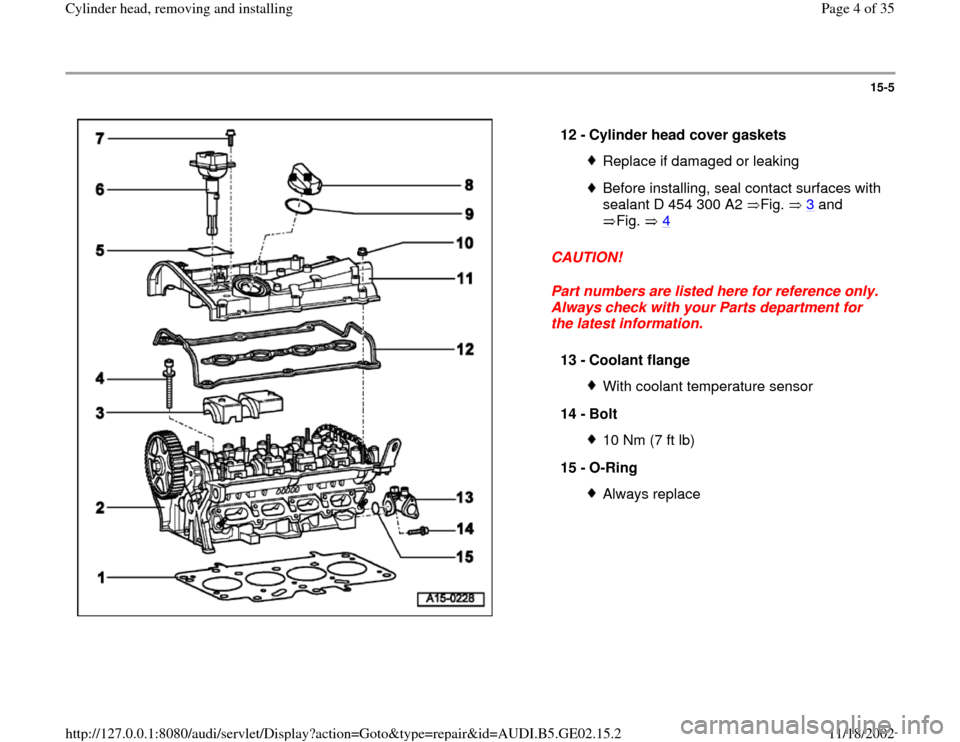
the latest information. 12 -
Cylinder head cover gaskets
Replace if damaged or leakingBefore installing, seal contact surfaces with
sealant D 454 300 A2 Fig. 3
and
Fig. 4
13 -
Coolant flange
With coolant temperature sensor
14 -
Bolt 10 Nm (7 ft lb)
15 -
O-Ring Always replace
Pa
ge 4 of 35 C
ylinder head, removin
g and installin
g
11/18/2002 htt
p://127.0.0.1:8080/audi/servlet/Dis
play?action=Goto&t
yp
e=re
pair&id=AUDI.B5.GE02.15.2
Page 5 of 35
15-6
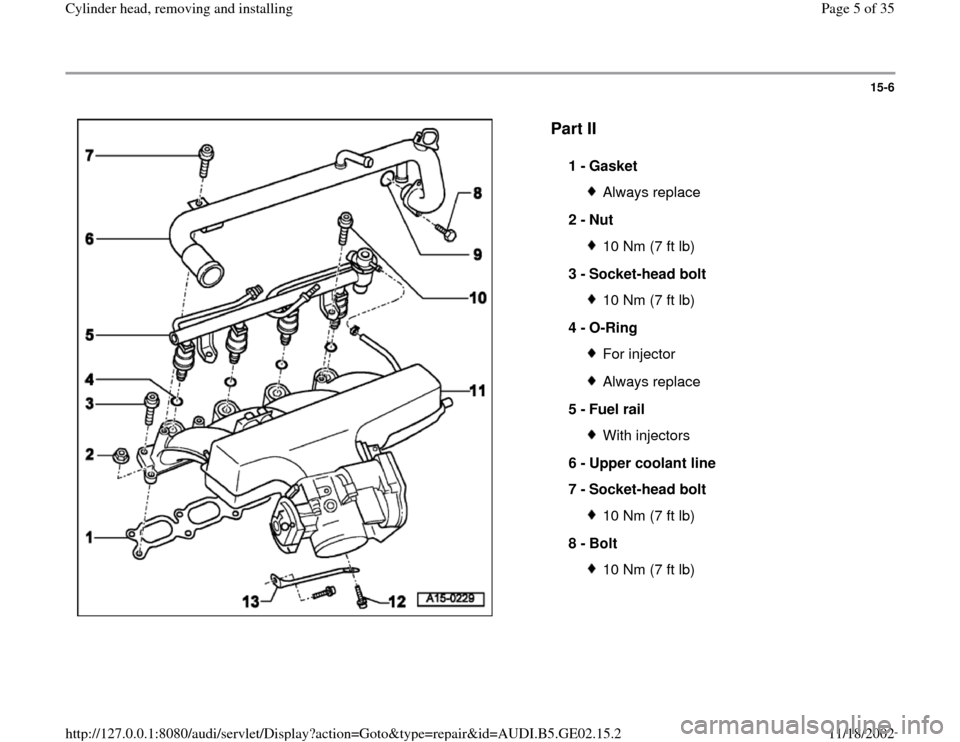
Part II
1 -
Gasket Always replace
2 -
Nut 10 Nm (7 ft lb)
3 -
Socket-head bolt 10 Nm (7 ft lb)
4 -
O-Ring For injectorAlways replace
5 -
Fuel rail With injectors
6 -
Upper coolant line
7 -
Socket-head bolt 10 Nm (7 ft lb)
8 -
Bolt 10 Nm (7 ft lb)
Pa
ge 5 of 35 C
ylinder head, removin
g and installin
g
11/18/2002 htt
p://127.0.0.1:8080/audi/servlet/Dis
play?action=Goto&t
yp
e=re
pair&id=AUDI.B5.GE02.15.2
Page 6 of 35
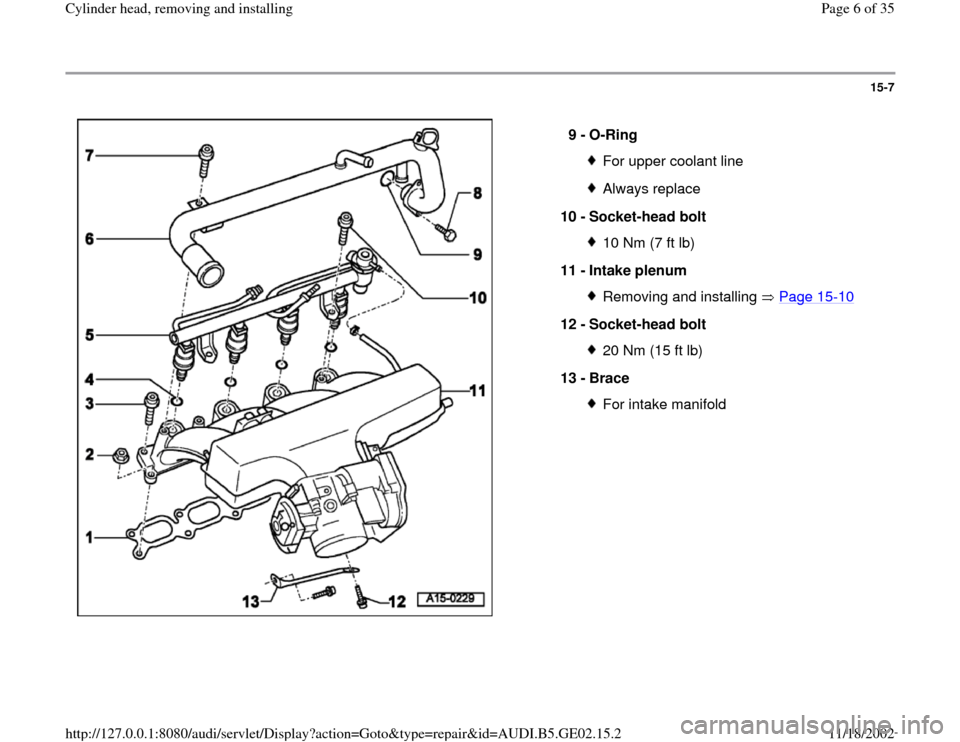
15-7
9 -
O-Ring
For upper coolant lineAlways replace
10 -
Socket-head bolt 10 Nm (7 ft lb)
11 -
Intake plenum Removing and installing Page 15
-10
12 -
Socket-head bolt
20 Nm (15 ft lb)
13 -
Brace For intake manifold
Pa
ge 6 of 35 C
ylinder head, removin
g and installin
g
11/18/2002 htt
p://127.0.0.1:8080/audi/servlet/Dis
play?action=Goto&t
yp
e=re
pair&id=AUDI.B5.GE02.15.2
Page 12 of 35
15-13
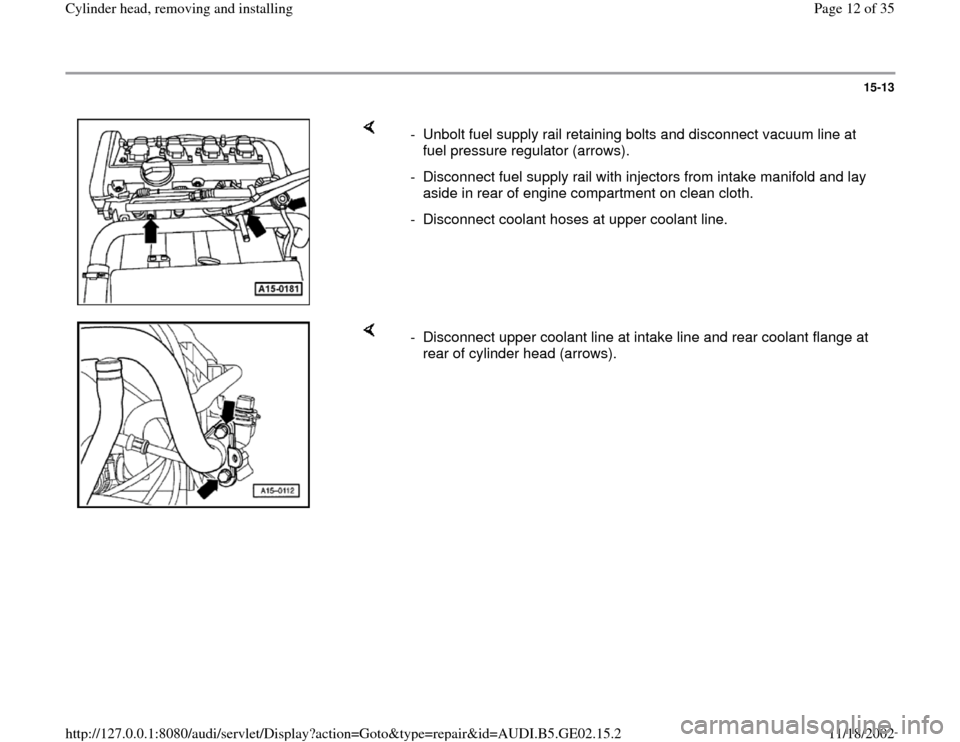
- Unbolt fuel supply rail retaining bolts and disconnect vacuum line at
fuel pressure regulator (arrows).
- Disconnect fuel supply rail with injectors from intake manifold and lay
aside in rear of engine compartment on clean cloth.
- Disconnect coolant hoses at upper coolant line.
- Disconnect upper coolant line at intake line and rear coolant flange at
rear of cylinder head (arrows).
Pa
ge 12 of 35 C
ylinder head, removin
g and installin
g
11/18/2002 htt
p://127.0.0.1:8080/audi/servlet/Dis
play?action=Goto&t
yp
e=re
pair&id=AUDI.B5.GE02.15.2
Page 13 of 35
15-14
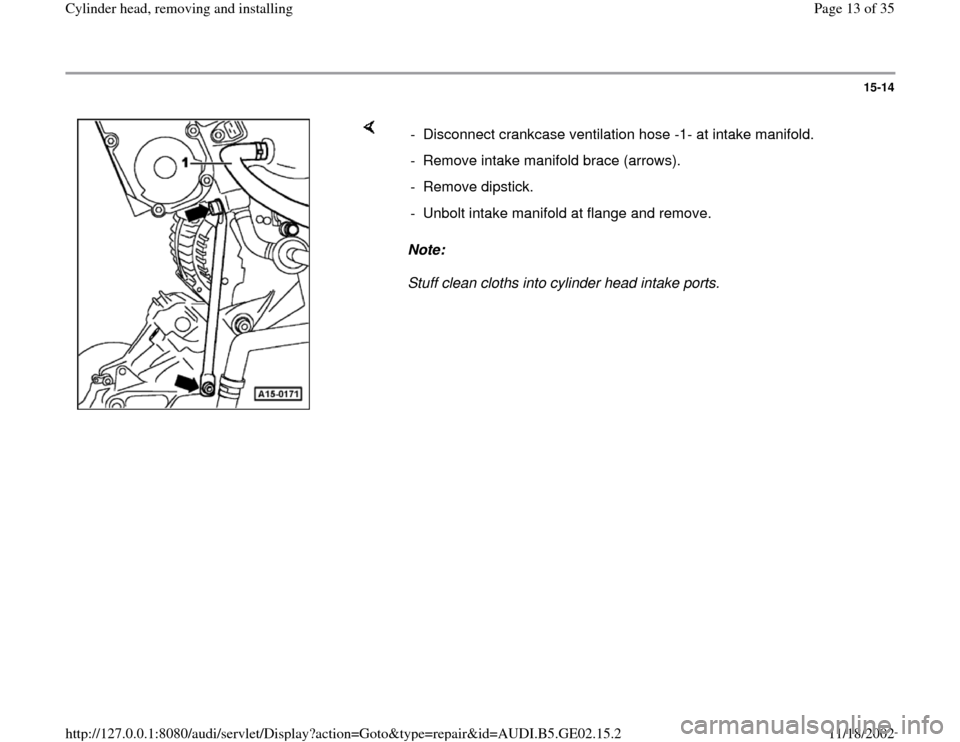
Note:
Stuff clean cloths into cylinder head intake ports. - Disconnect crankcase ventilation hose -1- at intake manifold.
- Remove intake manifold brace (arrows).
- Remove dipstick.
- Unbolt intake manifold at flange and remove.
Pa
ge 13 of 35 C
ylinder head, removin
g and installin
g
11/18/2002 htt
p://127.0.0.1:8080/audi/servlet/Dis
play?action=Goto&t
yp
e=re
pair&id=AUDI.B5.GE02.15.2
Page 17 of 35
15-17
Cylinder head cover, removing and
installing
Removing
- Remove engine covers.
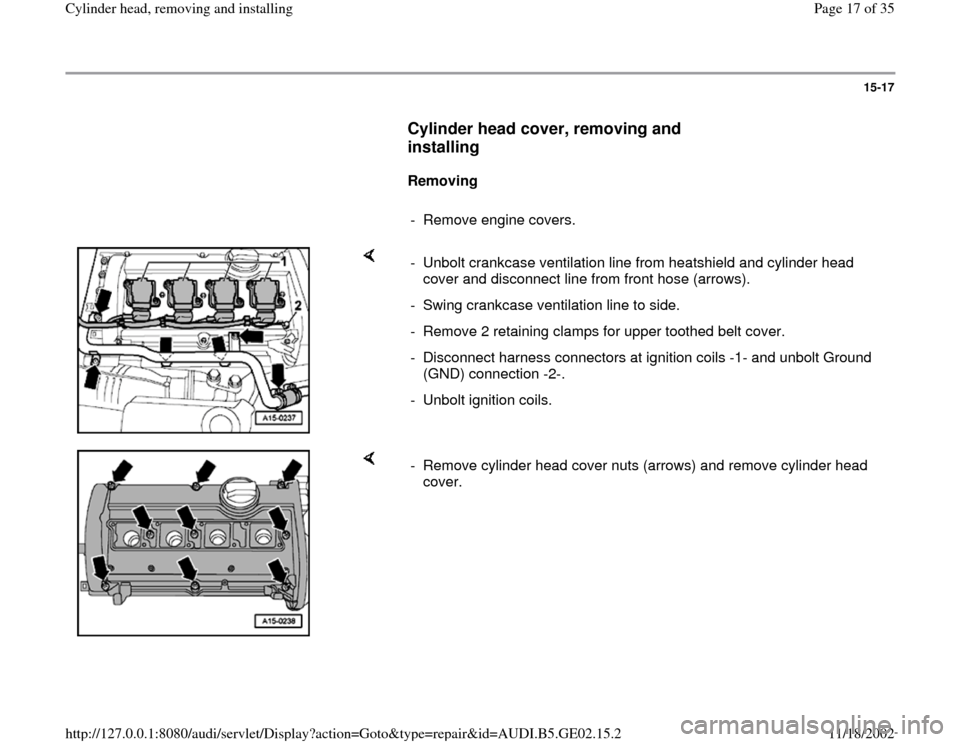
- Unbolt crankcase ventilation line from heatshield and cylinder head
cover and disconnect line from front hose (arrows).
- Swing crankcase ventilation line to side.
- Remove 2 retaining clamps for upper toothed belt cover.
- Disconnect harness connectors at ignition coils -1- and unbolt Ground
(GND) connection -2-.
- Unbolt ignition coils.
- Remove cylinder head cover nuts (arrows) and remove cylinder head
cover.
Pa
ge 17 of 35 C
ylinder head, removin
g and installin
g
11/18/2002 htt
p://127.0.0.1:8080/audi/servlet/Dis
play?action=Goto&t
yp
e=re
pair&id=AUDI.B5.GE02.15.2
Page 22 of 35

15-22
- Disconnect harness connector -1- at Engine Coolant Temperature
(ECT) sensor -G2-/-G62-.
- Disconnect harness connector -2- at temperature sensor II -G18-.
- Unclip all connections from cylinder head and move clear.
- Remove crankcase ventilation line -1-.
- Remove oil supply line at cylinder head -2-.
- Remove heat shield -3-.
- Unbolt turbocharger from exhaust manifold -4-.
- Disconnect coolant hose to heat exchanger at rear of cylinder head,
also detach retaining clamps at connecting flange.
- Remove upper toothed belt cover Page 13
-29
.
Pa
ge 22 of 35 C
ylinder head, removin
g and installin
g
11/18/2002 htt
p://127.0.0.1:8080/audi/servlet/Dis
play?action=Goto&t
yp
e=re
pair&id=AUDI.B5.GE02.15.2