AUDI A4 1999 B5 / 1.G General Trim Workshop Manual
Manufacturer: AUDI, Model Year: 1999,
Model line: A4,
Model: AUDI A4 1999 B5 / 1.G
Pages: 16, PDF Size: 0.32 MB
AUDI A4 1999 B5 / 1.G General Trim Workshop Manual
A4 1999 B5 / 1.G
AUDI
AUDI
https://www.carmanualsonline.info/img/6/887/w960_887-0.png
AUDI A4 1999 B5 / 1.G General Trim Workshop Manual
Trending: light, belt, lock, trunk, ABS, brake light, brake
Page 1 of 16
70-72
Trim (general)
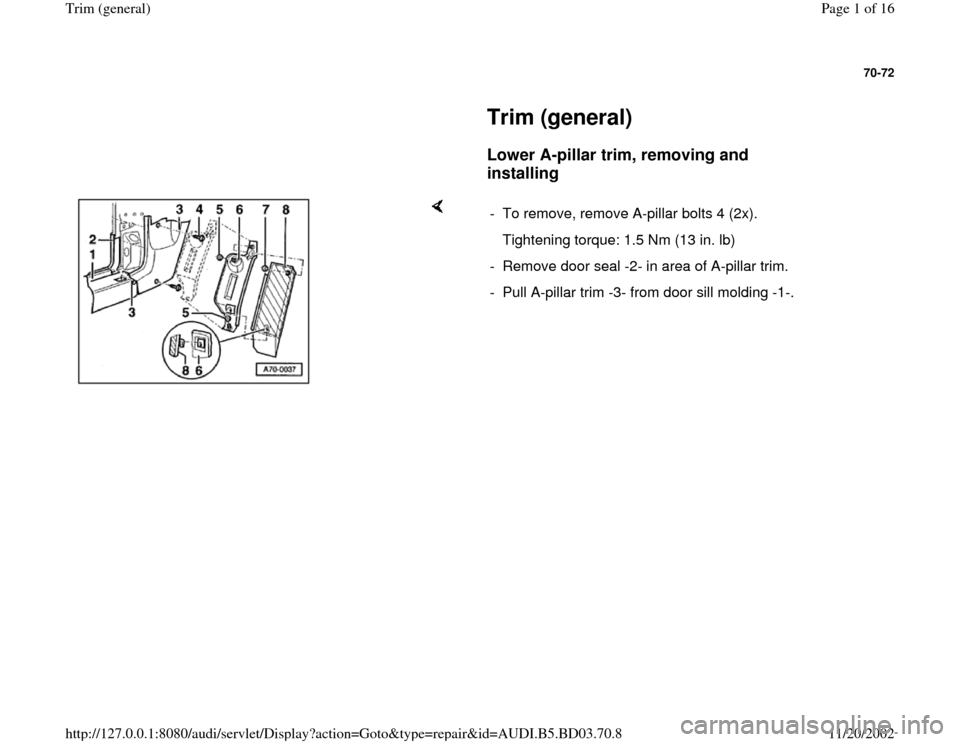
Lower A-pillar trim, removing and
installing
- To remove, remove A-pillar bolts 4 (2x).
Tightening torque: 1.5 Nm (13 in. lb)
- Remove door seal -2- in area of A-pillar trim.
- Pull A-pillar trim -3- from door sill molding -1-.
Pa
ge 1 of 16 Trim
(g
eneral
)
11/20/2002 htt
p://127.0.0.1:8080/audi/servlet/Dis
play?action=Goto&t
yp
e=re
pair&id=AUDI.B5.BD03.70.8
Page 2 of 16
70-73
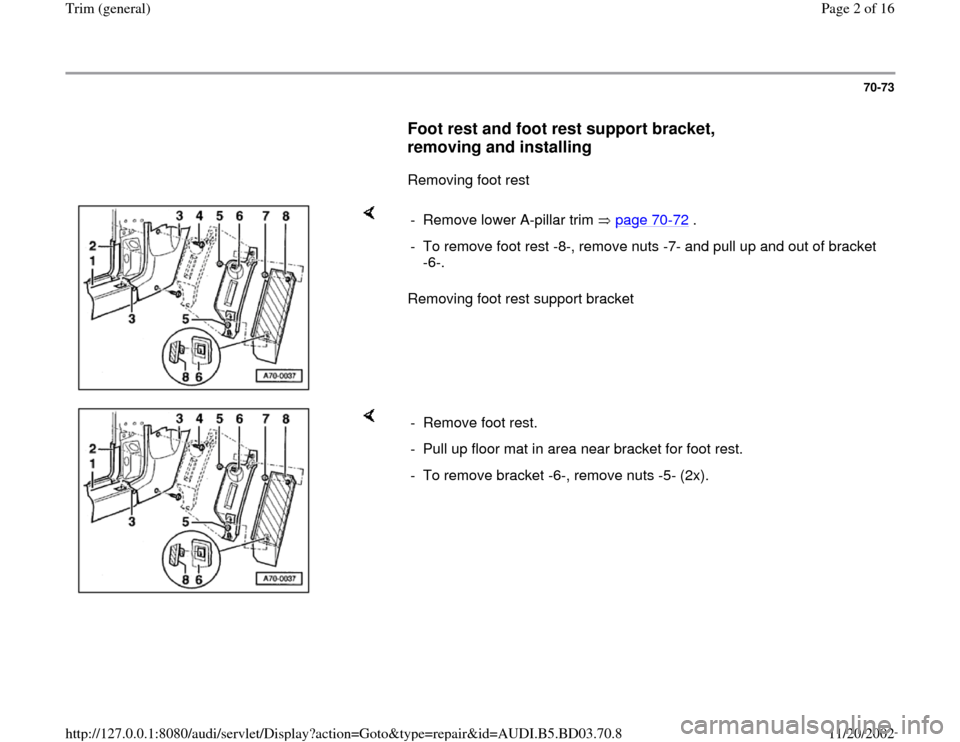
Foot rest and foot rest support bracket,
removing and installing
Removing foot rest
Removing foot rest support bracket - Remove lower A-pillar trim page 70
-72
.
- To remove foot rest -8-, remove nuts -7- and pull up and out of bracket
-6-.
- Remove foot rest.
- Pull up floor mat in area near bracket for foot rest.
- To remove bracket -6-, remove nuts -5- (2x).
Pa
ge 2 of 16 Trim
(g
eneral
)
11/20/2002 htt
p://127.0.0.1:8080/audi/servlet/Dis
play?action=Goto&t
yp
e=re
pair&id=AUDI.B5.BD03.70.8
Page 3 of 16
70-74
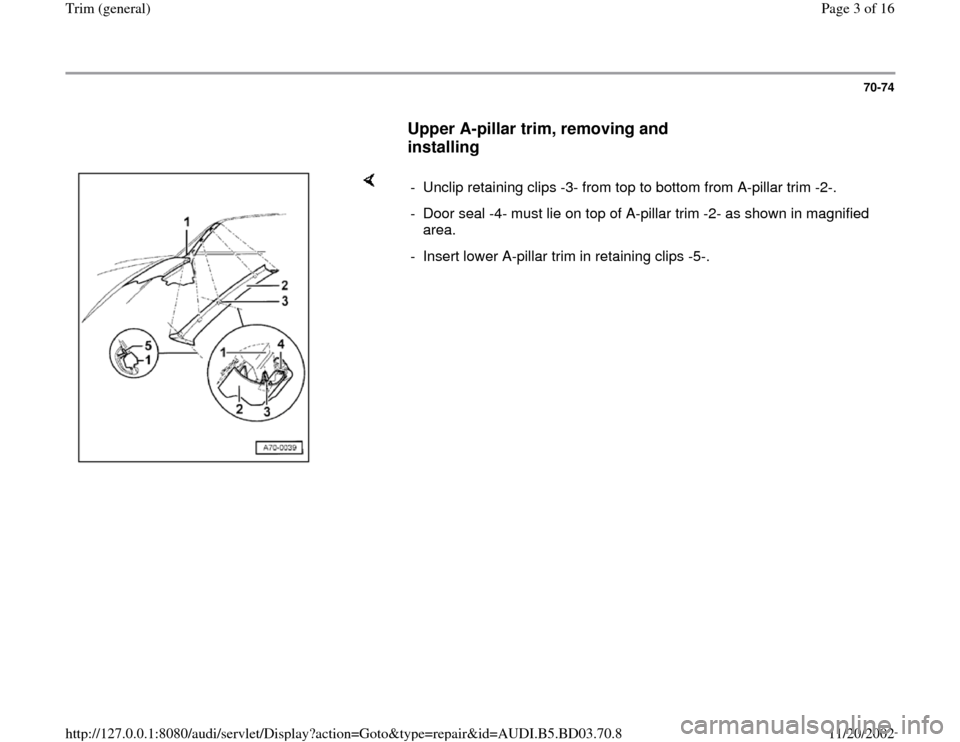
Upper A-pillar trim, removing and
installing
- Unclip retaining clips -3- from top to bottom from A-pillar trim -2-.
- Door seal -4- must lie on top of A-pillar trim -2- as shown in magnified
area.
- Insert lower A-pillar trim in retaining clips -5-.
Pa
ge 3 of 16 Trim
(g
eneral
)
11/20/2002 htt
p://127.0.0.1:8080/audi/servlet/Dis
play?action=Goto&t
yp
e=re
pair&id=AUDI.B5.BD03.70.8
Page 4 of 16
70-75
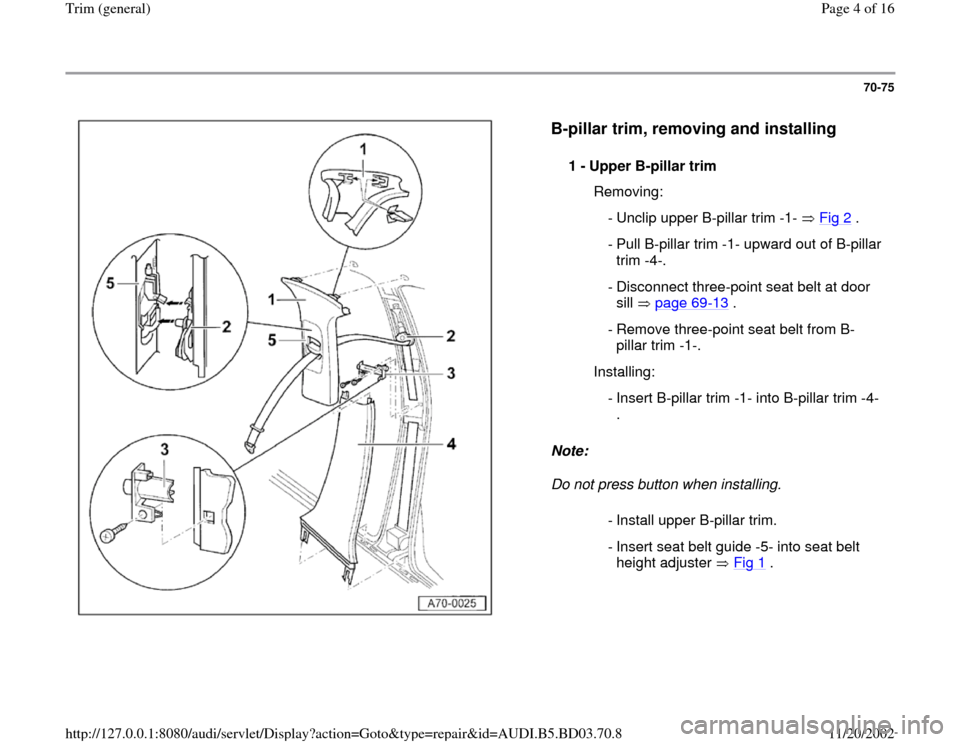
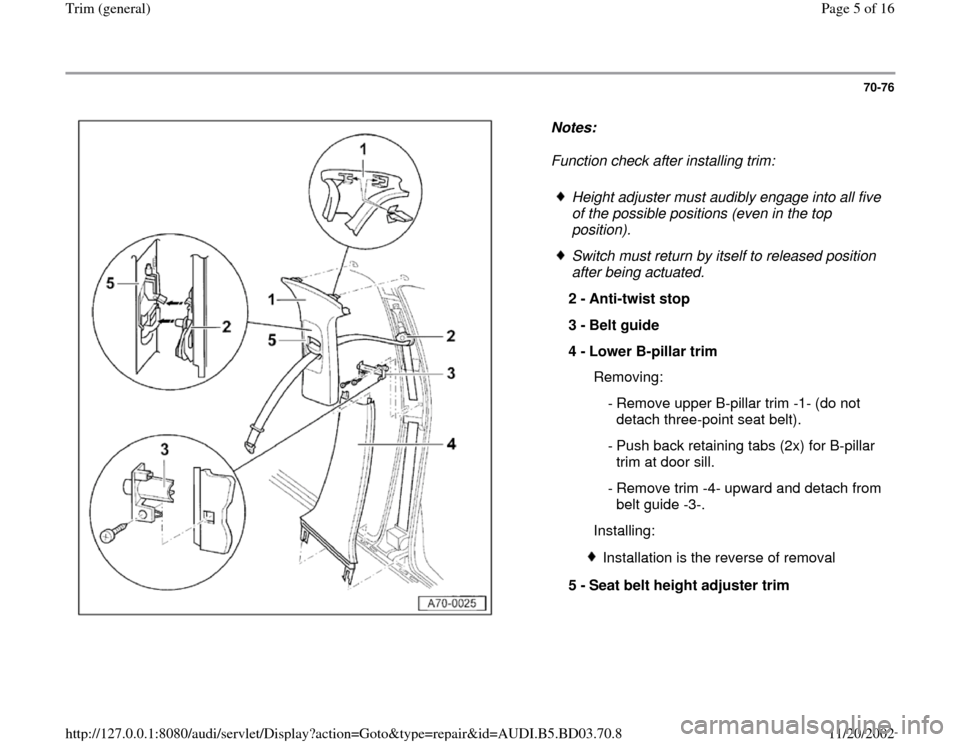
B-pillar trim, removing and installing
Note:
Do not press button when installing. 1 -
Upper B-pillar trim
Removing:
- Unclip upper B-pillar trim -1- Fig 2
.
- Pull B-pillar trim -1- upward out of B-pillar
trim -4-.
- Disconnect three-point seat belt at door
sill page 69
-13
.
- Remove three-point seat belt from B-
pillar trim -1-.
Installing:
- Insert B-pillar trim -1- into B-pillar trim -4-
.
- Install upper B-pillar trim.
- Insert seat belt guide -5- into seat belt
height adjuster Fig 1
.
Pa
ge 4 of 16 Trim
(g
eneral
)
11/20/2002 htt
p://127.0.0.1:8080/audi/servlet/Dis
play?action=Goto&t
yp
e=re
pair&id=AUDI.B5.BD03.70.8
Page 5 of 16
70-76
Notes:
Function check after installing trim:
Height adjuster must audibly engage into all five
of the possible positions (even in the top
position).
Switch must return by itself to released position
after being actuated.
2 -
Anti-twist stop
3 -
Belt guide
4 -
Lower B-pillar trim
Removing:
- Remove upper B-pillar trim -1- (do not
detach three-point seat belt).
- Push back retaining tabs (2x) for B-pillar
trim at door sill.
- Remove trim -4- upward and detach from
belt guide -3-.
Installing:
Installation is the reverse of removal
5 -
Seat belt height adjuster trim
Pa
ge 5 of 16 Trim
(g
eneral
)
11/20/2002 htt
p://127.0.0.1:8080/audi/servlet/Dis
play?action=Goto&t
yp
e=re
pair&id=AUDI.B5.BD03.70.8
Page 6 of 16
70-77
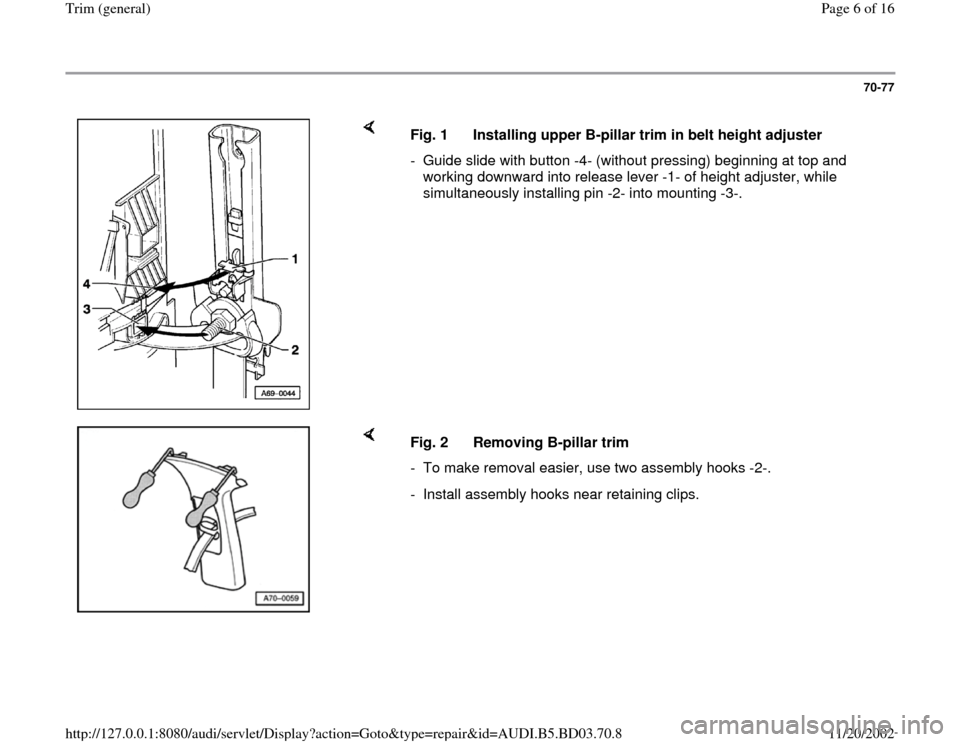
Fig. 1 Installing upper B-pillar trim in belt height adjuster
- Guide slide with button -4- (without pressing) beginning at top and
working downward into release lever -1- of height adjuster, while
simultaneously installing pin -2- into mounting -3-.
Fig. 2 Removing B-pillar trim
- To make removal easier, use two assembly hooks -2-.
- Install assembly hooks near retaining clips.
Pa
ge 6 of 16 Trim
(g
eneral
)
11/20/2002 htt
p://127.0.0.1:8080/audi/servlet/Dis
play?action=Goto&t
yp
e=re
pair&id=AUDI.B5.BD03.70.8
Page 7 of 16
70-78
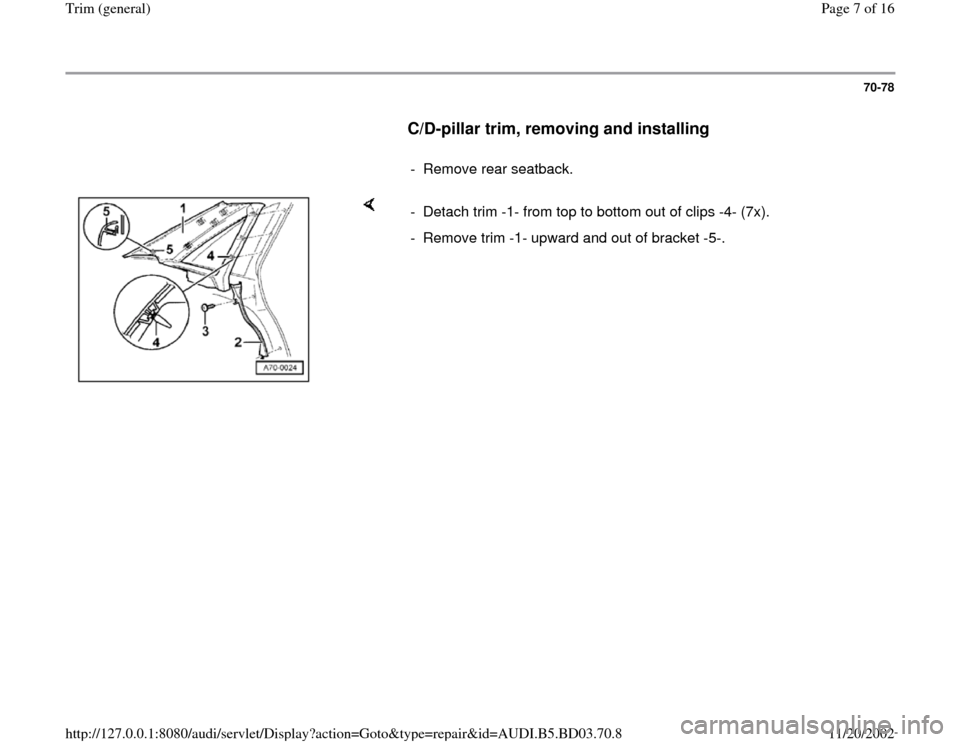
C/D-pillar trim, removing and installing
- Remove rear seatback.
- Detach trim -1- from top to bottom out of clips -4- (7x).
- Remove trim -1- upward and out of bracket -5-.
Pa
ge 7 of 16 Trim
(g
eneral
)
11/20/2002 htt
p://127.0.0.1:8080/audi/servlet/Dis
play?action=Goto&t
yp
e=re
pair&id=AUDI.B5.BD03.70.8
Page 8 of 16
70-79
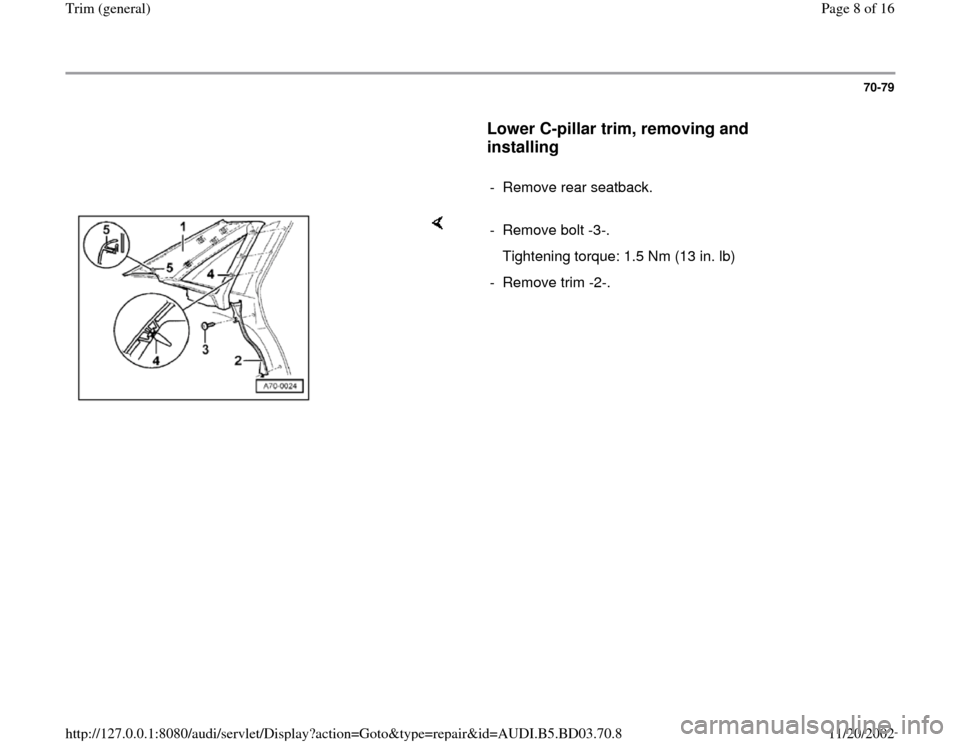
Lower C-pillar trim, removing and
installing
- Remove rear seatback.
- Remove bolt -3-.
Tightening torque: 1.5 Nm (13 in. lb)
- Remove trim -2-.
Pa
ge 8 of 16 Trim
(g
eneral
)
11/20/2002 htt
p://127.0.0.1:8080/audi/servlet/Dis
play?action=Goto&t
yp
e=re
pair&id=AUDI.B5.BD03.70.8
Page 9 of 16
70-80
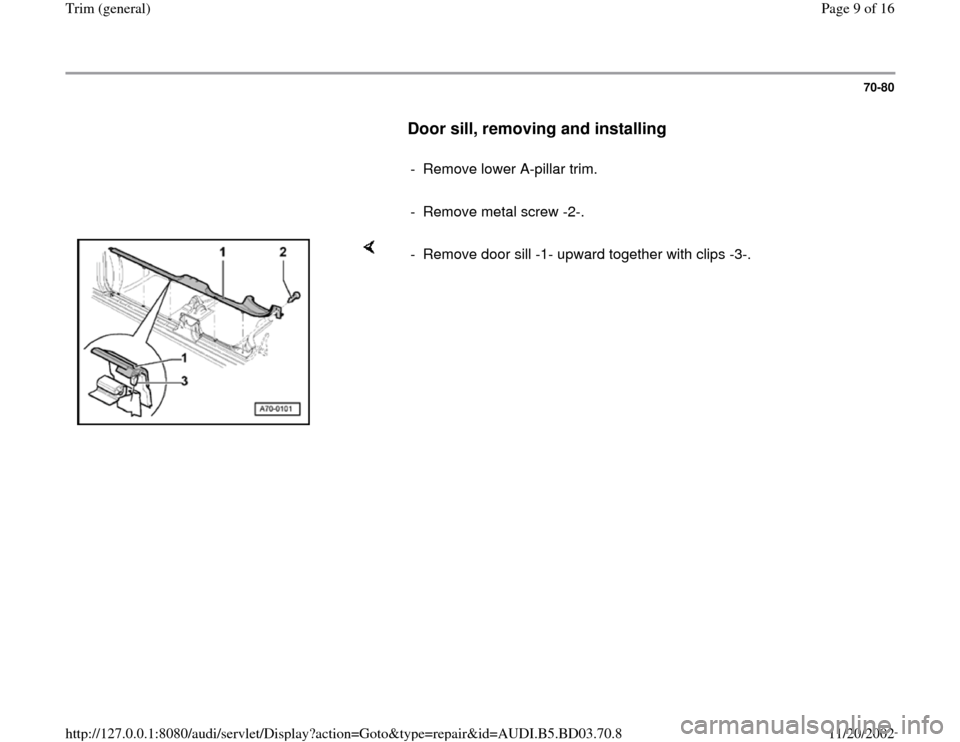
Door sill, removing and installing
- Remove lower A-pillar trim.
- Remove metal screw -2-.
- Remove door sill -1- upward together with clips -3-.
Pa
ge 9 of 16 Trim
(g
eneral
)
11/20/2002 htt
p://127.0.0.1:8080/audi/servlet/Dis
play?action=Goto&t
yp
e=re
pair&id=AUDI.B5.BD03.70.8
Page 10 of 16
70-81
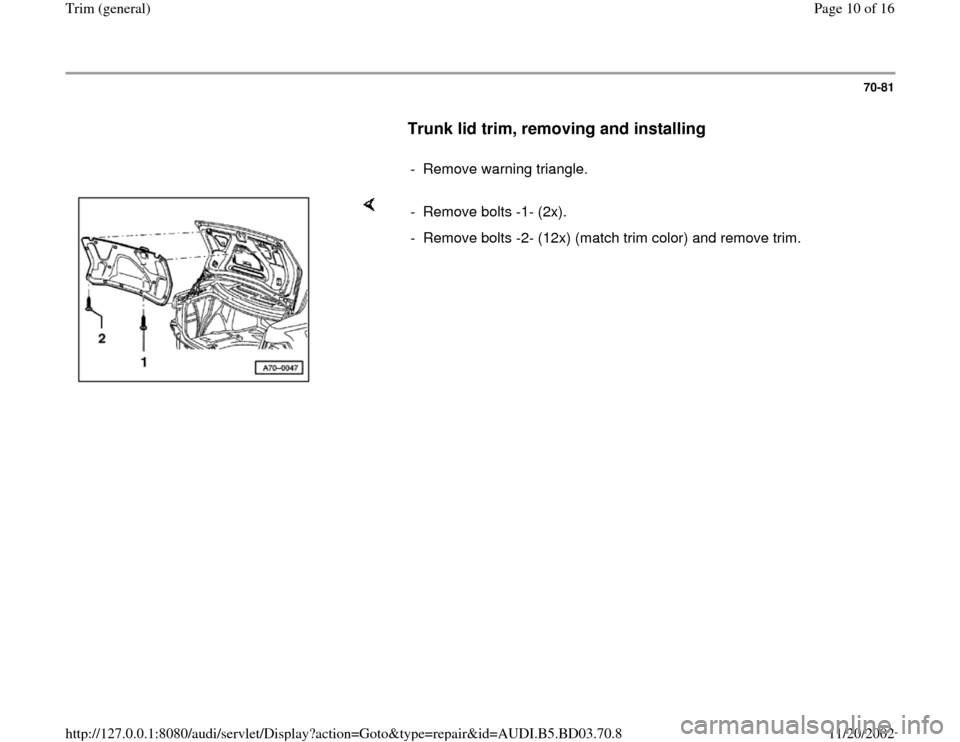
Trunk lid trim, removing and installing
- Remove warning triangle.
- Remove bolts -1- (2x).
- Remove bolts -2- (12x) (match trim color) and remove trim.
Pa
ge 10 of 16 Trim
(g
eneral
)
11/20/2002 htt
p://127.0.0.1:8080/audi/servlet/Dis
play?action=Goto&t
yp
e=re
pair&id=AUDI.B5.BD03.70.8
Trending: light, brake, belt, trunk, ABS, lock, tow
