AUDI A4 1999 B5 / 1.G Seatbelts Owner's Manual
Manufacturer: AUDI, Model Year: 1999,
Model line: A4,
Model: AUDI A4 1999 B5 / 1.G
Pages: 41, PDF Size: 0.61 MB
AUDI A4 1999 B5 / 1.G Seatbelts Owner's Manual
A4 1999 B5 / 1.G
AUDI
AUDI
https://www.carmanualsonline.info/img/6/901/w960_901-0.png
AUDI A4 1999 B5 / 1.G Seatbelts Owner's Manual
Trending: sensor, child seat, seat adjustment, trunk, light, warning, torque
Page 21 of 41
Three-point seat belt must not be hindered
by cables, wires or dampening material, etc
Pa
ge 21 of 41 Seat belts11/20/2002 htt
p://127.0.0.1:8080/audi/servlet/Dis
play?action=Goto&t
yp
e=re
pair&id=AUDI.B5.BD03.69.1
Page 22 of 41
69-17
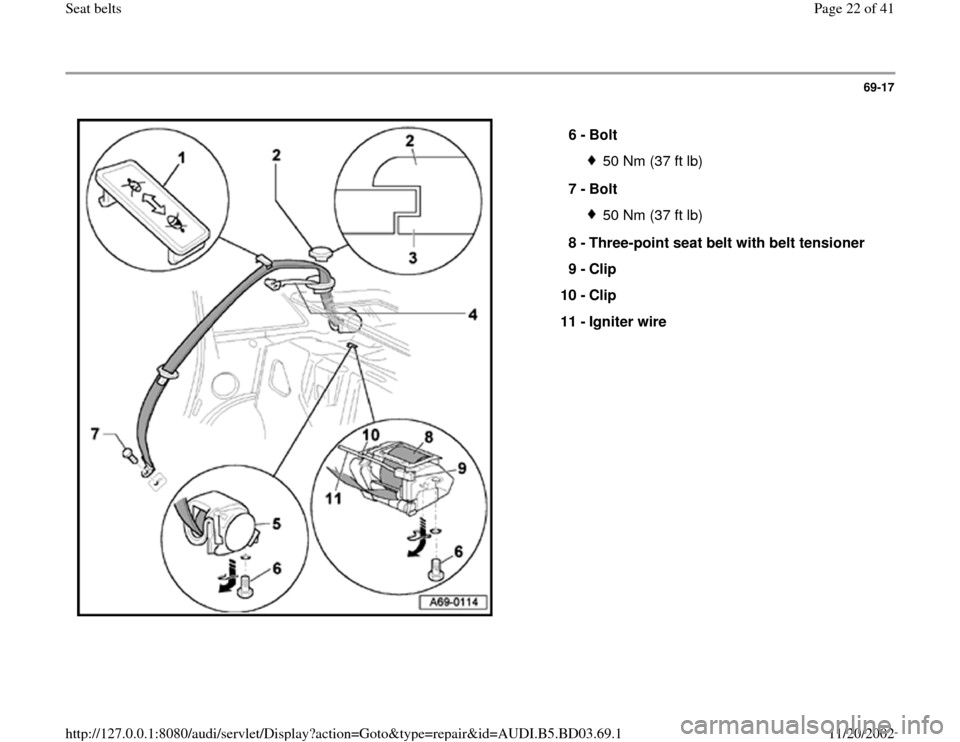
6 -
Bolt
50 Nm (37 ft lb)
7 -
Bolt 50 Nm (37 ft lb)
8 -
Three-point seat belt with belt tensioner
9 -
Clip
10 -
Clip
11 -
Igniter wire
Pa
ge 22 of 41 Seat belts11/20/2002 htt
p://127.0.0.1:8080/audi/servlet/Dis
play?action=Goto&t
yp
e=re
pair&id=AUDI.B5.BD03.69.1
Page 23 of 41
69-18
Avant
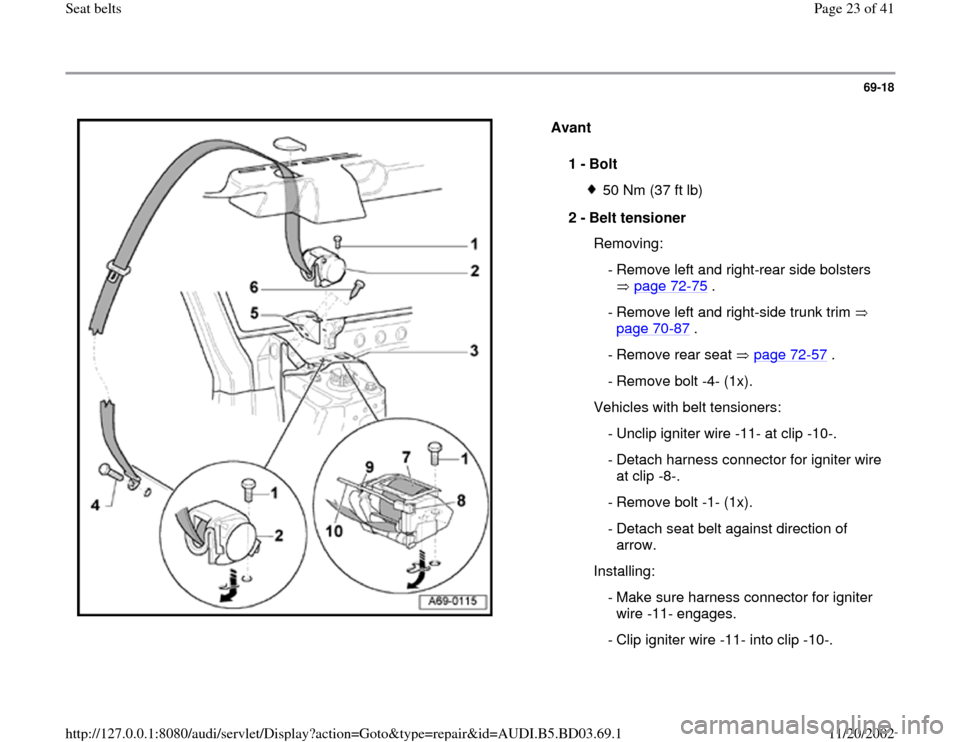
1 -
Bolt
50 Nm (37 ft lb)
2 -
Belt tensioner
Removing:
- Remove left and right-rear side bolsters
page 72
-75
.
- Remove left and right-side trunk trim
page 70
-87
.
- Remove rear seat page 72
-57
.
- Remove bolt -4- (1x).
Vehicles with belt tensioners:
- Unclip igniter wire -11- at clip -10-.
- Detach harness connector for igniter wire
at clip -8-.
- Remove bolt -1- (1x).
- Detach seat belt against direction of
arrow.
Installing:
- Make sure harness connector for igniter
wire -11- engages.
- Clip igniter wire -11- into clip -10-.
Pa
ge 23 of 41 Seat belts11/20/2002 htt
p://127.0.0.1:8080/audi/servlet/Dis
play?action=Goto&t
yp
e=re
pair&id=AUDI.B5.BD03.69.1
Page 24 of 41
Note:
The igniter wire -11- must not be located near the
belt webbing.
Pa
ge 24 of 41 Seat belts11/20/2002 htt
p://127.0.0.1:8080/audi/servlet/Dis
play?action=Goto&t
yp
e=re
pair&id=AUDI.B5.BD03.69.1
Page 25 of 41
69-19
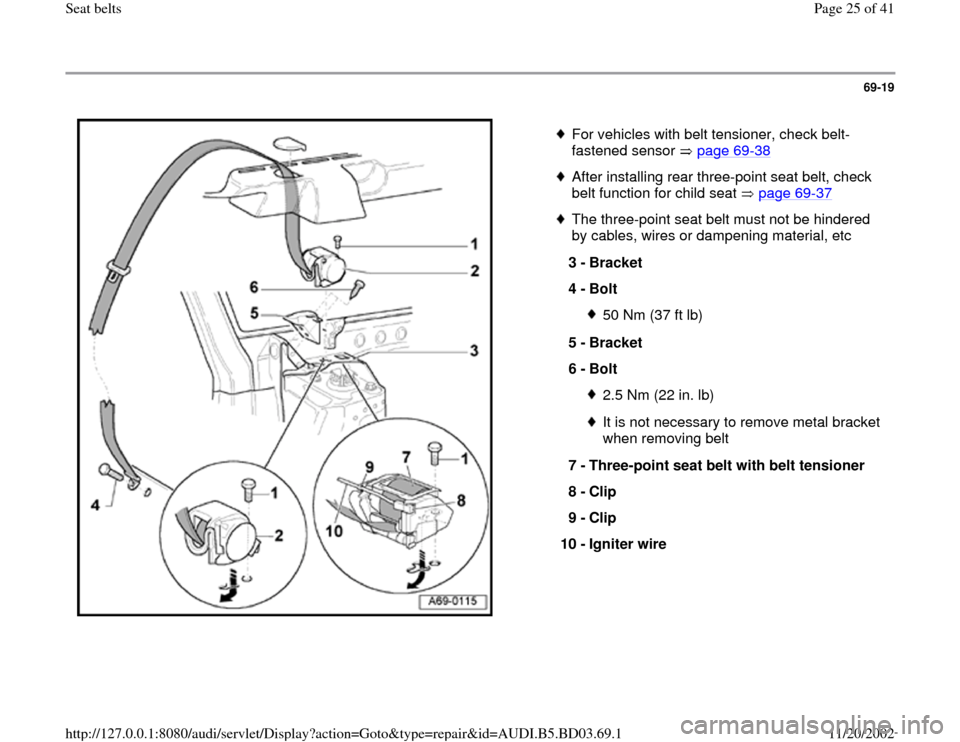
For vehicles with belt tensioner, check belt-
fastened sensor page 69
-38
After installing rear three-point seat belt, check
belt function for child seat page 69
-37
The three-point seat belt must not be hindered
by cables, wires or dampening material, etc
3 -
Bracket
4 -
Bolt
50 Nm (37 ft lb)
5 -
Bracket
6 -
Bolt 2.5 Nm (22 in. lb)It is not necessary to remove metal bracket
when removing belt
7 -
Three-point seat belt with belt tensioner
8 -
Clip
9 -
Clip
10 -
Igniter wire
Pa
ge 25 of 41 Seat belts11/20/2002 htt
p://127.0.0.1:8080/audi/servlet/Dis
play?action=Goto&t
yp
e=re
pair&id=AUDI.B5.BD03.69.1
Page 26 of 41
69-20
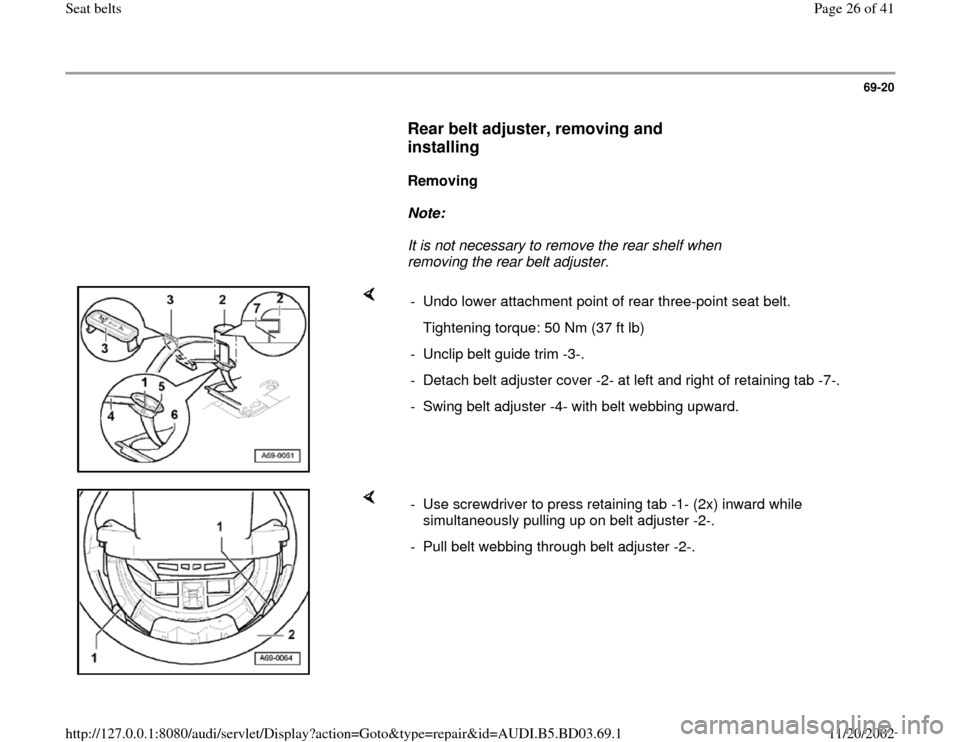
Rear belt adjuster, removing and
installing
Removing
Note:
It is not necessary to remove the rear shelf when
removing the rear belt adjuster.
- Undo lower attachment point of rear three-point seat belt.
Tightening torque: 50 Nm (37 ft lb)
- Unclip belt guide trim -3-.
- Detach belt adjuster cover -2- at left and right of retaining tab -7-.
- Swing belt adjuster -4- with belt webbing upward.
- Use screwdriver to press retaining tab -1- (2x) inward while
simultaneously pulling up on belt adjuster -2-.
- Pull belt webbing through belt adjuster -2-.
Pa
ge 26 of 41 Seat belts11/20/2002 htt
p://127.0.0.1:8080/audi/servlet/Dis
play?action=Goto&t
yp
e=re
pair&id=AUDI.B5.BD03.69.1
Page 27 of 41
69-21
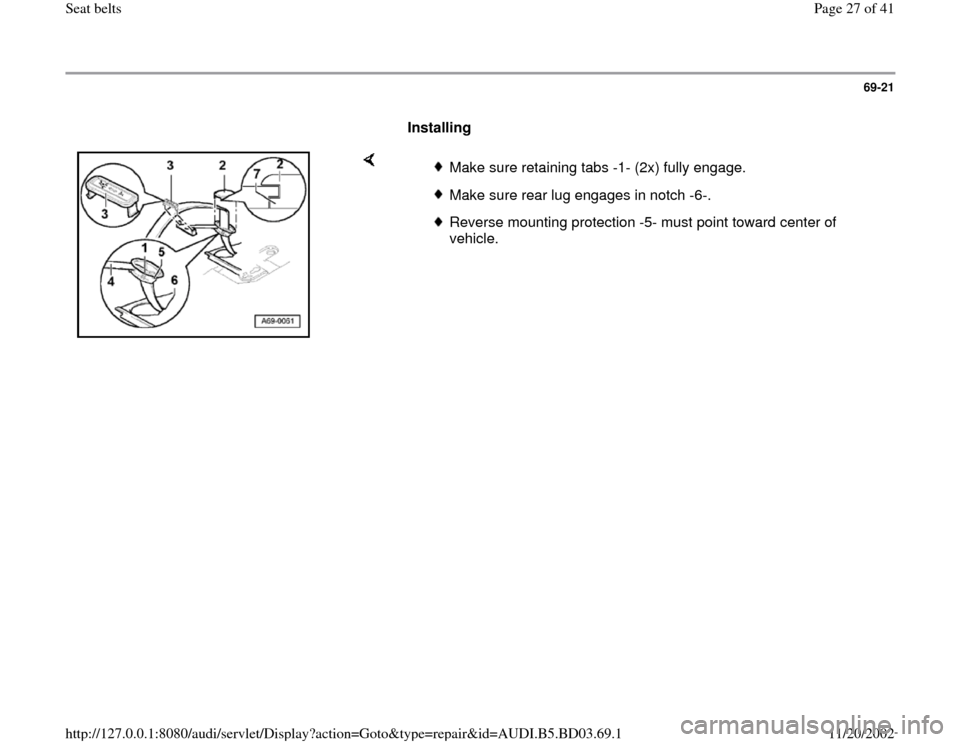
Installing
Make sure retaining tabs -1- (2x) fully engage.
Make sure rear lug engages in notch -6-.
Reverse mounting protection -5- must point toward center of
vehicle.
Pa
ge 27 of 41 Seat belts11/20/2002 htt
p://127.0.0.1:8080/audi/servlet/Dis
play?action=Goto&t
yp
e=re
pair&id=AUDI.B5.BD03.69.1
Page 28 of 41
69-22
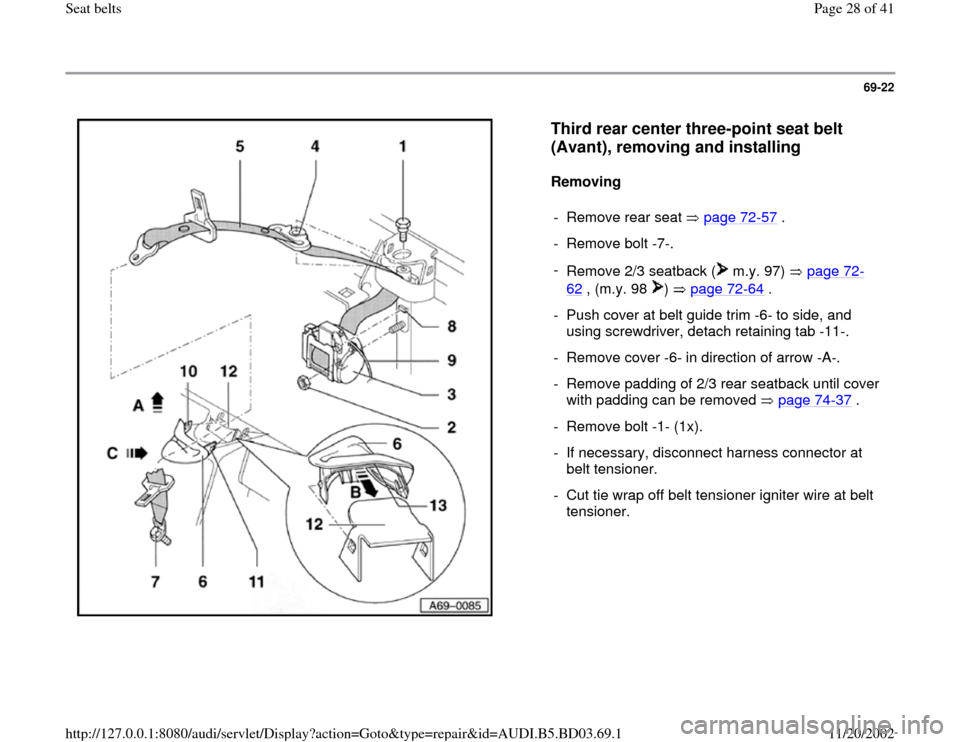
Third rear center three-point seat belt
(Avant), removing and installing
Removing
- Remove rear seat page 72
-57
.
- Remove bolt -7-.
-
Remove 2/3 seatback ( m.y. 97) page 72
-
62
, (m.y. 98 ) page 72
-64
.
- Push cover at belt guide trim -6- to side, and
using screwdriver, detach retaining tab -11-.
- Remove cover -6- in direction of arrow -A-.
- Remove padding of 2/3 rear seatback until cover
with padding can be removed page 74
-37
.
- Remove bolt -1- (1x).
- If necessary, disconnect harness connector at
belt tensioner.
- Cut tie wrap off belt tensioner igniter wire at belt
tensioner.
Pa
ge 28 of 41 Seat belts11/20/2002 htt
p://127.0.0.1:8080/audi/servlet/Dis
play?action=Goto&t
yp
e=re
pair&id=AUDI.B5.BD03.69.1
Page 29 of 41
69-23
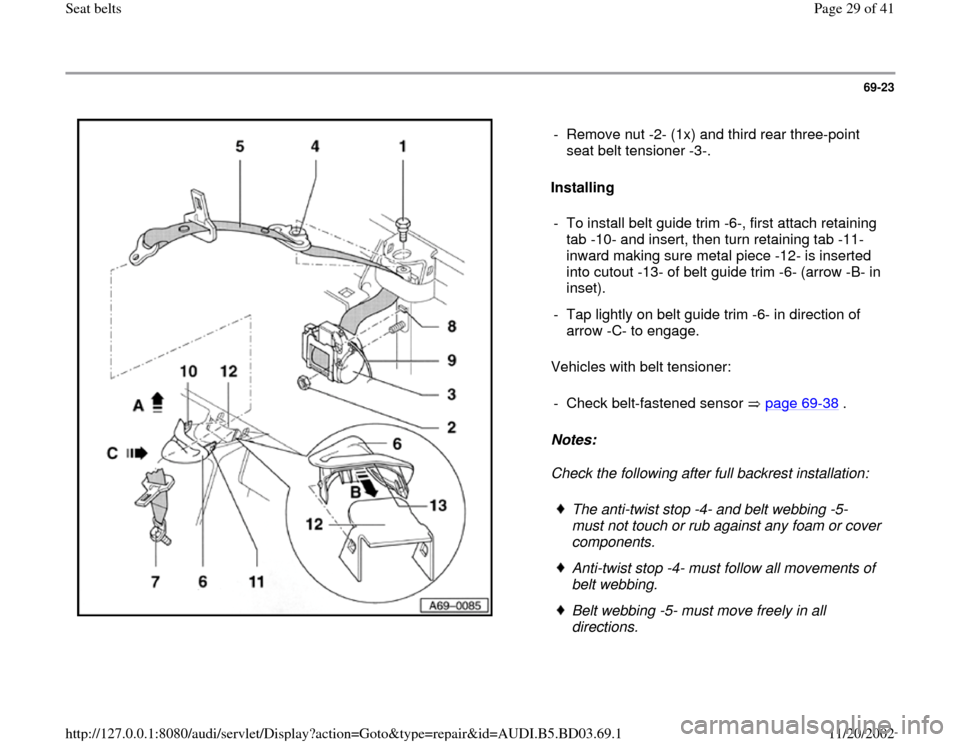
Installing
Vehicles with belt tensioner:
Notes:
Check the following after full backrest installation: - Remove nut -2- (1x) and third rear three-point
seat belt tensioner -3-.
- To install belt guide trim -6-, first attach retaining
tab -10- and insert, then turn retaining tab -11-
inward making sure metal piece -12- is inserted
into cutout -13- of belt guide trim -6- (arrow -B- in
inset).
- Tap lightly on belt guide trim -6- in direction of
arrow -C- to engage.
- Check belt-fastened sensor page 69
-38
.
The anti-twist stop -4- and belt webbing -5-
must not touch or rub against any foam or cover
components.
Anti-twist stop -4- must follow all movements of
belt webbing.
Belt webbing -5- must move freely in all
directions.
Pa
ge 29 of 41 Seat belts11/20/2002 htt
p://127.0.0.1:8080/audi/servlet/Dis
play?action=Goto&t
yp
e=re
pair&id=AUDI.B5.BD03.69.1
Page 30 of 41
69-24
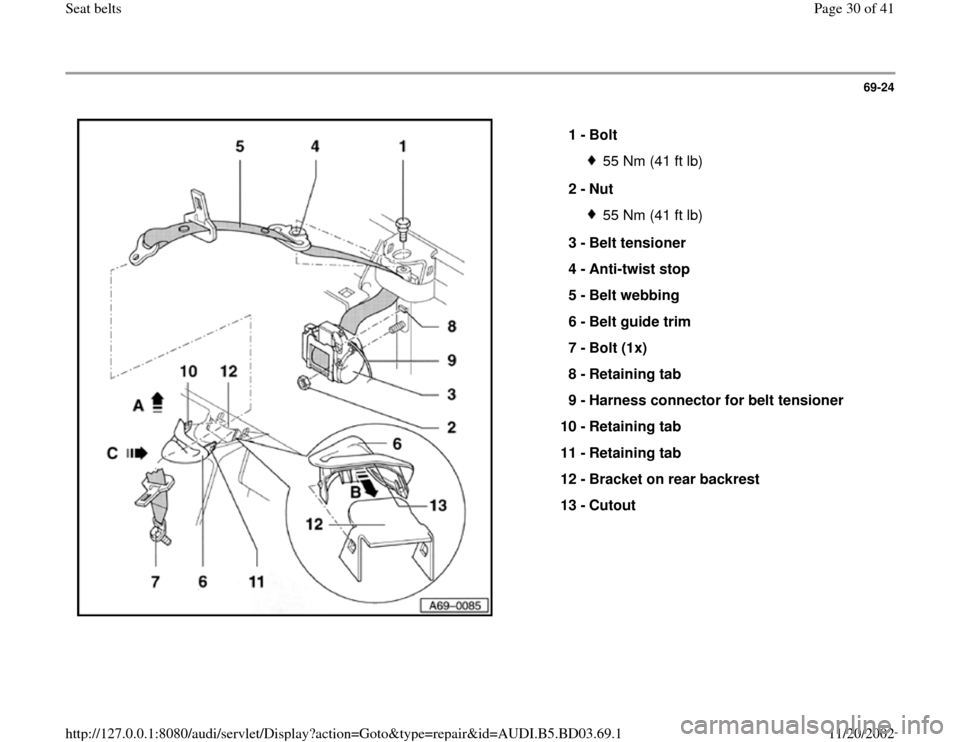
1 -
Bolt
55 Nm (41 ft lb)
2 -
Nut 55 Nm (41 ft lb)
3 -
Belt tensioner
4 -
Anti-twist stop
5 -
Belt webbing
6 -
Belt guide trim
7 -
Bolt (1x)
8 -
Retaining tab
9 -
Harness connector for belt tensioner
10 -
Retaining tab
11 -
Retaining tab
12 -
Bracket on rear backrest
13 -
Cutout
Pa
ge 30 of 41 Seat belts11/20/2002 htt
p://127.0.0.1:8080/audi/servlet/Dis
play?action=Goto&t
yp
e=re
pair&id=AUDI.B5.BD03.69.1
Trending: tow, window, CD player, stop start, ECU, width, seat adjustment
