air suspension AUDI A4 1999 B5 / 1.G Suspension Rear Struts And Upper Control Arm Workshop Manual
[x] Cancel search | Manufacturer: AUDI, Model Year: 1999, Model line: A4, Model: AUDI A4 1999 B5 / 1.GPages: 12, PDF Size: 0.36 MB
Page 1 of 12
42-65
Suspension strut and upper
control arm, removing and
installing
Removing
Vehicle must be standing on its wheels
above vehicle lift
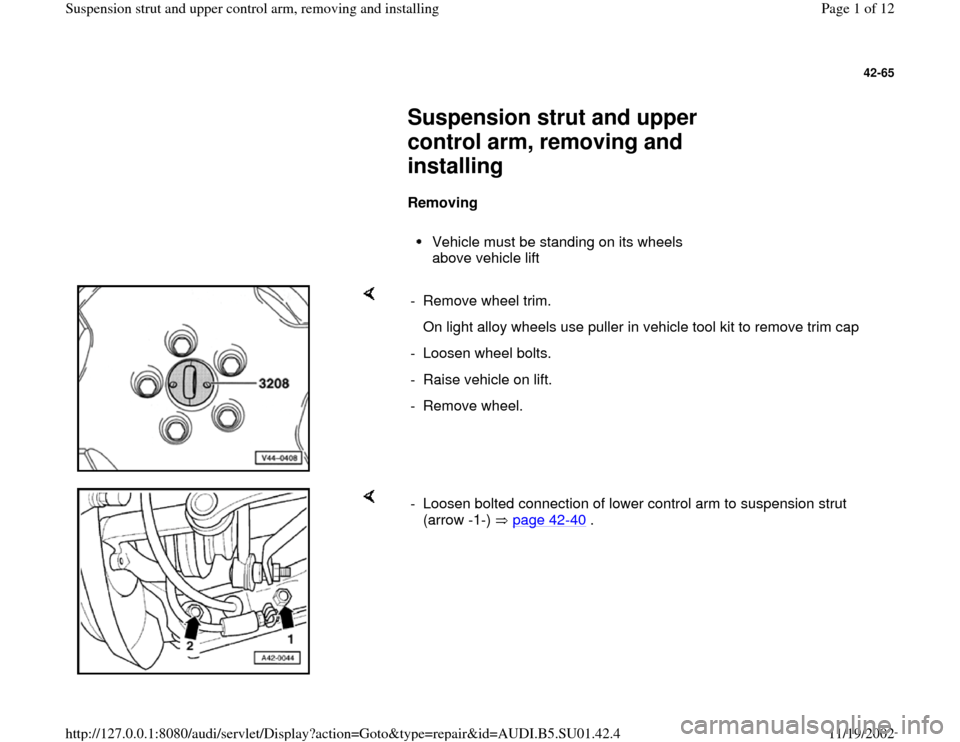
- Remove wheel trim.
On light alloy wheels use puller in vehicle tool kit to remove trim cap
- Loosen wheel bolts.
- Raise vehicle on lift.
- Remove wheel.
- Loosen bolted connection of lower control arm to suspension strut
(arrow -1-) page 42
-40
.
Pa
ge 1 of 12 Sus
pension strut and u
pp
er control arm, removin
g and installin
g
11/19/2002 htt
p://127.0.0.1:8080/audi/servlet/Dis
play?action=Goto&t
yp
e=re
pair&id=AUDI.B5.SU01.42.4
Page 2 of 12
42-66
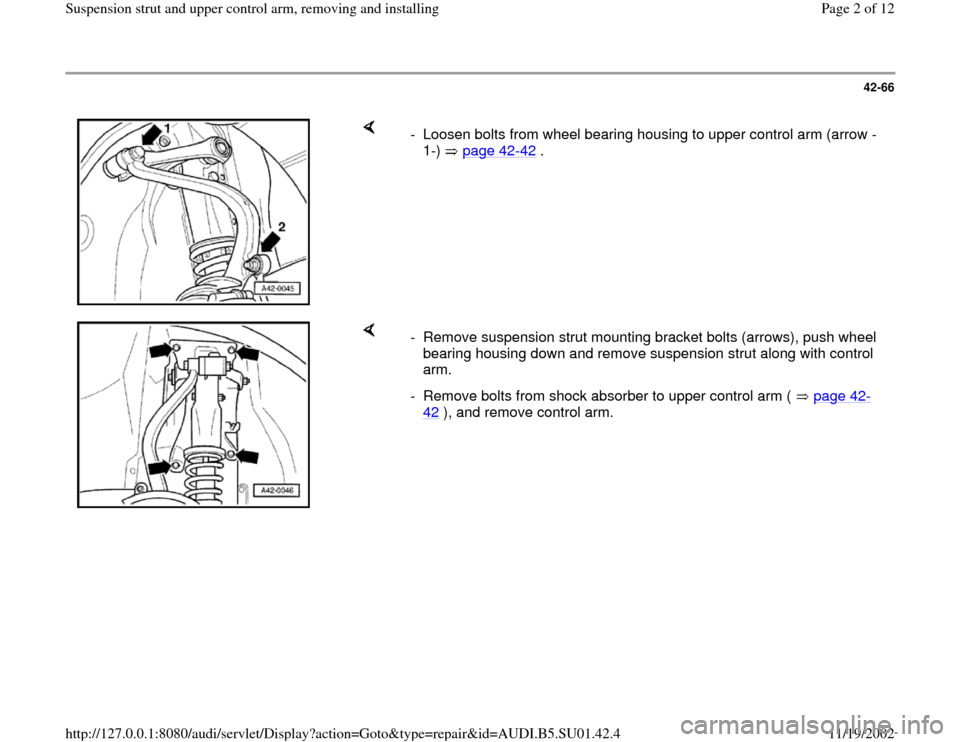
- Loosen bolts from wheel bearing housing to upper control arm (arrow -
1-) page 42
-42
.
- Remove suspension strut mounting bracket bolts (arrows), push wheel
bearing housing down and remove suspension strut along with control
arm.
- Remove bolts from shock absorber to upper control arm ( page 42
-
42
), and remove control arm.
Pa
ge 2 of 12 Sus
pension strut and u
pp
er control arm, removin
g and installin
g
11/19/2002 htt
p://127.0.0.1:8080/audi/servlet/Dis
play?action=Goto&t
yp
e=re
pair&id=AUDI.B5.SU01.42.4
Page 4 of 12
42-68
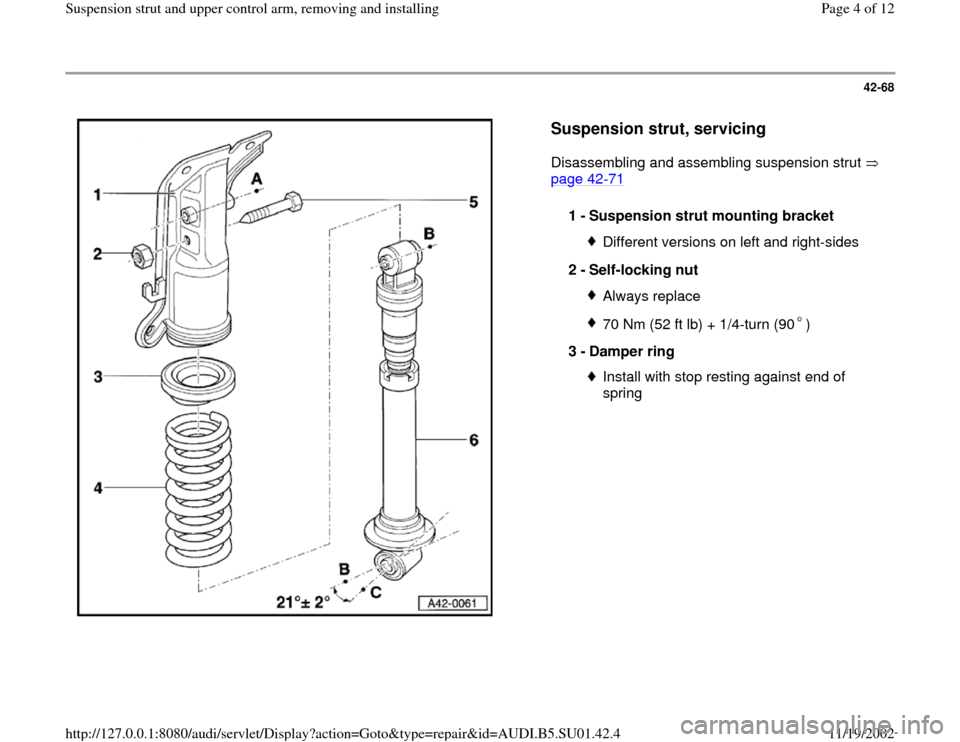
Suspension strut, servicing
Disassembling and assembling suspension strut
page 42
-71
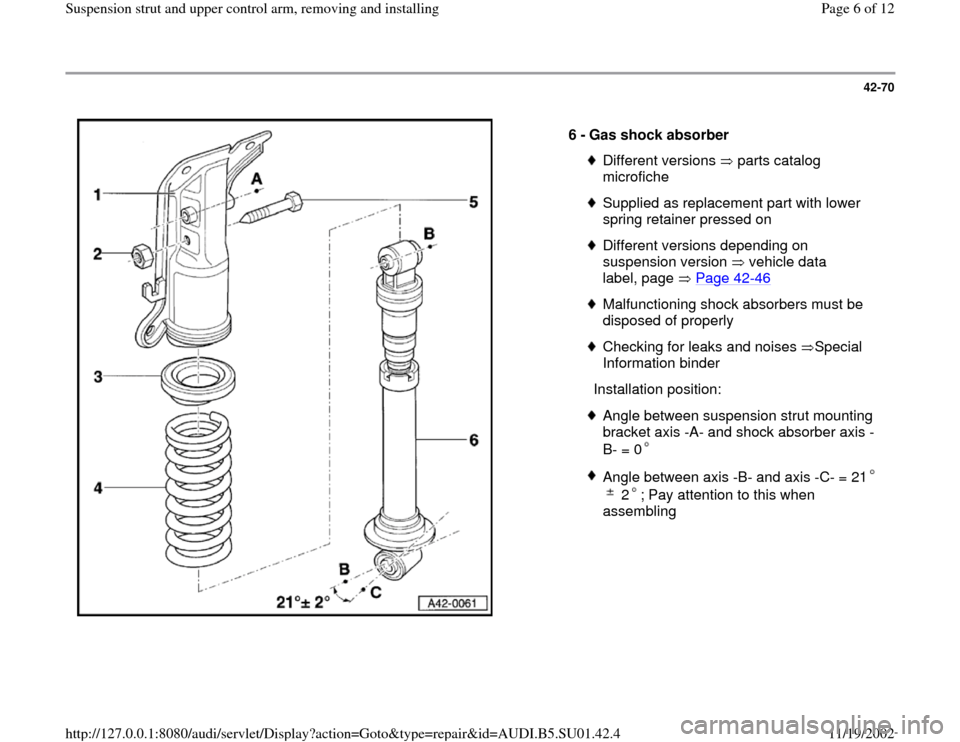
1 -
Suspension strut mounting bracket
Different versions on left and right-sides
2 -
Self-locking nut Always replace70 Nm (52 ft lb) + 1/4-turn (90 )
3 -
Damper ring
Install with stop resting against end of
spring
Pa
ge 4 of 12 Sus
pension strut and u
pp
er control arm, removin
g and installin
g
11/19/2002 htt
p://127.0.0.1:8080/audi/servlet/Dis
play?action=Goto&t
yp
e=re
pair&id=AUDI.B5.SU01.42.4
Page 5 of 12
42-69
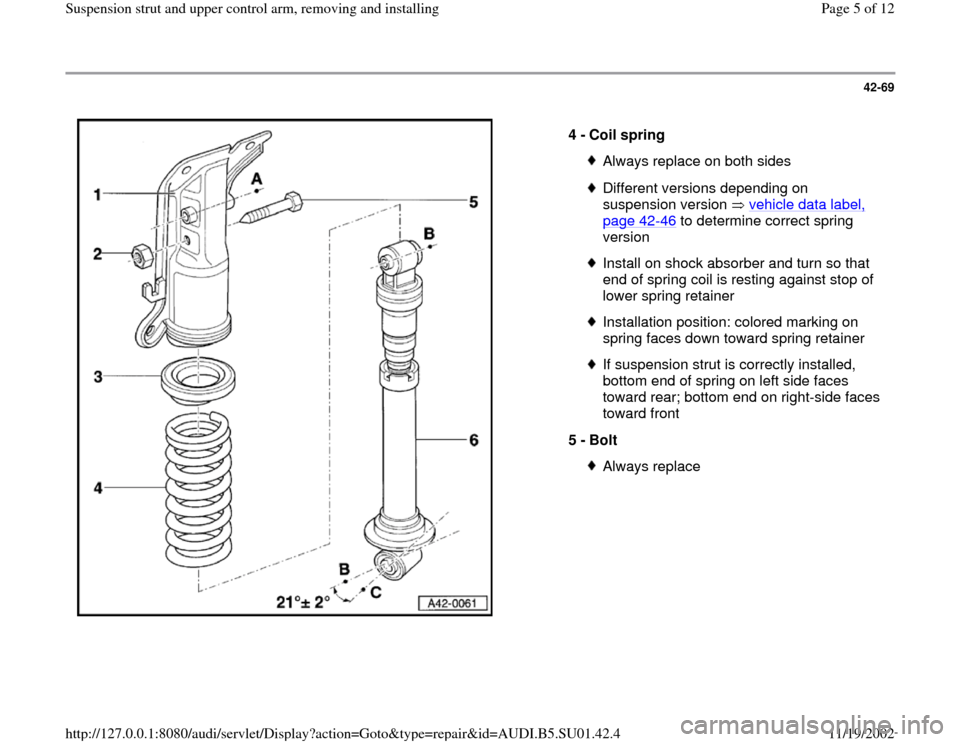
4 -
Coil spring
Always replace on both sidesDifferent versions depending on
suspension version vehicle data label, page 42
-46
to determine correct spring
version
Install on shock absorber and turn so that
end of spring coil is resting against stop of
lower spring retainer Installation position: colored marking on
spring faces down toward spring retainer If suspension strut is correctly installed,
bottom end of spring on left side faces
toward rear; bottom end on right-side faces
toward front
5 -
Bolt Always replace
Pa
ge 5 of 12 Sus
pension strut and u
pp
er control arm, removin
g and installin
g
11/19/2002 htt
p://127.0.0.1:8080/audi/servlet/Dis
play?action=Goto&t
yp
e=re
pair&id=AUDI.B5.SU01.42.4
Page 6 of 12
42-70
6 -
Gas shock absorber
Different versions parts catalog
microfiche Supplied as replacement part with lower
spring retainer pressed on Different versions depending on
suspension version vehicle data
label, page Page 42
-46
Malfunctioning shock absorbers must be
disposed of properly Checking for leaks and noises Special
Information binder
Installation position:
Angle between suspension strut mounting
bracket axis -A- and shock absorber axis -
B- = 0 Angle between axis -B- and axis -C- = 21
2 ; Pay attention to this when
assembling
Pa
ge 6 of 12 Sus
pension strut and u
pp
er control arm, removin
g and installin
g
11/19/2002 htt
p://127.0.0.1:8080/audi/servlet/Dis
play?action=Goto&t
yp
e=re
pair&id=AUDI.B5.SU01.42.4
Page 7 of 12
42-71
Disassembling and assembling suspension
strut
Disassembling
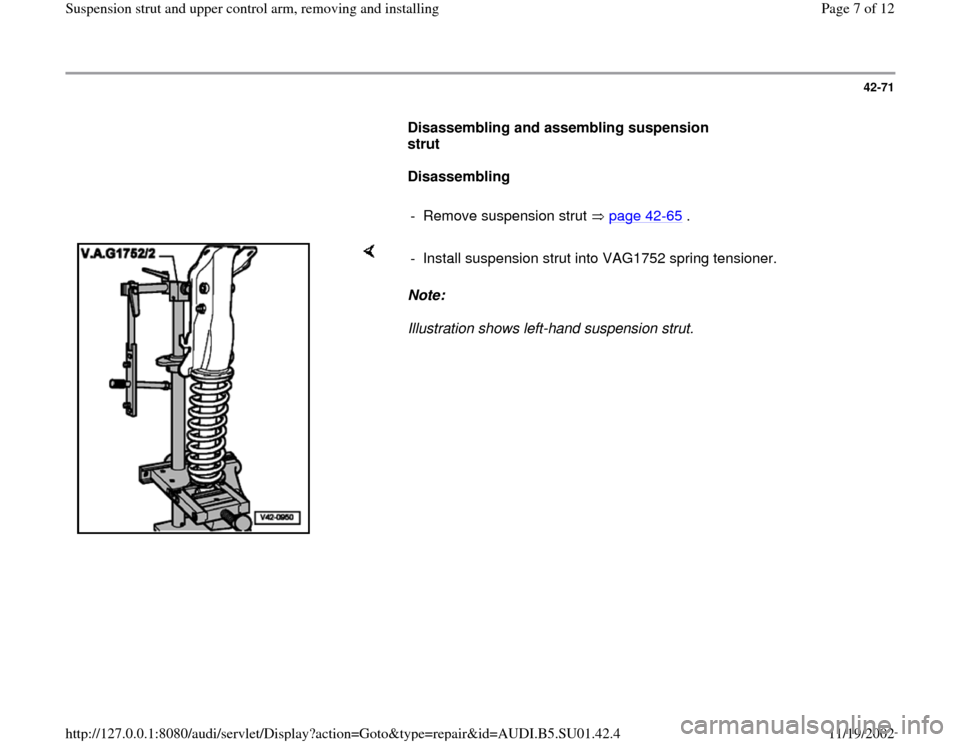
- Remove suspension strut page 42
-65
.
Note:
Illustration shows left-hand suspension strut. - Install suspension strut into VAG1752 spring tensioner.
Pa
ge 7 of 12 Sus
pension strut and u
pp
er control arm, removin
g and installin
g
11/19/2002 htt
p://127.0.0.1:8080/audi/servlet/Dis
play?action=Goto&t
yp
e=re
pair&id=AUDI.B5.SU01.42.4
Page 9 of 12
42-73
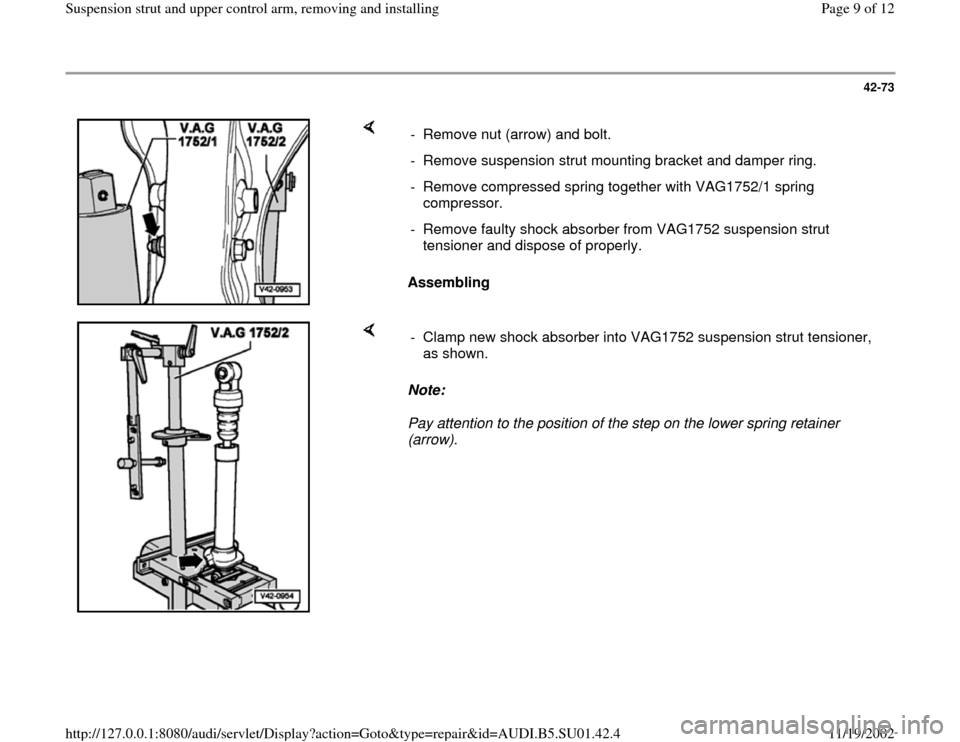
Assembling - Remove nut (arrow) and bolt.
- Remove suspension strut mounting bracket and damper ring.
- Remove compressed spring together with VAG1752/1 spring
compressor.
- Remove faulty shock absorber from VAG1752 suspension strut
tensioner and dispose of properly.
Note:
Pay attention to the position of the step on the lower spring retainer
(arrow). - Clamp new shock absorber into VAG1752 suspension strut tensioner,
as shown.
Pa
ge 9 of 12 Sus
pension strut and u
pp
er control arm, removin
g and installin
g
11/19/2002 htt
p://127.0.0.1:8080/audi/servlet/Dis
play?action=Goto&t
yp
e=re
pair&id=AUDI.B5.SU01.42.4
Page 11 of 12
42-75
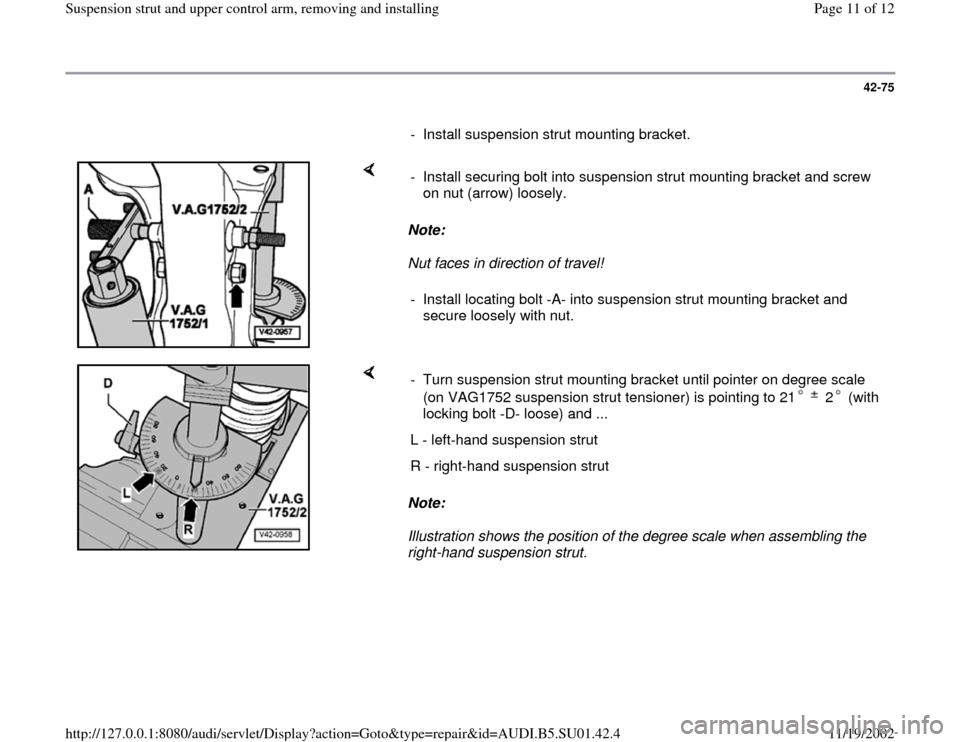
- Install suspension strut mounting bracket.
Note:
Nut faces in direction of travel! - Install securing bolt into suspension strut mounting bracket and screw
on nut (arrow) loosely.
- Install locating bolt -A- into suspension strut mounting bracket and
secure loosely with nut.
Note:
Illustration shows the position of the degree scale when assembling the
right-hand suspension strut. - Turn suspension strut mounting bracket until pointer on degree scale
(on VAG1752 suspension strut tensioner) is pointing to 21 2 (with
locking bolt -D- loose) and ... L - left-hand suspension strut
R - right-hand suspension strut
Pa
ge 11 of 12 Sus
pension strut and u
pp
er control arm, removin
g and installin
g
11/19/2002 htt
p://127.0.0.1:8080/audi/servlet/Dis
play?action=Goto&t
yp
e=re
pair&id=AUDI.B5.SU01.42.4
Page 12 of 12
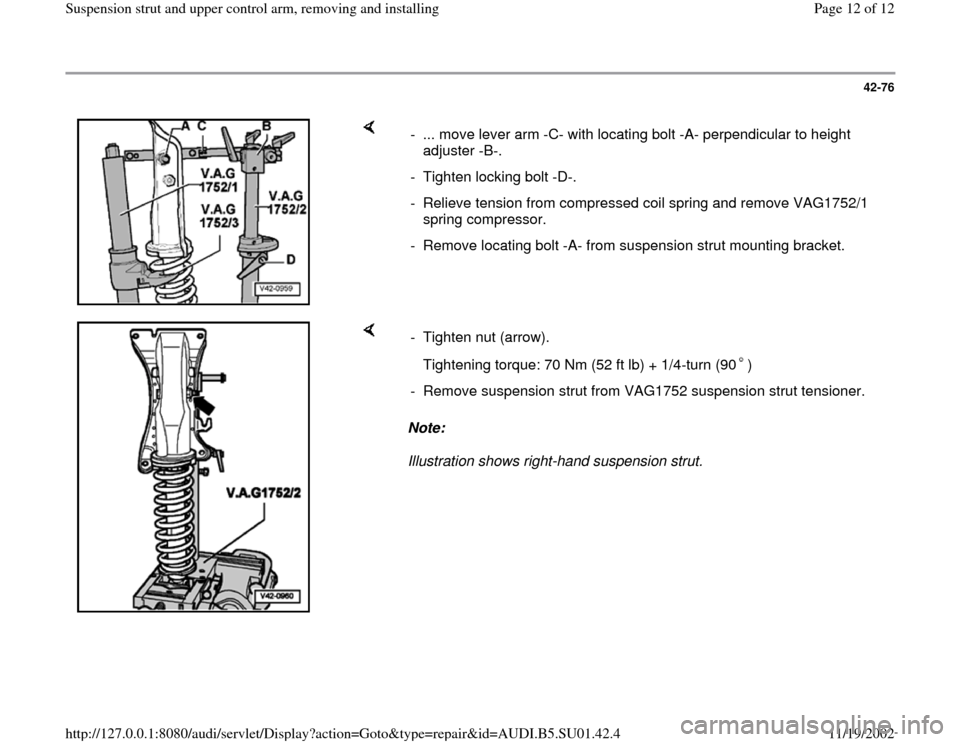
42-76
- ... move lever arm -C- with locating bolt -A- perpendicular to height
adjuster -B-.
- Tighten locking bolt -D-.
- Relieve tension from compressed coil spring and remove VAG1752/1
spring compressor.
- Remove locating bolt -A- from suspension strut mounting bracket.
Note:
Illustration shows right-hand suspension strut. - Tighten nut (arrow).
Tightening torque: 70 Nm (52 ft lb) + 1/4-turn (90 )- Remove suspension strut from VAG1752 suspension strut tensioner.
Pa
ge 12 of 12 Sus
pension strut and u
pp
er control arm, removin
g and installin
g
11/19/2002 htt
p://127.0.0.1:8080/audi/servlet/Dis
play?action=Goto&t
yp
e=re
pair&id=AUDI.B5.SU01.42.4