transmission AUDI A4 2000 B5 / 1.G 01W Transmission Differentila Disassemble And Assemble Workshop Manual
[x] Cancel search | Manufacturer: AUDI, Model Year: 2000, Model line: A4, Model: AUDI A4 2000 B5 / 1.GPages: 15, PDF Size: 0.35 MB
Page 4 of 15
39-17
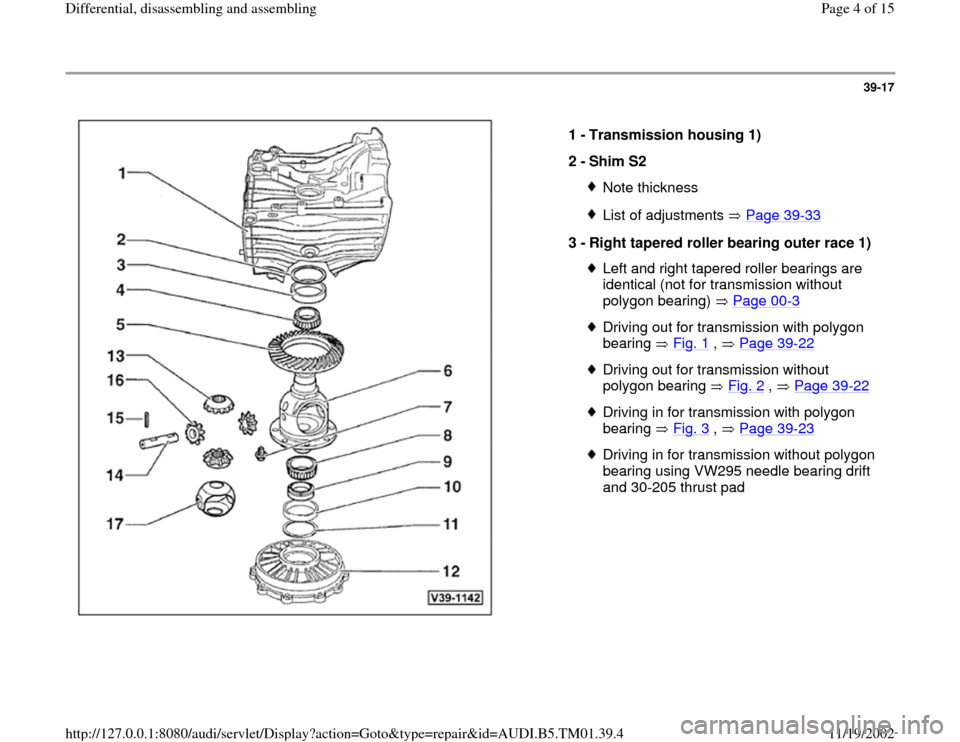
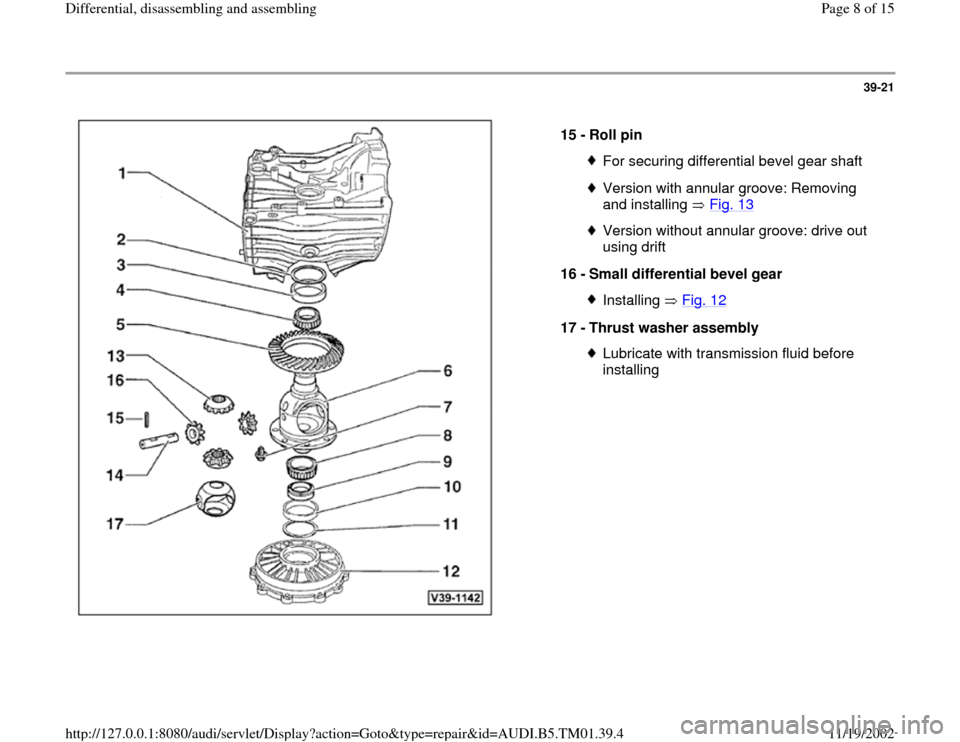
1 -
Transmission housing 1)
2 -
Shim S2
Note thicknessList of adjustments Page 39
-33
3 -
Right tapered roller bearing outer race 1)
Left and right tapered roller bearings are
identical (not for transmission without
polygon bearing) Page 00
-3
Driving out for transmission with polygon
bearing Fig. 1
, Page 39
-22
Driving out for transmission without
polygon bearing Fig. 2
, Page 39
-22
Driving in for transmission with polygon
bearing Fig. 3
, Page 39
-23
Driving in for transmission without polygon
bearing using VW295 needle bearing drift
and 30-205 thrust pad
Pa
ge 4 of 15 Differential, disassemblin
g and assemblin
g
11/19/2002 htt
p://127.0.0.1:8080/audi/servlet/Dis
play?action=Goto&t
yp
e=re
pair&id=AUDI.B5.TM01.39.4
Page 5 of 15
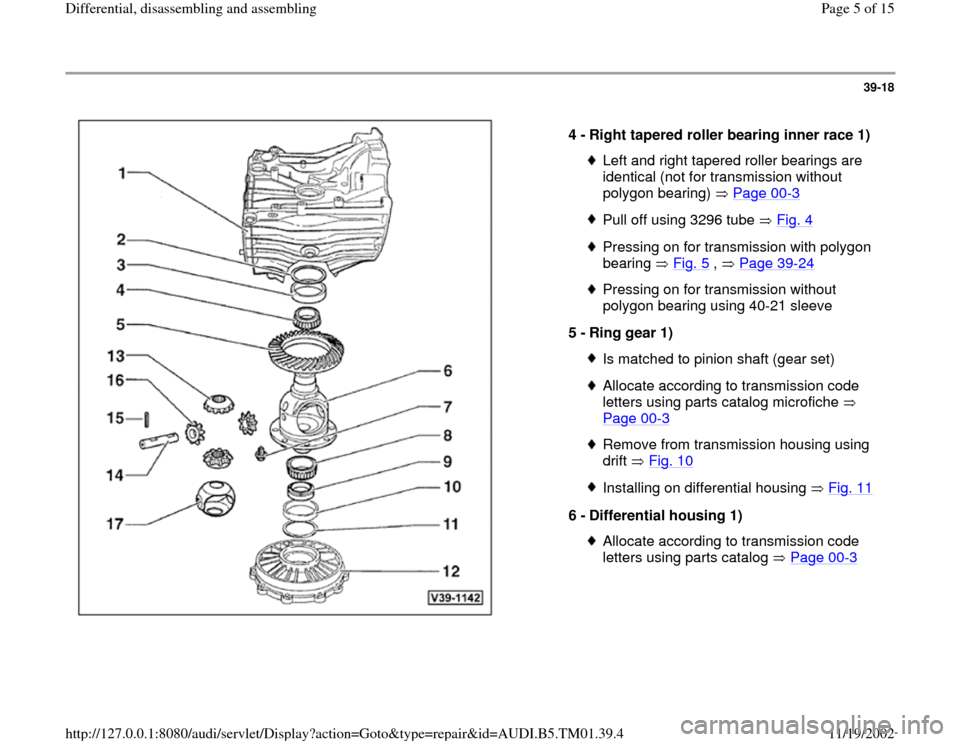
39-18
4 -
Right tapered roller bearing inner race 1)
Left and right tapered roller bearings are
identical (not for transmission without
polygon bearing) Page 00
-3
Pull off using 3296 tube Fig. 4Pressing on for transmission with polygon
bearing Fig. 5
, Page 39
-24
Pressing on for transmission without
polygon bearing using 40-21 sleeve
5 -
Ring gear 1) Is matched to pinion shaft (gear set)Allocate according to transmission code
letters using parts catalog microfiche
Page 00
-3
Remove from transmission housing using
drift Fig. 10
Installing on differential housing Fig. 11
6 -
Differential housing 1)
Allocate according to transmission code
letters using parts catalog Page 00
-3
Pa
ge 5 of 15 Differential, disassemblin
g and assemblin
g
11/19/2002 htt
p://127.0.0.1:8080/audi/servlet/Dis
play?action=Goto&t
yp
e=re
pair&id=AUDI.B5.TM01.39.4
Page 6 of 15
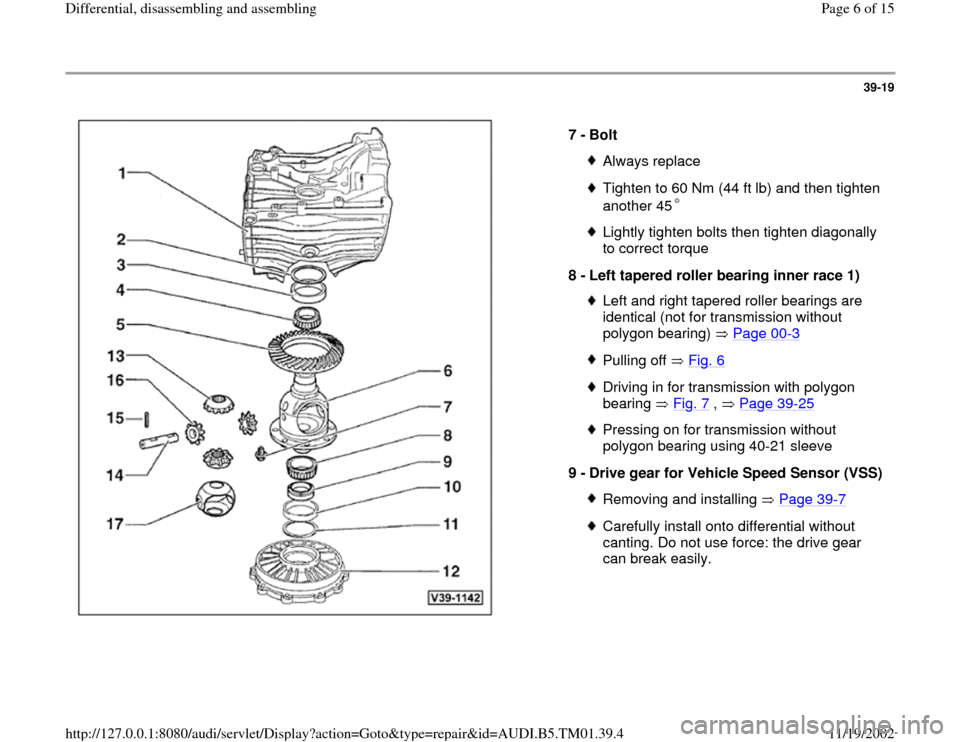
39-19
7 -
Bolt
Always replaceTighten to 60 Nm (44 ft lb) and then tighten
another 45 Lightly tighten bolts then tighten diagonally
to correct torque
8 -
Left tapered roller bearing inner race 1) Left and right tapered roller bearings are
identical (not for transmission without
polygon bearing) Page 00
-3
Pulling off Fig. 6Driving in for transmission with polygon
bearing Fig. 7
, Page 39
-25
Pressing on for transmission without
polygon bearing using 40-21 sleeve
9 -
Drive gear for Vehicle Speed Sensor (VSS)Removing and installing Page 39
-7
Carefully install onto differential without
canting. Do not use force: the drive gear
can break easily.
Pa
ge 6 of 15 Differential, disassemblin
g and assemblin
g
11/19/2002 htt
p://127.0.0.1:8080/audi/servlet/Dis
play?action=Goto&t
yp
e=re
pair&id=AUDI.B5.TM01.39.4
Page 7 of 15
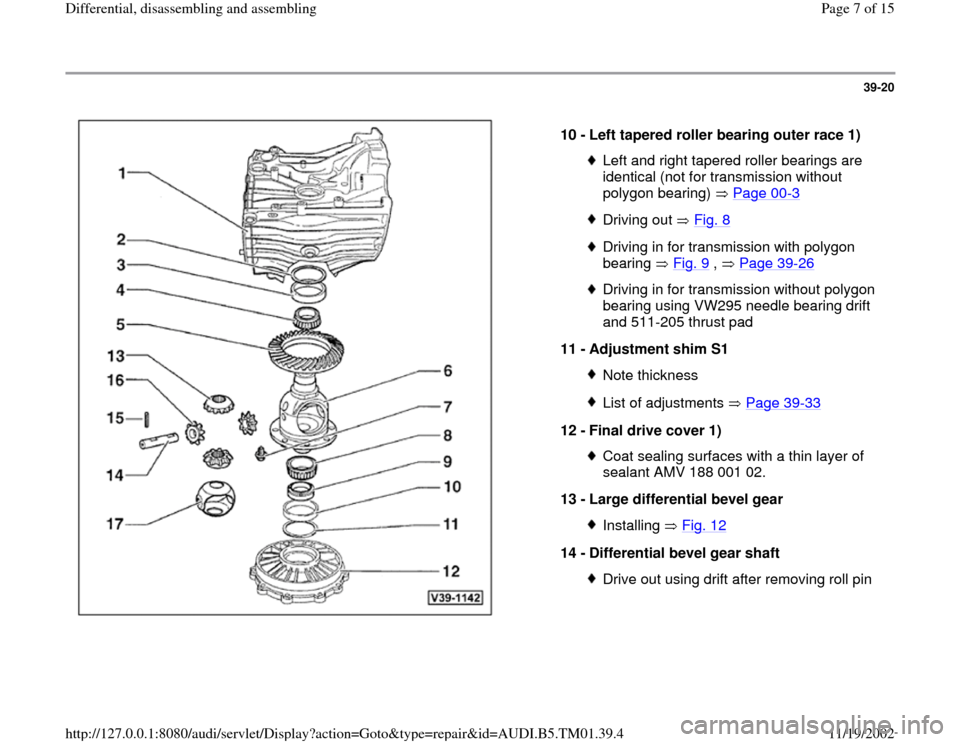
39-20
10 -
Left tapered roller bearing outer race 1)
Left and right tapered roller bearings are
identical (not for transmission without
polygon bearing) Page 00
-3
Driving out Fig. 8Driving in for transmission with polygon
bearing Fig. 9
, Page 39
-26
Driving in for transmission without polygon
bearing using VW295 needle bearing drift
and 511-205 thrust pad
11 -
Adjustment shim S1 Note thicknessList of adjustments Page 39
-33
12 -
Final drive cover 1)
Coat sealing surfaces with a thin layer of
sealant AMV 188 001 02.
13 -
Large differential bevel gear Installing Fig. 12
14 -
Differential bevel gear shaft
Drive out using drift after removing roll pin
Pa
ge 7 of 15 Differential, disassemblin
g and assemblin
g
11/19/2002 htt
p://127.0.0.1:8080/audi/servlet/Dis
play?action=Goto&t
yp
e=re
pair&id=AUDI.B5.TM01.39.4
Page 8 of 15
39-21
15 -
Roll pin
For securing differential bevel gear shaftVersion with annular groove: Removing
and installing Fig. 13
Version without annular groove: drive out
using drift
16 -
Small differential bevel gear Installing Fig. 12
17 -
Thrust washer assembly
Lubricate with transmission fluid before
installing
Pa
ge 8 of 15 Differential, disassemblin
g and assemblin
g
11/19/2002 htt
p://127.0.0.1:8080/audi/servlet/Dis
play?action=Goto&t
yp
e=re
pair&id=AUDI.B5.TM01.39.4
Page 9 of 15
39-22
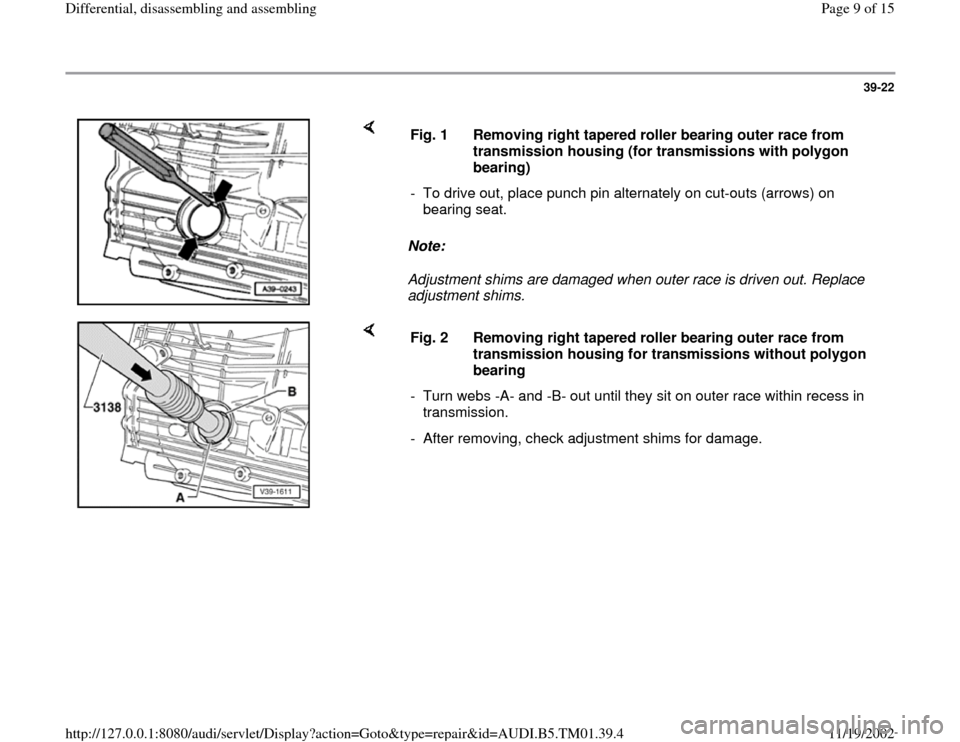
Note:
Adjustment shims are damaged when outer race is driven out. Replace
adjustment shims. Fig. 1 Removing right tapered roller bearing outer race from
transmission housing (for transmissions with polygon
bearing)
- To drive out, place punch pin alternately on cut-outs (arrows) on
bearing seat.
Fig. 2 Removing right tapered roller bearing outer race from
transmission housing for transmissions without polygon
bearing
- Turn webs -A- and -B- out until they sit on outer race within recess in
transmission.
- After removing, check adjustment shims for damage.
Pa
ge 9 of 15 Differential, disassemblin
g and assemblin
g
11/19/2002 htt
p://127.0.0.1:8080/audi/servlet/Dis
play?action=Goto&t
yp
e=re
pair&id=AUDI.B5.TM01.39.4
Page 10 of 15
39-23
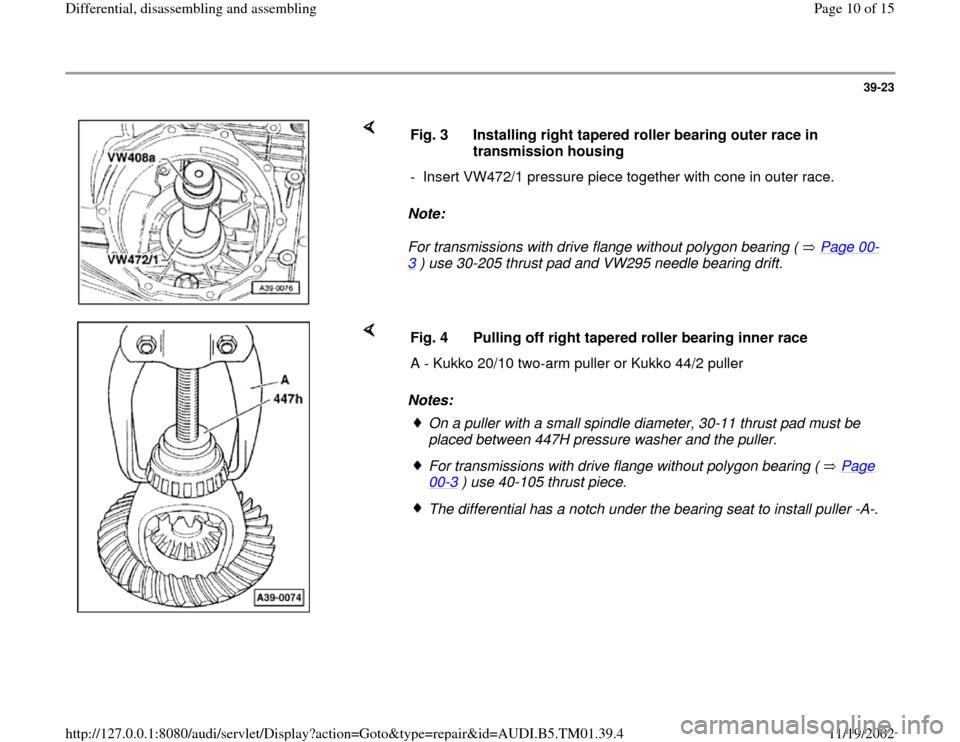
Note:
For transmissions with drive flange without polygon bearing ( Page 00
-
3 ) use 30-205 thrust pad and VW295 needle bearing drift. Fig. 3 Installing right tapered roller bearing outer race in
transmission housing
- Insert VW472/1 pressure piece together with cone in outer race.
Notes: Fig. 4 Pulling off right tapered roller bearing inner race
A - Kukko 20/10 two-arm puller or Kukko 44/2 puller
On a puller with a small spindle diameter, 30-11 thrust pad must be
placed between 447H pressure washer and the puller. For transmissions with drive flange without polygon bearing ( Page 00
-3 ) use 40-105 thrust piece.
The differential has a notch under the bearing seat to install puller -A-.
Pa
ge 10 of 15 Differential, disassemblin
g and assemblin
g
11/19/2002 htt
p://127.0.0.1:8080/audi/servlet/Dis
play?action=Goto&t
yp
e=re
pair&id=AUDI.B5.TM01.39.4
Page 11 of 15
39-24
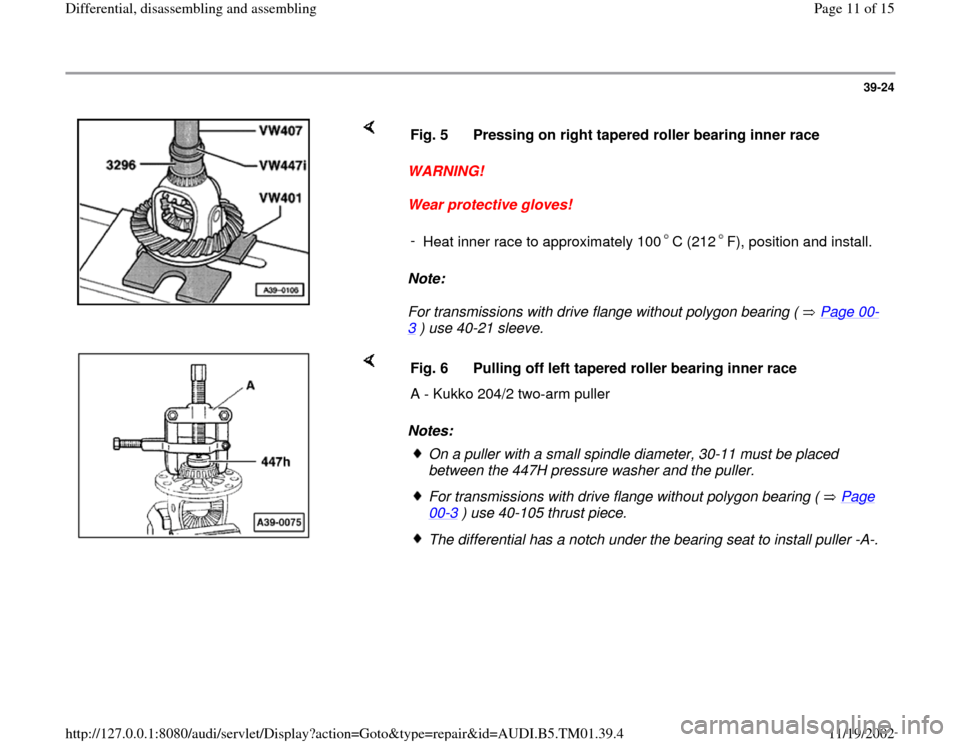
WARNING!
Wear protective gloves!
Note:
For transmissions with drive flange without polygon bearing ( Page 00
-
3 ) use 40-21 sleeve. Fig. 5 Pressing on right tapered roller bearing inner race
-
Heat inner race to approximately 100 C (212 F), position and install.
Notes: Fig. 6 Pulling off left tapered roller bearing inner race
A - Kukko 204/2 two-arm puller
On a puller with a small spindle diameter, 30-11 must be placed
between the 447H pressure washer and the puller. For transmissions with drive flange without polygon bearing ( Page 00
-3 ) use 40-105 thrust piece.
The differential has a notch under the bearing seat to install puller -A-.
Pa
ge 11 of 15 Differential, disassemblin
g and assemblin
g
11/19/2002 htt
p://127.0.0.1:8080/audi/servlet/Dis
play?action=Goto&t
yp
e=re
pair&id=AUDI.B5.TM01.39.4
Page 12 of 15
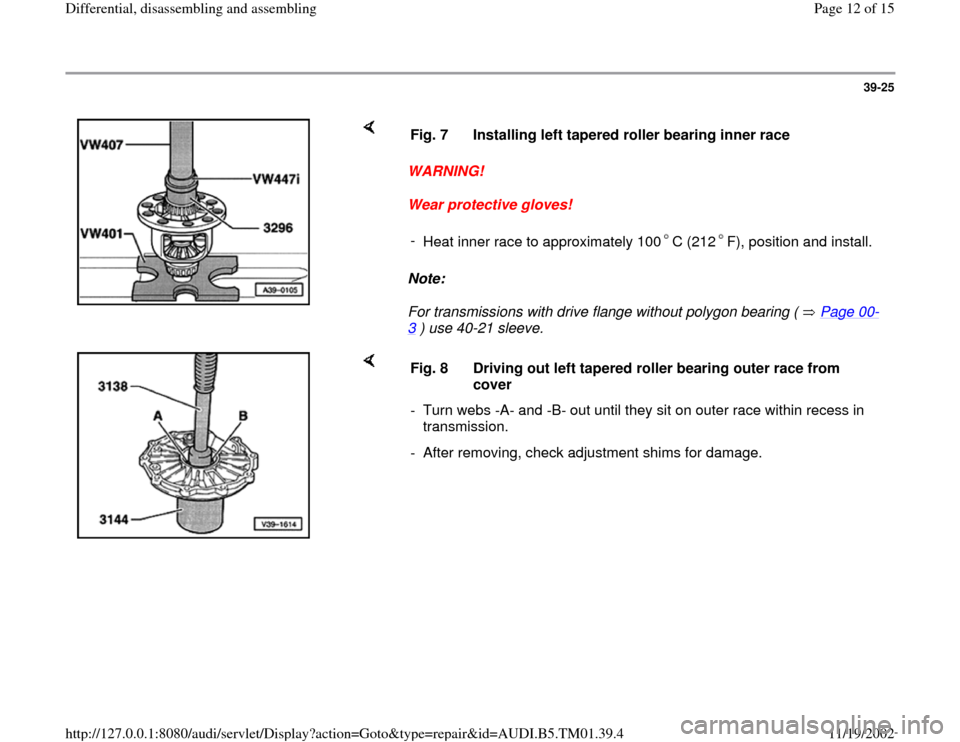
39-25
WARNING!
Wear protective gloves!
Note:
For transmissions with drive flange without polygon bearing ( Page 00
-
3 ) use 40-21 sleeve. Fig. 7 Installing left tapered roller bearing inner race
-
Heat inner race to approximately 100 C (212 F), position and install.
Fig. 8 Driving out left tapered roller bearing outer race from
cover
- Turn webs -A- and -B- out until they sit on outer race within recess in
transmission.
- After removing, check adjustment shims for damage.
Pa
ge 12 of 15 Differential, disassemblin
g and assemblin
g
11/19/2002 htt
p://127.0.0.1:8080/audi/servlet/Dis
play?action=Goto&t
yp
e=re
pair&id=AUDI.B5.TM01.39.4
Page 13 of 15

39-26
Note:
For transmissions with drive flange without polygon bearing ( Page 00
-
3 ) use VW511 thrust pad and VW295 needle bearing drift. Fig. 9 Driving in left tapered roller bearing outer race into cover
- Insert VW472/1 pressure piece together with cone in outer race.
Fig. 10 Driving out ring gear from housing
Pa
ge 13 of 15 Differential, disassemblin
g and assemblin
g
11/19/2002 htt
p://127.0.0.1:8080/audi/servlet/Dis
play?action=Goto&t
yp
e=re
pair&id=AUDI.B5.TM01.39.4