torque AUDI A4 2008 B8 / 4.G Owners Manual
[x] Cancel search | Manufacturer: AUDI, Model Year: 2008, Model line: A4, Model: AUDI A4 2008 B8 / 4.GPages: 342, PDF Size: 13.14 MB
Page 131 of 342
adaptive cruise control (ACC)129
Controls
Safety
Driving tips
General maintenance
Self-help
Technical data
•
Adaptive cruise control will not react when approaching a
stationary obstacle, e.g. the end of a traffic jam or a broken-down
vehicle, or if a vehicle should come towards you in the same lane.
•
Please make sure you do not unintentionally rest your foot on
the accelerator - this will override the adaptive cruise control
system which, as a result, will not automatically brake the vehicle.Note
•
For safety reasons, the speed setting will be deleted when the
ignition is switched off.
•
Switching on the adaptive cruise control automatically activates
the Electronic Stabilisation Program (ESP) and the traction control
system (ASR). These two systems cannot be deactivated while the
adaptive cruise control is switched on.
•
Damage caused by impacts (e.g. if the vehicle is damaged when
parking) can affect the radar sensor settings. This can cause the
system to malfunction or switch off completely.
•
The radar sensor is heated. However, in winter conditions, you
should make sure that the radar sensor is free of ice and snow
before you set off. If necessary, carefully clean the cover of the radar
sensor and the surrounding area ⇒page 128, fig. 136.
•
To make sure that the radar sensor is fully operative, do not
attach any objects (e.g. stickers, add-on parts or other accessories)
to the area surrounding the radar sensor. Do not paint the area
surrounding the radar sensor.
Applies to vehicles: with adaptive cruise control and manual gearboxVehicles with manual gearbox
The driver of a vehicle with a manual gearbox of course
has to change gears as appropriate, even when the adap-
tive cruise control is activated.The adaptive cruise control is available from the second to the sixth
gear (when driven in normal engine speed range).
When the adaptive cruise control is activated, the driver must press
the clutch pedal as normal in order to change gear. When changing
gear or pressing the clutch pedal (for up to 20 seconds), the adap-
tive cruise control will remain activated.
When changing gear, the driver does not have to accelerate after
engaging a gear as the engine torque will be coordinated by the
adaptive cruise control.
The following situations may lead to an automatic deactivation of
the adaptive cruise control:•
pressing the clutch pedal too long (longer than approx.
20 seconds)
•
incorrect changing of gears and/or use of the clutch pedalNote
•
The adaptive cruise control cannot be activated while changing
gears.
WARNING (continued)
document_0900452a81b1b9de.book Seite 129 Donnerstag, 26. Juli 2007 9:16 09
Page 164 of 342
Automatic gearbox 162Automatic gearboxmultitronic
®, tiptronic (6-speed
gearbox)
Applies to vehicles: with multitronic® or tiptronicIntroductionApplies to vehicles with multitronic
® gearbox
The vehicle is equipped with an electronically controlled continu-
ously variable transmission (multitronic
®). Unlike conventional
automatics, the gear ratios are not shifted in fixed steps but contin-
uously variable. This gives smoother transmission and makes for
better fuel economy.
The gearbox selects the gear ratio and shifts up or down automati-
cally according to the gear change programmes stored in the
control unit ⇒page 166.
If desired, you can also select the gears manually (tiptronic mode)
⇒page 166.
Please note that on vehicles with a multitronic® gearbox, torque is
transmitted via a multi-plate clutch, and not via a torque converter
as on conventional automatics. This means that the car will not
“creep” as much as conventional automatics when the engine is
idling if you stop temporarily with the selector lever in position D, S
or R.
Applies to vehicles with tiptronic gearbox
The vehicle is equipped with an electronically controlled 6-speed
automatic gearbox. The gearbox changes up and down automati-
cally.
If desired, you can also select the gears manually (tiptronic mode)
⇒page 166.
Applies to vehicles: with multitronic® or tiptronicGeneral notes on using multitronic
®
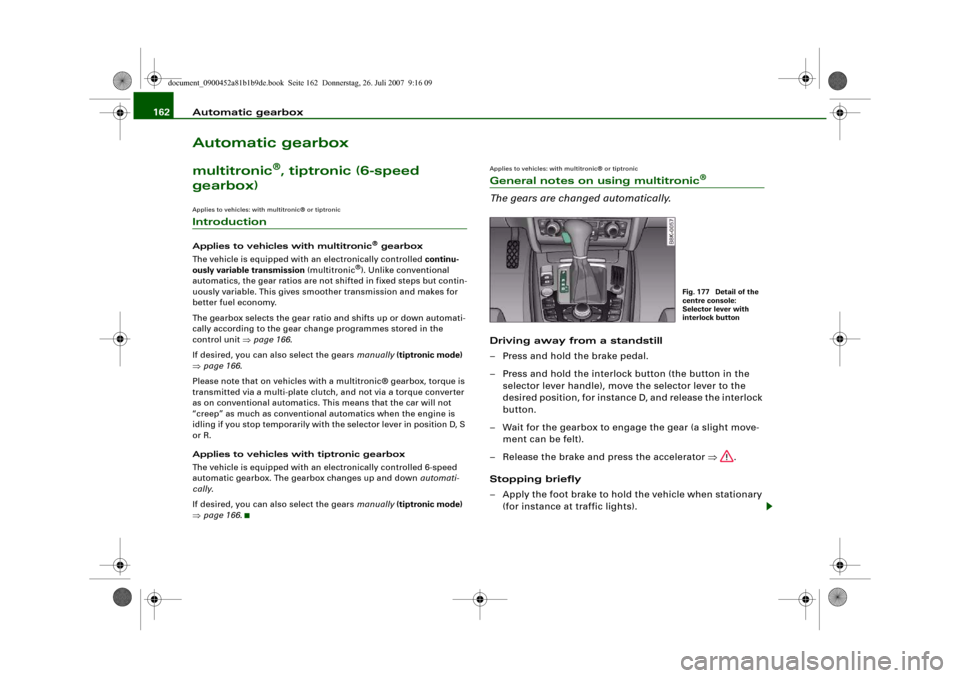
The gears are changed automatically.Driving away from a standstill
– Press and hold the brake pedal.
– Press and hold the interlock button (the button in the
selector lever handle), move the selector lever to the
desired position, for instance D, and release the interlock
button.
– Wait for the gearbox to engage the gear (a slight move-
ment can be felt).
– Release the brake and press the accelerator ⇒.
Stopping briefly
– Apply the foot brake to hold the vehicle when stationary
(for instance at traffic lights).
Fig. 177 Detail of the
centre console:
Selector lever with
interlock button
document_0900452a81b1b9de.book Seite 162 Donnerstag, 26. Juli 2007 9:16 09
Page 213 of 342
Child safety211
Controls
Safety
Driving tips
General maintenance
Self-help
Technical data
•
If children lean forward or are otherwise out of position when
the car is moving, they are at greater risk of injury in an accident.
This is particularly the case if the child is travelling on the front
passenger's seat and the airbag system is triggered in an accident.
There is then a risk of serious or potentially fatal injury.
•
To ensure proper protection, it is important to wear the seat
belts in the correct position ⇒page 197, “How to wear seat belts
properly”. Always check that the belt is properly positioned
according to the instructions provided by the manufacturer of the
child safety seat. Incorrectly worn seat belts can give rise to inju-
ries even in a minor collision.
•
Never install a rearward-facing child safety seat on the front
passenger's seat if the front passenger's airbag has not been deac-
tivated ⇒page 211.
•
Extra caution is advised if you are installing a child safety seat
using the same mounting bolts as the existing car seat belts. The
bolts must be screwed in all the way to the full depth of the
mounting holes and tightened to a torque of 50 Nm. Failure to
observe this precaution could result in potentially fatal injury. We
recommend having the installation performed by a qualified
workshop.
Using a child safety seat on the front passenger's seat
Whenever possible, child safety seats should always be
installed on the rear seat.For safety reasons, we recommend that child safety seats should be
installed on the rear seats whenever possible. However, if you have
to use a child seat on the front passenger's seat when there is no
other alternative, it is most important to note the following warn-
ings:
WARNING
•
Do not use a rearward-facing child safety seat on the front
passenger's seat unless the front passenger's airbag has been
deactivated. The child seat would be directly in the path of the
airbag as it inflates, and the child could sustain serious or fatal
injuries if the airbag were to be deployed.
•
However, if you have no alternative but to use a rearward-
facing child seat on the front passenger's seat, the front
passenger's airbag must be deactivated beforehand by means of
the key-operated switch* ⇒page 208. Failure to observe this
precaution could result in serious or potentially fatal injury.
•
Make sure that the front passenger's airbag is reactivated by
means of the key-operated switch* as soon as the child seat is no
longer needed on the front passenger's seat.
•
When using a child safety seat of the type which faces in the
direction of travel, the front passenger's seat must be moved back
to the rearmost position.
WARNING (continued)
document_0900452a81b1b9de.book Seite 211 Donnerstag, 26. Juli 2007 9:16 09
Page 224 of 342
Intelligent technology 222Intelligent technologyElectronic stabilisation program (ESP)DescriptionESP increases the car's stability. It reduces the tendency to skid and
improves the stability and roadholding of the vehicle. ESP detects
critical handling situations, such as understeer, oversteer and
wheelspin on the driven wheels. It stabilises the vehicle by braking
individual wheels or by reducing the engine torque. The warning
lamp
in the instrument cluster starts flashing as soon as the ESP
intervenes.
The ESP incorporates the functions of the anti-lock brake system
(ABS), the traction control system (ASR), the electronic differential
lock (EDL) and the dynamic steering*.
Anti-lock brake system (ABS)
ABS prevents the wheels from locking up under braking until the
vehicle has reached a virtual standstill. You can continue to steer the
vehicle even when the brakes are on full. Keep your foot on the brake
pedal and do not pump the brakes. You will feel the brake pedal
pulsate while the anti-lock brake system is working.
Brake assist system
The brake assist system can speed up the braking process and
shorten the braking distance. It automatically boosts the braking
force if you press the brake pedal quickly in an emergency. On vehi-
cles with adaptive cruise control*, the brake assist system will build
up a small amount of pressure in the hydraulic brake system if it
senses that you are too close to the vehicle in front.
Traction control system (ASR)
In the event of wheelspin, the traction control system reduces the
engine torque to match the amount of grip available. This helps the
car to start moving, accelerate or climb a gradient.Electronic differential lock (EDL)
When the EDL detects wheelspin, it brakes the spinning wheel and
directs the power to the other driven wheel (or wheels on quattro*
versions). This function is active up to about 100 km/h.
To prevent the disc brake of the braked wheel from overheating, the
EDL cuts out automatically if subjected to excessive loads. The
vehicle can still be driven. The EDL will switch on again automati-
cally when the brake has cooled down.
Dynamic steering*
On vehicles with dynamic steering*, the ESP can also intervene in
the steering to stabilise the vehicle in critical situations.
WARNING
•
The grip provided by the ESP, ABS, ASR, EDL and dynamic
steering* systems is still subject to the physical limits of adhesion.
Always bear this in mind, especially on wet or slippery roads. If
you notice the systems cutting in, you should reduce your speed
immediately to suit the road and traffic conditions. Do not let the
extra safety provided tempt you into taking any risks when driving
– this can cause accidents.
•
Please remember that the accident risk always increases if you
drive fast, especially in corners or on a slippery road, or if you
follow too close behind the vehicle in front of you. Please bear in
mind that even ESP, ABS, brake assist, EDL, ASR and dynamic
steering* cannot compensate for the increased accident risk.
•
When accelerating on a uniformly slippery surface (for instance
all four wheels on ice or snow), press the accelerator gradually and
carefully. The driven wheels may otherwise start to spin (in spite
of the integrated control systems), which would impair the car's
stability and could lead to an accident.
document_0900452a81b1b9de.book Seite 222 Donnerstag, 26. Juli 2007 9:16 09
Page 286 of 342
Self-help 284If you need the tools, the Tyre Mobility System or the jack*, you will
have to open the floor panel and take out the spare wheel*
⇒page 284.
The tool kit includes:•
A hook for removing hub caps
•
Pin for mounting a wheel
•
Screwdriver with reversible blade
•
Tool for changing bulbs
•
Interchangeable socket (Torx socket for changing bulbs)
•
Crank handle for jack
•
Adapter for anti-theft wheel bolts*
•
Jack*
•
Box spanner for wheel bolts
•
Towline anchorage
Some of the parts listed are only fitted on certain models or are
optional extras.
Before stowing the jack* again, wind down the arm of the jack as far
as it will go.
WARNING
•
Do not use the hexagonal socket in the screwdriver handle to
tighten the wheel bolts. It is not possible to tighten the bolts with
the required torque – risk of accident.
•
The jack supplied by the factory is only designed for changing
wheels on this model. On no account attempt to use it for lifting
heavier vehicles or other loads – risk of injury.
•
Never start the engine when the vehicle is on the jack - risk of
accident.
•
If work has to be done under the veh i cl e , e n su re t h a t i t is sa fe l y
supported on stands designed for the purpose, otherwise there is
a risk of injury.
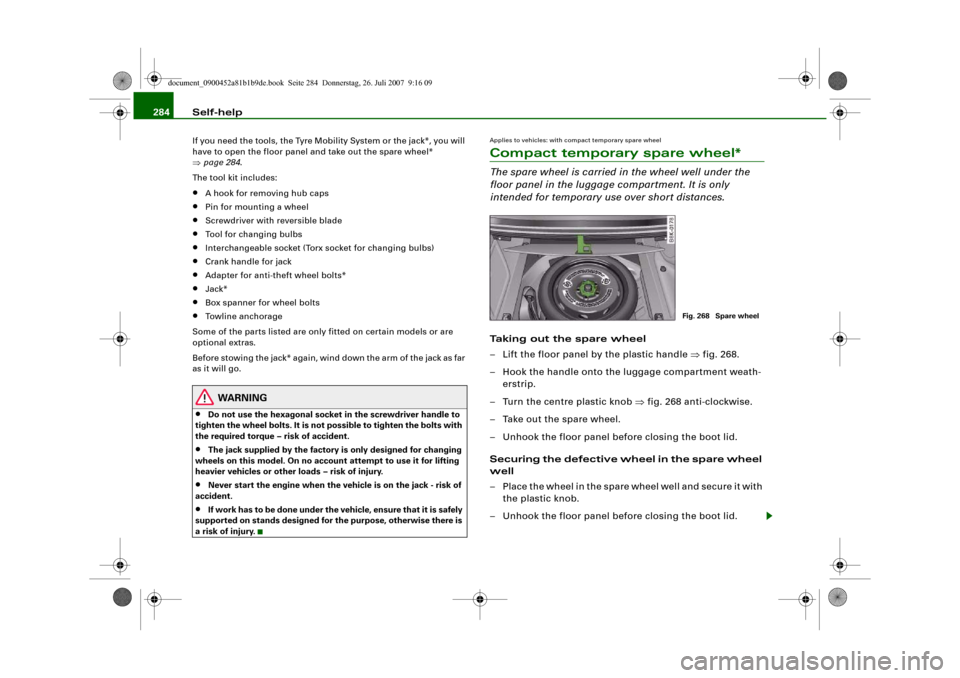
Applies to vehicles: with compact temporary spare wheelCompact temporary spare wheel*The spare wheel is carried in the wheel well under the
floor panel in the luggage compartment. It is only
intended for temporary use over short distances.Taking out the spare wheel
– Lift the floor panel by the plastic handle ⇒fig. 268.
– Hook the handle onto the luggage compartment weath-
erstrip.
– Turn the centre plastic knob ⇒fig. 268 anti-clockwise.
– Take out the spare wheel.
– Unhook the floor panel before closing the boot lid.
Securing the defective wheel in the spare wheel
well
– Place the wheel in the spare wheel well and secure it with
the plastic knob.
– Unhook the floor panel before closing the boot lid.
Fig. 268 Spare wheel
document_0900452a81b1b9de.book Seite 284 Donnerstag, 26. Juli 2007 9:16 09
Page 291 of 342
Self-help289
Controls
Safety
Driving tips
General maintenance
Self-help
Technical data
–Loosen the wheel bolts ⇒page 289.
–Raise the car with the jack* ⇒page 290.
–Ta k e o f f the wheel with the flat tyre and then put on the
spare wheel* ⇒page 291.
–Lower the vehicle to the ground.
– Tighten the wheel bolts firmly i n d i a g o n a l s e qu e n c e w i t h
the box spanner ⇒page 289.
–Fit the hub cap back on.After changing a wheel
What you must do after changing a wheel.– Place the wheel with the defective tyre in the spare wheel
well and secure it.
– Put the tools and the jack* back in the luggage compart-
ment.
–The inflation pressure of the newly fitted spare tyre must
be checked as soon as possible.
–Have the tightening torque of the wheel bolts checked as
soon as possible with a torque wrench. The correct tight-
ening torque is 120 Nm.
– Have the flat tyre replaced as quickly as possible.
Note•
If you notice that the wheel bolts are corroded and difficult to
turn when changing a wheel, they must be replaced before having
the tightening torque checked.
•
In the interest of safety, drive at moderate speeds until the tight-
ening torque of the wheel bolts has been checked.
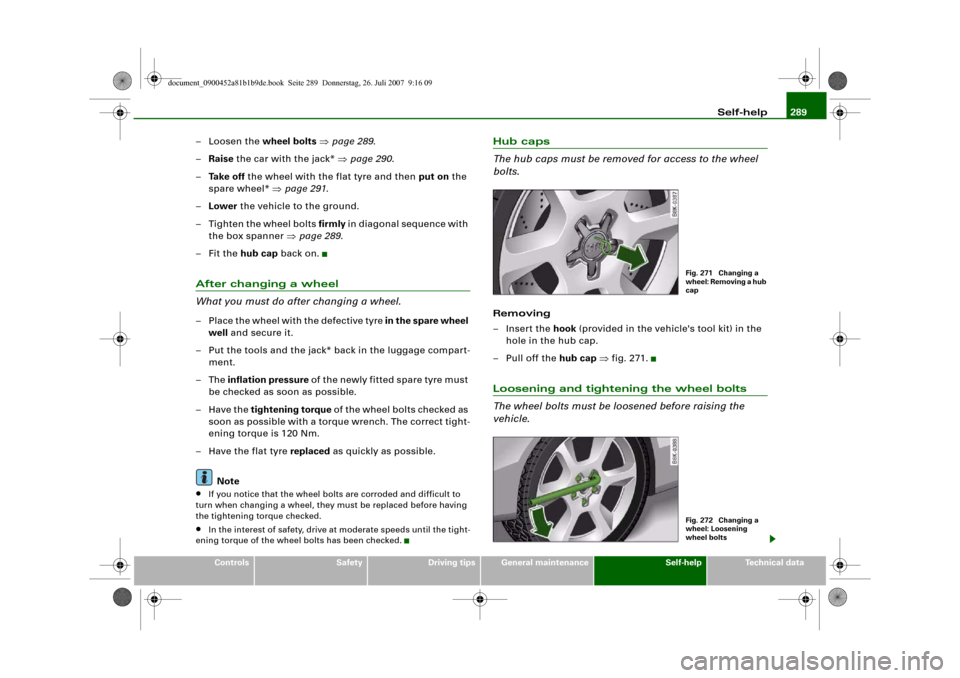
Hub caps
The hub caps must be removed for access to the wheel
bolts.Removing
– Insert the hook (provided in the vehicle's tool kit) in the
hole in the hub cap.
–Pull off the hub cap ⇒fig. 271.Loosening and tightening the wheel bolts
The wheel bolts must be loosened before raising the
vehicle.
Fig. 271 Changing a
wheel: Removing a hub
capFig. 272 Changing a
wheel: Loosening
wheel bolts
document_0900452a81b1b9de.book Seite 289 Donnerstag, 26. Juli 2007 9:16 09
Page 325 of 342
Performance, weights and dimensions323
Controls
Safety
Driving tips
General maintenance
Self-help
Technical data
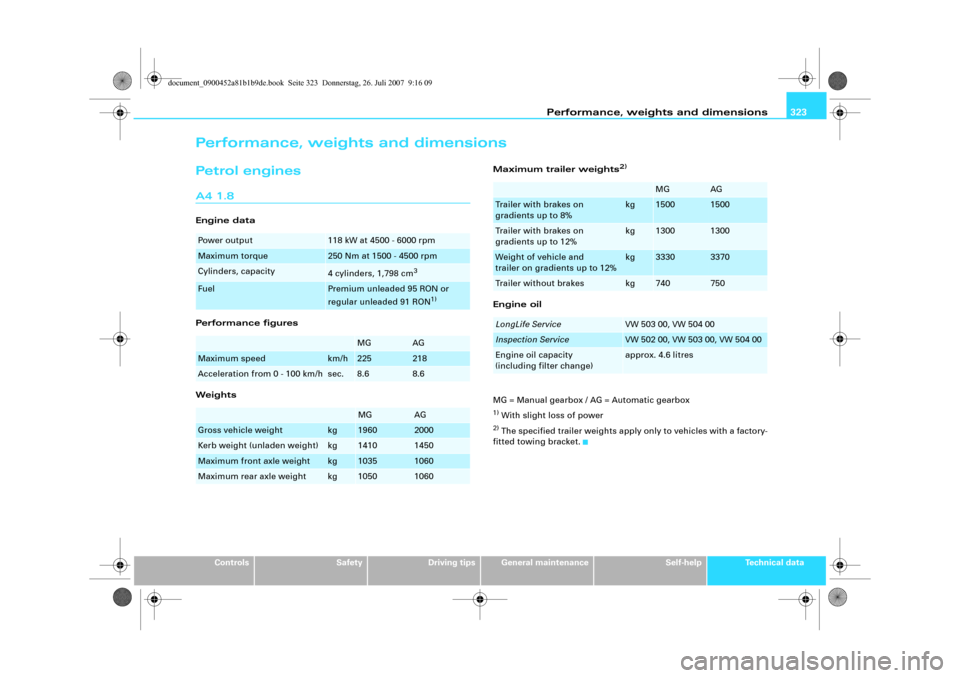
Performance, weights and dimensionsPetrol enginesA4 1.8Engine data
Performance figures
WeightsMaximum trailer weights
2)
Engine oil
MG = Manual gearbox / AG = Automatic gearbox1) With slight loss of power2) The specified trailer weights apply only to vehicles with a factory-
fitted towing bracket.
Power output
118 kW at 4500 - 6000 rpm
Maximum torque
250 Nm at 1500 - 4500 rpm
Cylinders, capacity
4 cylinders, 1,798 cm
3
Fuel
Premium unleaded 95 RON or
regular unleaded 91 RON
1)
MG
AG
Maximum speed
km/h
225
218
Acceleration from 0 - 100 km/h
sec.
8.6
8.6
MG
AG
Gross vehicle weight
kg
1960
2000
Kerb weight (unladen weight)
kg
1410
1450
Maximum front axle weight
kg
1035
1060
Maximum rear axle weight
kg
1050
1060
MG
AG
Trailer with brakes on
gradients up to 8%
kg
1500
1500
Trailer with brakes on
gradients up to 12%
kg
1300
1300
Weight of vehicle and
trailer on gradients up to 12%
kg
3330
3370
Trailer without brakes
kg
740
750
LongLife Service
VW 503 00, VW 504 00
Inspection Service
VW 502 00, VW 503 00, VW 504 00
Engine oil capacity
(including filter change)
approx. 4.6 litres
document_0900452a81b1b9de.book Seite 323 Donnerstag, 26. Juli 2007 9:16 09
Page 326 of 342
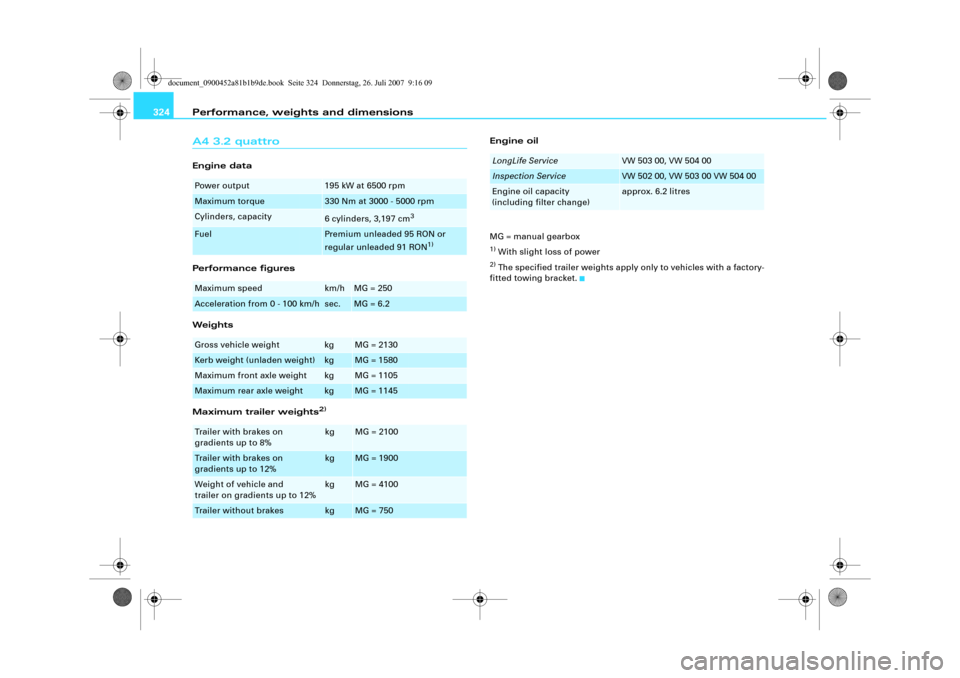
Performance, weights and dimensions 324A4 3.2 quattroEngine data
Performance figures
Weights
Maximum trailer weights
2)
Engine oil
MG = manual gearbox1) With slight loss of power2) The specified trailer weights apply only to vehicles with a factory-
fitted towing bracket.
Power output
195 kW at 6500 rpm
Maximum torque
330 Nm at 3000 - 5000 rpm
Cylinders, capacity
6 cylinders, 3,197 cm
3
Fuel
Premium unleaded 95 RON or
regular unleaded 91 RON
1)
Maximum speed
km/h
MG = 250
Acceleration from 0 - 100 km/h
sec.
MG = 6.2
Gross vehicle weight
kg
MG = 2130
Kerb weight (unladen weight)
kg
MG = 1580
Maximum front axle weight
kg
MG = 1105
Maximum rear axle weight
kg
MG = 1145
Trailer with brakes on
gradients up to 8%
kg
MG = 2100
Trailer with brakes on
gradients up to 12%
kg
MG = 1900
Weight of vehicle and
trailer on gradients up to 12%
kg
MG = 4100
Trailer without brakes
kg
MG = 750
LongLife Service
VW 503 00, VW 504 00
Inspection Service
VW 502 00, VW 503 00 VW 504 00
Engine oil capacity
(including filter change)
approx. 6.2 litres
document_0900452a81b1b9de.book Seite 324 Donnerstag, 26. Juli 2007 9:16 09
Page 327 of 342
Performance, weights and dimensions325
Controls
Safety
Driving tips
General maintenance
Self-help
Technical data
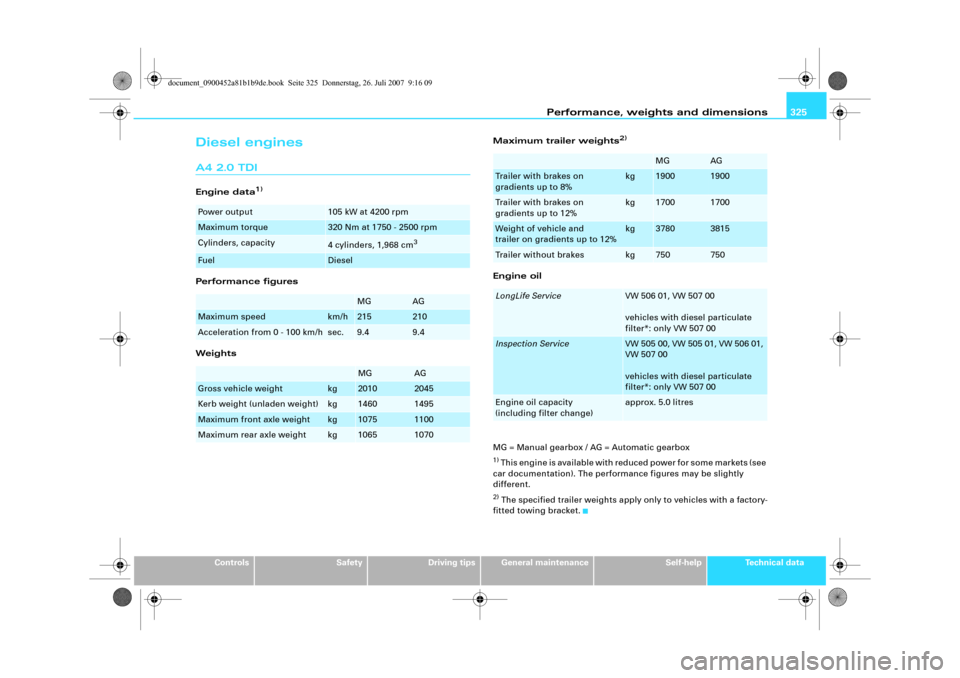
Diesel enginesA4 2.0 TDIEngine data
1)
Performance figures
WeightsMaximum trailer weights
2)
Engine oil
MG = Manual gearbox / AG = Automatic gearbox1) This engine is available with reduced power for some markets (see
car documentation). The performance figures may be slightly
different.2) The specified trailer weights apply only to vehicles with a factory-
fitted towing bracket.
Power output
105 kW at 4200 rpm
Maximum torque
320 Nm at 1750 - 2500 rpm
Cylinders, capacity
4 cylinders, 1,968 cm
3
Fuel
Diesel
MG
AG
Maximum speed
km/h
215
210
Acceleration from 0 - 100 km/h
sec.
9.4
9.4
MG
AG
Gross vehicle weight
kg
2010
2045
Kerb weight (unladen weight)
kg
1460
1495
Maximum front axle weight
kg
1075
1100
Maximum rear axle weight
kg
1065
1070
MG
AG
Trailer with brakes on
gradients up to 8%
kg
1900
1900
Trailer with brakes on
gradients up to 12%
kg
1700
1700
Weight of vehicle and
trailer on gradients up to 12%
kg
3780
3815
Trailer without brakes
kg
750
750
LongLife Service
VW 506 01, VW 507 00
vehicles with diesel particulate
filter*: only VW 507 00
Inspection Service
VW 505 00, VW 505 01, VW 506 01,
VW 507 00
vehicles with diesel particulate
filter*: only VW 507 00
Engine oil capacity
(including filter change)
approx. 5.0 litres
document_0900452a81b1b9de.book Seite 325 Donnerstag, 26. Juli 2007 9:16 09
Page 328 of 342
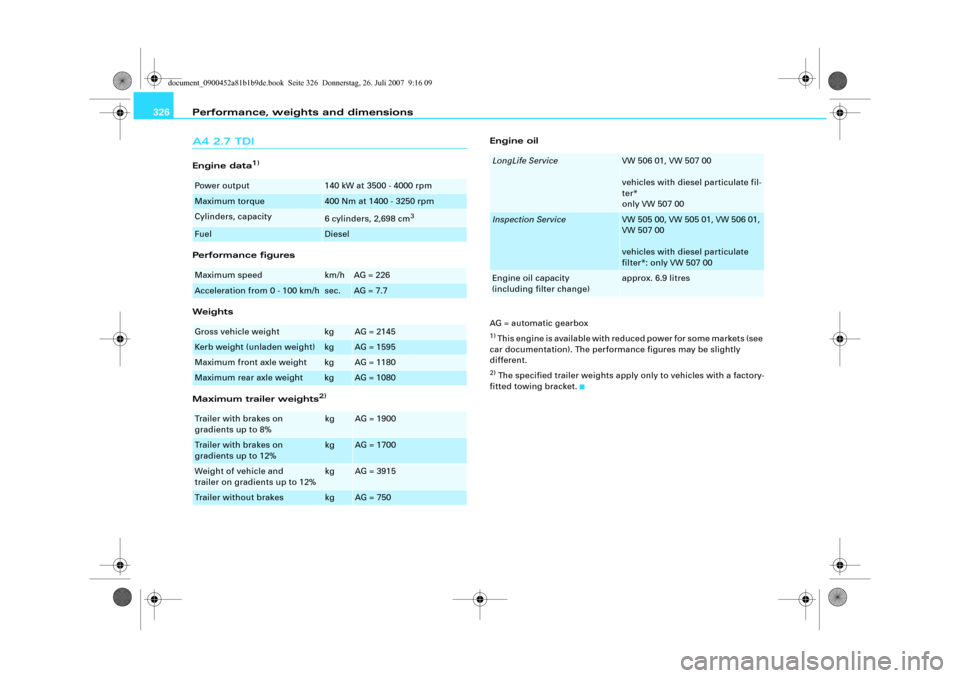
Performance, weights and dimensions 326A4 2.7 TDIEngine data
1)
Performance figures
Weights
Maximum trailer weights
2)
Engine oil
AG = automatic gearbox1) This engine is available with reduced power for some markets (see
car documentation). The performance figures may be slightly
different.2) The specified trailer weights apply only to vehicles with a factory-
fitted towing bracket.
Power output
140 kW at 3500 - 4000 rpm
Maximum torque
400 Nm at 1400 - 3250 rpm
Cylinders, capacity
6 cylinders, 2,698 cm
3
Fuel
Diesel
Maximum speed
km/h
AG = 226
Acceleration from 0 - 100 km/h
sec.
AG = 7.7
Gross vehicle weight
kg
AG = 2145
Kerb weight (unladen weight)
kg
AG = 1595
Maximum front axle weight
kg
AG = 1180
Maximum rear axle weight
kg
AG = 1080
Trailer with brakes on
gradients up to 8%
kg
AG = 1900
Trailer with brakes on
gradients up to 12%
kg
AG = 1700
Weight of vehicle and
trailer on gradients up to 12%
kg
AG = 3915
Trailer without brakes
kg
AG = 750
LongLife Service
VW 506 01, VW 507 00
vehicles with diesel particulate fil-
ter*
only VW 507 00
Inspection Service
VW 505 00, VW 505 01, VW 506 01,
VW 507 00
vehicles with diesel particulate
filter*: only VW 507 00
Engine oil capacity
(including filter change)
approx. 6.9 litres
document_0900452a81b1b9de.book Seite 326 Donnerstag, 26. Juli 2007 9:16 09