key AUDI A4 2008 B8 / 4.G Owner's Manual
[x] Cancel search | Manufacturer: AUDI, Model Year: 2008, Model line: A4, Model: AUDI A4 2008 B8 / 4.GPages: 342, PDF Size: 13.14 MB
Page 60 of 342
Lights and vision 58
WARNING
The automatic headlights are only intended to assist the driver.
The driver must always ensure that the headlights are used when
required, and may have to switch the m o n m a n u a l l y when the light
conditions or visibility are poor. For example, the light sensors are
not able to detect fog. Therefore, you should always switch on the
headlights
in these conditions and when driving after dark.
Note
•
The light sensor for automatic headlight control is located in the
mounting for the interior mirror. Do not affix any stickers on this
section of the windscreen to avoid malfunctioning of the sensor.
•
Some of the settings for the exterior lighting can be adjusted
⇒page 59.
•
If the lights are left on after the key has been taken out of the
ignition lock, a buzzer sounds when the driver's door is opened.
•
The use of the lighting described here is subject to the relevant
statutory requirements.
•
The coming home/leaving home function is active only when the
light switch is set to AUTO.
Fog lights
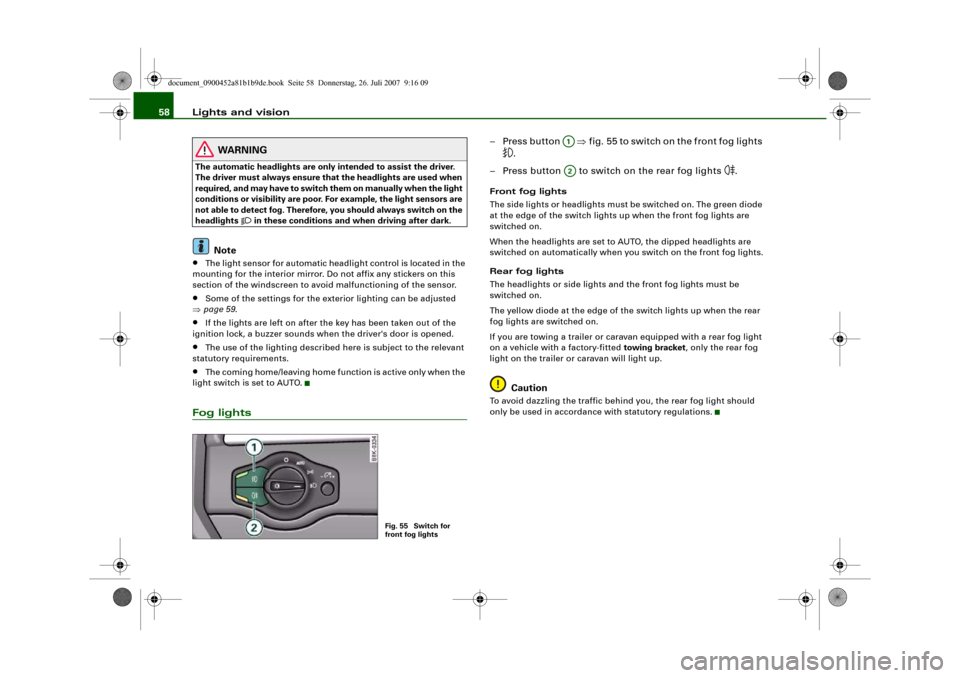
– Press button ⇒fig. 55 to switch on the front fog lights
.
– Press button to switch on the rear fog lights
.
Front fog lights
The side lights or headlights must be switched on. The green diode
at the edge of the switch lights up when the front fog lights are
switched on.
When the headlights are set to AUTO, the dipped headlights are
switched on automatically when you switch on the front fog lights.
Rear fog lights
The headlights or side lights and the front fog lights must be
switched on.
The yellow diode at the edge of the switch lights up when the rear
fog lights are switched on.
If you are towing a trailer or caravan equipped with a rear fog light
on a vehicle with a factory-fitted towing bracket, only the rear fog
light on the trailer or caravan will light up.
Caution
To avoid dazzling the traffic behind you, the rear fog light should
only be used in accordance with statutory regulations.
Fig. 55 Switch for
front fog lights
A1A2
document_0900452a81b1b9de.book Seite 58 Donnerstag, 26. Juli 2007 9:16 09
Page 65 of 342
Lights and vision63
Controls
Safety
Driving tips
General maintenance
Self-help
Technical data
Caution
Do not use the main beam headlights or the headlight flasher if this
would dazzle oncoming traffic.Interior lightsFront interior lights
The front interior lighting also incorporates the reading
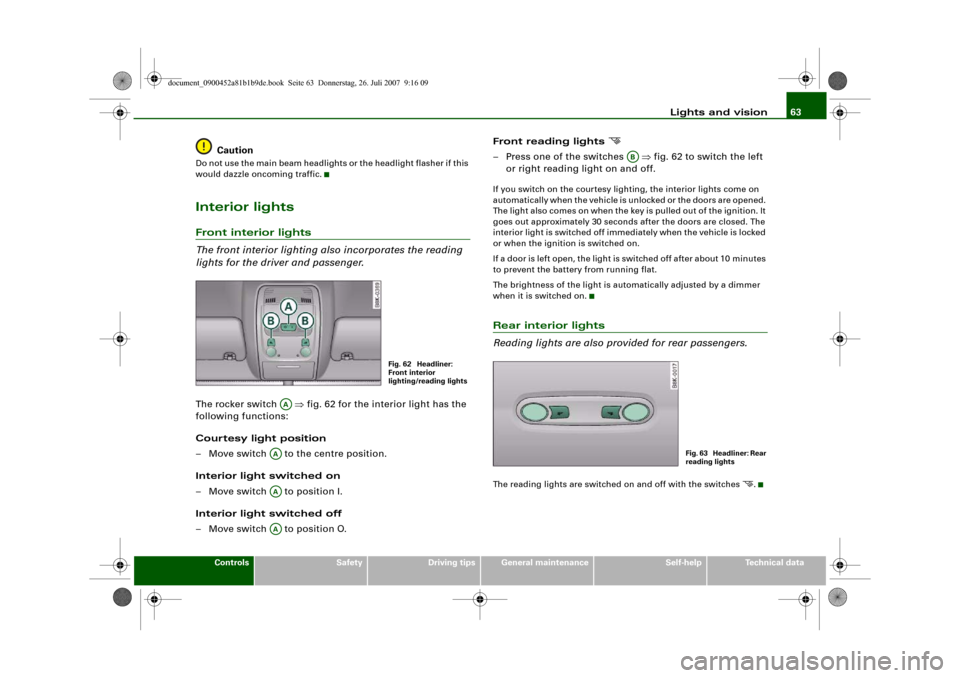
lights for the driver and passenger.The rocker switch ⇒fig. 62 for the interior light has the
following functions:
Courtesy light position
– Move switch to the centre position.
Interior light switched on
– Move switch to position I.
Interior light switched off
– Move switch to position O.Front reading lights
– Press one of the switches ⇒fig. 62 to switch the left
or right reading light on and off.If you switch on the courtesy lighting, the interior lights come on
automatically when the vehicle is unlocked or the doors are opened.
The light also comes on when the key is pulled out of the ignition. It
goes out approximately 30 seconds after the doors are closed. The
interior light is switched off immediately when the vehicle is locked
or when the ignition is switched on.
If a door is left open, the light is switched off after about 10 minutes
to prevent the battery from running flat.
The brightness of the light is automatically adjusted by a dimmer
when it is switched on.Rear interior lights
Reading lights are also provided for rear passengers.The reading lights are switched on and off with the switches
.
Fig. 62 Headliner:
Front interior
lighting/reading lights
AA
AAAAAA
AB
Fig. 63 Headliner: Rear
reading lights
document_0900452a81b1b9de.book Seite 63 Donnerstag, 26. Juli 2007 9:16 09
Page 67 of 342
Lights and vision65
Controls
Safety
Driving tips
General maintenance
Self-help
Technical data
– To retract the sun blind automatically when reversing,
select: Function selector button > Windows >
Automatic rear blind > on.If you switch the Automatic rear blind function on in the sound
system or MMI*, the raised sun blind will be retracted automatically
when reverse gear is engaged ⇒page 55. In this way, the rear blind
will not obstruct your vision when reversing. The rear blind returns
to its raised position when reverse gear is disengaged and the
vehicle is driven forwards at a speed above about 15 km/h. The
current setting is automatically stored and assigned to the remote
control key.
If the rear blind was rolled in automatically when reversing and then
the ignition was switched off and on again, the blind will not roll
back out again when you select a forward gear and the speed
exceeds 15 km/h. You will then have to press the button
on the
centre console to extend the blind again.
The sun blind for the rear window switches off automatically when
it reaches the end position. It can be made to move in the other
direction before it reaches its end position by briefly pressing the
switch a second time. If the ignition is turned off while the blind is
still moving, it continues until it reaches the end position before
switching off.
Note
•
An overload cut-out may be activated if the sun blind is operated
repeatedly. There will then be a short delay before the blind can be
operated again.
•
As the material of the sun blind is less flexible at low tempera-
tures the electric actuator is switched off when the temperature in
the car is below -5°C. The blind can only be operated when the
temperature in the car's interior rises above this level.
Windscreen wipersWindscreen wipers
The windscreen wiper lever controls the windscreen
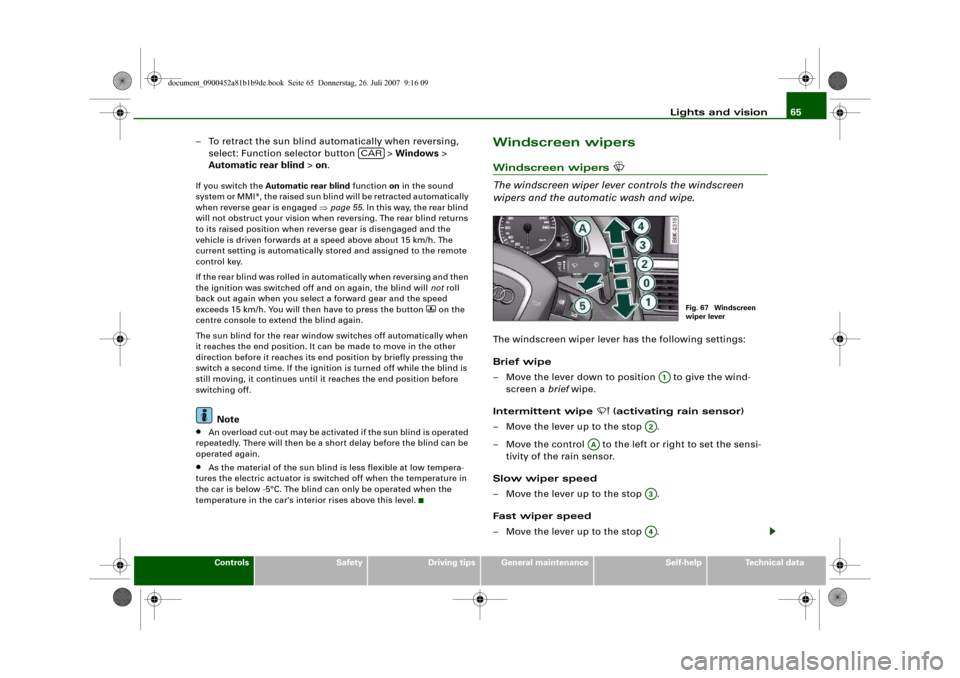
wipers and the automatic wash and wipe.The windscreen wiper lever has the following settings:
Brief wipe
– Move the lever down to position to give the wind-
screen a brief wipe.
Intermittent wipe
(activating rain sensor)
– Move the lever up to the stop .
– Move the control to the left or right to set the sensi-
tivity of the rain sensor.
Slow wiper speed
– Move the lever up to the stop .
Fast wiper speed
– Move the lever up to the stop .
CAR
Fig. 67 Windscreen
wiper lever
A1
A2
AA
A3A4
document_0900452a81b1b9de.book Seite 65 Donnerstag, 26. Juli 2007 9:16 09
Page 72 of 342
Lights and vision 70Exterior mirrors
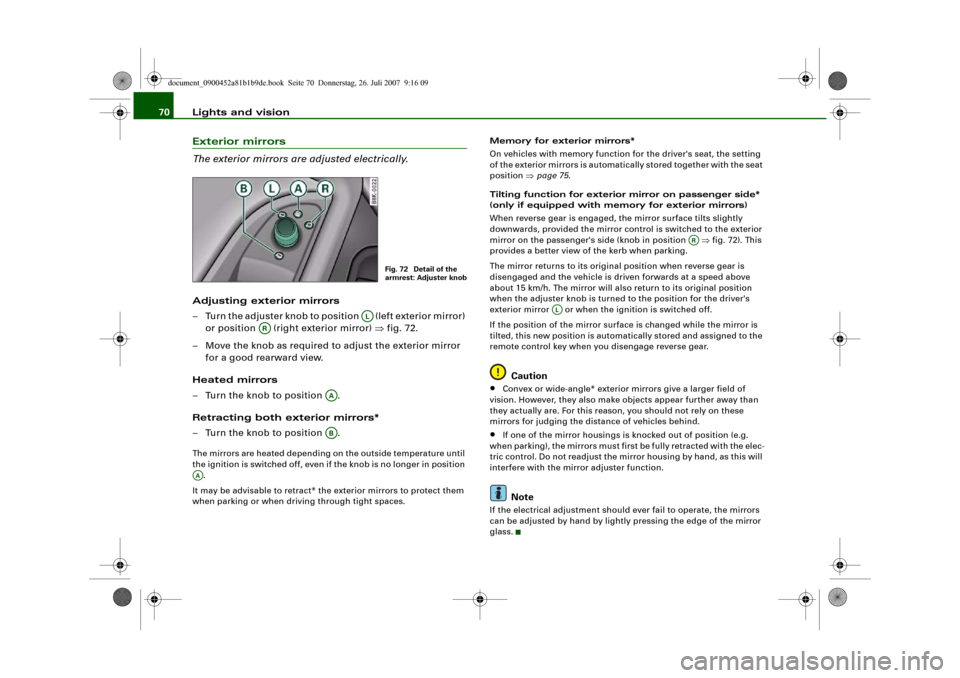
The exterior mirrors are adjusted electrically.Adjusting exterior mirrors
– Turn the adjuster knob to position (left exterior mirror)
or position (right exterior mirror) ⇒fig. 72.
– Move the knob as required to adjust the exterior mirror
for a good rearward view.
Heated mirrors
– Turn the knob to position .
Retracting both exterior mirrors*
– Turn the knob to position .The mirrors are heated depending on the outside temperature until
the ignition is switched off, even if the knob is no longer in position
.
It may be advisable to retract* the exterior mirrors to protect them
when parking or when driving through tight spaces.Memory for exterior mirrors*
On vehicles with memory function for the driver's seat, the setting
of the exterior mirrors is automatically stored together with the seat
position ⇒page 75.
Tilting function for exterior mirror on passenger side*
(only if equipped with memory for exterior mirrors)
When reverse gear is engaged, the mirror surface tilts slightly
downwards, provided the mirror control is switched to the exterior
mirror on the passenger's side (knob in position ⇒fig. 72). This
provides a better view of the kerb when parking.
The mirror returns to its original position when reverse gear is
disengaged and the vehicle is driven forwards at a speed above
about 15 km/h. The mirror will also return to its original position
when the adjuster knob is turned to the position for the driver's
exterior mirror or when the ignition is switched off.
If the position of the mirror surface is changed while the mirror is
tilted, this new position is automatically stored and assigned to the
remote control key when you disengage reverse gear.
Caution
•
Convex or wide-angle* exterior mirrors give a larger field of
vision. However, they also make objects appear further away than
they actually are. For this reason, you should not rely on these
mirrors for judging the distance of vehicles behind.
•
If one of the mirror housings is knocked out of position (e.g.
when parking), the mirrors must first be fully retracted with the elec-
tric control. Do not readjust the mirror housing by hand, as this will
interfere with the mirror adjuster function.Note
If the electrical adjustment should ever fail to operate, the mirrors
can be adjusted by hand by lightly pressing the edge of the mirror
glass.
Fig. 72 Detail of the
armrest: Adjuster knob
AL
AR
AAAB
AA
AR
AL
document_0900452a81b1b9de.book Seite 70 Donnerstag, 26. Juli 2007 9:16 09
Page 77 of 342
Seats and storage75
Controls
Safety
Driving tips
General maintenance
Self-help
Technical data
Adjusting contour of lumbar support
– Press the front or rear of switch to increase or
decrease the curvature of the lumbar support as
required.
Adjusting height of lumbar support
– Press the top or bottom of adjuster switch to move the
lumbar support upwards or downwards as required.
Moving seat backwards or forwards
– Press switch ⇒page 74, fig. 76 forwards or back-
wards.
Adjusting seat height
– Press switch up or down.
Raising/lowering seat at front
– Press the front of switch up or down.
Raising/lowering seat at rear
– Press the rear of switch up or down.
Adjusting backrest angle
– Press switch forwards or backwards.
Extending or shortening the thigh support*
– Lift the control below the seat cushion. The front seat
cushion will spring forward.
– Slide the seat cushion back to the normal position after
each use.
WARNING
•
Never adjust the driver's seat when the vehicle is moving - this
could lead to an accident.
•
The electrical seat adjustment also works when the ignition is
off and when the key is not in the ignition. To avoid accidental inju-
ries, never leave children unattended in the vehicle.
•
Be careful when adjusting the seat height. Careless or uncon-
trolled use of the height adjustment can cause injuries.
•
Do not drive with the backrests of the front seats reclined too
far as otherwise the seat belt and airbag could fail to restrain the
wearer properly in an accident, possibly leading to injury.
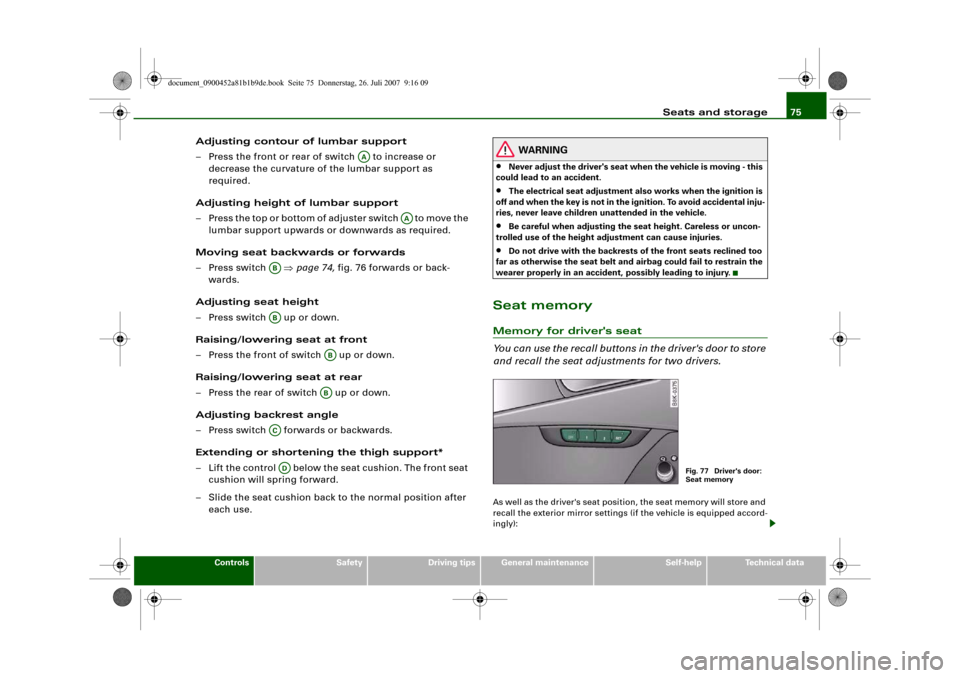
Seat memoryMemory for driver's seat
You can use the recall buttons in the driver's door to store
and recall the seat adjustments for two drivers.As well as the driver's seat position, the seat memory will store and
recall the exterior mirror settings (if the vehicle is equipped accord-
ingly):
AA
AA
ABAB
ABAB
ACAD
Fig. 77 Driver's door:
Seat memory
document_0900452a81b1b9de.book Seite 75 Donnerstag, 26. Juli 2007 9:16 09
Page 78 of 342
Seats and storage 76Storing and recalling settings
You can store and recall the settings for two different drivers using
the recall buttons 1 and 2 ⇒page 75, fig. 77 ⇒page 76.
In addition, the current settings are automatically stored when you
lock the vehicle and assigned to the remote control key that is being
used. When you unlock the vehicle, the system automatically recalls
the settings stored on that remote control key.
Switching seat memory on and off
The seat memory will be out of action if the switch has been
pressed and the diode in the switch is lit. In this case, the setting
cannot be stored.
The stored settings will all remain in the memory. However, the seat
can now only be adjusted using the conventional electrical
adjustment.Applies to vehicles: with seat memoryStoring and recalling settingsStoring settings
– Adjust the driver's seat as required.
– Adjust both exterior mirrors.
– Press the button. The diode in the switch will light
up to indicate that it is ready to store the settings. Now
press the desired recall button for at least a second.
– Release the button. The setting is now stored on the
selected recall button.
Recalling settings
– If the driver's door is open, press the desired recall
button briefly.– If the driver's door is closed, press and hold down the
desired recall button until the programmed settings are
reached.
A tone will sound and the diode in the button ⇒page 75,
fig. 77 will light up to confirm that the settings have been stored.
When you lock the vehicle the current settings are automatically
stored and assigned to the remote control key. However, the
settings assigned to the remote control key will not overwrite the
settings stored on recall buttons 1 and 2. The settings stored on the
recall buttons can be called up at any time. When you unlock the
vehicle, the settings assigned to the remote control key are recalled
automatically.
If your vehicle is also driven by other persons using your remote
control key, it is advisable to store your personal settings on one of
the recall buttons. You can then recall your own settings at any time
simply by pressing the corresponding recall button. When you lock
the vehicle these settings are then stored automatically and
assigned once again to the remote control key.
WARNING
•
For safety reasons, never recall seat settings when the vehicle
is moving - this could lead to an accident.
•
In an emergency the recall function can be stopped at any time
by pressing the switch, or by briefly pressing any of the
recall buttons.
OFF
SET
SET
ON/OFF
document_0900452a81b1b9de.book Seite 76 Donnerstag, 26. Juli 2007 9:16 09
Page 79 of 342
Seats and storage77
Controls
Safety
Driving tips
General maintenance
Self-help
Technical data
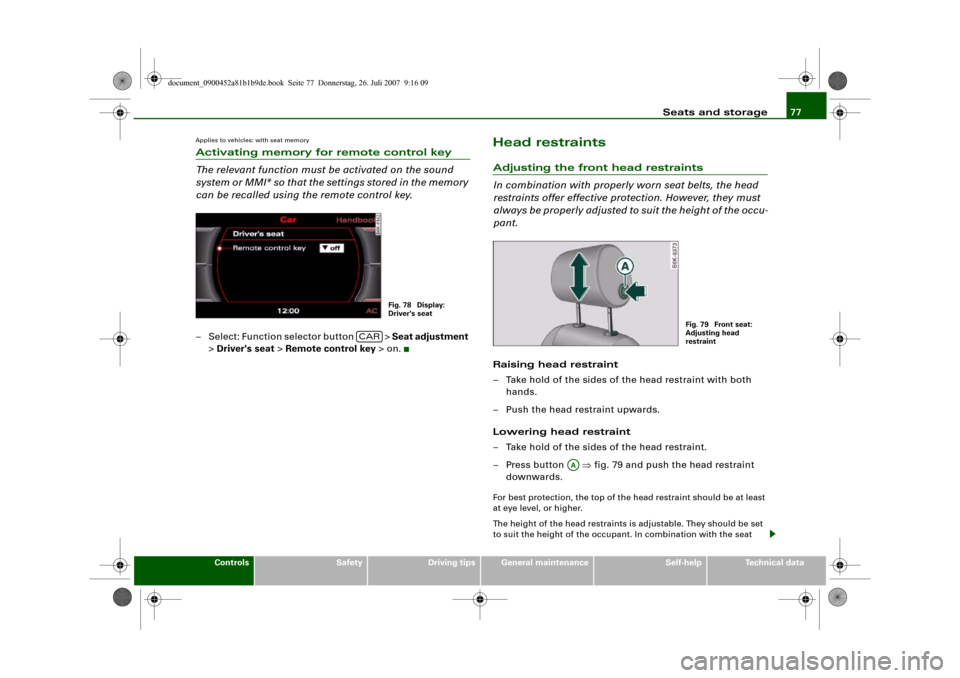
Applies to vehicles: with seat memoryActivating memory for remote control key
The relevant function must be activated on the sound
system or MMI* so that the settings stored in the memory
can be recalled using the remote control key.– Select: Function selector button > Seat adjustment
> Driver's seat > Remote control key > on.
Head restraintsAdjusting the front head restraints
In combination with properly worn seat belts, the head
restraints offer effective protection. However, they must
always be properly adjusted to suit the height of the occu-
pant.Raising head restraint
– Take hold of the sides of the head restraint with both
hands.
– Push the head restraint upwards.
Lowering head restraint
– Take hold of the sides of the head restraint.
– Press button ⇒fig. 79 and push the head restraint
downwards.For best protection, the top of the head restraint should be at least
at eye level, or higher.
The height of the head restraints is adjustable. They should be set
to suit the height of the occupant. In combination with the seat
Fig. 78 Display:
Driver's seat
CAR
Fig. 79 Front seat:
Adjusting head
restraint
AA
document_0900452a81b1b9de.book Seite 77 Donnerstag, 26. Juli 2007 9:16 09
Page 83 of 342
Seats and storage81
Controls
Safety
Driving tips
General maintenance
Self-help
Technical data
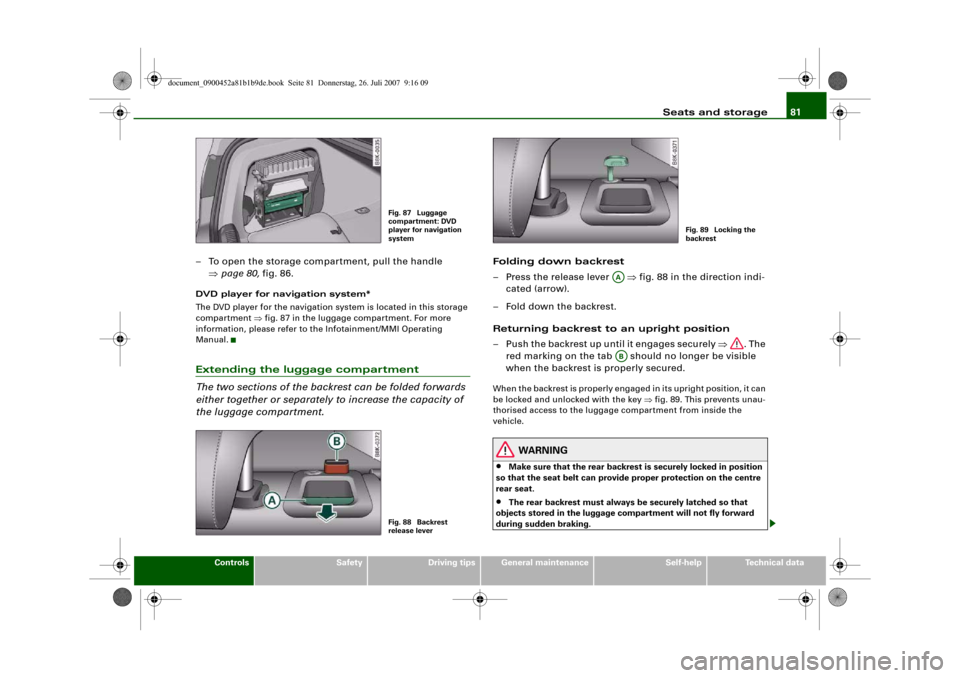
– To open the storage compartment, pull the handle
⇒page 80, fig. 86.DVD player for navigation system*
The DVD player for the navigation system is located in this storage
compartment ⇒fig. 87 in the luggage compartment. For more
information, please refer to the Infotainment/MMI Operating
Manual.Extending the luggage compartment
The two sections of the backrest can be folded forwards
either together or separately to increase the capacity of
the luggage compartment.
Folding down backrest
– Press the release lever ⇒fig. 88 in the direction indi-
cated (arrow).
– Fold down the backrest.
Returning backrest to an upright position
– Push the backrest up until it engages securely ⇒. The
red marking on the tab should no longer be visible
when the backrest is properly secured.When the backrest is properly engaged in its upright position, it can
be locked and unlocked with the key ⇒fig. 89. This prevents unau-
thorised access to the luggage compartment from inside the
vehicle.
WARNING
•
Make sure that the rear backrest is securely locked in position
so that the seat belt can provide proper protection on the centre
rear seat.
•
The rear backrest must always be securely latched so that
objects stored in the luggage compartment will not fly forward
during sudden braking.
Fig. 87 Luggage
compartment: DVD
player for navigation
systemFig. 88 Backrest
release lever
Fig. 89 Locking the
backrest
AAAB
document_0900452a81b1b9de.book Seite 81 Donnerstag, 26. Juli 2007 9:16 09
Page 89 of 342
Seats and storage87
Controls
Safety
Driving tips
General maintenance
Self-help
Technical data
Cigarette lighter and electrical
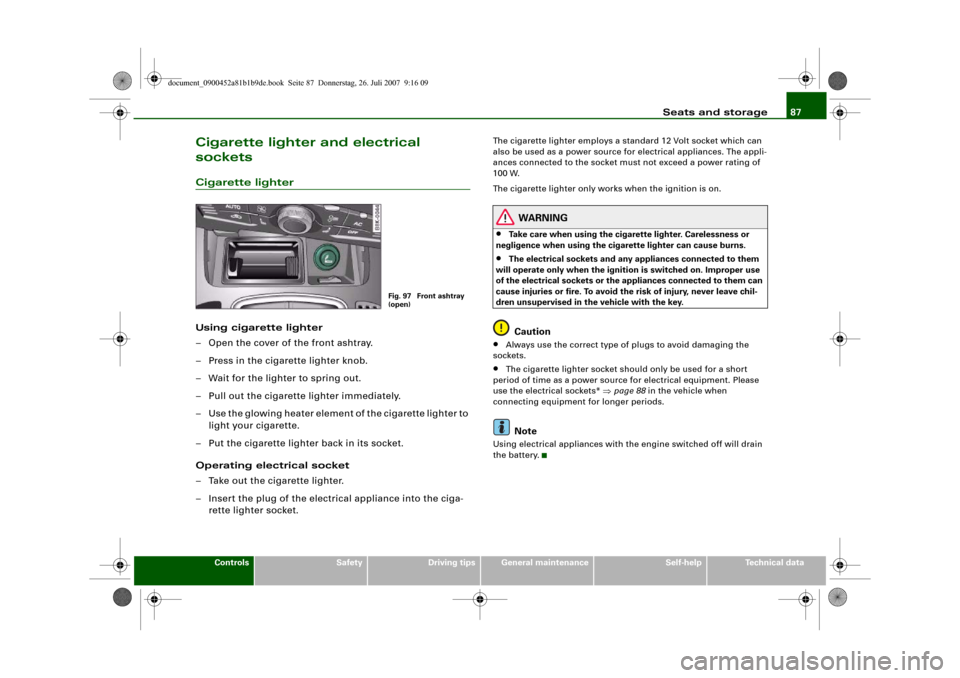
socketsCigarette lighterUsing cigarette lighter
– Open the cover of the front ashtray.
– Press in the cigarette lighter knob.
– Wait for the lighter to spring out.
– Pull out the cigarette lighter immediately.
– Use the glowing heater element of the cigarette lighter to
light your cigarette.
– Put the cigarette lighter back in its socket.
Operating electrical socket
– Take out the cigarette lighter.
– Insert the plug of the electrical appliance into the ciga-
rette lighter socket.
The cigarette lighter employs a standard 12 Volt socket which can
also be used as a power source for electrical appliances. The appli-
ances connected to the socket must not exceed a power rating of
100 W.
The cigarette lighter only works when the ignition is on.
WARNING
•
Take care when using the cigarette lighter. Carelessness or
negligence when using the cigarette lighter can cause burns.
•
The electrical sockets and any appliances connected to them
will operate only when the ignition is switched on. Improper use
of the electrical sockets or the appliances connected to them can
cause injuries or fire. To avoid the risk of injury, never leave chil-
dren unsupervised in the vehicle with the key.Caution
•
Always use the correct type of plugs to avoid damaging the
sockets.
•
The cigarette lighter socket should only be used for a short
period of time as a power source for electrical equipment. Please
use the electrical sockets* ⇒page 88 in the vehicle when
connecting equipment for longer periods.Note
Using electrical appliances with the engine switched off will drain
the battery.
Fig. 97 Front ashtray
(open)
document_0900452a81b1b9de.book Seite 87 Donnerstag, 26. Juli 2007 9:16 09
Page 90 of 342
Seats and storage 88Applies to vehicles: with 12 Volt sockets12 Volt sockets
Electrical equipment can be connected to both 12 Volt
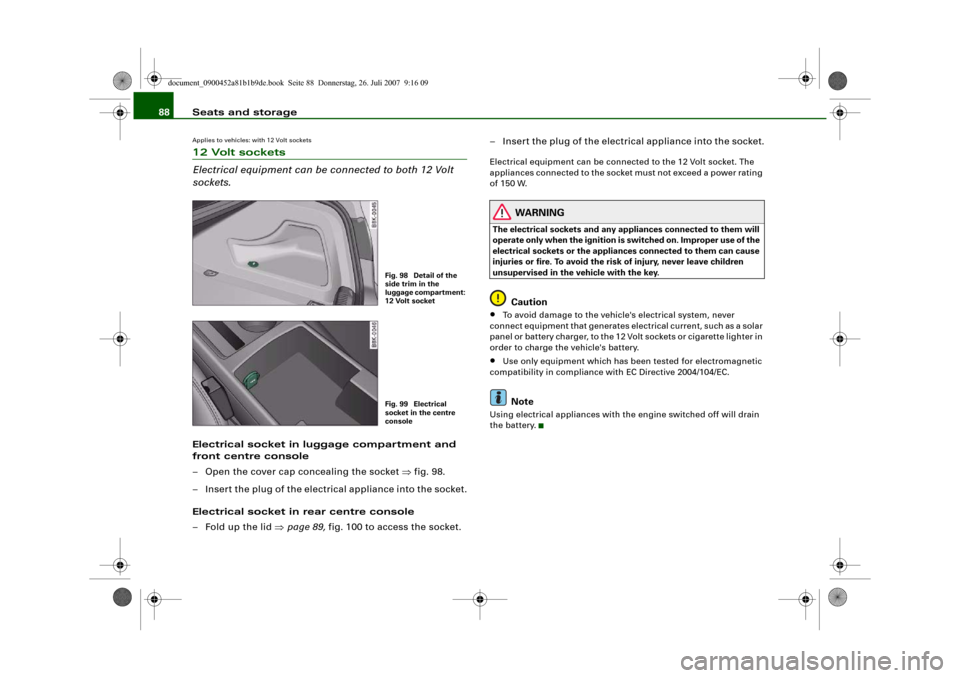
sockets.Electrical socket in luggage compartment and
front centre console
– Open the cover cap concealing the socket ⇒fig. 98.
– Insert the plug of the electrical appliance into the socket.
Electrical socket in rear centre console
– Fold up the lid ⇒page 89, fig. 100 to access the socket.– Insert the plug of the electrical appliance into the socket.
Electrical equipment can be connected to the 12 Volt socket. The
appliances connected to the socket must not exceed a power rating
of 150 W.
WARNING
The electrical sockets and any appliances connected to them will
operate only when the ignition is switched on. Improper use of the
electrical sockets or the appliances connected to them can cause
injuries or fire. To avoid the risk of injury, never leave children
unsupervised in the vehicle with the key.
Caution
•
To avoid damage to the vehicle's electrical system, never
connect equipment that generates electrical current, such as a solar
panel or battery charger, to the 12 Volt sockets or cigarette lighter in
order to charge the vehicle's battery.
•
Use only equipment which has been tested for electromagnetic
compatibility in compliance with EC Directive 2004/104/EC.Note
Using electrical appliances with the engine switched off will drain
the battery.
Fig. 98 Detail of the
side trim in the
luggage compartment:
12 Volt socketFig. 99 Electrical
socket in the centre
console
document_0900452a81b1b9de.book Seite 88 Donnerstag, 26. Juli 2007 9:16 09