Tire AUDI A4 2013 Owners Manual
[x] Cancel search | Manufacturer: AUDI, Model Year: 2013, Model line: A4, Model: AUDI A4 2013Pages: 302, PDF Size: 75.61 MB
Page 5 of 302
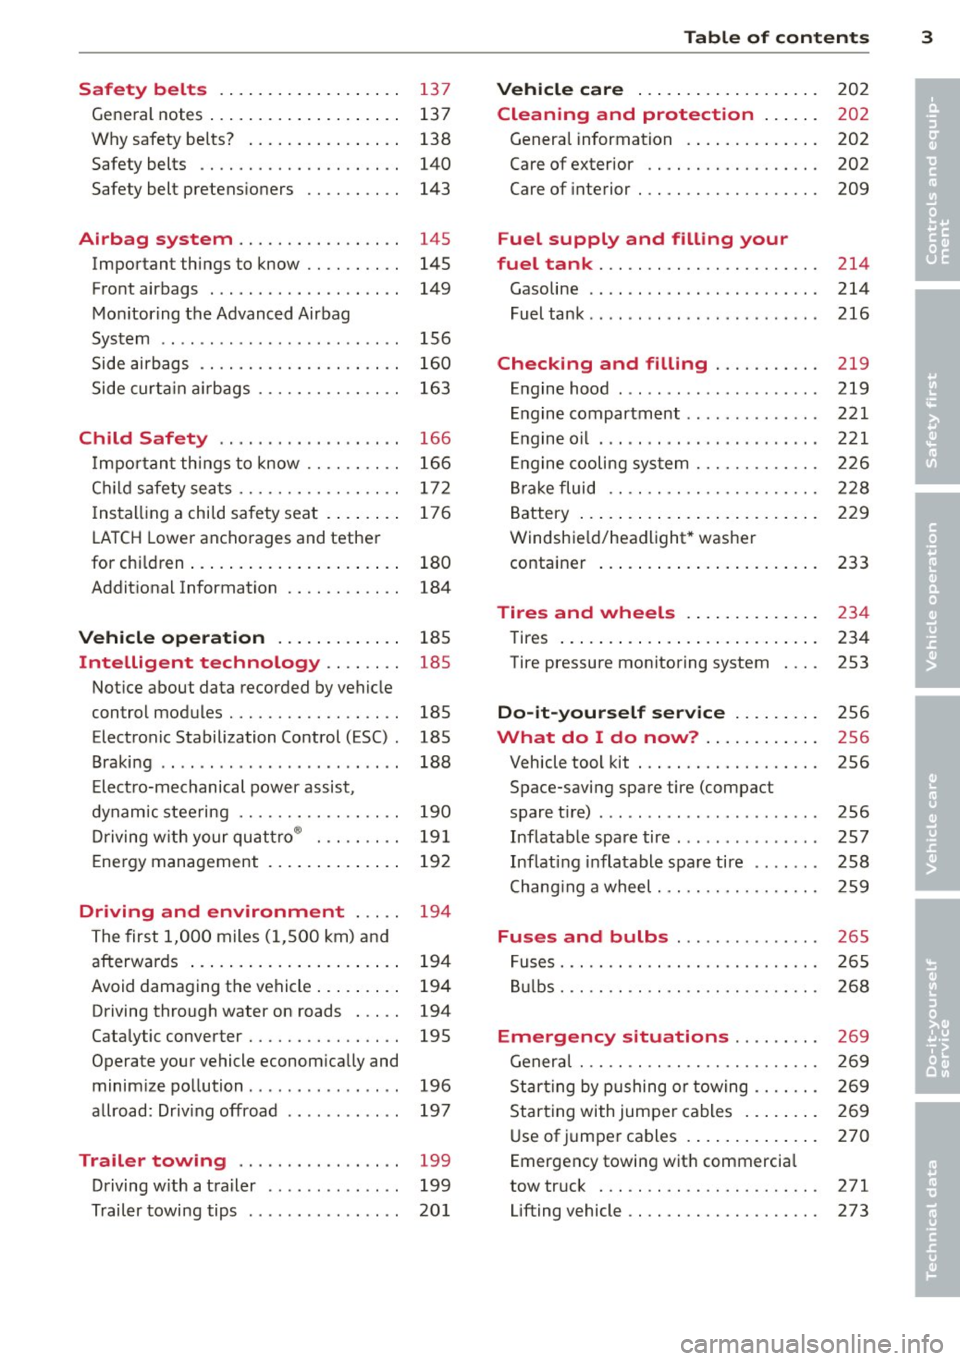
Safety belts . . . . . . . . . . . . . . . . . . . 137
General notes . . . . . . . . . . . . . . . . . . . . 137
Why safety be lts? . . . . . . . . . . . . . . . . 138
Safety belts . . . . . . . . . . . . . . . . . . . . . 140
Safety belt pretens ioners . . . . . . . . . . 143
Airbag system . . . . . . . . . . . . . . . . . 145
Important things to know . . . . . . . . . . 14S
Front airbags . . . . . . . . . . . . . . . . . . . . 149
Mon itor ing the Advanced Airbag
System . . . . . . . . . . . . . . . . . . . . . . . . . 156
Side airbags . . . . . . . . . . . . . . . . . . . . . 160
Side curta in a irbags . . . . . . . . . . . . . . . 163
Child Safety . . . . . . . . . . . . . . . . . . . 166
I mpor tant th ings to know . . . . . . . . . . 166
C hi ld safety sea ts ................. 172
I ns tall ing a chi ld safety seat . . . . . . . . 176
L A T CH Lower anchorages and tether
for children . . . . . . . . . . . . . . . . . . . . . . 180
Addit ional Information
184
Vehi cle operat ion . . . . . . . . . . . . . 185
Intelligent technology . . . . . . . . 185
Not ice about data recorded by vehicle
control modules . . . . . . . . . . . . . . . . . . 18S
Electronic Stabilization Control (ESC) . 185
Braking . . . . . . . . . . . . . . . . . . . . . . . . . 188
E lect ro-mechanical power assist ,
dynamic stee ring . . . . . . . . . . . . . . . . . 190
Driving w ith your qu attro ® . . . . . . . . . 191
E nergy management . . . . . . . . . . . . . . 192
Driving and environment . . . . . 194
The first 1,000 miles (1,500 km) and
afterwards . . . . . . . . . . . . . . . . . . . . . . 194
Avoid damaging the vehicle . . . . . . . . . 194
Driving through water on roads . . . . . 194
Catalytic converter . . . . . . . . . . . . . . . . 19S
Operate your vehicle econom ically and
minim ize pollution . . . . . . . . . . . . . . . . 196
allroad: Driv ing offroad . . . . . . . . . . . . 197
Trailer towing . . . . . . . . . . . . . . . . . 199
Driving w ith a t ra iler . . . . . . . . . . . . . . 199
Trailer towing tips . . . . . . . . . . . . . . . . 20 1
Table of contents 3
Vehicle care . . . . . . . . . . . . . . . . . . .
202
Cleaning and protection . . . . . . 202
Genera l information . . . . . . . . . . . . . . 202
Care of exterior . . . . . . . . . . . . . . . . . . 202
Care of interior . . . . . . . . . . . . . . . . . . . 209
Fuel supply and filling your
fuel tank ... .. .. .. . .............
214
Gasoline . . . . . . . . . . . . . . . . . . . . . . . . 214
Fuel tank .. .. .. .. .. . .. .... ...... . 216
Checking and filling . . . . . . . . . . . 219
Engine hood . . . . . . . . . . . . . . . . . . . . . 219
Engine compartment .............. 221
E ngine oil . . . . . . . . . . . . . . . . . . . . . . . 221
E ngine cooling system . . . . . . . . . . . . . 226
B rake fluid . . . . . . . . . . . . . . . . . . . . . . 228
Battery . . . . . . . . . . . . . . . . . . . . . . . . . 229
Windshie ld/headlight* washer
container . . . . . . . . . . . . . . . . . . . . . . . 233
Tires and wheels . . . . . . . . . . . . . . 23 4
Tires . . . . . . . . . . . . . . . . . . . . . . . . . . . 234
Tire pressure monitoring system 253
Do-it-yourself service . . . . . . . . . 256
What do I do now? . . . . . . . . . . . . 256
Vehicle tool kit . . . . . . . . . . . . . . . . . . . 2S6
Space-saving spare tire (compact
spare tir e) . . . . . . . . . . . . . . . . . . . . . . . 256
Inflatable spare tire . . . . . . . . . . . . . . . 257
Inflat ing i nflatable spa re tire . . . . . . . 258
Changi ng a wheel. . . . . . . . . . . . . . . . . 259
Fuses and bulbs . . . . . . . . . . . . . . . 265
Fuses..... .. .. .. .. . ............. 265
Bul bs. . . . . . . . . . . . . . . . . . . . . . . . . . . 268
Emergency situations . . . . . . . . . 269
Genera l . . . . . . . . . . . . . . . . . . . . . . . . . 269
St art ing by p ushing or towing . . . . . . . 269
Star ting with jumpe r cables . . . . . . . . 269
Use of jumper cables . . . . . . . . . . . . . . 270
Emergency towing wit h commercia l
tow truck ... .. .. .. .. ........... . 271
Lifting vehicle . . . . . . . . . . . . . . . . . . . . 273
•
•
Page 16 of 302
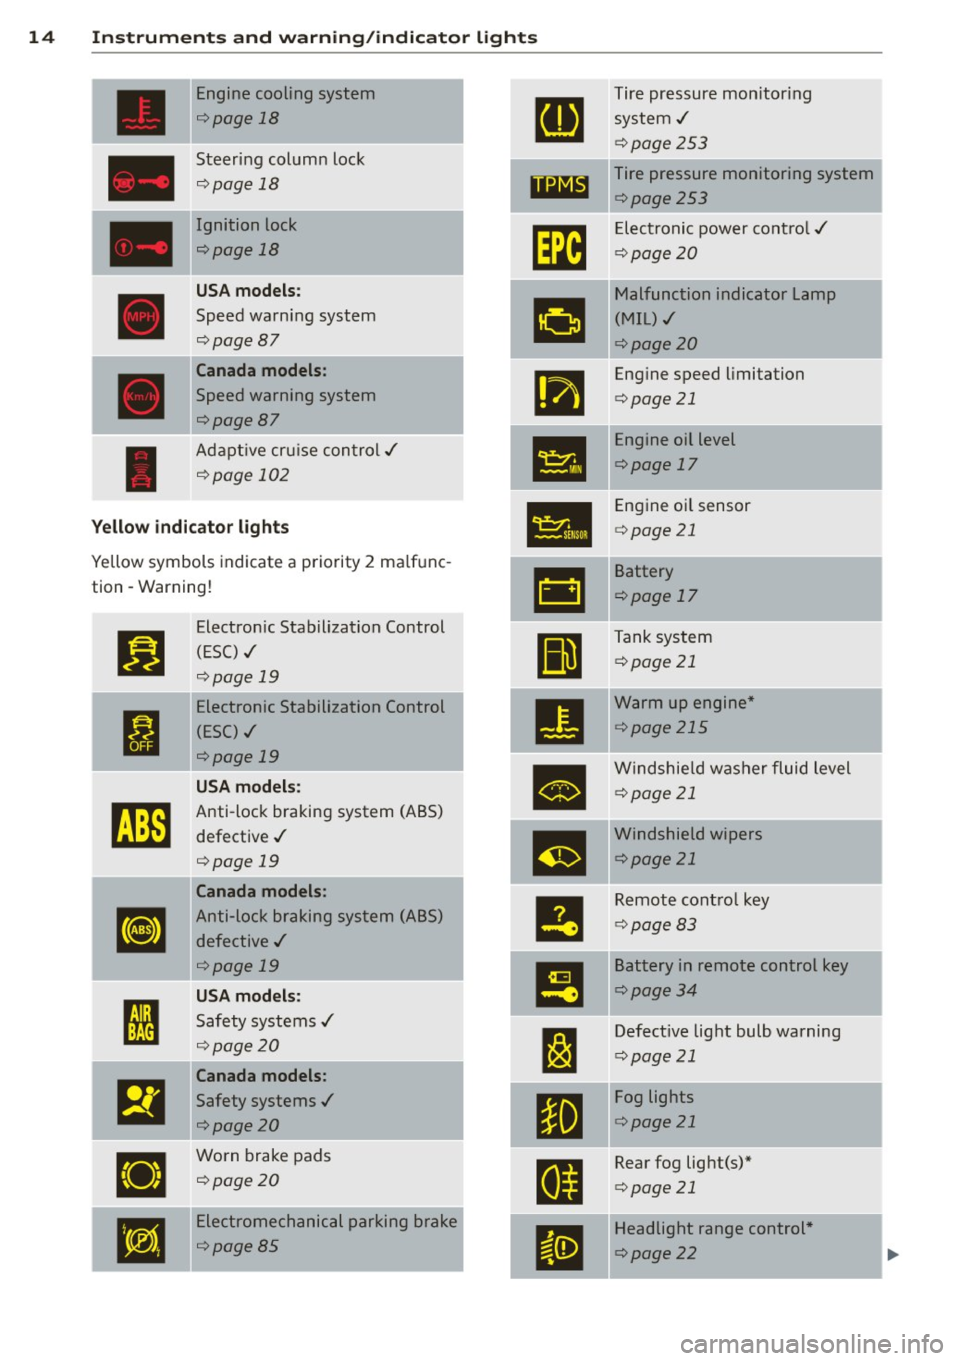
14 Instrum ent s and w arn ing /indic ato r light s
Engine cooling system Tire pressure monitor ing
¢ page 18
system,/
¢page253
Steering column lock Tire pressure monitoring system
¢ page 18
1181~1 ¢page253
Ignition lock
Im
Electronic power cont ro l ,/
r:::;,page 18
c:>page20
U SA mod els:
•
Malfunction indicator Lamp
Speed warning system (MIL),/
r:::;, page 87
c:> page 20
Canada models :
•
Engine speed limitation
Speed warning system c:>page 21
r:::;,page87 Engine oil level
Adapt ive cru ise control./
•
c:>page 17
¢ page 102
•
Engine o il sensor
Yellow ind ic a to r lights c:> page 21
Yellow symbols indicate a priority 2 ma lfunc-
-
&1
Battery
tion -Warning!
c:>page 17
Jj]
Electron ic Stabilization Control
Ill
Tank system
(ESC) ,/
c:>page 21
r:::;, page 19
-Electronic Stabilization Control
•
Warm up engine *
ti
(ESC) ./ c:>
page 215
r:::;, page 19
•
Windshie ld washer fluid level
U SA m odel s: c:>page 21
~
Anti-lock braking system (ABS)
defective ,/
m
Windshield wipers
r:::;, page 19 c:>page
21
Canada models :
le
Remote control key
[I]
Anti-lock braking system (ABS)
c:>page 83
defective ,/
r:::;, page 19
I!
Battery in remote control key
USA models: c:>page 34
I
Safety systems ,/ --
l:J
Defective light bulb warning ' r:::;, page 20
c:>page 21
Canada models :
El
Safety systems ,/
•
Fog lights
<=>page20 c:>
page 21
•
Worn brake pads
E
Rear fog light(s)*
<=> page 20
c:>page 21
•
Electromechanical parking brake
II
Headlight range control *
<=>page 85
c:> page 22
Page 26 of 302
24 Driver information d isplay
Driver information
display
Introduction
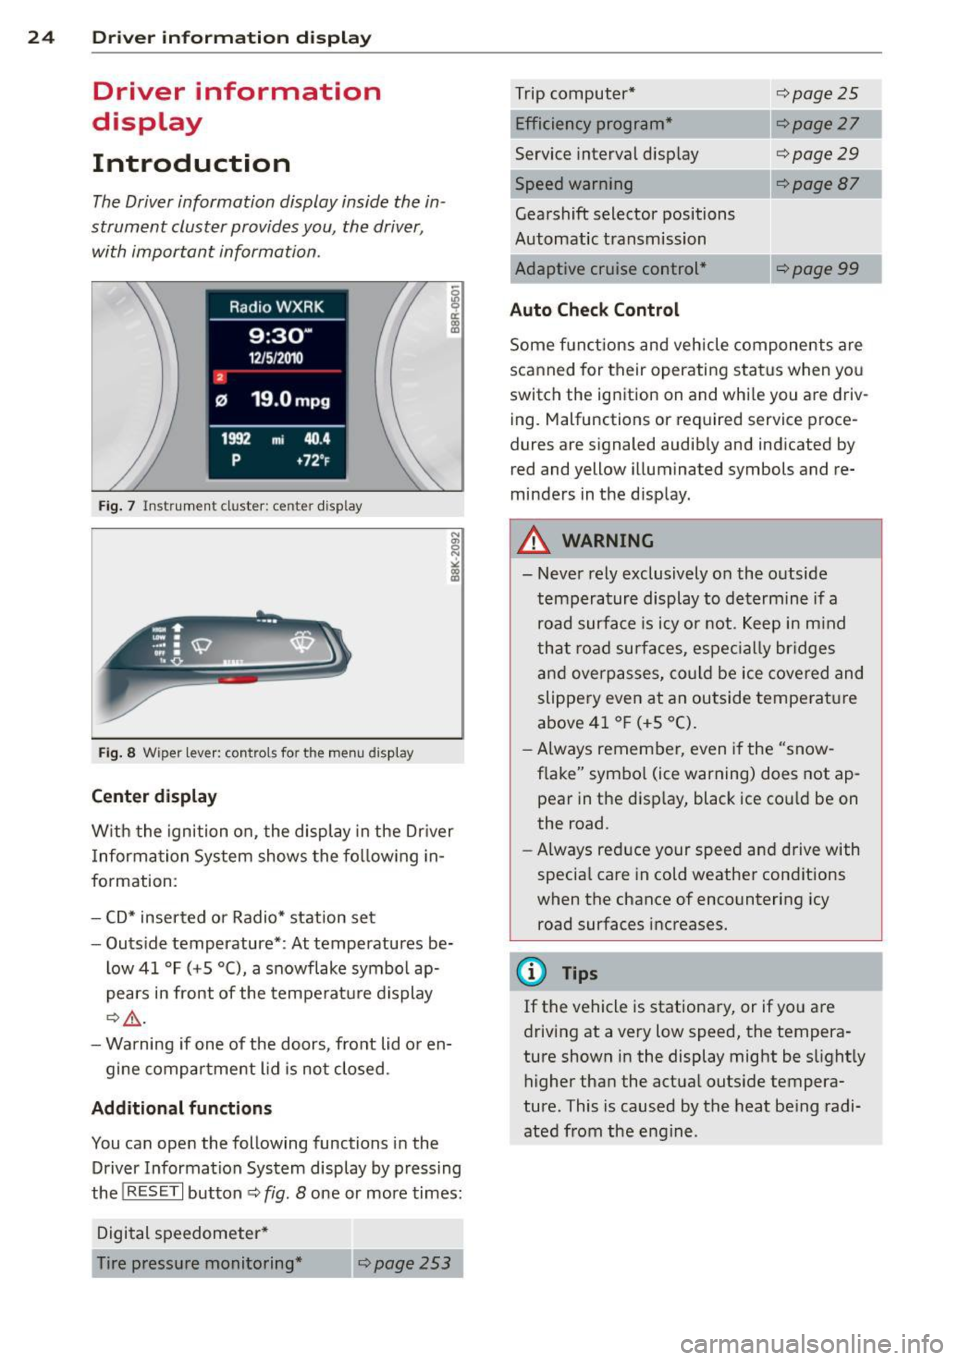
The Driver information display inside the in
strument cluster provides you, the driver ,
with important information.
Fig. 7 Ins trum en t cl uster : ce nter display
Fig. 8 W iper lev er: con trols fo r th e menu disp lay
Center display
W ith the ignition on, the display in the Dr iver
I nformation System shows the following in
formation :
- CD* inserted or Radio* station set
- Outside temperature* : At temperatures be-
low 41 °F (+5 °C), a snowflake symbol ap
pears in front of the temperature display
c::> .&_.
-Warning if one of the doors, front lid or en-
gine compartment lid is not closed .
Additional functions
You can open the following functions in the
Driver Information System display by pressing
the
! RESET I button c::> fig. 8 one or more times:
Digital speedometer*
Tire pressure monitoring *
~page253
Trip computer*
Efficiency program*
Service interval display
c::>page25
c::> page 27
c::> page 29
--·-
Gearshift selector positions
Automatic transmission
Adaptive cruise control*
Auto Check Control
<::>page 87
Some functions and vehicle components are
scanned for their operating status when you
switch the ignition on and whi le you are driv
ing. Malfunctions or required service proce
dures are signaled audibly and indicated by
red and yellow illuminated symbols and re
minders in the d isplay.
A WARNING
--- Never rely exclusively on the outside
temperature display to determine if a
road surface is icy or not. Keep in mind
that road surfaces, especially br idges
and overpasses, could be ice covered and
slippery even at an outside temperature
above 41 °F (+5 °C).
- Always remember, even if the "snow
flake" symbol (ice warning) does not ap
pear in the disp lay, black ice cou ld be on
the road.
- Always reduce your speed and drive with
specia l care in cold weather cond itions
when the chance of encountering icy
road surfaces increases.
¢j) Tips
If the vehicle is stationary, or if you are
driving at a very low speed, the tempera
ture shown in the display might be s light ly
higher than the actual outs ide tempera
ture. This i.s caused by the heat being radi
ated from the engine .
Page 33 of 302
In o rder to connect the special diagnostic
equipment, push the plug into the Data Link
Connector (DLC) . The DLC is located to the
right of the hood release ¢
fig. 18.
Your authorized A udi dealer or qualified work
shop can interpret the code and perform the necessary repa ir.
A WARNING
Do not use the diagnostic connector for
personal use. Incorrect usage can cause
malfunctions, which can increase the risk
of a coll is ion!
Electronic speed limiter
-
Your veh icle may be factory equipped with
tires that are rated for a maximum speed of 130 mph (210 km/ h). Thi s is may be less than
the maximum speed of your ve hicle. To red uce
the risk of sudden ti re failure and loss of con
trol if the vehicle is operated at excessive
speeds, your vehicle has an e lectronic speed
limiter. The electronic speed limiter prevents
your veh icle from going faster than the t ire
speed rat ing . For more informat ion
¢ page 246 .
If the engine control unit rece ives fa ulty vehi
cle roadspeed signa ls, the Ma lfunction Indica
tor Light (MIL)
¢..ij w ill illuminate . If this oc
curs, contact the nearest authorized Audi
deale r for assistance.
A WARNING
-
Always observe the posted speed limits
and ad just yo ur speed to suit p revail ing
road, t raff ic and weather conditions . Never
drive your vehicle faster than the maxi
mum speed rating of the tires insta lled .
Dri ver information di spla y 31
Page 37 of 302
@ For the sake of the environment
Dispose of dead batteries properly so as
not to pollute the environment.
@ Tips
The replacement battery must be the
same specification as the original.
Emergency unlocking of the ignition key
In the event of malfunctions in the electrical
system, it may happen that you cannot re move the ignition key .
• Remove the mechanical key<:? page 34.
• Lock the vehicle using the mechanical key
<:?page 38.
• Have the e lectrica l system inspected by an
authori zed Audi dealership .
Locking and unlocking the vehicle with
the remote control
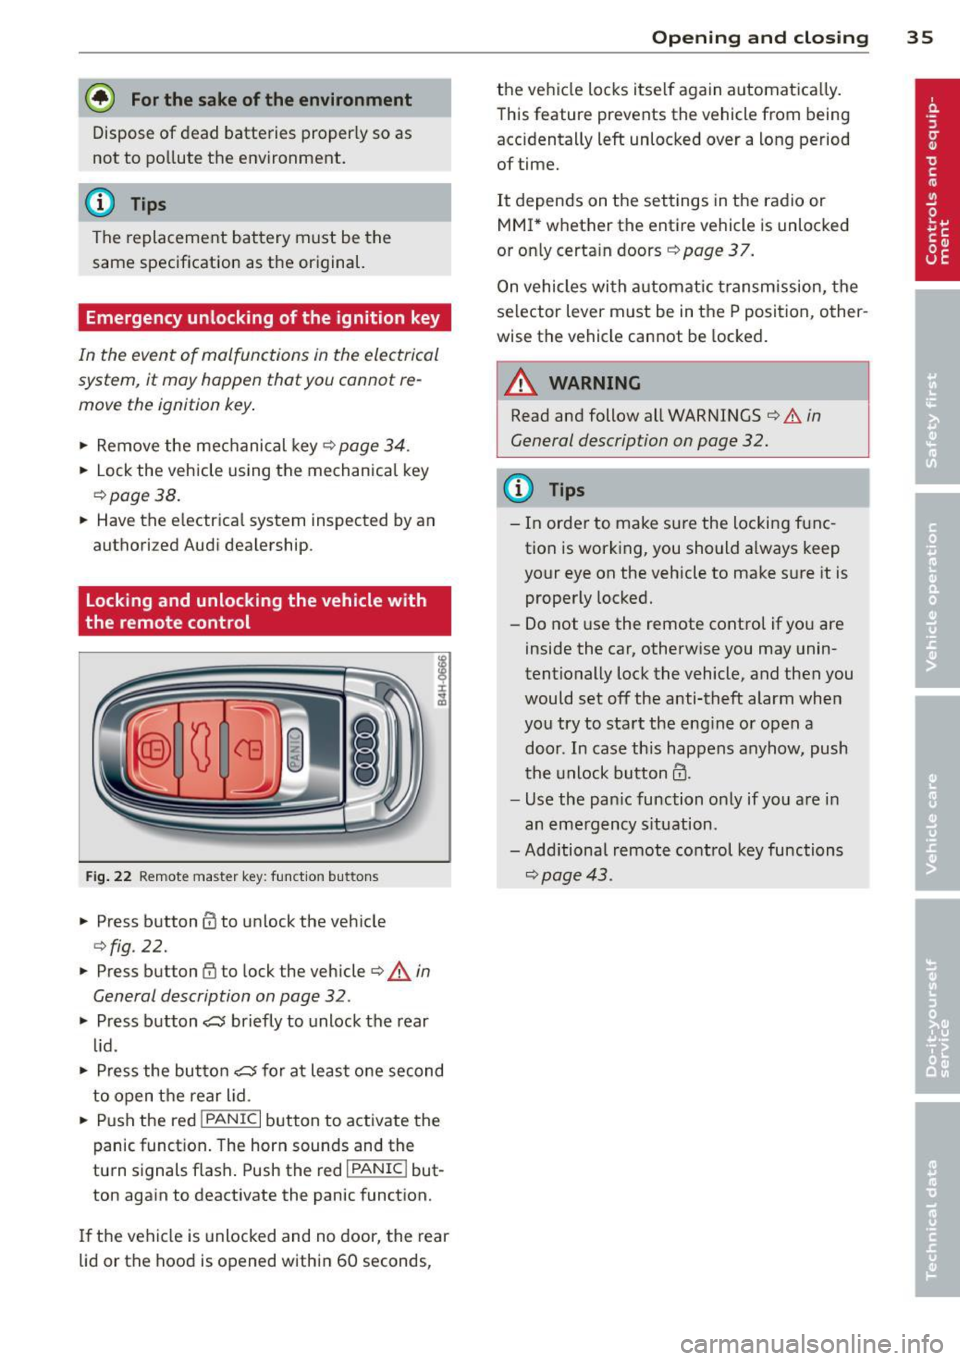
Fig. 22 Remote master key: function but tons
• Press button @to unlock the vehicle
Qfig . 22.
• Press button fij to lock the vehicle QA in
General description on page
32 .
• Press button ,c:;5 briefly to unlock the rear
lid .
• Press the button
,c:;5 for at least one second
to open the rear lid .
• Push the red
I PANIC I button to activate the
panic function. The horn sounds and the
turn s ignals flash . Push the red
I PANIC ! but
ton again to deactivate the panic function.
If the vehicle is unlocked and no door, the rear
lid or the hood is opened within 60 seconds,
Opening and closing 35
the vehicle locks itself again automat ica lly.
This feature prevents the vehicle from being
accidentally left unlocked over a long period of time.
It depends on the settings in the radio or
MMI* whether the entire vehicle is unlocked
or only certain doors <:?
page 37.
On vehicles with automatic transmission, the
selector lever must be in the P position, other
wise the vehicle cannot be locked.
A WARNING
Read and follow all WARNINGS ¢.&. in
General description on page
32.
(D Tips
- In order to make sure the locking func
tion is working, you should a lways keep
your eye on the vehicle to make sure it is properly locked.
- Do not use the remote control if you are
inside the car, otherwise you may unin
tentionally lock the vehicle, and then you
would set off the anti-theft alarm when
you try to start the eng ine or open a
door . In case this happens anyhow, push
t he unlock button@.
- Use the pan ic function only if you are in
an emergency s ituation.
-Add itional remote control key functions
¢page 43 .
Page 38 of 302
36 Opening and clo sing
locking and unlocking with convenience
key
Appl ies t o vehicles : wit h convenience key
The doors ond the rear lid can be unlocked
and locked without operating the master key.
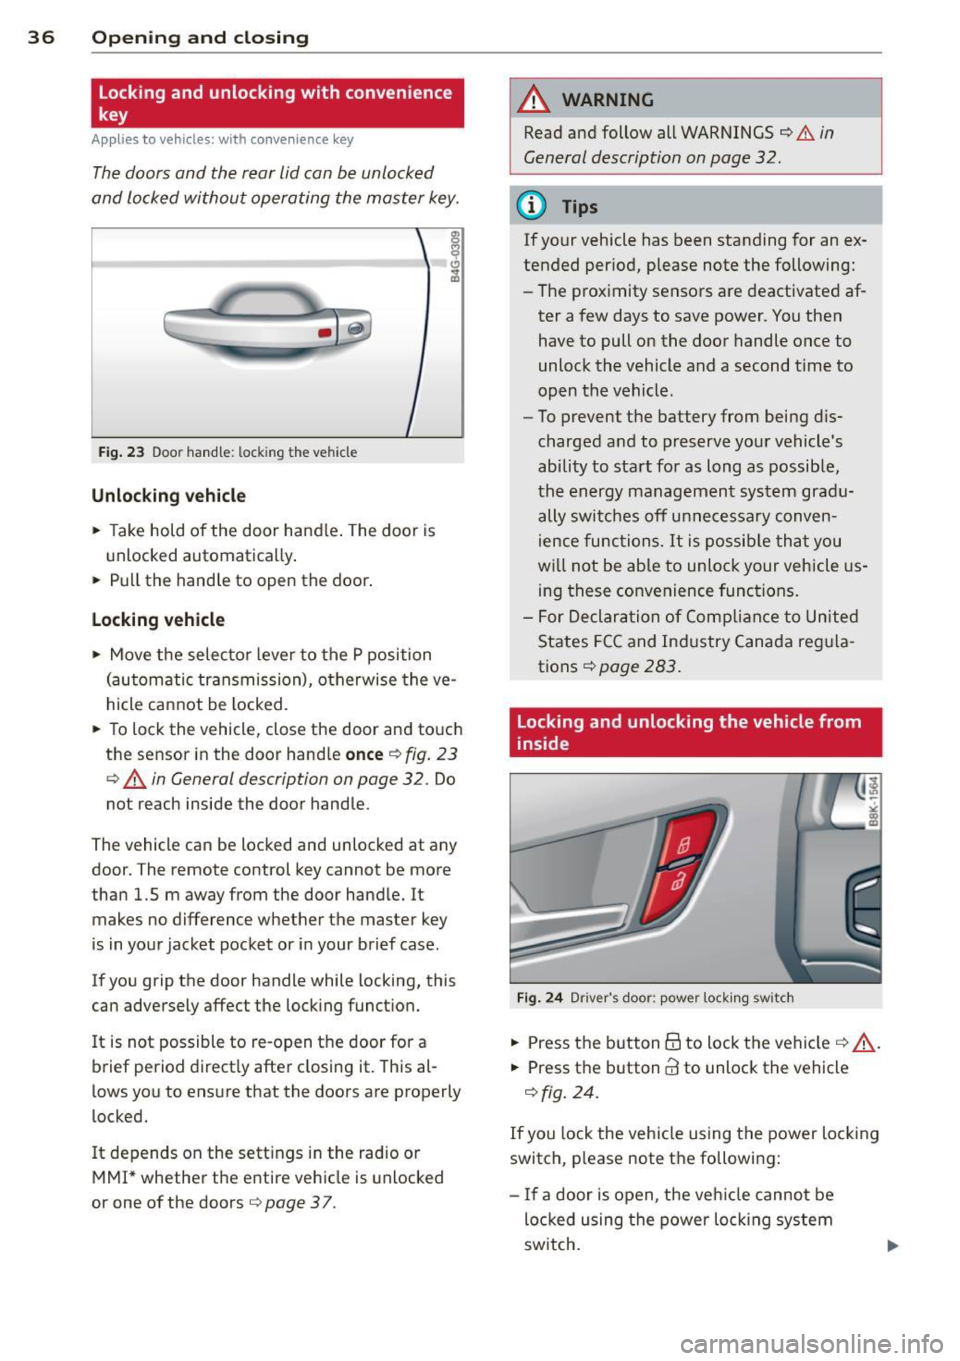
Fig . 23 Door hand le: lock ing the v ehi cle
Unlocking vehicl e
.. Take hold of the door hand le . The door is
unlocked automatically .
.. Pull the handle to open th e door .
locking vehicle
.. Move the selecto r lever to the P position
(au tomatic transmission), o therwise the ve
hicle cannot be locked.
.. To lock the veh icle , close the door and to uch
the sensor in th e door hand le
once ¢ fig. 23
c:> A in General description on page 32. Do
not reach inside the door handle .
The vehicle ca n be locked and unlocked at any
doo r. T he remote control key cannot be more
t han 1.5 m away from the door hand le. It
makes no difference whether the m aster key
is in your jacket pocket or i n your brief ca se .
If you grip the door handle while lo cking, th is
can adversely affect the lock ing funct ion.
I t is not possible to re-open the door for a
brief period direct ly after closing it. This al
l ows you to ensure that the doors are properly
locked.
I t depends on the sett ings in the radio or
MMI* whether the e ntire vehicle is unlocked
or one of the doors
c:> page 3 7 .
A WARNING
-
Read and follow all WARNINGS c:> .&. in
General description on page
32 .
(D Tips
If your vehicle has been standing for an ex
tended per iod, please note the following:
- The prox imity sensors are deactivated af-
ter a few days to save power. You then
have to pull on the door handle once to
unlock the vehicle and a second t ime to
open the vehicle .
- To prevent the battery from being d is
charged and to preserve your vehicle 's
ability to start for as long as possib le,
the energy managemen t system gra du
ally switches off u nnecessa ry c onven
ience func tions.
It is possib le th at you
w ill not be able to unloc k your vehicle us
ing these convenience func tions.
- F or Declar ation of Complian ce to Unite d
States FC C and Ind ustry Canada reg ula
tions
¢ page 283.
locking and unlocking the vehicle from
inside
Fi g. 24 Drive r's doo r: pow er lock ing sw it c h
.. Press the b utton B to lock the vehicle c::> ,& .
.. Press the button @ to unlock the vehicle
¢ fig. 24.
If you lock the veh icle using the power loc king
switch, p lease note the followi ng:
- I f a door is open, the veh icle canno t be
loc ked u sing the power loc king system
sw itch.
Page 39 of 302
-You cannot open the doors or the rear lid
from the outside (increased security, for ex
amp le when yo u are stopped at a red light).
- The diodes in the power loc king switc h illu
minate when a ll the doors are closed and
l ocked.
- Front doors: you can un lock and open the
doors from the ins ide by p ulling on the door
hand le.
- Rea r doors: p ull the door handle once to re
lease the lock. Pull the hand le again to open
the door.
- If you have a crash and the airbag is activat
ed, the doors automatically un lock.
A WARNING
- The power locking sw itch works w ith the
ignition off and automatically locks the
entire vehicle when it is actua ted .
- On a vehicle locked from the outs ide the
power locking system switch is inopera
t ive.
- Locked doors make it more diffic ult for
eme rg ency workers to get into th e vehi
cle, w hich puts lives at risk . Do not leave
anyone behi nd in the ve hicle, espe cially
ch ildren.
(D Tips
Your vehicle is locked automatically at a
speed of
9 mph (15 km/h) (Au to Lock)
~ page 32. You ca n unl ock the vehicle
a g ai n using the opening f un ction in the
power locking sys tem swit ch ~ -
Setting power locking
In the radio/MM !*, you can se t which doors
t he central locking system will unlo ck .
.,. Se lect: ICARlf unct io n button>
Central lock
ing .
Or
.,. Se lect: ~ I C-A-R~I fu nct io n bu tton >
Car sy s
tems*
c ontrol bu tton > Vehicle setting s >
(Central lock ing) *.
Single door unlocking /Unlock door s* -
you
c a n specify whi ch door s unl ock when yo u open
the vehicle .
Opening and clo sin g 37
-Select ing off / All and p ressing the Iii button
on t he remote contro l key unlocks the entire
veh icle.
- Selecting
on /Driver and pressing the Iii but
ton on the remote control key once un locks
only the driver's door. In vehicles with a con
ven ience key*, only the door whose handle
you pull w ill unlock. If you press the
Iii but
ton tw ice, the entire vehicle will u nlock . If
you press the [@] button, t he entire ve hicle
w ill always lock .
Luggage comp. loc k/Lock e xterior trunk han
dl e -
If you select On , you can no longer ope n
the luggage compartment using the rea r lid
hand le
~ page 39, fig. 2 7. In this case, the
r ear lid can be opened with t he l=I button on
th e maste r key¢ page 35, fig. 22 or with the
l = I* button in the d river's doo r¢ page 40,
fig .
29 .
Fold mirrors * if you se lec t On , the outs ide
mirro rs will fo ld in au tomati cally when yo u
press the
Iii button on the remote cont ro l key
~ page 50.
Tone when locking -if you selec t On, a to ne
will soun d when yo u lo ck t he vehicle.
Auto Lock /Lock when driving -if you selec t
On, th e e nti re ve hicl e w ill lock automat ically
whe n the speed reaches
9 m ph (1 5 km /h).
Page 69 of 302
Roof rack
Description and mounting locations
Additional cargo can be carried with a roof
luggage rack .
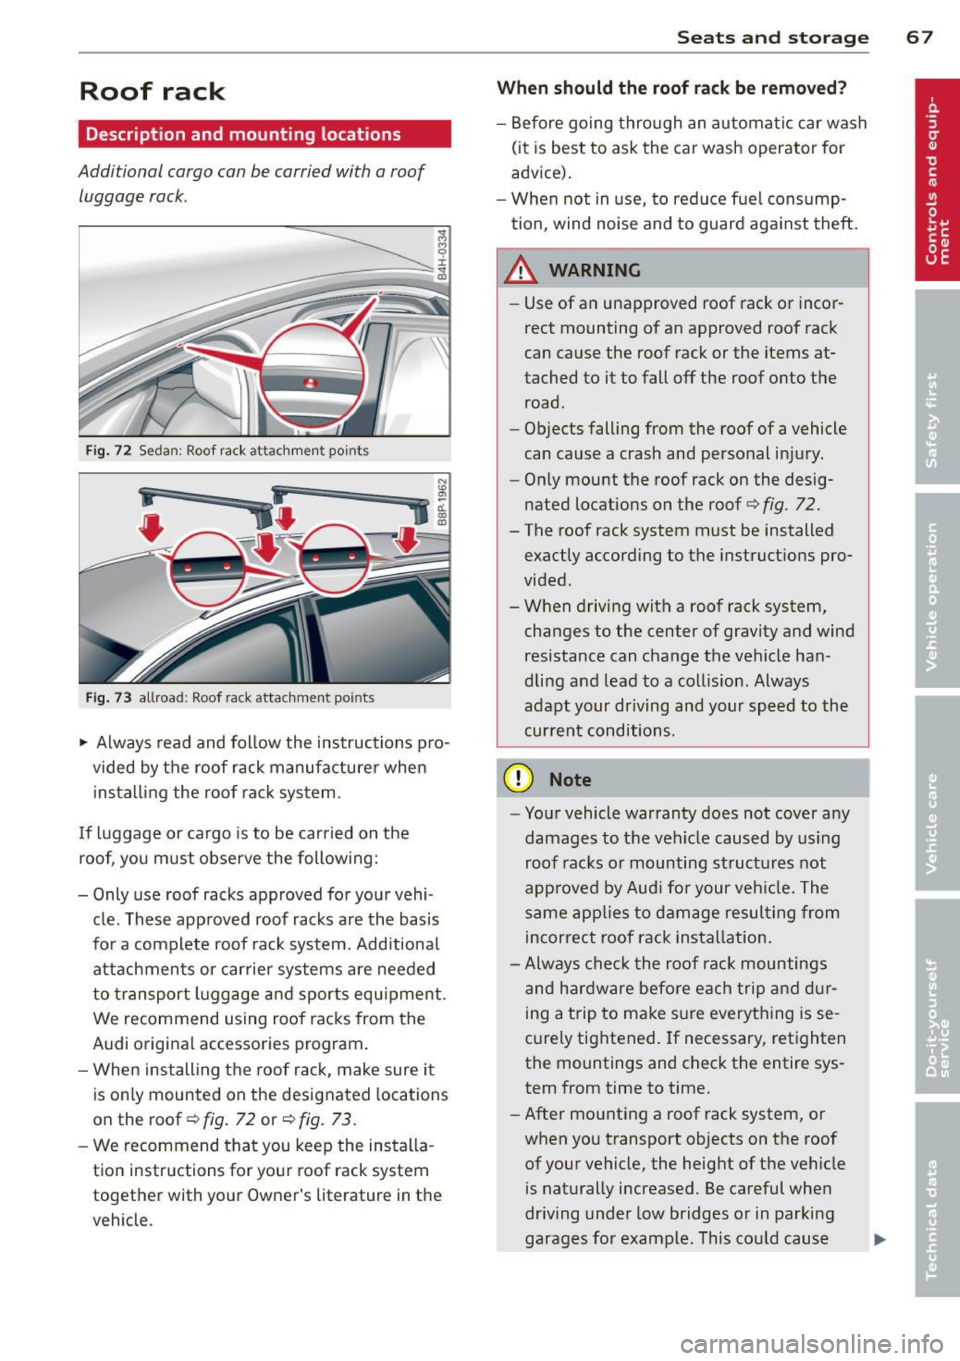
Fig. 72 Seda n: Roof ra ck atta chmen t po ints
Fig. 73 allroa d: Roof ra ck atta chm ent points
~ Always read and follow the instructions pro
vided by the roof rack manufacturer when
installing the roof rack system.
If luggage or cargo is to be carried on the roof, you must observe the following:
- Only use roof racks approved for your vehi
cle. These approved roof racks are the basis
for a complete roof rack system. Additional
attachmen ts or carrier systems are needed
to transport luggage a nd sports equ ipment .
We recommend using roof racks from the
Audi original accessories program.
- When installing the roof rack, make sure it
is only mounted on the designated locations
on the roof ¢
fig. 72 or¢ fig. 73 .
-We recommend that you keep the installa
tion instructions for your roof rack system
together with your Owner 's literature in the
veh icle .
Sea ts a nd s to rage 67
Wh en should th e ro of rack be r emo ved ?
-Before going through an automatic car wash
(it is best to ask the car wash operator for
advice).
- When not in use, to reduce fuel cons ump
tion, wind noise and to guard against theft.
A WARNING
=
- Use of an unapproved roof rack or incor-
rect mounting of an approved roof rack
can cause the roof rack or the items at
tached to it to fall off the roof onto the road.
- Objects falling from the roof of a vehicle
can cause a crash and personal injury.
- Only mount the roof rack on the desig
nated locations on the roof
i:> fig . 72.
- The roof rack system must be installed
exactly according to the instruct ions pro
vided.
- When driving with a roof rack system,
changes to the center of gravity and wind
resistance can change the vehicle han
dling and lead to a collision . Always
adapt your driving and your speed to the
cur ren t conditions.
(D Note
- Your vehicle warranty does not cover any
damages to the veh icle caused by using
roof racks or mounting structures not
approved by Aud i for your veh icle. The
same app lies to damage resulting from
incorrect roof rack installation.
- Always check the roof rack mountings
and hardware before each trip a nd d ur
ing a trip to make sure everything is se
curely tightened. If necessary, retighten
the mountings and check the entire sys
tem from time to time.
- After mounting a roof rack system, or
when you transport objects on the roof
of your vehicle, the height of the veh icle
is naturally increased. Be careful when
dr iving under low bridges or in parking
garages for example . This cou ld cause
111>
Page 90 of 302
88 On the road
vehicle speed exceeds the set speed by about
3 mph (3 km/h). At the same time, a warning
symbol appears in the d isp lay . The symbol's
appeara nce m ight be d ifferent in some mod
els.
The speed warning system has one or two*
warn ing thresholds that f unct ion independ
ently of each other and that have somewhat
d ifferent purposes:
Speed warn ing 1
You can use speed warning 1 to set the maxi
m um speed w hile you are driv ing. T his setting
will remain in effect until you turn
off the igni
tion, assuming that you have not changed or
reset the setting.
The . (USA models)/ . (Canada models)
speed warning symbol in the warning 1 dis
p lay appears whe n you exceed the maximum
speed. It goes out when the speed fa lls below
the stored max imum speed .
The speed warning symbo l w ill also go out if
the speed
exceeds the stored max imum speed
by more than about 25 mph (40 km/h) for at
least 10 seconds. The stored maximum speed
is deleted .
Sett ing speed warning 1
c::> page 88.
Speed warning 2*
Sto ring warning 2 is recommended if you al
ways
want to be reminded of a certain speed,
for example when yo u are traveling in a coun
try that has a general maximum speed limit,
or if you do not want to exceed a specified
speed for winter tires.
The . (USA mode ls)/ . (Canada mode ls)
speed warning 2 symbo l appears in the dis
play when you exceed the stored speed lim it.
Unlike warning 1, it will not go out until the
vehicle speed drops below the stored speed
lim it.
Sett ing speed warning 2
c::> page 88.
(D Tips
Even tho ugh your vehicle is equipped with
a speed warning system, you should st ill watch the speedome
ter to ma ke s ure you
are not dr iving faster than the speed limit .
Speed warning 1: setting a speed limit
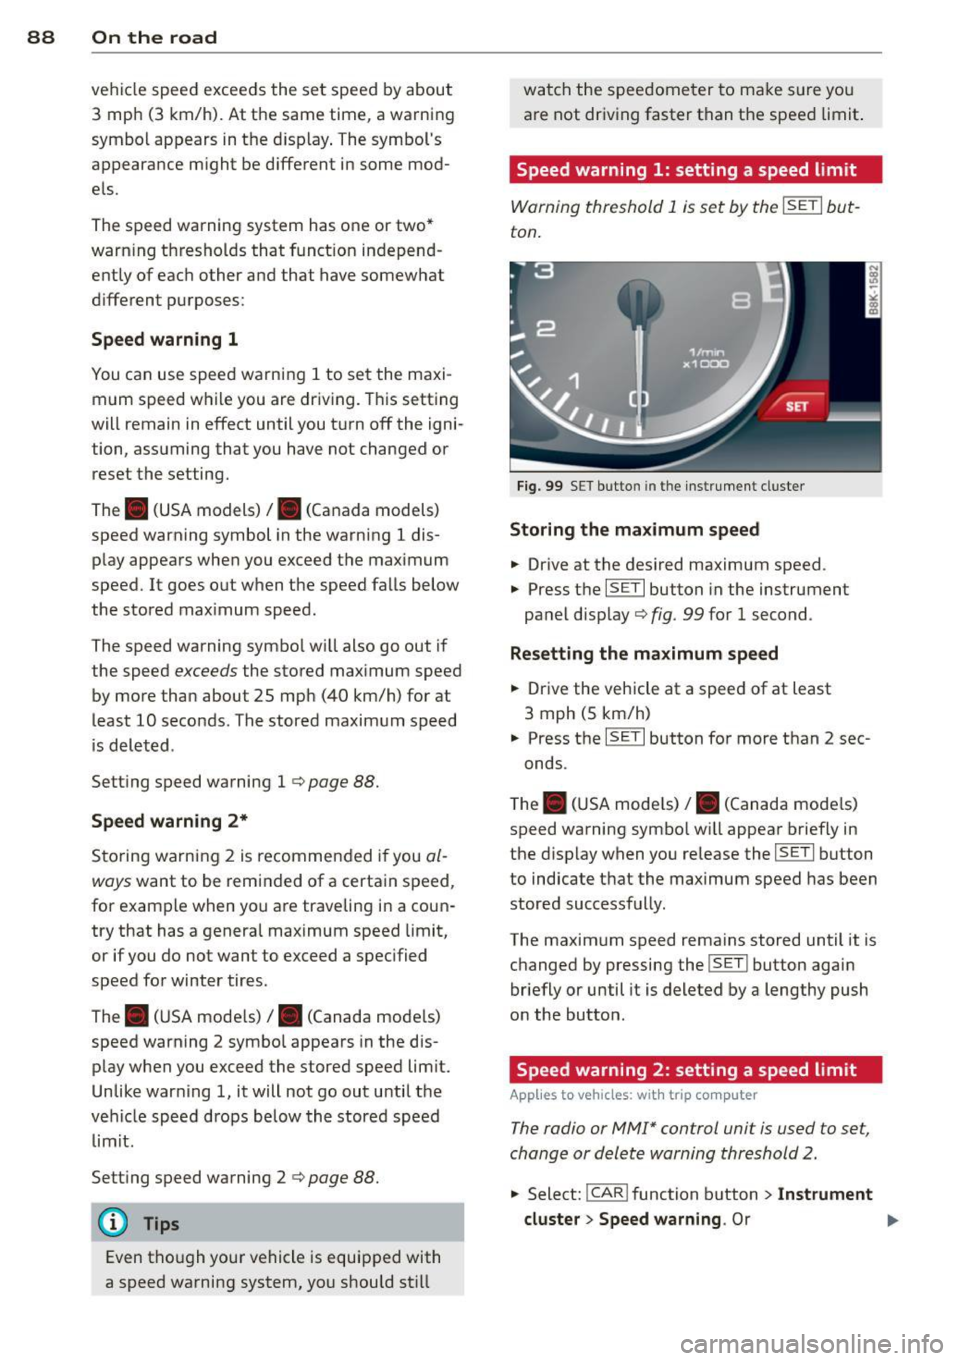
Warning threshold 1 is set by the ISETI but
ton.
F ig . 99 SET bu tton in the instr ume nt cluste r
Storing the max imum speed
.. Drive at the desired maximum speed .
.,. Press t he
ISE TI button in the instrument
panel disp lay
c::> fig . 99 for 1 second .
Resetting the maximum speed
.. Drive the vehicle at a speed of at least
3 mph (5 km/h)
.. Press the
ISET I button for more than 2 sec-
onds.
T he . (USA mode ls)/ . (Canada mode ls)
speed warning symbo l w ill appear briefly in
the display when you release the
I SE TI button
to indicate that the maximum speed has been
stored successfully.
The maximum speed remains stored until it is changed by pressing the
I SET ! button again
briefly or until it is deleted by a lengthy push
on the button.
Speed warning 2: setting a speed limit
App lies to vehicles: wi th trip co mp uter
The radio or MMI* control unit is used to set,
change or delete warning threshold 2.
.. Select: !CAR ! function b utton > In st rument
cluster > Speed warning .
Or
Page 122 of 302
120 Park ass is t
@ Tips
- The rear view camera picture is avai lable
as soon as the MMI Display or the MMI is
switched on, or the start-up phase is
completed.
- Keep the sensors in the rear bumper and the rear view camera lens clean and free
of snow and ice, so that the parking sys
tem can work properly . Please follow the
additional notes on
~ page 122.
Reverse Park ing
App lies to vehicles: with parking system (rear, wit h rear
view came ra)
Parking mod e 1 can be used when parking in
a garage or parking space.
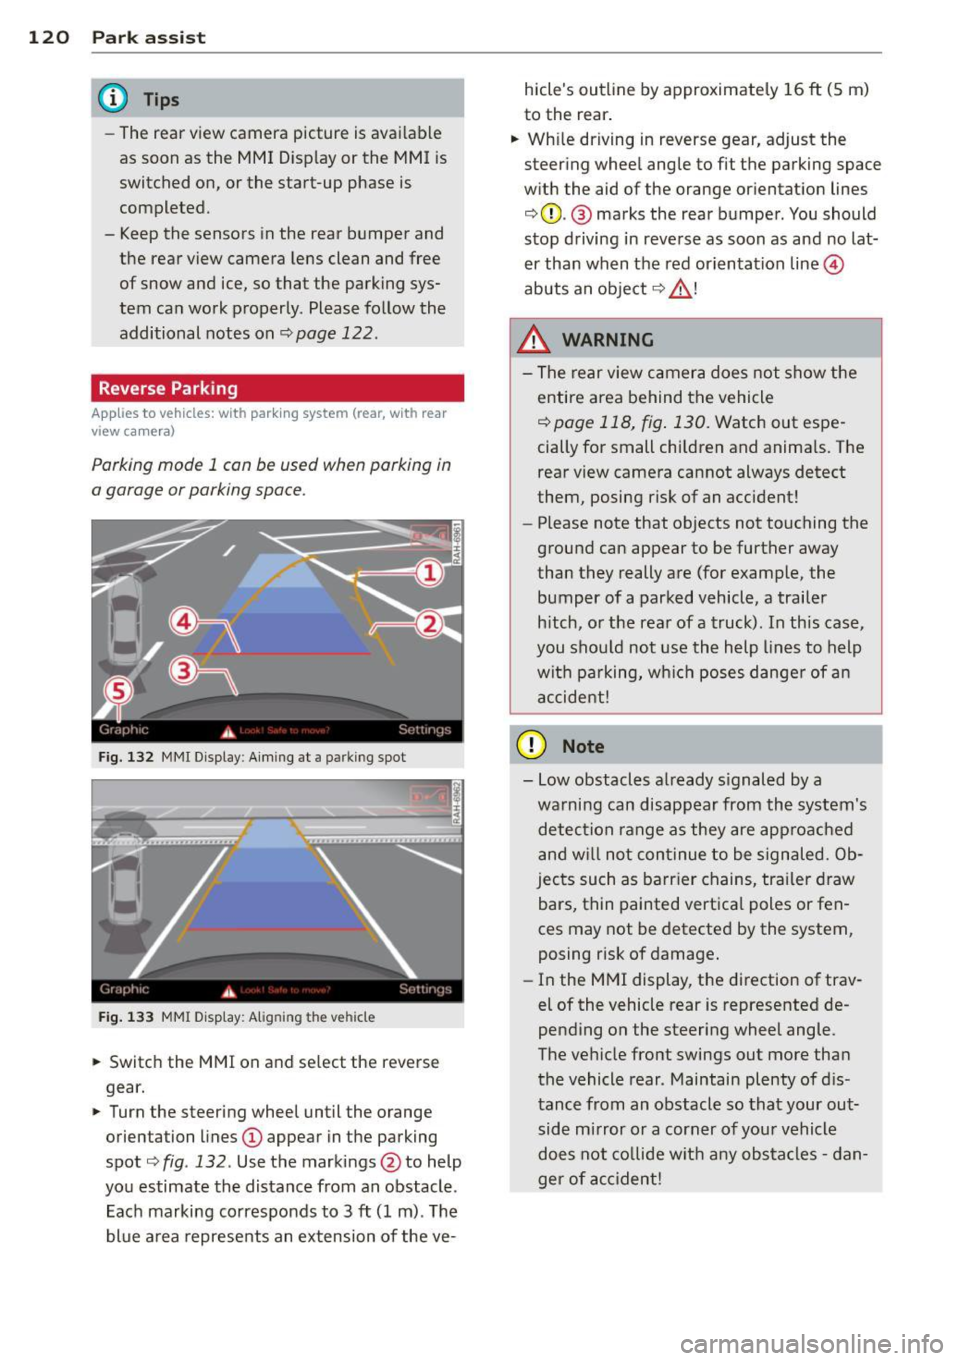
F ig. 132 MMI Display : Aim ing at a p arkin g spot
Fig . 133 MMI Disp lay: Ali gning th e vehi cle
"' Switch the MMI on and se lect the reverse
gear.
"' Turn the steering wheel until the orange
orienta tion lines
(D appear in the parking
spot ¢
fig. 132 . Use the mark ings @to help
yo u estimate the distance from an obstacle .
Each marking corresponds to 3
ft (1 m) . T he
blue a rea represents an extension of the ve- hicle's outline by approximate
ly 16
ft (5 m)
to the rear .
"' Wh ile driving in reverse gear, adjust the
steering whee l angle to fit the parking space
w ith the aid of the orange or ientation lines
¢ 0 . @ marks the rear bumper . You should
stop d riving in reve rse as soon as and no lat
er than when the red orientation line©
abuts an object ¢ _&. !
_& WARNING
-The rear view c amera does not show t he
e ntire area behind t he vehicle
¢ page 118, fig . 130. Watch out espe
cially for small children and anima ls. The
rear view camera cannot always detect
them, posing risk of an accident!
- Please note that objects not touching the
ground can appear to be further away
than they really a re (for example, the
bumper of a parked vehicle , a trailer
h itch, o r the rear of a truck). In this case,
you shou ld not use the h elp lines to help
wit h pa rking, wh ich poses danger of an
a ccident!
(D Note
- Low obstacles a lready s ignaled by a
wa rning can disappear from th e system's
detec tion range as they are approac hed
and w ill not con tinue to be signaled. Ob
jec ts such as barr ier chains, tr ailer draw
bars, thin painted vertica l poles or fen
ces may not be detecte d by the system,
posing risk of damage.
- In the MMI display, t he direction of trav
el of the vehicle rear is represented de
pending on the steering wheel angle.
The ve hicle fro nt swings out more tha n
the vehicle rear . Maintain plenty of d is
tance from an obstacle so that your out side mirror o r a corner of you r vehicle
does not co llide w it h any obs ta cl es -d an
ger of ac cident!