RADIO AUDI A4 2015 User Guide
[x] Cancel search | Manufacturer: AUDI, Model Year: 2015, Model line: A4, Model: AUDI A4 2015Pages: 304, PDF Size: 74.86 MB
Page 52 of 304
50 Clear vis ion
@ Tips
- The light sensor* for headlight control is
located in the rear view m irror mount.
You should therefore not apply any st ick
ers to the windsh ield in this area in order
to prevent malfunctions or failures.
- Some exterior lighting functions can be
adjusted
c> page 50.
- When you remove your key from the igni
tion while the vehicle's lights are turned
on, a buzzer sounds as long as the driv
er's door is open .
- In cool or damp weather, the ins ide of
the headlights, turn signals and tail lights can fog over due to the tempera
ture difference between the inside and
outside. They will clea r shor tly after
switching them on. This does not affect
the service life of the lighting.
- In the even t of a light sensor malfunc
tion, the driver is no tified in the instru
ment cluster disp lay¢
page 22.
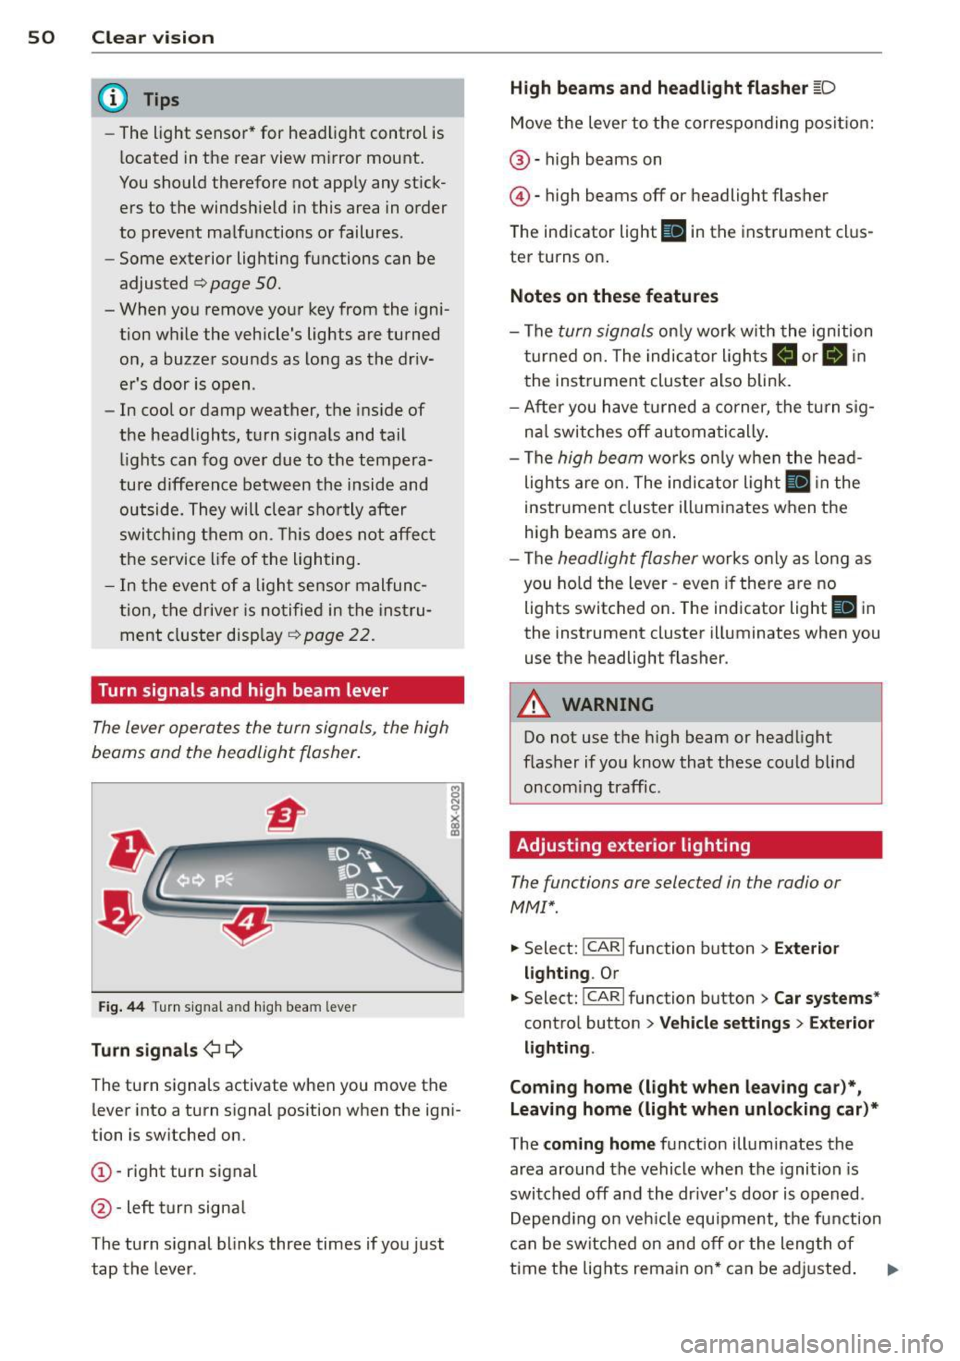
Turn signals and high beam lever
The lever operates the turn signals, the high
beams and the headlight flasher .
Fig. 44 Tu rn s ig na l and hig h beam lever
Turn sign als ¢i ¢
The turn signals activate when you move the
l ever into a turn s ignal pos ition when the ign i
tion is switched on.
(D -right turn signal
@-left tur n signa l
The turn s ignal blinks three times if you just
tap the lever .
High be ams and headlight flasher [D
Move the lever to the correspon ding posit io n:
@ -high beams on
@ -high beams off or headlight flasher
The indicator light
ii in the instrument cl us
te r turns on .
Notes on thes e features
-The turn signals on ly wor k w ith the ignition
t ur ned on. The indicator ligh ts
Ct or a in
the instrument cluster also blink.
- After you have turned a co rner, the turn s ig
na l switches off au toma tically .
- The
high beam works on ly w hen the head
lights a re on. The ind icator ligh t
II in the
instrument cluster illuminates when the
high beams are on .
- The
headlight flasher works o nly as long as
you ho ld the lever -even if there a re no
lights switched on . The indicator light
II in
the instrument cluster illuminates when you
use the headlight flasher.
A WARNING
--
Do not use the h igh beam or headlight
flasher if you know that these could blind
oncom ing traffic.
Adjusting exterior lighting
The functions ore selected in the radio or
MMI" .
.,. Select: !CARI function button> Exte rior
light ing .
Or
.,. Select: !CARI function button > Car systems *
control button > Vehicle s etting s> Exterior
lighting .
Coming home (light when leav ing car }*,
Leav ing home (light when unlocking car )*
The coming home function illuminates the
area around the vehicle when the ignition is
switched off and th e dr ive r's door is open ed.
Depend ing on veh icle equ ipment, the function
can be switched on and off or the length of
time the lig hts remain on* can be ad justed . ..,.
Page 59 of 304
"" N
0 ::.,: co ,...., \!) 1.1'1 ,...., 1.1'1 ,....,
Rear wip er*
• Lift the w iper arm away from the rear w in
dow .
A WARNING
Dirty windshield wiper blades can impair
your view. This can lead to accidents.
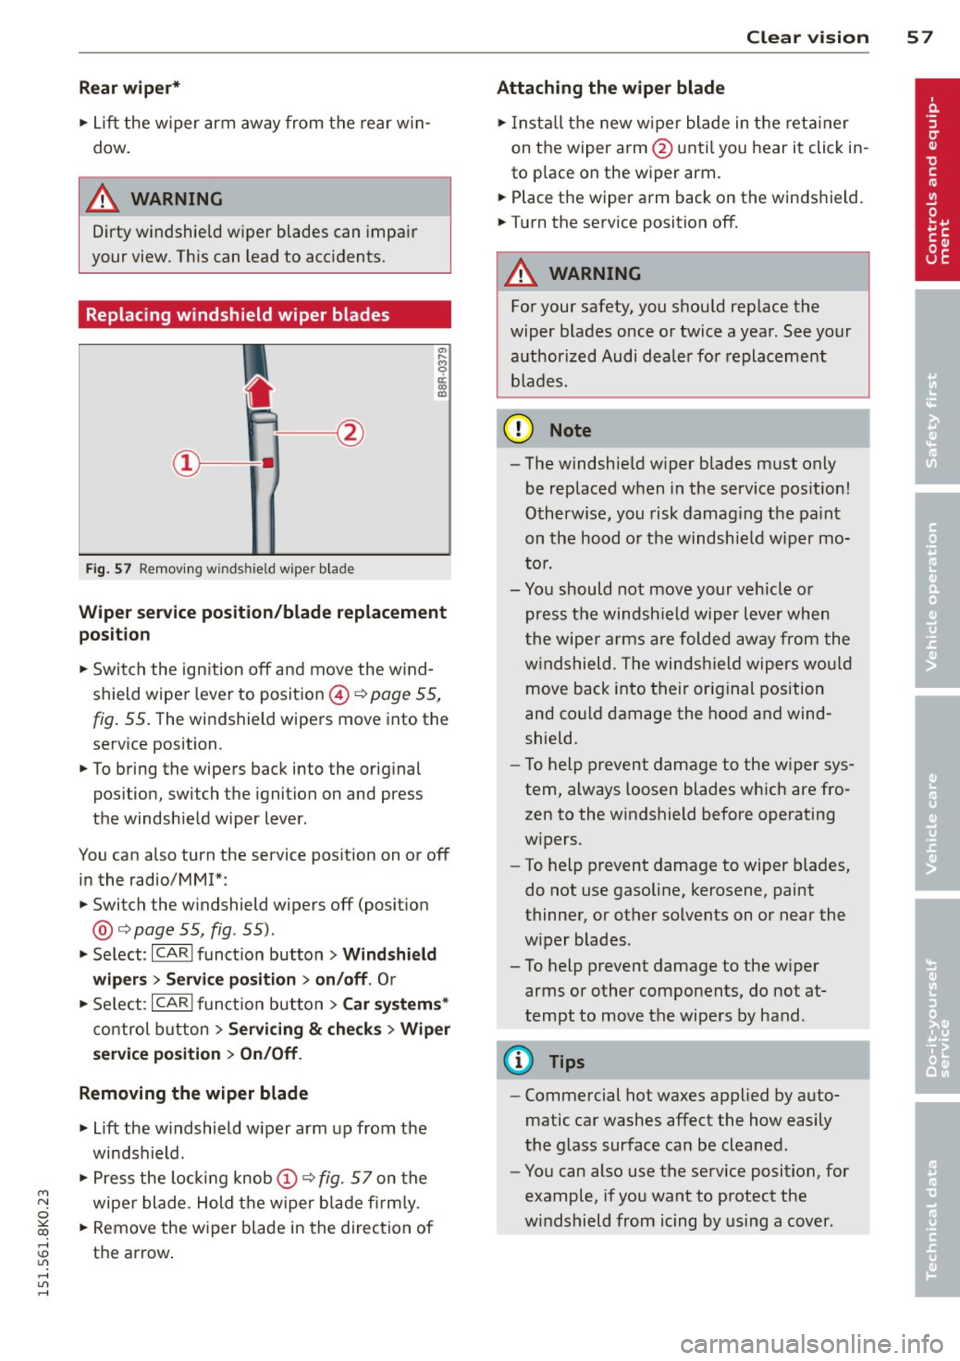
Replacing windshield wiper blades
Fi g. 57 R emov ing wi nd shi eld w iper blade
-
Wiper ser vice position /blade replacem ent
position
• Switch the ign ition off and move the w ind
shield wiper lever to position ©¢
page 55,
fig. 55 . The windshield wipers move into the
service position.
• To bring the wipers back into the original
position, swi tch the ignition on and press
the windshield wiper lever.
You can also turn the service pos ition on or off
in the radio/MM!*:
• Switch the w indshield wipers off (posit ion
@ ¢
page 55, fig. 55).
• Se lect : ICARI funct ion button> Wind shie ld
wiper s
> Servi ce positi on > on /off . Or
• Se lect :
IC ARI funct ion button> Car syste m s*
control b utton
> S ervicing & ch eck s > Wiper
s er vic e pos ition
> On/ Off .
Removing the wiper blade
• Lift the w indshield wiper arm up from the
windshield.
• Press the locking knob
(D ¢ fig. 57 on the
wiper blade . Hold the wiper blade fi rm ly.
• Remove the wiper blade in the direct ion of
the arrow .
Clear vis ion 5 7
Attach ing the wiper blade
• Insta ll the new wiper blade in the reta iner
on the wiper arm@ unti l yo u h ear it click in
to place on the wiper arm .
• Place the wiper arm back on the windshield.
• Turn the service position off.
A WARNING
For your safety, you should rep lace the
wiper b lades once or twice a year . See your
authorized Audi dealer for replacement b lades.
(D Note
- The windshield w iper blades must only
be replaced when in the service pos ition!
Otherw ise, you risk damag ing the pa int
on the hood o r the windshie ld w iper mo
to r.
- Yo u should not move your vehicle o r
press the windsh ield wiper lever when
t he wipe r arms are folded away from the
w indshield . The windsh ield wipers wou ld
move back into their original position
and co uld damage the hood and wind
shield.
- To help prevent damage to the w iper sys
tem, always loosen blades which are fro
zen to the windshield before operating
w ipers.
- To help p revent damage to wiper blades,
do not use gasoline, kerosene, paint
thinner, or other solvents on or near the
w iper blades .
- To help prevent damage to the w iper
arms or other components, do not at
tempt to move the wipe rs by hand .
(D Tips
- Commercial hot waxes applied by auto
matic car washes affect the how easily
the glass surface can be cleaned .
- You can also use the service position, for
example, if you want to protect the
w indshield from icing by using a cover .
Page 66 of 304
64 Seats and storage
¢ fig. 65. Pull the head restraint out of the
backrest at the same time¢,&. .
Installing the head restraints
.. Slide the posts on the head restraint down
into the guides until you feel the posts click
i nto place.
.. Press the button@¢
fig. 65 and slide the
head restraint all the way down. You should
not be able to pull the head restraint out of
the backrest.
So that the driver can have a better view to
the rear, the head restraints should be pushed
down completely when the rear seats are not
occupied .
A WARNING ,.
- Read and heed all WARNINGS
¢ page 130, Proper adjustment of head
restraints .
- Only remove the rear seat head restraints
when necessary in order to install a child
seat¢
page 173. Install the head re
straint again immediately once the child
seat is removed. Driving without head re
straints or with head restraints that are
not properly adjusted increases the risk
of serious or fatal neck injury dramatical
ly.
@ Tips
Correctly adjusted head restraints and
safety belts are an extremely effective
combination of safety features .
Seat memory
Description
Applies to vehicles: with memory function
The memory function allows you to quickly
and easily store and recall personal seating
profiles for the dr iver . The memory function is
operated through the master key and the memory buttons in the driver's door.
The driver's seating profi le is stored and as
signed to the master key each time the vehicle
is locked. When you open the door, the seat profile is
automatically recalled.
If two people
use one vehicle, it is recommended that each
person always uses "their own" master key.
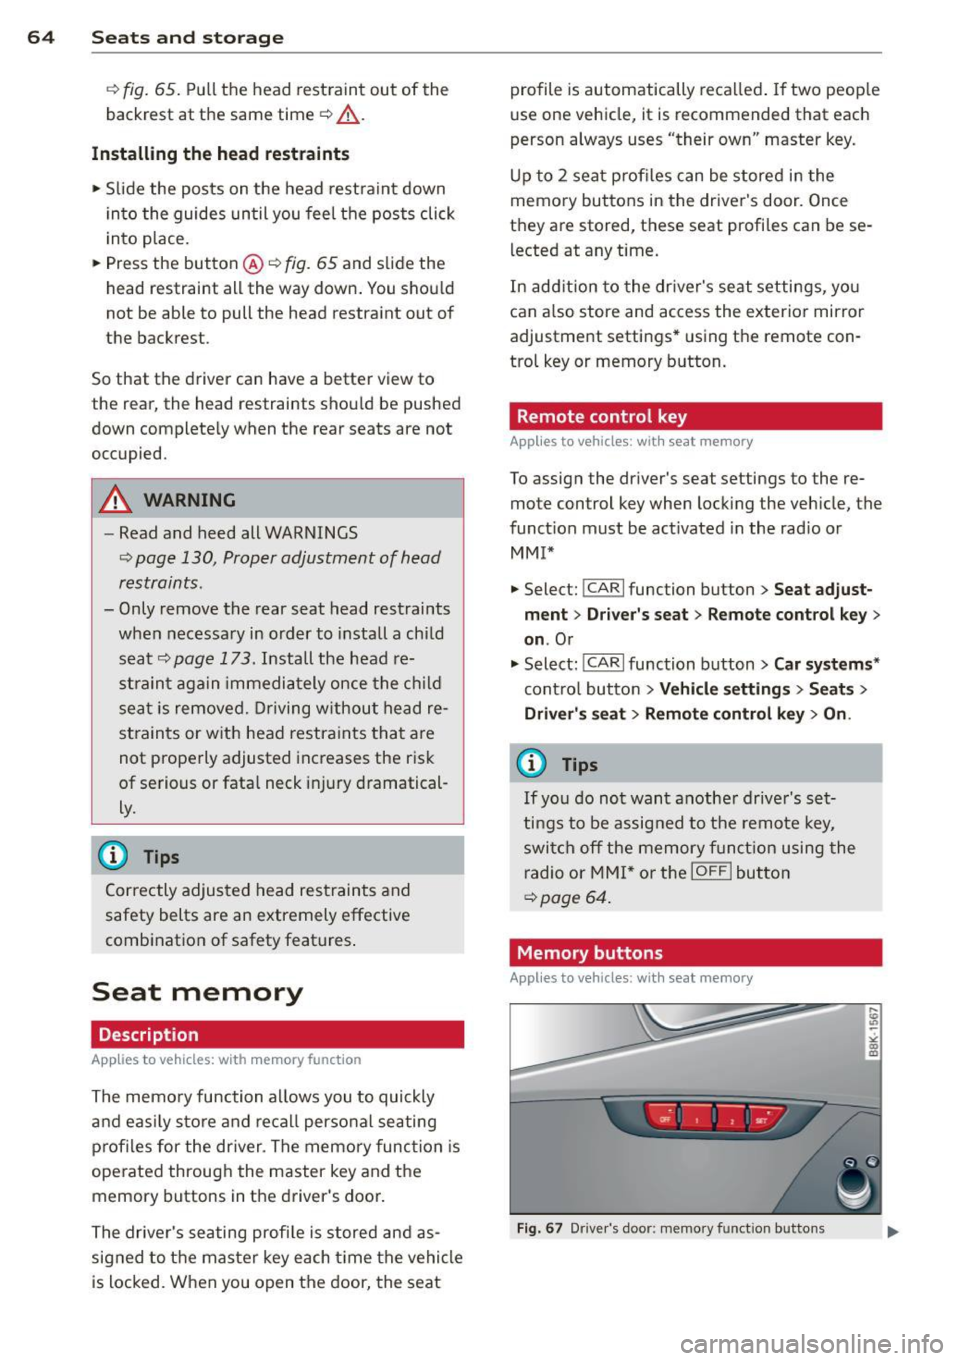
Up to 2 seat profiles can be stored in the
memory buttons in the driver's door. Once
they are stored, these seat profiles can be se
lected at any time .
In addition to the driver's seat settings, you
can also store and access the exterior mirror
adjustment settings* using the remote con
trol key or memory button.
Remote control key
Applies to vehicles: wit h seat memory
To assign the driver's seat settings to the re
mote control key when locking the vehicle, the
function must be activated in the rad io or
MMI*
.. Select: !CAR I function button> Seat adjust
ment
> Driver's seat > Remote control key >
on.Or
.. Select: !CARI function button> Car systems*
control button > Vehicle settings > Seats >
Driver' s seat> Remote control key> On .
(i) Tips
If you do not want another driver's set
tings to be assigned to the remote key,
switch off the memory function using the
radio or MMI* or the
IOFFI button
¢page 64.
Memory buttons
Applies to vehicles: with seat memory
Fig. 67 Dr iver's door: memo ry fu nct ion buttons
Page 81 of 304
Warm and cold 79
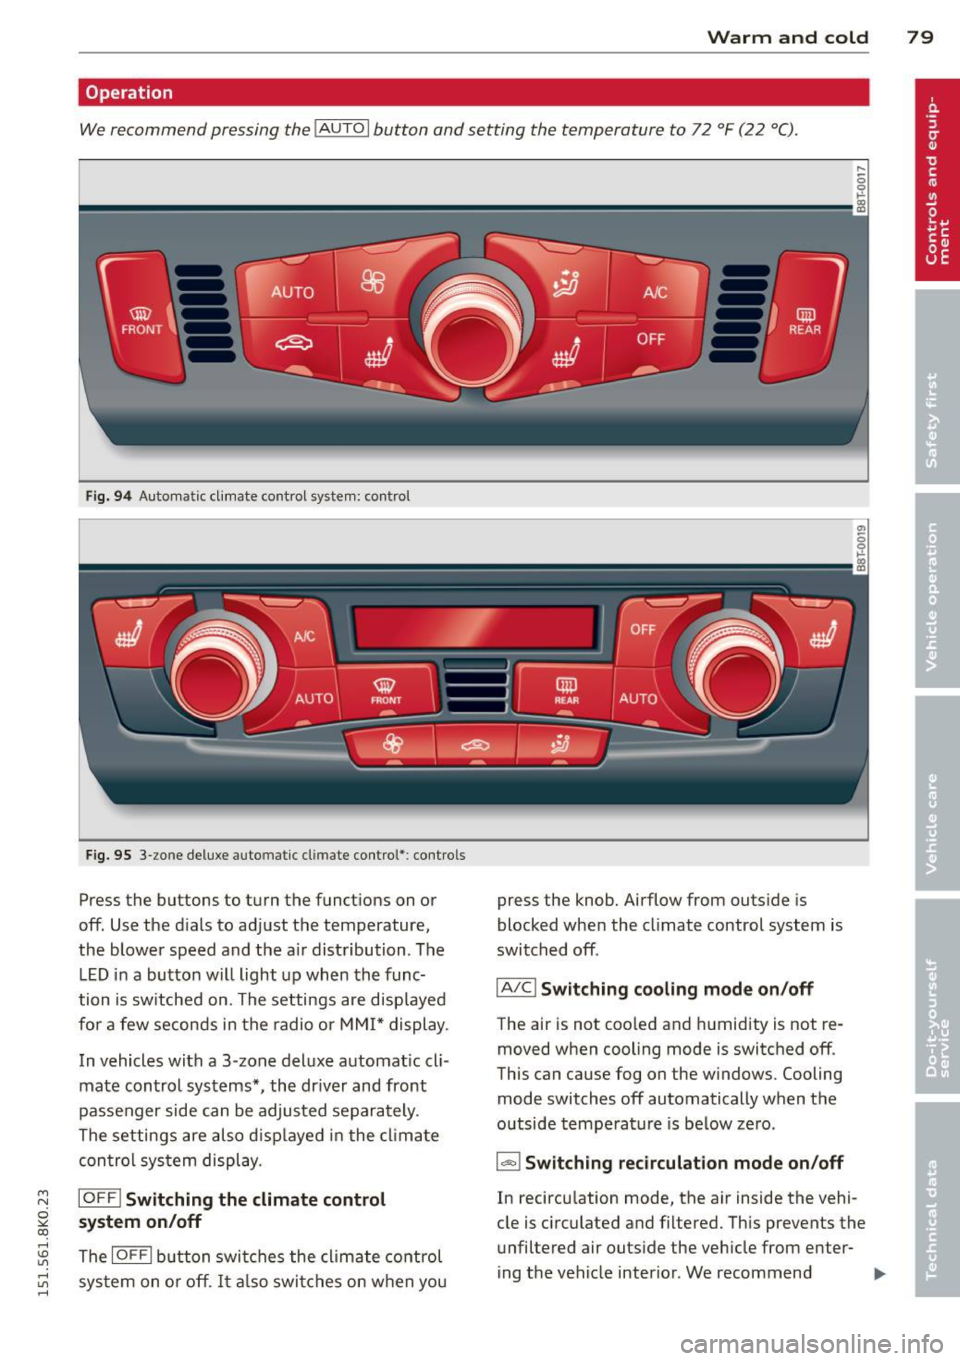
Operation
We recommend pressing the IAUTO I button and setting the temperature to 72 °F (22 °C).
Fig. 94 Automatic cl imate control system: control
Fig. 95 3-zone deluxe automatic cl imate control': co ntrols
Press the buttons to turn the functions on or
off. Use the d ials to adjust the temperature,
the blower speed and the a ir distribution. The
LE D in a button will light up when the func
tion is switched on. The settings are displayed
for a few seconds in the radio or MMI* display.
In vehicles with a 3-zone deluxe automatic cli
mate control systems*, the driver and front
passenger side can be adjusted separately.
The settings are also displayed in the climate
con trol system display .
~ IOFFI Switching the climate control
~ system on/off
rl
:5: The IOFFI button switches the climate control
~ sys tem on or off . It also switches on when you rl
press the knob. Airflow from outside is
blocked when the climate control system is
switched off.
IA/C l Switching cooling mode on /off
The air is not coo led and humidity is not re
moved when cooling mode is switched off.
This can cause fog on the w indows. Cooling
mode switches off automatically when the
outside temperature is be low zero.
1-1 Switching recirculation mode on/off
In recircu lation mode, the air inside the vehi
cle is circulated and filtered. This prevents the unfiltered air outside the vehicle from enter-
ing the vehicle interior. We recommend "'
Page 83 of 304
"' N
0 ::.,: co ...... \!) ..,.,
...... ..,., ......
Setup
The basic climate control settings can be ad
justed in the radio or MM!*.
11-Select : I CARI function button > A/C control
button. Or
11-Select: I CARI funct ion button > Car systems*
control button > AC.
Automatic recirculation*
When switched on, automatic recirculation
controls the recirculation mode automat ically.
If the windows fog up, press the
l
button .
Synchronization*
When synchronization is switched on, the
same settings are applied to both the driver
and front passenger, except for the seat heat
ing/ventilation* . Synchronization switches off
when you adjust the settings on the front pas
senger's side.
You can also switch synchronizat ion on by
press ing and holding the knob on the driver's
side.
Supplementary heater
The supplementary heater warms the interior
of vehicles with flexible fuel eng ines more
qu ickly . The supplementary heater is control
led automatically in the
Auto setting .
Warm and cold 81
Page 88 of 304
86 On the road
in the hy dra ulic valve adjusters. This is
norma l and not a cause for concern.
- If you leave the vehicle with the ignit ion
switched on, the ignition will switch
off
after a certain period of time . Please
note that e lectrica l equipment such as
exter ior lights w ill switch
off as well
when that happens.
Switching engine off
Applies to vehicles: with conven ience key
" Bring your vehicle to a complete stop.
"Automatic transmiss ion: Move the selector
lever to the P or N pos it ion.
" Press the
!START ENGINE STOPI b utton
r::!;pageBS, fig.100.
St eering lock
The stee ring locks when you turn the engine
off us ing the I STAR T ENGINE STOP I button
and open the dr iver's door. The locked stee r
i ng helps preven t vehi cle theft.
Emergency off
If necessary, the eng ine ca n be sw itched off
with the selector leve r in the R or D/S pos i
tions. To do so, step on the b rake pedal and
p ress a nd hold the
I START ENGINE STOP I but
ton vehicle speed must be less th an 6 mph
(10 km/h).
_& WARNING
- Never t urn off the eng ine before the ve
hicle has come to a complete stop . The
full function o f the brake booster and the
power steering is not guaranteed. You
must use more force to turn or brake if
necessary . Because you cannot steer and
brake as you usua lly would, this could
lead to crashes and se rious injur ies.
- For safety reasons, you s hould always
par k your vehicle with the se lector lever
in P. Ot he rwi se, the ve hicle co uld i nad
vertent ly roll away.
- T he r adiator fan ca n continue to ru n for
up to 10 mi nutes even after yo u have
tu rne d
off the eng ine and remove d the ignit
ion key. T he radiator fan can a lso
tur n on again if the engine coo lant heats
up because of intense sunlight or heat
bu ild-up in the engine compartment.
- Always take the key w ith you whenever
you leave your ve hicle. Otherw ise, the
eng ine could be sta rted or elect rical
equ ipme nt such as the power windows
could be ope rated. This can lead to seri
o us injury.
(D Note
If the engine has bee n under heavy load
fo r an extended pe riod, heat bu ilds up in
the engine compartment after the engine
i s sw itched
off -there i s a r is k of damag ing
the e ngine. A llow the eng ine to run at i dle
for about two minutes before switching it
off.
Driver messages
Ignition i s on
This message appears and a warning tone
sounds if you open the d river's door when the
ignition is sw itched on.
No key id entified
This message appears when t he
I S TART ENGI NE STOPI button is pressed if
there is no master key ins ide the veh icle or if
the system does not recognize it . Fo r exam
ple, the master k ey cannot be recognized if it
is covered by an object (e.g. al uminum b rief
case) which
screens the radio s ignal. Elec tron
ic dev ices such as cell phones can also inter
fere with the radio s ignal.
Press brak e pedal to start engine
This message appears if you do not press the
brake pedal to start the eng ine in a veh icle
with an automat ic transm iss ion.
Press clutch pedal to sta rt engine
T his message ap pears if you do not press the
clutch pedal to start the engine in a vehicle
with a manual transmission. .,.
Page 92 of 304
90 On the road
speed. It goes out when t he speed fa lls below
the stored maximum speed .
The speed warning symbo l w ill also go out if
the speed
exceeds the s to red m ax imum speed
by more than about 25 mph ( 40 km/h) for at
least 10 seconds. The stored maximum speed
is deleted.
Sett ing speed wa rning 1
~ page 90.
Speed warning 2*
Storing warning 2 is recommended if you al
ways
want to be reminded of a certa in speed,
for examp le when you a re traveling in a coun
try that has a general maximum speed limit,
or if you do not want to ex ceed a spec ified
speed for winter tires.
The . (USA models) /. (Canada mode ls)
speed warning 2 symbo l appears in the dis
p lay when you exceed the stored speed limit .
Unlike warning 1, it will not go out until t he
vehicle speed drops below the stored speed
limit.
Sett ing speed wa rning 2
~ page 90.
@ Tips
Even tho ugh your vehicle is equipped wi th
a speed wa rni ng sys tem, you s hou ld s till
watch the speedometer to make sure you
are not drivi ng faster than the speed limit.
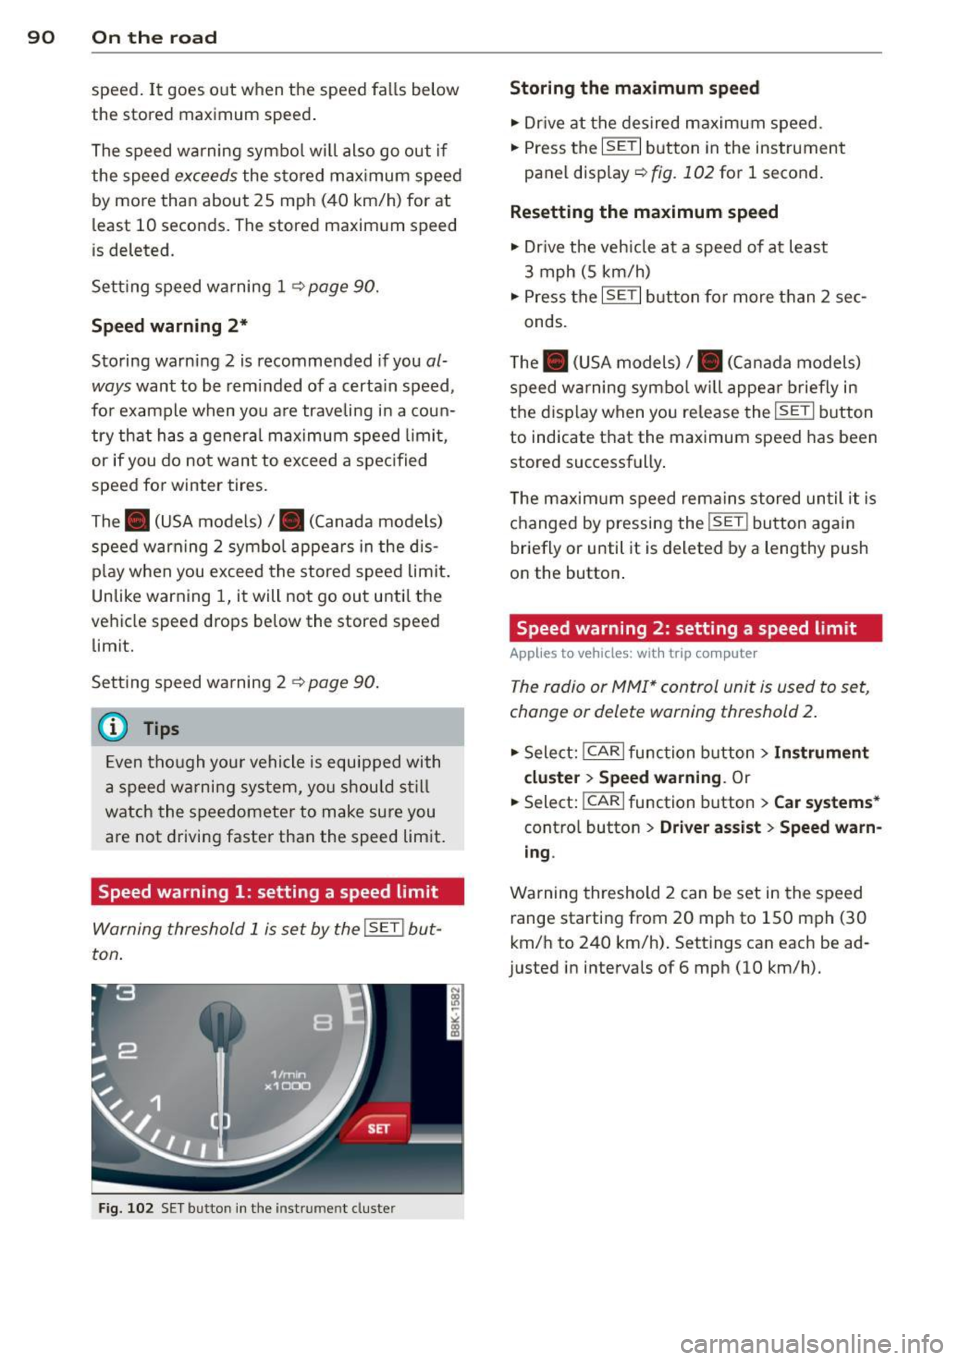
Speed warning 1 : setting a speed limit
Warning threshold 1 is set by the I SET ! but
ton .
Fig. 102 SET button in the inst rum en t cluste r
Storing the ma ximum speed
.,. Dr ive at the desired maximum speed .
.,. Press the
ISETI button in the instrument
panel display ~
fig. 102 for 1 second.
Resett ing the maximum speed
.,. Dr ive the veh icle at a speed of at least
3 mph (5 km/h)
.,. Press the
I SET I but ton for more than 2 sec-
onds.
T he . (USA models)/ . (Canada models)
speed w arning symbo l w ill appe ar briefly in
the d isplay when you release the
ISETI button
to indicate t hat the maximum speed has been
stored successfully .
T he maxim um speed remai ns stored un til it is
changed by pressing the
! SE T! button again
briefly or until it is deleted by a lengthy push
on the button .
Speed warning 2: setting a speed limit
Applies to veh icles: w it h trip co mputer
The radio or MMI* control unit is used to set,
change or delete warning threshold 2.
.,. Sele ct: !CAR I func tion button > Instrument
cl uster > Speed warnin g.
Or
.,. Select:
!CARI function button > Car system s*
contro l button > Dri ver a ssist > Speed warn
ing .
Warning threshold 2 can be set in the speed
range starting from 20 mph to 150 mph (30
km/h to 240 km/h) . Settings can each be ad
justed in intervals of 6 mph (10 km/h).
Page 108 of 304
106 Audi adap tive cruise control and br aking guard
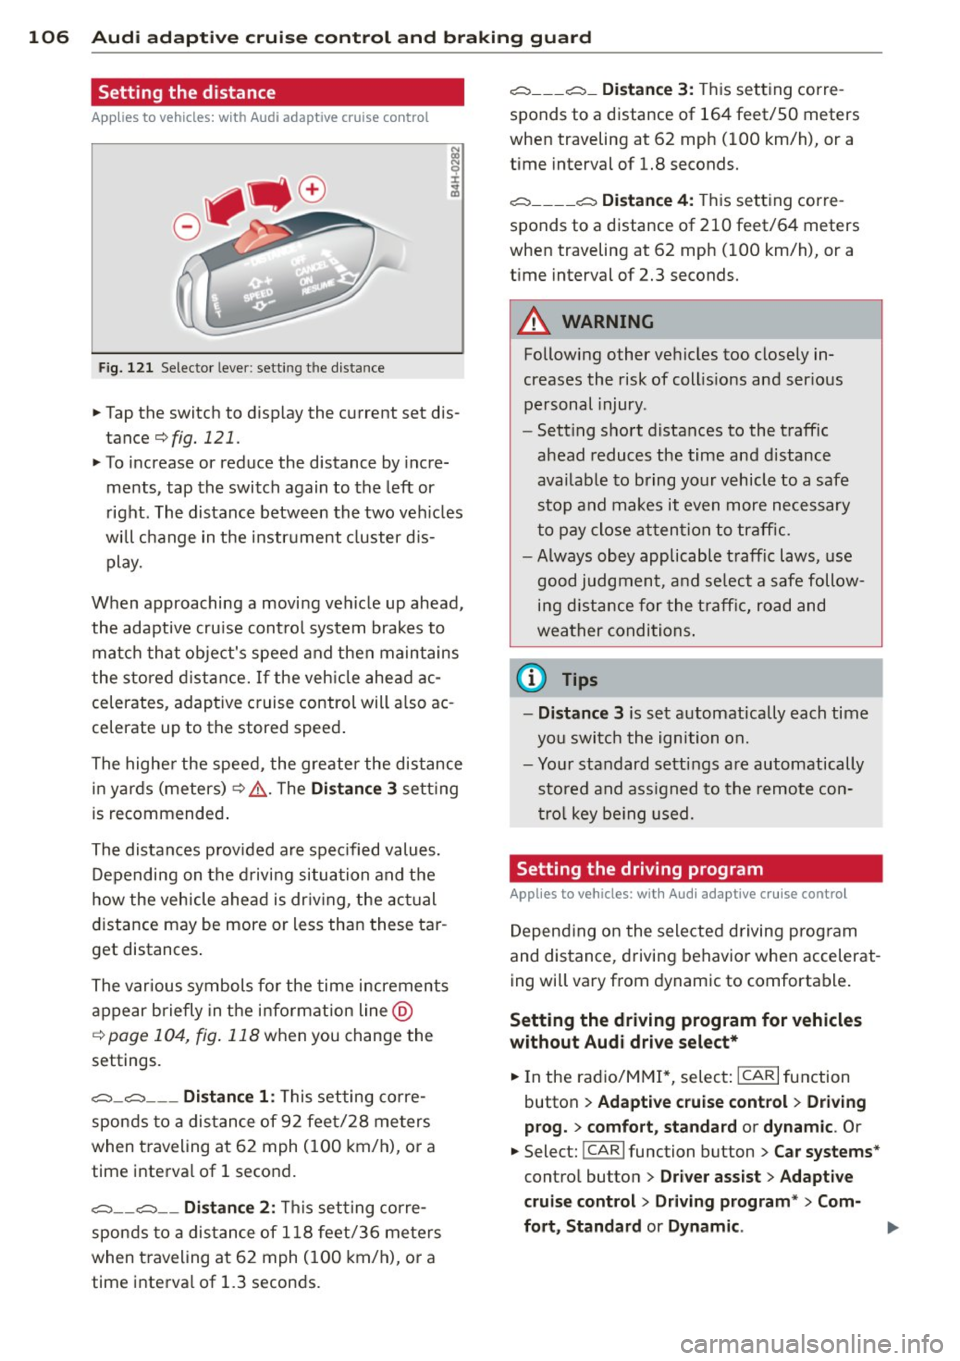
Setting the distance
Applies to vehicles: wit h Aud i adapt ive cru ise co ntrol
F ig. 121 Selector lever: setting the distance
~ Tap the switch to display the current set dis
tance
¢fig. 121.
~ To increase or reduce the distance by incre
ments, tap the switch again to the left or
right. The distance between the two veh icles
will change in the instrument cluster d is
play.
When approaching a moving vehicle up ahead,
the adaptive cru ise cont rol system brakes to
matc h that object's speed and then maintains
the stored d istance. If the vehicle ahead ac
celerates, adaptive cruise control will also ac
celerate up to the stored speed.
The highe r the speed, the greater the distance
in yards (meters)¢ ,&.. T he
Di st a nc e 3 setting
is recommended .
The distances p rov ided are specified values.
Depending on the driving situation and the
how the vehicle ahead is dr iving, the actual
distance may be more or less than these tar
get distances .
The various symbols fo r the time increments
appear briefly in the information line @
c;, page 104, fig. 118 when you change the
settings.
c::::::,_c::::::, ___ Dist ance 1: This setting corre-
sponds to a distance of 92 feet/28 meters
when traveling at 62 mph (100 km/h), or a
time interva l of 1 second.
c::::::, __ c::::::, __ Dista nce 2 : This setting corre
sponds to a distance of 118 feet/36 meters
when traveling at 62 mph (100 km/h), or a
time interva l of 1.3 seconds .
c::::::, ___ c::::::, _ Dista nce 3 : This setting corre-
sponds to a distance of 164 feet/SO meters
when traveling at 62 mph (100 km/h), or a
time interval of 1.8 seconds.
c::::::, ____ c::::::, Dista nce 4 : This setting corre-
sponds to a distance of 210 feet/64 meters
when traveling at 62 mph (100 km/h), or a
t ime interval of 2.3 seconds.
A WARNING
Following other vehicles too closely in
creases the risk of collis ions and ser ious
personal injury .
- Sett ing short distances to the traffic
ahead reduces the time and distance
availab le to bring your vehicle to a safe
stop and makes it even more necessary
to pay close attention to traffic.
-
- Always obey applicable t raffic laws, use
good judgment, and select a safe follow
ing d istance for the t raff ic, road and
weather conditions .
0) Tips
-Distan ce 3 is set automatically each time
you switch the ignition on.
- Your standard settings are automatically
stored and ass igned to the remote con
tro l key be ing used.
Setting the driving program
Applies to veh icles: w ith Audi ada ptive c ruise control
Depending on the selected driving program
and distance, driving behavior when accelerat
ing will vary from dynamic to comfortable .
Setting the dri ving program for vehicles
without Aud i d riv e se le ct*
~ In the radio/MM!*, select: ICARlfunction
button
> Ad apti ve cr uise cont rol > D rivi ng
p rog.
> c omfort, sta nd ard or dyn amic . Or
~ Select: !CAR I function button > Car systems *
control button > Driver assi st > A dapt ive
c ruis e control > Dr iving p rogram *
> Com-
f o rt , Standard
or D ynamic . ll-
Page 110 of 304
108 Audi adapti ve cruise control and br aking guard
- If a co llision is imminent, the system will
first provide an
acute wa rning by bri efly and
sharp ly app ly ing the brakes .
- If you do not react to the ac ute warning ,
braking guard can brake within the limits of
the system. This reduces the veh icle speed
in the event of a collis ion.
- At speeds under 20 mph (30 km/h), the sys
tem can in it iate a complete deceleration
s hortly before a collision
l) .
-If the braking guard senses that you are not
braking hard enough when a collision is im
minent, it can increase the braking force.
Which function s can be contr oll ed ?
You can switch braking g uard and the dis
tance/approach warning on or off in the radio
or MM I c> poge 108, Settings in the radio/
MMI.
A WARNING
Lack of attention can cause col lisions, oth
er accidents and serious persona l injuries.
The b raking guard is an assist system and
cannot p revent a col lis ion by itself. The
dr iver m ust always in tervene . T he d rive r is
always responsib le for br aking at the cor
rect time.
- Always pay close attention to traffic,
even when the bra king guard is switched
on. Be ready to intervene and be ready to
take complete control whenever necessa
ry. A lways keep the safe and legal dis
tance between your vehicle and vehicles
up ahead.
- Braking guard works w ith in limits and
will not respond outs ide the system lim
its, for example when approaching a
stopped vehicle or stationary obstacle
(end of a traff ic jam or veh icle that has
broken down in traffic).
- Always remember that the radar sensor
for the braking guard wo rks only within
defined detection and range limits that
l ) Th is is not available in some c oun tri es.
may prevent the proper detection of oth
er vehicles.
- The radar sensor's function and range
can be reduced by rain, snow and heavy
spray. Moving veh icles up ahead may not
be prompt ly detected or may not be de
tected at all .
- Reflective surfaces including crash barri
ers or tunne l entrances may impair the
function of the radar sensor .
(D Tips
- You can cancel the braking that is in it iat
ed by the system by braking yourse lf, by
accelerating not iceably or by swerving .
- Braking guard error messages
c>poge 109.
- Keep in mind that brak ing guard can
brake unexpectedly. Always secure any
cargo or objects that you are transport
ing to reduce the risk of damage or in
jury .
Settings in the radio/MMI
App lies to vehicles : wit h Audi ada ptive cr uise contro l
., Select: !CARI function button> Car sy ste m s*
contro l but ton > Driver a ssist> Audi brak
ing guard .
Or
., Select: !CAR I function button> Audi b raking
gua rd.
S ys tem -
Switch A udi braking guard On and
Off . When you switch the ignition on, the
message
Audi b raking guard off appears if
the system is switch ed off .
Ea rly warnin g -The distance and approach
warnings in the display can be switched
On/
Off .
(D Tips
-Yo ur settings are automatically s tored
and assigned to the remote contro l key
being used at the times the settings are
made.
Page 111 of 304
'"" N
0 ::.,: co ,...., \!) ..,.,
,...., ..,., ,....,
Audi adaptive cruise control and braking guard 109
-If you restrict or switch off the ESC, the
braking guard also switches itself off
¢page 187.
- Switch braking guard off when you are
loading the vehicle onto a vehicle carrier,
tra in, ship or other type of transporta
tion. This can prevent undesired warn i ngs from the braking guard system.
Messages
App lies to vehicles: with Audi adaptive cruise co ntrol
Braking guard: Off
This driver message appears if the system is
turned off via the radio/MM!*. Otherwise, if
the system is turned off, the information ap pears every time shortly after the start of the
tr ip.
The driver message also appears if the system is not avai lab le due to a malfunction or if the
ESC is not switched on¢
page 187. If this is
the case, the system will not provide warnings
about a possible collision.
Braking guard: Activated
This driver message appears if sharp brake
press ure was applied due to an acute warning.
•••
Three wh ite dots appear if a setting cannot be
selected with the operat ing lever . For exam
p le , this happens if you want to raise/lower
the speed even though there was no previous
l y saved speed .
ACC: Deactivation
The driver message appears in vehicles with
manual transmission . If the clutch pedal was
pressed down for too long, the adaptive cruise
control turns off . A chime sounds as a rem ind
er .
ACC: Sensor blocked
This message appears if the sensor view is ob
structed, for example by leaves, snow, heavy
spray or dirt. Clean the sensor¢
page 101,
fig. 113.
ACC: not available
The driver message appears if there is a mal
function . The adaptive cruise contro l turns off .
A chime sounds as a reminder. Have the sys
tem checked by an authori zed Aud i dea ler or
authorized Aud i Service Fac ility.
ACC: unavailable
The driver message appears if, for example,
the brake temperat ure is too high. The adap
tive cruise control is temporarily unavailable .
A chime sounds as a reminder.
Engine speed!
This driver message appears in vehicles with
manua l transmission if the driver had not up
shifted or downs hifted in time while using
adaptive cruise control braking or accelerat
ing, caus ing the vehicle to exceed or no t reach
the permitted limit speed. The adaptive cruise
control turns off. A chime sounds as a remind
er .
Shift lever position!
Vehicles with an automat ic transmission: the
driver message appears if the selecto r lever is
shifted to the N position. Th e adaptive cruise
control is no t available while in this position.
Vehicles with manua l transm ission: the driver
message appears for vehicles with manual
transmission if there is no forward gear en
gaged, meaning if the reverse gear or the 1st
gear is engaged or if the selector leve r is in
the neutral position . The adaptive cr uise con
trol is not available while in th is position.
Stabilization control (ESC)
This message appears if the electronic stabili
z ation control ( ESC) is taking action to stab i
lize the vehicle. The adaptive cruise contro l
turns off. A chime sounds as a reminder .
Speed too low
This message appears if the current speed is
too low
to set or to maintain the desired
speed .
The speed be ing saved must be at least
20 mph (30 km/h). The cruise control is
turned off for speeds lower than 12 mph