stop start AUDI A4 2015 Owner's Manual
[x] Cancel search | Manufacturer: AUDI, Model Year: 2015, Model line: A4, Model: AUDI A4 2015Pages: 304, PDF Size: 74.86 MB
Page 124 of 304
122 Park ass is t
Sw it c hing off
.,. Drive faster than 9 mph (15 km/h), or
.,. take the vehicle out of reverse gear. The
acoustic parking system is immediately de
activated, and the rear view camera picture
is deactivated automatically after a per iod
of about 15 seconds, or
.,. switch off the ignition.
The delay in deactivating the camera provides an uninterrupted view behind the vehicle es
pec ially when maneuvering in tight parking
spaces and prevents the picture from turning
off the every time you sh ift out of reverse .
If the warning message appears in the display but not the rear view camera picture, read and
confirm the warning message. The acoustic
d istance signal is always active .
If you press a function button on the MMI
control console, the rear view camera picture
d isappears. The rear view camera picture reap
pears the next time you park.
Further information on the warn ing message
and the MMI control console can be found in
the MMI instruction booklet .
A WARNING
-Only use the rearview camera to assist
you if it shows a good, clea r picture. For
example, the image may be affected by
the sun sh in ing into the lens, dir t on the
lens or if there is a defect .
- Use the rearview camera only with the
rear lid completely closed. Make sure any
objects you may have mounted on the
rear lid do not block the rearview cam
era .
(D Tips
-The rear v iew camera picture is ava ila b le
as soon as the MM I Display or the MM I is
switched on, or the start-up phase is
completed.
- The sensors must be kept clean and free
of snow and ice for the park assist to op
erate. -
Yo u can change the vo lume and pitch of
the s ignals as we ll as the disp lay
¢ page 124 .
-What appea rs in the disp lay is time-de
layed.
· Reverse Parking
Applies to vehicles: with parking system (rear, with rear
v iew camera}
Parking mode 1 can be used when parking in
a garage or parking space.
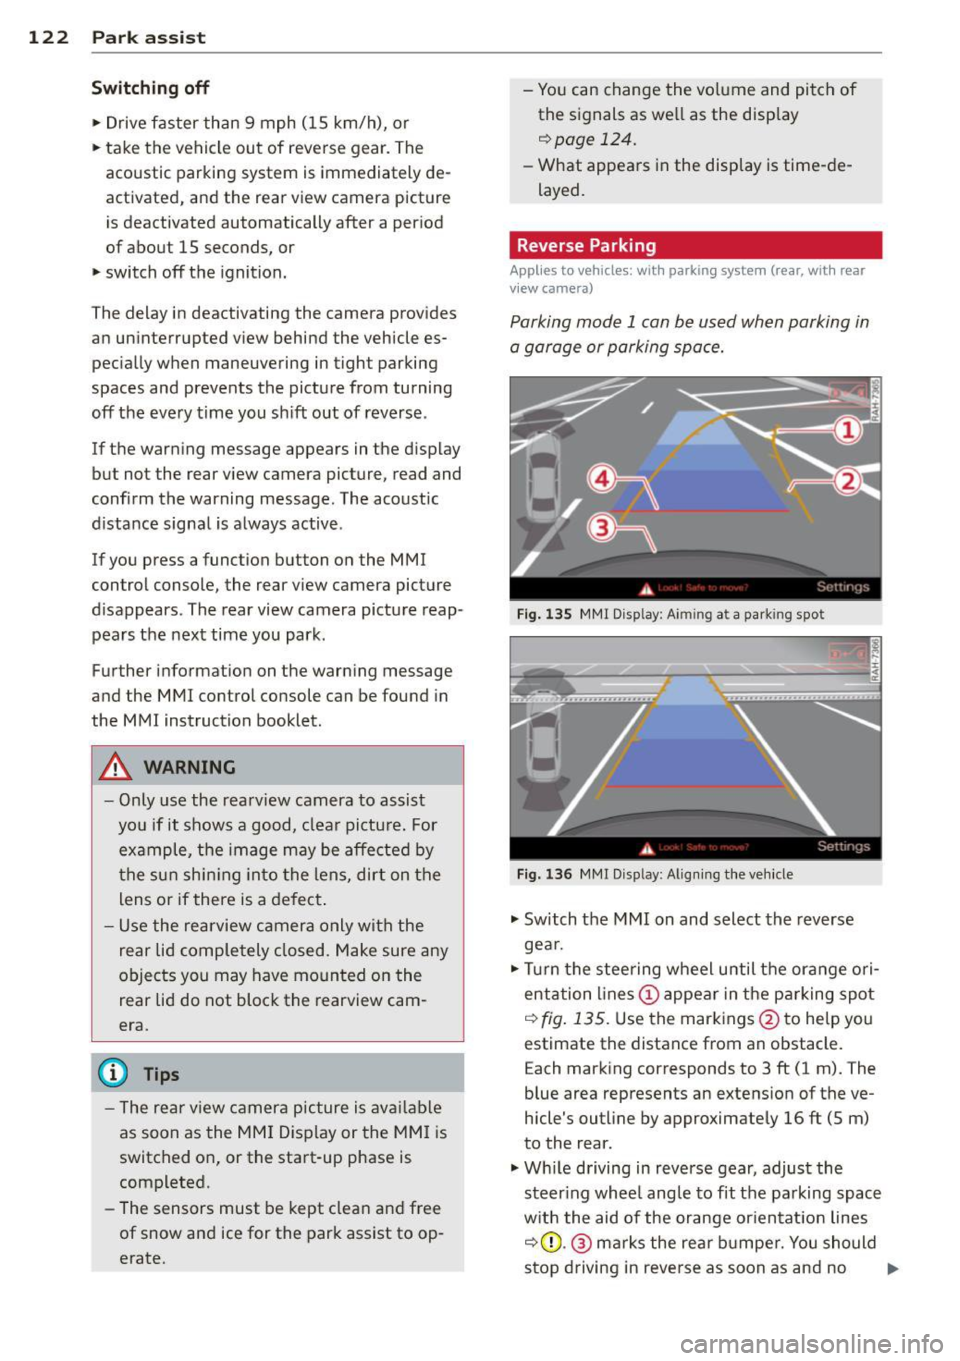
F ig . 1 35 MMI Disp lay : A im ing a t a park ing spo t
Fig. 136 MMr Disp lay : A lig nin g the ve hicle
.,. Switch the MMI on and select the reverse
gea r.
.,. Turn the stee ring wheel u ntil the ora nge ori
entation lines(!) appea r in the pa rking spot
c:> fig . 135. Use the markings @to help you
estimate the distance from an obstacle.
E ach marking corresponds to 3 ft (1 m). The
blue area represents an extens ion of the ve
hicle's outline by approximately 16 ft (5 m)
to the rear.
.,. Wh ile driving in reverse gear, adjust the
steer ing whee l angle to fit the parking spac e
w ith the aid of the orange or ien tat ion lines
c:> (D .@ marks the rear b umpe r. You should
stop driving in reve rse as soon as and no .,.
Page 126 of 304
124 Park assis t
the b lue area should be on the curb. The en
ti re b lue area must fit into the parking spot.
• While the vehicle is stationary, turn the
steering wheel to the right as far as it will
go.
• Back into the park ing spot . Stop the vehicle
as soon as the blue curve touches the curb
¢ fig . 138.
• While the vehicle is stationa ry, turn the
steering wheel to t he left as far as i t wi ll go.
• Conti nue to bac k up into the park ing spot
unti l the vehicle is pa rked parallel to the
c ur b.® marks the rear bumper . You sho uld
stop dr iving in reverse as soon as and no lat
er than when the red orientation line@
abuts an object¢,&! Keep an eye on the
front of your veh icle wh ile doing this
c> (D .
Pa rking ne xt to obstacle s
When there is an obstacle (such as a wall)
next to the parking spot, choose a spot w ith
more space on the sides. Pos ition the long
side of the blue area so that there is sufficient
space from the curb . T he area must not be on
the curb . Yo u will also need to start turn ing
the steer ing whee l much ear lie r. T he re s hou ld
be a suff ic ient amoun t of sp ace between the
curb and the b lue curve, and the blue c urve
¢
fig . 138 must not touch the curb .
8_ WARNING
-The rea r view came ra does not show the
entire area beh ind the veh icle
¢
page 120, fig. 133. Watch o ut espe
cially for small children and an imals. The
rear view camera cannot a lways detect
them, pos ing risk of a n accide nt!
- Please note that objects not touch ing the
ground can appear to be further away
than they really are (for examp le, the
bumper of a pa rked vehicle, a t railer
hit ch, or the rear of a t ru ck ). In this case,
yo u shoul d no t use the help li nes to he lp
with par king, which poses danger of an
acc ident!
(D Note
In the M MI dis p lay, the direction of travel
of the vehicle rear is represented depend
i ng on the steering wheel angle . The vehi
cle front swings out more than the vehicle
rear. Mainta in plenty of dista nce from an
obstacle so that your outs ide mir ro r or a
corner of you r vehicle does not coll ide with
any obstacles - dange r of accide nt!
(D Tips
The left o r right orie ntation lines and su r
faces will be disp layed, depending on t he
t u rn s ignal being used .
Adjusting the display and warning tones
Applies to vehicles: with parking system (rear, with rear
view camera)
The display and warning tones are adjus ted in
the radio or MMI*.
.. Select: !CAR I function button> Parking sys
tem .
Or
--.. Select: !C AR I func tion but ton> Car systems "
control butto n> Driver assist > Parking aid .
Di splay
- Off -when the parking system is switched
on, on ly aud ib le signals are given .
-On -when the par king system is switched
on, the picture from the rear view camera is
disp layed.
Warning tones
- Rear volum e -
rear sensor vo lume
- Rear frequency -rear senso r frequency
- Music volume whil e parking -when the
parking system is sw itched on, the volume
of the active audio sour ce is lowered.
The newly ad justed value is briefly heard from
the sig nal generato r. The sett ings are auto
matically stored and assigned to the remote
control key. ..,
Page 192 of 304
190 Intelligent technology
overheat re ducin g the effectiveness of
the ent ire brake system.
- Failure of one brake circuit will impair
the braking capability resulting in an in
creased stopp ing distance. Avoid driv ing
the vehicle and have it towed to the near est author ized Audi dealer or qualified
workshop .
- Never let the vehicle ro ll to a stop w ith
the engine shut off.
- If the brake booster is not working, the
brake pedal must be pressed conside ra
bly harder to make up for the lac k of
booster assistance.
Electro-mechanical
power assist, dynamic
steering
The electro-mechanical power assist helps
the driver when steering.
Power stee ring adapts electronically based on
the vehicle speed.
Indicator lights and messages
• Steering defective! Do not drive vehicle!
If this ind icator lig ht tu rns on and stays on
an d th is message appears, t he power steer ing
may have f ailed.
D o
not cont in ue d riving. See yo ur autho rized
Aud i deale r or a q ua lifi ed r epa ir facility for as
sistance.
'1:I Dynamic steering : System fault! You can
cont inue driv ing
If the indicator light t urns on and the mes
sage appears, the steer ing may be more diffi
cul t to move or more se nsitive than usual. The
steer ing wheel may also be at an angle whe n
d riving straight .
Drive s low ly to your author ized Audi dealer or
q ua lified workshop to have the malfunction
cor rected .
'y.ij Dynamic steering: initializing
If this driver message appears and the indica
tor light is f lashing on the instrument panel,
dynam ic steer ing * is being re in it ia lized. After
starting the engine, the steering wheel will move s light ly. Re- initialization might be nec
essary if the steering wheel was moved hard
to the left and right wh ile the vehicle was not
moving . Th e display goes out as soon as ini ti
ali za tion is complete.
_& WARNING
Ha ve the dy namic stee ring * system m al
f u nction repa ired as soon as possib le by an
a uthorized Audi dea ler or qua lified work
shop -risk of acc ident !
@ Tips
-If the . or '1:I indic ator li ght only s tays
on fo r a shor t time, you m ay continue
dr iving.
- T he dynamic s teering * stabi lit y syste ms
are no t av ail ab le in the even t of a system
ma lf u nction.
- F or ad di tion al information on dynamic
steering *, refe r to
¢page 115 .
-
Driving with your
quattro
App lies to vehicles: wi th all-w hee l drive
With a/I-wheel drive, all four wheels are driv
en .
General information
With a ll-wheel d rive, power is distr ib uted to
all four wheels. This happens automatically
depending on your driving style and the road
co ndit ions at the time . See also
¢ page 185.
A center d ifferential distributes the driving
power variably to the front and rear axle. It
wor ks together with selective w heel torque
co ntrol, wh ich activates when dr iving t hrough
c ur ves
c::;,page 186. With the sport differe n
t ia l* , pow er d istr ibut ion to the rea r wheels is
variable a nd can be adjusted w ith drive se lect
c::;, page 115. .,..
Page 196 of 304
194 Driving and en vironm ent
8_ WARNING
After driving through water, mud, slush,
etc ., the brakes may be slow to take effect
because of wet brake rotors and pads . Dry
the brakes first by braking carefully to re
store the full braking effect.
(D Note
Vehicle components such as the engine,
transmiss ion, suspension or electrical sys
tem can be severely damaged by driving
through wate r.
@ Tips
- Check the depth of the water before dr iv
i ng through it .
- Do not stop the veh icle, dr ive in reverse
or switc h the engine off when driving
t hr ough water .
- Keep in mind that oncoming vehicles
may c reate waves that raise the water
l evel and make it too deep fo r you r vehi
cle to dr ive through safely.
-
- Avoid dr iving thro ugh salt water because
i t can ca use corrosion.
Catalytic converter
It is very important that your emission con
trol system (catalytic conv ert er) is function
ing properly to ensure that your vehicle is run
ning in on env ironm entally sound manner.
,,. Always use lead-free gaso line Q page 207,
Fuel supply .
,,. Never run the tank down a ll th e way to emp
ty.
,,. Never put too much moto r oil in your engine
Q page 216, ~ Adding engine oil .
,,. Never try to push -or tow -start your ve hicle .
T he cata lytic converter is an eff ic ient "clean
up" device built in to the exhaust system of
the vehicle . The catalytic converter burns
many of the polluta nts in the exhaust gas be
fore they are released into the atmosphe re . The exclus
ive use of unleaded f uel is critica lly
important for the life of the catalytic conv ert
er and p roper funct ion ing of the eng ine .
A WARNING
=
-The temperature of the exhaust system
is high, both when driving and after stop
p ing the eng ine .
- Never touch the exhaust tail pipes once
they have become hot. This could result
in burns.
- Do not park or operate the vehicle i n
areas where the hot exhaust system may
come in co ntact with dry grass, brush,
fue l spill or other material wh ich can
cause a fire .
- Do not app ly additional undercoating or
r u stp roofing on or nea r the exhaust
manifold, exhaust pipes, cataly tic con
ver ter or he at s hields. Dur ing driv ing, the
substance used fo r undercoating could
overheat and cause a fire.
CI) Note
- Be aware tha t just o ne tank filling with
leaded fu el w ill alre ady ser io usly de
grade the performance of the cata lytic
converter .
- Do not exceed the cor rect engine oil level
Q poge 216.
-Do not drive until the fuel t ank becomes
comple tely empty . The engine cou ld mis
fire . Unburned fuel could also get into
the exhaust system and th is co uld cause
the catalytic converter to overheat.
- Do not turn off the ignition while the ve
hicle is mov ing.
- Do not contin ue to ope rate your veh icle
under these conditions, as otherwise fuel
can reach the catalyt ic converter. Th is
co uld result in overheating of the con
verter, requir ing its replacement.
- To assure efficient operation of the Emis -
sion Control System: .,..
Page 202 of 304

200 Trailer towing
Tire pressure
When towing a trai le r, inflate the tir es of your
vehicle to the cold tire pressure listed under
"Full load" on the label located on the driver 's
side B-pillar (visible when the door is open).
Inflate trailer tires to trailer and tire manufac
turers' specifications.
Lights
The headlight settings should be checked with
the trailer attached before dr iving off. Check
to make sure both vehicle and tra iler lights
are working properly.
Safety chains
Be sure trailer safe ty cha ins are properly con
nected from the trailer to the hitch on the ve
hicle. Leave eno ugh slack in the chains to per
mit turning corners. When you install safety
cha ins, make sure they w ill not drag on the
road when you are driving.
The chains shou ld cross under the trai ler
tongue to prevent it from dropping in case of
separation from the hitch.
Driving instructions
Driving with a trailer always requires extra
care and consideration.
To obtain the best possible handling of vehicle
and trai ler, p lease note the following:
.,. Do not tow a loaded trailer when your car it
self is not loaded .
.,. Be especia lly careful when passing other
vehicles .
.,. Observe speed limits .
.,. Do not drive at the maximum permissible
speed.
.,. Always apply brakes early.
.,. Monitor the temperature gauge.
Weight distribution
Towing a loaded trai ler with an empty car re
sults in a highly unstable distribution of
weight . If this cannot be avo ided, drive at very
low speeds only to avoid the risk of losing
steering control. A "ba
lanced" rig is easier to operate and con
tro l. This means that the tow vehicle should
be loaded to the extent possible and permissi
ble, while keep ing the trai ler as light as possi
ble under the c ircumstances. Whenever poss i
ble, transfer some cargo to the luggage com
partment of the tow veh icle while obse rving
tongue load requi rements and vehicle load ing
considerations.
Speed
The higher the speed, the more d iff icu lt it be
comes for the driver to control the rig. Do not
drive at the maximum permissible speed. Re
duce your speed even more if load, weather or
wind conditions are unfavorable -pa rticularly
whe n going downhill.
Reduce veh icle speed
immediately if the trail
er shows the slightest s ign of sway ing.
Do not
try to stop the swaying by accelerating.
Observe speed limits . In some areas, speeds
for vehicles tow ing tra ilers are lower than for
regular vehicles .
Always apply brakes early. When driving
downh ill, shift into a lower gear to use the en
gine braking effect to slow the vehicle. Use of
the brakes alone can cause them to overheat
and fail.
Coolant temperature
The coolant temperature gauge c> page 10
must be observed carefully . If the needle
moves close to the upper end of the scale, re
duce speed immediately and/or turn off the
air conditioner.
If the coolant temperature warning light •
i n the i nstrument cluster starts flashing, pull
off the road, stop and let the engine
idle for
abo ut two minutes to prevent heat build-up .
_& WARNING
Anyone not properly restrained in a mov
ing vehicle is at a much greater risk in an
accident . Never let anyone ride in your car
who is not p roper ly wea ring the restraints
provided by Audi.
-
Page 203 of 304
Trailer towing tips
Important to know
Your vehicle hand les different ly when tow ing
a trailer because o f the addit ional weight and
d iffe ren t weight distribution . Safety, pe rform
ance and economy w ill greatly depend on how
caref ully you load your trailer and operate
your rig.
B efore you actua lly tow your trailer, pr actice
turning, stopp ing and bac king up in an area
away from traffic. Keep practicing until you have become comp lete ly fam iliar with the way
your veh icle-trailer comb ination behaves and
responds.
Backing up is d ifficu lt a nd requires practice .
Backing up with a tra iler genera lly requires
steer ing action opposite to that when backing
up your vehicle without a trailer.
M aintain a g reater distance betwee n your ve
h icle and the one in front o f you . You will need
mo re room to stop. To compensate for the
trailer, you will need a larger than normal
turning radius .
W hen pass ing, remember that yo u cannot ac
celerate as fast as yo u normally wo uld be
cause of the added load. Ma ke s ure you have
e nough room to pass . After passing , allow
p lenty o f room fo r your tra iler before chang
in g la nes aga in .
Avoid jerky starts, sharp turns or rap id lane
changes.
(D Tips
- Do not tow a tra iler during the break-in
period of you r vehicle.
- If you tow a trailer, your A udi may re
quire more frequent maintenance due to
the extra load
o page 283.
Trailer towin g 201
Parking on a slope
Do not park on a slope with a trailer . If it can
not be avoided, do so only after doing the fol lowing:
When parking:
.. App ly the foot brake.
.. Have someone p lace chocks under both the
veh icle and the tra iler wheels .
.,. With chocks in place, slowly release t he
bra kes unt il t he whee l choc ks absorb the
load .
.. Tu rn the whee ls towards the curb.
.,. App ly the par king b rake .
.. Place an a utomatic transm ission* in P, re
spectively a manual transmission in first or
reverse gear.
When restarting after parking:
.,. App ly th e foot br ake .
.. Start t he en gine.
.. Move the selector lever to D/S , respect ively
a man ual transmiss ion in first gea r.
.. Release the parking bra ke and s low ly pull
out and away from the wheel chocks .
.. Stop and have someone retr ieve the wheel
chocks.
@ Tips
If you move the selector leve r of the auto
matic transmissio n* to P before applying
the pa rking brake and before blocking the
whee ls, you may hav e to use mor e forc e
l ater to m ove the le ver out of the P posi
tion.
•
•
Page 204 of 304
202 Vehicle care and cleaning
Vehicle care and
cleaning
General information
Regular, proper care helps to maintain your
ve hicle 's value. It can also be a requirement
when subm itting warranty claims for co rro
sion damage and paint defec ts on the body .
The required cleaning and care prod ucts can
be obtained from your authorized Audi dea ler
or qualified workshop . Read and follow t he in
structions fo r use on the pac kaging .
A WARNING
-Us ing cle aning and care products incor
rect ly can be dange rous to your he alth .
- Always store cleaning and care products
o ut o f reach of children to redu ce the r is k
of po ison ing.
@ For the sake of the environment
- Prefera bly use environmentally-frie ndly
p roducts when buying cleaning agents .
- Do not d ispose of leftover cleaning and
ca re p ro du cts with household trash .
Car washes
-
The longer deposits remai n on t he veh icle, the
mo re the surface ca n be damaged. H igh tem
pe rat ures such as those caused by su nlight in
crease the d amaging effe cts.
Before washing, wet heavy deposi ts w ith p len
ty of wate r.
Stubbor n depos its s uch as bird dropp ings or
tree sap are best removed with plen ty of wa
ter and a m icrofiber cloth .
A lso, was h the underside of your vehicle once
road salt stop s be ing used for the season.
Pres sure washers
When wash ing your ve hicles w ith a pressure
washer, always follow the operating instr uc
tions provided w ith the pressure washe r. T his
is especially important in regard to the pres- s
u re and sp raying dis tance. Do not aim the
s p ray direct ly at sea ls on side windows, doo rs,
t h e hood, the rear lid o r the sunroof* or at
t ires, rubber hoses, insu lating material, sen
sors" or camera lenses*. Keep a d ista nce of at
least 16 inches (40 cm) .
Do not remove snow and ice with a pressu re
washer.
Never use rotary nozzles or high pressure noz
zles .
T he wate r temperature m ust not be above
1 4 0
°F (6 0 °( ).
Automatic car washes
Sp ray off the ve hicle befo re washing .
Make sure that the w indows and roof * are
closed and the winds hield wipers are off. Fol
low instructions from the ca r wash operator,
especially if there are accesso ries attached to
you r vehicle .
If possible, use car washes that do not have
brushes .
Washing by hand
Clean the ve hicle starti ng from the to p and
wor king down using a soft sponge or cleaning
brush. Use solvent-free clean ing products .
Washing vehicles with matte finish paint
by hand
To avoid damaging the paint when washing,
first remove dust and large particles from
your vehicle. Insects, grease spots and fi nger
pr ints are best removed w ith a spec ial cleane r
for matte finish paint .
Apply t he prod uct using a microfiber cloth. To
avo id damaging the pa int surface, do not use
too much pressure.
Rinse the ve hicle thoroughly with water. Then
clean using a neutra l shampoo and a soft mi
crofiber cloth.
Rinse the ve hicl e thoro ughly again and let it
air dry. Remove any water residue using a
shammy.
Page 243 of 304
Tires and wheels 241
-Turn the valve stem cap coun- ize the new tire pressures in the •
ter-clockwise to remove it tire pressure monitoring sys-• '
from the tire valve. tern*
¢ page 257.
-Place the air pressure gauge
A WARNING
on the valve.
Incorrect tire pressures and/
-The tire pressures should only or underinflation can lead
be checked and adjusted when sudden tire failure, loss of
the tires are cold. The slightly control, collision, serious per-
raised pressures of warm tires sonal injury or even death.
must not be reduced. -When the
ti] warning sym-
-Adjust the tire pressure to the bol appears in the instru-
load you are carrying. ment cluster, stop and in-
-Reinstall the valve stem cap spect the tires.
on the valve. -Incorrect tire pressure and/
When should I check the tire or underinflation can cause
pressure? increased tire wear and can
The correct tire pressure is es- affect the handling of the
pecially important at high vehicle and stopping ability.
speeds. The pressure should -Incorrect tire pressures
therefore be checked at least and/or underinflation can
once a month and always be- also lead to sudden tire fail-
fore start ing a journey. Do not ure, including a blowout
forget to check the tire pres- and sudden deflation, caus-
sure for the spare wheel. ing loss of vehicle control.
When should I adjust the
-
The driver is responsible for
the correct tire pressures for
tire pressures?
all tires on the vehicle. The
Adjust the tire pressure to the applicable pressure values
load you are carrying. After are located on a sticker on
changing a wheel
or replacing the driver's side B-pillar.
wheels you have to adjust the
'"" N
0 tire pressures on all wheels. In ::.,: co ....
addition, you must then initial-\!) 1.1'1
.... 1.1'1 ....
Page 260 of 304
258 Tires and wheels
Accordingly, when the low tire pressure tell
tale illuminates, you should stop and check
your tires as soon as possible, and inf late
them to the proper pressure. Driving on a sig nificantly under-inflated tire causes the tire to
overheat and can lead to tire failure. Under-in
flation also reduces fuel efficiency and tire
tread life, and may affect the vehicle's han
dling and stopp ing ability.
Please note that the TPMS is not a subst itute
for proper tire maintenance, and it is the driv
er's responsib ility to ma inta in correct tire
pressu re, even if under- inflation has not
reached the level to trigger illumination of the
TPMS low tire pressure telltale.
Your veh icle has also been equ ipped with a
TPMS malfunction indicator to indicate when
the system is not operating properly. The
TPMS malfunction indicator is combined with
the low tire pressure telltale . When the sys
tem detects a malfunction, the te lltale will
f lash for approximately one minute and then
remain cont inuous ly illuminated. This se
quence will continue upon subsequent vehicle
start-ups as long as the ma lfunction ex ists .
When the malfunct ion indicator is illuminat
ed, the system may not be able to detect or
signal low t ire pressure as intended. TPMS
malfunctions may occur for a variety of rea
sons, includ ing the installat ion of replace
ment or a lternate tires or whee ls on the veh i
cle that prevent the TPMS from functioning
p rop erly. Always check the TPM S malf unct ion
tellta le after replacing one o r more t ires or
wheels on your vehicle to ensure that the re p lacement or a lternate tires and wheels allow
the TPMS to continue to function properly. Tire pressure indicator appears
App lies to vehicles : wi th tire p ress ure mo nito rin g system
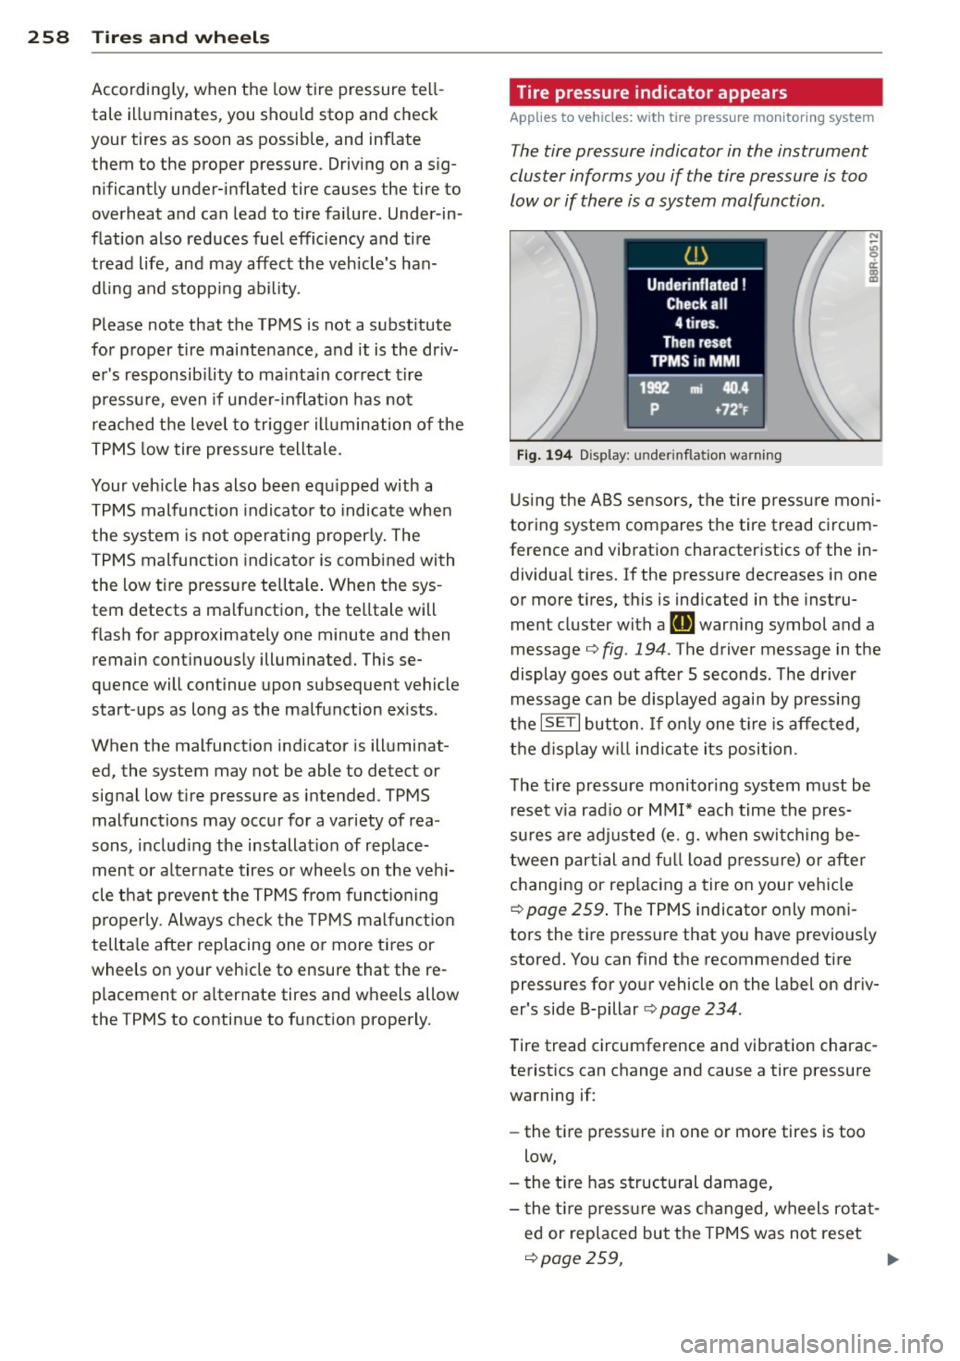
The tire pressure indicator in the instrument
cluster informs you if the tire pressure is too
low or if there is a system malfunction .
Fig. 194 Display: u nde rinfla tion warning
Using the ABS sensors, the tire pressure moni
toring system compares the tire tread circum
ference and vibration characteristics of the in
dividua l tires.
If the pressure decreases in one
or more t ires, this is indicated in the instru
ment cluster with a
RI] war ning symbol and a
message¢
fig . 194 . The driver message in the
display goes out afte r 5 seconds . The driver
message can be displayed again by pressing
the
ISETI button. If o nly one tire is affec ted,
the display will ind icate its position.
The tire pressure monitoring system must be
reset via rad io or MMI* each time the pres
sures are adjusted (e.g. when switching be
tween partial and full load pressure) or after
changing or replacing a tire on your ve hicle
¢
page 259. The TPMS indicator only moni
tors the tire pressure that you have previous ly
stored. You can find the recommended tire
pressures for your vehicle on the label on driv
er's side 8-pillar ¢
page 234.
Tire tread circumference and vibration charac
teristics can change and cause a tire pressure
warning if:
- the tire pressure in one or more tires is too
low,
- the tir e has structural damage,
- the tir e pressure was changed, wheels rotat-
ed or rep laced but the TPMS was not reset
¢page 259, ..,_
Page 292 of 304
29 0 Index
Child restra ints
D ang er of using child restraints in th e
front seat . . . . . . . . . . . . . . . . . . . . . . . . 145
Where can I get addit ional information
about child restra ints and their use? . . 183
C hild restraint system anchors ..... .. . 179
Ch ild safety .. ................ ... ... 165
Conve rtible locking retracto r .. .. ..... 175
I mportant safety instructions fo r using
ch ild safety seats ....... .. .. .. .. .. . 168
I mportant things to know when driving
with chi ldren .. .. ..... ... .. .. .... . 165
Installing a child restraint us ing the
LATCH system . . . . . . . . . . . . . . . . . . . . . 180
Lower anchorages .......... .. .... . 180
Mount ing and releasing the anchorage
hook .. .... .......... ...... ... .. . 180
Tether anchors ............... .. ... 181
Tether st raps .......... .. .. .. .. .. . 18 1
Ch ild safety locks
Power windows . ..... .... .. .. .. .. .. 42
Rear doors . .............. ... .. .. .. 41
C hild safety seats .. ..... ... .. .. .... . 17 1
Booster se ats . . . . . . . . . . . . . . . . . . . . . 173
Convertible c hild seats .... .. .. .... . 172
Convertible locking retracto r .. .. ..... 175
Danger of us ing c hild restra ints in the
front seat . . . . . . . . . . . . . . . . . . . . . . . . 145
H ow do I proper ly install a child safety
seat in my vehicle? ...... .. .. .. .. .. . 168
I nfant sea ts ............. .. .. .. .. . 17 1
I ns tall ing . . . . . . . . . . . . . . . . . . . . . . . . 17 5
LATCH system .. .. ..... ... .. .. .... . 180
Safety instructions ..... ... .. .. .... . 168
Unused safety belts on the rear seat . . 170
C igare tte lig hte r . . . . . . . . . . . . . . . . . . . . . 65
C leaning .. .. ................ ... .. .
202
Climate controls . . . . . . . . . . . . . . . . . . . . . 78
C lima te con trol system
Automat ic recircula tion .... .. .. .. .. . . 81
Supp lementary hea ter ... .. .. .. .... . . 81
synchronizing .. . ...... ... .. .. .... .. 81
C lock ....... .......... ...... ... .. .. 12
C losing
Power windows .......... .. .. .... .. 42
Sliding/tilting sunroof ...... ..... .. .. 43
Sunshade .. ................ ... ... . 43 Closing/opening
at the lock cylinder . . . . . . . . . . . . . . . . . . 3 7
by remote control . . . . . . . . . . . . . . . . . . 34
with the centra l locking switch ... .... . 3S
with the conven ience key ........ .... . 35
Co ld tire infla tion pressure ..... ... .. .. 234
Coming home . . . . . . . . . . . . . . . . . . . . . . . 50
Compact spare ti re . ............. .... 260
also refer to Spare tire .......... .. .. 260
Compartments . . . . . . . . . . . . . . . . . . . . . . 68
Compass in the m irror ... .. ... ..... .. . 58
Compliance ..... .. .. ... ..... ... .. .. 286
Consumer Informa tio n . . . . . . . . . . 134, 283
Contacting NHTSA . ... .......... .. .. 134
Controls Cleaning . ..... .. .. ... ..... ... .. .. 204
Convenience key Indi cator lights .. ... .......... .. .. . 86
Star ting engine (S TART E NGIN E STOP
button) ... .... .. ... .. ..... ... .. .. . 85
Stopping the engine (START ENGINE
STOP button) . . . . . . . . . . . . . . . . . . . . . . 86
Switching on ignition ........... .... . 85
unlocking/lock ing ............. .... . 35
Convenience opening/clos ing ... .. .. .. . 42
Convertib le child safe ty seats ........ . 172
Convertib le locking retractor
Activating . .. .. .. ............. .. .. 177
Deact ivat ing ... .. ... .... ...... .... 178
U sing to secure a child safety seat 1.75, 177
Coolant system .... .. ... ..... ... .. .. 218
Cooling mode (automat ic climate co ntrol) 79
Cooling System Expansion tank . .. .......... ...... . 218
Cornering light .... .. .... .... ... .. .. . 49
Cru ise cont ro l
Changi ng speed .. ............. .. .. . 91
Presett ing you r speed .......... .... . 92
Switching off .... .. ... ..... ... .. .. . 92
Switching on ..... ... .. ..... ... .. .. . 91
Cruisi ng range ... .. ............. .... . 24
( u pholder .. .... .. ............. .... . 67
D
Data recorder . . . . . . . . . . . . . . . . . . . . . . 184
Date d isp lay .... .. ............. .... . 12