remove seats AUDI A4 2015 Owners Manual
[x] Cancel search | Manufacturer: AUDI, Model Year: 2015, Model line: A4, Model: AUDI A4 2015Pages: 304, PDF Size: 74.86 MB
Page 64 of 304
62 Seats and storage
Power seat adjustment
App lies to vehicles: with power adjustable seats
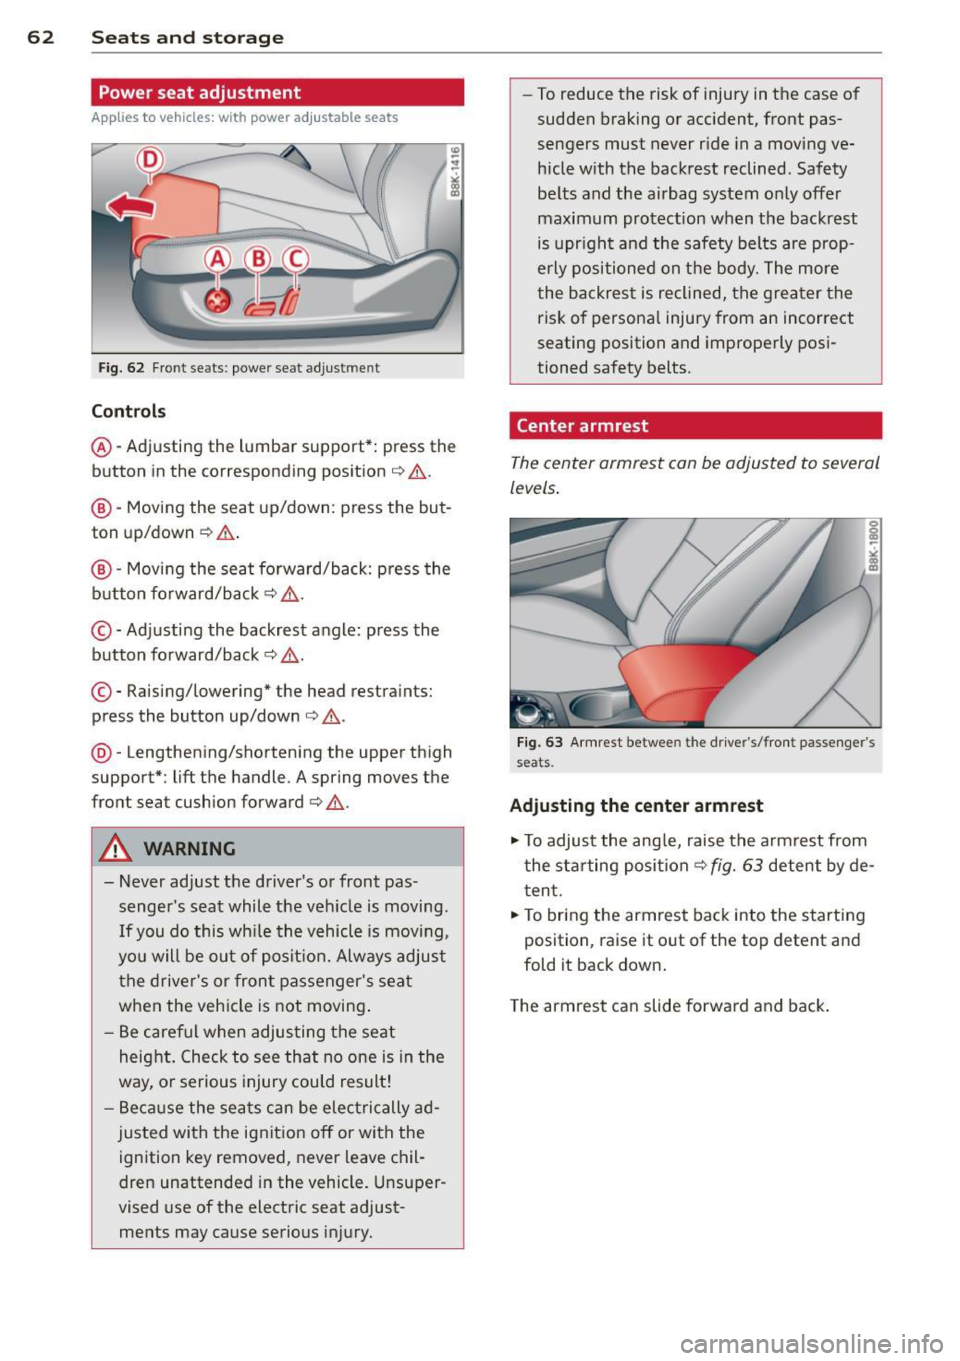
Fig. 62 Front seats: powe r seat adjust men t
Contr ols
@ -Adj usting the lumbar support*: press the
button in the corresponding position ¢.&. .
@ -Moving the seat up/down: press the but
ton up/down ¢.&. .
@ -Moving the seat forward/back: p ress the
button fo rward/back
¢ & .
©-Adjusting the backrest angle: press the
button fo rward/back
¢ & .
©-Raising/lowering* the head restraints:
press the button up/down ¢ .&. .
@ -Lengthening/shortening the upper thigh
support*: lift the handle. A spring moves the
front seat cushion forward¢& .
A WARNING
- Never adjust the d river's or front pas
senger 's seat while the veh icle is moving .
If you do this wh ile the vehicle is movi ng,
yo u will be out of posit ion. Always adjus t
the drive r's or front passenger's seat
when the vehicle is not moving .
- Be care ful when adjus ting the seat
heig ht. Check to see that no one is in the
way, o r serious injury could result!
- B eca use the sea ts can be elec trically ad
justed with the ignit ion off or with the
ignition key removed, never leave chil
dren unattended in the vehicle. Unsuper
vised use of the electric seat adjust ments may cause serious injury. -
To reduce the risk of injury in the case of
sudden braking or accident, front pas
sengers must never r ide in a moving ve
hicle with the backrest reclined . Safety
be lts and the airbag system only offer
maximum protection when the backrest is upr ight and the safety belts are prop
e rly po sit ioned on the body. The more
the backres t is reclined, the grea ter the
risk of persona l injury from an incorrect
seating position and imprope rly posi
tioned safety belts.
Center armrest
The center armrest can be adjusted to several
levels .
Fig . 63 A rm rest betwee n the d rive r's/front passenger's
seats.
Ad ju sting the center armrest
"" To adjus t the ang le, raise the armrest from
the starting position
¢ fig. 63 detent by de
t en t.
.,. To bring the armrest back into the starting
position, raise it out of the top detent and
fold it back down.
T he armrest can slide forwar d and back .
Page 66 of 304
64 Seats and storage
¢ fig. 65. Pull the head restraint out of the
backrest at the same time¢,&. .
Installing the head restraints
.. Slide the posts on the head restraint down
into the guides until you feel the posts click
i nto place.
.. Press the button@¢
fig. 65 and slide the
head restraint all the way down. You should
not be able to pull the head restraint out of
the backrest.
So that the driver can have a better view to
the rear, the head restraints should be pushed
down completely when the rear seats are not
occupied .
A WARNING ,.
- Read and heed all WARNINGS
¢ page 130, Proper adjustment of head
restraints .
- Only remove the rear seat head restraints
when necessary in order to install a child
seat¢
page 173. Install the head re
straint again immediately once the child
seat is removed. Driving without head re
straints or with head restraints that are
not properly adjusted increases the risk
of serious or fatal neck injury dramatical
ly.
@ Tips
Correctly adjusted head restraints and
safety belts are an extremely effective
combination of safety features .
Seat memory
Description
Applies to vehicles: with memory function
The memory function allows you to quickly
and easily store and recall personal seating
profiles for the dr iver . The memory function is
operated through the master key and the memory buttons in the driver's door.
The driver's seating profi le is stored and as
signed to the master key each time the vehicle
is locked. When you open the door, the seat profile is
automatically recalled.
If two people
use one vehicle, it is recommended that each
person always uses "their own" master key.
Up to 2 seat profiles can be stored in the
memory buttons in the driver's door. Once
they are stored, these seat profiles can be se
lected at any time .
In addition to the driver's seat settings, you
can also store and access the exterior mirror
adjustment settings* using the remote con
trol key or memory button.
Remote control key
Applies to vehicles: wit h seat memory
To assign the driver's seat settings to the re
mote control key when locking the vehicle, the
function must be activated in the rad io or
MMI*
.. Select: !CAR I function button> Seat adjust
ment
> Driver's seat > Remote control key >
on.Or
.. Select: !CARI function button> Car systems*
control button > Vehicle settings > Seats >
Driver' s seat> Remote control key> On .
(i) Tips
If you do not want another driver's set
tings to be assigned to the remote key,
switch off the memory function using the
radio or MMI* or the
IOFFI button
¢page 64.
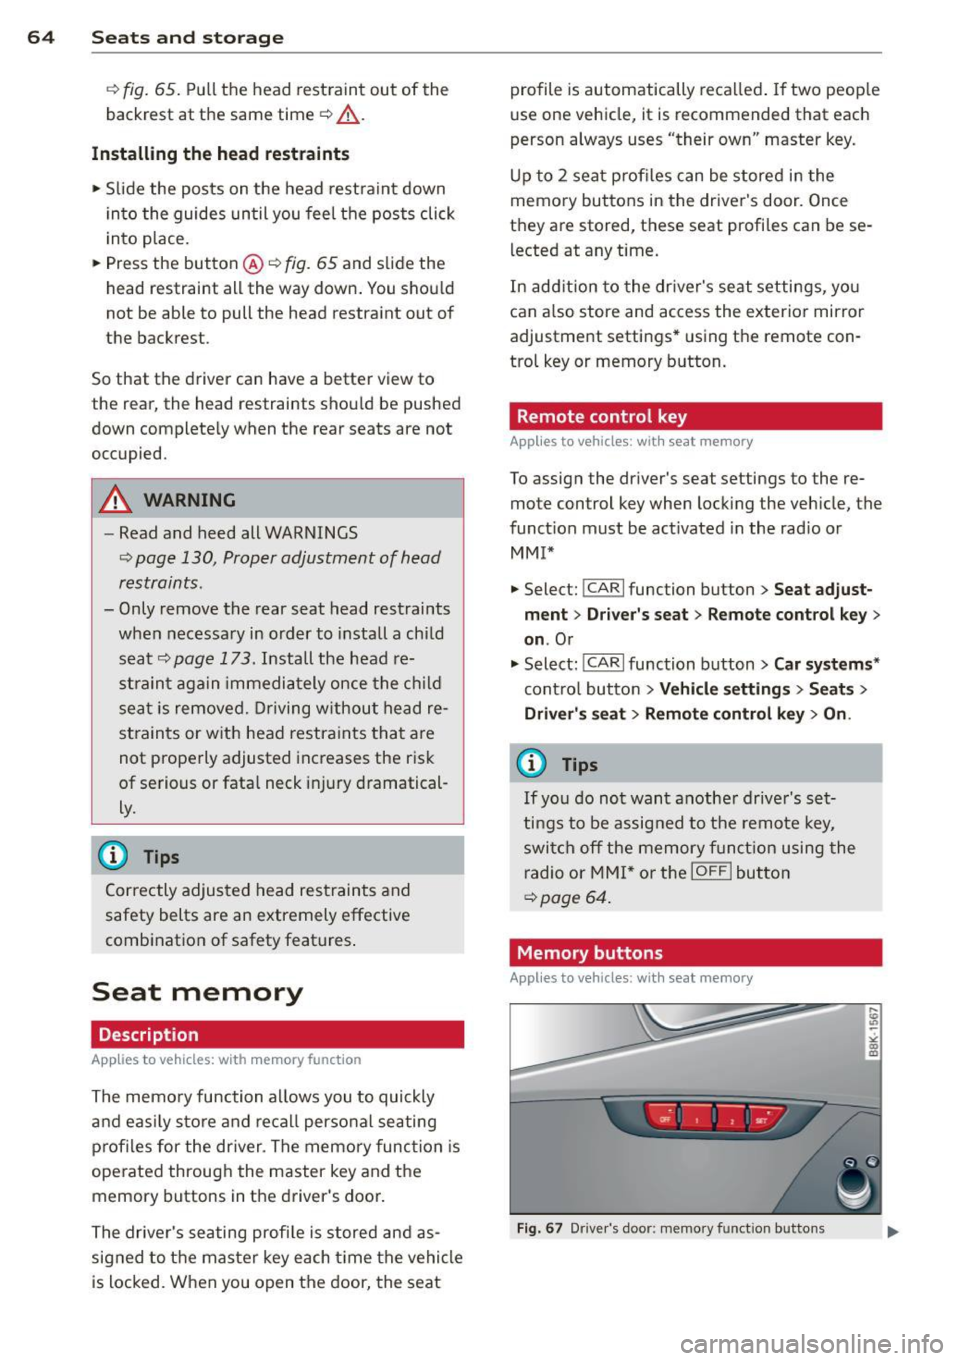
Memory buttons
Applies to vehicles: with seat memory
Fig. 67 Dr iver's door: memo ry fu nct ion buttons
Page 67 of 304
M N
~ co
rl I.O
"' rl
"' rl
The memory buttons are located in the driv
er's door.
Switching the memory function on/off
• Press the !OFF ! button to switch the memory
function on/off. The word
OFF lights up
when the memory function is switched off.
Seat profiles are neither stored nor recalled.
Storing a seat profile
• Press the !SET ! button. When the word SET
lights up, the memory is ready to store set
t in gs.
• Press a memory button
([II or rn) briefly. A
tone confirms that the settings were stored.
Accessing a seat profile
• If the driver's door is open and the ignition
is switched off, press the memory button.
• If the driver's door is closed or the ignition is
switched on, press and hold the memory
button until the seat adjustment is com
plete .
A WARNING
-For safety reasons, the seat sett ing can
only be recalled when the vehicle is sta
tionary - otherwise you risk having an ac
c ident.
- In an emergency the recall procedure can
be cancelled by press ing the
!OF F! switch
or by tapping the memory buttons.
Ashtray
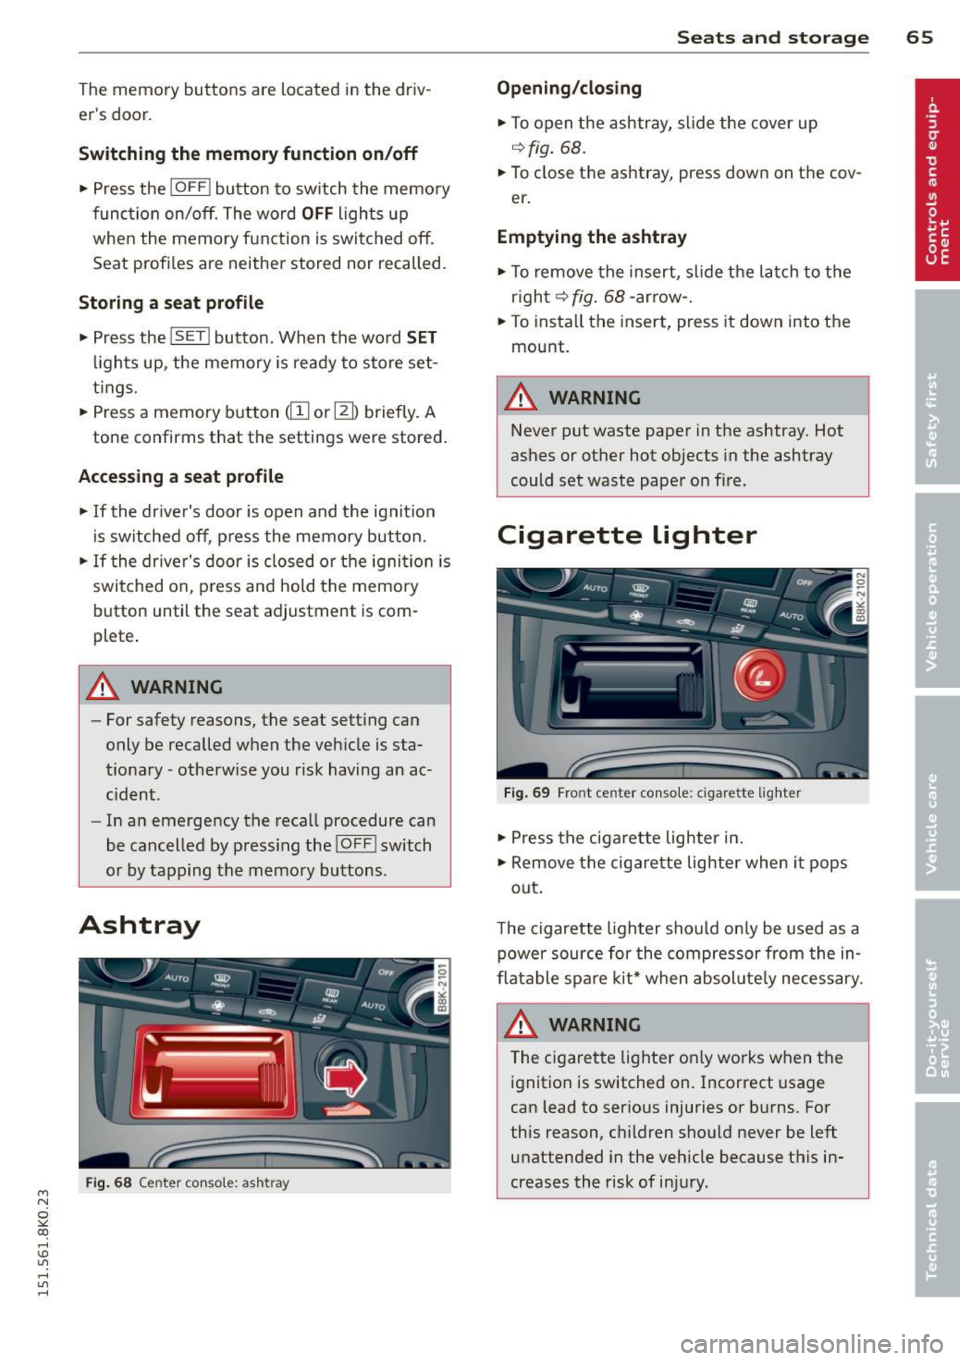
Fig . 68 Center console: ashtray
Seats and storage 65
Opening/closing
• To open the ashtray, slide the cover up
~fig. 68.
• To close the ashtray, press down on the cov
er .
Emptying the ashtray
• To remove the insert, slide the latch to the
right~fig. 68-arrow-.
• To instal l the insert, press it down into the
mount.
A WARNING
Never put waste paper in the ashtray. Hot
ashes or other hot objects in the ashtray
could set waste paper on fire.
Cigarette lighter
Fig. 69 Front center console: cigar ette lighter
• Press the cigarette lighter in.
• Remove the cigarette lighter when it pops
out .
T he cigarette lighter should only be used as a
power source for the compressor from the in
flatable spare kit* when absol ute ly necessary.
A WARNING
The cigarette lighter on ly works when the
ignition is switched on. Incorrect usage
can lead to serious injuries or burns. For
this reason, children should never be left unattended in the vehicle because this in
creases the risk of injury.
Page 68 of 304
66 Seats and st o rage
12-volt socket
Appl ies to vehicles: wit h 12-volt socket
Electrical accessories can be connected to the
12-volt socket.
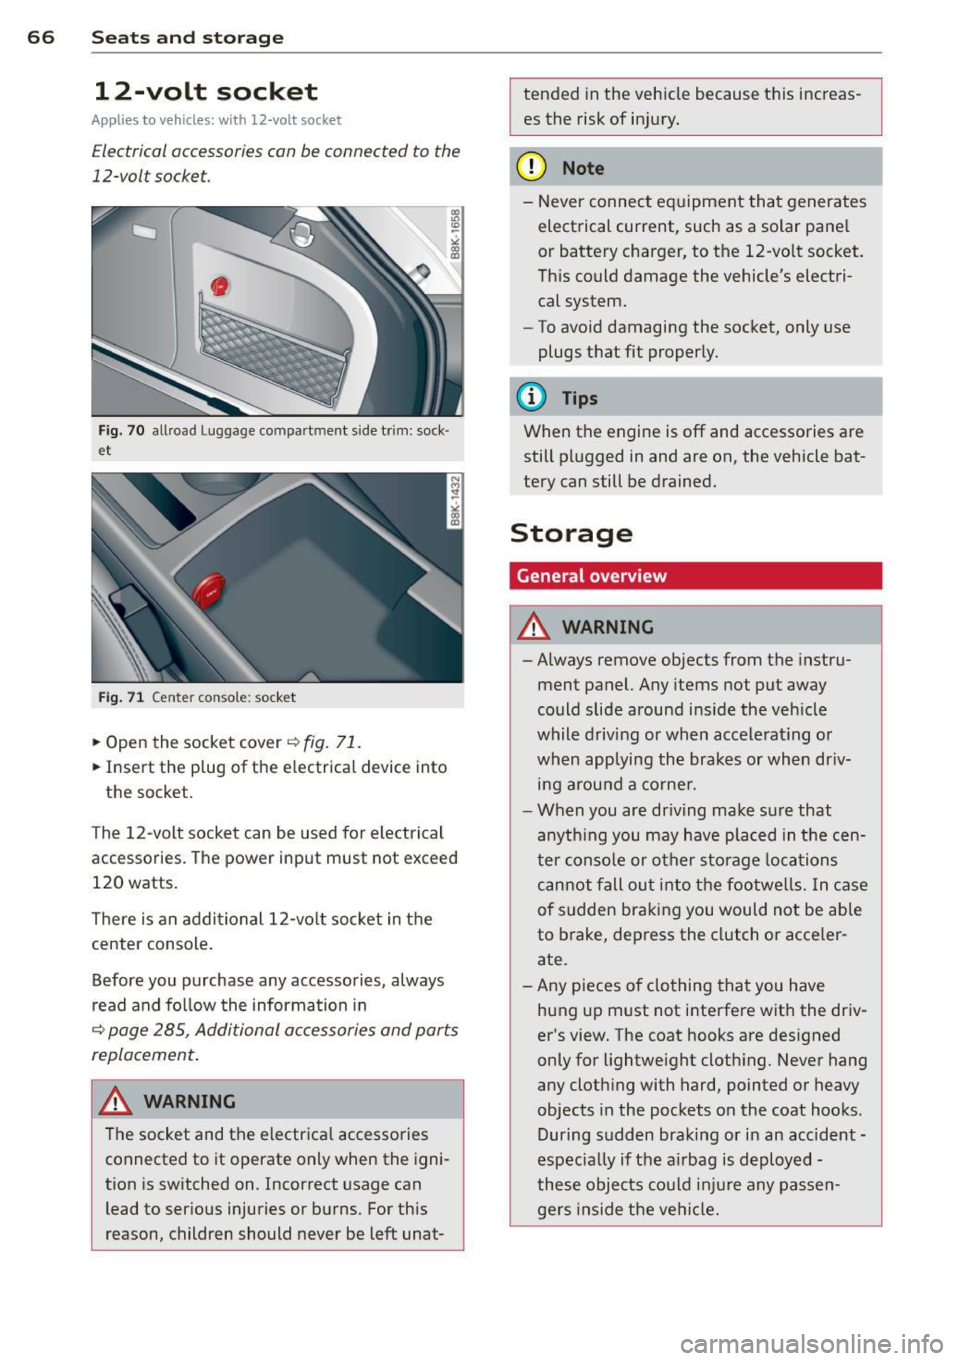
Fig. 70 allroad Luggage compartment s ide trim: sock·
et
Fig . 71 Center conso le: socket
.,. Open the socket cover~ fig. 71 .
.,. Insert the plug of the e lectrical device into
the socket.
The 12-volt socket can be used for electrical
accessories. The power input must not exceed
120 watts.
There is an additional 12-vo lt socket in the
center console .
Before you purchase any accessories, always
read and fo llow the information in
~ page 285, Additional accessories and parts
replacement .
.&_ WARNING
The socket and the electrica l accessories
connected to it operate only when the igni
tion is switched on. Incorrect usage can
lead to serious injuries or burns. For this
reason, children should never be left unat-
-
tended in the veh icle because this increas
es the risk of in jury.
(D Note
- Never connect equipment that generates
electrical current, such as a solar pane l
or battery charger, to the 12-vo lt socket.
Th is could damage the vehicle's electri
cal system.
- To avoid damaging the socket, only use
plugs that fit properly.
(D Tips
When the engine is off and accessories are
still plugged in and are on, the vehicle bat
tery can still be drained.
Storage
General overview
.&_ WARNING
-
- Always remove objects from the instru-
ment panel. Any items not put away
could slide around ins ide the veh icle
while driving or when accele rat ing or
when applying the brakes or when dr iv
ing arou nd a corne r.
- When you are dr iving make su re that
anyth ing you may have placed in the cen
ter conso le or other sto rage locations
can not fall out i nto the footwe lls. In c ase
of sudden braking you would not be able
to brake, dep ress the clutch o r acce ler
ate.
- Any pieces o f clothing that you have
hung up m ust not interfere with the driv
er's view. The coat hooks are des igned
only for lightweight cloth ing. Never hang
any clothing with hard, pointed or heavy
objects in the pockets on the coat hooks .
During sudden braking or in an accident -
especia lly if the a irbag is d eployed -
these objec ts co uld inju re any passen
gers inside the ve hicl e.
-
Page 70 of 304
68 Seats and stor age
Addit ional storage
There are a variety of storage compartments
and fasteners in var ious places in the vehicle.
- In the roof headliner above the rearview
mirror .
- On the back of the front seat . The com pa rt
ment can hold a maximum weight of 1 kg.
- On the left and right of the luggage com
partment, behind the side trim.
- Garment hooks on the pillars in the rear of
the vehicle .
A WARNING
-When driving, do not leave any hard ob
jects on the rear window shelf or allow your pet to s it on the shelf. They could
become a hazard for ve hicle occupants in
the event of sudden braking or a crash.
- Always remove objects from the instru
ment pane l. Any items not stored could
slide around inside the vehicle while driv
ing or when accelerating or when apply
ing the brakes or when driving around a
corner.
- When you are driving make sure that
anything you may have placed in the cen
ter console or other storage locations cannot fall out into the footwells. In case
of sudden braking you would not be able
to brake or accelerate.
- Any articles of clothing that you have
hung up must not interfere with the driv
er's v iew. The coat hooks are designed
only for lightweight clothing. Never hang
any clothing with hard, pointed or heavy
objects in the pockets on the coat hooks.
During sudden braking or in an accident -
especially if the airbag is deployed -
these objects could injure any passen
gers inside the vehicle .
- To reduce the risk of personal injury in an
accident or sudden stop, always keep the
glove compartment closed while driving.
- Read and follow all WARNINGS
i=> page 161, Important safety instruc
tions on the side airbag system.
- Hang clothes in such a way that they do
not impair the driver's vision.
- The coat hooks must only be used for
lightweight clothing. Do not leave any
heavy or sharp edged objects in the pock
ets which may interfere with the side cur
tain airbag deployment and can cause personal injury in a crash.
- Do not use coat hangers for hanging
cloth ing on the coat hooks as th is can in
terfere with proper deployment of the
side curtain air bags in an accident.
- Do not hang heavy objects on the coat
hooks, as they could cause personal in
jury in a sudden stop.
- Always keep the compartment above the
rea rv iew mirror closed while driving to
red uce the risk of injury in the event of
sudden braking maneuvers or a collision.
(£} Note
Objects located on the rear shelf that rub
against the rear window could damage the
heating wires for the rear window defog"
ger.
(D Tips
-A vent slot is located between the shelf
and the rear windo w. Do not block the
vent with any items you may place on the
rear window she lf.
- Do not place bulky items on the rear win
dow shelf as they could restrict or block
the driver's vision in the rear view mirror.
Page 73 of 304
M N
~ co
rl I.O
"' rl
"' rl
Luggage compartment cover
Applies to vehicles: with luggage compartment cover
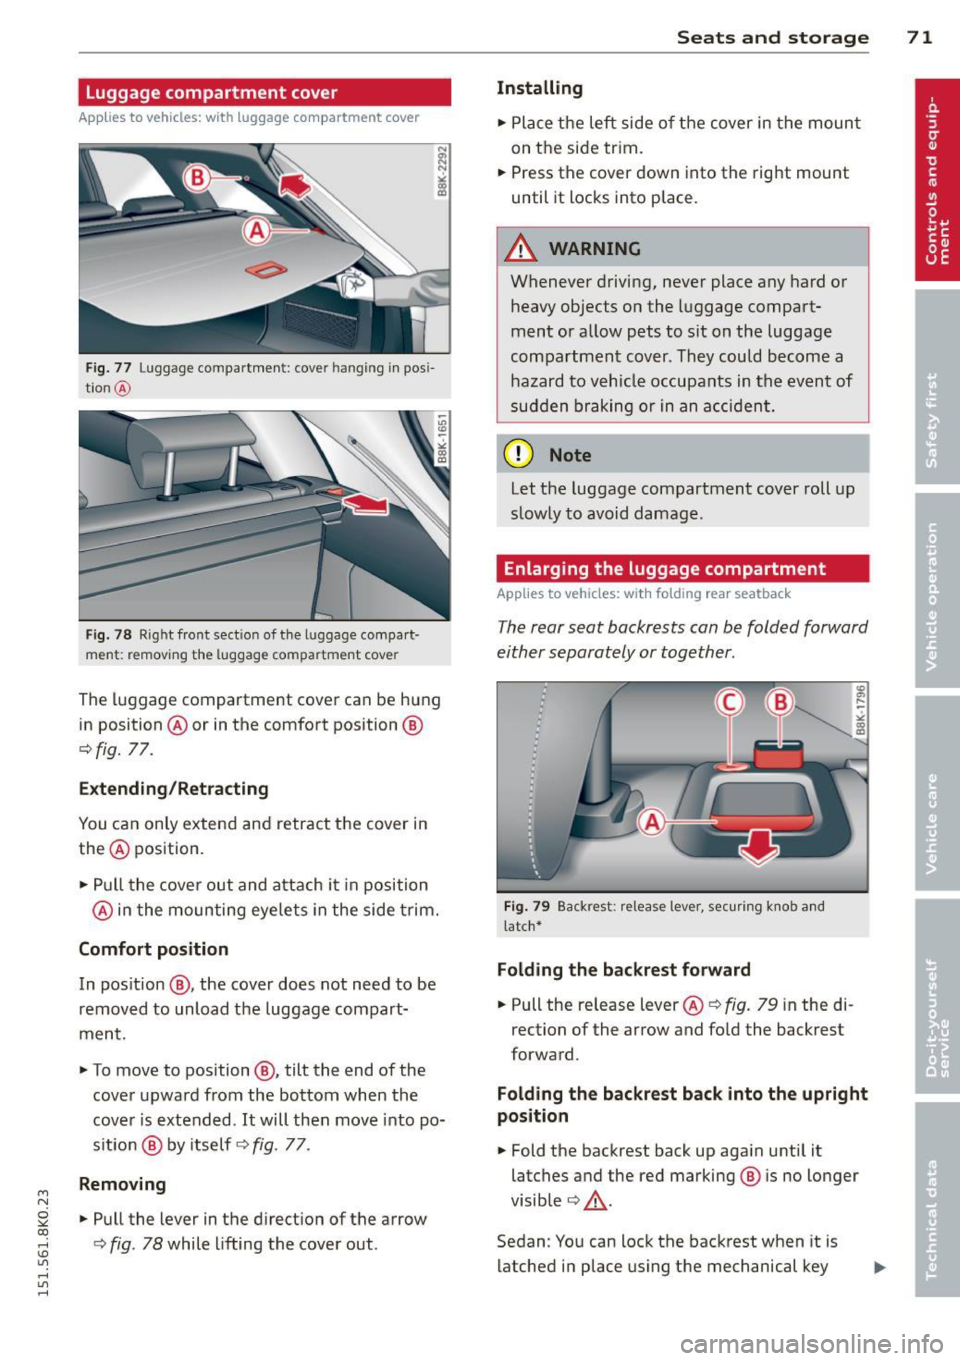
Fig. 77 Luggage compartment: cover hanging in pos i
t ion @
Fig. 78 R ight front section of the luggage compart
ment: remov ing the luggag e compartment cover
The luggage compartment cover can be hung
in position @or in the comfort position @
¢fig. 77.
Extending/Retracting
You can only extend and retract the cover in
the @ position .
• Pull the cover out and attach it in position
@ in the moun ting eyelets in the side trim.
Comfort position
In pos ition @, the cover does not need to be
removed to unload the luggage compart·
ment.
• To move to position @, tilt the end of the
cover upward from the bottom when the
cover is extended. It will then move into po·
s ition @ by itself ¢
fig. 77 .
Removing
• Pull the lever in the direction of the arrow
¢
fig . 78 while lifting the cover out .
Seats and storage 71
Installing
• Place the left side of the cover in the mount
on the side trim.
• Press the cover down into the rig ht mount
until it locks into place.
A WARNING
=
Whenever driving, never place any hard or
heavy objects on the luggage compart·
mentor allow pets to sit on the luggage
compartment cover . They could become a
hazard to vehicle occupants in the event of
sudden braking or in an accident.
ffi Note
Let the luggage compartment cover roll up
slow ly to avoid damage.
Enlarging the luggage compartment
Applies to vehicles: wit h fo lding rear seatback
The rear seat backrests can be folded forward
either separately or together.
Fig. 79 Backrest : relea se lever, securing knob and
l a tc h*
Folding the backrest forward
• Pull the release lever @¢ fig. 79 in the di
rection of the arrow and fold the backrest
forward.
Folding the backrest back into the upright
position
• Fold the backrest back up again until it
latches and the red marking @ is no longer
visible ¢
_&..
Sedan: You can lock the backrest when it is
latched in place using the mechanical key
Page 74 of 304
7 2 Seats and storage
.::> page 33 ©.::>fig. 79 . This prevents any ac
cess to the luggage compartment from the
vehicle interior.
You can on ly enlarge the luggage compar t
ment if the backrest is not locked .
~ WARNING
-
-The backrest must a lways be securely
latched so that the safety belt of the cen
ter seating pos ition can work properly to
help protect the occupant .
- The backrest must be secure ly latched in
posit ion so that no items contained in
the luggage compartment can slide for
ward upon sudden braking .
- Always check whether the latch is f ully
engaged by pu lling the seatback for
wa rd.
- Never allow safety belts to become dam
aged by being caught in doo r o r seat
hardware.
- Torn or frayed safety belts can tear and
damaged belt ha rdware can break in a
c rash. Inspect the be lts periodica lly.
B elt s showing damage to webbing, bind
ings, buckles, or retractors must be re
placed.
(D Note
- If you move the front seat back when the
r ear seat ba ckrest is fo lded fo rward, yo u
could d amage t he head res tra ints on the
rear sea t.
- Slide the belt guide on the outside safety
belt all the way up before folding the
backrest back forward. Make su re the
seat belt is not pinched o r damaged
when the rear seat backrest if folded back. Other objects shou ld be removed
from the rear seat bench to protect the seatback from damage. Partition net (seatback in upright
position)
Applies to vehicles: with partition net
The partition net is designed to pr event loose
objects from flying forward into the passen
ger compartment (e.g. under sudden brak
ing).
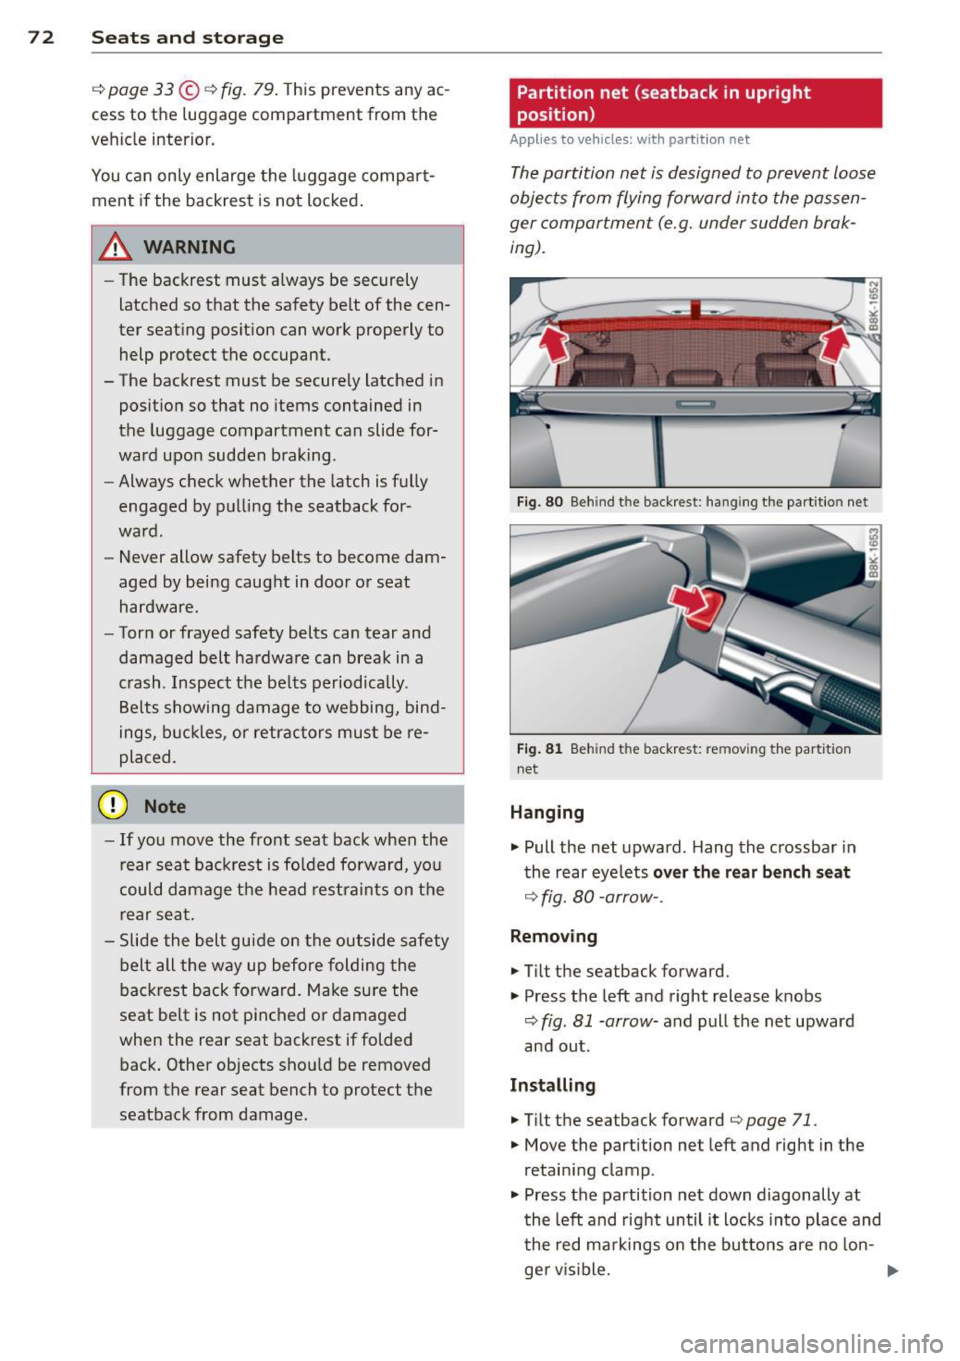
Fi g. 80 Beh ind t he backrest : hang ing t he part itio n net
Fi g. 8 1 Beh ind t he backrest: re m ov ing the part it ion
ne t
Hanging
.,. Pull the net upward . Hang the c rossbar in
the rear eye lets
over th e re ar bench seat
¢ fig. 80 -arrow-.
Removing
.,. Ti lt the seatback forward.
.,. Press the left and right release knobs
¢ fig. 81 -arrow-and pull the net upward
and out.
Installing
• Ti Lt the seatback forward
¢ page 71 .
.,. Move the partition net left and right in the
retain ing clamp .
.,. Press the partition net down diagonally at
t he left and right until it locks into place and
t he red ma rkings o n the bu ttons are no lon-
ger v is ible. ..,.
Page 75 of 304
M N
~ co
rl I.O
"' rl
"' rl
(D Note
Let the partition net roll up slowly to pre
vent damage.
Partition net (seatback tilted forward)
Applies to vehicles: with partition net
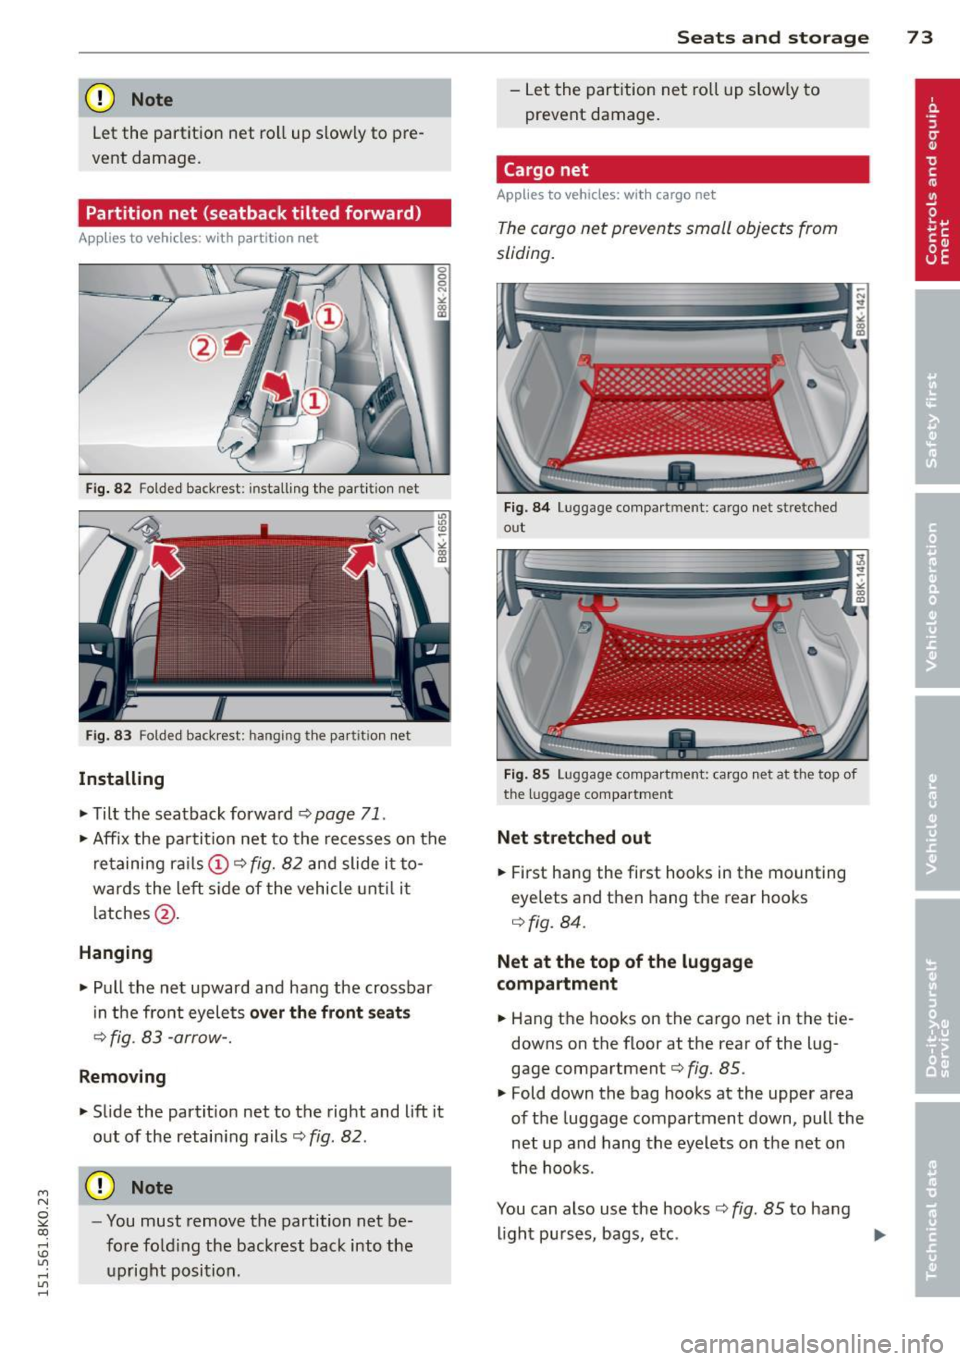
Fig. 82 Fol ded ba ckrest: install ing the part it ion net
Fig. 83 Folded backrest: hanging the partition net
Installing
• Tilt the seatback forward r::;, page 71.
0 0
0
~ gi
• Affix the partition net to the recesses on the
retaining rails (D r::!>fig.
82 and slide it to
wards the left side of the vehicle until it
latches @.
Hanging
• Pull the net upward and hang the crossbar
in the front eyelets
over the front seats
r=> fig. 83 -arrow-.
Removing
• Slide the partit ion net to the right and lift it
out of the retaining rails
r::;, fig. 82.
@ Note
-You must remove the partition net be
fore foldi ng the backrest back into the
upright position.
Seats and storage 73
-Let the partition net roll up slow ly to
prevent damage.
Cargo net
Applies to vehicles: with cargo net
The cargo net prevents small objects from
sliding.
Fig. 84 Luggage compartment: cargo net stretched
out
Fig . 85 Luggage compartment: ca rgo net at the top of
the luggage compartment
Net stretched out
• First hang the first hooks in the mounting
eyelets and then hang the rear hooks
r::;, fig. 84.
Net at the top of the luggage
compartment
• Hang the hooks on the cargo net in the tie
downs on the floor at the rear of the lug
gage compartment
r::;, fig. 85.
• Fold down the bag hooks at the upper area
of the luggage compartment down, pull the
net up and hang the eyelets on the net on
the hooks .
You can also use the hooks
r=> fig. 85 to hang
light purses, bags, etc.
1JJ,,
Page 142 of 304
140 Safety belts
To provide maximum protection, safety belts must always be positioned correctly on the
wearer 's body .
.,. Adjust the front seat and head restraint
properly ¢
page 60, Seats and storage .
.,. Make sure the seatback of the rear seat
bench is in an upright position and securely
latched in place befo re using the belt¢.&, .
.,. Hold the belt by the tongue and pull it even-
ly across the chest and pelvis¢.&, .
.,. Insert the tongue into the correct buckle of
your seat until you hear it latch securely
¢fig . 148.
.,. Pull on the belt to make sure that it is se-
curely latched in the buckle .
Automatic safety belt retractors
Every safety belt is equipped with an automat
ic belt retractor on the shoulder belt . This fea
ture locks the belt when the belt is pulled out
fast, during hard braking and in an accident.
The belt may also lock when you drive up or
down a steep hill or through a sharp curve. During normal driving the belt lets you move
freely .
Safety belt pretensioners
The safety belts are equipped with a be lt pre
tensioner that helps to tighten the safety belt
and remove slack when the pretensioner is ac
tivated. The function of the pretensioner is
monitored by a warning light¢
page 20 .
Convertible locking retractor
Every safety belt except the one on the driver
seat is equipped with a convertible locking re
tractor that
must be used when the safety
belt is used to attach a child safety seat. Be
sure to read the important information about
this feature ¢
page 175.
A WARNING
Improperly positioned safety belts can
cause serious injury in an accident
¢ page 140, Safety belt position.
- Safety belts offer optimum protection
only when the seatback is upright and
-
belts are properly positioned on the
body.
- Always make sure that the rear seat
backrest to which the center rear safety
belt is attached is securely latched when
ever the rear center safety belt is being
used. If the backrest is not securely
latched, the passenger w ill move for
ward with the backrest during sudden
braking, in a sudden maneuver and espe
cially in a crash .
- Never attach the safety belt to the buck
le for another seat. Attaching the belt to
the wrong buckle will reduce safety belt
effectiveness and can cause serious per
sonal injury.
- A passenger who is not properly restrain
ed can be seriously injured by the safety
belt itself when it moves from the stron
ger parts of the body into critical areas
like the abdomen .
- Always lock the convertible locking re
tractor when you are securing a child
safety seat in the vehicle
c:> page 177.
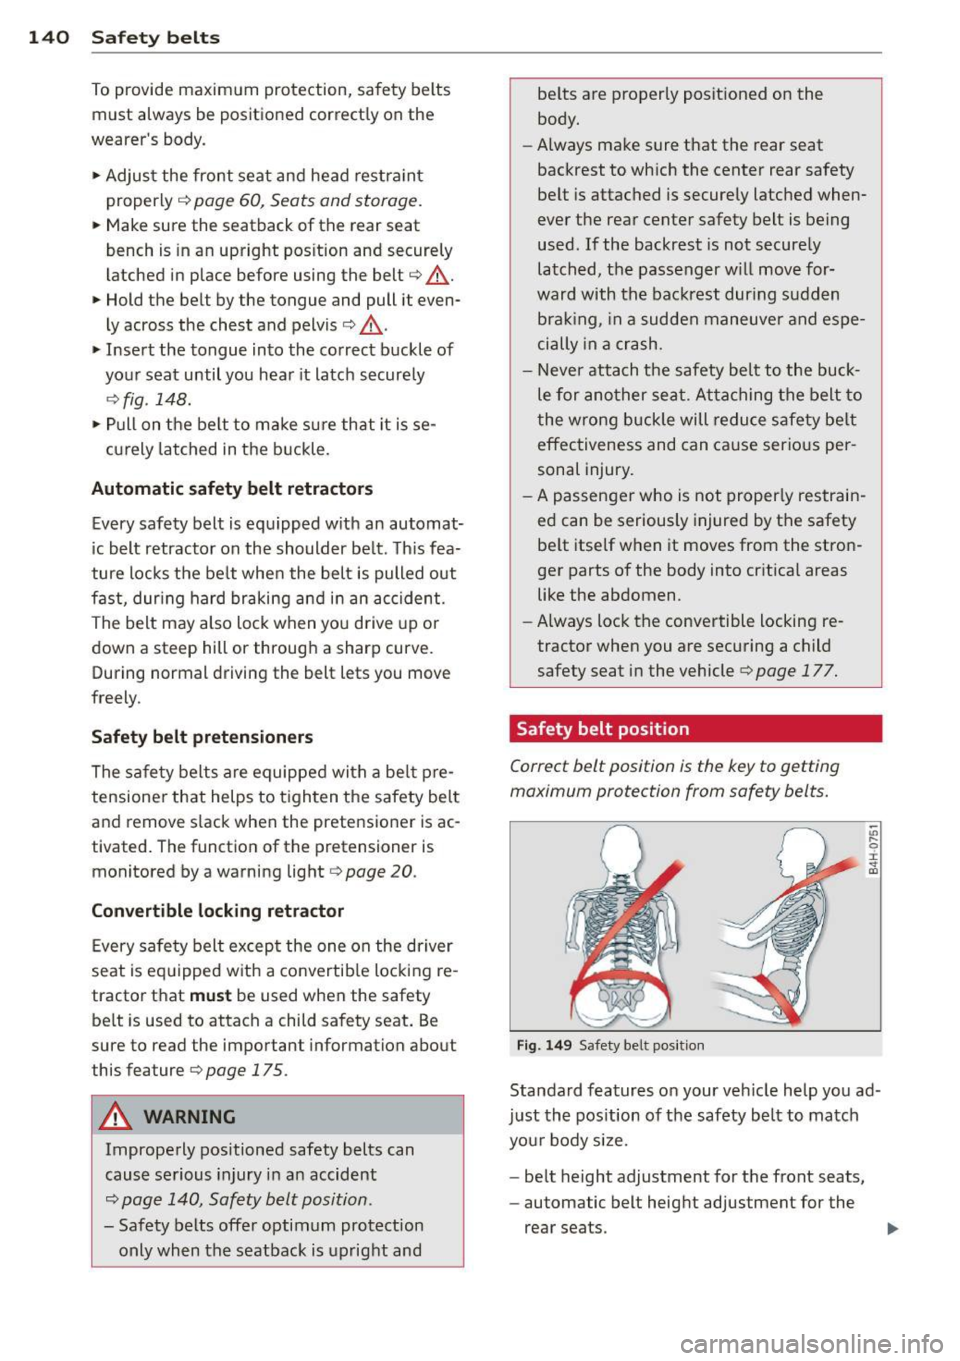
Safety belt position
Correct belt position is the key to gett ing
maximum protection from safety belts.
Fig. 149 Safety bel t position
Standard features on your vehicle help you ad
just the position of the safety belt to match
your body size.
- belt height adjustment for the front seats,
- automatic belt height adjustment for the
rear seats .
Page 154 of 304
152 Airbag system
-Repairs to the front passenger seat must
be performed by qualified and properly
trained workshop personnel.
- Never remove the front passenger or
driver seat from the vehicle.
- Never remove the upholstery from the
front passenger seat.
- Never disassemble or remove parts from
the seat or disconnect wires from it.
- Never carry sharp objects in your pockets
or place them on the seat. If the weight
sensing mat in the passenger seat is
punctured it cannot work properly.
- Never carry things on your lap or carry
objects on the passenger seat. Such
items can increase the weight registered
by the weight-sensing mat and send the
wrong information to the airbag control unit.
- Never store items under the front pas senger seat. Parts of the Advanced Air
bag System under the passenger seat
could be damaged, preventing them and
the airbag system from working proper ly.
- Never place seat covers or replacement
upholstery that have not been specifical
ly approved by Audi on the front seats.
- Seat covers can prevent the Advanced
Airbag System from recognizing child re
straints or occupants on the front pas
senger seat and prevent the side airbag
in the seat backrest from deploying prop
erly.
- Never use cushions, pillows, blankets or
similar items on the front passenger seat. The additional padding will prevent
the weight-sensing mat in the seat from
accurately registering the child restraint
or person on the seat and prevent the
Advanced Airbag System from function
ing properly.
- If you must use a child restraint on the
front passenger seat and the child re straint manufacturer's instructions re
quire the use of a towel, foam cushion or
something else to properly position the child restraint, make certain that the
PASSENGER AIR BAG OFF light comes
on and stays on whenever the child re
straint is installed on the front passen
ger seat.
- If the
PASSENGER AIR BAG OFF light
does not come on and stay on, immedi
ately install child restraint in a rear seat
ing position and have the airbag system
inspected by your authorized Audi dealer.
How the Advanced Airbag System
components work together
The front Advanced Airbag System and the
side airbags supplement the protection of
fered by the front three-point safety belts
with pretensioners and load limiters and the
adjustable head restraints to help reduce the
risk of injury in a wide range of accident and
crash situations. Be sure to read the impor
tant information about safety and heed the
WARNINGS in this chapter.
Deployment of the Adva need Airbag System
and the activation of the safety belt preten sioners depend on the deceleration measured
by the crash sensors and registered by the
electronic control unit. Crash severity depends
on speed and deceleration as well as the mass
and stiffness of the vehicle or object involved
in the crash.
On the passenger side, regardless of safety
belt use, the airbag will be turned off if the
weight on the passenger seat is less than the amount programmed in the electronic control
unit. The front airbag on the passenger side
will also be turned off if one of the child safe
ty seats that has been certified under Federal
Motor Vehicle Safety Standard 208 has been
recognized on the seat. The
PASSENGER AIR
BAG OFF
light comes on and stays on to tell
you when the front Advanced Airbag on the passenger side has been turned off
~ page 145, Child restraints on the front seat
- some important things to know.
1111>