lock AUDI A4 2016 Owner's Manual
[x] Cancel search | Manufacturer: AUDI, Model Year: 2016, Model line: A4, Model: AUDI A4 2016Pages: 278, PDF Size: 70.26 MB
Page 46 of 278
Opening and clo sin g
Valet parking
Applies to vehicles: with folding and lockable rear seatbacks
The valet parking feature protects the luggage
comportment from unauthorized access .
-
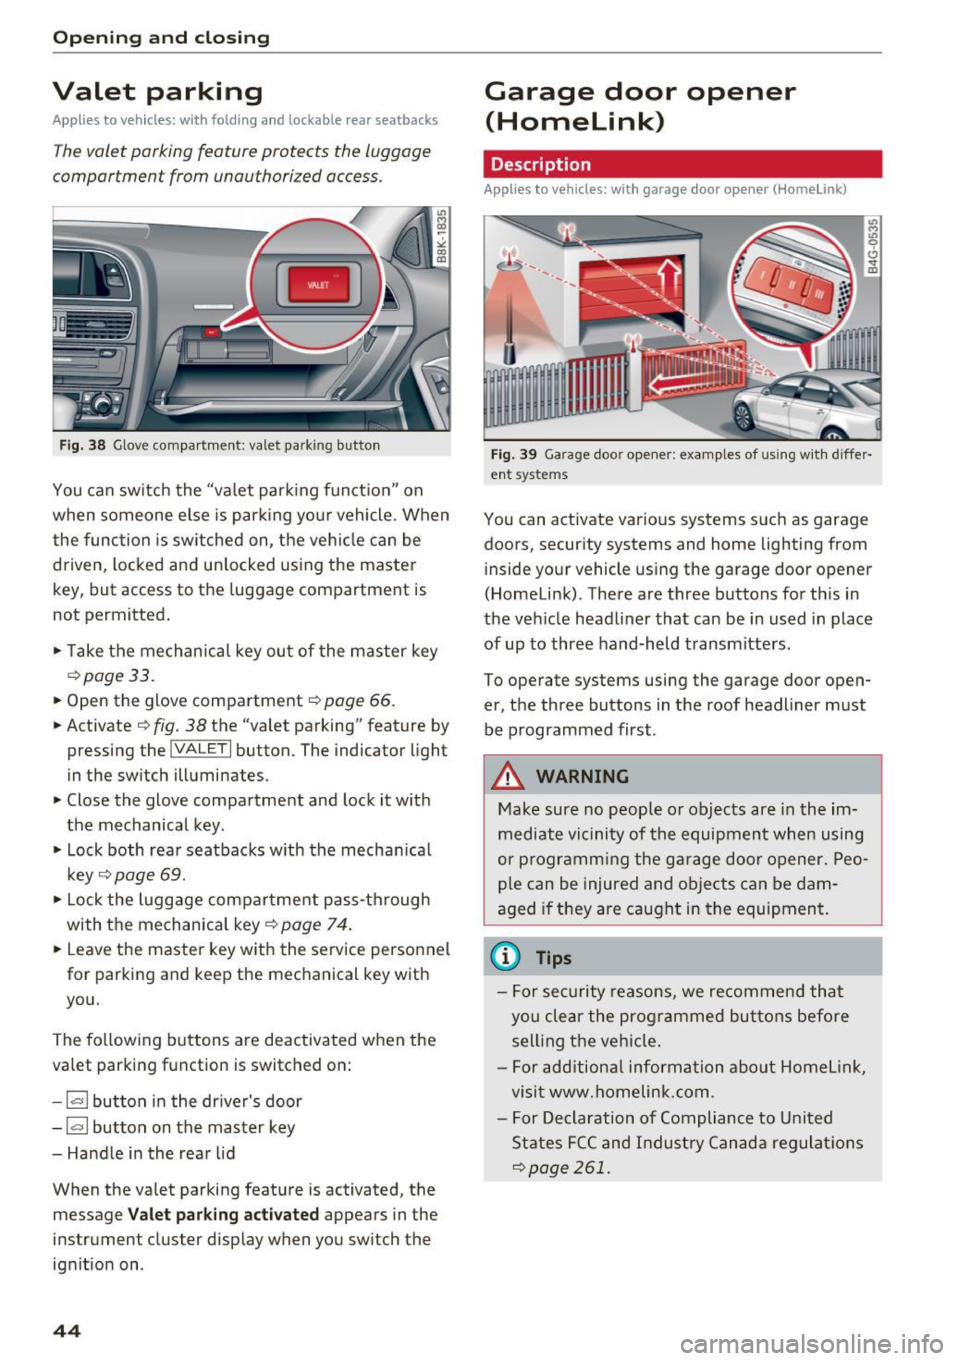
Fig. 38 Glove compartment: valet park ing button
You can sw itch the "va let park ing funct ion" on
when someone else is pa rk ing you r vehicle. When
the function is sw itched on, the vehicle can be
driven, locked and un locked using the master
key, but access to the luggage compartment is
not permitted .
• Take the mechanical key ou t of the master key
<=> page 33.
• Open the glove compartment r::!> page 66 .
• Activate
¢ fig. 38 the "valet parking" feature by
pressing the
! VALET I button. The indicator light
in the switch illuminates.
• Close the glove compartment and lock it with
the mechanical key.
• Lock both rea r seatbacks w ith the mechan ica l
key
¢ page 69.
• Lock the luggage compar tment pass-through
with the mechanical key<=>
page 74 .
• Leave the master key with the service personnel
for parking and keep the mechanical key with
you.
The fo llowing buttons are deactivated when the
valet parking function is switched on:
- 1""' 1 bu tton in the dr iver's door
- I a I button on the master key
- Handle in the rear lid
When the valet parking feature is activated, the message
V alet park ing activ ated appears in the
instrument cluster display when you switch the ignit ion on .
44
Garage door opener
(Homelink)
Description
Applies to vehicles: with garage door opener (Horne Link)
Fig. 3 9 Garage doo r opene r: exa mples of using w it h d iffer·
ent syste ms
You can act ivate vario us systems suc h as garage
doors, secur ity systems and home lighting from
inside your vehicle using the garage door opener
(Homelink) . There are three buttons for th is in
the veh icle headliner that can be in used in place
of up to three hand-held transmitters.
To operate systems using the garage door open
er, the three buttons in the roof headliner must be programmed first .
A WARNING
Make sure no people or objects are in the im
mediate vi cinity of the equipment when using
or p rogramm ing the ga rage door opener. Peo
pl e can be injured and ob jects can be dam
aged i f they are caught in the equipment.
(D Tips
- For sec urity reasons, we recommend that
yo u clear the prog rammed but tons before
sell ing t he ve hicl e.
- For add itiona l information about HomeL ink,
visit www.homelink .com .
- For Declaration of Compliance to United
States FCC and Indust ry Canada regulat ions
<=>page 261.
Page 51 of 278

.... N
0
""' CX)
.... I.Cl U"I
.... I.Cl ....
the windshield in this area in order to
prevent malfunctions or failures.
- Some exterior lighting functions can be ad
justed
c:, page 49.
- When you remove your key from the igni
tion while the vehicle's lights are turned on,
a buzzer sounds as long as the driver's door
is open.
- In cool or damp weather, the inside of the
headlights, turn signals and tail lights can
fog over due to the temperature difference
between the inside and outside. They will
clear shortly after switching them on. This does not affect the service life of the light
ing .
- In the event of a light sensor malfunction,
the driver is notified in the instrument clus
ter display
c:, page 21.
Turn signals and high beam lever
The lever operates the turn signals, the high
beams and the headlight flasher.
Fig. 43 Turn signal and high beam lever
Turn signals¢¢
g N
0
~ CD
The turn signals activate when you move the lev
er into a turn signal position when the ignition is
switched on.
@ -right turn signal
@-left turn signal
The turn signal blinks three times if you just tap
the lever.
High beams and headlight flasher ~D
Move the lever to the corresponding position:
@-high beams on
Light and Vision
@-high beams off or headlight flasher
The indicator light
II in the instrument cluster
turns on.
Notes on these features
- The turn signals only work with the ignition
turned on. The indicator lights. or
II in the
instrument cluster also blink.
- After you have turned a corner, the turn signal
switches off automatically.
- The
high beam works only when the headlights
are on. The indicator light
II in the instrument
cluster illuminates when the high beams are
on.
- The
headlight flasher works only as long as you
hold the lever -even if there are no lights
switched on . The indicator light
II in the in
strument cluster illuminates when you use the
headlight flasher.
WARNING
Do not use the high beam or headlight flasher
if you know that these could blind oncoming
traffic.
Adjusting exterior lighting
The functions are selected in the radio or MMI* .
.,. Select: !CAR I function button> Exterior light
ing .
Or
.,. Select: 1-C~A ~ R-.l function button > Car systems*
control button > Vehicle settings > Exterior
lighting.
Coming home (light when leaving car)*,
Leaving home (light when unlocking car)*
The coming home function illuminates the area
around the vehicle when the ignition is switched
off and the driver's door is opened. Depending on
vehicle equipment, the function can be switched on and off or the length of time the lights remain
on* can be adjusted .
The
leaving home function illuminates the area
around the vehicle when unlocking it. This func-
tion can be switched on and off.
ll>
49
Page 54 of 278
Light and Vision
Q/P -Adjusting the left/right exter ior mir ror.
Move th e knob in the des ired direction.
(@. -Heat ing the m irro r glass depending on the
ou tside temperat ure*.
.9 -Folding exterior mirrors* . In the Infotain
men t system, you can select if the mirrors fold in
automatically when you lock the vehicle
¢ page 36.
Front passenger's exterior mirror tilt
function*
To help you see the curb when ba cking in to a
pa rking space , the surface of the mirror tilts
slightly. For this to happen, the knob must be in
the posit ion for the front passenger's outs ide
mirror.
You can adjust the ti lted mi rror sur fa ce by turn
ing the knob in the desired direction. When you
move out of reverse and into another gear, the
new mirror position is sto red and assigned to the
key yo u are using.
The mirror goes back into its o riginal position
once yo u drive forward faster than 9 mph
(15 km/h) or tu rn the ignition off .
A WARNING
Curved mirror surfaces (convex or spherical *)
increase your f ield of view. Remember that
vehicles or other objects will appear smaller
and fa rther away than when seen in a flat mir
ror. If you use t his mirro r to est imate distan
ces of following vehicles whe n cha ng ing
lanes, yo u co uld estimate incor rectly and
c ause an accident .
(D Note
-If the mir ror housing was moved by outs ide
fo rces (such as an impac t when maneuver
in g), y ou must use the powe r fo ldi ng func
tion to fold the mirro r all the way out . The
mirror housing must not be moved back in
to place by hand beca use this would impa ir
the function of the m irror mechanism.
- If you wash the ve hicle in an automatic car
wash, yo u m ust fold the exte rior m irrors i n
to reduce the risk of damage to the mirrors.
52
N ever fold power fold ing ex terior mirrors *
by hand . On ly fold them in and out using
the power controls .
(D Tips
-If the power adjusting function malfunc
tions, the glass in both mirrors can be ad
justed by p ressing on the edge of it by hand .
- The exte rior m irro r settings are sto red w it h
the memory function* ¢
page 63.
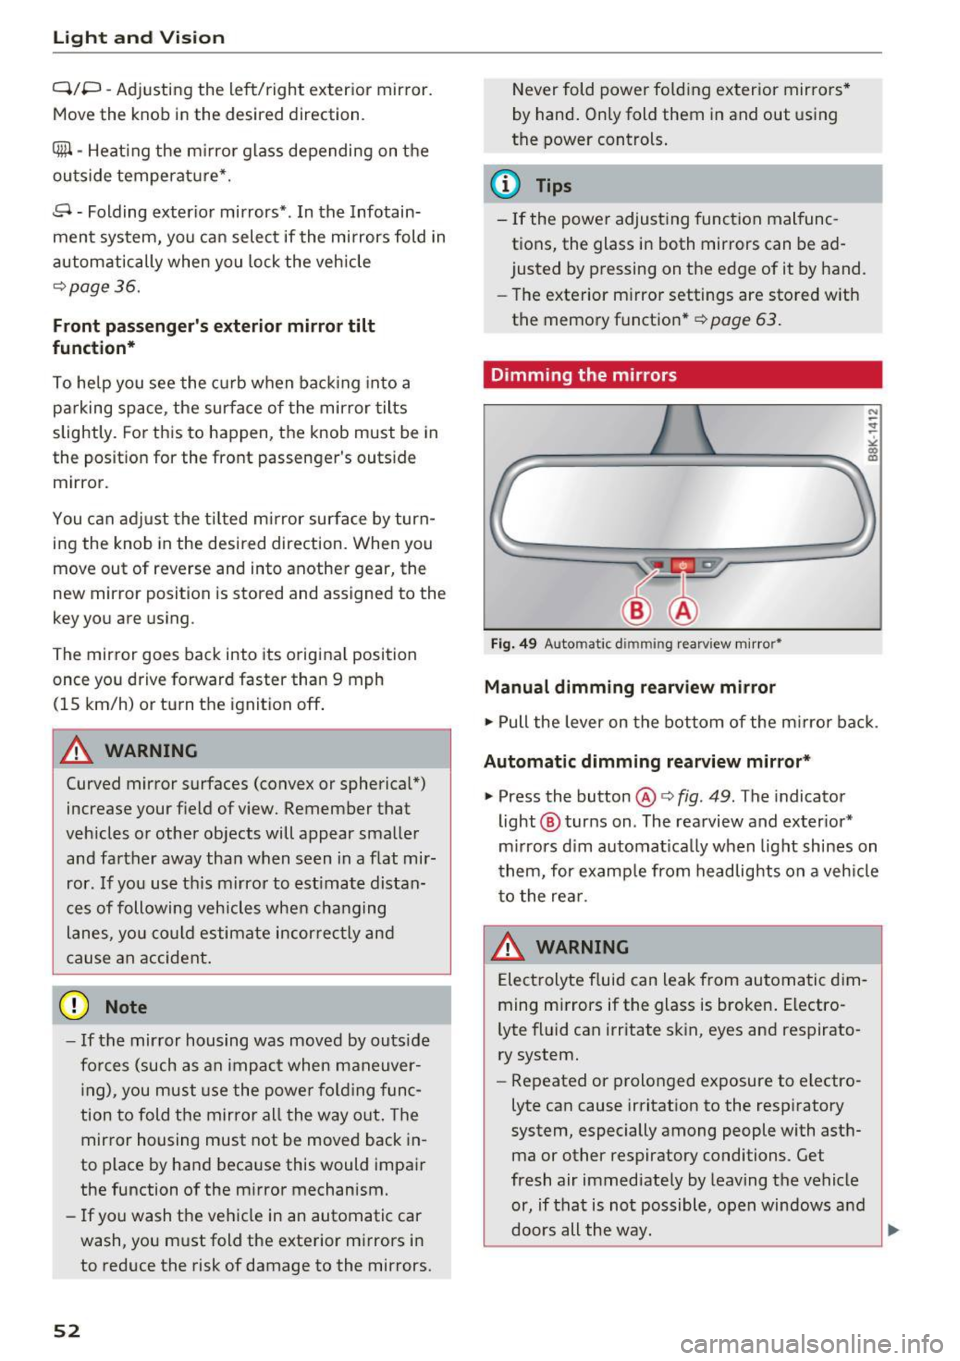
Dimming the mirrors
Fig. 49 Automat ic d immin g rear view m irro r•
Manual dimming rearview mirror
.,. Pull the lever on the bottom of the m irror ba ck .
Automatic dimming rearview mirror *
.,. Press the button@¢ fig. 49. The indicator
light @ turns on . The rearview and ex ter ior*
m irrors d im au tomat ica lly when light shines on
t hem, for e xamp le from headlig hts on a veh icle
to the re ar.
A WARNING
Electrolyte f luid can leak from automa tic di m
ming mi rrors if the glass is broken . Electro
lyte fl uid can irritate s kin, eyes and respirato
ry system.
- Repeated or prolonged exposure to electro
lyte ca n cause irritation to the respiratory
system, especially among people with asth ma or other respiratory conditions . Get
fresh air immediately by leaving the vehicle
or, if that is not possible, open windows a nd
doors all the way. ..,.
Page 58 of 278
Lig ht a nd Visio n
Replacing windshield wiper blades
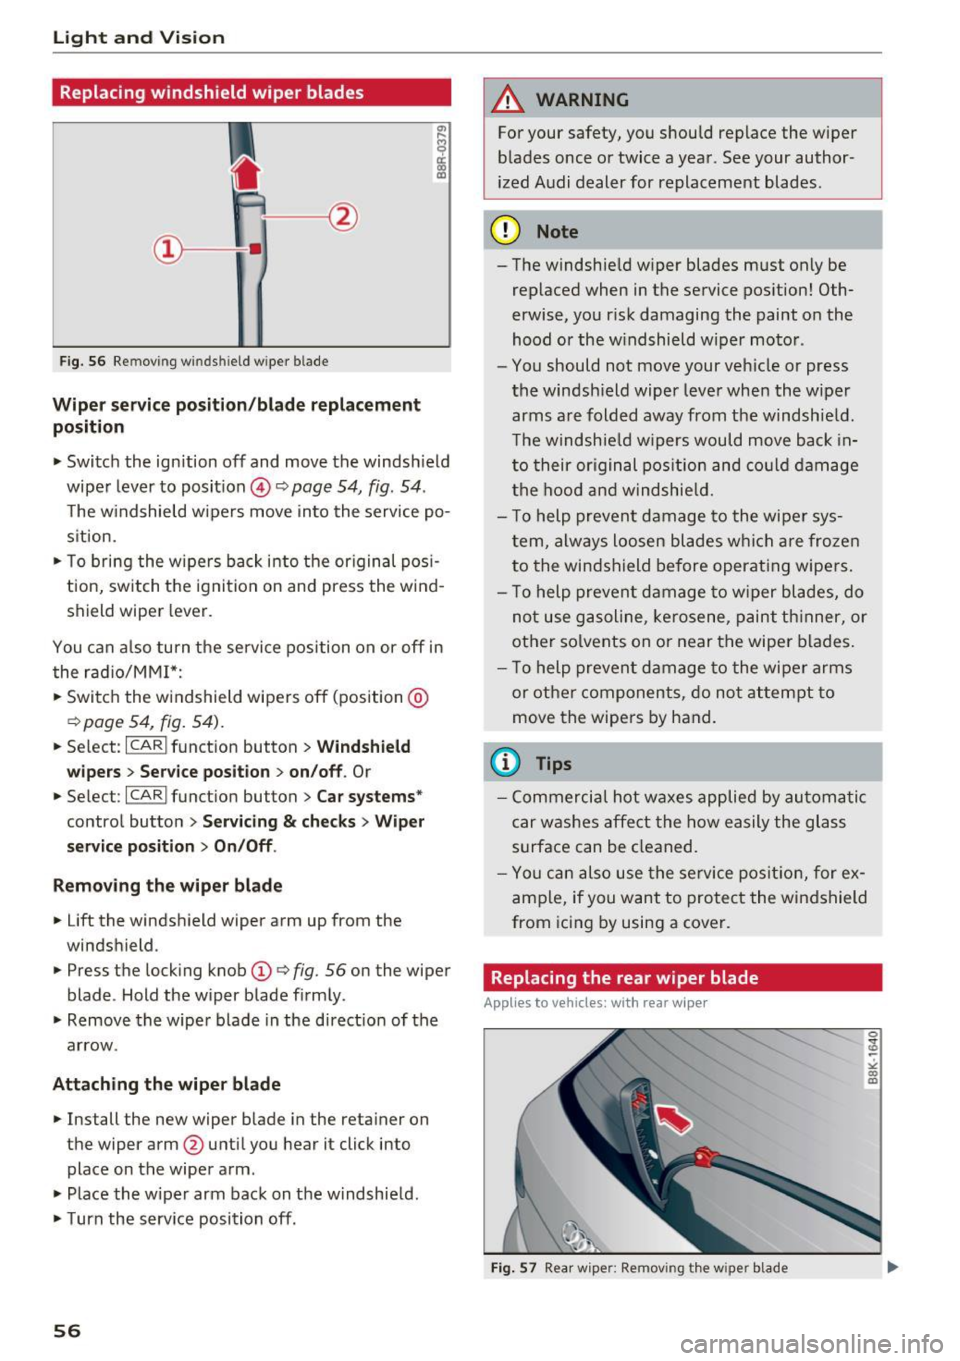
Fig. 56 Re mov ing w indshi eld w iper blade
Wiper service po siti on/b la de r eplac em ent
po sit ion
• Switch the ignition off and move the windsh ield
wiper lever to position @
Q page 54, fig. 54 .
The w indshield wipers move into the service po
sition.
• To bring the wipers back into the or iginal pos i
tion, switch the ignition on and press the wind
shield w iper lever.
You can a lso turn the service position on or off in
the radio/MM!*:
• Switch the windshield wipers off (position @
Qpage 54, fig. 54) .
• Select : ICARI function button > Windshi eld
wi pers > Servic e posit ion > on/off .
Or
• Select :
I CARI funct ion button > C ar syst ems*
control button > Servici ng & ch ecks > W ip er
se rvic e po sition
> O n/Off .
R emo ving th e wiper blad e
• Lift the w indshield w iper arm up from the
windshield.
• Press the locking knob
(D Q fig. 56 on the wiper
blade . Hold the wiper blade firmly .
• Remove the wiper b lade in the direct ion of the
arrow.
Attaching th e wiper blade
• Install the new wiper blade in the reta iner on
the wiper arm @untilyou hear it click into
place on the wiper arm .
• Place the w iper arm back on the w indshie ld.
• Turn the service position off.
56
A WARNING
For your safety, you should replace the wiper
blades once or twice a year . See your author
ized A udi dealer for replacement blades.
(D Note
- The windshield w iper blades must only be
replaced when in the service pos ition! Oth
erwise, you r isk damaging the paint on the
hood or the w indshield wiper motor .
- You should not move your vehicle or press
the windsh ield wiper lever when the wiper
arms are folded away from the windshie ld.
T he windshield w ipers would move back in
to their original pos ition and co uld damage
the hood and windshie ld.
- T o help prevent damage to the wiper sys
tem, always loosen blades which a re froze n
to the windshield before operat ing wipers.
- T o help prevent damage to w iper blades, do
not use gasoline, ke rosene, paint th inner, or
other solvents on or near the wiper blades.
- T o help prevent damage to the wiper arms
or othe r componen ts, do no t at tempt to
move the wipers by hand.
(l} Tips
- Commercia l hot waxes applied by automatic
car washes affect the how easily the glass
surface can be cleaned.
- You can also use the service pos it ion, for ex
ample, if you want to protect the windshield
from icing by using a cover .
Replacing the rear wiper blade
Applies to vehicles: with rear wipe r
Fig . 57 Rear wipe r: Remov ing t he w ipe r blade
Page 64 of 278
Sea ts and stor age
.,. To adju st the height of the head restraint, grip
the head restraint on the sides with both hands
and s lide it up/down until it locks into place
¢ fig. 63.
Refer to c::> page 124, Proper adjustment of head
restraints
for guidelines on how to adjust the
height of the front head restraints to suit the oc
cupant's body size.
A WARNING
- Driving without head restraints or with head
restra ints that are not properly adjusted in
c reases the risk of ser ious or fatal neck in
jury dramatically.
- Read and heed all WARNINGS
c::>page 124,
Proper adjustment of head restraints.
(D) Tips
Correctly adjusted head restraints and safety
be lts are an extremely effective combination
of safety features .
Rear head restraints
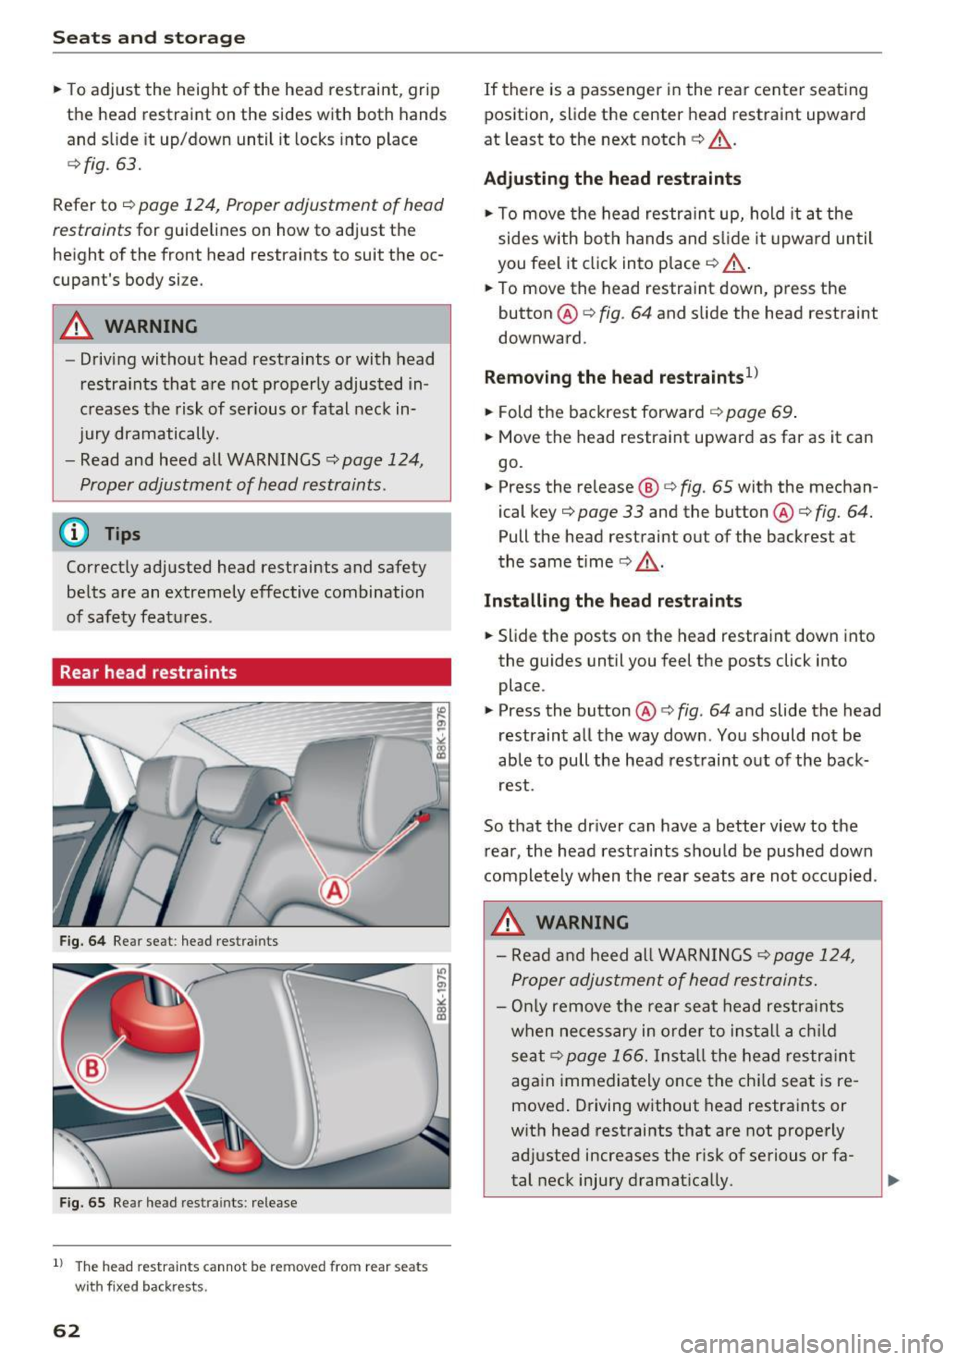
Fig. 64 Rear seat : head restra ints
Fig. 65 Rear head restra ints : release
1l The head restra ints cannot be removed from rear seats
with fixed backrests.
62
If there is a passenger in the rear center seating
position, slide the center head restraint upward
at least to the next notch
c::> &_ .
Adjusting the head re straints
.,. To move the head restraint up, hold it a t the
sides with both hands and s lide it upward until
you feel it click into place
c::> &_ .
.,. To move the head restraint down, press the
button @
c:> fig. 64 and s lide the head restraint
downward .
Removin g the head r estraint s1l
.,. Fold the backrest forward c::> page 69 .
.,. Move the head restraint upward as far as it can
go.
.,. Press the release @
c::> fig. 65 with the mechan
ical key
c::> page 33 and the button @ c::> fig. 64.
Pull the head restraint out of the backrest at
the same t ime
c::> ,& .
Insta lling the he ad r estraint s
.,. Slide the posts on the head restraint down into
the guides until you feel the posts click into
place .
.,. Press the button @
c::> fig. 64 and slide the head
restraint all the way down. You should not be
ab le to pull the head restraint out of the back
rest.
So that the driver can have a better view to the rear, the head restraints should be pushed down
completely when the rear seats a re not occ upied.
A WARNING
- Read and heed all WARN INGS c::>page 124,
Proper adjus tment of head restraints.
- On ly remove the rear seat head restra ints
when necessary in order to install a c hild
seat
c::>page 166. Insta ll the head restra int
again immediately once the chi ld seat is re
moved . Driving without head restraints or
w ith head restraints that are not properly
ad justed increases the risk of serious or fa
tal neck injury dramatica lly.
Page 65 of 278
..... N
0 ::..:: co .....
Correctly adjusted head restraints and safety
belts are an extremely effective combination
of safety features .
Memory function
Description
Applies to vehicles: with memory function
The memory function allows you to quickly and
easi ly store and recall personal seating profiles
for the driver. The memory function is operated
through the master key and the memory buttons
in the driver 's door.
The driver's seating profile is stored and assigned
to the master key each time the vehicle is locked .
When you open the door , the seat profile is auto
matica lly recalled. If two people use one vehicle,
it is recommended that each person always uses
" t heir own" master key .
Up to 2 seat profi les can be stored in the memory
buttons in the driver's doo r. Once they are stor
ed, these seat profiles can be se lected at any
time.
In addition to the driver's seat settings, you can
also store and access the exterior mirror adjust ment settings* using the remote control key or
memory but ton.
Remote control key
Applies to vehicles: with seat memory
To assign the driver's seat settings to the remote
control key when locking the vehicle, the function
must be activated in the radio or MMI*
~ Select: I CARI function button > Seat adjust
ment > Driver's seat > Remote control key
>
on.Or
~ Select: ICARI function button> Car systems*
control button > Vehicle settings> Seats >
Driver's seat> Remote control key > On .
@ Tips
If you do not want another driver's settings to
be assigned to the remote key, switch off the
Seats and storage
memory function using the radio or MMI* or
the
I OF Fl button c:::> page 63.
Memory buttons
Applies to vehicles: with seat memory
Fig. 66 Dri ver's door: memo ry func tion b uttons
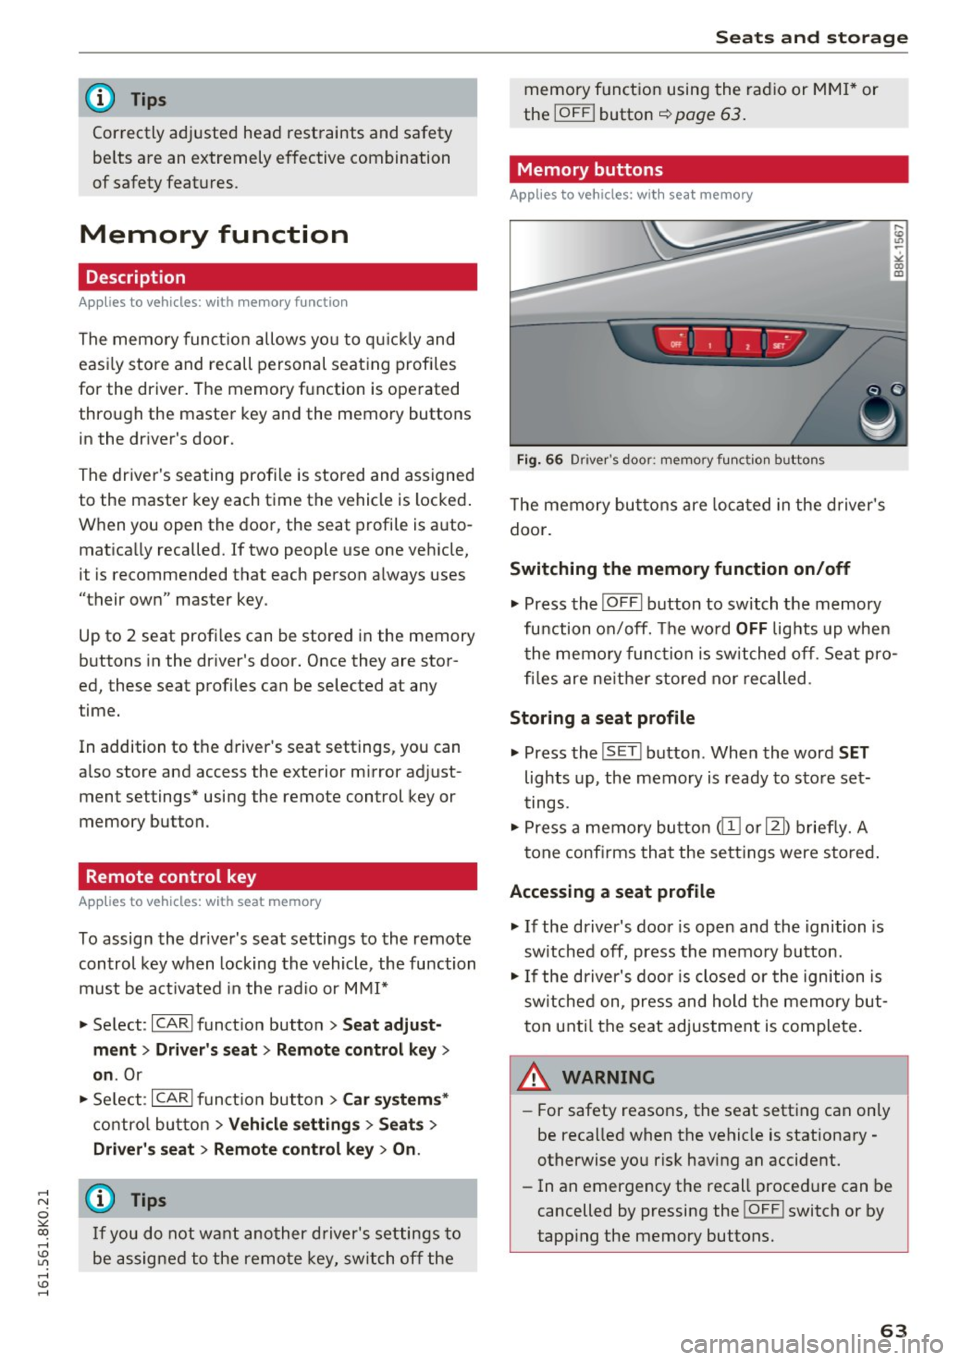
The memory buttons are located in the driver's
doo r.
Switching the memory function on/off
~ Press the I OFFI button to switch the memory
fu nction on/off. The wo rd
OFF lights up when
the memory function is switched off. Seat pro
files are ne ither stored nor recalled .
Storing a seat profile
~ Press the IS E T I button . When the word SET
lights up, the memory is ready to store set
tings .
~ Press a memory button @or [Ii) briefly. A
tone confirms that the settings were stored.
Accessing a seat profile
~ If the driver's door is open and the ignition is
sw itched off, press the memory button .
~ If the driver's door is closed or the ignition is
sw itched on, press and hold the memory but
ton until the seat adjustment is complete.
.&_ WARNING
-For safety reasons, the seat setting can only
be recalled when the vehicle is stationary
otherwise you risk having an accident.
- In an emergency the recall procedure can be
cancelled by pressing the
! O FF ! switch or by
tapp ing the memory buttons.
63
Page 68 of 278
Sea ts and stor age
- Use only soft cups in the cupholder. Hard
cups and g lasses can cause injury in an acci
dent.
- Never use the cupholder or adapter as an
ashtray -risk of fire.
(D Note
On ly drink containe rs with lids should be car"
r ied in the cupholder . Liquid co uld spill out
and damage your vehicle's electronic equip
ment or stain the upho lstery, etc.
Glove compartment
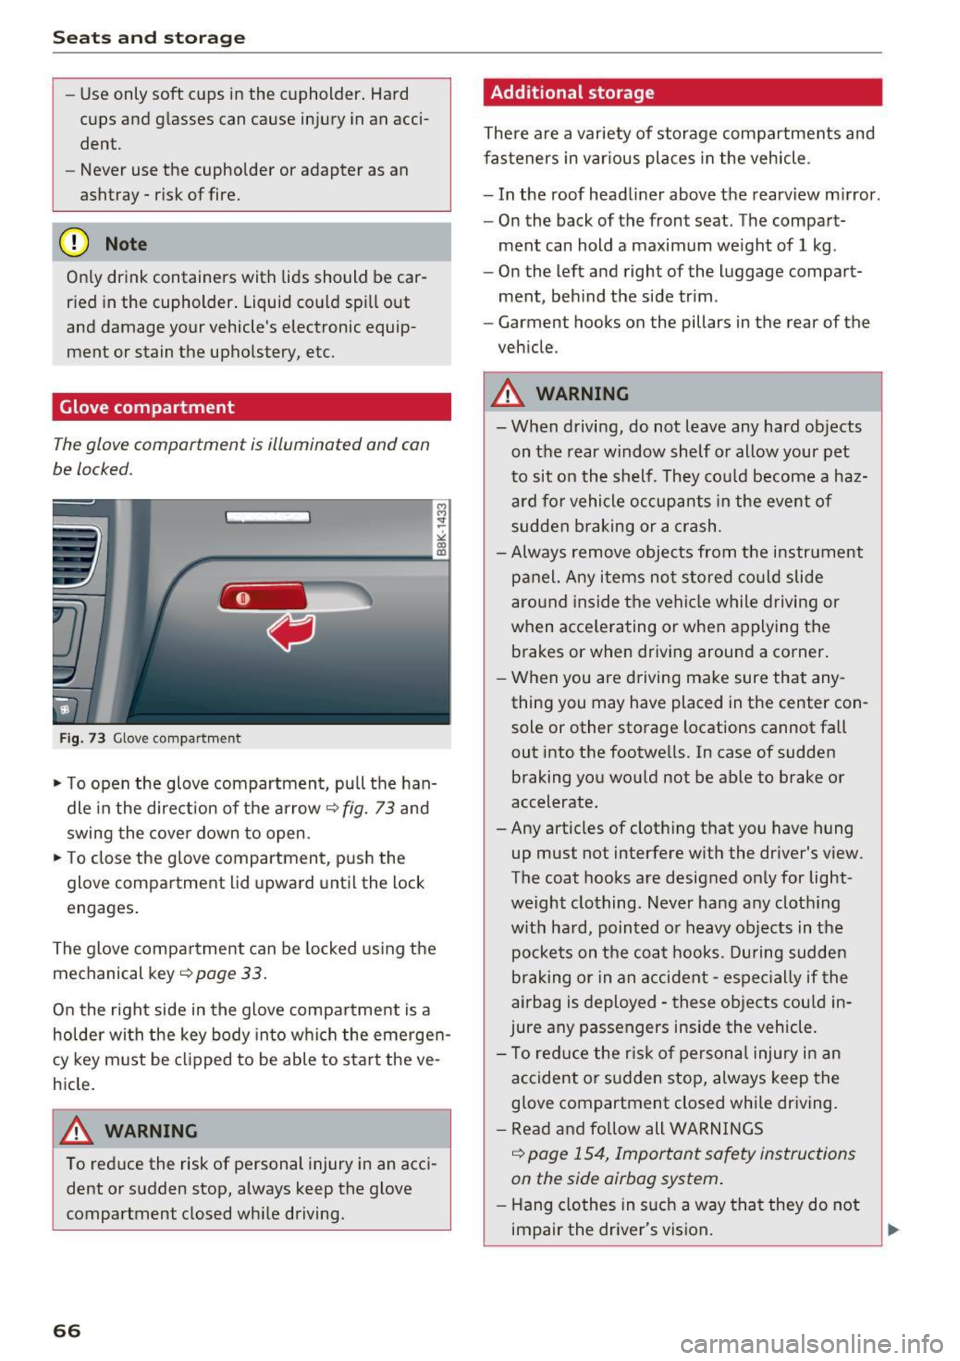
The glove compartment is illuminated and can
be lo cked .
Fig. 73 Glove compar tment
M M ., ~ ' ,.:
"' IX)
• To open the glove compartment, pull the han
dle in the direct ion of the arrow¢
fig. 73 and
swing the cove r down to open .
• To close the g love compartment , pus h the
glove compartment lid upwa rd unt il the lock
engages .
The glove compartment can be locked using the
mechan ical key ¢
page 33.
On the right side in the glove compa rtment is a
holder with the key body into which the emerge n
cy key m ust be cl ipped to be able to start the ve
hicle.
A WARNING
To red uce the risk of personal injury in an acc i
dent or sudden stop, always keep the glove
compartment closed wh ile driving.
66
Additional storage
There a re a variety of storage compartments and
fasteners in var ious places in the veh icle .
- In the roof head liner above t he rearview m irror .
- On the back of the fron t seat . The compart-
ment can hold a maximum we ight of 1 kg .
- On the left and right of the luggage compart
ment, beh ind the side trim .
- Garment hooks on the pillars in the rear of the
vehicle .
.,&. WARNING
- When driving, do not leave any hard objects
on the rear window shelf o r allow your pet
to sit on the shelf . They co uld become a haz
ard for vehicle occupants in the event of
sudden b raking or a crash .
- Always remove objects from the instr ument
panel. Any items no t stored co uld slide
aro und inside t he vehi cle while drivi ng or
when acce le rating or when a pplying the
brakes or when dr iving around a corner.
- When you are driving make sure that any
thing you may have placed in the center con
sole or other storage locations cannot fa ll
out into the footwells. In case of sudden
braking you wo uld not be able to brake or
accelerate.
- Any articles of clothing that you have hung up must not interfere with the driver 's view .
The coat hooks are designed on ly for light
we ight clothing . Never ha ng a ny clot hing
w it h ha rd, pointed o r heavy ob jects in the
pockets on t he coa t hooks. Du ring sudden
braking or in an acciden t -espe cially if the
ai rbag is deployed -these ob jects cou ld in
jure any passengers inside the veh icle .
- To reduce the r is k of person al injury i n an
accident or sudden stop, always keep the
glove compartment closed while dr iving.
- Re ad a nd follow alt WARN INGS
¢ page 154, Important safety instructions
on the side airbag system .
-Hang clothes in such a way tha t they do not
impair the drive r's vision . ,...
Page 69 of 278
,....,
N
0
""' CX) ,....,
I.Cl U"I ,....,
I.Cl ,....,
-The coat hooks must only be used for light
weight clothing . Do not leave any heavy or
sharp edged objects in the pockets which
may interfere with the side curtain airbag
deployment and can cause personal injury in
a crash .
- Do not use coat hangers for hanging cloth ing on the coat hooks as this can interfere
with proper deployment of the side curtain
airbags in an accident.
- Do not hang heavy objects on the coat
hooks, as they could cause personal injury in
a sudden stop.
-Always keep the compartment above the
rearview mirror closed while driving to re
duce the risk of injury in the event of sudden
braking maneuvers or a collision.
0 Note
Objects located on the rear shelf that rub
against the rear window could damage the
heating wires for the rear window defogger.
(j) Tips
-A vent slot is located between the shelf and
the rear window. Do not block the vent with
any items you may place on the rear window
shelf.
- Do not p lace bulky items on the rear window
shelf as they could restrict or block the driv
er's vision in the rear view mirror.
Roof rack
Description and mounting locations
Additional cargo can be carried with a roof lug
gage rack .
Fig. 74 Sedan: Roof rack a ttac hm en t poin ts
Seats and storage
Fig. 75 allroad : Roof rack attachme nt points
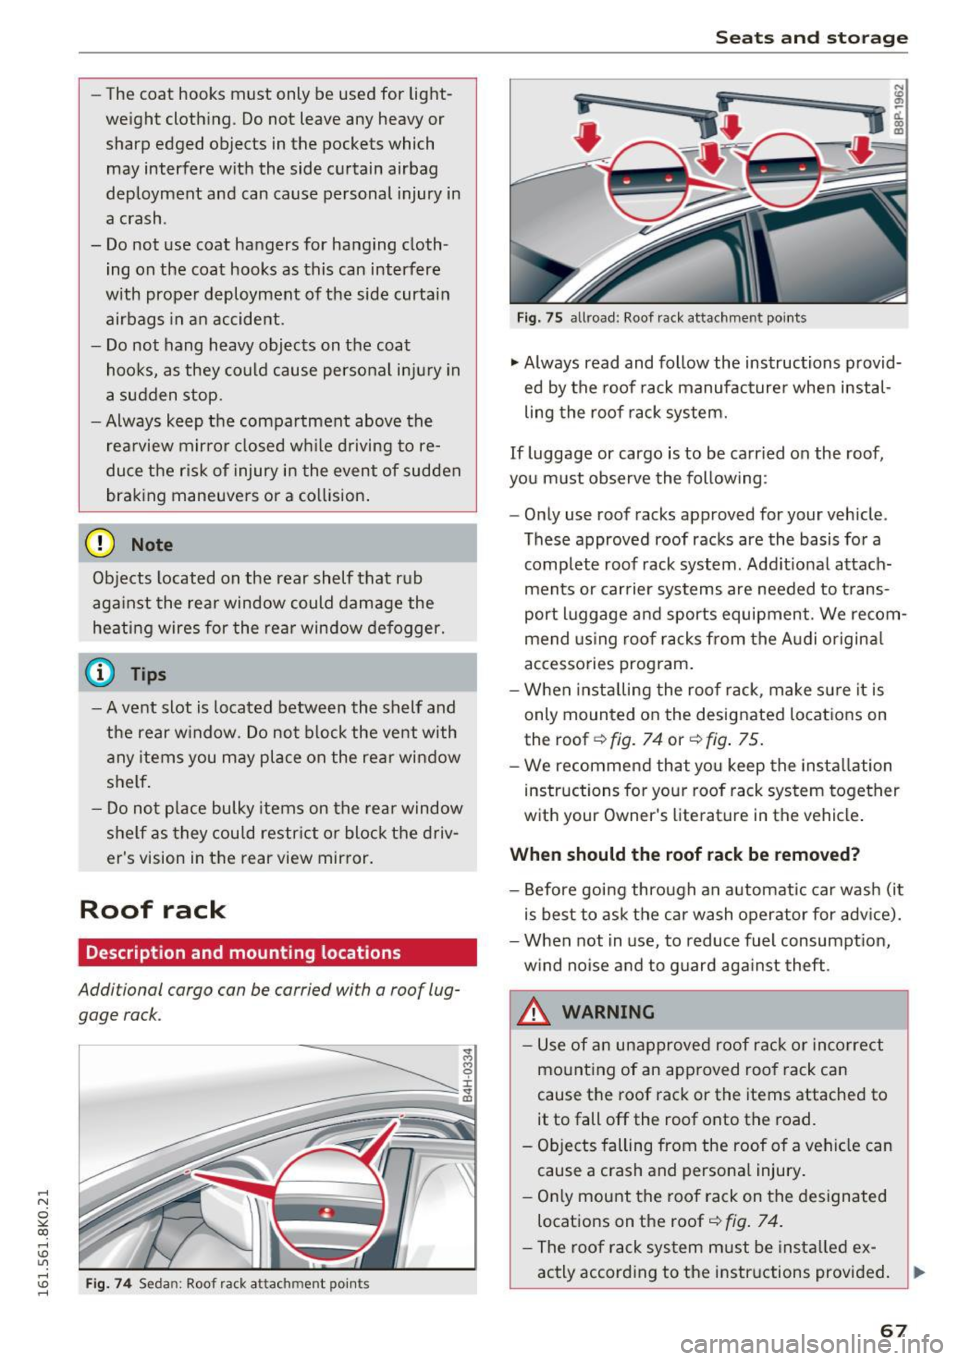
"'Always read and follow the instructions provid
ed by the roof rack manufacturer when instal
ling the roof rack system.
If luggage or cargo is to be carried on the roof,
you must observe the following :
- Only use roof racks approved for your vehicle .
These approved roof racks are the basis for a
complete roof rack system . Add it ional attach
ments or carrier systems are needed to trans
port luggage and sports equipment. We recom
mend using roof racks from the Audi original
accessories program.
- When insta lling the roof rack, make sure it is
only mounted on the designated locations on
the roof
r::!> fig. 74 or r::!> fig. 75.
- We recommend that you keep the installation
instructions for your roof rack system together
with your Owner's literature in the vehicle .
When should the roof rack be removed?
-Before going through an automatic car wash (it
is best to ask the car wash operator for advice).
- When not in use, to reduce fuel consumption,
wind noise and to guard against theft .
_&. WARNING
- Use of an unapproved roof rack or incorrect
mounting of an approved roof rack can
cause the roof rack or the items attached to
it to fall off the roof onto the road.
- Objects falling from the roof of a vehicle can
cause a crash and personal injury.
- Only mount the roof rack on the designated
locations on the roof
r::!> fig. 7 4.
- The roof rack system must be install ed ex-
actly according to the instructions provided. ..,.
67
Page 71 of 278

,....,
N
0
""' CX) ,....,
I.Cl U"I ,....,
I.Cl ,....,
Luggage compartment
General information
A WARNING
Read and follow the important safety precau
tions on
~ page 126, Storing cargo correctly.
Luggage compartment cover
Applies to vehicles: with luggage compartment cover
Fig. 76 Luggage compartment: cover hanging in position
@
Fig. 77 Right front section of the luggage compartment:
removing the luggage compa rtment cover
The luggage compartment cover can be hung in
position @or in the comfort position @
¢fig. 76.
Extending/Retracting
You can only extend and retract the cover in the
@ position.
• Pull the cover out and attach it in position @in
the mount ing eyelets in the side trim.
Comfort position
In pos ition @, the cover does not need to be re
moved to unload the luggage compar tment.
Seats and storag e
• To move to position @, tilt the end of the cover
upward from the bottom when the cover is ex
tended . It w ill then move into position @ by it
self ~
fig. 76.
Removing
• Pull the lever in the dire ction of the arrow
¢
fig . 77 while lifting the cover out.
Installing
• Plac e the left side of the cover in the mo unt on
the s ide t rim.
" Press the cove r down in to the r ight mo unt u ntil
it locks i nto place .
_&. WARNING
-Whenever driving, never place any hard or
h eavy objects on the luggage compartment or
a llow pets to s it on t he luggage compartment
cover. They could become a hazard to vehicle
occupants in the event of sudden braking or in
an accident.
(D Note
Let the luggage compartment cover roll up
s low ly to avoid damage.
Enlarging the luggage compartment
Applies to vehicles: with fo lding rear seatback
The rear seat backrests can be folded forward ei
ther separately or together.
Fig . 78 Backrest: release lever, securing knob and latch·
Folding the backrest forward
" Pull the release leve r@ ¢ fig. 78 in t he d irec
tion of the arrow and fold the backrest forward . .,.
69
Page 72 of 278
Sea ts and stor age
Folding the ba ckrest back into the up right
po sit ion
.. Fo ld the backrest back up again until it latches
and the red marking @ is no longer visible
c> & .
Sedan: You can lock the backrest when it is latch
ed in place using the mechanical key ¢
page 33
© co> fig. 78. This prevents any access to the lug
gage compartment from the vehicle interior .
You can only enlarge the luggage compartment if
the backrest is not locked.
A WARNING
- The backrest must always be securely latch
ed so that the safety belt of the center seat
ing posit ion can work properly to help pro
tect the occupant.
- The backrest must be securely latched in po
sit ion so that no items contained in the lug
gage compartment can slide forward upo n
s u dden brak ing.
- Always check whe ther the latch is f ully en
gaged by pulling the seatback forward .
- Never allow safety be lts to become dam
aged by being caught in doo r or seat hard
ware.
- Tor n or frayed safety belts can tear and
damaged belt ha rdware can break in a
c rash. Inspect the belts per io d ically. Belts
showing dam age to webbing, bi ndings,
bu ck les, or retractors m ust be rep laced.
(D Note
- If you move the front seat back when the
rear seat bac kres t is folded forward, you
could damage the head res traints on the
rear se at.
- Slide the bel t gu ide on the outside safety
belt all the way up before fo lding the ba ck
r est bac k forward . Ma ke sure the seat be lt is
not pinched or damaged when the rear seat
b ackrest if folded back. Other objects
shou ld be removed from the rear seat bench
to protect the seatback from damage.
70
Partition net (seatback in upright position)
Applies to vehicles: with partit ion net
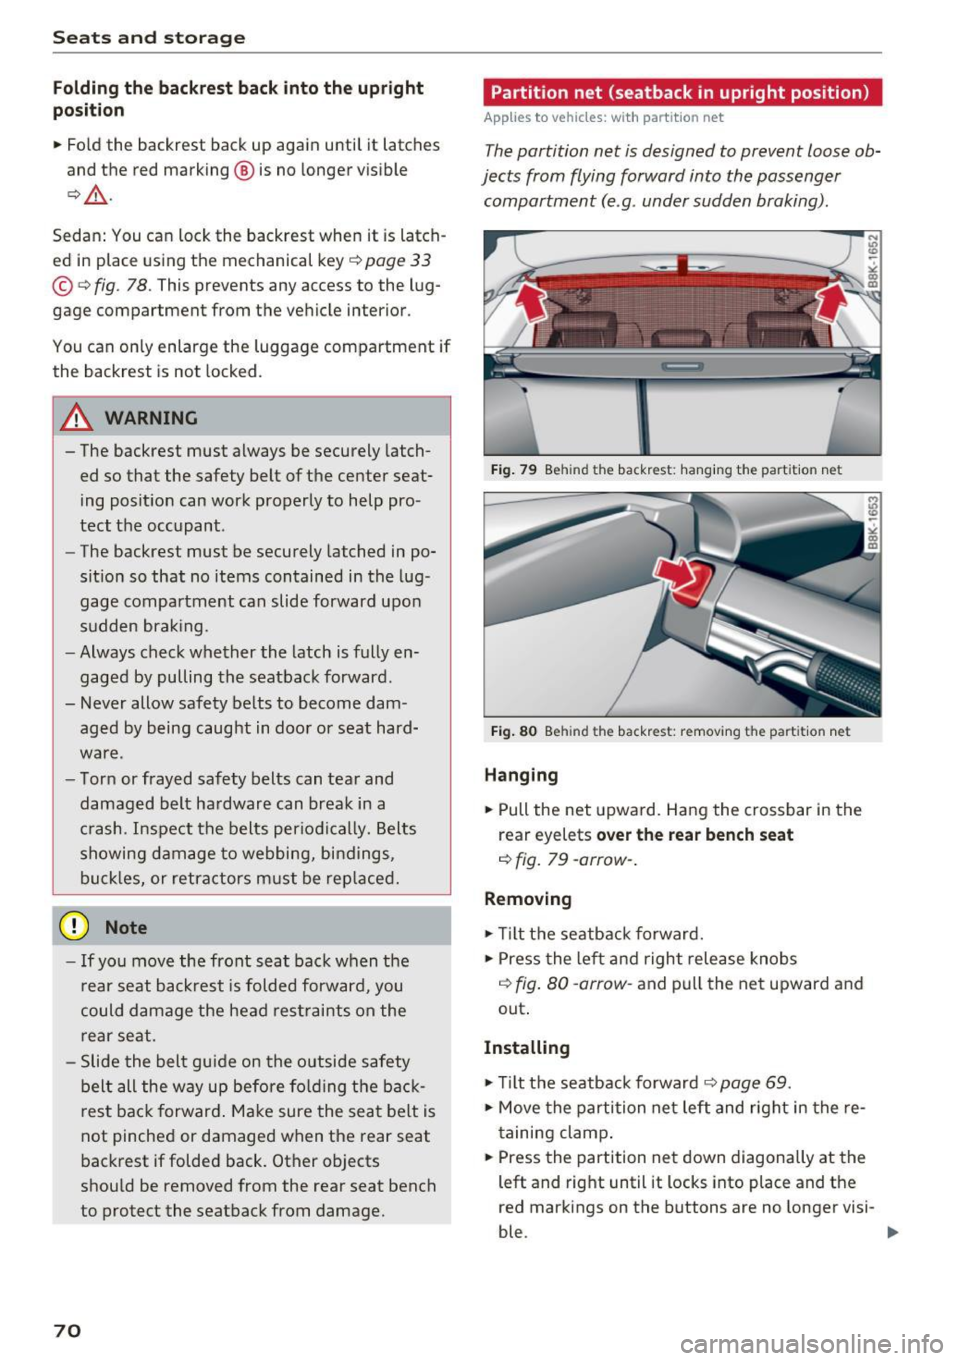
The partition net is designed to prevent loose ob
jects from flying forward into the passenger
compartment (e .g . under sudden braking).
F ig . 79 Be hind the backrest : hang ing the part it ion net
F ig . 8 0 Beh ind the backrest: removi ng the part it ion net
Hanging
.. Pull the net upward. Hang the crossbar in the
rear eyelets
over the rear bench seat
¢fig. 79-arrow- .
Removing
.. Til t the seatb ack forward .
.. Press the le ft a nd right release knobs
q fig. 80 -arrow -and pu ll the net upward and
out .
Installing
.. Til t the seatback forward ¢ page 69.
.. Move the partition ne t left and right in the re
t aining clamp .
.. Press the partition net down diagonally at the
left and right until it locks into place and the
red markings on the buttons are no longer visi-
ble. ..,_