mirror controls AUDI A4 2017 Owners Manual
[x] Cancel search | Manufacturer: AUDI, Model Year: 2017, Model line: A4, Model: AUDI A4 2017Pages: 386, PDF Size: 96.32 MB
Page 57 of 386

<( a, .... N ,....
N .... 0 0
3 a,
0 - all adjustment functions ar e deactivated .
Q / P -adjust ing the left/ right exterio r mirror.
Move the knob in the desired direction .
4iil -Heat* the mirror glass depending on the out
side temperature .
8 -Folding ex terior mirro rs* . To fold the m irrors
out , turn the knob to one of the other pos itions .
In the Infotainment system, you can select if the mirro rs fo ld in automatically when you lock the
ve hicl e
r:::) page 41 .
Front pa ssenger's e xterior mirror tilt
function*
To he lp you see the curb when back ing into a
pa rking space, t he surface of the mirror tilts
slightly . Fo r th is to happen, the knob m ust be in
the posit io n for the front passenger 's ou tside
mirror.
You can adjust the t ilted m irror surface by turn
i n g the knob in the desi red direction . When you
move ou t of reverse and into another gear, the
new mirror position is sto red and assigned to the
k ey yo u are using.
The mir ror goes back into its o rig inal position
once yo u drive forward f aster than 9 mph
(15 km/h) or turn the ignition off .
A WARNING
Curved mirror surfaces (for examp le convex)
en large the f ield of vision . However, they
make objects in the mirror appear sma ller
and farther away. Your may estimate i ncor
rectly when you use these m irrors to ga uge
your dis tance from the vehicles behind you
when changing lanes, wh ich increases the r is k
of an accident.
(D Note
- Applies to vehicles with power folding out
s ide mir rors* : if the mirror housing was
moved by outside forces (such as an impa ct
whe n maneuvering), yo u m ust use the pow
e r folding func tion to fol d the mi rror a ll t he
way o ut. T he mirro rs will make a lo ud no ise
when they latc h into place . The mir ror hous
ing must not be moved back into place by
Light s and Vision
hand beca use this would impai r the func
tion of the mirror mechanism.
- Applies to veh icles withou t power folding
outside mir rors : if the m irro r ho using was
moved by outside forces (such as an impact
when maneuvering), you must move it back
in place by hand .
- If you wash the vehicle in an automatic car
was h, you must fold the exter ior mir rors in
to reduce the r isk of damage to the m irrors.
Never fold power fo ld ing exter ior mirrors*
by hand . On ly fold them in and out us ing
the power controls .
(D Tips
-If the power adjusting function malfunc
tions, the glass in both mirrors can be ad
justed by p ressing on the edge of it by hand .
- The exterior m irror settings are stored w ith
the memory funct io n*
r:::) page 63.
Dimming the mirror
Your vehicle is equipped with a manual or auto
matic* dimming rearview mirror .
Manual dimming rearview m irror
.. Pull the leve r on the bottom of the m ir r or back.
Automat ic dimming rearview mirror*
.. The inte rior a nd e xte rior m irrors d im automat i
cally when light s hines on them, for examp le
from headlig hts on a ve hicle beh ind you.
A WARNING
=
If the g lass on an a utomatic dimming m irro r
b reaks, electro lyte can leak out. T his liquid
can irritate the skin, eyes and respiratory sys
tem. If there is contact w ith the fluid, flush
i mmedia tely w ith p lenty of water. Consult a
p hysic ian if necessa ry .
- Re peated or long -term exposure to e lectro
ly te fl uid can lead to ir rita tion of the air
ways, especia lly in peopl e with ast hma o r
o ther respiratory condi tions. Take deep
b rea ths immedi ately afte r leaving the vehi
cle or, if this is not poss ible, open all of the
doors and w indows as wide as possib le .
55
Page 61 of 386

.. To turn the compass on or off, press the button
@ until the compass in the mirror appears or
disappears.
The digital compass only works when the ign ition
is switched on. The direction is shown in abbrevi
ated form:
N (North), NE (Northeast), E (East),
SE (Southeast), S (South), SW (Southwest), W
(West), NW (Northwest) .
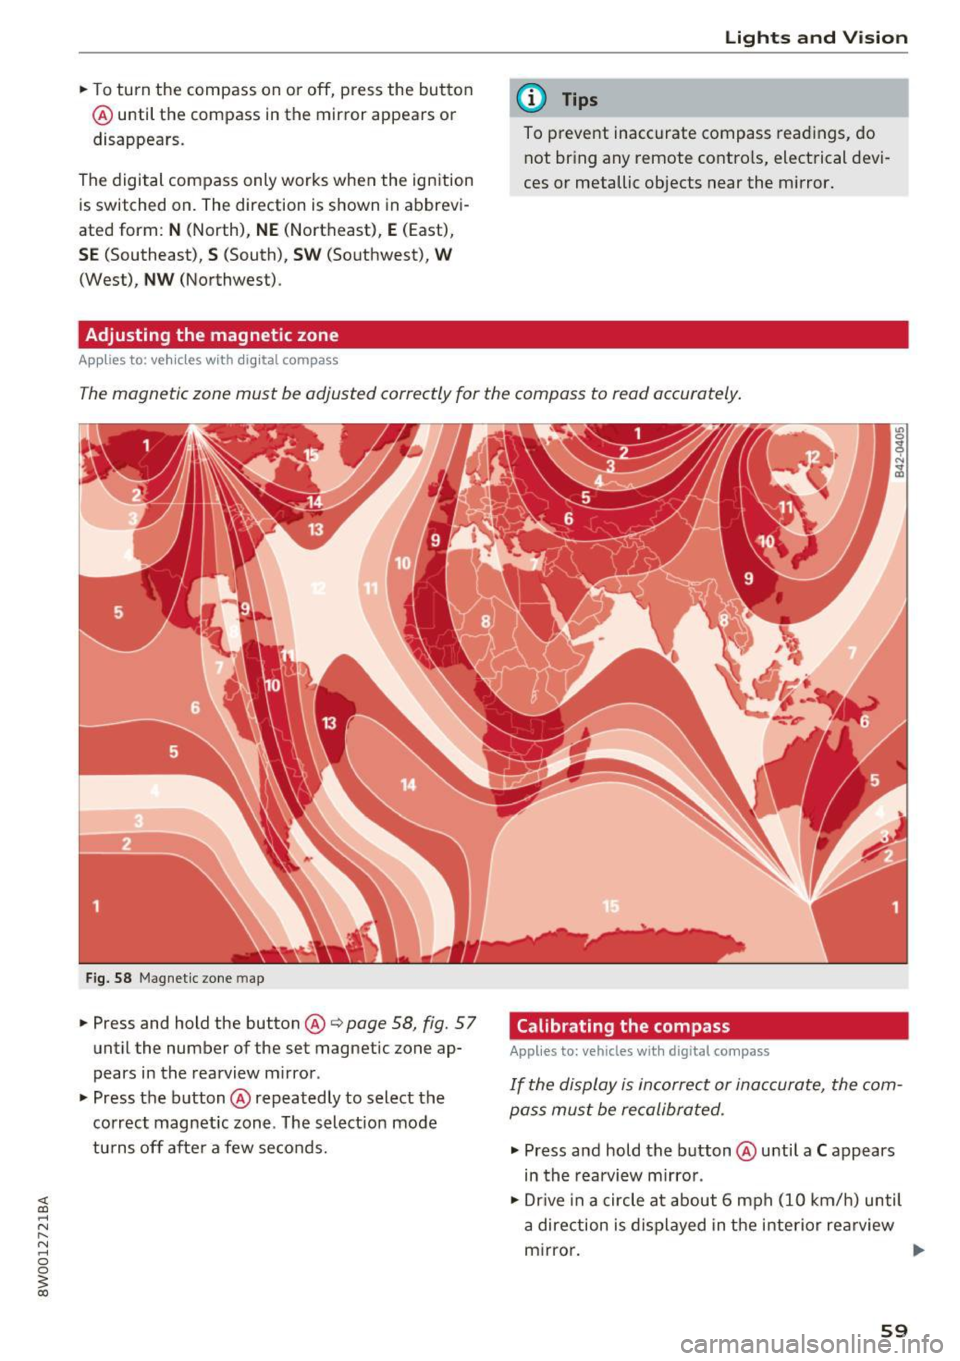
Adjusting the magnetic zone
Applies to: vehicles with digital compass
Lights and V ision
(D Tips
To p revent inaccurate compass readings, do
not br ing any remote controls, electrical devi
ces or metallic objects near the mirror.
The magnetic zone must be adjusted correctly for the compass to read accurately.
Fig. 58 Magnet ic zone map
.. Press and hold the button@¢ page 58, fig. 57
until the number of the set magnetic zone ap
pears in the rearview mirror .
.. Press the button@repeatedly to select the
correct magnetic zone . The select ion mode
turns off after a few seconds. Calibrating the compass Applies
to: vehicles with digital compass
If the display is incorrect or inaccurate, the com
pass must be recalibrated.
.. Press and hold the button @until a C appears
in the rearview mirror .
.. Dr ive in a circle at about 6 mph (10 km/h) until
a direction is displayed in the interior re arview
mirror. .,.
59
Page 343 of 386

<( a, .... N ,....
N .... 0 0
3 a,
avoid scratches, move the scraper only in
one direction and not back and forth.
- Never remove snow or ice from door win
dows and mirrors using warm or hot water
because this could cause cracks to form.
- To avoid damage to the rear window de
fogger, do not apply any stickers on the
heating wires on the inside of the window.
- Decorative part .s/trim
- Never use chrome care or cleaning prod-
ucts .
- Paint
- To reduce the risk of scratches, the vehicle
must be free of dirt and dust before pol
ishing or waxing .
- To prevent paint damage, do not polish or
wax the vehicle in direct sunlight .
- To reduce the risk of paint damage, do not
polish away rust spots.
- Remove cosmetics and sunscreen immedi
ately- these could damage the paint.
- Displays/instrument cluster
- The displays/instrument cluster and the
trim surrounding them must not be
cleaned with dry cleaning methods be
cause they could be scratched.
- Make sure that the instrument cluster is
switched off and has cooled off before
cleaning it.
- Make sure no fluids enter the spaces be
tween the instrument cluster and the
trim, because that could cause damage.
- Controls
- Make sure that no fluids enter the con-
trols, because this could cause damage.
- Safety belts
- Do not remove the safety belts to clean
them.
- Never clean safety belts or their compo
nents chemically or with corrosive fluids
or solvents and never allow sharp objects
to come into contact with the safety belts.
This could cause damage to the belt web bing.
- If there is damage to the webbing, the
connections, the retractors or the buckles,
Care and cleaning
have them replaced by an authorized Audi
dealer or authorized Audi Service Facility.
- Textiles/artificial leather/ Alcantara
- Never treat artificial leather/Alcantara
with leather care products, solvents, floor
polish, shoe polish, spot remove or similar
products.
- Have a specialist remove stubborn stains
to prevent damage.
- Never use steam cleaners, brushes, hard
sponges, etc . when cleaning.
- Do not turn on the seat heating* to dry the
seat .
- Objects with sharp edges, such as zippers
or rivets on clothing or belts, can cause
damage to the surface.
- Open hook and loop fasteners, for exam
ple on clothing, can damage seat covers .
Make sure hook and loop fasteners are
closed .
- Natural leather
- Never treat leather with solvents, floor
polish, shoe polish, spot remover or simi
lar products.
- Objects with sharp edges, such as zippers
or rivets on clothing or belts, can cause
damage to the surface .
- Never use steam cleaners, brushes, hard
sponges, etc. when cleaning.
- Do not turn on the seat heating* to dry the
seat.
- To help prevent the leather from fading,
do not leave the vehicle in direct sunlight
for long periods of time. If leaving the ve
hicle parked for long periods of time, you
should cover the leather to protect it from
direct sunlight.
(D Tips
- Insects are easier to remove from paint that
has been freshly waxed.
- Regular waxing can prevent rust spots from
forming.
341
Page 355 of 386

<( a, .... N ,....
N .... 0 0
3 a,
Fuse panel @ (brown)
No . Equipment
2 Mass airflow sensor, camshaft adjustment
3 Exhaust doors, fuel in jectors, radiator inlet
4 Vacuum pump, hot water pump, particu -
late senso r, biodiesel sensor
5 Brake light sensor
6 Engine va lves
7
Heated oxygen sensor, mass airflow sen-
sor
8
Water pump, high pressure pump, high
pressure regulator va lve
9 Hot water pump
10
Oil pressure sensor, oi l temperature sen-
sor
11 Clutch pedal position sensor
12 Engine valves
13 Radiator fan
14 Fuel injectors
15 I gnition coils
16 Fuel pump
Fuse panel @ (red)
No . Equipment
1 Anti-theft alarm system
2 Engine control module
3 Lumbar support
4
Automatic transmission selector mecha-
nism
5 Horn
6 Electromechan ical park ing brake
7 Gateway control module
8 I nterior headl iner lights
10 Airbag control module
11 Electronic Stabilization Control (ESC)
12 Diagnostic connector, light/rain sensor
13 Climate control system
14 Right front door control module
15 A/C compressor
Fuses and bulbs
Fuse panel © (black)
No . Equipment
1 Front seat heating
2 Windshield w ipers
3 L eft head light electronics
4
Panorama glass roof/ sliding/t ilting sun-
roof
5 L eft front door control module
6 Sockets
7 Right rear door control module
9 Right headlight electronics
10
Windshield washer system/headlight
washer system
1 1 Left rear door control module
Fuse panel @ (black)
No . Equipment
1
Seat ventilation, rearv iew mirror, rear cl i-
mate control system controls
2 Gateway , climate control system
3 Sound actuator/exhaust sound tuning
4 Clutch pedal pos ition sensor
s Engine start
8 Homelink
9 Adaptive cruise control
11 Video camera
12 Matrix LED headlight/right LED headlight
13 Matrix LED headlight/left LED headlight
14 Rear window wiper
Fuse panel © (red)
No . Equipment
l Ignition coi ls
2 Natural gas tank valves
5 Engine mount
6 Automat ic transmission
7 Instrument panel
8 Cli mate control system (blower)
10 Dynamic steering
11 Engine start
353