AUDI A4 2018 Manual PDF
Manufacturer: AUDI, Model Year: 2018, Model line: A4, Model: AUDI A4 2018Pages: 403, PDF Size: 66.81 MB
Page 71 of 403
of injuries, never leave children unattended in
the vehicle with the vehicle key.
(D Note
-To reduce the risk of damage to the vehicle
electrical system, never attempt to charge
the vehicle battery by connecting accesso
ries that provide power, such as solar panels
or battery chargers, to the 12 Volt sockets
or the cigarette lighter.
-To reduce the risk of damage to the sockets,
only use plugs that fit correctly.
Storage
Cup holders
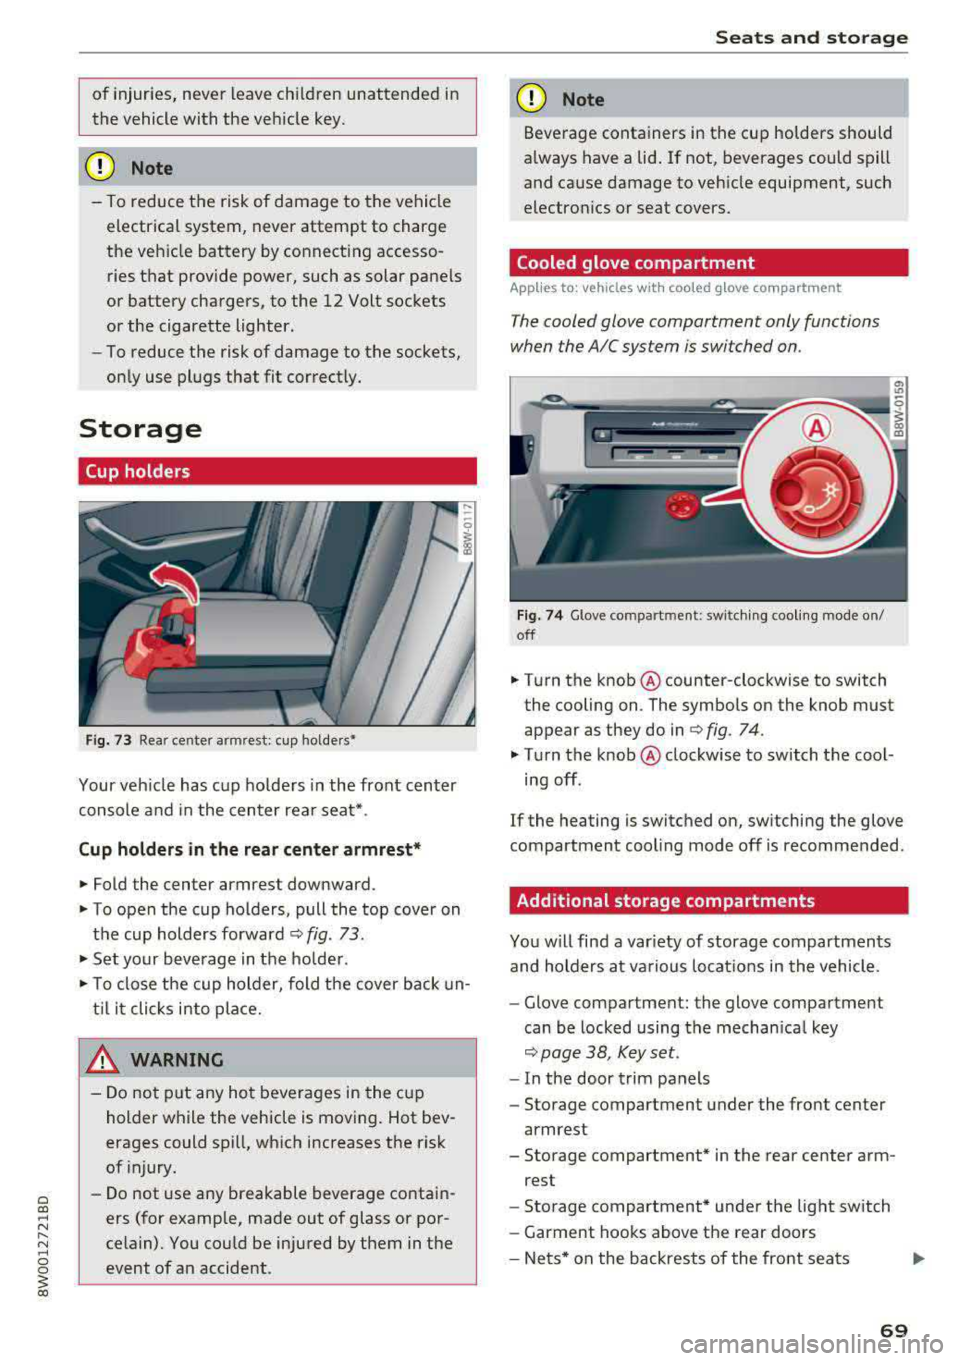
Fig. 73 Rea r cente r arm rest: cup holde rs•
Your vehicle has cup holders in the front center
console and in the center rear seat* .
Cup holders in the rear center armrest*
.,. Fold the center armrest downward.
.,. To open the cup holders, pull the top cover on
the cup holders forward
c::> fig. 73.
.,. Set your beverage in the holder .
.,. To close the cup holder, fold the cover back un
til it clicks into place.
& WARNING
-Do not put any hot beverages in the cup
holder while the vehicle is moving. Hot bev
erages could spill, which increases the risk
of injury.
-Do not use any breakable beverage contain
ers (for example, made out of glass or por
celain). You could be injured by them in the event of an accident.
Seats and storage
(D Note
Beverage containers in the cup holders should
always have a lid. If not, beverages could spill
and cause damage to vehicle equipment, such
electronics or seat covers.
Cooled glove compartment
App lies to: vehicles wit h coo led g love co mpartment
T he cooled glove compartment only functions
when the AIC system is switched on .
Fig. 74 Glove compart ment : swi tching cooling mode on/
off
.,. Turn the knob @counter-clockwise to switch
the cooling on . The symbols on the knob must
appear as they do in
r=> fig. 74.
.,. Turn the knob @clockwise to switch the cool
ing off.
If the heating is switched on, switching the glove
compartment cooling mode off is recommended .
Additional storage compartments
You will find a var iety of storage compartments
and holders at various locations in the vehicle .
-Glove compartment: the glove compartment
can be locked using the mechanical key
c::> page 38, Key set.
-In the door trim panels
- Storage compartment under the front center
armrest
- Storage compartment* in the rear center arm-
rest
- Storage compartment* under the light switch
- Garment hooks above the rear doors
-Nets* on the backrests of the front seats
69
Page 72 of 403
Sea ts and stor age
-Nets* on the left/right luggage compartment
trim pane l
-Tie-downs * on the left/right luggage compart
ment trim panel
-Bag hooks* in the luggage compartmen t
A WARNING
-
-Always keep the g love compartment lid
closed w hile d riving to reduce the risk of in
jury .
-Only use the storage compartments in the
door trim pane ls to store small objects that
will not st ick o ut of the compartment and
impa ir the range of the side a irbags.
-Due to strength reasons, on ly secure objects
up to 11 lbs (S kg) with the tie-downs*.
Heav ier objects are not adequately secured.
The re
i.s risk of perso nal injury.
- Make sure that the view to the rear is not
obstructed by hanging garments.
- Hang only lightweight cloth ing and be sure
that there are no heavy or sharp-edged ob
jects in the pockets.
- Do not use coat hangers to hang the cloth
ing because this could impair the effective
ness of the side curta in airbags.
Luggage compartment
General information
A WARNING
Read and follow the important safety precau
tions in
q page 259, Storing cargo correctly .
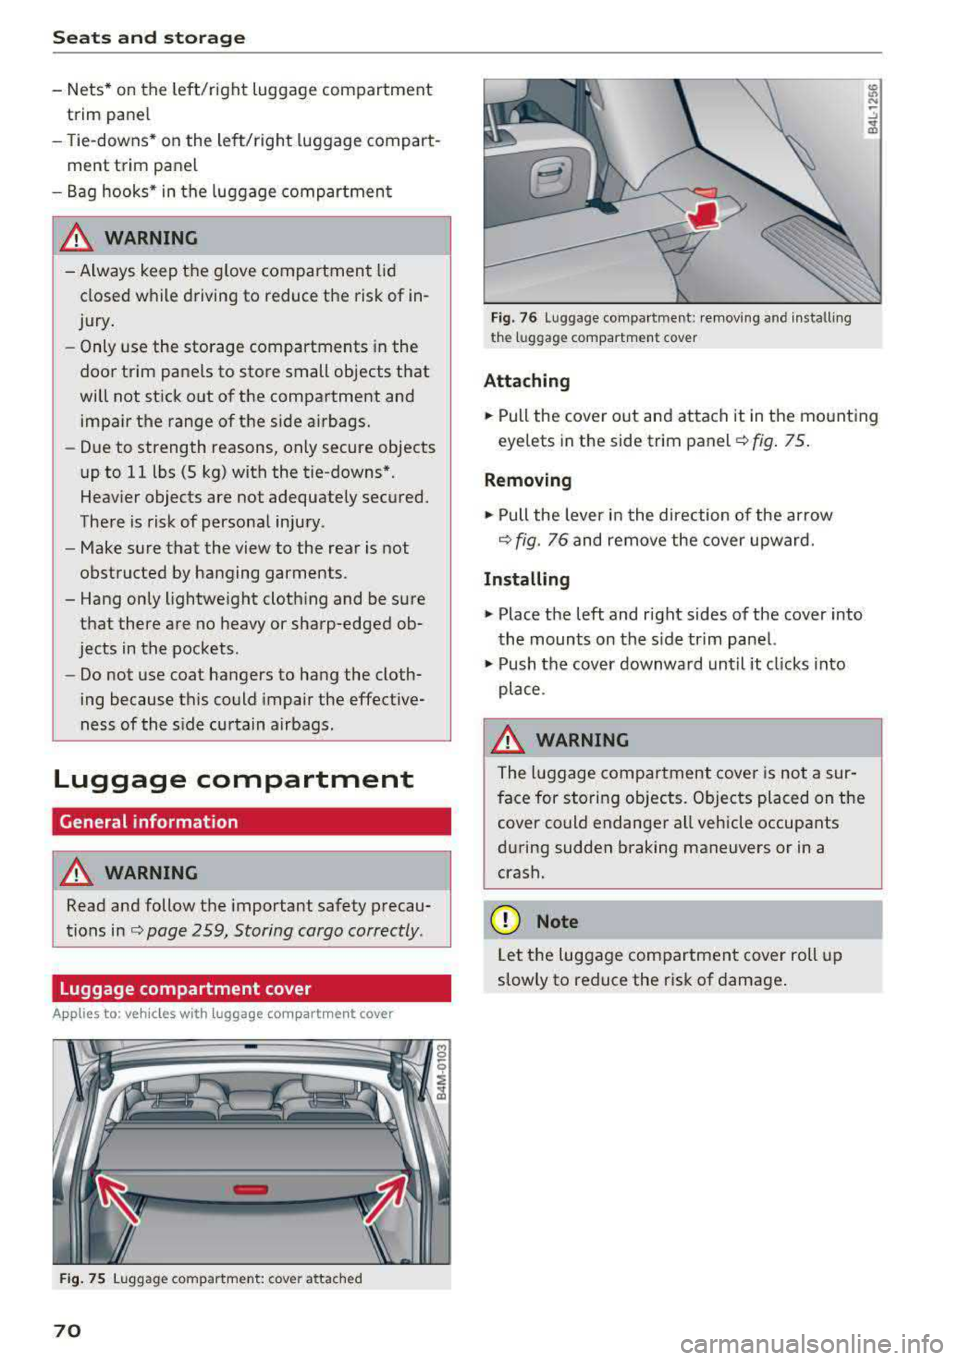
Luggage compartment cover
Applies to: vehicles with luggage compartment cover
F ig . 75 Luggage compa rtment: cove r attached
70
Fig. 76 Luggage compa rtment: remov ing and install ing
the lu ggage compartment cover
Attaching
.,. Pull the cover out and attach it in the mounting
eyelets in the side trim
panel ¢ fig. 75.
Removing
.,. Pull the lever in the direction of the arrow
q fig. 76 and remove the cover upward.
Installing
.,. Place the left and rig ht sides of the cover into
the mounts on the s ide trim panel.
.,. Push the cover downward unt il it clicks into
place .
A WARNING
The luggage compartment cover is not a sur
face for storing objects. Objects placed on the
cover could endange r all vehicle occupants
d uring sudden b raking maneuvers or in a
crash.
(D Note
Let the luggage compartment cover roll up
slow ly to reduce the risk of damage .
Page 73 of 403
Increasing the size of the vehicle interior
Applies to: vehicles with fold ing backrests
The rear seat backrests can be folded for ward ei
the r separately* or together .
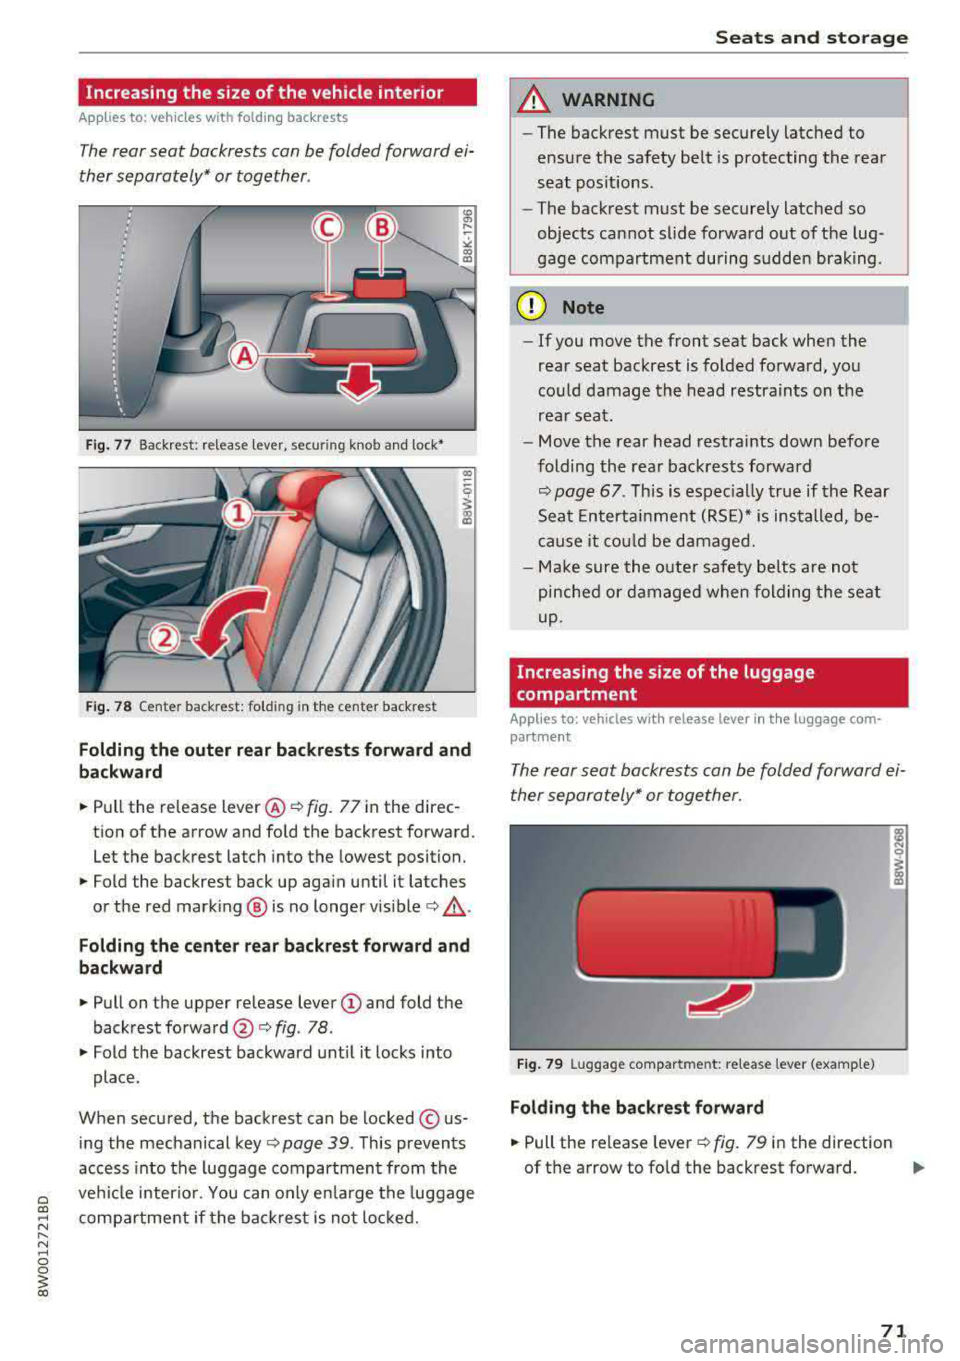
Fig. 77 Back rest: release lever, securing knob and lock•
F ig. 78 Center backrest: folding in the center backrest
Folding the outer rear backr ests forward and
backward
.,.. Pull the release lever @¢ fig. 77 in the direc
tion of the arrow and fo ld the backrest forward .
Let the backrest latch into the lowest position .
.,.. Fold the backrest back up aga in until it latches
or the red mark ing @ is no longer
vis ible ¢,&. .
Folding the center rear backrest forward and
backward
.,.. Pull on the upper re lease lever (D and fold the
backrest
forward @c::> fig. 78 .
.,.. Fold the backrest backward unt il it l ocks into
place.
When secured, the backrest can be locked © us
ing the mechanical
key ¢ page 39 . This prevents
access into the luggage compartment from the
ve hicl e interio r. You can only e nlarge the luggage
compa rtme nt if the backr est is not loc ke d .
Seats and storag e
A WARNING
-~
-The backrest must be securely latched to
e nsu re the safety belt is protecting the rea r
seat pos itions .
- The bac krest must be securely latched so
objects cannot slide fo rwa rd out of the lug
gage compartment during sudde n braking.
(D Note
- If you move the front seat back when the
rear seat backrest is fo lded fo rward, you
could damage the head restraints on the
rear seat .
- Move the rear head restrai nts down befo re
folding the rea r back rests forward
c::> page 67. Th is is espec ially true if the Rear
Sea t Enterta inment (RS E)* is ins talled, be
cause it co uld be damaged.
- Ma ke sure the o ute r safety be lts are not
pinched or d am age d when fol ding the seat
up.
Increasing the size of the luggage
compartment
Applies to: vehicles with release lever in the luggage com·
partment
The rear seat backrests can b e folded forward ei
ther separately* or together .
Fig. 7 9 Luggage co mpartme nt: re lease lever (example)
Folding the backre st fo rward
.,.. Pull the release leve r ¢fig. 79 in the direction
of th e arrow to fo ld the backrest forward.
.,.
71
Page 74 of 403
Seats and storage
Folding the backrest back into the upright
position
.. Fo ld the backrest back up again until it latches
or the red marking
q page 71, fig. 77 is no lon
ger visible c::, A in Increasing the si ze of the ve
hicle interior on page 71.
CD Note
Move the rear head restraints down before
folding the rear backrests forward
q page 67.
This is especially true if the Rear Seat Enter
tainment (RSE)* is installed, because it could
be damaged.
Partition net (upright backrest position)
Applies to: vehicles with partition net
The partition net prevents objects from sliding
from the Luggage compartment into the passen
ger compartment.
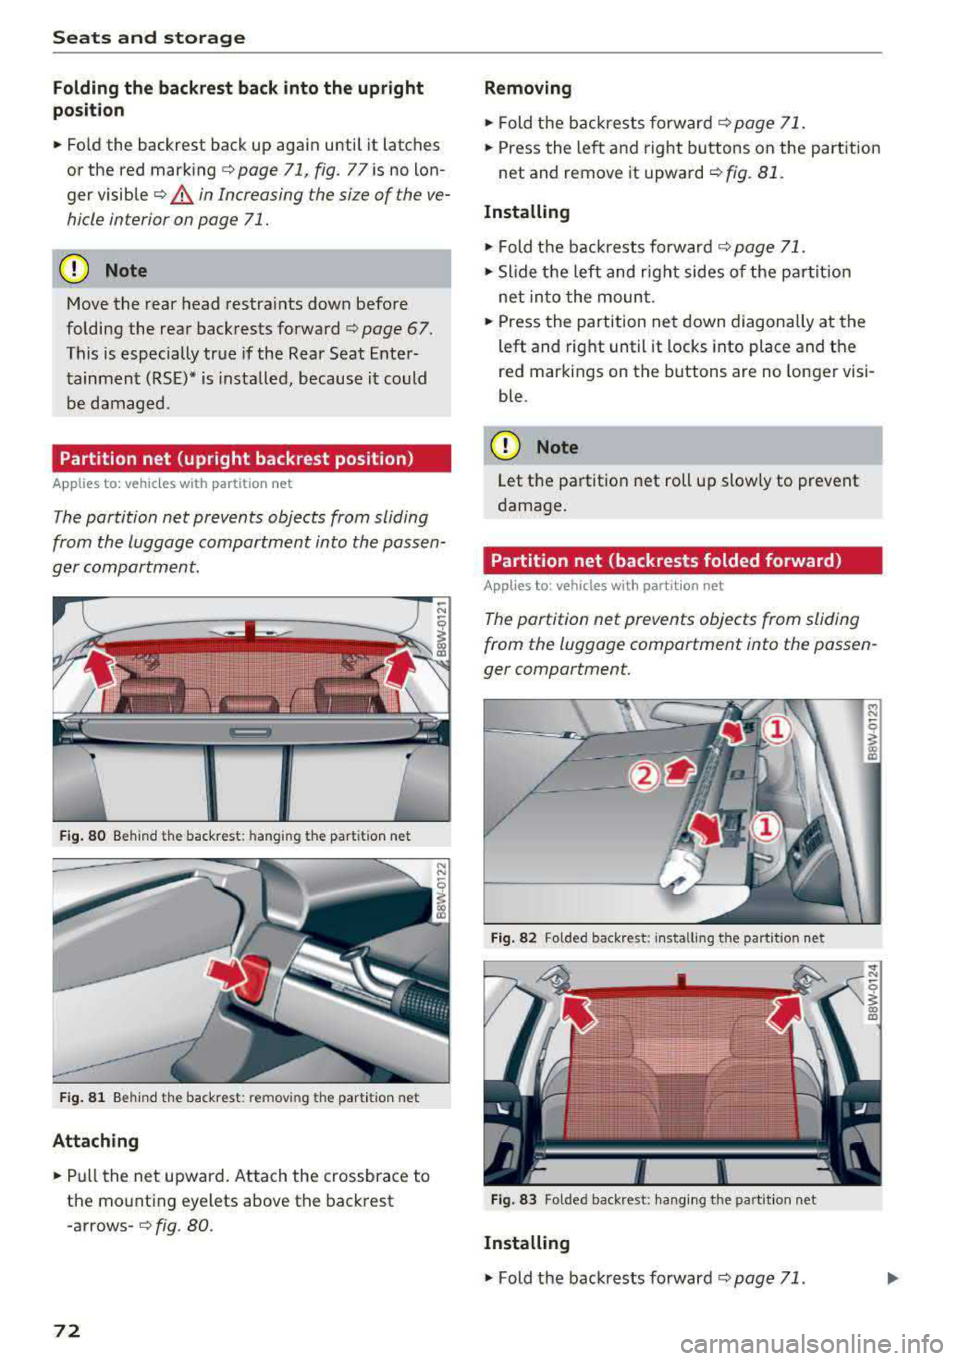
Fig. 80 Behind th e back rest : hang in g the parti tion net
Fig. 81 Behind the backrest : rem ov ing the parti tion net
Attaching
.. Pull the net upward. Attach the crossbrace to
the mo unting eyelets above the backrest
-arrows-c::, fig. 80.
72
Removing
.. Fold the backrests forward c::, page 71 .
.. Press the left and right buttons on the part ition
net and remove it upward
c::, fig. 81.
Installing
.. Fold the backrests forward c::, page 71.
.. Slide the left and right sides of the partition
net into the mount .
.. Press the partition net down diagonally at the
left and right until it locks into place and the
red markings on the buttons are no longer visi
ble.
CD Note
Let the partitio n net roll up slowly to prevent
damage.
Partition net (backrests folded forward)
Applies to: vehicles with part ition net
The partition net prevents objects from sliding
from the Luggage compartment into the passen
ger compartment.
Fig. 8 2 Folded back rest : in st a lling t he part it ion net
Fig. 83 Folded backrest : hanging the part it io n net
Installing
.. Fold the backrests forward c::, page 71.
Page 75 of 403
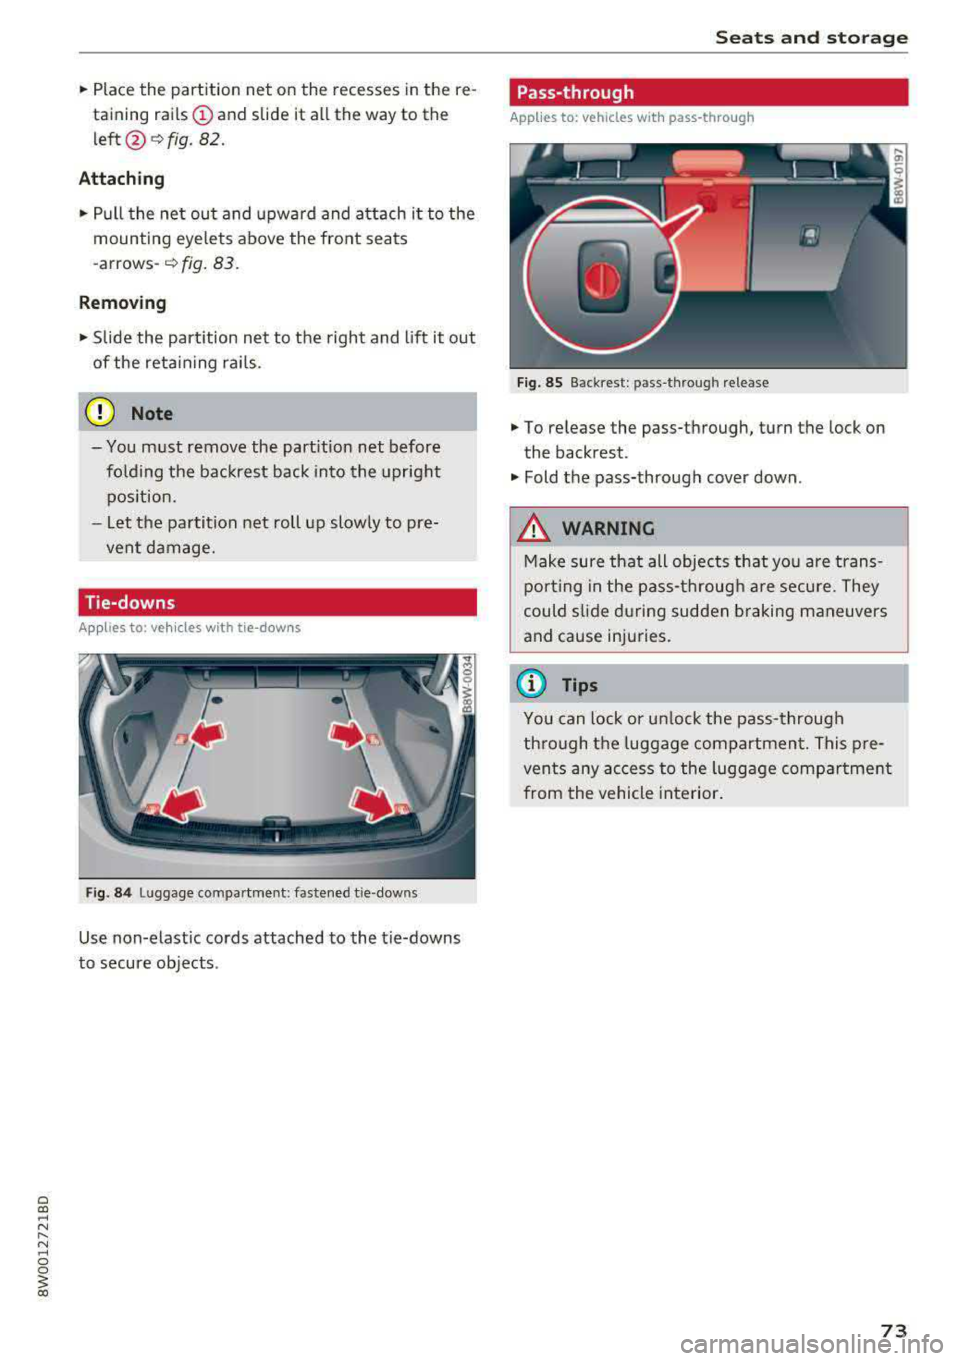
.. Place the partition net on the recesses in the re
taining rails
(D and slide it all the way to the
left @~ fig. 82.
Attaching
.. Pull the net out and upward and attach it to the
mounting eyelets above the front seats
-arrows-
¢ fig. 83.
Removing
.. Slide the partition net to the right and lift it out
of the retaining rails.
(D Note
-You must remove the partition net before
folding the backrest back into the upright
position.
- Let the partition net roll up slowly to pre
vent damage.
Tie-downs
A pp lies to: ve hicles with tie -dow ns
Fig . 84 Lu ggage compartment : fa stened t ie -dow ns
Use non-elastic cords attached to the tie-downs
to secure objects .
Seats and storage
Pass-through
App lies to : vehicles wi th pass -through
Fig. 85 Back rest : pas s-thro ugh release
.. To release the pass-through, turn the lock on
the backrest .
.. Fold the pass-through cover down .
_&. WARNING
Make sure that all objects that you are trans
porting in the pass-through are secure. They
could slide during sudden braking maneuvers
and cause injuries .
(D Tips
You can lock or unlock the pass-through
through the luggage compartment. This pre
vents any access to the luggage compartment
from the vehicle interior.
73
Page 76 of 403

Sea ts and stor age
Reversible cargo floor
Applies to: vehicles with reve rs ible cargo f loor
You can transport dirty and damp objects in the
reversible cargo area floor .
Fig . 86 Luggage compartment: cargo area floor
Fig . 87 Luggage compartment: cargo area floor reversed
Reve rsing the cargo area floor
.,. L ift up the cargo area floo r using the handle
-arrow-
c::> fig . 86.
.,. Flip the floor over and install it .
Roof rack
Applies to: sedan
Fig. 88 Roof : mounting points for the roof rack
74
Applies to: allroad
Fig. 89 Roof: mount ing points for the roof rack
If luggage or cargo is to be ca rr ied on the roof,
you m ust observe the fo llow ing:
- On ly a specially designed roof rack may be used
on you r vehicle. These roof racks are the bas is
for a comple te roof rack system. Additional at
t achments/ca rrier systems are necessary to
transpo rt luggage and spo rts equipment. We
recommend roof racks and attachments from
the Audi Genuine Accessories program.
- When installing the roo f rack, make sure that it
is mounted only at the designated points on
the roof
c::> fig. 88 or c::> fig. 89.
- The max imum permissib le roof load for your
vehicle is 200 lbs (90 kg). The roof load is the
total of the weight of the roof rack, the attach
ments and the cargo you are carrying. However,
please note the permissib le load of the carrier
system being used, the permissible axle loads
and the permissible total vehicle weight
c::> page 3 79.
.&_ WARNING
- Follow the install ation instru ct ions prov ided
w ith the roof rack system.
If you do not se
cure the roof rack system and objects on the
roof correctly, they could come loose from
the vehicle and ca use an accident.
- The risk of an accident increases when using
a roof rack system, because it changes the
driving characterist ics by shifting the center
of grav ity and/or the increasing the surface
area exposed to wind. Adapt your driving
and speed to the current cond itions.
~
Page 77 of 403
a co .... N ,....
N .... 0 0
3 co
(D Note
Make sure that the open luggage compart
ment lid and the ti lting/sliding sunroof* or
panorama glass roof* do not come into con
tact with objects on the roof.
@ For the sake of the environment
Your veh icle will use more fuel due to the in
creased wind res istance. So remove the roof
rack after using it.
Seats and storage
75
Page 78 of 403

Warm and cold
Warm and cold
Climate control system
Description
The climate control system warms, cools and re moves humidity from the air in the vehicle interi
or. It is the most effective when the windows and
sunroof * are closed. If there is a bui ld-up of heat
inside the vehicle, ventilation can he lp to speed
up the cooling process.
I n all heating mode f unctions except for
defrost,
the blower only switches to a higher speed once
the engine coolant has reached a sufficient tem
perature .
Pollutant filt er
The po llutant filter removes poll utants such as
dust and pollen from the a ir .
Ke y recognit ion
The climate control settings are automatically
stored and assigned to the remote contro l key
that is in use .
76
® For the sake of the environment
-If you would like to reduce fuel consump
t ion, sw itch the air conditioning
off. This
will also reduce emissions.
- In veh icles with a diesel engine, you can
switch the auxiliary heater
off in the Info
tainment system.
(D Tips
- To prevent interference with the heating
and cooling output and to prevent the win
dows from fogging over, the air intake in
front of the windshie ld must be free of ice,
snow or leaves.
- Condensation from the cooling system can
dr ip and form a pudd le of water under the
vehicle . This is norma l and does not mean
there is a leak.
- The energy management system may tem porarily switch
off certain functions, such as
the seat heating* o r rear window defogger.
T hese systems are ava ilable again as soon
as the ene rgy supply has been restored.
Page 79 of 403

Warm and cold
3 zone deluxe automatic climate control
Operation
.... M
~ a,
Fig. 90 3-zone de lu xe a uto mat ic cl imate contro l; cockpit controls
Fig. 9 1 3-zone de luxe automatic cl imate control system: rear controls
Press the knobs, buttons or rocker switches to
turn the functions on or off . When the funct ion is
sw itched on, the LED in the respect ive button or
knob t urns
on ¢ fig. 90. The rocker switc hes are
se nsitive to to uch. The drive r and front passenger
sett ings can be ad justed sepa rately.
You can adjust the settings for the rea r of the ve
hi cle using the controls in the rear
~ fig. 91 .
On right-hand dr ive vehicles*, the functions of
the rocker sw itched ® and ® are switched .
OFF
clima te control sy stem
You can switc h the cl imate control system on and
off using the OFF button.
It also sw itches on when you press another button or a knob. A
irflow
from outside is b locked when the clima te control
system is sw itched off.
A/C Cooling mode
You can switch the coo ling mode on or off using
the rocker switch ®· The air is not coo led and hu
mid ity is not removed when cooling mode is
switched off. This can cause fog on the w indows .
Cooling mode switches off automatically when
t h e outs ide tempe ra ture is below zero .
A/Ceco cooling mode*
You can switch the eco cooling mode on or off us-
ing the rocker switch ®· The climate control
..,.
77
Page 80 of 403

Warm and cold
system operates most efficiently in eco cooling
mode.
A/C MAX cooling mode*
You can switch the maximum cool ing mode on or
off using the rocker switch@. Th e air is not
coo led and humidity is not removed when cooling
mode is switched off. This can cause fog on the
windows. Cooling mode switches off automati
cally when the outside temperature is below
zero. When the cooling mode is switched on, the
vehicle interior is cooled as quickly as possible
and dehumidified .
c:E) Recirculation mode
In recirculation mode, the air inside the vehicle is
circu lated and filtered. This prevents the unfil
tered air outside the vehicle from entering the
vehicle interior. Switching recirculation mode on
when dr iv ing through a tunnel or when s itting in
traffic is recommended
Q &, .
Using the button, recirculation mode is~ using
the button. You can also switch the recirculation
mode off by pressing the knob (D or the ~ but
ton.
AUTO
Automatic mode
Automatic mode maintains a constant tempera
ture inside the vehicle. Air temperature, airflow
and air distribution are controlled automatically .
You can switch automatic mode on or off by
pressing the
knob@.
Temperature
You can adjust the temperature between 60°F
( + 16°()
and 84°F ( +28°() by turn ing the knob
(D . Outs ide of this range, LO or HI will appear in
the climate control system display . In both set
tings, the climate control runs constantly at the
maximum cooling or heating level. The tempera
ture is not regulated.
The temperature can be adjusted in the rear us
ing the rear contro ls
Q fig. 91.
86'~ Blower
You can adjust the vo lume of air generated by the
blower to your preference using the rocker switch
@ . The blower should always run at a low setting
78
to prevent the windows from fogging and to en
sure a continuous exchange of air inside the vehi
cle. To have the blower regulated automatically,
press one of the knobs
(D .
Air distribution
You can use the rocker sw itches @to adjust the
vents where the air will flow out of. Press the
rocker switches @repeatedly unti l the desired
air distribution setting is displayed in the climate
control system controls. To have the air distribu
tion regulated automatically, press one of the
knobs
(D .
""lll"' OPEN/CLOSE the wide vent
You can open and close the wide vent in the cock
pit using the rocker switch ®·
JI~ Seat heating and ventilation*
If you press the button J ,J, the seat heating/
ventilat ion is switched on at the highest leve l (3) .
The LEDs indicate the temperature level. To re
duce the temperature, press the button again. To
switch the seat heating/ventilation off, press the
button repeatedly until the LED turns
off.
3% Defrosting
The windshield and side windows are defrosted
or cleared of condensation as quick ly as possible .
The maximum amount of air flows mainly from
the vents below the windsh ield. Recirculation
mode switches off. The temperature should be
set at
+72°F (+22°() or higher . The temperature
i s controlled automat ically .
Defrost is switched on and off
3% using the but
ton. You can switch the function off by pressing a knob
(D .
Applies to vehicles with windshield defogger: the
windshield defogger switches on automatically
when outside temperatures are low. If you would like to sw itch the windshield defroster on man
ually, press the
3%. The LED in the button blinks.
ClWREAR Rear window defogger
Press the button [email protected] switch the rear window de
fogger on. It on ly operates when the engine is
running. It switches off automatically after
10 to .,,.