ESP AUDI A4 2018 Owners Manual
[x] Cancel search | Manufacturer: AUDI, Model Year: 2018, Model line: A4, Model: AUDI A4 2018Pages: 403, PDF Size: 66.81 MB
Page 8 of 403
About this Owner's Manual
This Owne r's Man ual applies to a ll versions of
this mode l.
It contains important information,
tips, suggestions and warn ings for using your ve
h icle.
Keep this manual in your vehicle at all times . This
is especially important if you loan your vehicle to
others or sell it.
This owner's manua l describes the
equipment
range
specified for this mode l at the time of
printing. Individual equipment options described
may on ly be available at a later date or may only
be offered in certain countries .
Some sections in this manual do not apply to all
vehicles. When this is the case, the beginning of
the sect ion ind icates the
validity, for example
"Applies to vehicles : with cruise contro l system".
Optional or vehicle-specific equipment is also
ident ified with an asterisk
"*" .
The illustrations in this manual are a guide.
Some of the detai ls in your vehicle may differ
from the illustration .
All
directions , such as "left", "right", "front" and
"rear", are based on the vehicle's direct ion of
travel.
* Optional or vehicle
-specific equipment
.,._ The section continues on the next page .
c::> & Cross reference to a "WARNING" within a
section. If a page number is indicated, the
WARNING is located outs ide of the section.
&, WARNING
Text with this symbol contains information
about safety and how to reduce the risk of se
rious personal injury or death.
(D Note
Text with this symbol contains informat ion
about reducing the risk of damage to your ve
hicle.
@ For the sake of the environment
Text with this symbol contains informat ion on
protecting the environment.
6
-
(D Tips
Text with this symbol contains additional use
fu l information.
Page 16 of 403
Cockpit overview
Control buttons
Applies to: vehicles w ith mu ltifunct ion steering wheel p lus
I rM
' t M' ...
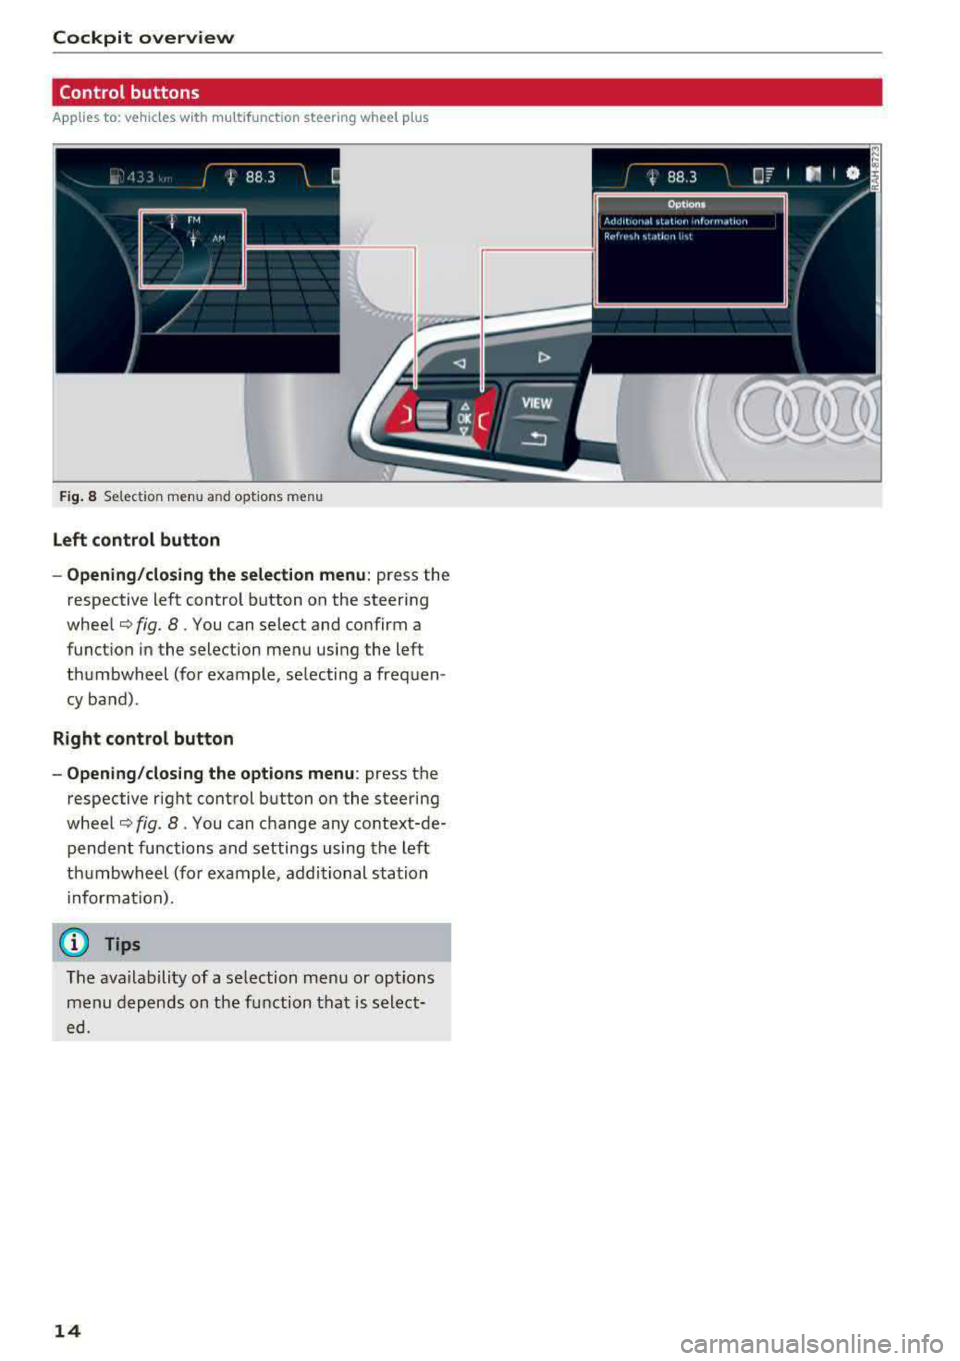
F ig . 8 Select ion menu an d opt io ns m en u
Left control button
- Opening/closing the selection menu :
press the
respective left control button on the steering
wheel¢ fig. 8. You can select and confirm a
function in the selection menu using the left
thumbwheel (for example , selecting a frequen
cy band).
Right control button
- Opening/closing the options menu :
press the
respective right control button on the steering
wheel¢ fig. 8. You can change any context-de
pendent functions and settings using the left
thumbwheel (for example, additional station
in format ion).
(D Tips
The ava ilability of a se lection menu or options
menu depends on the function that is select
ed.
14
Page 19 of 403

a co .... N ,....
N .... 0 0
3 co
Third tab Rad io ¢page 18
Media ¢ page 18
Fourth tab Telephone ¢
page 19
a) This tab is only v isible when there is at least one ind icato r
l ight or mess age disp layed.
- Switching tabs : press the !MODE ! button
<=> fig. 12 on the mult ifunction steering wheel
repeatedly unti l the des ired tab is d isp layed .
-Se lect ing a function in the m enu /list : turn the
left thumbwheel on the mult ifunct ion steer ing
whee l to the desired funct ion.
- Confirming a sel ection : press the left thumb
wheel on the multifunction steer ing wheel to
confirm your se lec tion.
- Scrolling within th e lists: turn the left thumb
wheel on the mult if u nction steer ing wheel
quick ly to scroll wi thin the lists.
@ button @;]
- Switching the voice recogn it ion sy stem on :
briefly press the 51 button¢ fig. 13 . Say the
desired command after the
B eep .
- Switching th e vo ice recogn ition sy stem off :
press and hold the 51 button. Or: say the com
ma nd
Cancel.
For more information about the vo ice recognit ion
system, see
<=> page 168, Voice recognition sys
tem
or ¢ page 248.
@ Right thumbwheel
The volume of an audio source or a system mes
sage (such as traffic announcements) can be di
rectly adjusted dur ing the aud io output.
- Inc rea sin g o r decrea sing the volume : turn the
rig ht thumbwhee l
¢ fig. 13 up or down.
- Muting or pausing : turn the right thumbwheel
down.
Or : press the right thumbwhee l.
-Unmuting or resuming : turn the right thumb
whee l up.
Or : press the right thumbwhee l.
Cockpit o ve rv iew
Driver information
system
On-board computer
F ig. 14 Instrument cluster: fuel co nsumpt io n display
Resetting values to zero
Requirement: the Fue l consumption , Short -term
memory or Long-t erm mem ory
d isplay must be
selected.
.. To reset the value for the respective memory to
zero, press and hold the left thumbwheel
(i)
¢ page 13, fig. 7 or @ <=> page 16, fig. 12 on
the multifunction stee ring wheel for one sec
ond. Or
.,. On the multifunction stee ring wheel, select:
the right control button>
Re set value s*.
Ad justing additional displays (Audi virtual
c ockpit)*
.,. On the multifunction stee ring wheel, select the
right control button >
Additional di splay .
.. Select the desired additional display .
In the first tab (on -board comp ute r), you can c all
u p the following disp lays one after the other by
turning the left thumbwheel on the multifunc
tion steer ing wheel.
- Time and
da ter=> page 248
- Dig ita l speedomete r*
- Average consumption
- Remaining range*
- AdBlue range*
<=>page 319
- Short-term memory overview
- Long-term memory overview
- Energy consumers
r=> page 18
- Dr iver assistan ce* ¢ page 108
-Traff ic sign recog nition* ¢ page 104
17
Page 39 of 403
a co .... N ,....
N .... 0 0
3 co
Opening and closing
Central locking
Description
You can lock and unlock the veh icle centrally . You
have the following options:
-Remote control key¢ page 40,
-Sensors in the door handles* ¢ page 40,
-Lock cylinder on the driver's door c::> page 42,
or
-Interior central locking switch c::> page 41.
Turn signals
The turn s ignals flash twice when you unlock the
veh icle and flash once when you lock the veh icle.
If they do not flash, then one of the doors, the
rear lid or the hood is not closed.
Automatic locking (Auto Lock)
The Auto Lock funct ion locks all doors and the
luggage compartment lid once the speed has
ex
ceeded approximately 9 mph (15 km/h).
The vehicle can be unlocked if the opening func
tion in the central locking system sw itch is used
or one of the door handles is pulled.
In the event of a crash with airbag deployment,
the doors will a lso automat ically unlock to allow
access to the vehicle.
Selective door unlocking
The doors and luggage compartment lid will lock
when they close . You can set in the Infotainment
system whether
only the driver's door or the en
tire vehicle should be unlocked when unlocking
c::> page 41.
Unintentionally locking yourself out
Only lock your vehicle when all of the doors and
the luggage compartment lid are closed and the remote control key is not in the vehicle . This
helps to prevent you from locking yourse lf out
accidentally .
The follow ing cond it ions prevent you from lock
ing your remote control key in the vehicle:
Opening and closing
-If the driver's door is open, the vehicle cannot
be locked by pressing the
fi'.) button on the re
mote contro l key or by touching the locking
sensor* on a door.
-If the most recently used convenience key* is
detected in the luggage compartment, the lug
gage compartment lid automatically unlocks
again after closing it.
-If the convenience key* that was last used is de
tected inside the vehicle, then the vehicle will
not be able to lock from the outside .
_& WARNING
---
-When you lock your vehicle from outs ide,
nobody- espec ially children
-should rema in
inside the vehicle. Remember, when you
loc k the vehicle from the outside the win
dows cannot be opened from the inside .
- When you leave the vehicle, always take the
ignit ion key with yo u. This will prevent pas
sengers (children, for examp le) from acci
dentally being locked in the vehicle should
they accidentally press the power locking
switch in the doors.
- Do not leave children inside the vehicle
un
supervised. In an emergency it would be im
possible to open the doors from the outside
without the key.
(D Tips
-Do not leave valuables unattended in the ve
hicle. A locked vehicle is not a safe!
-The LED in the driver's door rail blinks when
you lock the vehicle. If the LED lights up for
approximately 30 seconds after locking,
there is a malfunction in the central locking
system. Have the problem corrected by an
authorized Audi dealer or authorized Audi
Service Facility.
37
Page 42 of 403

Opening and clo sin g
@ Tips
The replacement battery must meet the same
specifications as the orig inal battery in the re
mote control key.
Unlocking/locking by remote control
I rn
F ig . 27 Re mote contro l key: bu tton programm ing
• To unlock the vehicle, press the 6:l button
¢ fig. 27.
• To lock the vehicle, press the {D button on ce.
• To unlock the luggage compartment lid, press
the
a button briefly .
• To open the luggage compartment lid, press
and hold the
a button for at least one second .
• To trigger the alarm, p ress t he red I PANIC I but
ton. The ve hicle horn and emergency flashers
turn on.
• To switch off the alarm, p ress the red I PANIC I
button again .
I f the ve hicle is unlocked and none of the doors,
the hood, or the luggage compartment lid are
opened within 45 seconds, the vehicle locks
again automatica lly. This feature prevents the ve
hicle from being accidentally left unlocked over a long per iod of time.
The settings in the Infotainment system deter mine if the entire vehicle or only the driver's door
is unlocked when unlocking the vehicle
¢page 41.
A WARNING
No one, especially chi ldren, should stay in the
vehicle when it is locked from the outside, be cause the w indows can no longer be opened
from the
inside¢ page 42. Locked doors
40
make it more difficult for emergency workers
to get into the veh icle, wh ich puts lives at
risk.
@ Tips
- Only use the remote control key when you
are within view of the vehicle.
- Applies to: vehicles with automatic trans
mission: the vehicle can only be locked
when the selector lever is in P.
- Do not use the remote control when you a re
inside the vehicle. Otherwise, you could un
intentionally lock the vehicle. If you then try
to open a door, the anti-theft alarm w ill
trigger. If this happens, press the unlock
button
6:l.
- Only use the pan ic function in an emergen
cy.
Unlocking/locking with the convenience
key
Applies to : vehicles with convenience key
The doors and luggage compartment lid can be
unlocked/locked without using the remote con
trol key.
F ig . 28 Door ha nd le: locki ng t he veh icle
Unlocking the v ehicl e
• Grip the door hand le . The door unlocks auto-
matically.
• Pull on the door handle to open the door.
Locking th e vehicle
• Applies to: veh icles with automatic transmis
sion : Se lect the P position, otherwise the vehi -
cle will not lock .
.,.
Page 43 of 403

.. To lock the vehicle, close the door and touch
the sensor in the door handle
on ce c::> fig. 28 . Do
not hold the door handle while doing this .
You can u nlock/ lock the vehicle at every door.
The remote control key cannot be more than ap
proximately 4 feet (1.5 m) away from the door
handle. It makes no difference whether the mas
ter key is in your jacket pocket or in your brief
case, for example .
If you hold the door handle while locking, this
can impair the locking function.
The doo r cannot be opened for a br ief period di
rect ly after locking it. This way you have the op
portunity to check if the doors locked correctly.
The settings in the Infotainment system deter
mine if the entire vehicle or on ly one of the doors
is unlocked when unlocking the vehicle
c::> pag e 41.
A WARNING
Read and following all WARNINGS c::> &. in De
scription on page 3
7.
@ Tips
If your vehicle is left standing for a long peri
od of time, note the following:
-The energy management system grad ually
turns off unnecessary convenience functions
to prevent the vehicle battery from draining
and to mainta in the vehicle's ab ility to start
for as long as possible. You may not be able
to unlock your vehicle us ing the convenience
key .
Central locking switch
Fig. 29 Drive r's door : central loc king switch
Openin g an d clos ing
.. To lock the vehicle, press the l'.D button c::> &_ .
.. To unlock the vehicle, press the @ button.
When locki ng the vehicle with the central lock ing
switch, the following applies:
-Opening the door and the luggage compart
ment lid from the
outside is not poss ible (for
secur ity reaso ns, such as when stopped at a
light) .
-The LED in the centra l locking sw itch t urns on
when all doors are closed and locked .
- You ca n open the doors individua lly from the
inside by pu lling the doo r handle.
- In the event of a crash with a irbag deploymen t,
the doo rs unlock automat ica lly to allow access
t o the vehicle .
~~ WARNING
-
- The central locking switch a lso works when
the ignition is switched off and automatica l
ly locks the entire vehicle when the
l'.D but
ton is pressed.
-The central locking switch is inope rative
when the vehicle is locked from the outs ide.
-Locked doors make it more difficult for
emergency workers to get into the vehicle,
which puts lives at r isk. Do not leave anyone
behind in the vehicle, especially children.
-Read and fo llowing a ll WARNINGS c::> &. in
Description on page 3
7.
(D Tips
Your vehicle locks automatically when it reaches a speed of 9 mph (15 km/h) (Auto
Lock)
c::> page 37. You can unlock the vehicle
again using the
ca button in the central lock
i ng switch.
Setting the central locking system
In the Infotainment system, you can set which
doors the central locking system will unlock .
.. Select in the Infotainment system: I MENU! but
ton
> V ehicle > left control b utton > Vehicle
settings > Central lock ing .
Door unlo cking
-you can decide if All doors or
only the
Dri ver 's door shou ld unlock. The
41
Page 45 of 403

triggered. The anti-theft alarm system is activat
ed when the vehicle is locked as usua l.
It
switches off when the vehicle is unlocked.
If the a larm is trigge red, it w ill shu t off automat
ically a fter a ce rtain amount of time . Switch the
ignition on or press
the m button on the remote
control key to turn
off the alarm.
Luggage compartment
Lid
Opening /closing the luggage compartment
lid
Fig . 32 Driver 's door: opening the luggage compartment
lid
Applies to: vehicles with automatic transmission:
The luggage compartment lid can only open
when the selector lever is in P.
Applies to: vehicles with manual transmission:
The luggage compartment lid can only open
when the parking brake is set. Pull the
«el) sw itch
~ page 88 to set the parking brake.
Opening th e luggage compartment lid
.,. Press and hold the c:;; button on the remote
contro l key for at least one second . The luggage
compartment lid unlocks and opens slightly . Or
.,. Press the handle in the luggage compartment
l id. Or
.,. Pull the c:>* switch in the dr iver's door.
Cl osing the luggage compartment lid
.,. Use the inside gr ip to pull the luggage com
partment lid down and allow it to close using a
gentle p ush
~ ,&. .
Op enin g an d clos ing
A WARNING
--After closing the luggage compartment lid,
make sure that it is latched . Otherw ise the
luggage compartment lid could open sud
denly when dr iving, which increases the r isk
of an a cc ident.
- Never drive with the luggage compartment
lid ajar or open, because poisono us gases
can enter the vehicle interior and create the
risk of asphyx iat ion.
- Never leave your veh icle unattended when
the luggage compartment lid is open. A
child cou ld climb into the veh icle through
the luggage compartment. If the luggage compartment lid was then closed, the child
would be trapped in the vehicle and unable
to escape. To reduce the risk of injury, do
not allow children to play in or around the
veh icle . Always keep the luggage compart
ment lid and the doors closed when the ve h icle is not in use.
-Always make sure no one is in the luggage
compartment lid's range of motion when it
is closing, especially near the hinges. Fin
gers or hands could be pinched.
© Tips
- When the vehicle is locked, the luggage compartment lid can be unlocked separately
by pressing the
c:5 button on the remote
control key. The luggage compartment lid
locks automa tically when it is closed again.
- T he settings in the Infotainment system de
termine if the luggage compartment lid can be opened using the
hand le~ page 41 .
- In case of an emergency or a fau lty handle,
t he luggage compartment lid can be opened
manually from t he
ins ide ~ page 46.
43
Page 50 of 403
Opening and closing
Child safety lock
The child safety lock prevents the rear doors
from being opened from the inside and the rear
power windows from be operated .
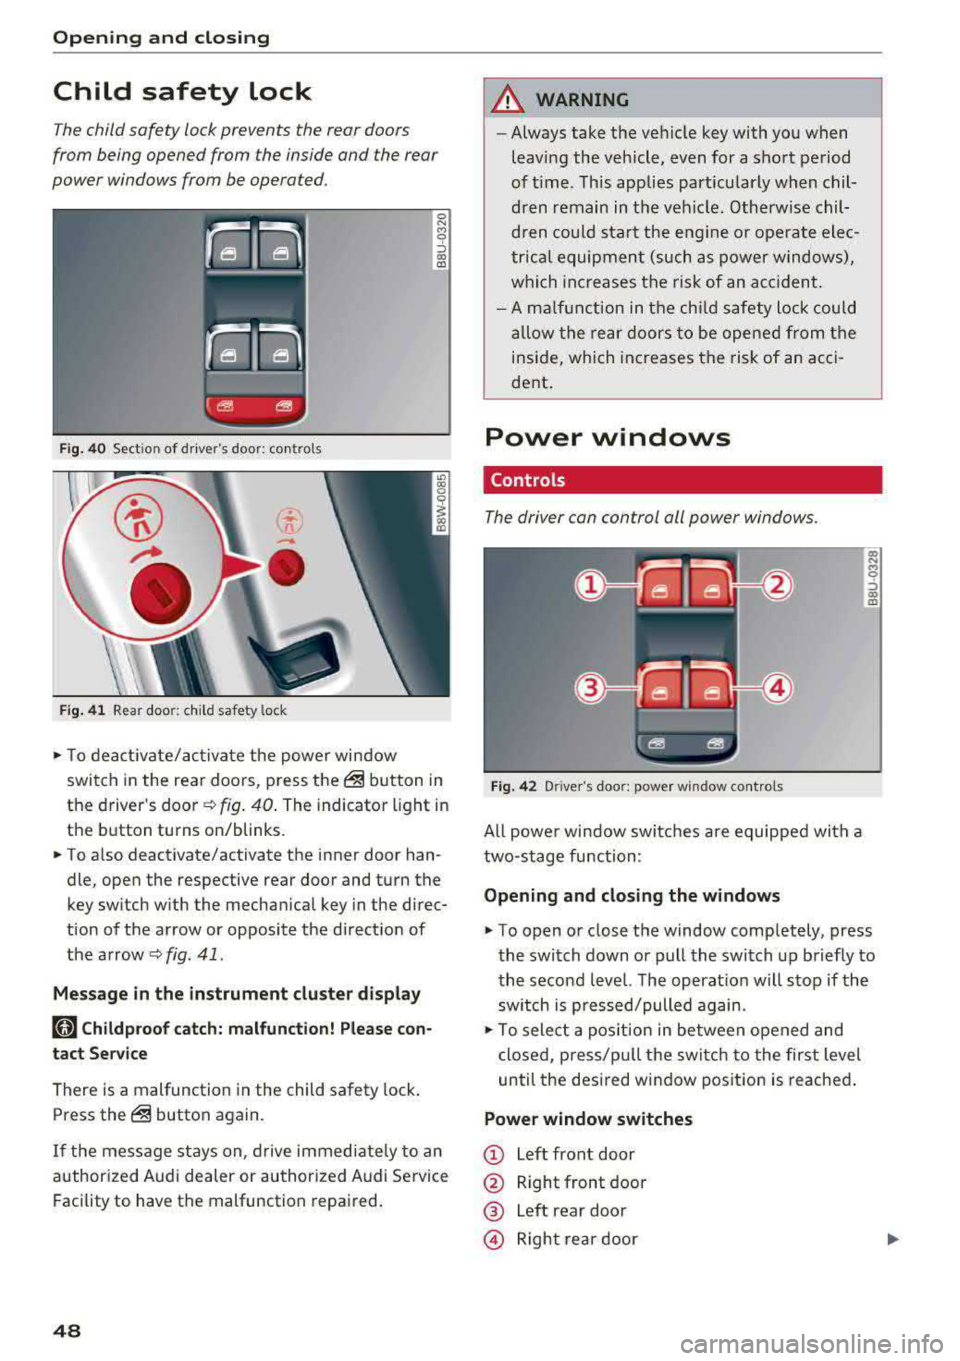
Fig. 40 Section of driver's door: co ntrols
Fig. 41 Rear door: chil d safety lock
0 N M 9 ::J co (D
• T o deactivate/activate the power window
switch in the rear doors, press the@ button in
the driver 's
door ¢ fig. 40. The indicator light in
the button turns on/blinks.
• To also deactivate/activate the inner door han
dle, open the respective rear door and turn the
key switch with the mechan ical key in the direc
tion of the arrow or opposite the direct ion of
the arrow
<=> fig. 41 .
Message in the instrument cluster display
faj Childproof catch: malfunction! Please con
tact Service
There is a malfunction in the child safety lock.
Press the@ button again.
If the message stays on, drive immediately to an
authori zed Audi dealer or authorized Audi Service
Facility to have the malfunction repaired.
48
A WARNING
-Always take the vehicle key with you when
leav ing the vehicle, even for a short period
of time . This applies part icularly when chil
dren remain in the vehicle . Otherwise chil
dren could start the engine or ope rate elec
trical equipment (such as power windows),
which increases the risk of an acc ident.
- A malfunction in the child safety lock could
allow the rear doors to be opened from the
inside, which increases the risk of an acci
dent .
Power windows
Controls '
The driver con control all power windows .
Fig. 42 Driver"s door: power w indow controls
All powe r window switches are equipped with a
two-stage function :
Opening and closing the windows
a, .... M 0 ::, (X) (D
• To open or close the window completely, press
the switch down or pull the switch up briefly to
the second level. The operat ion will stop if the
sw itch is p ressed/pulled again.
• To select a position in between opened and
closed, p ress/pu ll the switch to the first level
until the desired window position is reached.
Power window switches
CD Left front door
@ Right front door
® Left rear door
© Right rear door
Page 56 of 403
Lights and Vision
Lights and Vision
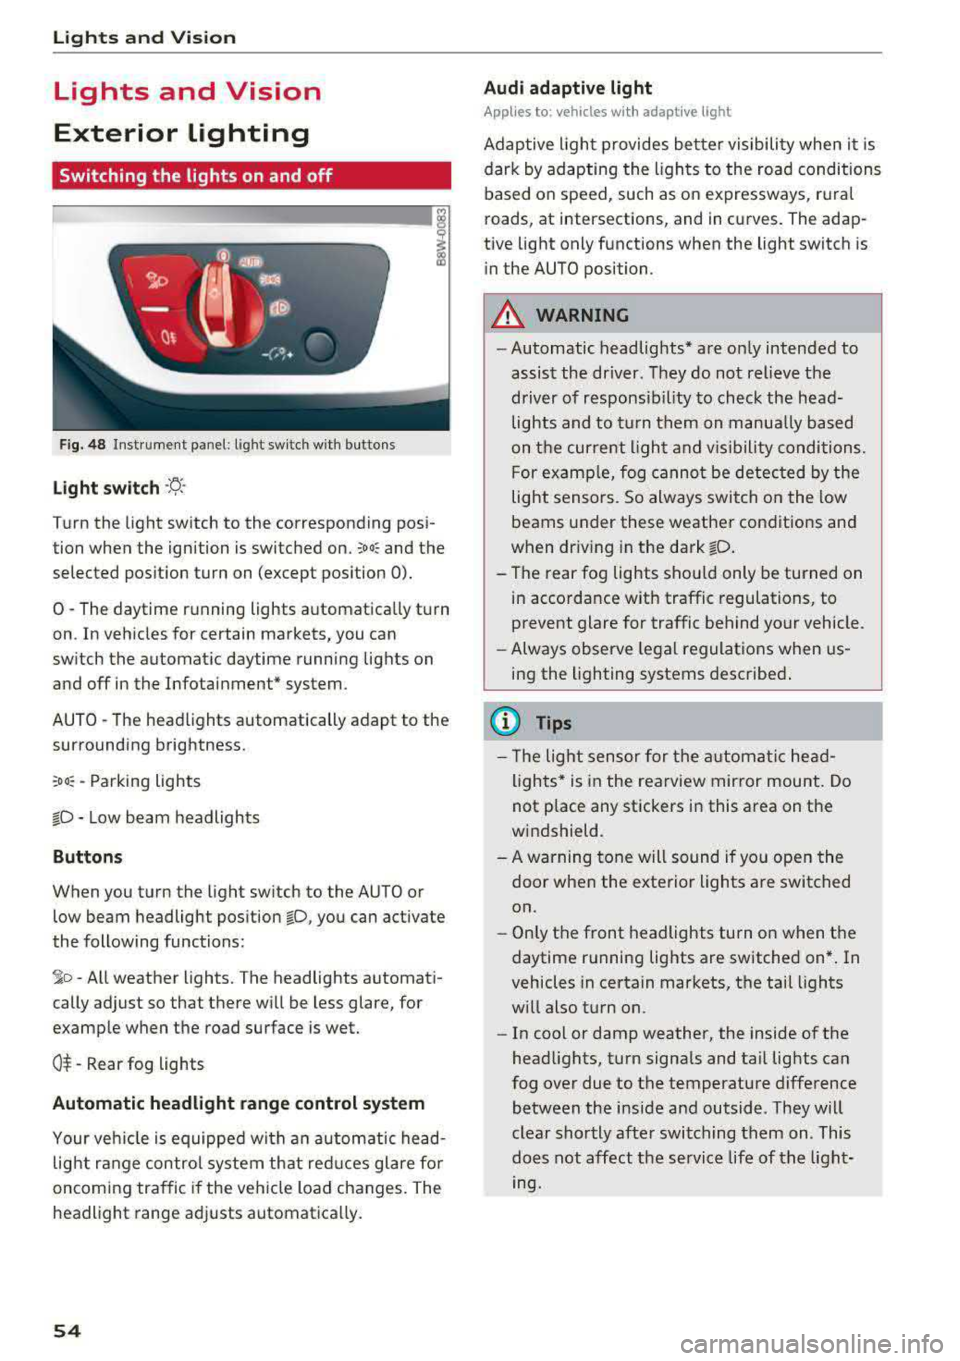
Exterior lighting
Switching the lights on and off
--- --------...... ~
I
Fig. 48 Instrument panel: light sw itch w ith buttons
Light switch ·ti :
Turn the light switch to the corresponding posi
tion when the ignition is switched on.
;oo: and the
selected pos ition turn on (except pos ition 0).
0 -The daytime r unning lights a utomat ica lly turn
on . In veh icles for certain markets, you can
switch the automatic daytime runn ing lights on
and off in the Infotai nment* system.
AUTO -T he head lights automatically adapt to the
surrounding brightness.
:oo: -Parking lights
io -Low beam headlights
Buttons
When you turn the light sw itch to the AUTO or
low beam headlight position
io, you can activate
the following functions:
jo -All weather lights. The headlights automati
cally adjust so that there will be less glare, for
examp le when th e road surface is wet.
0$ -Rear fog lights
Automatic headlight range control system
Your veh icle is equipped wi th a n automatic head
light r ange control system th at red uces glare fo r
oncoming tra ffic if the vehicle load changes. The
headlight range ad justs automatica lly.
54
Audi adaptive light
App lies to: vehicles wi th adaptive light
Adap tive ligh t provides be tter visibility when it i s
dark by adapting the ligh ts to the road conditions
based on speed, such as on expressways, r ura l
roads, at intersections, and in curves. The adap
tive light only functions when the light switch is
i n the AUTO position.
A WARNING
-Automatic headlig hts* are on ly intended to
assist the driver. They do not relieve the
driver of responsib il ity to check the head
lights and to t urn them on manua lly ba sed
on t he curre nt ligh t and v is ibility conditions.
F or examp le, fog cannot be detec ted by the
light sensors. So always switch on the low
beams under these weather condit ions and
when dr iv ing in the dark
fD .
- The rear fog lights shou ld only be turned on
in accordance w ith traffic regulations, to
prevent glare for traffic behind your vehicle.
- Always observe legal regulat ions when us
ing the lighting systems desc ribe d.
{l) Tips
- Th e light sensor for the a utomat ic he ad
lights * is in the rearview mir ror mount. Do
not p lace any stickers in this area on the
w indshield.
- A warning tone will sound if yo u ope n the
door when the exte rior lights a re switched
on.
- On ly the front headlights turn on when t he
daytime running lights are switched on* . In
vehicles in certain markets, t he tail lights
w ill also t urn on.
- In cool or damp weather, the inside of the
head lights, t urn signa ls and ta il lig hts can
fog over due to the temperature difference between the inside and outside. They w ill
clear shortly afte r switching them on. This
does not affect the service life of t he light
mg.
Page 57 of 403

Turn signal and high beam lever
The lever operates the turn signals, the high
beams and the headlight flasher .
Fig. 49 Turn signal and high beam lever
Turn signals ¢¢
N
0 0
> u. C0
The turn signals activate when you move the lev
e r i nto a turn s ignal position when the ign ition is
switched on.
(D -Right turn signa l
@-Left turn signal
The turn s ignal blinks three times if you just tap
the lever.
High beams and headlight flasher ~D
Move the lever to the corresponding position:
@ -High beams on (vehicles with high beam as
sistant*) ¢
page 55
©-High beams off or headlight flasher
The
II ind icator light in the instrument cluster
turns on.
A WARNING
H igh beams can cause glare for other drivers,
which increases the risk of an acc ident. For
this reason, only use the h igh beams or the
head light flasher when they will not create
glare for other drivers.
Lights and V ision
High beam assistant
Applies to: vehicles with high beam assistant
The high beam assistant automatically turns the
high beams on or off depending on the surround
ing conditions .
A camera on the rearview mirror mount can de
tect light sources from other road users . The high
beams sw itch on or off automatically depending
on the posit io n of vehicles driving ahead and on
coming vehicles, the vehicle speed and other en
vironmental and traffic conditions.
Activating high beam assistant
Requirement: the light sw itch must be set to the
AUTO posit ion and the high beam ass istant must
be switched on in the Infota inment system
¢p age 56.
.,. To act ivate the high beam ass istant, tap the
lever forward @¢
page 55, fig . 49 . The lj!a in
d icator light appears in the instrument cluster
disp lay and the high beams a re switched on/off
automatically. If the high beams were com
p letely or partially switched on, the
II indica
to r light turns on.
Switching the high beams on/off manually
If the high beams did not switch on/off automat
ically as expected, yo u may swi tch them on or off
man ua lly ins tead:
.,. To switch the h igh beams on manua lly, tap the
lever forwa rd @ ¢
page 55, fig. 49. The II in
dicator light turns on.
.,. To switch the high beams off manually, pull the
lever back©¢
page 55, fig. 49. The high beam
assistant is deactivated .
Operating the headlight flasher
.,. To operate the headlight flasher when the high
beam ass istant is activated and high beams are
sw itched off, pull the lever back ©¢
page 55,
fig. 49.
The high beam assistant remains ac
tive .
Messages in the instrument cluster display
ml Audi adaptive light: malfun ction! See own-
er's manual
..,.
55