service indicator AUDI A4 2021 OwnerôÇs Manual
[x] Cancel search | Manufacturer: AUDI, Model Year: 2021, Model line: A4, Model: AUDI A4 2021Pages: 304, PDF Size: 107.89 MB
Page 15 of 304
8W1012721BC
Instrument cluster
vehicle safely. See an authorized Audi dealer
or authorized Audi Service Facility for assis-
tance.
G) Tips
ã The following pages primarily show illustra-
tions of the Audi virtual cockpit*. The dis-
play or location of the items that are shown
may vary on the different versions of the in-
strument cluster.
ã You can select the units used for tempera-
ture, speed, and other measurements
=> page 212.
ã Speeds are displayed in mph (miles per
hour) or km/h (kilometers per hour).
ã Certain instrument cluster content can also
be displayed in the head-up display*
=>page 25.
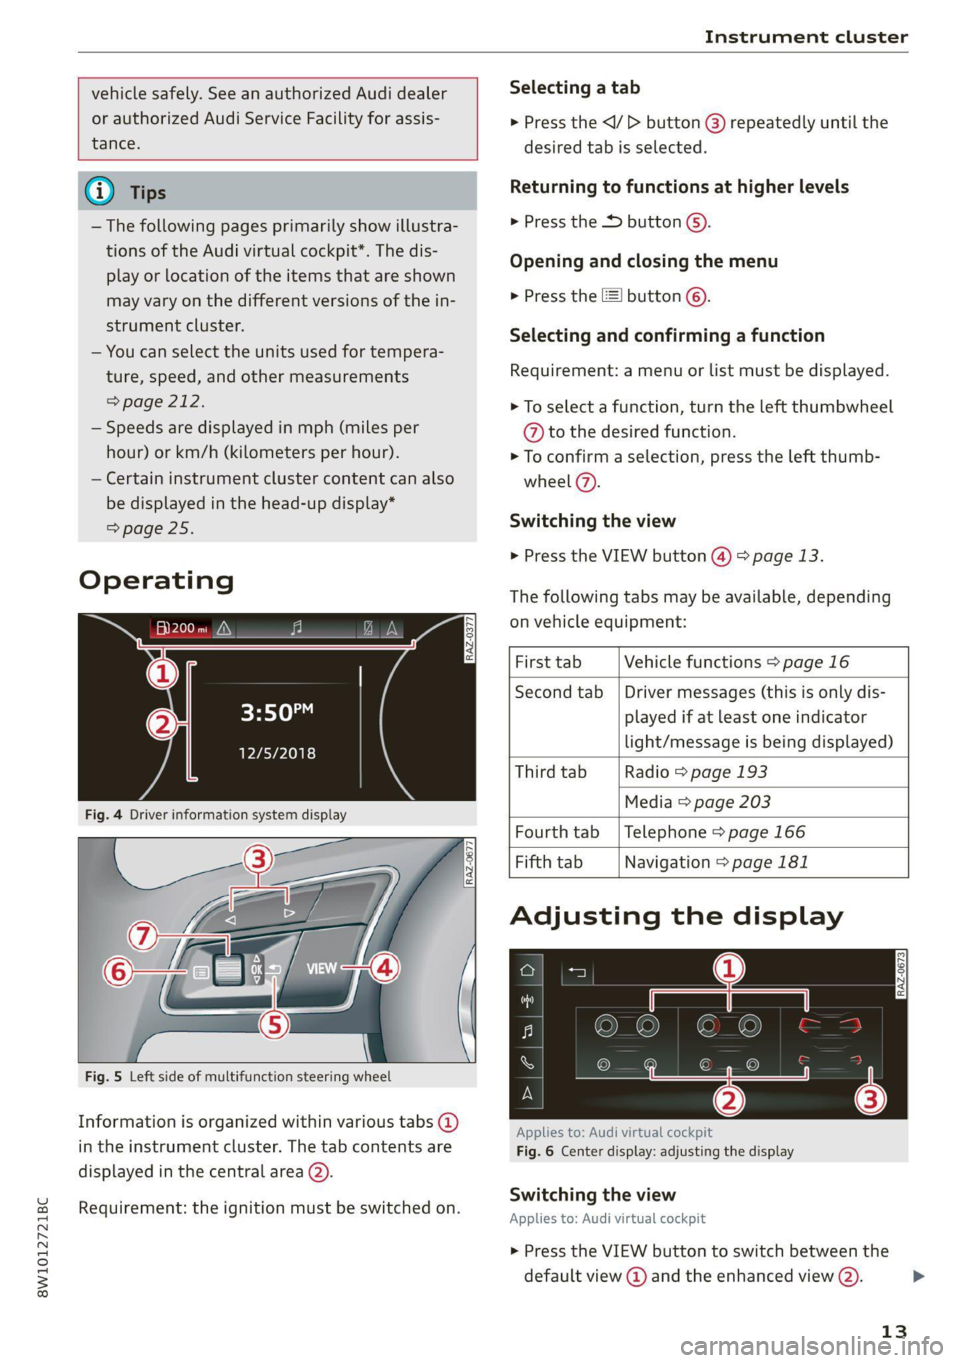
Operating
Fig. 5 Left side of multifunction steering wheel
Information is organized within various tabs @)
in the instrument cluster. The tab contents are
displayed in the central area (2).
Requirement: the ignition must be switched on.
RAZ-0377
Selecting a tab
> Press the
desired tab is selected.
Returning to functions at higher levels
> Press the D button ôˋ).
Opening and closing the menu
ô£ Press the [=] button ôˋ).
Selecting and confirming a function
Requirement: a menu or list must be displayed.
> To select a function, turn the left thumbwheel
@ to the desired function.
> To confirm a selection, press the left thumb-
wheel (7).
Switching the view
> Press the VIEW button @) > page 13.
The following tabs may be available, depending
on vehicle equipment:
First tab Vehicle functions > page 16
Second tab | Driver messages (this is only dis-
played if at least one indicator
light/message is being displayed)
Third tab Radio > page 193
Media > page 203
Fourth tab | Telephone > page 166
Fifth tab Navigation > page 181
Adjusting the display
RAZ-0673
Applies to: Audi virtual cockpit
Fig. 6 Center display: adjusting the display
Switching the view
Applies to: Audi virtual cockpit
> Press the VIEW button to switch between the
default view @ and the enhanced view (2).
13
Page 16 of 304
Instrument cluster
Adjusting the layout
Applies to: Audi virtual cockpit
Depending on the vehicle equipment, various lay-
outs may be available.
> Applies to: MMI: Select on the home screen:
SETTINGS > Display & brightness > Audi virtu-
al cockpit.
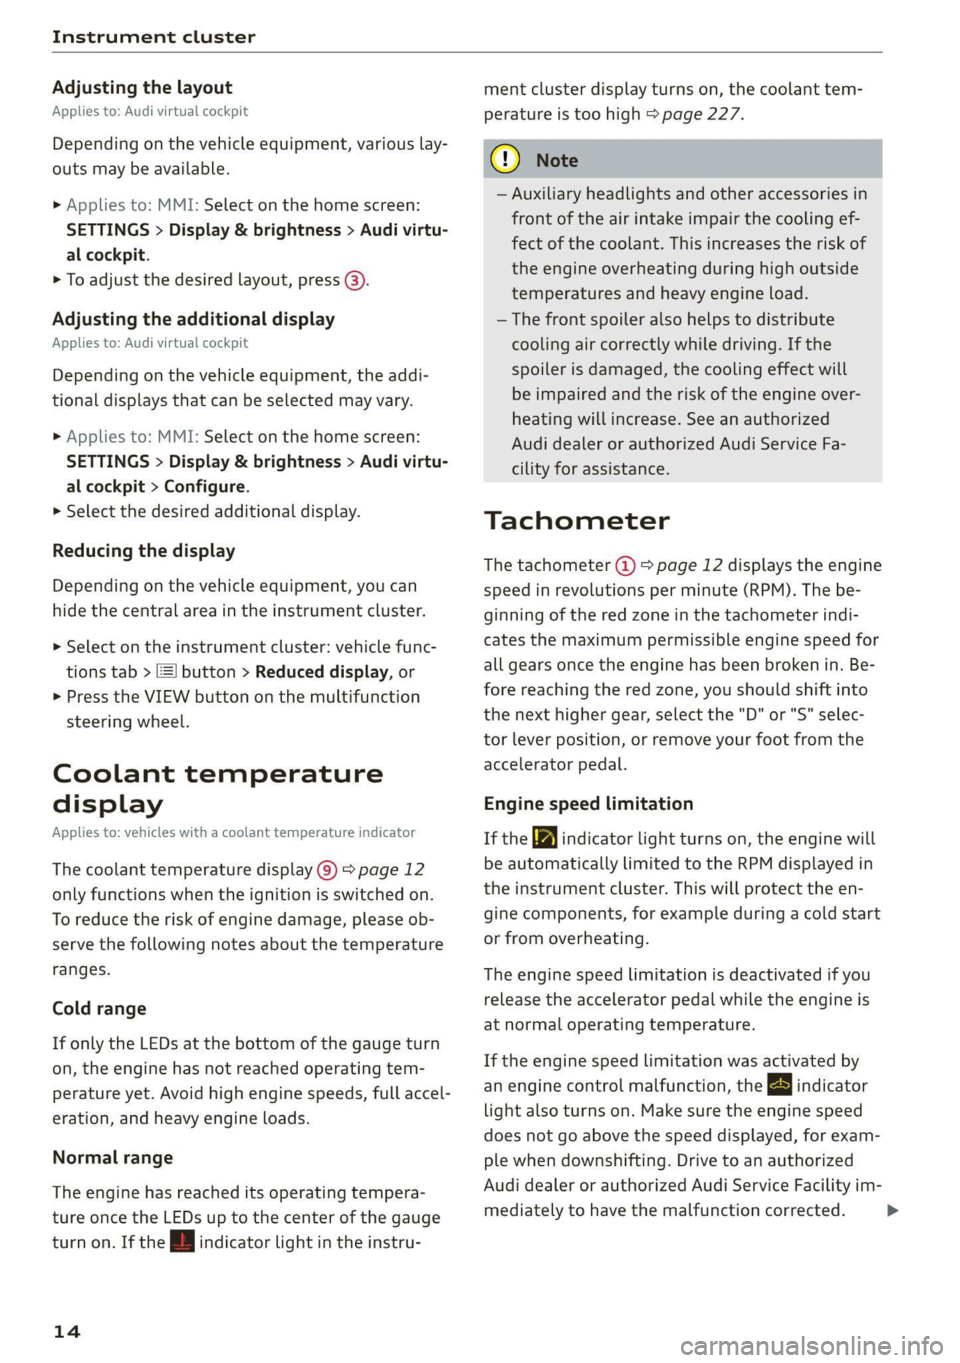
> To adjust the desired layout, press @).
Adjusting the additional display
Applies to: Audi virtual cockpit
Depending on the vehicle equipment, the addi-
tional displays that can be selected may vary.
> Applies to: MMI: Select on the home screen:
SETTINGS > Display & brightness > Audi virtu-
al cockpit > Configure.
> Select the desired additional display.
Reducing the display
Depending on the vehicle equipment, you can
hide the central area in the instrument cluster.
> Select on the instrument cluster: vehicle func-
tions tab > [=] button > Reduced display, or
> Press the VIEW button on the multifunction
steering wheel.
Coolant temperature
display
Applies to: vehicles with a coolant temperature indicator
The coolant temperature display @) > page 12
only functions when the ignition is switched on.
To reduce the risk of engine damage, please ob-
serve the following notes about the temperature
ranges.
Cold range
If only the LEDs at the bottom of the gauge turn
on, the engine has not reached operating tem-
perature yet. Avoid high engine speeds, full accel-
eration, and heavy engine loads.
Normal range
The engine has reached its operating tempera-
ture once the LEDs up to the center of the gauge
turn on. If the | indicator light in the instru-
14
ment cluster display turns on, the coolant tem-
perature is too high > page 227.
() Note
ã Auxiliary headlights and other accessories in
front of the air intake impair the cooling ef-
fect of the coolant. This increases the risk of
the engine overheating during high outside
temperatures and heavy engine load.
ã The front spoiler also helps to distribute
cooling air correctly while driving. If the
spoiler is damaged, the cooling effect will
be impaired and the risk of the engine over-
heating will increase. See an authorized
Audi dealer or authorized Audi Service Fa-
cility for assistance.
Tachometer
The tachometer @) > page 12 displays the engine
speed in revolutions per minute (RPM). The be-
ginning of the red zone in the tachometer indi-
cates the maximum permissible engine speed for
all gears once the engine has been broken in. Be-
fore reaching the red zone, you should shift into
the next higher gear, select the "D" or "S" selec-
tor lever position, or remove your foot from the
accelerator pedal.
Engine speed limitation
If the tA indicator light turns on, the engine will
be automatically limited to the RPM displayed in
the instrument cluster. This will protect the en-
gine components, for example during a cold start
or from overheating.
The engine speed limitation is deactivated if you
release the accelerator pedal while the engine is
at normal operating temperature.
If the engine speed limitation was activated by
an engine control malfunction, the By indicator
light also turns on. Make sure the engine speed
does not go above the speed displayed, for exam-
ple when downshifting. Drive to an authorized
Audi dealer or authorized Audi Service Facility im-
mediately to have the malfunction corrected. >
Page 54 of 304
Lights and Vision
Turn signal and high beam lever
BFV-0012
Fig. 42 Lever: switching on the turn signal and high beams
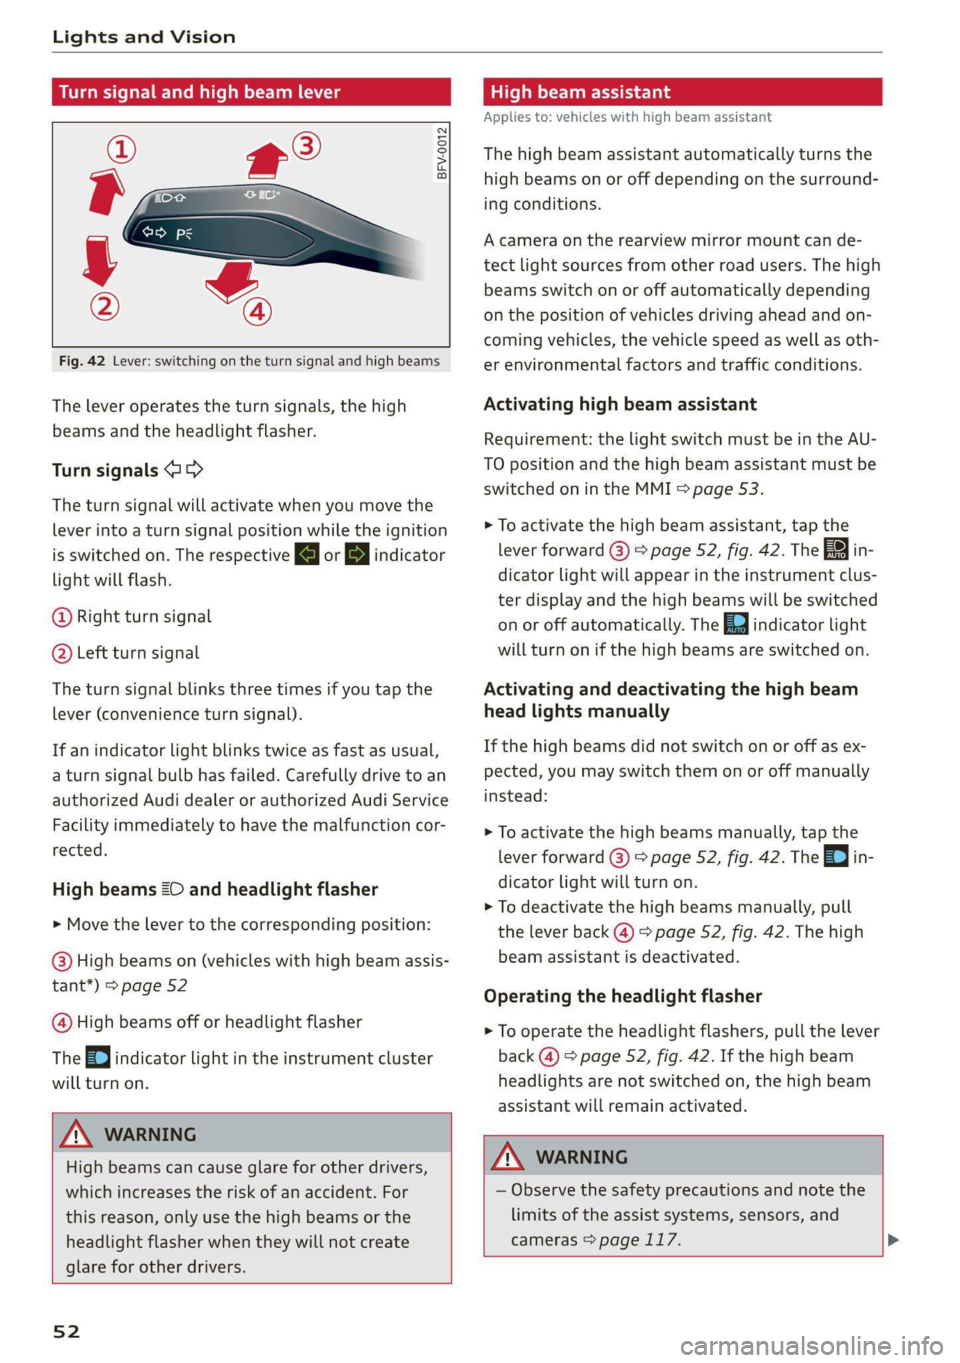
The lever operates the turn signals, the high
beams and the headlight flasher.
Turn signals @ >
The turn signal will activate when you move the
lever
into a turn signal position while the ignition
is switched on. The respective Kl or By indicator
light will flash.
@ Right turn signal
@ôÛ Left turn signal
The turn signal blinks three times if you tap the
lever (convenience turn signal).
If an indicator light blinks twice as fast as usual,
a turn signal bulb has failed. Carefully drive to an
authorized Audi dealer or authorized Audi Service
Facility immediately to have the malfunction cor-
rected.
High beams 20 and headlight flasher
> Move the lever to the corresponding position:
@) High beams on (vehicles with high beam assis-
tant*) > page 52
@ High beams off or headlight flasher
The
ED indicator light in the instrument cluster
will turn on.
Z\ WARNING
High beams can cause glare for other drivers,
which increases the risk of an accident. For
this reason, only use the high beams or the
headlight flasher when they will not create
glare for other drivers.
52
item luo
Applies to: vehicles with high beam assistant
The high beam assistant automatically turns the
high beams on or off depending on the surround-
ing conditions.
A camera on the rearview mirror mount can de-
tect light sources from other road users. The high
beams switch on or off automatically depending
on the position of vehicles driving ahead and on-
coming vehicles, the vehicle speed as well as oth-
er environmental factors and traffic conditions.
Activating high beam assistant
Requirement: the light switch must be in the AU-
TO position and the high beam assistant must be
switched on in the MMI > page 53.
> To activate the high beam assistant, tap the
lever forward @) > page 52, fig. 42. The 3&4 in-
dicator light will appear in the instrument clus-
ter display and the high beams will be switched
on or off automatically. The Ea indicator light
will turn on if the high beams are switched on.
Activating and deactivating the high beam
head lights manually
If the high beams did not switch on or off as ex-
pected, you may switch them on or off manually
instead:
> To activate the high beams manually, tap the
lever
forward @) > page 52, fig. 42. The & in-
dicator light will turn on.
> To deactivate the high beams manually, pull
the lever back @) > page 52, fig. 42. The high
beam assistant is deactivated.
Operating the headlight flasher
> To operate the headlight flashers, pull the lever
back @) > page 52, fig. 42. If the high beam
headlights are not switched on, the high beam
assistant will remain activated.
Z\ WARNING
ã Observe the safety precautions and note the
limits of the assist systems, sensors, and
cameras > page 117.
Page 56 of 304
Lights and Vision
Messages
If the 8; indicator light turns on, a bulb has
failed. The displayed message indicates the cause
and possible solutions. If one of the messages re-
mains on, drive immediately to an authorized
Audi dealer or authorized Audi Service Facility to
have the malfunction repaired.
By Audi adaptive light: malfunction! See own-
er's manual
Adaptive light* is not working. The headlights
still function. Drive immediately to an authorized
Audi dealer or authorized Audi Service Facility to
have the malfunction repaired.
By Headlight range control: malfunction! See
owner's manual
There is a malfunction in the headlight range
control system, which may cause glare for other
drivers. Drive to an authorized Audi dealer or au-
thorized Audi Service Facility immediately to have
the malfunction corrected.
High beam assistant: malfunction! See own-
er's manual
You can still switch the high beams on or off
manually. Drive immediately to an authorized
Audi dealer or authorized Audi Service Facility to
have the malfunction repaired.
High beam assistant: currently unavailable.
Camera view limited due to environmental con-
ditions
This message appears if the camera's visual field
is blocked. The system will switch itself off. Try
switching the systems on later.
[BY Automatic headlights: malfunction! See
owner's manual
The light/rain sensor is malfunctioning. In the
AUTO light switch position, the low beams re-
main switched on at all times for safety reasons.
Drive immediately to an authorized Audi dealer
or authorized Audi Service Facility to have the
malfunction repaired.
54
Interior lighting
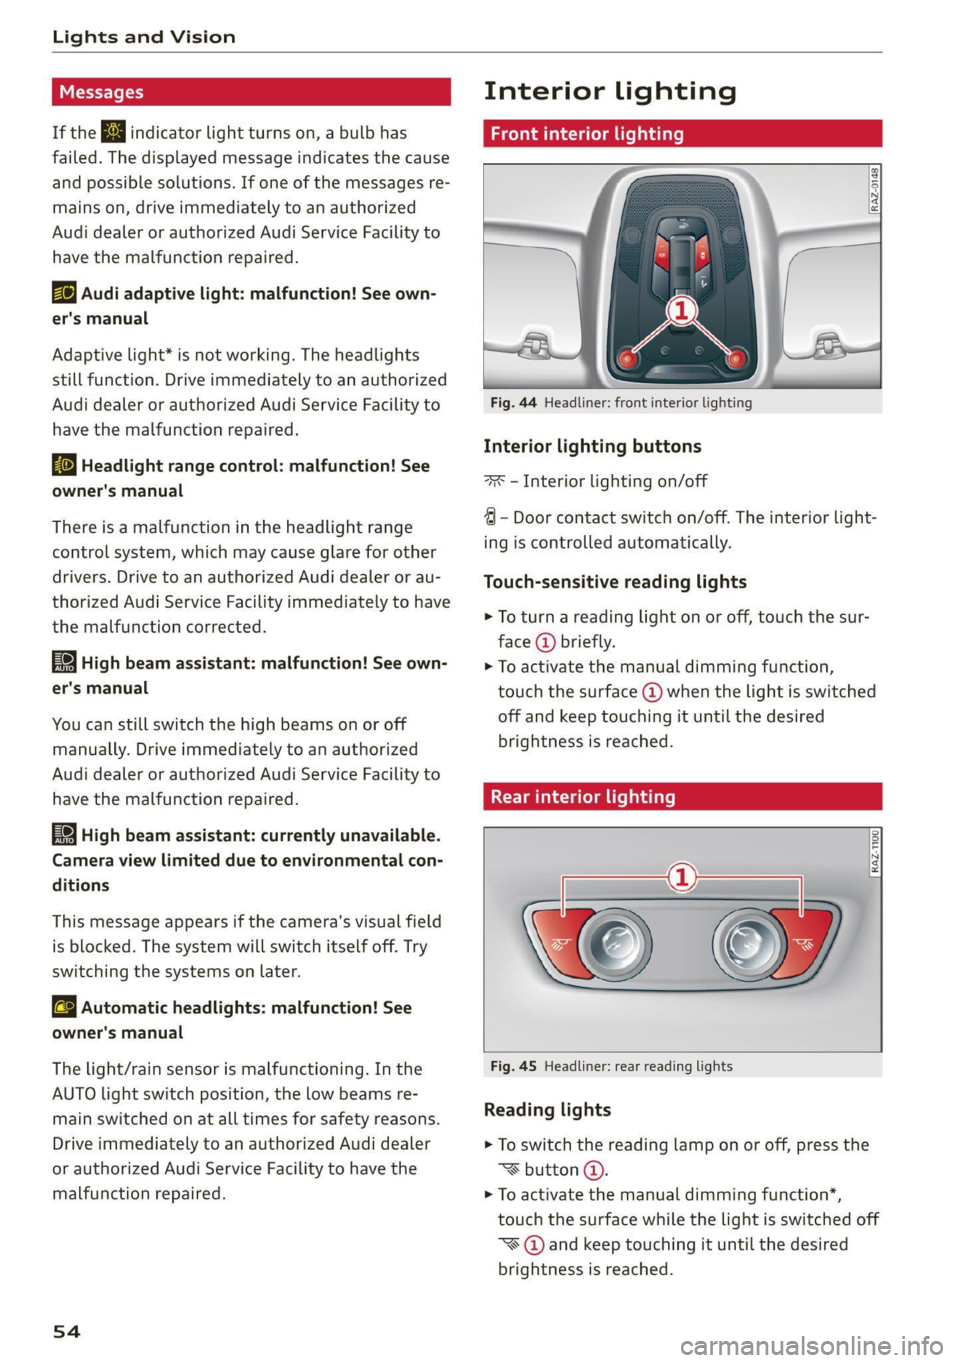
Front interior lighting
Fig. 44 Headliner: front interior lighting
Interior lighting buttons
ax ã Interior lighting on/off
4 - Door contact switch on/off. The interior light-
ing is controlled automatically.
Touch-sensitive reading lights
> To turn a reading light on or off, touch the sur-
face @ briefly.
> To activate the manual dimming function,
touch the surface @ when the light is switched
off and keep touching it until the desired
brightness is reached.
Rear interior lighting
RAZ-T100
Fig. 45 Headliner: rear reading lights
Reading lights
> To switch the reading lamp on or off, press the
~ôË button @.
> To activate the manual dimming function*,
touch the surface while the light is switched off
ã~ôË@ and keep touching it until the desired
brightness is reached.
Page 62 of 304
Lights and Vision
> Remove the wiper blade from the windshield
wiper arm mount @).
> Insert the new wiper blade into the mount on
the wiper arm until it clicks into place.
> Place the wiper arm back on the windshield.
> Exit the wiper blade replacement position.
ZX WARNING
ã For safety reasons, the windshield wiper
blades should be replaced once or twice
each year.
ã Dirty windshield wiper blades can impair vi-
sion, which increases the risk of an accident.
ôˋ) Note
ã The windshield wipers must only be lifted
up when in the wiper blade replacement po-
sition. Otherwise, you risk damaging the
paint on the hood or the windshield wiper
motor.
ã You should not move your vehicle or press
the windshield wiper lever when the wiper
arms are folded up from the windshield. The
windshield wipers would move back into
their original position and could damage the
hood and windshield.
Gi) Tips
ã You can also use the wiper blade replace-
ment position for other reasons, for exam-
ple if you want to protect the windshield
from icing by using a cover.
ã You cannot activate the wiper blade replace-
ment position when the hood is open.
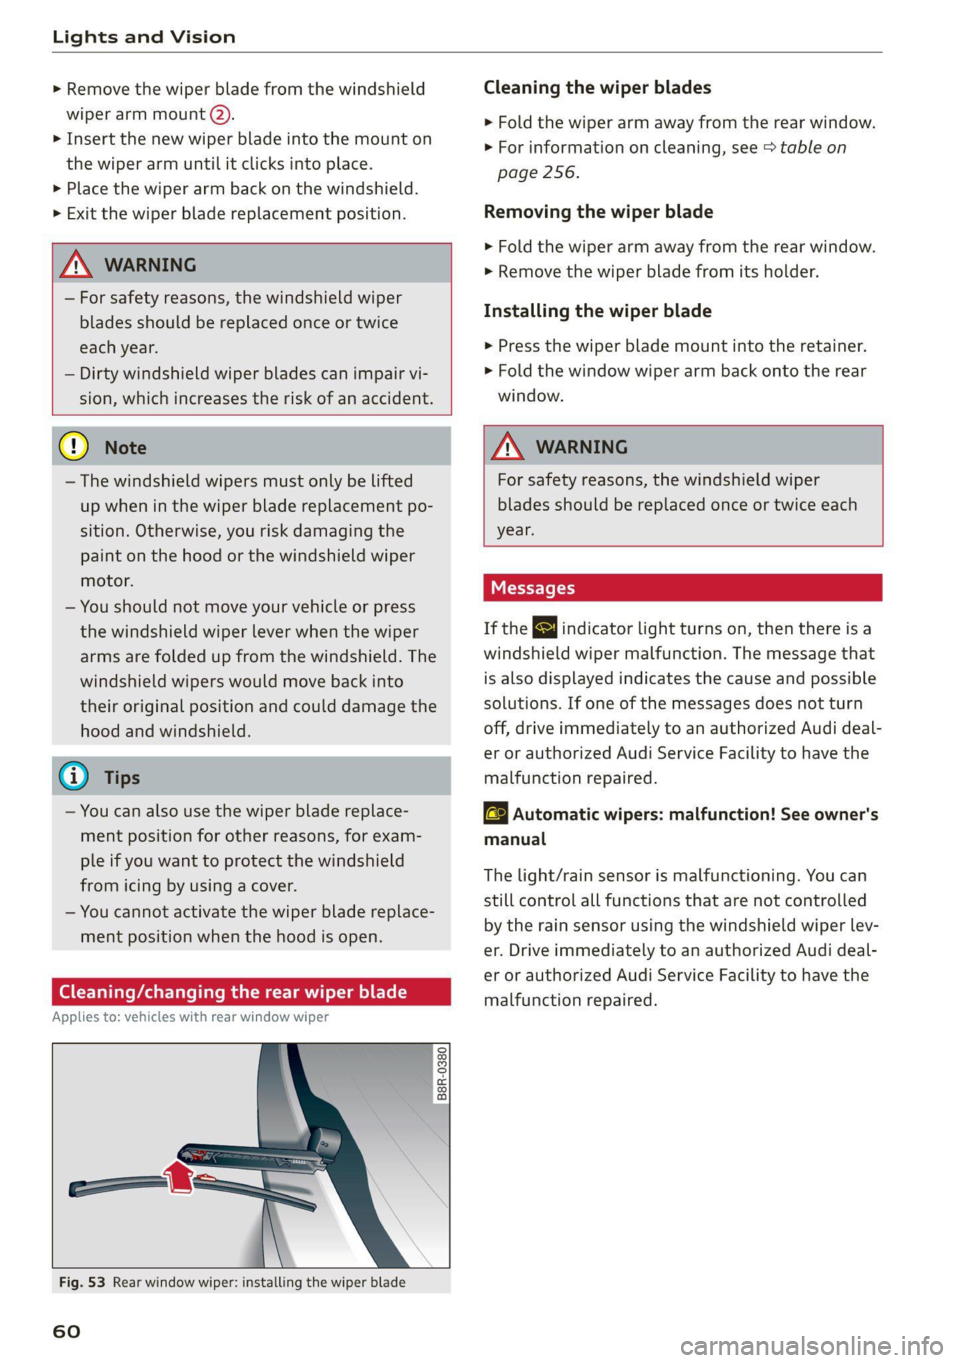
(aE Th} anging the rear wiper blade
Applies to: vehicles with rear window wiper
B8R-0380
Fig. 53 Rear window wiper: installing the wiper blade
60
Cleaning the wiper blades
> Fold the wiper arm away from the rear window.
>ô£ For information on cleaning, see > table on
page 256.
Removing the wiper blade
> Fold the wiper arm away from the rear window.
> Remove the wiper blade from its holder.
Installing the wiper blade
> Press the wiper blade mount into the retainer.
> Fold the window wiper arm back onto the rear
window.
ZA WARNING
For safety reasons, the windshield wiper
blades should be replaced once or twice each
year.
Messages
If the & indicator light turns on, then there is a
windshield wiper malfunction. The message that
is also displayed indicates the cause and possible
solutions. If one of the messages does not turn
off, drive immediately to an authorized Audi deal-
er or authorized Audi Service Facility to have the
malfunction repaired.
a Automatic wipers: malfunction! See owner's
manual
The light/rain sensor is malfunctioning. You can
still control all functions that are not controlled
by the rain sensor using the windshield wiper lev-
er. Drive immediately to an authorized Audi deal-
er or authorized Audi Service Facility to have the
malfunction repaired.
Page 74 of 304
Sitting correctly and safely
of whether the seat is equipped with an air-
bag or not.
ã Never place your feet on the instrument
panel, out of the window, or on the seat sur-
faces. To help ensure that the airbag system
can deploy correctly, never bend forward or
lean on the door or the side window. Other-
wise, serious and possibly fatal injuries can
occur if the airbags deploy.
ã People, animals, or objects between the
passengers and the airbag system can inter-
fere with the correct deployment of the air-
bag or can be thrown through the vehicle in-
terior, increasing the risk of serious or fatal
injuries. Make sure that nothing is located
between the vehicle occupants and the air-
bag system. Do not secure or transport any
objects within the deployment zone of the
airbag systems, especially on the steering
wheel, on the instrument panel, on the
doors, on the windows, or in the footwell.
ã Never put stickers on the airbag system cov-
ers or cover them with any objects.
ã Only lightweight clothing should be hung
from the garment hooks in the vehicle. Do
not use clothes hangers to hang clothing.
The pockets of the clothing must not con-
tain any heavy, breakable, or sharp-edged
objects. This could impair the effectiveness
of the side curtain airbags.
ã You must not use seat or protective covers
that are not specifically approved for use on
Audi seats with side airbags. Since the side
airbags deploy from the seat backrest, such
covers could impair the protective function
of the side airbags.
ã Damage to the original seat covers in the
side airbag deployment area must always be
repaired by an authorized Audi dealer or au-
thorized Audi Service Facility.
ã Airbag system components are installed at
various locations in your vehicle. Incorrect
work or repairs on the vehicle could damage
the airbag system components or impair
their functionality. This may prevent the air-
bags from deploying or cause them to de-
ploy incorrectly in the event of an accident,
which increases the risk of serious or fatal
72
injuries. Only have an authorized Audi dealer
or authorized Audi Service Facility make re-
pairs or modifications to a vehicle.
ã The airbag system can only provide protec-
tion during one collision. If there is another
collision, the airbag system will not deploy
again. If the airbag system has deployed,
have it replaced immediately by an author-
ized Audi dealer or authorized Audi Service
Facility.
ã Fine dust may appear if the airbags deploy.
This is completely normal and does not indi-
cate a fire in the vehicle. The fine dust can ir-
ritate the skin and mucous membranes in
the eyes and can cause difficulty breathing,
particularly for individuals who have or have
had asthma or other health issues that af-
fect breathing. Exit the vehicle or open the
windows or doors to get access to fresh air.
(i) Tips
If you are transporting children in the vehicle,
read the information and follow the safety
precautions > page 76.
Safety systems monitoring
The ka indicator light in the instrument cluster
monitors the safety systems such as the airbags
(including the control modules, sensor, and wir-
ing) and the belt tensioners. It turns on when you
switch the ignition on and turns off after several
seconds.
If the indicator light does not turn on when the
ignition is switched on, does not turn off after
several seconds, or turns on or flashes while driv-
ing, there may be a malfunction in one of the
safety systems. Drive to an authorized Audi deal-
er or authorized Audi Service Facility immediately
to have the malfunction corrected.
ZA WARNING
Have the malfunction in the safety systems in-
spected immediately. Otherwise, there is a
risk that the systems may not activate during
an accident, which increases the risk of seri-
ous or fatal injury.
Page 76 of 304
Sitting correctly and safely
within milliseconds. Inflated airbags reduce the
movement of passengers wearing safety belts in
the direction of the impact and thus help to re-
duce the risk of injury. They can help to protect
the head, upper body, and lap, for example. How-
ever, there is the possibility that airbag deploy-
ment can cause injuries.
The airbag system only works when the ignition
is turned on.
If you or other vehicle passengers have physical
limitations that prevent sitting in a correct posi-
tion, modifications to the vehicle may be neces-
sary. For more information, contact an author-
ized Audi dealer or authorized Audi Service Facili-
ty, or call Audi customer support at
1-800-822-2834.
@) Tips
The side curtain airbags in your vehicle have
ejection mitigation functions. This reduces
the risk of being ejected from the vehicle inte-
rior during an accident, especially in the event
of a vehicle rollover.
Advanced airbag system
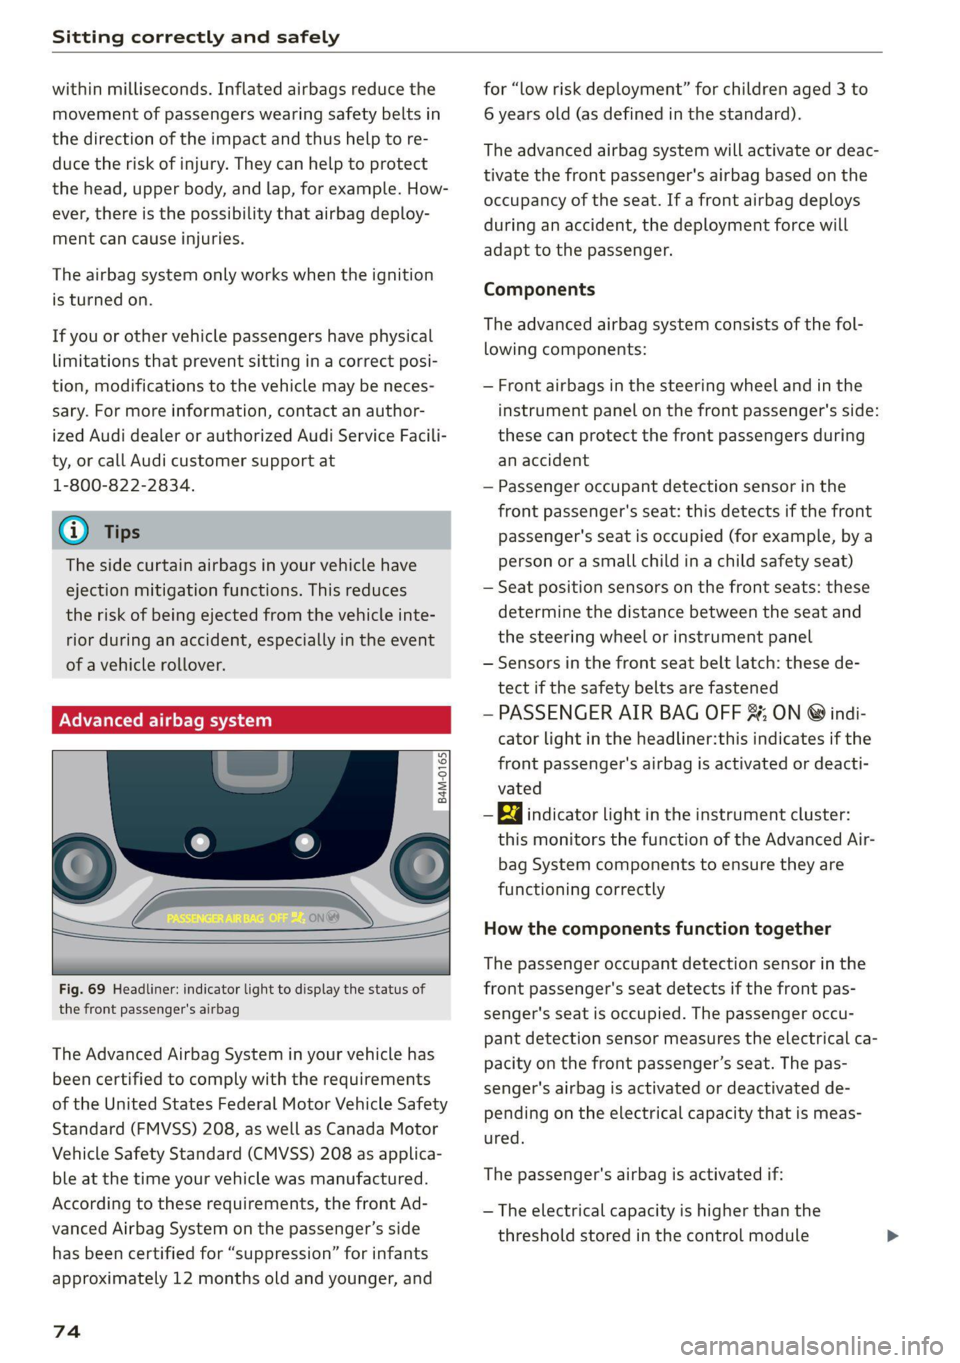
Fig. 69 Headliner: indicator light to display the status of
the front passenger's airbag
The Advanced Airbag System in your vehicle has
been certified to comply with the requirements
of the United States Federal Motor Vehicle Safety
Standard (FMVSS) 208, as well as Canada Motor
Vehicle Safety Standard (CMVSS) 208 as applica-
ble at the time your vehicle was manufactured.
According to these requirements, the front Ad-
vanced Airbag System on the passengerãs side
has been certified for ãsuppressionã for infants
approximately 12 months old and younger, and
74
for ãlow risk deploymentã for children aged 3 to
6 years old (as defined in the standard).
The advanced airbag system will activate or deac-
tivate the front passenger's airbag based on the
occupancy of the seat. If a front airbag deploys
during an accident, the deployment force will
adapt to the passenger.
Components
The advanced airbag system consists of the fol-
lowing components:
ã Front airbags in the steering wheel and in the
instrument panel on the front passenger's side:
these can protect the front passengers during
an accident
ã Passenger occupant detection sensor in the
front passenger's seat: this detects if the front
passenger's seat is occupied (for example, by a
person or asmall child in a child safety seat)
ã Seat position sensors on the front seats: these
determine the distance between the seat and
the steering wheel or instrument panel
ã Sensors in the front seat belt latch: these de-
tect if the safety belts are fastened
ã PASSENGER AIR BAG OFF ; ON ôÛ indi-
cator light in the headliner:this indicates if the
front passenger's airbag is activated or deacti-
vated
- ka indicator light in the instrument cluster:
this monitors the function of the Advanced Air-
bag System components to ensure they are
functioning correctly
How the components function together
The passenger occupant detection sensor in the
front passenger's seat detects if the front pas-
senger's seat is occupied. The passenger occu-
pant detection sensor measures the electrical ca-
pacity on the front passengerãs seat. The pas-
senger's airbag is activated or deactivated de-
pending on the electrical capacity that is meas-
ured.
The passenger's airbag is activated if:
ã The electrical capacity is higher than the
threshold stored in the control module
Page 77 of 304
8W1012721BC
Sitting correctly and safely
ã The electrical capacity is the same as or greater
than the electrical capacity of a typical adult
The passenger's airbag is deactivated if:
ã The electrical capacity is lower than the thresh-
old stored in the control module
ã The electrical capacity is the same as or less
than the electrical capacity of a typical one-
year-old child in a child safety seat that has
been used for certification in accordance with
FMVSS 208
If the front passenger's airbag is activated, the
PASSENGER AIR BAG ON @ indicator light
will turn on. If the front passenger's airbag is de-
activated, the PASSENGER AIR BAG OFF #;
indicator light will turn on.
The deployment force of the front airbags adapts
based on whether or not the safety belt is used
and the distance between the seat and the steer-
ing wheel/instrument panel. For example, if a
person is too close to the front airbag, the front
airbag will deploy with less force to help reduce
the risk of injury.
Meaning of PASSENGER AIR BAG OFF 3; ON
ôÛ indicator light
When the ignition is switched on, the system de-
tects whether the front passenger's seat is occu-
pied. PASSENGER AIR BAG OFF #; ON @
will turn on for several seconds during this proc-
ess. Then it will indicate whether the front pas-
senger's airbag is activated or deactivated.
ã PASSENGER AIR BAG OFF #%%;: the front
passenger's airbag is deactivated and will not
deploy in the event of an accident.
ã PASSENGER AIR BAG ON ôÛ:: the front pas-
senger's airbag is activated and could deploy in
the event of an accident.
If a change to the occupancy status of the front
passenger's seat is detected
PASSENGER AIR BAG OFF #, ON @ will
flash for several seconds and will then display the
status of the front passenger's airbag.
Always make sure the indicator light corresponds
to the occupancy of the front passenger's seat.
ã An adult or individual of similar size in the
front passenger's seat: the front passenger's
airbag must be activated, therefore
PASSENGER AIR BAG ON @ must remain
turned on.
ã An individual of smaller size (for example, an
adolescent or small adult) in the front pas-
senger's seat: the front passenger's airbag
must be activated, so
PASSENGER AIR BAG ON @ must stay on.
ã Child in a child safety seat on the front pas-
senger's seat: the front passenger's airbag
must be deactivated, so
PASSENGER AIR BAG OFF #ôË; must stay on.
ã Front passenger's seat not occupied: the front
passenger's airbag must be deactivated, so
PASSENGER AIR BAG OFF %; must stay on.
Z\ WARNING
ã An adult or a person with a small stature
(such as a young person or small adult) seat-
ed on the front passenger's seat will not be
protected by the passenger's airbag in the
event of a collision if the passenger's airbag
is deactivated. This increases the risk of in-
jury and death. Always make sure that
PASSENGER AIR BAG ON @ remains on
while driving. If
PASSENGER AIR BAG ON @ does not
turn on, make sure the front passenger is
sitting correctly in the seat > page 63 and
that there is nothing covering the front pas-
senger's seat (such as blankets or pillows).
If PASSENGER AIR BAG ON ôÛ@ still does
not turn on, the front passenger's seat must
not be used. Drive to an authorized Audi
dealer or authorized Audi Service Facility
and have the airbag system inspected.
ãAchild ina child safety seat on the front
passenger's seat - especially in a rear-facing
child safety seat - can receive a severe im-
pact if the front passenger's airbag deploys,
which increases the risk of serious or fatal
injury. Always secure child safety seats on
the rear seats. If special circumstances re-
quire the use of a child safety seat on the
front passenger's seat, always make sure
75
Page 102 of 304
Driving
Manually releasing the parking lock
B8W-0047
B8W-0162
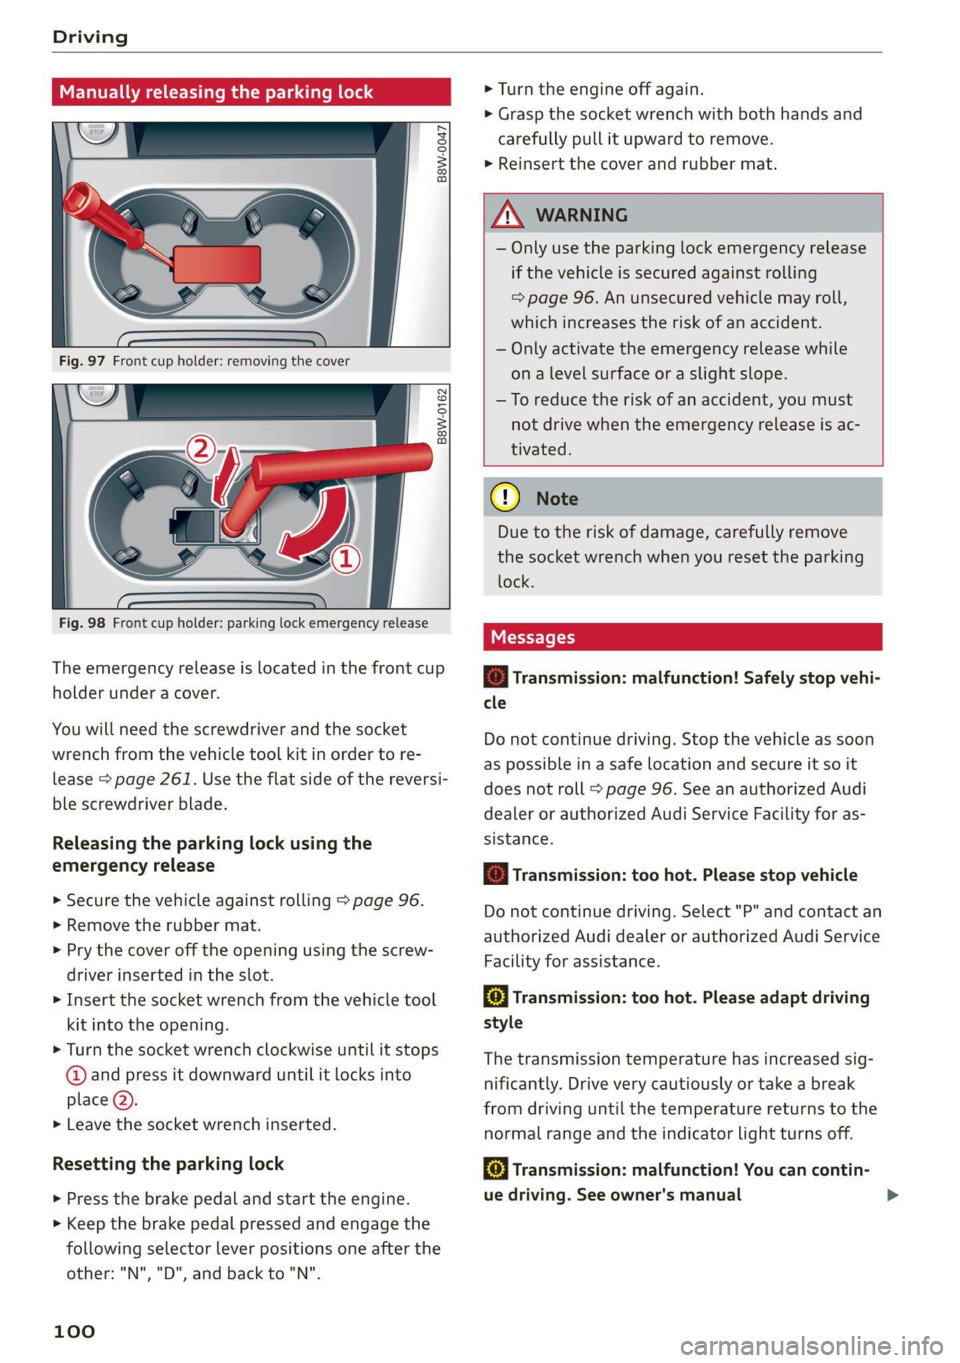
Fig. 98 Front cup holder: parking lock emergency release
The emergency release is located in the front cup
holder under a cover.
You will need the screwdriver and the socket
wrench from the vehicle tool kit in order to re-
lease > page 261. Use the flat side of the reversi-
ble screwdriver blade.
Releasing the parking lock using the
emergency release
> Secure the vehicle against rolling > page 96.
> Remove the rubber mat.
> Pry the cover off the opening using the screw-
driver inserted in the slot.
>ô£ Insert the socket wrench from the vehicle tool
kit into the opening.
> Turn the socket wrench clockwise until it stops
@ and press it downward until it locks into
place Q).
> Leave the socket wrench inserted.
Resetting the parking lock
> Press the brake pedal and start the engine.
> Keep the brake pedal pressed and engage the
following selector lever positions one after the
other: "N","D", and back to ""N".
100
> Turn the engine off again.
> Grasp the socket wrench with both hands and
carefully pull it upward to remove.
> Reinsert the cover and rubber mat.
ZA WARNING
ã Only use the parking lock emergency release
if the vehicle is secured against rolling
= page 96. An unsecured vehicle may roll,
which increases the risk of an accident.
ã Only activate the emergency release while
on a level surface or a slight slope.
ãTo reduce the risk of an accident, you must
not drive when the emergency release is ac-
tivated.
C) Note
Due to the risk of damage, carefully remove
the socket wrench when you reset the parking
lock.
Messages
i Transmission: malfunction! Safely stop vehi-
cle
Do not continue driving. Stop the vehicle as soon
as possible in a safe location and secure it so it
does not roll > page 96. See an authorized Audi
dealer or authorized Audi Service Facility for as-
sistance.
& Transmission: too hot. Please stop vehicle
Do not continue driving. Select "P" and contact an
authorized Audi dealer or authorized Audi Service
Facility for assistance.
fal Transmission: too hot. Please adapt driving
style
The transmission temperature has increased sig-
nificantly. Drive very cautiously or take a break
from driving until the temperature returns to the
normal range and the indicator light turns off.
& Transmission: malfunction! You can contin-
ue driving. See owner's manual
Page 107 of 304
8W1012721BC
Driving
ZA WARNING
ã Only apply the brakes for the purpose of
cleaning the brake system when road and
traffic conditions permit. You must not en-
danger other road users and increase the
risk of an accident.
ã Due to the risk of injury, only have an au-
thorized Audi dealer or authorized Audi
Service Facility work on the brake system.
Incorrect repairs could impair the function.
ã Never let the vehicle roll while the engine is
stopped because this increases the risk of an
accident.
ã During automatic braking maneuvers, the
brake pedal may move downward automati-
cally. To reduce the risk of injury, do not
place your foot under the brake pedal.
@) Note
ã Never let the brakes ãrubã by pressing the
pedal lightly when braking is not actually
necessary. This can cause the brakes to over-
heat and increases braking distance and
causes wear.
ã Observe the important information for driv-
ing downhill > page 107. This especially ap-
plies when towing a trailer.
@) Tips
ã In vehicles with an electromechanical brake
booster, the resistance in the brake pedal
may vary depending on the driving situation
(such as if driver assistance system are ac-
tive).
ã If you retrofit your vehicle with a front spoil-
er, wheel covers or similar items, make sure
that the air flow to the brakes is not ob-
structed. Otherwise the brake system can
overheat.
ã Also refer to the information about brake
fluid > page 229.
Ga 7 @ Brakes: malfunction! Stop vehicle
safely
There is a malfunction in the brake system. If
[S/ Bana fA also turn on, there is a malfunc-
tion in the ABS, ESC, and braking distribution. If
the brake booster is not working, you have to use
much more force when braking the vehicle.
Do not continue driving. See an authorized Audi
dealer or authorized Audi Service Facility for as-
sistance. Read and follow the other safety pre-
cautions > A\.
Hie / ôˋ Brake pads: wear limit reached. You
can continue driving. Please contact Service
The brake pads are worn. Drive to an authorized
Audi dealer or authorized Audi Service Facility as
soon as possible to have the malfunction correct-
ed.
Brake booster: limited functionality. You can
continue driving. Please contact Service
There is a brake booster malfunction. The brake
booster is available, but its effectiveness is re-
duced. The braking performance may be different
compared to the usual performance. Drive to an
authorized Audi dealer or authorized Audi Service
Facility immediately to have the malfunction cor-
rected.
Brake booster: deactivated. See owner's manual
The brake booster remains active for a brief peri-
od of time after switching off the ignition. Secure
the vehicle against rolling > page 96.
Other indicator lights
When you switch the ignition on, the EG i @
indicator light turns on briefly to check the func-
tion. If the indicator light does not turn on, there
is a system malfunction.
file / ôˋ stays on, there is a malfunction in
the brake system.
@- A high load was placed on the brakes from
driving downhill for a long period of time. Follow
the instructions in the message to utilize the en-
gine braking effect and to relieve the brakes.
Z\ WARNING
If a malfunction occurs in the ABS, ESC, and
braking distribution, interventions that >
105