door lock AUDI A4 AVANT 2008 Owner's Manual
[x] Cancel search | Manufacturer: AUDI, Model Year: 2008, Model line: A4 AVANT, Model: AUDI A4 AVANT 2008Pages: 368, PDF Size: 46.19 MB
Page 94 of 368
Clear vision
Adjusting th e outside mirrors
- Turn the adjus ting knob
to=> page 91, fig. 93 © (drive r's
side ou tside mirror)
to @ (front passenger's outside
m irror).
- Press the knob in the appropriate direction to move the
m irror surface so t hat you have a good view to the rear.
Folding both outside mirrors *
- Turn t he kn ob
to @ .
The mirror surfaces are heated whenever you sw itch on the rear
window defogger regardless of the outside temperature .
You are we ll- advised to fold the outside mirro rs in when maneu
vering in t ight spaces or when leaving the car parked close to other
vehic les.
A uto matic tilt -d own of passen ger side outsid e mirr or*
With the knob turned to posi tion ®=> page 91, fig. 93, the mirror on
the front passenger door will tilt downward s lightly when you move
the selector lever into
R ( R everse) . This feature provides a better
view of the curb when you are backing into a parking space.
T he mirror wil l go back to its original position when you shift out of
Reverse, or when y ou turn the control k nob back
to © or@ .
Memo ry setting for the outsid e mirrors *
On veh ic les w it h the memory function *, w hen you store a seat posi
tion in the memory, the position of the outside mirrors is a lso stored
in the
memory => page 100.
0 Note
• Curved mirror surfaces (co nvex o r spher ical*) i ncrease you r fie ld
of view . Remember that vehic les or other objects wil l appear smaller
and fa rther away than w he n seen in a fla t mi rro r. If yo u use t his mirror to estimate distances of following vehic
les when changing
lanes, you cou ld esti mate incorrec tly a nd cause an acc ident .
• I f the mirror housing is moved unintentional ly (for example,
while parking y our vehicle), t hen you must first fo ld the mirror e lec
trically. Do not readjust the mirror housing manually . You cou ld
damage the m otor which controls t he m irror.
[ i ] Tips
If there shou ld be a malfunction in t he electrical syste m, you can
sti ll ad just the outside mirrors by pressing the edge of the mirror .•
Ap plies to vehicles : wit h au tomat ica lly a djus tin g outs ide mirro rs
Automatic dimming for the outside mirrors
The outside mirro rs d im at t he same t ime as the ins ide mirror. W hen
the ignition is switched on, the mirrors automatical ly dim
depending on the amount of flight striking the mir ro rs (such as
headlights shinin g into the veh ic le from the rear).
When you switch on the in terior light , or when you move the
selector lever into
R (Reverse), the d imm ing function stops and the
mirrors return to their original condition (not darkened).
[ i ] Tips
The automat ic dimming feature on the mirrors wil l not operate
pro per ly if the ligh t shining on the m irrors is blocked by other
objects .•
Page 103 of 368
________________________________________________ S_ e_ a
_ t_
s _a_ n_d _ s_t _o _ r_ a_ g~ e __ ffllll
Memory buttons
On each memory button (On each memory button G) ,@ , G) and ©
=> page 100, fig. 102 , you can sto re a sea t and outside mirror posi
tion . Up to 4 different drivers can store their
settings .=> page 100,
fig. 102 , you can sto re a seat and outside mirro r position . Up to 4
d iffer ent driv ers can stor e their s ettings .
ST OP b utton
Press the STOP button to switch off the seat memory.
The word
OFF next to the STOP button wi ll illuminate. The 4 different
sea t adjust ments remain stored in th e memory . When the s eat
memory is switched off, then you can only adjust the seat and
outsid e mirrors in th e usual way .
It is recommended to use the STOP feature if your vehicle is going
to be used by another driver temporarily .
[ i ] Ti ps
• The vehicle must be turned on to p rogram the memory button
settings .
• You can recall a seat posi tion using either the memory bu ttons
or using the remote contro l
=> page 102.
• Seat position settings cannot be re ca lled if the s eat back is folded
forward. •
Applies t o vehi cle s: w ith po wer seats and driver's seat memory
Storing a seat position
Before you can store your seat position, the S TOP button
must be engaged (down) .
-Adjust the driver 's seat => page 97 .
Adjust both outside mirrors=> page 91.
Controls and equip
ment
-Press the MEMO button and hold it down. A t th e same time,
press one of the memory buttons for at least one seco nd.
-Re lease the buttons . The seat and outside mirror pos i-
t ions are now stored on that memory button.
Each time to assign a sea t position to a key , you ca ncel the seat posi
t ion, wh ich had be en assigned to that key befor e.
Whenever you store a new pos it ion on a memory button, the former
position is erased. W e recommend you assign m emory buttons
starting with button 1.
When you
l ock your vehicle using the remote control, the las t seat
and mirror position wil l be stored.
When you
unl ock your vehic le the next t ime, the mirrors and the
seat wi ll adjust automat ica lly to the last pos ition stor ed in your k ey .
This wil l not erase the seat posi tion a lready stored on memory
buttons (1) th rough (4).
•
App lies to veh ic les: w ith power seats and d river 's se at memory
Recalling a seat position
You can recall a seat position using either the memory
buttons or using the remote control in your key.
Usin g th e memory buttons
-Driver's door open -press the desired memo ry button.
-Driver's door c losed -press and hold the respective
memory button unt il the seat and the m irrors move into
t h eir store posi tion .
U sing th e remote control
-Un lock the vehicle using the remote contro l. Then open
the driver's door w ithin ten minutes . .,._
Page 104 of 368
___ S_ e
_ a_t_s _ a_n_ d
__ s _t _o _r_a ...::g==---- e ________________________________________________ _
If you do not open the door within ten minutes after unlocking it,
then you have to use the memory button to recall a seat position.
& WARNING
In an emergency, the recall operation can be stopped by pressing
the STOP button or by briefly pressing any given store button . •
App lies to vehicles: with power seats and driver's seat memory
Assigning the keys
Each remote key can be assigned to a memory button.
After you have stored your seat adjustments on a memory
button~ page 101 you can assign the remote key to the
memory button
Assigning a seat position to a key
- Press the memory button of the seat position you wish to
assign to your key.
- Hold down the memory button and within
ten seconds
press the unlock button on your remote control key.
- Release both buttons after
two seconds . Now that seat
position has been assigned to that remote key.
Canceling a seat position assigned to a key
-Hold the MEMO button depressed and within ten seconds,
press the unlock button on the remote control key.
- Release the
MEMO button after two seconds.
Each time to assign a seat position to a key, you cancel the seat posi
tion, which had been assigned to that key before. We recommend you assign
memory buttons (1) and (2) to the two
remote control keys you received with your vehicle. You can obtain
additional remote control keys from your authorized Audi dealer. •
Center armrest
The front center armrest can be adjusted to several posi
tions and contains a storage bin.
Adjusting the armrest
Fig. 103 Between the
front seats: armrest
folded down
- Press button @ down ~ fig. 103 and push armrest
down.
- Then lift the armrest slowly until it is in a comfortable
position.
Opening the storage bin
- Pull the release button ® upward.
Page 124 of 368
![AUDI A4 AVANT 2008 Owners Manual -
Seats and storage
----=---------------
0 Note
To avoid damaging the socket, only use plugs that fit properly.
[ i] Tips
When the engine is off and accessories are still plugg](/img/6/57552/w960_57552-123.png "AUDI A4 AVANT 2008 Owners Manual -
Seats and storage
----=---------------
0 Note
To avoid damaging the socket, only use plugs that fit properly.
[ i] Tips
When the engine is off and accessories are still plugg")
-
Seats and storage
----=---------------
0 Note
To avoid damaging the socket, only use plugs that fit properly.
[ i] Tips
When the engine is off and accessories are still plugged in and are
on , the vehicl e battery can still be drained .•
Storage
General overview
There are numerous places to store items in your vehicle.
Glove compartment
Center console
Owner's Literature
Compartments in the door trims
Coat hooks
Compartments in the door trims ::, page 122
=:> page 123
=:> page 123
------::, page 124
=:> page 124
=:> page 114
Some of the storage locations are only found on specific vehicle
models or are optional equipment.
& WARNING
• Always remove objects from the instrument panel. Any items
not put away could slide around inside the vehicle while driving or
when accelerating or when applying the brakes or when driving
around a corner.
• When you are driving make sure that anything you may have
placed in the center console or other storage locations cannot fall
& WARNING (continued)
out into the footwells. In case of sudden braking you would not be
able to brake, depress the clutch or accelerate.
• Any pieces of clothing that you have hung up must not interfere
with the driver's view. The coat hooks are designed only for light
weight clothing . Never hang any clothing with hard, pointed or
heavy objects in the pockets on the coat hooks. During sudden
braking or in an accident
-especially if the airbag is deployed -
these objects could injure any passengers inside the vehicle. •
Glove compartment
The glove compartment is illuminated and can be locked .
•
To open glove compartment
Fig. 132 Glove
compartment
- Pull the handle in the direction of the arrow ~ fig. 132
and swing the cover down to open.
_,,,
Page 140 of 368
___ o_ n_ t_h _e _ r_o _a_ d __________________________________________________ _
-Keep the release button pressed and lower the parking
brake~ &.
If you should drive off with the parking brake still set, a warning tone
will sound and the following will appear in the instrument cluster to
remind you to release the parking brake:
Parking brake set
The parking brake warning comes on only after you have driven for
longer than 3 seconds and faster than 5 mph (5 km/h).
The parking brake warning light Brake (USA)/
«Dl (CDN) illuminates
when the parking brake is set and you switch on the ignition.
& WARNING
Always release the parking brake completely. A partially engaged
brake will overheat the rear brakes, reduce their effectiveness and
cause excessive wear. This could lead to brake failure and an acci
dent.
0 Note
Only after the vehicle has come to complete stop, should you firmly
set the parking brake and either move the gearshift lever into 1st.
gear (manual transmission) or move the selector lever into
"P"
(Automatic transmission).•
Parking
To prevent a parked vehicle from rolling away, there are a
few things you should do.
When you park your vehicle, do the following:
-Stop the vehicle using the brake pedal.
-Set the parking brake firmly.
-Move the selector lever into the P position ~ &.
-Switch off the engine and remove the ignition key from
the ignition lock.
What else you should do when parking your vehicle on
an incline or decline
Turn the steering wheel so that if the vehicle should start to roll, it
will roll into the curb.
If you are parking on a
decline (the front of your vehicle facing
downhill), turn the front wheels to the right so that they point
toward the curb.
If you are parking on an incline (the front of your vehicle facing
uphill), turn the front wheels to the left so that they point
away from
the curb.
Move the selector lever into the P position.
& WARNING
This is how you can reduce the risk of injury when leaving your
vehicle.
• Never park the vehicle where it can come in contact with dry
grass, spilled fuel or any other flammable materials.
• Never allow anyone -especially small children -to remain in the
vehicle when it is locked. Locked doors make it more difficult for
rescuers to access the passenger compartment in the event of an
emergency. Danger to life!
• Never leave children unsupervised in the vehicle. Children
could release the parking brake or move the gearshift lever out of
gear. The vehicle could start to roll away and cause an accident.
• No matter what the season is, the temperature in a parked
vehicle can reach dangerous levels. •
Page 176 of 368
___ D_ r
_ i_v _i_n ..;::g :;_ S_ a_ f_ e_, ly'----------------------------------------------------
& WARNING
Improperly stored luggage or other items can fly through the
vehicle causing serious personal injury in the event of hard braking
or an accident. To help reduce the risk of serious personal injury:
• Always put objects, for example, luggage or other heavy items
in the luggage compartment .
• Always secure objects in the luggage compartment using the
tie-down hooks and suitable straps .
& WARNING
Heavy loads will influence the way your vehicle handles. To help
reduce the risk of a loss of control leading to serious personal
injury :
• Always keep in mind when transporting heavy objects, that a
change in the center of gravity can also cause changes in vehicle
handling:
-Always distribute the load as evenly as possible.
- Place heavy objects as far forward in the luggage compart-
ment as possible.
• Never exceed the Gross Axle Weight Rating or the Gross
Vehicle Weight Rating specified on the safety compliance sticker on the left door jamb. Exceeding permissible weight standards
can cause the vehicle to slide and handle differently.
• Please observe information on safe
driving => page 166.
& WARNING
To help prevent poisonous exhaust gas from being drawn into the
vehicle, always keep the rear lid closed while driving.
• Never transport objects larger than those fitting completely
into the luggage area because the rear lid cannot be fully closed.
& WARNING (continued)
• If you absolutely must drive with the rear lid open, observe the
following notes to reduce the risk of poisoning :
- Close all windows,
- Close the power roof*,
- Open all air outlets in the instrument panel,
- Switch off the air recirculation,
- Set the fresh air fan to the highest speed.
& WARNING
Always make sure that the doors, all windows, the power roof*
and the read lid are securely closed and locked to reduce the risk
of injury when the vehicle is not being used.
• After closing the rear lid, always make sure that it is properly
closed and locked.
• Never leave your vehicle unattended especially with the rear lid
left open. A child could crawl into the vehicle through the luggage
compartment and close the rear lid becoming trapped and unable
to get out . Being trapped in a vehicle can lead to serious personal
injury.
• Never let children play in or around the vehicle.
• Never let passengers ride in the luggage compartment . Vehicle
occupants must always be properly restrained in one of the
vehicle's seating positions.
[ i] Tips
Air circulation helps to reduce window fogging. Stale air escapes to
the outside through vents in the trim panel, on the left side of the
luggage compartment. Be sure to keep these slots free and open. •
Page 202 of 368

__ .....;.A..;.;.;. ir.;;b ;..; a;;;. g=.... s;;;..!. y.;;s ;.;;t ..;;e ;.;.m.;..;... ________________________________________________ _
• make sure that the safety belt tension sensor is not blocked.
Shake the safety belt latch on the front passenger seat back and
forth;
• If a strap or tether is being used to tie the child safety seat to the
front passenger seat, make sure that it is not so tight that it causes
the weight -sensing mat to measure more weight than is actually on
the seat.
If the PASSENGER AIR BAG OFF light still does not come on and does
not stay on continuously (when the ignition is switched on),
• take the child restraint off the front passenger seat and install it
properly at one of the rear seat positions. Have the airbag system
inspec ted by your Audi dealer immediately .
• move the child to a rear seat position and make sure that the
child is properly restrained in a child restraint that is appropriate for
its size and age.
The
PASSENGER AIR BAG OFF light should NOT come on when the
ignition is on and an adult is sitting in a proper seating position on
the front passenger seat. If the
PASSENGER AIR BAG OFF light
comes on and stays on or flashes for about 5 seconds while driving,
under these circumstances, make sure that:
• the adult on the front passenger seat is properly seated on the
center of the seat cushion with his or her back up against the back
rest and the backrest is not
reclined~ page 168, "Proper occupant
seating positions",
• the adult is not taking weight off the seat by holding on to the
passenger assist handle above the front passenger door or
supporting their weight on the armrest,
• the safety belt is being properly worn and that there is not a lot
of slack in the safety belt webbing,
• accessory seat covers or cushions or other things that may cause
an incorrect reading or impression on the weight-sensing mat
under the upholstery of the seat have been removed from the front
passenger seat, •
a safety belt extender has not been left in the safety belt latch for
the front passenger seat.
In addition to the
PASSENGER AIR BAG OFF light in the center of the
instrument panel, the message
PASSENGER AIR BAG OFF or
PASSENGER AIR BAG ON will briefly appear in the instrument cluster
display. This is to inform the driver of the current front passenger
airbag status. •
Important safety instructions on monitoring
the Advanced Airbag System
& WARNING
An airbag system that is not functioning properly cannot provide
supplemental protection in a frontal crash.
• If the airbag indicator light comes on, it means that there may
be something wrong with the Advanced Airbag System. It is
possible that the airbag will inflate when it is not supposed to, or
will not inflate when it should.
• Have the airbag system inspected immediately by your Audi
dealer.
& WARNING
If the front airbag inflates, a child without a child restraint, in a
rearward-facing child safety seat or
in a forward-facing child
restraint that has not been properly installed will be seriously
injured and can be killed .
• Even though your vehicle is equipped with an Advanced Airbag
System, make certain that all children, especially 12 years and
younger, always ride on the back seat properly restrained for their age and size .
• Always install forward or rear-facing child safety seats on the
rear seat -even with an Advanced Airbag System.
.,_
Page 218 of 368
___ C_h_ i_ld _ S_ a_ f_ e_ t__, y'-------------------------------------------------
in a crash. These child safety seats must never be used in the front
seat because of the risk of serious injury or death should the airbag
deploy in a
crash:::::, fig . 185.
& WARNING
Not using a child safety seat, using the wrong child safety seat or
improperly installing a child restraint increases the risk of serious
personal injury and death in a crash.
• Never install rear-facing child safety seats or infant carriers on
the front passenger seat -even with an Advanced Airbag System.
A child will be seriously injured and can be killed when the inflating airbag hits the child safety seat or infant carrier with
great force and smashes the child safety seat and child against the
backrest, center arm rest, or
door:::::, page 189, "Child restraints on
the front seat
-some important things to know".
• Always install rear-facing child safety seats or infant carriers on
the rear seat.
• Never install a rear-facing child restraint
in the forward-facing
direction. Such restraints are designed for the special needs of
infants and very small children and cannot protect them properly
if the seat is forward-facing.
• If you must install a rearward facing
child safety seat on the
front passenger seat because of exceptional circumstances and
the PASSENGER AIR BAG OFF light does not come on and stay on,
immediately install the rear-facing child safety seat in a rear
seating position and have the airbag system inspected by your
Audi dealer.
• Always read and heed all WARNINGS whenever using a child
restrained in a vehicle is being
used :::::, page 176, "Safety belts",
:::::, page 187, "Airbag system" and:::::, page 210, "Important things
to know". •
Convertible child safety seats
Properly used convertible child safety seats can help
protect toddlers and children over age one who weigh
between 20 and 40 lbs. (10 and 20 kg) in a crash.
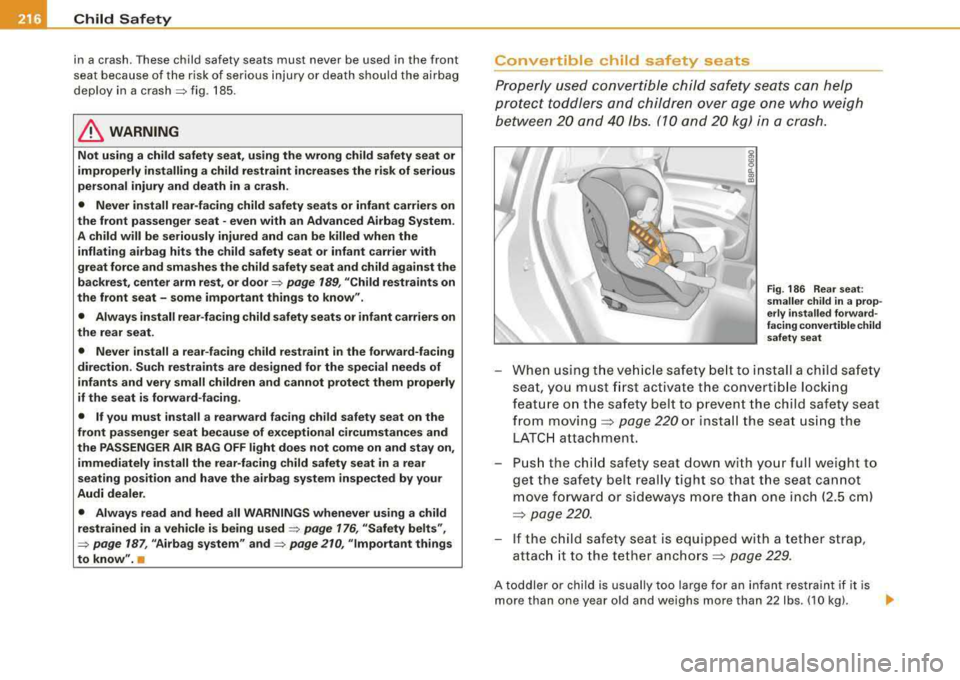
I d.. a, a,
Fig. 186 Rear seat:
smaller child in a prop·
erly installed forward·
facing convertible chi Id
safety seat
-When using the vehicle safety belt to install a child safety
seat, you must first activate the convertible locking
feature on the safety belt to prevent the child safety seat
from
moving ~ page 220 or install the seat using the
LATCH attachment.
-Push the child safety seat down with your full weight to
get the safety belt really tight so that the seat cannot
move forward or sideways more than one inch (2.5 cm)
~ page 220.
-If the child safety seat is equipped with a tether strap ,
attach it to the tether
anchors ~ page 229.
A toddler or child is usually too large for an infant restraint if it is
more than one year old and weighs more than 22 lbs. (10 kgl.
..,
Page 224 of 368
llfflJ_....:::C:.:.h :.:.i::.::
ld :...:: S::.::a :.:f .:::e ::.::t .!..y ____________________________________________ _
& WARNING
Rearward-facing child restraints:
• A child in a rearward-facing child safety seat installed on the
front passenger seat will be seriously injured and can be killed if
the front airbag inflates -even with an Advanced Airbag System.
• The inflating airbag will hit the child safety seat or infant
carrier with great force and will smash the child safety seat and
child against the backrest, center arm rest, door or roof.
• Always be especially careful if you must install a rearward
facing child safety seat on the front passenger seat in exceptional
circumstances.
• A tight tether strap on a rearward-facing child restraint
attached to the front passenger seat can put too much pressure
on the weight-mat in the seat and register a heavier weight in the
Advanced Airbag System. The heavier weight registered can make
the system work as though an adult were on the seat and deploy
the Advanced Airbag when it must be suppressed causing serious or even fatal injury to the child.
• Make sure that the PASSENGER AIR BAG OFF light comes on
and stays on all the time whenever the ignition is switched on.
• If the PASSENGER AIR BAG OFF light does not come on and stay
on, immediately install the rear-facing child safety seat in a rear
seating position and have the airbag system inspected by your
Audi dealer. •
Activating the convertible locking retractor
Use the convertible locking retractor to secure a child
restraint.
Always heed the child safety seat manufacturer's instruc
tions when installing a child restraint in your vehicle. To
activate the convertible locking retractor:
-Place the child restraint on a seat, preferably on the rear
seat.
-Slowly pull the belt all the way out.
-Route it around or through the child restraint belt path
=>& .
-Push the child safety seat down with your full weight to
get the safety belt really tight.
-Insert the belt tongue into the buckle for that seating
position.
-Guide the safety belt back into the retractor until the belt
lies flat and snug on the child safety seat.
-You should hear a "clicking" noise as the belt winds back
into the inertia reel. Test the convertible locking retractor
by pulling on the belt. You should no longer be able to
pull the belt out of the retractor. The convertible locking
retractor is now activated.
-Make sure that the red release button is facing away from
the child restraint so that it can be unbuckled quickly.
-Pull on the belt to make sure the safety belt is properly
tight and fastened so that the seat cannot move forward
or sideways more than one inch (2.5 cm).
& WARNING
Using the wrong child restraint or an improperly installed child
restraint can cause serious personal injury or death in a crash.
• Always make sure that the safety belt retractor is locked when
installing a child safety seat. An unlocked safety belt retractor
cannot hold the child safety seat in place during normal driving or
in a crash.
~
Page 272 of 368
Fuel supply and filling your fuel tank
Taking the fuel cap off
- To open the fuel filler flap, pull the button~ page 269,
fig. 200.
- Unscrew fuel filler cap counter-clockwise and hang it on the fuel filler flap.
Refuelling procedure
- Insert the fuel nozzle from the gasoline pump into the
fuel filler neck as far as it will go.
- Select a medium refuelling rate so that the nozzle
switches off automatically when the tank is full.
Putting the fuel cap back on
- After filling your tank, twist the fuel filler cap clockwise
until you hear a definite click.
- Close the fuel filler flap.
To avoid fuel spilling or evaporating from the fuel tank always close
fuel filler cap properly and completely. An improperly closed fuel
filler cap may also cause the MIL lamp => page 27to come on.
& WARNING
Improper refueling or handling of fuel can cause fire, explosion
and severe burns .
• Fuel is highly flammable and can cause severe burns and other
injuries.
• Failure to shut the engine off while refueling and/or to insert
the pump nozzle fully into the car's filler neck could cause fuel
overflow and fuel spray. Fuel spray and overflowing fuel are
dangerous because they can cause fire or serious injury.
& WARNING (continued)
• Never use a cellular telephone while refueling. The electromag
netic radiation can cause sparks that can ignite fuel vapors and
cause a fire .
• Never get back into your vehicle while refueling. If in excep
tional circumstances you must get back in your vehicle while refu
eling, make certain that you close the door and touch metal to
discharge static electricity before touching the filler nozzle again .
Static electricity can cause sparks that can ignite fuel vapors
released during refueling .
• Never smoke or have an open flame anywhere in or near your
vehicle when refueling or filling a portable fuel container.
• For your safety, we strongly recommend that you do not travel
with a portable fuel container in your vehicle. The container, full or
empty may leak and could cause a fire, especially in a crash.
• If, under exceptional circumstances, you must transport a
portable fuel container, please observe the following:
- Never fill a portable fuel container while it is anywhere in or
on the vehicle (for example, in the luggage compartment, or on
the trunk). Static electricity can build up while filling and can
ignite fuel vapors causing a fire.
- Always place a portable fuel container on the ground before
filling.
- Always keep the filler nozzle completely inside the portable container before and during filling.
- If filling a portable container made of metal, the filler nozzle must always be in contact with the container. This will help
prevent static electricity from discharging and cause a fire.
- Never spill fuel inside the vehicle or luggage compartment .
Fuel vapors are highly flammable.
- Always observe local and state/provincial laws regarding the
use, storage and transportation of fuel containers
~