fuel cap AUDI A4 AVANT 2008 Owners Manual
[x] Cancel search | Manufacturer: AUDI, Model Year: 2008, Model line: A4 AVANT, Model: AUDI A4 AVANT 2008Pages: 368, PDF Size: 46.19 MB
Page 18 of 368

Instruments and warning /indi cator lights
M alfun ction message
I f there is a malfunction somewhere in the inst rument cluster, dEF
wi ll appear in the trip odometer and will stay on . Contact your
authorized Audi dealer to have the prob lem corrected. •
Electronic immobilizer SAFE
Trying to start the vehicle with a non -a u thorized or a
defective key will ac tivate the electronic immobilize r.
miles
52YY
Fig. 6 Odom eter
di spl ay in the spe ed
o me ter: electroni c
immobilizer activat ed
Each time you swi tch on the igni tion, the data stored in the vehicle
key a re e lectronical ly scanned to verify that key data and vehicle
da ta ma tch .
I f a non-coded or a defective vehicle key is used , the word SAFE will
appear and remain lit in the uppe r (trip) odo meter display . If this
happens, the vehicle cannot be started
=> page 54 . •
Fuel gauge
The fuel gauge works only when the ignition is on . When the need
le reaches the red area , the warning light in the
instr ument cl uster will
il lu mi nate ::::> page 34 . This means yo u
have approximate ly 2 .4 ga llons (9 liters) of fue l left in the tank .
Time
to refuel!
The tota l tank capacity of your veh ic le is listed in => page 343,
"Data". Be aware of the different tank capacit ies of front -wheel and
quattro ® all -wheel drive models.
0 Note
Never run the tank completely dry! An i rregular supply of fuel can
cause engine misfir ing and fuel could ent er into th e exhaust
sys tem . The catalytic conver te r could then overheat and be
damaged .•
CHECK button
F ig . 7 CHE CK button i n
the in strument clu ster
The CHECK button performs the fol lowing functions :
Page 29 of 368

You can switch off the open-door-or-lid warning display by briefly pressing the On Board computer control
but tons => page 39. The
open door or trunk warn ing will, however, illuminate again as soon
as there is a change in the position of the doors, engine hood or
trunk lid. •
On-Board Diagnostic system (OBD)
Malfunction Indicator Lamp (MIL) (USA
models) / (Canada models)
The Malfunction Indicator Lamp (MIU in the instrument cluster
=> page 19, fig. 9 is part of the On -Board Diagnostic (OBD II) system.
The warning/indicator light il luminates when the ignition is
switched on and goes out after the engine starts and the idle has
stabi lized . This indicates that the MIL is working prope rly.
If the light do es not go out after the engine is started, or illuminates
while you are driving, a malfunction may exist in the engine system.
If the light starts flashing, the catalytic converter could be damaged .
Continue driving
w ith redu ced pow er (avoiding sustained high
speeds and/or rapid accelerations) and have the condition
corrected. Contact your authorized Audi dealer.
If the light illuminates, the e lectronic speed limiter may also be
malfunctioning . For more
information=> page 28, "Electronic speed
limiter".
An impr operly c lo se d fuel filler cap may al so cau se th e MIL l amp to
illumi nate
=> page 269. •
Controls and equip
ment
Dri ver inf orma tio n di spl ay
On -Board Diagnostics
F ig. 15 Locatio n of
Da ta Li nk Co nnecto r
( DL Cl
On-Board Diagnostics monitors the components of your emission
control system . Each control led component in your engine system
has been assigned a code. In case of a malfunction, the component
wil l be identified and the fault stored as a code in the control
modu le memory.
The M IL lamp may a lso illuminate if there is a leak in the on-board
fuel vapor recovery system. If the light illuminates after a refuelling,
pull off the road and stop the vehicle, then check that the fuel fi ller
cap is proper ly closed
=> page 269.
In order to make an accurate diagnosis, the stored data can only be
displayed using special diagnos tic equipment (generic scan tool for
OBD).
In order to connect the special diagnostic equipment, push the plug
into the Data Link Connector (DLC). The DLC is located to the right of
the engine hood release
lever => fig. 15 .
Your author ized Audi dealer or a qua lified service station can inter
pre t the code and perform the necessary repair. •
irechnical data
Page 52 of 368
Driver inf orma tion di spl ay
-Push the I RESET I button.
-Push in the upper (lower) protrusion on the function
se lector switch
@ to select the Sto re pre ssure s option
~ page 49, fig. 41.
Following each intentional change in specified pressures , tire pres
sures must be resaved .
Af ter the pressures are saved, the tire pressure monitoring system
measures the current tire pressures and saves them as the new
specified pressures .
[ i] Tips
• The tire pressure is shown on the tire pressure label. On USA
vehic les, the tire pressure label is located on the driver's side 8-
pillar. On Canada vehicles, the tire pressure labe l is located either on
the driver's side 8 -pillar or inside the fuel filler flap . The tire pressure
label lists the recommended cold tire inflation pressures for the
vehicle at its maximum capacity weight and the tires that were on
your vehicle at the time it was manufactured. For recommended tire
pressures for normal load cond itions, please see chapter
~ page 297.
• The tire pressure monitoring system he lps the driver to keep an
eye on tire pressures. But the driver stil l has the responsibility for
mainta ining the correct tire pressure. •
Applies to vehic les : w it h tir e press ure m onit oring sys te m
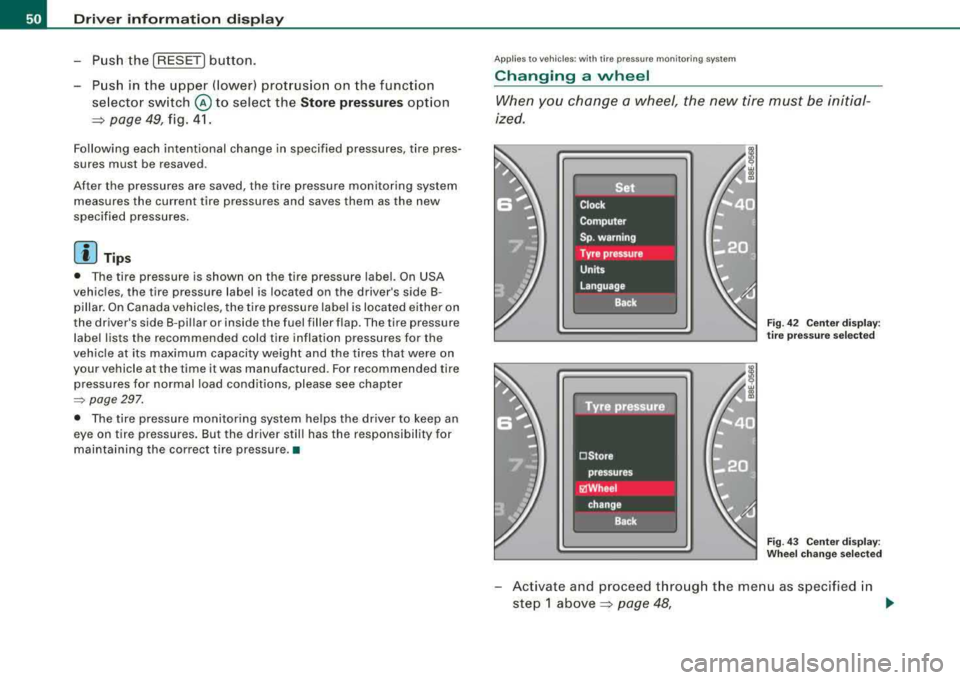
Changing a wheel
When you change a wheel, the new tire mus t be initial
ized.
Fi g. 4 2 C enter display :
t ir e pr ess ure se lected
Fig . 4 3 Ce nter displa y:
W heel ch ang e se lecte d
-Act ivate and proceed through the menu as specified in
step 1
above~ page 48, .,
Page 270 of 368
Fue l su pply and fillin g yo ur fu el tank
Ble nd of g aso line and ethanol (grain alco hol or ethyl alco ho l!
• Anti-knock index must be 87 AKI or higher.
• Blend must not contain more than 10% ethanol.
Blend of ga solin e and MTBE
• Anti-knock index must be 87 AKI or higher.
• Blend must contain not more than 15% MTBE.
Sea sonall y adj usted ga soline
Many gasoline grades are blended to perform especia lly we ll for
winter or summer drivi ng . Dur ing seasona l change -over, we suggest
that you fil l up at busy gas stations where the seasonal adjustment
is more likely to be made in time .
0 Note
• Methanol fuels which do not meet these requirements may
cause corrosion and damage to plastic and rubber components in
the fue l system.
• Do not use fuels that fail to meet the specified criteria in this
chapter .
• If you are unable to determine whether or not a particu lar fuel
b lend meets the specifications, ask your service station or its fuel
supplier.
• Do not use fuel for w hich the contents ca nnot be identified.
• Fue l system damage and performance problems resulting from
t he use of fuels different fro m those specified are no t the responsi
bility of Audi and are not covered under the New Vehicle or the
Em ission Control System Warranties .
• If you experience a loss of fue l economy or driveabi lity and
performa nce problems due to the use of o ne of these fuel blends,
we recommend that you switch to unblended fuel. •
Gasoline additives
A major concern among many auto manufacturers is carbon
depos it build-up caused by the type of gasoline you use.
A lthough gasoline grades differ from one manufacturer to another,
they have certain things in common. All gaso line grades contain
substances that can cause deposits to co llect on vital engine parts,
such as fue l injectors and intake valves. A lthough most gaso line
brands include additives to keep engine and fue l systems clean,
they are not equal ly effective .
Audi reco mmends using TOP TIER De tergen t Gasoline. For more
information on TOP T IER Detergent Gasoline, please go to the offi
cia l website (www.toptie rgas .com).
After an extended period of using inadequate fuels, built-up carbon
deposits can rob your engine of peak performance .
(D Note
Damage or malfunction due to poor fuel qua lity is not covered by
the Aud i New Veh ic le Limited Warranty. •
Fuel tank
Fuel filler neck
The fue l fi ller neck is located o n the r ight rear side pane l be hin d the
fuel filler flap.
I f the power locking system shou ld fail, you can stil l open the flap
manual ly - for detai led instructions
see=> page 271 .
You can find the fuel tank capacity of your vehicle in Techni cal Dat a
=> page 343. ~
Page 271 of 368
The label on the inside of the fuel filler flap tells you the correct fuel
for your vehicle . F o r m ore information abou t fuel specif ications, see
=> page 267 .
Your vehicle fue l tank has an on -board refuelling vapor recovery
system. Th is feature helps to prevent fuel vapors from escapin g
from the tank and polluting the environment wh ile you refue l your
veh ic le . I n order to fi ll the ta nk properly whi le protect ing the envi
ronment, please follow this refueling procedure care fully .
& WARNING
Under normal operating conditions , never carry additional fuel
container s in your car. Gas canisters and other containers used to
transport fuel can be dangerous . Such conta iners , full or empty ,
may leak and could cause a fire in a collision . If you must transport
fuel to use for your lawn mower , snow blower , etc. , be very c areful
and always ob serve local and state law s regarding the u se , trans
port ation and storage of su ch fuel containers . Make certain the
container meets industry standards (ANSI/ASTM F852 -86 1.
0 Note
Never drive you r ve hicle unti l the fue l tank is comp le tely dry . The
irregular supply of fuel can cause misfiring . Gasoline cou ld enter
into the exha ust system and damage the catalytic c onverter. •
Fuel supply and fill ing your fuel tank
Refuelling
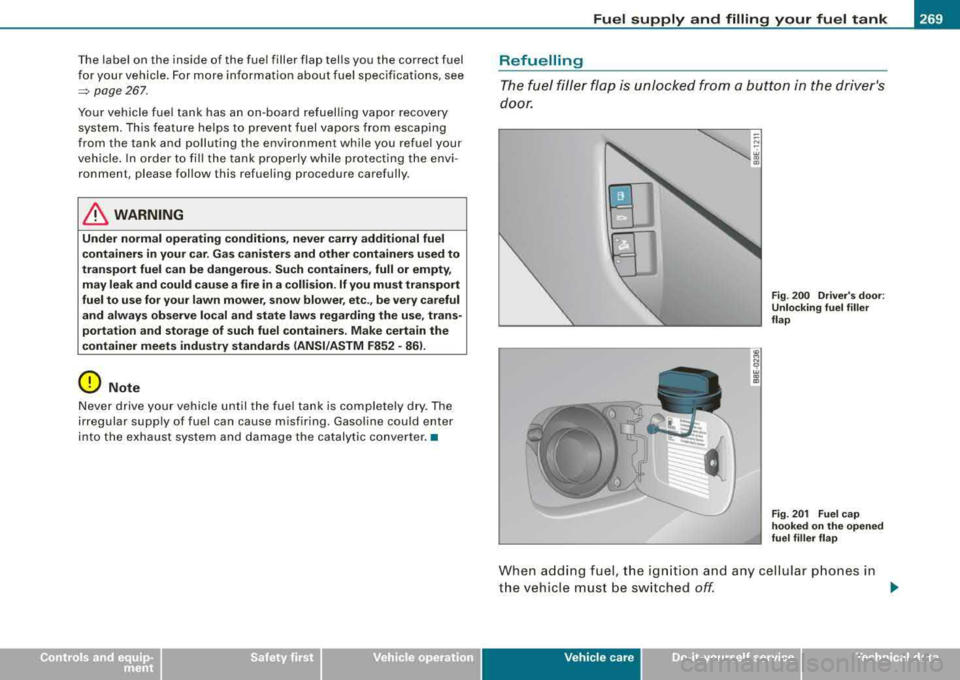
The fuel filler fl ap is unl ocked f rom a button in the dri ver's
door.
Fig . 2 00 Driv er's door :
Unl ocking fuel filler
flap
Fig . 201 Fu el c ap
hooked on the opened
fu el
fill er flap
When add ing fuel, the ign ition and an y cellular p hones in
t h e vehicle must be sw itched
off. .,.
Ve hic le care irechnical data
Page 272 of 368
Fuel supply and filling your fuel tank
Taking the fuel cap off
- To open the fuel filler flap, pull the button~ page 269,
fig. 200.
- Unscrew fuel filler cap counter-clockwise and hang it on the fuel filler flap.
Refuelling procedure
- Insert the fuel nozzle from the gasoline pump into the
fuel filler neck as far as it will go.
- Select a medium refuelling rate so that the nozzle
switches off automatically when the tank is full.
Putting the fuel cap back on
- After filling your tank, twist the fuel filler cap clockwise
until you hear a definite click.
- Close the fuel filler flap.
To avoid fuel spilling or evaporating from the fuel tank always close
fuel filler cap properly and completely. An improperly closed fuel
filler cap may also cause the MIL lamp => page 27to come on.
& WARNING
Improper refueling or handling of fuel can cause fire, explosion
and severe burns .
• Fuel is highly flammable and can cause severe burns and other
injuries.
• Failure to shut the engine off while refueling and/or to insert
the pump nozzle fully into the car's filler neck could cause fuel
overflow and fuel spray. Fuel spray and overflowing fuel are
dangerous because they can cause fire or serious injury.
& WARNING (continued)
• Never use a cellular telephone while refueling. The electromag
netic radiation can cause sparks that can ignite fuel vapors and
cause a fire .
• Never get back into your vehicle while refueling. If in excep
tional circumstances you must get back in your vehicle while refu
eling, make certain that you close the door and touch metal to
discharge static electricity before touching the filler nozzle again .
Static electricity can cause sparks that can ignite fuel vapors
released during refueling .
• Never smoke or have an open flame anywhere in or near your
vehicle when refueling or filling a portable fuel container.
• For your safety, we strongly recommend that you do not travel
with a portable fuel container in your vehicle. The container, full or
empty may leak and could cause a fire, especially in a crash.
• If, under exceptional circumstances, you must transport a
portable fuel container, please observe the following:
- Never fill a portable fuel container while it is anywhere in or
on the vehicle (for example, in the luggage compartment, or on
the trunk). Static electricity can build up while filling and can
ignite fuel vapors causing a fire.
- Always place a portable fuel container on the ground before
filling.
- Always keep the filler nozzle completely inside the portable container before and during filling.
- If filling a portable container made of metal, the filler nozzle must always be in contact with the container. This will help
prevent static electricity from discharging and cause a fire.
- Never spill fuel inside the vehicle or luggage compartment .
Fuel vapors are highly flammable.
- Always observe local and state/provincial laws regarding the
use, storage and transportation of fuel containers
~
Page 273 of 368
Fuel supply and filling your fuel tank ------------ -=--=---=-----:::,.......c._ _ __,
/b, WARNING (continued)
-Make certain the fuel container meets industry standards
(ANSI / ASTM F852-861.
0 Note
If any fuel has spilled onto the car, it should be removed immedi
ately to prevent damage to the paint.
ffi For the sake of the environment
As soon as the correctly operated no zzle switches off automatically
for the first time, the tank is full. Do not try to add more fuel because
fu el may spill out . In addition, the expansion space in the fuel tank
will be filled
-causing the fuel to overflow when it becomes warm
and pollute the environment.
[ i] Tips
• Running your engine while refuelling may cause vapors to
escape or even fuel to spill out of the tank. This would then shut off
the fuel nozzle before the tank is full.
• Do not refuel your vehicle with the ignition switched on. The fuel
gauge may o therwise not indicate the correc t fuel level after
refuelling. •
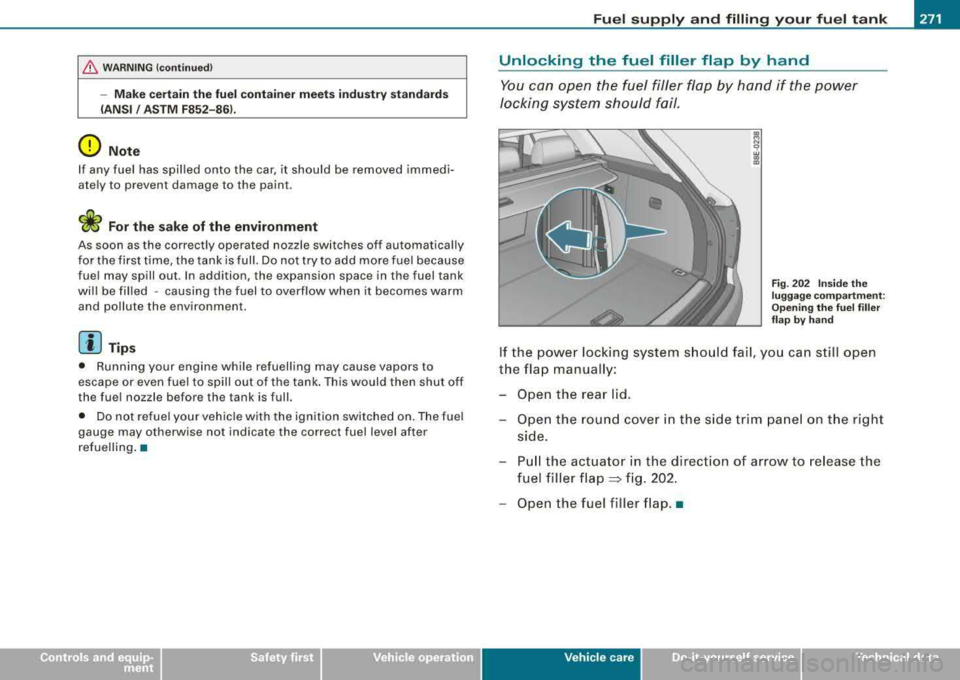
Unlocking the fuel filler f lap by hand
You can open the fuel filler flap by hand if the power
locking system should fail.
Fig . 202 Inside the
luggage compartment:
Opening the fuel filler
flap by hand
If the power locking system should fail, you can still open
the flap manually:
- Open the rear lid.
- Open the round cover in the side trim panel on the right
side.
- Pull the actuator in the direction of arrow to release the
fuel filler flap
=> fig. 202.
- Open the fuel filler flap. •
Vehic le care irechnical data
Page 275 of 368

Checking and filling -
-----------------------------==--------=--
& WARNING (continued)
ment. Wait until no steam or coolant can be seen or heard before
carefully opening the hood.
•
Closing the engine hood
- Pull the hood down until the pressure from the strut is
reduced.
- Let the hood
drop down and latch in place. Do not try to
push
it shut; it may fail to engage =:>& .
& WARNING
A hood that is not completely latched could fly up and block your
view while driving.
• When you close the engine hood, check it to make sure the
safety catch has properly engaged. The hood should be flush with
the surrounding vehicle body parts.
• If you notice while driving that the hood is not secured prop
erly, stop at once and close it. •
Working in the engine compartment
Be especially careful whenever you work in the engine
compartment.
Whenever you must perform any work in the engine compartment,
for example checking and filling different fluids, there is a risk of
injury, burns and accidents. To prevent personal injury always
observe the following WARNINGS . The engine compartment of any
vehicle is a hazardous area
=> & .
• I I • • I
& WARNING
To help avoid injury, before you check anything under the hood:
• Turn off the engine.
• Remove the ignition key .
• Apply the parking brake.
• Move selector lever of automatic transmission to
"P" (Park);
put manual transmission in Neutral.
• Always let the engine cool down. Hot components will burn
skin on contact.
• To reduce the risk of being burned, never open the hood if you
see or hear steam or coolant escaping from the engine compart
ment. Wait until no steam or coolant can be seen or heard before
carefully opening the hood.
• Keep children away from the engine compartment.
• Never spill fluids on hot engine components. They can cause a
fire.
• Never touch the radiator fan. The auxiliary electric fan is
temperature controlled and can switch on suddenly.
• Never open the coolant reservoir cap when the engine is still
warm . The coolant system is pressurized and hot coolant could
spray out.
• Protect your face, hands and arm from steam or hot engine
coolant by placing a thick rag over the cap when you open the
coolant reservoir .
• If work on the fuel system or the electrical system is necessary: -Always disconnect the battery.
- Never smoke or work near heaters or open flames. Fluids in
the engine compartment could start a fire .
- Keep an approved fire extinguisher immediately available.
• To avoid electrical shock and personal injury while the engine
is running or being started, never touch:
- Ignition cables
.,_
Vehicle care
Page 280 of 368
llffll...__C_ h_ e_c _k _ i_n ..::g ,_ a_n_ d_ f_il _li _n....: g==---------------------------------------------
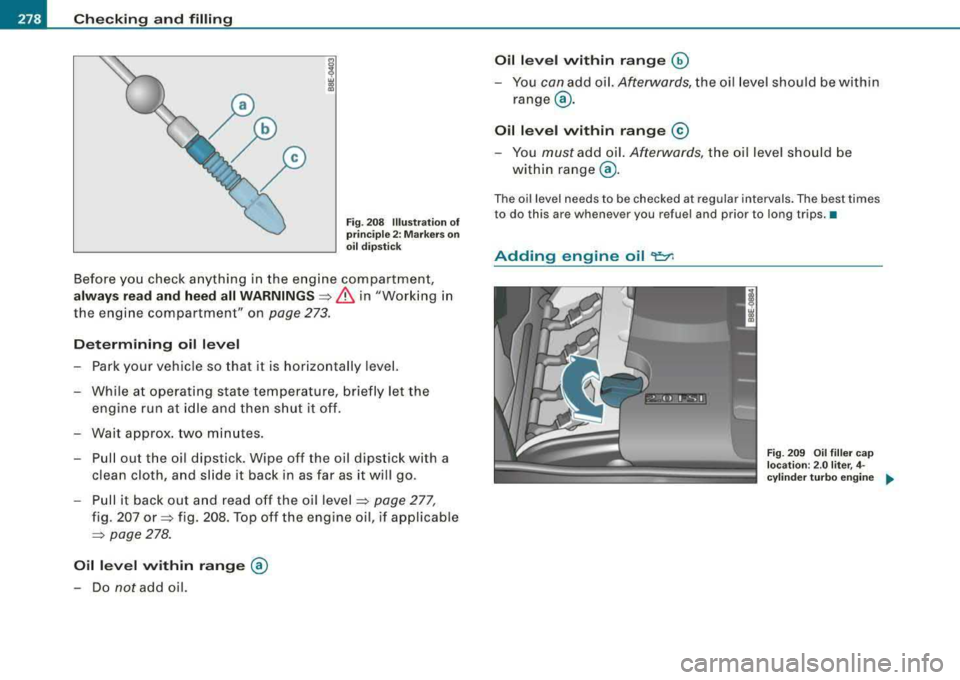
Fig. 208 Illustra tion o f
principle 2: Markers on
oil dipstick
Before you check anything in the engine compartment,
always read and heed all WARNINGS => & in "Working in
the engine compartment" on
page 273.
Determining oil level
-Park your vehicle so that it is horizontally level.
- While at operating state temperature, briefly let the
engine run at idle and then shut
it off.
- Wait approx. two minutes.
- Pull out the oil dipstick . Wipe off the oil dipstick with a
clean cloth, and s lide it back in as far as it will go.
- Pull it back out and read off the oil level
=> page 277,
fig. 207 or=> fig . 208. Top off the engine oil, if applicable
=> page 278.
Oil level within range @
-Do not add oil.
Oil level within range ~
You can add oil. Afterwards, the oil level should be within
range @.
Oil level within range ©
-You must add oil. Afterwards, the oil level should be
within range @.
The oil level needs to be checked at regular intervals. The best times
to do this are whenever you refuel and prior to long trips. •
Adding engine oil 'l:::7:
Fig. 209 Oil filler cap
locat ion: 2.0 liter , 4-
cylinder turbo engine
...
Page 296 of 368
___ T_ ir_e _ s_ a_ n
_ d_ w_ h_ e_ e_ls _________________________________________________ _
&, WARNING (continued)
crashes and serious personal injuries . Have worn or damaged tires
replaced immediately.
• Tires age even if they are not being used and can fail suddenly,
especially at high speeds. Tires that are more than 6 years old can
only be used in an emergency and then with special care and at
low speed.
Glossary of tire and loading terminology
Accessory weight
means the combined weight (in excess of those standard items
which may be replaced) of automatic transmission, power steering,
power brakes, power windows, power seats, radio, and heater, to
the extent that these items are available as factory-installed equip
ment (whether installed or not).
Aspect ratio means the ratio of the height to the width of the tire in percent.
Numb ers of 55 or lower indicate a low sidewall for improved
steering response and better overall handling on dry pavement.
Bead means the part of the tire that is made of steel wires, wrapped or
reinforced by ply cords and that is shaped to fit the rim.
Bead separation
means a breakdown of the bond between components in the bead.
Cord
means the strands forming the plies in the tire.
&, WARNING (continued)
• Never mount used tires on your vehicle if you are not sure of
their "previous history." Old used tires may have been damaged
even though the damage cannot be seen that can lead to sudden
tire failure and loss of vehicle control.
• If you notice unusual vibration or if the vehicle pulls to one side
when driving, always stop as soon as it is safe to do so and check
the wheels and tires for damage.
•
Cold tire inflation pressure
means the tire pressure recommended by the vehicle manufacturer
for a tire of a designated size that has not been driven for more than
a couple of miles (kilometers) at low speeds in the three hour period
before the tire pressure is measured or adjusted .
Curb weight
means the weight of a motor vehicle with standard equipment
including the maximum capacity of fuel, oil, and coolant, air condi
tioning and additional weight of optional equipment.
Extra load tire
means a tire designed to operate at higher loads and at higher infla
tion pressures then the corresponding standard tire. Extra load tires
my be identified as "XL", "xi", "EXTRA LOAD", or
"RF" on the side
wall.
Gross Axle Weight Rating ("GAWR")
means the load-carrying capacity of a single axle system, measured
at the tire-ground interfaces .
Gross Vehicle Weight Rating ("GVWR")
means the maximum total loaded weight of the vehicle.