engine AUDI A4 AVANT 2008 Workshop Manual
[x] Cancel search | Manufacturer: AUDI, Model Year: 2008, Model line: A4 AVANT, Model: AUDI A4 AVANT 2008Pages: 368, PDF Size: 46.19 MB
Page 156 of 368
___ T_ ra_ n_ s_ m_ is_ s_ io_ n _____________________________________________________ _
heavy acceleration. This gives best fuel efficiency, with early
upshifting and delayed downshifting.
The transmission will automatically select the
sporty shift programs
when you drive at higher speeds, or with heavy acceleration and
frequently changing speeds. Upshifts are delayed to make full use
of engine power. Downshifting takes place at higher engine speeds
than in the economy programs.
The selection of the most suitable shift program is a continuous,
automatic process. The driver can a lso make the transmission
switch to a sporty program by
quickly pressing down the gas pedal.
This causes the transmission to shift down into a lower gear ratio
and makes quick acceleration possible (to pass another vehicle) You
do not need to press the gas pedal into the kickdown range. After
the transmission has upshifted, the original program is selected
according to your driving style .
An additiona l shift program allows the automatic transmission to
select the proper gear for uphill and downhill gradients.
This prevents the transmission from shifting up and down unneces
sari ly on hills. The transmission will shift down to a lower gear ratio
when the driver presses the brake pedal on a downhill gradient. This
makes use of the braking effect of the engine without the need to
shift down manually .
If you are driving in hills and mountains, the transmission will
continuously adjust the gear ratio to the road grade. If you press the
brake pedal when driving downhill, the transmission will downshift
automatically . This increases the braking effect of the engine.
If the cruise control is on when you are traveling downhill, the trans
mission will automatical ly select a lower gear ratio in order to main
tain the set vehicle speed . This will cause the engine speed to
increase. •
Applies to vehi cles : wi th mu ltit roni c™ Con tinu ousl y V ariabl e Tra nsmi ssio n lC VT I
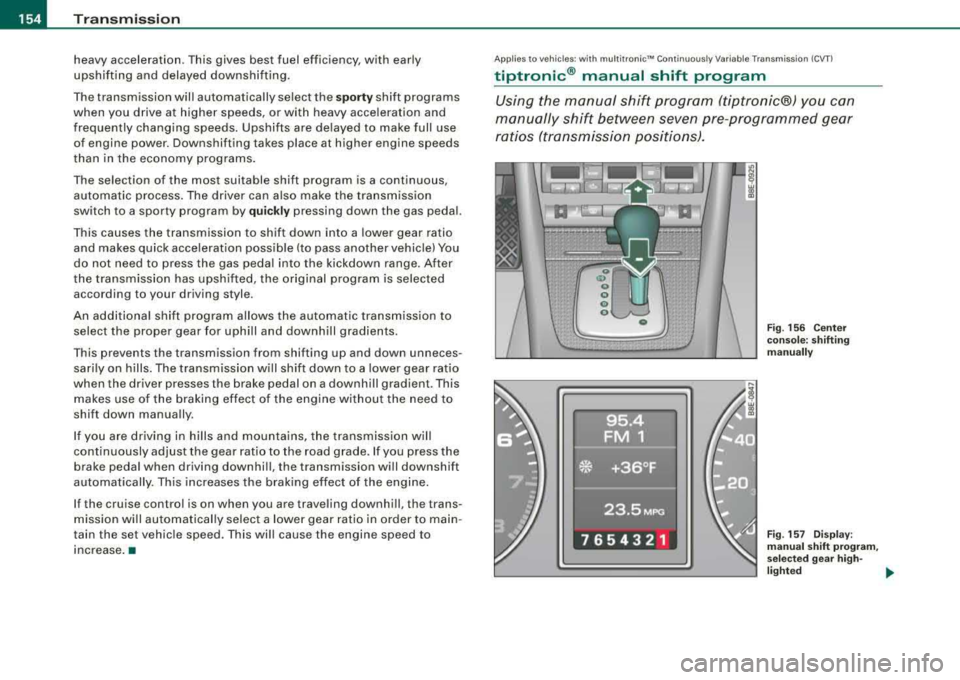
tiptronic ® manual shift program
Using the manual shift program (tiptronic®) you can
manually shift between seven pre-programmed gear
ratios (tran smission positions).
Fig. 156 Center
console: shifting
manually
Fig . 157 Display:
manual shift program,
se lecte d gear high -
lighted ~
Page 157 of 368
_______________________________________________________ T:...:.; ra::.:.. n:.:s:.: m
:..:.:.:.: is:::: s::.:.: io::.:.. n:__J""
Swi tching to ma nual s hift pro gra m
- With the selector lever in
D, push lever to the right. The
display will show7
6 5 4 3 2 1 as soon as the selector lever
is switched over. The gear you select wi ll also be h igh
lighted in the
display => page 154, fig. 157.
To up shift
- Push the selector lever forward to the plus position
=> page 154, f ig. 156 G) .
To d ownshift
- P ush the lever to the mi nus positio n
Q.
When accelerating, the transmission will automatically shift into the
next higher gear before the engine reaches the maximum RPM .
When accelerating, if you apply a light throttle, the tiptronic® wil l
automatically shift into the next higher gear to save fuel. If you apply
a heavy throttle, the transmission will stay in gear engaged until
near maximum RPM are reached, or until the driver manually shifts
into a higher gear.
If you take your foot off the accelerator pedal when driving down a
steep incline, the tiptronic ® wi ll downshift from the selected gear
into the next lower gear based on road speed and engine RPM . The
automatic downshifting is interrupted as soon as you apply throttle
again .
[ i ] Tips
• When you shift into the next lower gear, the engine will down
shift only when there is no possibility of over-revving.
• When the kick -down comes on, the transmission will sh ift down
to a lower gear depending on vehicle and engine speeds.
• The tiptronic® is inoperative when the transmission is in the fail
safe mode. •
Controls and equip
ment
Ap plies to vehi cles: with mult it r o ni c™ Cont inuo usly V ariab le Tr ansm iss io n (CV Tl -not
a vail abl e at the t ime of p rin ting
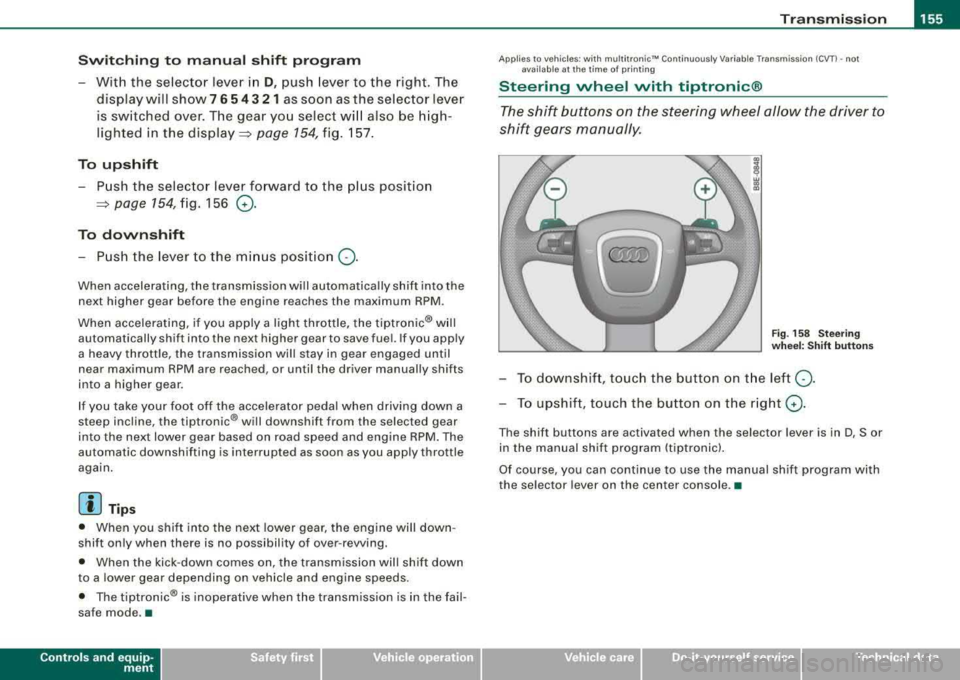
Steering wheel with tiptronic ®
The shift buttons on the steering wheel allow the driver to
shift gears manually .
Fig. 158 Stee ring
w hee l: S hift butt ons
To d ownshif t, touch the button on t he left Q .
To upshift, touch the button on the right G) .
The shift buttons are activated when the selector lever is in D, Sor
in the manual shift program (tiptronicl.
Of course, you can continue to use the manual shift program with
the selector lever on the center console. •
irechnical data
Page 160 of 368
___ H_ o_ m_ e_L_ i_n _k_ ® __________________________________________________ _
Applies to vehicles: with Home link® univer sal rad io frequency remote contro l
Programming the HomeLink ® Universal
Remote Control
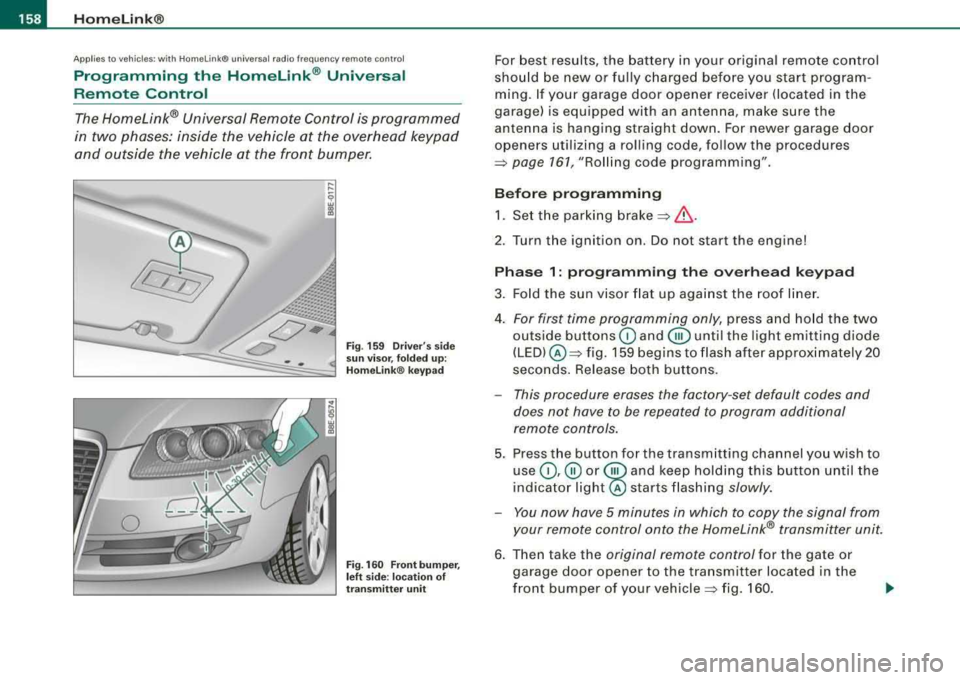
The Homelink® Universal Remote Control is programmed
in two phases: inside the vehicle at the overhead keypad
and outside the vehicle at the front bumper.
Fig . 159 Driver's side
sun visor, folded up:
Homelink ® keypad
Fig. 160 Front bumper,
left side : location of
transmitter unit
For best results, the battery in your original remote control
should be new or fully charged before you start program
ming. If your garage door opener receiver (located in the
garage) is equipped with an antenna, make sure the
antenna is hanging straight down. For newer garage door
openers utilizing a rolling code, follow the procedures
=> page 161, "Rolling code programming" .
Before programming 1. Set the parking
brake =>& .
2. Tur n the ignition on. Do not start the engine!
Phase 1: programming the overhead keypad
3. Fold the sun visor flat up against the roof liner.
4.
For first time programming only, press and hold the two
outside buttons
G) and @until the light emitting diode
(LED) @=> fig. 159 begins to flash after approximately 20
seconds. Release both buttons.
- This procedure erases the factory -set default codes and
does not have to be repeated to program additional
remote controls.
5. Press the button for the transmitting channel you wish to
use
G) ,@ or @ and keep holding this button until the
indica tor
light@ starts flashing slowly.
- You now have 5 minutes in which to copy the signal from
your remote control onto the Homelink® transmitter unit.
6. Then take the original remote control for the gate or
garage door opener to the transmitter located in the
front bumper of your
vehicle => fig. 160.
Page 163 of 368
_________________________________________________ H_ o_m _ e_L _i_n _k _® __ ftllll
Identifying a rolling code:
-Press the button for the programmed transmitter
channel again and hold it down.
- If the light emitting
diode @=> page 160 , fig. 161 first
flashes quickly and then remains lit after 2 seconds, the
garage door opener is using a rolling code.
•
A pplies to vehicle s: w it h H omelin k® u niv ers al radio fr equ enc y remot e con tro l
Rolling code programming
A rolling code is programmed in two phases: at the
garage door opener motor and inside the vehicle at the
overhead keypad.
Phase 1:
programming the garage door opener motor
1. Make sure that your vehicle is located within operat ing
range of the remote controlled garage door opener.
2. Locate the set button (teach button) on the garage door
opener motor (refer to the operating instructions for the
garage door opener).
3. Press the set button (teach button) on the garage door
opener motor.
Phase 2: programming the overhead keypad
4. Set the parking brake.
5. Turn the ignition on. Do not start the engine!
6. On the overhead keypad press the button for the previ
ously programmed transmitter channel.
7. Press this button a
second time in order to finish the
rolling code programming.
Controls and equip
ment The vehicle should be
located no further than 15 ft (5 m) from the
remote controlled garage door opener to remain within the average
signal range o f mos t remote con trolled systems.
Refer to the garage door opener operating instructions to locate the
set button (t each button) on the garage door opener motor .
After the keypad has been programmed, the g arage door opener
should recognize the radio frequency s ignal from the Homelink ®
Universal Remote Control and respond to signals from it.
[ i] Tips
Having a second person assist you makes programming of the
rolling code easier and faster . For some makes of garage door
op eners t he Homelink ® button may have to b e press ed a third time
to complete the teaching sequence. •
Applies to vehic le s: w it h Hom elink® univ ers al ra dio fr eque ncy remote c ontro l
Erasing the programming of the Homelink ®
universal remote control
When you erase the programming, the programming on
all three of the transmitter channels with be lost!
1. Set the parking brake.
2. Turn the ignition on. Do not start the engine!
3. Hold down both outside buttons
Ci) and @=> page 160,
fig. 161 simultaneously, until the diode begins to flash
(after about 20 seconds).
4. Release both buttons immediately. The programming on
all three transmitter channels is now erased.
.,_
Page 180 of 368
___ s_a_ f_ e_ t-= y_ b_e_ l_ t _s _______________________________________________ _
T he physical principles are simple . Both the vehicle and the passen
gers possess energy wh ich varies w ith vehicle speed and body
weight . Engineers cal l this energy "kinetic energy ."
The higher the speed of the vehicle and the greater the vehicle's
weight, the more energy that has to be "absorbed" in the crash.
Vehicle speed is the most significant factor . If the speed doub les
from 15 to 30 mph (25 to 50 km/h), the energy increases 4 times!
Because the passengers of this vehicle are not using safety belts
~ page 177, fig. 167, they will keep moving at the same speed the
vehic le was moving just before the crash, until something stops
them
-here, the wall ~ page 177, fig . 168 .
The same principles apply to people sitting in a vehicle that is involved in a frontal collision . Even at city speeds of 20 to 30 mph
(30 to 50 km/h), the forces acting on the body can reach one ton
(2,000 lbs, or 1,000 kg) or more. At greater speeds, these forces are
even higher.
People who do not use safety belts are a lso not attached to their
vehic le. In a frontal collision they will also keep moving forward at
the speed their vehicle was trave lling just before the crash. Of
course, the laws of physics don't just apply to frontal collisions, they
determine what happens in all kinds of accidents and coll isions .•
What happens to occupants not wearing
safety belts?
In crashes unbelted occupants cannot stop themselves
from flying forward and being injured or killed . Always
wear your safety belts!
0
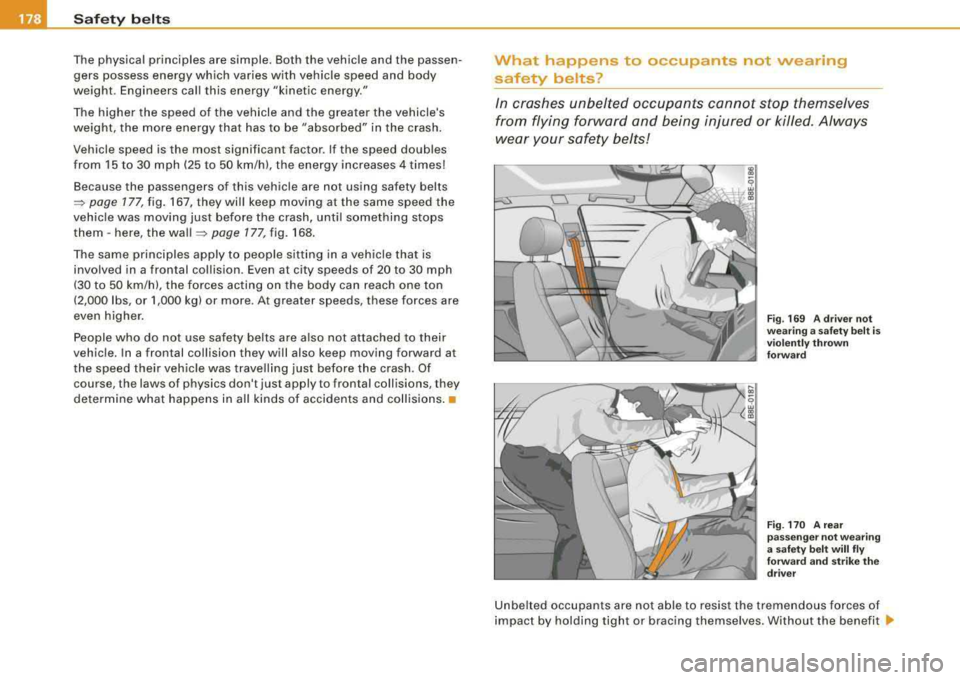
F ig . 169 A driver not
wear ing a safety belt is
v iol ently thr own
forwa rd
Fig. 17 0 A rear
passenge r not wearing
a safe ty belt w ill
fly
for wa rd a nd strik e the
dr iver
Unbelted occupants are not able to resist the tremendous forces of
impact by holding tight or bracing themselves . Without the benefit ._
Page 181 of 368
of safety restraint systems, the unrestrained occupant will slam
violently into the steering wheel, instrument panel, windshield, or
whatever else is in the
way=> fig . 169. This impact with the vehicle
interior has all the energy they had just before the crash.
Never rely on airbags alone for protection . Even when they dep loy,
airbags provide only additional protection . Airbags are not
supposed to deploy in all kinds of accidents . Although your Audi is
e quipped wi th airbags, all vehicle occupan ts , including the driver,
must wear safety belts correctly in order to minimize the risk of
severe injury or death in a crash .
Remember too, that airbags will deploy only once and that your
safety belts are always there to offer protection in those accidents
in which airbags are not supposed to deploy or when they have
already deployed . Unbelted occupants can also be thrown out of the
vehicle where even more severe or fatal injuries can occur.
It is also important for the rear passengers to wear safety belts
correctly . Unbelted passengers in the rear seats endanger not only
themselves but also the driver and other
passengers~ page 178,
fig. 170. In a frontal collision they will be thrown forward violently,
where they can hit and injure the driver and/or front seat
passenger. •
Safety first
Safety belts
Safety belts protect
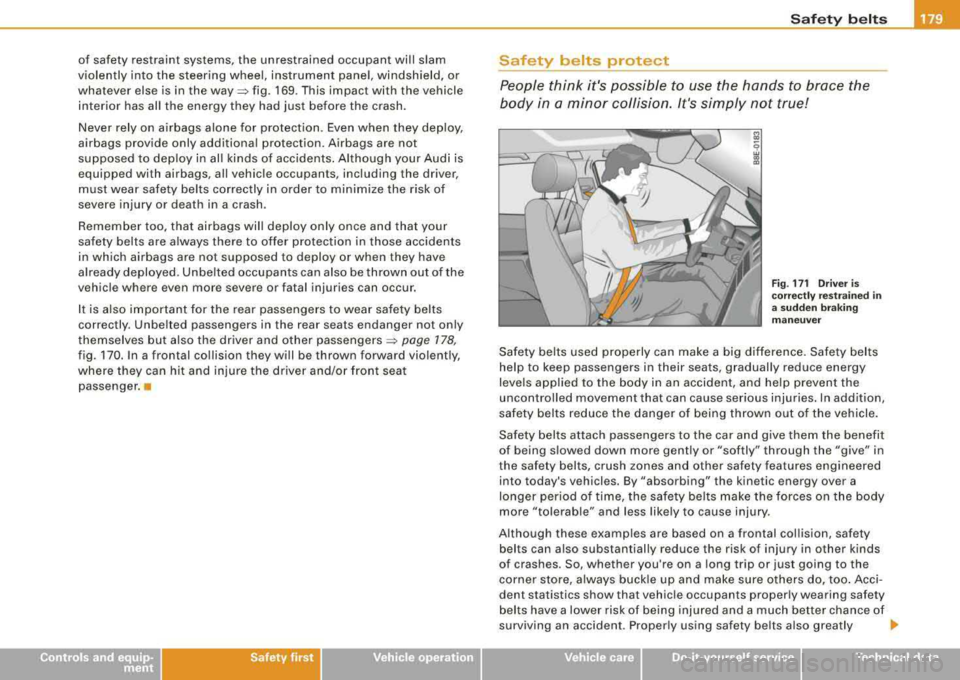
People think it's possible to use the hands to brace the
body in a minor collision. It's simply not true!
&l
9 w a, a,
Fig. 171 Driver is
correctly restrained in
a sudden braking
maneuver
Safety belts used properly can make a big difference. Safety belts
help to keep passengers in their seats, gradually reduce energy
levels applied to the body in an accident, and help prevent the
uncontrolled movement that can cause serious injuries. In addition ,
safety belts reduce the danger of being thrown out of the vehicle .
Safety belts attach passengers to the car and give them the benefit
of being slowed down more gently or "softly" through the "give" in
the safety belts, crush zones and other safety features engineered
into today's vehicles. By "absorbing" the kinetic energy over a
longer period of time, the safety belts make the forces on the body
more "tolerable" and less likely to cause injury .
Although these examples are based on a frontal collision, safety belts can also substantially reduce the risk of injury in other kinds
of crashes. So, whether you're on a long trip or just going to the
corner store, a lways buckle up and make sure others do, too . Acci
dent statistics show that vehicle occupants properly wearing safety
belts have a lower risk of being injured and a much better chance of
surviving an accident . Properly using safety belts also greatly .,,_
irechnical data
Page 238 of 368
-L-__;l.:..n ..::t ..::e :.:..11 :.:..ig ,.,_;: e:.:..n .:.. t:....:. te.::..::. c.:..h :.:..n.:.. o::..:..: lo~g~ y ___________________________________________ _
Intelligent technology
Notice about data recorded by
vehicle control modules
Your vehicle is not equipped with an Event Data Recorder (EDR),
installed by some manufacturers for the express purpose of
capturing data for retrieval after an accident or crash event . EDR's
are sometimes called "crash recorders" .
Some state laws restrict the retrieval or downloading of data stored
by EDR's that were insta lled in a vehicle for the express purpose of
retrieving data after an accident or crash event without the owner's
consent.
Although your vehicle is not equipped with an EDR, it is equipped
with a number of electronic control modules for various vehicle
systems such as, for example, engine function, emission control, as
we ll
as for the airbags and safety belts.
These electronic control modules also record vehicle-related data
during normal vehicle operation for diagnostic and repair purposes .
The recording capacity of the electronic control modules is limited
to data (no sound is recorded) and only a small amount of data is
actually recorded over a very limited period of time and stored when
a system fault or other condition is sensed by a control unit. Some
of the data then stored may relate to vehic le speed, d irection,
braking as well as restraint system use and performance in the
event of a crash or other condition . Stored data can only be read and
down loaded with special equipment. •
Electronic Stabilization Program (ESP)
General information
The ESP improves the vehicle stability.
(X) CD
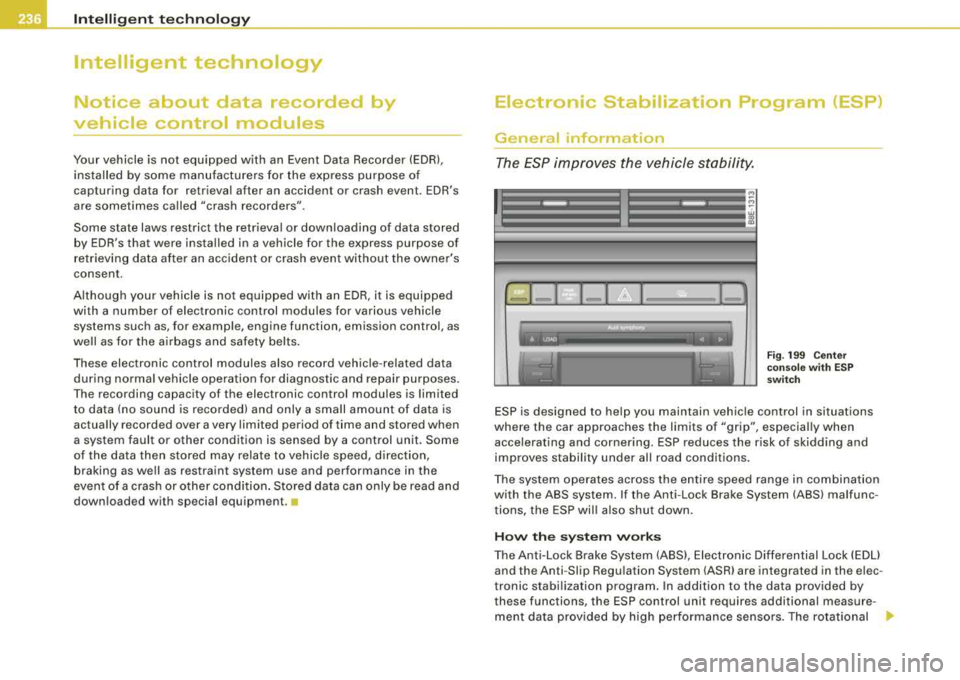
Fig. 199 Center
console with ESP
sw itch
ESP is designed to he lp you maintain vehic le control in situations
where the car approaches the limits of "grip", especial ly when
acce lerating and cornering. ESP reduces the risk of skidding and
improves stability under al l road conditions.
The system operates across the entire speed range in combination
with the ABS system . If the Anti-Lock Brake System (ABS) malfunc
t ions, the ESP will a lso shu t down.
How the system works
The Anti-Lock Brake System (ABS), Electronic Differential Lock (EDU
and the Anti -Slip Regu lation System (ASR) are integrated in the e lec
tronic stabilization program . In addition to the data provided by
these functions, the ESP control unit requires additional measure
ment data provided by high performance sensors. The rotational
.,,.
Page 239 of 368
_________________________________________ ___:l:.:.. n !.!t ~e :.:.11 :.!.ig ~e :.:..n !.!t :... t::.: e::.: c~ h:..:.:..,: n~o =.!l~o ~g Lly '.,_ _l!III
speed of the vehicle about its vertica l axis, the lateral acce leration
ac ting on the veh ic le, the brake pressure and the s teering ang le a re
a ll measured .
The direction in which the driver wishes to travel is determined with
the aid of the steering angle and veh icle speed and is continua lly
compared with the actual behavior of the vehicle. If the two do not
match, -for example, when the vehicle starts hydrop la ning on a
wet road -
, ESP will au tomatical ly brake the appropria te wheel to
correct the problem .
The vehicle is then stabi lized by the forces acting on the whee l
during braking . If the vehicle is
oversteering (r ea r tends to skid out
of the turn), t he brakes are main ly app lied on the whee l that is on
the outside of the curve . In the case of a vehicle that is
understeering
(tendency to s lide out of the curve) , the bra kes are applied at the
rear whee l that is on the inside of the curve. An acoustic signal indi
cates when ESP brake appl ication cuts in
=> & .
The system operates across the entire speed range in combination
wi th the ABS system
~ page 240. If the Ant i- Lock Brake Sys te m
(ABS) malfunctions, the ESP wi ll be out of act ion as well.
Ac tivat ion
When you turn on the engine, ESP will automatica lly be activated
and will perfo rm a self -test.
You can activate a deactivated ESP or deact ivated ASR as requ ired
by pressing the
=> page 236, fig. 199 button.
D eac tiva tion
Norma lly, the ESP should always be on .
When necessary, you can deact ivate Anti -Slip Regulat ion (ASR) or
the Electronic Stabilization Program (ESP) by pressing the button
=> page 236, fig. 199 .
• Dea ctivating A SR: Tap briefly on the ESP button . In certain excep
t iona l situations (e .g. driving wit h tire chains or a t a forced pace
around a track), the Anti-S lip Regu lation (ASR) can be deactivated
Controls and equip
ment Safety first Vehicle operation
=> page
238 . The ESP check light flashes . T ap the ESP button again
t o r eact ivate ASR. The ESP check light g oes out .
• Deactiv ating ESP : Press the ESP button for more than 3 seconds .
W ith ESP deactivated, the ESP check ligh t illum inates cons tant ly .
Press the ESP button again to reactivate ESP . The ESP check light
g o es out .
& WARNING
The Electronic Stabilization Program i s neve rthele ss subject to the
laws of physi cs . It is part icularly important to pa y attent ion to thi s
fact on we t and slippery roads . It is therefore important that you
always adapt your driving to the condit ion of the road and traffic
c onditions. Do not allow the inc reased safety provided by the Elec
tronic Stabiliz ation Program sy stem to lull you into a ccepting
additional safety ri sk s.
• Plea se note that when ESP or ASR is dea ctivated , the drive
wheels can spin on icy and slippery roads and the vehicle can
break a way -da nger of skidding! •
Electronic differential lock (EDL)
The elec tr o nic differen tial l ock mon itors t he r ota tion al
speed of the drive wheels .
Gener al not es
The elec tronic d if f erential l ock (EDU helps the ca r to start mov ing,
accelerate and c limb a grad ient on surfaces providing poor or
a lmost n o grip. W ithout EDL, th is w ould be difficult, if no t impos
sib le.
How the system works
The EDL operates automatical ly. It monitors the rotational speed of
the drive whee ls on an ax le with the he lp of t he ABS senso rs
=> page 2 40 . If a noticeable difference in rotational speed between
the drive wheels on one axle is de tected (e .g. on sl ippery grou nd
on .,,.
Vehicle care Do-it-yourself service Technical data
Page 240 of 368

-Intelligent technology
------~----- ~~--------------------------------------
one side), the spinning wheel is braked, thereby transferring power
to the other drive wheel or wheels (all- wheel drivel. This is done up
to a speed of about 60 mph (100 km/h). Noises from the brake
system signal that wheel spin is being control led.
Driving off
When driving off, always be sure to keep road conditions in mind as
you accelerate. If one drive wheel spins because it is on a surface
with less grip, gradual ly increase the pressure on the accelerator
pedal until the car starts to move. The wheel less able to transfer
power spins.
Overheating of brakes
To prevent the disc brake of the braked wheel from overheating if
subjected to excessive loads, the EDL cuts out temporarily. The
veh ic le remains operational and behaves in the same way as a
vehic le without EDL.
As soon as the brake has cooled down, EDL switches on again auto
matically.
& WARNING
• When accelerating on slippery surfaces, such as on ice or snow,
always be careful when depressing the accelerator pedal. Even
with the EDL working, the drive wheels can spin and reduce your
ability to control your car . - Risk of crash!
• The increased safety afforded by EDL does not mean that you
ca n take safety risks. Always adapt your driving style to the road
conditions and traffic situation.
[ i ] Tips
If a fault occurs in the ABS, the EDL is also not functioning. This is
indicated by the ABS warning
light => page 21. •
Anti-Slip Regulation System (ASR)
The Anti-Slip Regulation System prevents the driven
wheels from spinning when the car is accelerating.
General notes
The Anti-Slip Regulation System (ASR) is integrated in the electronic
stabilization program (ESP) . When the vehicle starts up and acceler
ates, the wheels are prevented from sp inning by adjus tin g the
engine power to match the amount of grip availab le from the road
surface.
How the system works
ASR performs automatical ly, i.e . w ithout the driver's intervention.
With the aid of the ABS
sensors=> page 240, ASR monitors the
speed of the driven wheels. If the wheels start to spin, the engine
power is reduced automatically until the tires find enough grip to
lock onto the road surface. The system is active across the entire
speed range.
The ASR works in conjunction with the ABS. If a malfunction shou ld
occur in the ABS, the ASR will also be out of act ion.
Activation
The ESP is automatica lly activated when the eng ine is started, and
it performs a self-test. You can activate a deactivated ASR, if
requ ired, by pressing
t h e=> page 236, fig . 199 button .
Deactivation
You can deactivate the ASR, if required, by pressing the button (for
less than 3
seconds) => page 236, fig. 199. With the ASR deactivated,
the ESP check light flashes,
see=> page 22.
Normally, the ESP shou ld always be on, however, it may be advanta
geous to turn off the system in certai n special cases when some
degree of wheel spin is desired such as :
• when driving with snow chains
Page 241 of 368
____________________________________________ ln_t_ e_ l_ li _,..g "- e_ n
_ t_t_e _c_ h_ n_o _l_o _....g ,_,y'-----'""
• when driving in deep snow or on a loose surface (to allow the
wheels to dig in to reach firm ground)
• when trying to "rock" the vehicle free when it has become stuck .
The system should be reactivated once you are no longer in such
situations.
Both, the ABS and EDL systems are still functioning even if the ESP
is switched off.
& WARNING
The increased safety afforded by ASR does not mean that you can
take safety risks. Always adapt your driving style to the road conditions and traffic situation.
[ i] Tips
To ensure that the ASR works properly, all four wheels must be fitted
with identical tires Any differences in rolling radius of the tires can
cause the system to reduce engine power when this is not desired.
See
also::::;, page 305, "New tires and replacing tires and wheels". •
Braking
General information
What affects braking efficiency?
Operating conditions and driving habits
The brakes on today's automobiles are still subject to wear,
depending largely on operating conditions and driving
habits::::;, &.
On vehicles which are driven mostly in stop -and -go city traffic or
which are driven hard, the brake pads should be checked by your
authorized Audi dealer more often than specified in the
Mainte
nance
& Warranty booklet.
Controls and equip ment Safety first Vehicle operation
On steep slopes, you should use the braking effect of the engine
.
This way, you prevent unnecessary wear on the brake system. If you
must use your brakes, do not hold the brakes down continuously.
Pump the brakes at intervals.
Moisture or road salt
Under certain conditions, for example, when driving through water
or very heavy rain, or even after washing your vehicle, the braking
effect can be reduced due to moisture (or in freezing conditions ice)
on the brake pads. A few cautious brake applications should dry off
the brake pads or remove any ice coatings.
The effectiveness of the brakes can be reduced when the vehicle is
driven on a salt -covered road and the brakes are not used. Likewise,
you clean off accumulated salt coating from brake discs and pads
with a few cautious applications of the
brake::::;, &.
Corrosion
There may be a tendency for dirt to build up on the brake pads and
corrosion to form on the discs if the car is not driven regularly or
only for short trips with little use of the brakes .
If the brakes are not used frequently, or if corrosion has formed on
the discs , it is advisable to clean off the pads and discs by braking
firmly a few times from a moderately high
speed ::::;,& .
Faults in the brake system
If you should notice a sudden increase in brake pedal travel, then
one of the two brake circuits may have
failed::::;, &.
Low brake fluid level
Malfunctions can occur in the brake system if the brake fluid level is
too low. The brake fluid level is monitored electronically.
& WARNING
• You should perform braking maneuvers for the purpose of
cleaning the brake system only if road conditions permit. Other
road users must not be put at risk - you may cause an accident!
.,.
Vehicle care Do-it-yourself service Technical data