horn AUDI A4 AVANT 2008 Owners Manual
[x] Cancel search | Manufacturer: AUDI, Model Year: 2008, Model line: A4 AVANT, Model: AUDI A4 AVANT 2008Pages: 368, PDF Size: 46.19 MB
Page 13 of 368
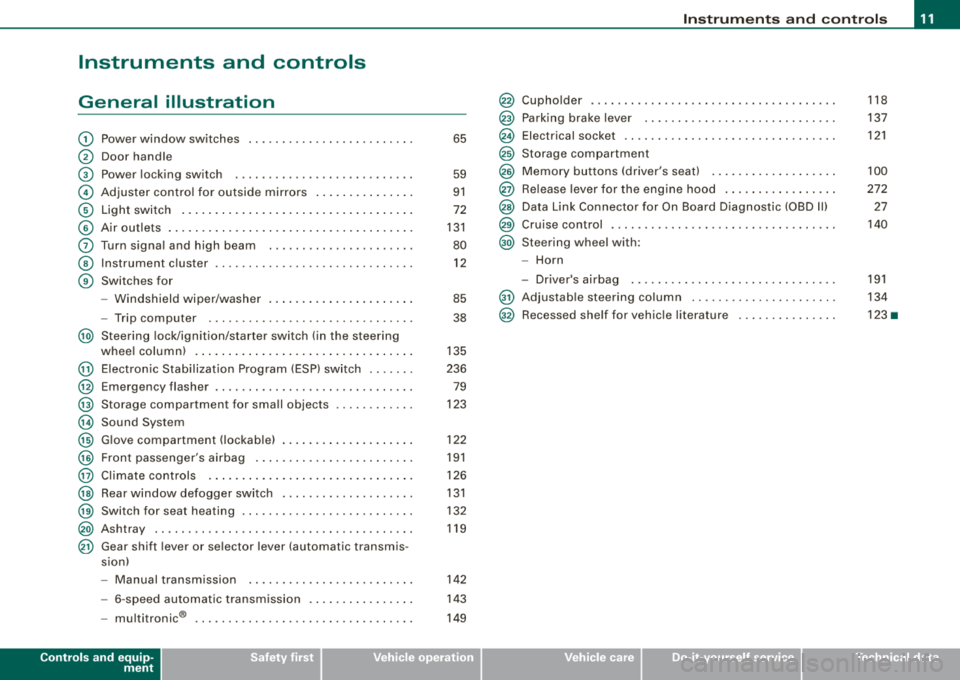
Instruments and controls
General illustration
G) Power window switches ........................ .
0 Door handle
G) Power locking switch .......................... .
© Adjuster control fo r outside mirrors ...... .... .... .
© Light switch .. ...... .... ... .... .... .... .... ... .
© Air o utlets ........ ... .. .... .... ... .... .... .... .
0 Turn s igna l and high beam .. .... .... ......... .. .
© Instrument c luster .. ... .... .... .... ... .. .... ... .
G) Switches for
- Windshield wiper/washer . ...... .... .... ... ... .
- Trip computer ...... .... .... ... .... .... .... . .
@ Steering lock/ignition/starter switch (in the steering
@
@
@
@
@
@
@
@
@
@
@
whee l column) . ...... ... .... .... .... ... .... ... .
Electron ic Stab ilization Prog ram (ESP) switc h ...... .
Emergency flasher ....... .... .... .... .... .... .. .
Storage compartment for sma ll objects
Sound System
G love compartment ( lockab le) ... .. .... .... .... .. .
Front passenger's airbag .... .... .... .... ..... .. .
Cl imate controls .. ..... .... .... ...... .... ... .. .
Rear window defogger switc h .... .... .... .... ... .
Switch for seat heating ......................... .
Ashtray .. ....... .... ............. ...... .... .. .
Gear shift lever or selector lever (automatic transmis
s ion)
- Manual transmission .. ...... ....... ...... ... .
- 6-speed automa tic transm ission .. ...... .... ... .
I .
.
® -mu t1tronic ................................ .
65
59
91
72
131
80
12
85
38
135
236 79
123
122
191
126
131
132
119
142
1 4 3
14 9
Controls and equip
ment • I I • • I
Instrum ents and controls
Cupho lder
Park ing brake lever ............................ .
Electrical socket ............................... .
Storage compartment
Memory buttons (driver's seat) .. ...... .... ... ... .
Re lease lever for t he e ngine hood ...... .... ... ... .
Data Link Connector fo r On Board D iagnostic (OBD Ill
Cruise control .... .... .... .... ....... .... .... .. .
Steering wheel with:
- Horn
D. ' . b - nversa1r ag . ................ .... ......... .
@ Adjustab le steering co lumn .. ...... .... .... .... . .
@ Recessed she lf for vehic le literature .............. .
118
137
121
100
272 27
140
191
134
123 •
Page 57 of 368
Power locking system
General description The power Jocking system J ocks all the vehicle d oors and
rear lid simultaneously or allows you to unlock either just the driver's door or all the vehicle doors and rear lid
simultaneously.
The power locking system in your vehic le incorporates the following
f unctions:
• Central locking function
• Remote contro l feature
:::::, page 56 .
• Anti -theft alarm system :::::, page 64 .
All the doors and the rear lid are locked by the central locking
system when you lock the vehicle .
Unlo cking th e vehicle
You can un lock the vehicle from outside either by using the remote
control
or by inserting and turning the key in the driver's door lock.
When you
unlo ck your vehicle:
• The anti-the ft alarm sys tem is deactivated briefly.
• The vehicle interior l ights illuminate for approximate ly 30
seco nds.
• All turn signal lights will flash twice when the car is unlocked.
• After unlocking the vehic le, you have 60 seconds to open a door
or the rear lid. After 60 seconds, t he vehicle automatically locks and
the anti -theft a larm system activates again .
The rear lid can be locked or unlocked either by using the remote
co ntr ol
or by insert ing and turning the key in the driver's door lock .
Unlocking the vehicle with the remote contro l wi ll only
unlock the
rear lid, t o
open it, the lid handle needs to be pressed .
Controls and equip
ment
Op ening and clo sin g
Lo cking the vehicle
You can lock the veh icle from outside e ithe r by using the remote
control
or by inserting and turning the key in the drivers 's door lock.
When you
lock the ve hicle:
• All doors and the rear lid are locked .
• All tu rn signal lights will flash once when the car is locked.
• The anti -theft alarm system is activated . The horn of the anti
theft alarm sys tem wi ll sound and the anti -theft a larm sys tem read i
ness light, located in t he upper part of the driver's door panel, w ill
start to blink.
• The vehicle interior lights turn off .
Automati c locking *
The automatic locking feature locks all the vehicle doors and the rear lid when you drive faster t han 9 mph (15 km/h).
You can unlock the vehicle from the inside by :
• removing the key from the ignition switch (the vehicle wil l auto
mat ically un lock itself) or
• pressing the unlock part of the power lock switch
(l::[) or
pull ing the door handle (twice to open the door!.
If you wish, you can have an authorized Audi dea ler convert your
power doo r loc k system to au tomatic locking .
LJ}. WARNING
• When you lo ck your vehicle from out side , nobody -especially
c hildren - sho uld remain in side the vehi cle . Remember , when you
lock the vehicle from the out side the windows c annot be opened
from the in side .
• When you leave the vehicle , alway s remove the ignition key and
take it with you . Thi s will pre vent pa ssenger s (children , for
example ) from accidentally being locked in the vehicle should the y
a ccidentally pre ss the power locking swit ch on the center con sole . .,_
Page 59 of 368
To unlock rear lid only ~
- Press button © for approximately one second.
PANIC Button Push the red
butto n@) to activate the panic function. The
horn sounds and t he turn signals flash.
- P ush the
button @) again to deact ivate the panic fu nc
t io n.
& WARNING
R ead and fo llow all WARNIN GS=> & in "G eneral de scr iption " on
page 5 5.
[ i] Tip s
• In orde r to make sure the locking function is working, you should
always keep your eye on the vehic le to make sure it is proper ly
locked .
• Do not use the remote control if you are inside the car, otherwise
you may uninten tiona lly lo ck the vehicle, and then you would set off
the anti -t heft alarm when you try to s tart the engine or open a door.
In case this happens anyhow, push the unlock button
ft .
• Use the panic funct ion only if you are in an emergency
situation .•
Controls and equip
ment
Op ening and closing
Resetting the remote control
The remote control must be reset if the vehicle does not
unlock .
0
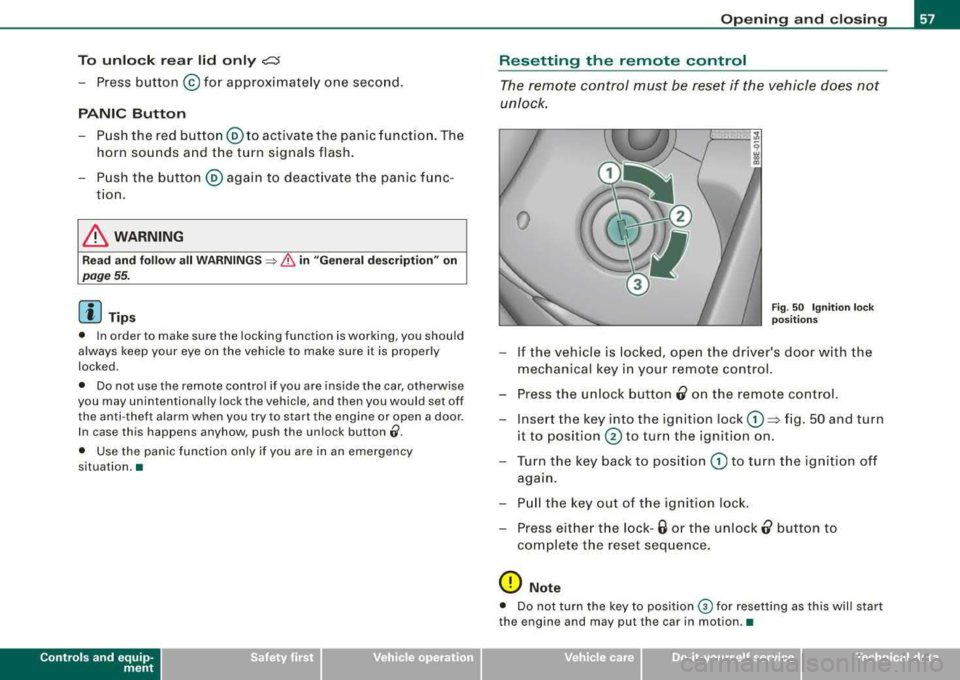
Fig . 50 Ig ni tio n l ock
p ositi ons
- If the vehicle is locked, ope n the driver's door w ith the
mechanical key in your remote control.
- Press the u nlock button
0 on the remote co ntrol.
- Inse rt the key into the ignition lock
G) => fig. 50 and turn
it to
position @ to turn the ignition on .
- T urn the key back to posit ion
G) to turn t he ignition off
aga in.
- P ull the key out of the igniti on lock.
- Press eithe r the lock -
6 or the unlock 0 button to
co mplete t he reset seque nce .
0 Note
• Do not turn the key to position ® for resetting as this will start
the engine and may pu t the car in motion .•
irechnical data
Page 203 of 368
& WARNING (continued)
• If you must install a rearward-facing child safety seat on the
front passenger seat because of exceptional circumstances and
the PASSENGER AIR BAG OFF light does not appear and stay on ,
immediately install the rear -facing child safety seat in a rear
seating posit ion and have the airbag system inspected by your
Audi dealer .
• A tight tether or other strap on a rearward-facing child restraint
attached to the front passenger seat can put too much pressure
on the weight-sensing mat in the seat and register more weight
than is actually on the seat. The heavier weight registered can make the system work as though an adult were on the seat and
deploy the Advanced Airbag when it must be suppressed causing
serious or even fatal injury to the child.
• If , in exceptional circumstances , you must install a forward
facing child restraint on the front passenger seat , always move the
seat into its rearmost position in the seat 's fore and aft adjust
ment range , as far away from the airbag as possible. The backrest
must be adjusted to an upright position . Make sure that the
PASSENGER AIR BAG OFF light comes on and stays on all the time
whenever the ignition is switched on .
& WARNING
• If the PASSENGER AIR BAG OFF light does not go out when an
adult is sitting on the front passenger seat after taking the steps
described above , make sure the adult is properly seated and
restrained at one of the rear seating positions .
• Have the airbag system inspected by your Audi dealer before
transporting anyone on the front passenger seat .
Controls and equip ment Safety first
Vehicle operation
Airbag system
[ i ] Tips
If the w eig ht-sens ing ma t in th e front passe nger seat detects an
e m pty seat , the front airbag on the pa ssenge r side wil l be turned
o ff , a nd PASSENGER AIR BAG OFF will stay o n.
a
Repair, care and disposal of the airbags
Pa rts o f the airba g sy ste m are i nsta lled at many d ifferen t pl aces on
y our Audi. Instal ling, removing , se rvicing or re pairing a pa rt in an
ar ea of th e ve hicle ca n da mage a part of an airbag syst em and
prevent that system from wor king properly in a co llision.
T he re a re so me impo rtant thin gs you have to know t o make sure
that the effectiv eness of the system will not be impaired and that
di scar ded co mpon ents do not ca use inju ry o r po llut e th e env iron
m ent .
& WARNING
Improper care , servicing and repair pro cedures can increase the
risk of personal injury and death by preventing an airbag from
deploying when needed or deploying an airbag unexpectedly :
• Never cover, obstruct, or change the steering wheel horn pad
or airbag cover or the instrument panel or modify them in any way.
• Never attach any objects such as cup holders or telephone
mountings to the surfaces covering the airbag units .
• For cleaning the horn pad or instrument panel , use only a soft ,
dry cloth or one moistened with plain water . Solvents or cleaners
could damage the airbag cover or change the stiffness or strength
of the material so that the airbag cannot deploy and protect prop
erly .
• Never repair , adjust , or change any parts of the airbag system.
• All work on the steering wheel, instrument panel, front seats or
electrical system (including the installation of audio equipment ,
...,
Vehicle care Do-it-yourself service Technical data
Page 330 of 368
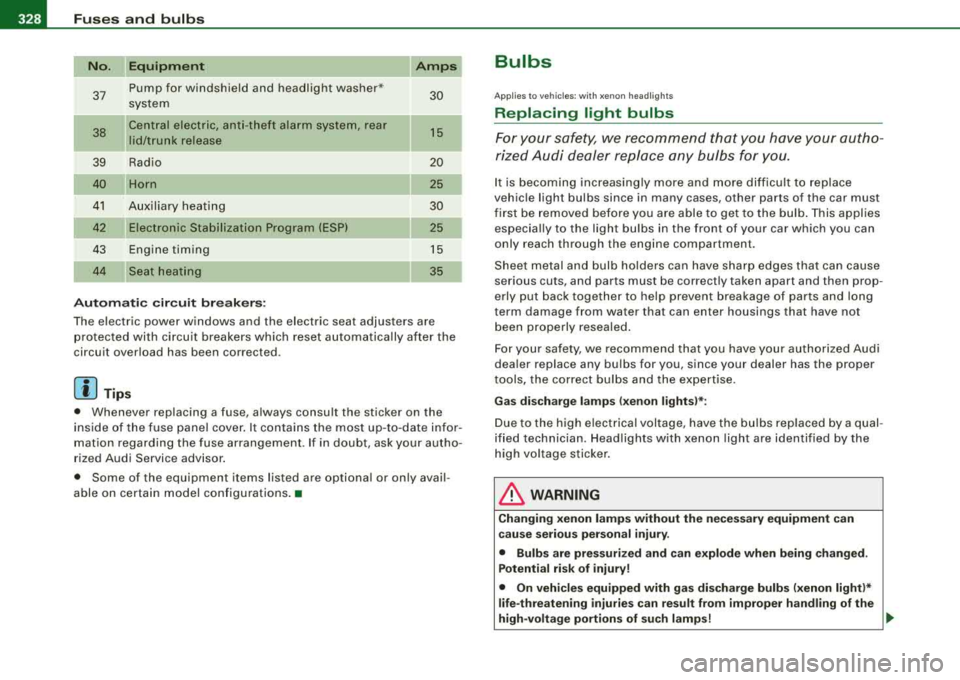
11111.___F_ u_ s_ e_s _ a_ n_d _ b_u_ l_ b _ s ______________________________________________ _
No.
37
38
39
40
41
43
44
Equipm ent
Pump for windshie ld and headlight washer *
system
Central elect ric, anti -theft a larm system, rear
lid/ tr u nk release
Rad io
Horn
Auxiliary hea tin g
Electronic Stab ilization P rogram (ESP)
Engine timing
Seat heating
Automatic circuit bre akers : Amps
30
15
20
25
30
25
15
35
T he electric power windows and the electr ic seat adjusters are
pro tected with circu it breakers which reset automatica lly after the
circuit overload has been corrected .
[ i ] Tip s
• Whenever replacing a fuse, always consult the sticker on the
inside of the fuse panel cover . It contains the most up -to -date info r
mat ion regarding the fuse arrangement . If in doubt , ask your autho
rized Audi Service adv isor .
• Some of the equipment items listed are op tiona l o r only avail
able on certa in model configu rations .•
Bulbs
A pplies to vehicle s: wit h xenon he ad ligh ts
Replacing light bulbs
For your safety, we recommend that you have your autho
rized Audi dealer replace any bulbs for you.
I t is becoming increasing ly more and more difficult t o replace
vehic le light bulbs since in many cases, other parts of the car must
first be removed before yo u are able to get to the bu lb . T his applies
especia lly to the ligh t bu lbs in the front of your car which you can
only reach th rough the eng ine compartment.
Sheet metal and bulb ho lders can have sharp edges that can cause
s e rious cuts, and parts must be correctly taken apart and th en prop
erly put back together to help prevent breakage of par ts and long
te rm damage from water that can enter housings that have not
been properly resealed .
For your safety , we recommend that you have your authorized Audi
dea ler replace any bulbs for you, since your dealer has the prope r
tools, the correct bulbs and the expertise .
Gas di sc harge l amp s (x enon l ight s)*:
Due to the h igh e lectrical voltage, have t he bu lbs replaced by a qual
ified technician . Head lights with xenon light are identified by the
high voltage sticker .
& WARNING
Changing xenon lamps without the ne cessary equipment c an
c au se seriou s per sonal injury .
• Bulb s are pres surized and can explode when being changed.
Potential ri sk of injur y!
• On vehicle s equipped with ga s di scharge bulb s (xenon ligh t)*
life -threaten ing injurie s can re sult from impr oper h andling of the
high -voltage portion s of su ch lamp s!
~