roof rack AUDI A4 AVANT 2008 Owners Manual
[x] Cancel search | Manufacturer: AUDI, Model Year: 2008, Model line: A4 AVANT, Model: AUDI A4 AVANT 2008Pages: 368, PDF Size: 46.19 MB
Page 4 of 368
Table of contents
Table of contents
Vehicle literature ........ .
About this Owner's Manual ..................... .
Controls and
equipment .. ... ... ........ . .
Inst rumen ts and cont rols ..... .
Genera l ill ustration ............. .
Instruments and
warning/indica tor ligh ts ....... .
Instruments ................... .
Warning/indica tor lights ........ .
Driver informa tio n d isplay ..... .
Introduction ................... .
On-Board Diagnostic system
(080)
Auto-Check Control ....... ..... .
Speed warn ing system ... .. .... .
Trip computer ..... ...... ..... . .
Menu display .................. .
T ire pressure monitoring system ..
Opening and c losing .......... .
Keys .......................... .
Power lock ing system .......... .
5
6
9
11
1 1
1 2
1 2
1 9
2 4
2 4
27
28
35
38
41
45
52
52
55
Keyless entry remote contro l . . . . . 56 Doors, power
locks ......... ... .
Rear lid . ......... ............ .
Child safety lock in the rear doo rs
Anti -theft a larm system ........ .
Power w indows .............. .
Slid ing /tilting power sunroof . .. .
C lear v is ion ............ .... .. . .
Lights .............. ....... ... .
Inter ior lights ......... ........ .
V is ion .... .. .. ... ... .... ... ... .
Wiper and washer system ...... .
M irrors .. .. ............ ....• .. .
Digital compass ............ ... .
Seats and storage ......... ... .
Genera l recommenda tions ..... .
Adjust ing the front seats manually
Adjust ing the fro nt powe r se ats .
Lumbar support ............... .
Extending/ shortening the driver's
seat cush ion .................. .
Driver's seat memory ..•..... •..
Center armrest ........ ..... ... .
Rear seats ................. ... .
Head rest rain ts ..... ... .... ... .
Luggage compartment ........ .
Roof rack ins tallation .......... .
Cupho lder .. .... ...... .. .. .. .. .
Asht rays .... ....... ..... ..... .
Cigarette l igh ter /socke t ..... ... .
Storage ......... .......... ... .
War m and cold ............... .
Climate controls .............. .
Electrically heated front seats .. .
Electrically heated rear seats .. . . 58
On t
he road ............. ..... . .
61 Steer ing ..................... · ·
63 Ignition lock and ignition switch
64 Sta rting and stopping the eng ine
65 Parking brake ..... .. .......... .
67 acoustic park assist ........... . .
72 Cru ise control ................ •.
72
Tra nsmissi on .................. .
81 Manual transmission .. ... ..... . .
84 tiptronic® (6-speed automatic
85 transmission) .... ............. .
90 multi tronic™ .... ... ..... ...... .
93
H omeLin k® .... ......... ....... .
95 Universal radio frequency remote
95 con trol ... ... ... ... ...... ... .. .
96
97
99
100
100
102
103
10 5
107
1 16
118
1 19
120
122
125
125
132
133
Safety first ................ .
Driving Safe ly .... ............. .
General notes .......... ....... .
Proper occupant seating pos it ions
Peda l area ... ... .... ..... ... .. .
Stow ing luggage ............. . .
Report ing safety defects ....... .
Safety belts ..... ... ... .. .. .... .
General notes ................ . .
Why safety be lts? ....... ....... . 1
34
134
135
1 36
137
139
1 40
1 42
1 42
143
1 49
157
1 57
1 6 5
1 66
166
168
1 72
1 7 3
1 75
1 7 6
17 6
17 7
Page 118 of 368
___ S_ e_a _t_s _ a_n_ d_ s_ t_ o_ ra~ g_e ______________________________________________ _
Roof rack installation
General information
The vehicle is equipped with integrated r oof railings. A
r oo f rack c an be used to carry additional luggage on the
r oo f.
- Always heed and read t he instructions prov ided by the
roo f rack manuf act urer when t he roof rack system must
be installed.
If a roof rack or simi lar luggage carry ing equipment is to be
insta lled, please note the fo llowing :
• T he ve hicle is eq uip ped with
integrated roof railings, which can
be covered into roof rack by installing cross bars . Only insta ll cross
b ars spec ifically des igned for this vehicle .
• These bars are the basis for a comp lete roof rack system . Addi
tio nal a ttachments are necessary to safe ly t ransport luggage, b icy
cles, surf boards, skis or small boats .
• All n ecessary har dware for these systems is ava ilable from your
authorized Audi dea ler.
When should the ro of r ac k be removed ?
• Before going through an automatic car wash (it is best to ask the
car was h operator}.
• When not in use (reduce fuel consumption, reduce wind noise
and guard agai nst theft).
_& WARNING
• Use of an unappro ved roof ra ck or incorre ct mounting of an
approved roof rack can cause the roof rack or the items carried on
it to fall off the roof onto the ro ad .
& W ARNING (continued )
• Objects falling from the roof of a vehi cle can cause a crash and
per sonal injury .
• Only mount the sy stem between the markings shown in
=> page 11 7, fig. 124.
• The roof ra ck sy stem must be installed exactly according to the
instruct ions prov ided.
0 Note
• Any damage to the vehicle caused by using roof racks or other
t ypes o f cross bars that have not been approved by Audi for y our
vehic le, or incorrect roof rack instal lation, is not covered by the
Warranty .
• Always check the roof rack mountings and hardware before each
t rip and during a trip to make s ure everyth ing is securely tightened .
If necessary, retighten the mountings and check the entire system
from time to time.
• After mounting a roof rack system, or when you transport
objects on the roo f of your vehicle, the height of the vehicle is natu
ra lly increased . Be carefu l when driving under low bridges or in
park garages for example . Th is cou ld cause damage to the vehic le
and even the load. •
Page 119 of 368
________________________________________________ s_e_ a_ ts_ a_ n_d _ s_t _o _r_ a ..;; g:. e _ __._
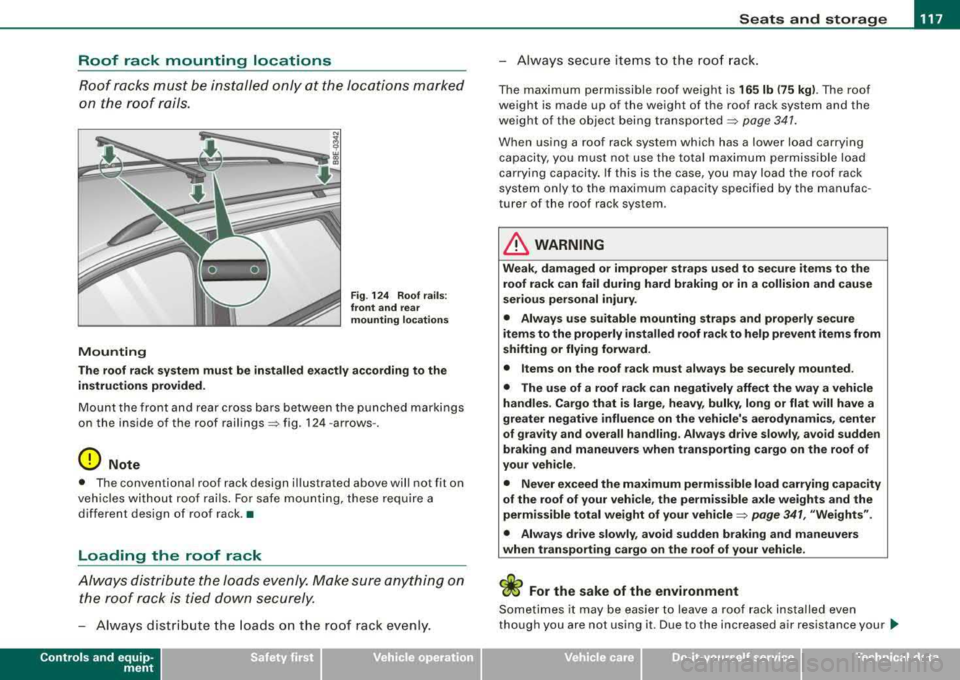
Roof rack mounting locations
Roof rocks must be inst alled only at the locations marke d
on the roof roils.
Mounting
F ig . 12 4 Ro of ra ils :
fr ont and re ar
mounting lo cation s
The roof ra ck system must be in stalled exact ly a ccording to the
instructions provided .
Mount the front and rear cross bars between the punched markings
on the inside of the roof rail ings => fig. 124 -arrows -.
0 Note
• The conventiona l roof rack design i llustrated above will not fit on
vehicles withou t roof rai ls . For safe mounti ng, t hese require a
different design of roof rack .•
Loading the roof rack
Alw ays distri bute the loads evenly . Make sure anything on
the roof r ock is tied down securely.
Always distribute the loads on the roof rack evenly .
Controls and equip
ment
Always secure items to the roo f rack.
The maximum perm issible roof weight is 16 5 lb (75 kg ). The roof
weight is made up of the weight of the roof rack system and the
weight of the object being transported :=:>
page 341.
When using a roof rack system which has a lower load carrying capacity, you must not use the tota l maximum permissible load
carrying capacity. If this is the case, you may load the roof rack
system only to the maximum capacity specified by the manufac
turer of the roof rack system .
& WARNING
Weak, damaged or imp rope r strap s used to sec ure items to the
roof rack can fail during hard braking or in a collision and c aus e
se rious per son al injury .
• Alway s use suitabl e mounting strap s and properly secure
it em s to the prop erly in sta lled roof ra ck to help pre vent item s from
shifting or flying forward .
• Items on the r oof rack must al ways be securely mou nted.
• The use of a roof r ack can n egatively affect the w ay a vehi cle
h and les. C arg o th at is large , he avy, bulky , long or flat will have a
g reater negativ e influence on the vehicle' s aerodynamic s, ce nter
of grav ity and overall h andling . Alway s drive slo wly, a vo id sudden
braking and m aneuver s when t ran sp orting cargo on the roof of
your vehicle .
• Never exc eed the maximum permi ssible load carrying capa city
of the roof of your vehi cle, the p ermissibl e axle weights and the
perm issible tot al weight of your vehicle :=:>
page 341, "We ight s".
• Alway s drive s lowly, avoid sudden br ak ing and m aneuvers
when tran sporting cargo on the roof of your vehicle .
<£> For the sake of the environment
Sometimes it may be easier to leave a roof rack insta lled even
though you are not using it. Due to the increased air resistance your .,_
irechnical data
Page 120 of 368
___ S_ e_ a_t _s _a_ n_d _ s_t _o _ r_ a...: g==-- e ______________________________________________ _
vehicle wi ll unnecessarily use more fuel. Remove the roof rack if you
are not going to use i t.•
Cupholder
Cuphold er in th e center consol e
---==-----
Fig. 12 5 Center
c onsole : d u al
c uph older
T here are two cupholders in the center console => fig. 125.
& WARNING
Spilled hot liquid can cau se an accident and pe rsonal injury .
• Never carry any beverage containers with hot liquid s, such as
hot coffee or hot tea , in the vehi cle while it i s moving . In case of an
accident , sudden braking or other vehicle movement , hot liquid
could spill , cau sing scalding burns. Spilled hot liquid can also
c ause an ac cident and personal injury .
• Use only soft cups in the cup holder . Hard c ups and gla sses can
c au se injury in an accident.
0 Note
On ly dr ink containers with lids shou ld be carr ied in the cupholder .
Li quid could spill out and damage your vehicle's electronic equip
ment or stai n th e upho lstery, etc .•
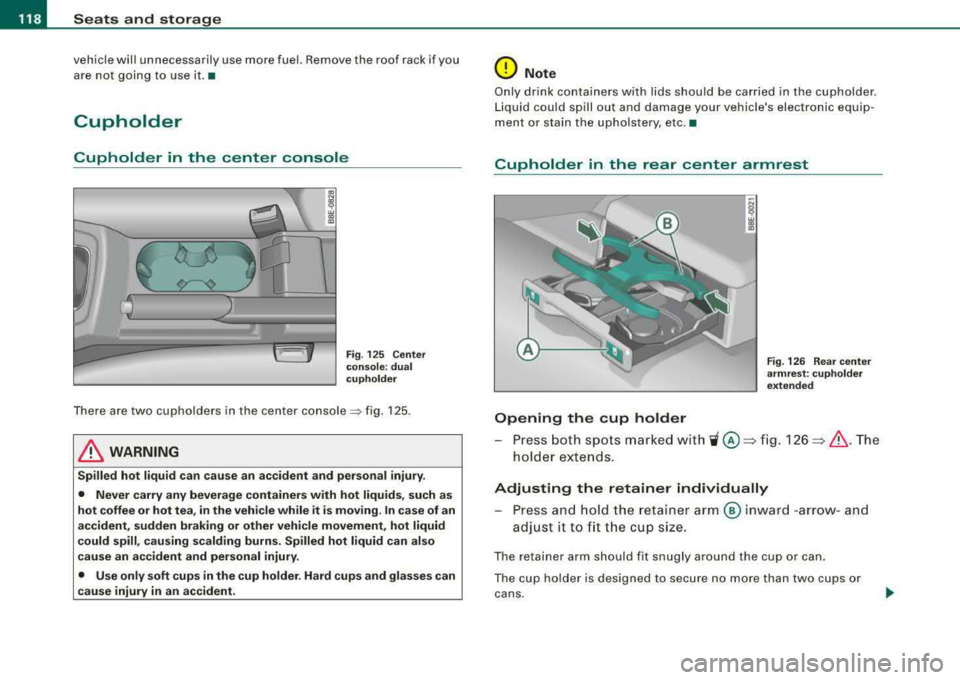
Cupholder in the re ar center armrest
Opening the cup holder
Fig . 126 Rea r center
a rmrest : cupholder
extended
- Press both spots marked wit h 'i@ ~ fig. 1 26 ~ & .T he
holde r exte nds.
Adjusting the retainer individually
Pr ess an d ho ld t he retain er arm ® inwar d -arrow -an d
adjust it to
fi t th e cup size.
The retainer arm sh ould fi t snugly ar oun d the c up or can .
The cup holder is designed to secure no more than two cups or cans .
Page 196 of 368

___ A_ ir_b _ a_ g=- s--=- y_s _t _e _m _________________________________________________ _
&, WARNIN G (continu ed )
• The inflating airbag will hit the child s afety seat or infant
car rier with gre at for ce and will sma sh the child safe ty se at and
c hild agai nst the ba ckre st, center arm re st, door , or roof .
• Alwa ys in sta ll re arw ard -f aci ng child re str aint s in the b ack se at .
• If you mu st in stall a rearw ard facing child safety seat on the
front p assenger se at be cause of e xce pti ona l ci rc um stan ce s a nd
the PASSENGER AIR BAG OFF light doe s not come on and stay on ,
immedi atel y insta ll the re ar-f a cing child s afet y s ea t in a re ar
se ating position and h av e the airb ag sy stem inspe cted by your
Audi dealer .
& WARNING
If, in e xception al c ir cum sta nces, you mu st in sta ll a forward -f ac in g
c hild re straint on the front p assenger 's seat:
• Alway s mak e sure the forward-f acing seat ha s been designed
and certified by it s manufacturer for u se on a front seat with a
p asseng er front and side airb ag .
• Never put the forw ard -fa cing child re straint up again st or very
near the instrument panel.
• Alway s move the p assenger seat into it s re armost position in
the se at's fore and aft adju stment range , as far a way from the
a irbag a s pos sible , before installing the forward -f a cing child
rest raint . The ba ckrest must be ad justed to an upright po sitio n.
• Make sure that the PASSENGER AIR BAG OFF light come s on
a nd stay s on all th e time whenever the ignit ion i s swi tched on .
•
Advanced Airbag System components
The front passenger seat in your vehicle has a lot of very impo rtant
parts of the Advanced A irbag System in it . These parts include the
we ight -sensing mat , sensors, wiring, brackets , and more. The func -tion of the system in the front passenger seat is checked by the e
lec
tronic contro l unit w hen t he ignit ion is on . The co ntrol uni t monitors
the Advanced Airbag System and turns the airbag indicator light on
whe n a malfunction i n the system components is detected. T he
function of the airbag ind icator light is described in greater detai l
below. Because the front passenger seat contains important parts
o f the Advanced Airbag System, you must take care to prevent it
from being damaged . Damage to the seat may prevent the
Advanced Airbag for the front passenger seat from do ing its job in
a crash .
The front Adva nc ed Airbag S ystem consi sts of th e
following :
• Crash sensors in the front of the ve hicle that measure veh ic le
acce leration/deceleration to provide information to the Advanced
A irbag System about t he severity of t he crash .
• An electronic control unit, with integrated crash sensors for front
and side impacts. The control unit "dec ides" whethe r to fire the
front airbags based on the information received from the crash sensors . The control unit also "dec ides" whether the safety be lt
pretensioners should be activated.
• A dual -stage Advanced Airbag with gas generator for the driver
inside the steering wheel hub.
• A dual-stage Advanced A irbag and gas generator inside the
instrument pane l for the front passenger .
• A we ight -sensing mat under the upholstery padding of the front
passenger seat cushion that measures the tota l weight on the seat .
T he information registered is sent continuously to the electronic
control un it to regu late dep loyment of the front Advanced Airbag on
the passenger side .
• An airbag monitor ing system and indicator light in the instru
ment
cluster=> page 198 .
• The PASSENGER AIR BAG OFF light comes on and stays on in t he
center of the instrument panel
=> page 199, fig . 180 and te lls you
when the fron t Advanced Airbag on the passenger side has been
turned off.
~
Page 199 of 368
Airbag system 111111
-----------------------------=--=-------
It is important to remember that while the supplemental airbag
system is designed to reduce the likelihood of serious injuries, other
injuries, for example swelling, bruising and minor abrasions, can
also happen when airbags inflate. Airbags do not protect the arms
or the lower parts of the body. Front airbags only supplement the
three point safety belts in some frontal collisions in which the
vehicle deceleration is high enough to deploy the airbags.
Front airbags
will not deploy:
• if the ignition is switched off when a crash occurs,
• in side collisions,
• in rear -end collisions,
• in rollovers ,
• when the crash deceleration measured by the airbag system is
less than the minimum threshold needed for airbag deployment as
registered by the electronic control unit.
The front passenger airbag
will also not deploy:
• when the front passenger seat is not occupied,
• when the weight on the front passenger seat as sensed by the
Advanced Airbag System indicates that the front airbag on the
passenger side has to be turned off by the electronic control unit
(the PASSENGER AIR BAG OFF light comes on and stays onl.
& WARNING
Sitting in the wrong position can increase the risk of serious injury
in crashes.
• To reduce the risk of injury when the airbags inflate, the driver
and passengers must always sit in an upright position, must not
lean against or place any part of their body too close to the area
where the airbags are located.
• Occupants who are unbelted, out of position or too close to the
airbag can be seriously injured by an airbag as it unfolds with
great force in the blink of an
eye :::::, page 189.
Controls and equip ment Safety first
Vehicle operation
& WARNING
A child in a rearward-facing child safety seat installed on the front
passenger seat will be seriously injured and can be killed if the
front airbag inflates
-even with an Advanced Airbag System.
• The inflating airbag will hit the child safety seat or infant
carrier with great force and will smash the child safety seat and
child against the backrest, center arm rest, door or roof.
• Always install rear-facing child safety seats on the rear seat.
• If you must install a rearward facing child safety seat on the
front passenger seat because of exceptional circumstances and
the PASSENGER AIR BAG OFF light does not come on and stay on, immediately install the rear-facing child safety seat in a rear
seating position and have the airbag system inspected by your
Audi dealer .
& WARNING
Objects between you and the airbag will increase the risk of injury
in a crash by interfering with the way the airbag unfolds or by
being pushed into you as the airbag inflates .
• Never hold things in your hands or on your lap when the vehicle
is in use.
• Never transport items on or in the area of the front passenger
seat. Objects could move into the area of the front airbags during
braking or other sudden maneuver and become dangerous projec
tiles that can cause serious personal injury if the airbags inflate.
• Never place or attach accessories or other objects (such as cup
holders, telephone brackets, large, heavy or bulky objects) on the
doors, over or near the area marked "AIRBAG" on the steering
wheel, instrument panel, seat backrests or between those areas
and yourself. These objects could cause injury in a crash, espe
cially when the airbags inflate.
• Never recline the front passenger's seat to transport objects.
Items can also move into the area of the side airbag or the front _,,
Vehicle care Do-it-yourself service Technical data
Page 257 of 368
Cleaning and protection -
------------~---
High temperatures, as from exposure to intense sunlight, intensify
the corrosive effect particularly when humidity is high as well.
Under certain circumstances,
weekly washing may be necessary.
Under other conditions, a monthly washing and waxing may be
adequate.
After the winter, the
underside of the vehicle should be thoroughly
washed preferably in a professional car wash.
& WARNING
Always read and heed all WARNINGS and the information
~ page 254 . •
Automatic car wash
The vehicle can be washed in almost any modern auto
matic car wash.
The vehicle paint is so durable that the vehicle can normally be
washed without problems in an automatic car wash. However, the effect on the paint depends to a large extent on the design of the
facility, the filtering of the wash water, the type of wash and care
material, etc. If the paint has a dull appearance after going through
the car wash or is scratched, bring this to the attention of the oper
ator immediately . If necessary, use a different car wash .
Before going through a car wash, be sure to take the usual precau
tions such as closing the windows and power roof* . Remove
antenna if applicable.
If you have installed additional accessories on the vehicle -such as
spoilers, roof rack, etc . - it is best to ask the car wash operator if
these should be removed.
& WARNING
Always read and heed all WARNINGS and the information
=> page 254. •
Washing the vehicle by hand
A lot of water is needed when washing a vehicle by hand.
- Before you start washing, make sure you have read and
understood the
WARNINGS=> & in "General informa
tion" on
page 254 .
- First soak all dried dirt until it is soft, then rinse it off.
- As you clean your vehicle, start with the roof and work
your way down to the bottom, using a sponge, a sponge
glove or a clean brush.
- Rinse the sponge or the sponge glove often, flushing it
clean each time.
- Use special car shampoo only for very persistent dirt.
- Rinse the car thoroughly with water.
- Use a chamois leather to gently wipe the exterior dry.
Use a separate sponge for cleaning the wheels, door sills and other
regions exposed to pick up road dirt. In this way, you will not
scratch the paint with coarse particles imbedded in the sponge the
next time you wash the car.
& WARNING
• Do not clean the underside of the chassis, fenders, wheel
covers, or other hard to reach parts without protecting your hands
and arms . You may cut yourself on sharp-edged metal parts.
.,
Vehicle care
Page 297 of 368
__________________________________________________ T_ ir_e_ s_ a_ n_d _ w_ h_ e_ e_l_s _____ llll
Groove
means the space between two adjacent tread ribs.
L oa d ratin g (code)
means the maximum load that a t ire is rated to carry for a given
inflation pressure. You may not find this information on all tires
because it is not required by law.
M ax imum l oad r atin g
means the load rat ing for a t ire at the maximum permiss ib le infla
tion pressure for that tire.
Ma ximum l oaded vehicle we ight
means the sum of :
(al Curb weight
(b) Accessory weight
(c) Vehicle capacity weight, and
(d) Production opt ions weight
M ax imum (permissibl e) infl ati on press ure
means the maximum cold inflatio n pressure to wh ich a t ire may be
inflated. Also ca lled "maximum inflation pressure ."
No rm al occ upant we ight
means 150 lbs. (68 ki lograms) times the number of occupants
seated in the vehicle up to the total seati ng capacity of your vehicle .
Occupant distributi on
means distribution of occupants in a vehicle .
Outer diameter
means the overal l diameter of an inflated new tire.
Ove rall width
means the linear distance between the exteriors of the sidewa lls of
an inf lated t ire, including elevations due to labe ling, decorat ions, or
protective bands or ribs .
Ply
means a layer of rubber -coated para lle l cords.
Pr odu ction opt io ns weig ht
means the comb ined weight of those installed regular product ion
options weighing over 5 lbs . (2.3 kg) in excess of those standard
items which they replace, not previously cons idered in curb weight
or accessory weight, inc luding heavy duty brakes, ride levelers, roof
rack, heavy duty ba ttery, and specia l trim .
Radi al pl y tir e
means a pneumat ic tire in which the ply cords that extend to the
beads are laid at substantially 90 degrees to the centerline of the
tread .
Recomm ended infl ati on p ress ure
see => page 294, "Cold tire inflat io n pressure".
Reinfor ced tir e
means a tire designed to operate at higher loads and at higher infla
tion pressures then the corresponding standard tire. Reinforced
t ires my be ide ntified as "XL", "xi", "EXTRA LOAD", or "RF" on the
sidewall.
Rim
means a metal support for a tire or a tire and tube assembly upon
wh ich the t ire beads are seated.
Rim di ameter
means nom inal d iameter o f the bead seat. I f you change your whee l
size, you wi ll have to purchase new tires to match the new rim diam
eter.
Rim siz e design ation
means rim diameter and width.
R im width
means nominal distance between rim flanges .
Vehicle care
Page 329 of 368

Fuses and bulbs -
----------------
0 Note No. Equipment Amps
• On no account should fuses be repaired (e.g. patched up with tin 13 Steering column module 10
foil or wire) as this may cause serious damage elsewhere in the elec -14 Brake lights 10
trical circuit or cause fire.
15 Instrument cluster, Navigation system 10
• If a fuse blows repeatedly, do not keep replacing it. Instead, have
the cause for the repeated short circuit or overload tracked and Garage door opener
5
fixed.
•
Level, tire pressure control, park assist,
17 light/rain sensor 10
Fuse list Automatic headlight range control, left 5
Fuses which can be replaced. 19 Fog lights, rear fog light 15
20
Not used
No. Equipment Amps
21 Not used
1 Air conditioner 10 Front doors 15
2
Footwell illumination 5 23 Rear doors 15
3 Heated washer jets 5 Central convenience electrical system 20
4 Radiator fan 5 25 Heater blower 30
5
Telephone, oil level sensor, multifunction 10 26 Rear window defogger 30
switch, rear heated Seat, shift gate
27 Socket for trailer towing (controller) 30
6
Air conditioner (air quality sensor), air pressure 5 28 Fuel pump 20 sensor
Electronic Stabilization Program (ESP), brake
29 Not used
7 light switch, clutch pedal switch, steering angle 10 Power sunroof 20
sensor Automatic transmission, mirror dimming, diag-
31 15 8 Telephone 5 nosis socket
9 Brake booster (vacuum pump) 15 Towing assembly 15
10
Automatic headlight beam adjustment, auto -5 33 Cigarette
lighter 20
matic headlight range control, right
Electrical socket 20
11
Airbag 5 35 Luggage compartment socket 20
12
Diagnosis socket 10 Windshield wiper system 30
Do -it -yourself service
Page 343 of 368

_________________________________________________ G_ e_ n_ e_r _a _l_ i_n _f_o _ r_ m_ a_ t
_ i
_ o _ n
__ __
T he sa fe ty co mplia nce s ticke r
is your assurance t hat your new vehicle complies with a ll applicable
Federa l Motor Vehic le Safety Standards which were in effect at the
t ime the veh ic le was manufactured . You can find t his st icker on the
left door jamb. It shows the mon th and year of production and the
vehic le identification number of your vehic le (perforation) as well as
the Gross Veh icle Weight Rating (GVWR) and the Gross Axle Weight
Rating (GAWRl.
Th e high volt ag e wa rning la bel
is located on the lock carrier .
The spark ignition syste m mee ts all requirement s of the Canadi an
Interf ere nc e-C au si ng Equipm ent Regulati ons. •
Weights
Gross Veh icle Weight R ating
The G ross Veh ic le Weight Rat ing (GVWR), and the Gross Ax le Weight
Rating (GAWR) for front and rear are listed on a sticker on the left
door jamb .
The Gross Vehicle Weight Rating includes the we ight of the basic
vehic le plus fu ll fuel tank, oil and coolant, plus maximum load,
whic h inc ludes passenger weight ( 150 lbs/68 kg per designated
seating position) and luggage weight.
Gr oss Axle Weight Ra ting
The Gross Ax le Weight Rating is the maximum load that can be
app lied at each axle of the
veh ic le =:> & .
Vehicl e cap acit y w eight
The vehicle capacity weight (max. load) is listed either on the
driver's side 8 -pillar or inside the fuel fi ller f lap .
Controls and equip
ment Safety first Vehicle operation
Roof
weight
The maximum permissible roof we ight is
165 lb (75 kg ). The roof
weight is made up of the weight of the roof rack system and the
weight of the object being
transported =:> page 117, "L oading the
roof rack".
LJ}. WARNING
• The actual Gr oss Axle Weight R atin g at the front and re ar ax les
s hould not ex ceed the permi ssible w eight s, and th eir combination
mu st not e xceed the Gr oss Vehicle Weight R atin g.
• Exceeding pe rmi ssible weight ratin gs can re sult in vehicle
d am age , acc ident s and per son al inju ry.
0 Note
• The vehicle capacity weight figures apply when the load is
distr ibuted even ly in t he ve hicle (passengers and l uggage). When
transporting a heavy load in the luggage compartment, carry the
load as near to the rear axle as possib le so that the vehic le's
handling is not impaired .
• Do not exceed the maxim um permissib le axle loads or the
maximum gross vehic le weight. Always remember that the vehic le's
handling wi ll be affected by the extra load . Therefore, adjust your
speed according ly.
• Always observe local reg ulations. •
Dimensions
The specifications refer to the basic mode l. Differences may occur
depending on the mode l type and options ordered, for example, tire
sizes.
..,
Vehicle care Do-it-yourself service Technical data