wiper blades AUDI A4 AVANT 2008 Owners Manual
[x] Cancel search | Manufacturer: AUDI, Model Year: 2008, Model line: A4 AVANT, Model: AUDI A4 AVANT 2008Pages: 368, PDF Size: 46.19 MB
Page 88 of 368

Clear vision
& WARNING
• Wip er blades a re c ruc ia l f or sa fe dri vin g! On ly whe n the y are in
good condition are th ey able to cl ear the window s properly to
p rovi de un comp romi sed vis ibilit y. Wor n or damaged wiper bl ade s
are a safety
hazard => page 88, "In stalling new wiper blades "!
• The rain sen sor i s onl y des igned to assist and s upport the
driver. It rem ain s entirely the driver's respon sibil ity to monit or
o ut side weather con dit ions and to manu ally acti va te the wipe rs as
s o on as rain or drizz le reduce s vi sibility through th e wind shield .
• The windshi eld mu st not b e treat ed w ith water -r e pellent m ate
rials. T hey can increa se glare u nder poor visibilit y conditi ons such
as w etness, darkne ss, or when the sun i s low on the hori zo n. In
addition , they can caus e the windshield wipers to chatt er.
0 Note
I n freezing or near freezing conditions :
• Always check that the wiper blades are not frozen to the glass
before yo u turn the wipers on. Loosen a wiper b lade which is frozen
in place before operating the w ipers to prevent damage to the wiper
blade or the wiper motor.
• Do not use the wipers to clear a frosted window . Using the
wipers as a convenient ice scraper will destroy the wiper blades .
• Before you take your vehicle to an automatic car wash , make sure
you have the windshield w iper system switched off (lever in position
0), otherwise the windshield wiper system could get damaged in the
car wash if it should suddenly come on .
[ i J Tips
• The rain sensor is part of the interva l wiping system . Turning off
the ignition will also deactivate the rain sensor. To reactivate the sensor, switch off the interval wiping function, then switch it back
on again. •
If you switch off the ignition with the windshield wiper lever sti ll
in the interva l wipe position and then come back a while later and
drive off, the rain sensor will reactivate itself after the vehicle speed
has exceeded 4 mph (6 km/h) .
• Worn or dirty windshield wiper b lades cause smearing which
can affect the opera tion of the rain sensor . Check the conditio n of
your windshield wiper blades regularly .
• Make sure the washer fluid reservoir in the engine compartment
is topped off before going on a long trip . Look
up=> page 291 for
checking and filling the washer container .•
Rear vvindovv vviper (Q
The wiper lever is also used to operate the rear window
wiper and the automatic wiper/w asher function.
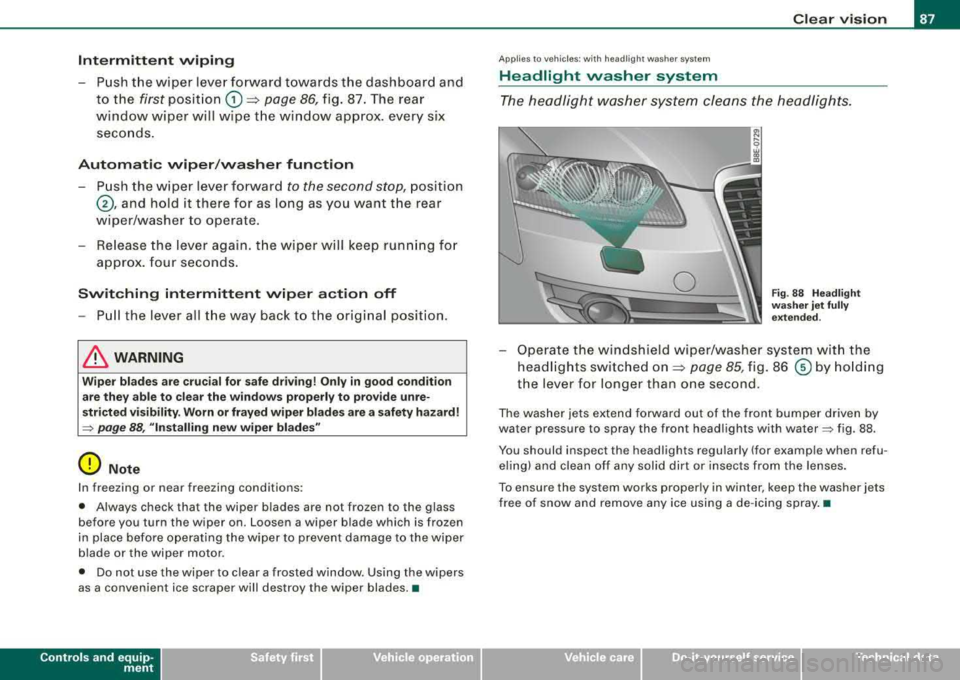
F ig . 8 7 Wip er lever:
a cti vating th e rea r
w indo w wipe r an d
was her
The rear win dow wiper a nd the au tomati c wip er/washer
f un ctions are activate d as fo llows:
Page 89 of 368
Intermittent wiping
- P ush the wiper lever forward towards the dashboard and
to the first posit ion
G) => page 86, fig. 87. The rear
wi ndow wiper will wipe t he wi ndow approx. every six
seco nds .
Automatic w iper /washer fun ction
- P ush the wiper lever forward to the second stop, position
@ , and hold it there for as long as you want t he rear
wiper/washer to operate.
- Release the lever again . th e wiper will keep run ning fo r
approx. four seconds.
Switching intermittent wiper a ction off
- Pull the lever all the way b ack to t he orig inal posit ion.
& WARNING
Wipe r blades are cruci al for safe dr iv ing! Only in good cond ition
a re the y able to clea r the windo ws properly to provide unre
s tricted vi sibility . Worn or frayed wiper blades a re a safety hazard!
~ page 88 , "In stalling new wiper bl ades "
0 Note
In freezing or near freezing conditions:
• Always check that the wiper blades are not frozen to the glass
before you turn the wiper on. Loosen a wiper blade which is frozen
in place before operating the wiper to prevent damage to the wiper
b lade or the wiper moto r.
• Do not use the wiper to clear a frosted window. Using the wipers
as a convenient ice scraper will destroy the wiper blades. •
Controls and equip
ment
Clear v ision
Ap plies to vehicles : wi th h eadl igh t w as her sy ste m
Headlight washer system
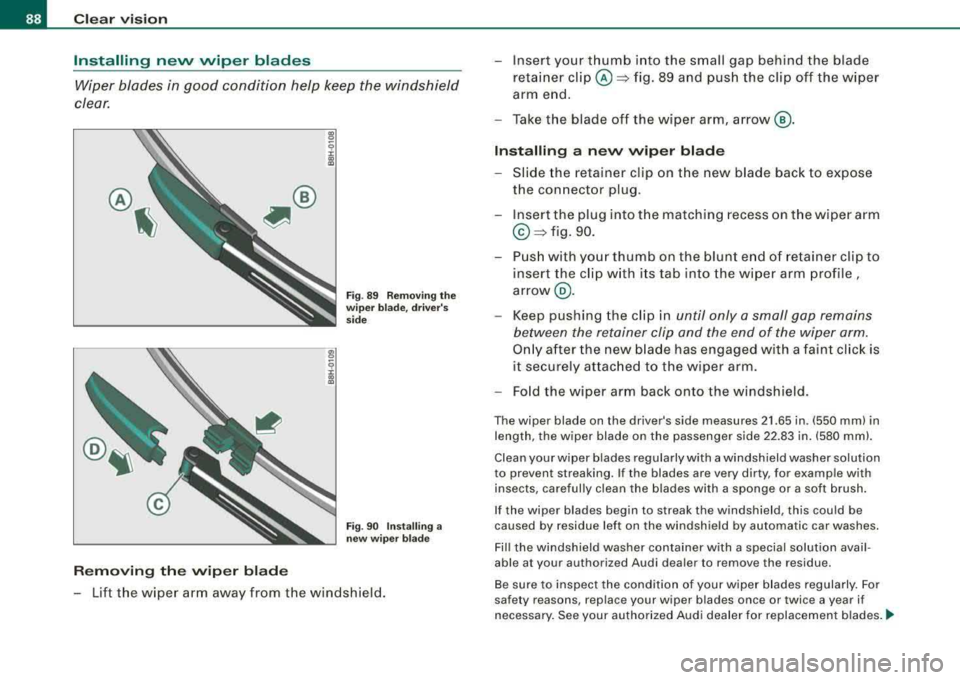
The headlight w asher system cleans the headligh ts .
Fig . 88 Headlight
wa sher jet fully
e xte nded .
-Operate the windshield wiper/washer system wi th the
head lights switched
on=> page 85 , fig. 86 © b y hold ing
the lever for longer than one second .
The washer jets extend forward out of the fron t bumper driven by
water pressure to spray the front head lights with
water~ fig. 88 .
You should inspect the headlights regu lar ly (for example when refu
e ling) and c lean off any solid dirt or i nsects from the lenses .
To ensure the system works proper ly in winter , keep the washer jets
free of snow and remove any ice using a de -icing spray .•
irechnical data
Page 90 of 368
Clear vision Installing new wiper blades
Wiper blades in good condition help keep the windshield
clear.
@
'
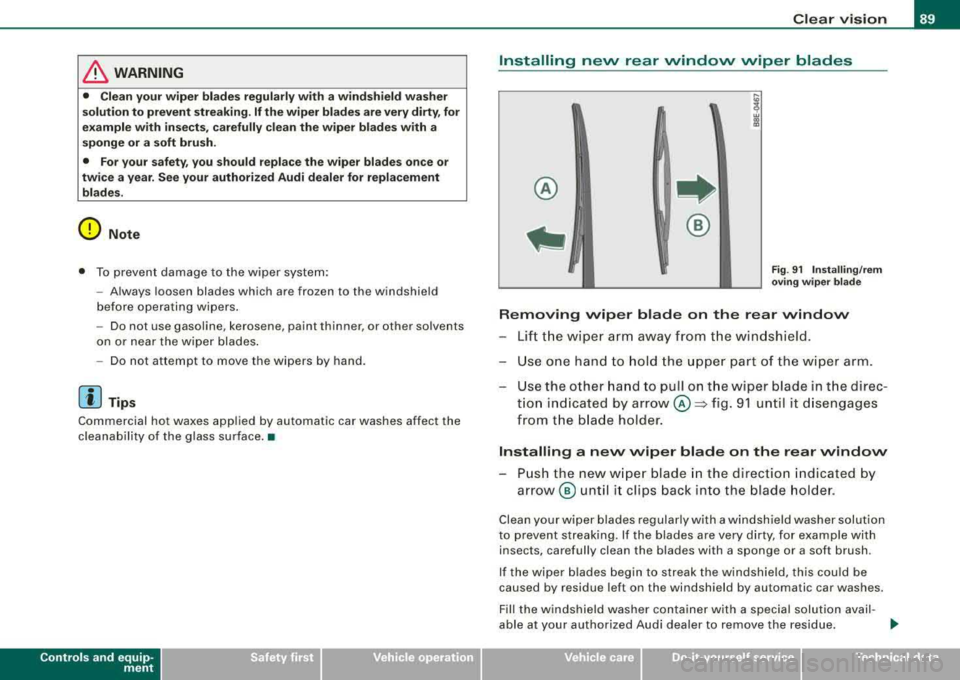
Removing the wiper blade
Fig . 89 Removing the
wiper blade, driver's
side
Fig . 90 Installing a
new wiper blade
-Lift the wiper arm away from the windshield.
-Insert your thumb into the small gap behind the blade
retainer
clip @==> fig. 89 and push the clip off the wiper
arm end.
-Take the blade off the wiper arm, arrow ®·
Installing a new wiper blade
-Slide the retainer clip on the new blade back to expose
the connector plug .
-Insert the plug into the matching recess on the wiper arm
@==>fig. 90.
-Push with your thumb on the blunt end of retainer clip to
insert the clip with its tab into the wiper arm profile ,
arrow @.
-Keep pushing the clip in until only a small gap remains
between the retainer clip and the end of the wiper arm.
Only after the new blade has engaged with a faint click is
it securely attached to the wiper arm.
-Fold the wiper arm back onto the windshield.
The wiper blade on the driver's side measures 21.65 in. (550 mm) in
length, the wiper blade on the passenger side 22.83 in. (580 mml.
Clean your wiper blades regularly with a windshield washer solution
to prevent streaking. If the blades are very dirty, for examp le with
insects, carefully clean the blades with a sponge or a soft brush.
If the wiper blades begin to streak the windshield, this could be
caused by residue left on the windshield by automatic car washes.
Fill the windshield washer container with a special solution avail
able at your authorized Audi dealer to remove the residue.
Be sure to inspect the condition of your wiper blades regularly. For
safety reasons, replace your wiper blades once or twice a year if
necessary. See your authorized Audi dealer for replacement
blades. ~
Page 91 of 368
& WARNING
• Clean your wiper blades regularly with a windshield washer
solution to prevent streaking.
If the wiper blades are very dirty, for
example with insects, carefully clean the wiper blades with a
sponge or a soft brush.
• For your safety, you should replace the wiper blades once or
twice a year. See your authorized Audi dealer for replacement blades.
0 Note
• To prevent damage to the wiper system:
-Always loosen blades which are frozen to the windshield
before operating wipers.
-Do not use gasoline, kerosene, paint thinner , or other solvents
on or near the wiper blades.
-Do not attempt to move the wipers by hand.
[ i] Tips
Commercial hot waxes applied by automatic car washes affect the
cleanability of the glass surface. •
Controls and equip
ment
Clear vision
Installing new rear window wiper blades
@
®
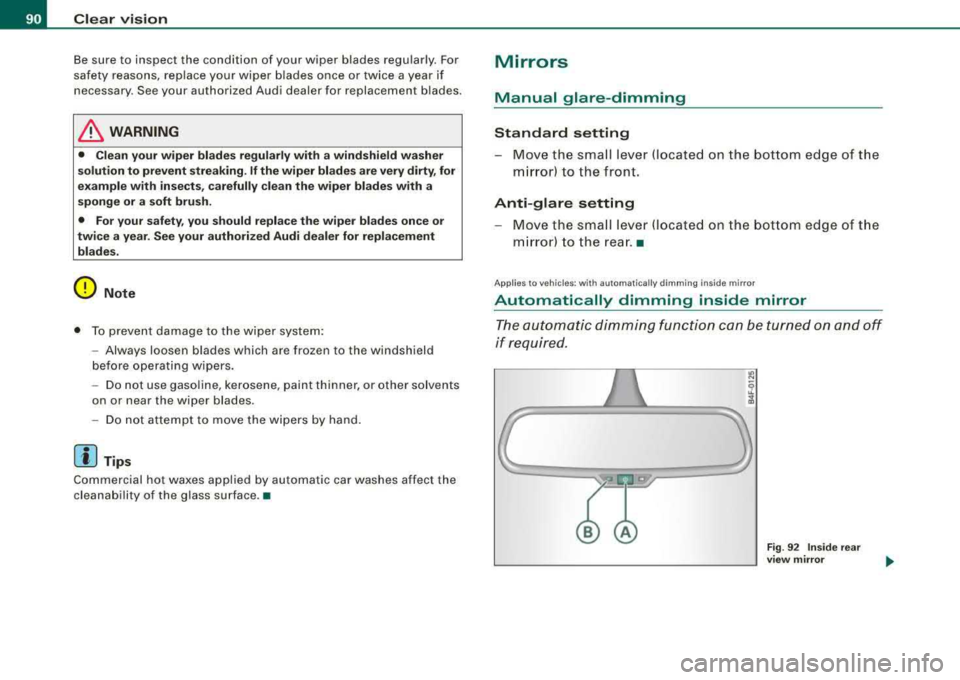
Fig . 91 Installing/rem
oving wiper blade
Removing wiper blade on the rear window
Lift the wiper arm away from the windshield.
Use one hand to hold the upper part of the wiper arm.
-Use the other hand to pull on the wiper blade in the direc
tion indicated by
arrow @=} fig. 91 until it disengages
from the blade holder.
Installing a new wiper blade on the rear window
Push the new wiper blade in the direction indicated by
arrow ® until it clips back into the blade holder .
Clean your wiper blades regularly with a windshield washer solution
to prevent streaking . If the blades are very dirty, for example with
insects, carefully clean the blades with a sponge or a soft brush .
If the wiper blades begin to streak the windshield, this could be
caused by residue left on the windshield by au tomatic car washes.
Fill the windshield washer container with a special solution avail -
able at your authorized Audi dealer to remove the residue.
.,,_
irechnical data
Page 92 of 368
Clear vision
Be su re to inspect the condition of your w iper blades regu larly . For
safety reasons, replace your wiper blades once or twice a year if
necessary . See your authorized Aud i dealer for replacement b lades.
& WARNING
• Clean your wiper blades regularly with a windshield washer
solution to prevent streaking . If the wiper blade s are very dirty , for
e xample w ith in se cts , c arefully clean the wiper blade s w ith a
sponge or a soft brush.
• For your safety , you s hould repl ace the wiper blades on ce or
twi ce a year . See your authorized Audi dealer for replacement
blades .
0 Note
• To prevent damage to the wiper system:
-Always loosen blades which are frozen to the windshield
be fore operating wipers .
-Do not use gasoline, kerosene, paint thinner, or other solvents
on or near the wiper blades .
-Do not attemp t to move the wipers by hand.
[ i ] Tips
Commercial hot waxes applied by automatic car washes affect the
cleanabili ty of the g lass surface .•
Mirrors
Manual glare-dimming
Standard setting
-Move the sma ll lever (located on the bottom edge of t he
m irr or) to the front .
Anti-glare setting
Move the sma ll l ever (locate d on th e bottom edge of t he
m irror) to the rea r. •
Ap plies to vehic les: w it h auto matically dimming inside mirro r
Automatically dimming inside mirror
The automatic dimming function can be turned on and off
if required .
Fig . 9 2 Inside re ar
v iew mirror
Page 366 of 368
-Alphabetical index _ _e ____________________________________ _
Waxing .... .... ....... .... .... ... .. 257 Why safety belts? ....... .... .... 176, 177 y
Wear indica tor ..................... 303 Windows
Weatherstrips .... ... .... .... .... ... 259 Cleaning ........................ 258 Yellow symbols ... .... .... ...... ..... 33
Weights ........................... 341 Convenience close/open feature ..... 59
What happens if you wear your safety be lt too Defogging · · · · · · · · · · · · · · · ·
...... 131
loose? ........................ 182 Defrosting ...................... 131
What happens to unbelted occupants? . 178 Rapid defrosting/defogging ........ 131
What impairs driving safety? .. ...... . 167
What should I do after changing a wheel? .. 300
What should I do after replacing whee ls? ...
300
Wheel bolts Torque ......................... 311
Wheel change . . . . . . . . . . . . . . . . . . . . . . 318
Wheels .. .... .... .... ....... .... ... 293
Cast a lloy ... .. .... .... .......... 260
Checking tire pressure ............ 299
Cold tire inflation pressure ...... .. 297
Genera l notes .... .... .... ...... . 293
G lossary of tire and loading terminology
294
New tires and whee ls . . . . . . . . . . . . . 305
Stee l whee ls .......... .......... 259
Tires and vehicle load limits . . . . . . . 301
When must a safety belt be replaced? .. 180
When must the airbag system be inspected? 198
When should I adjust the tire pressures?
300
When should I check the tire pressures? 300 Windshield washer fluid
Low level .... ....... ...... .... ... 34
Windshield wipers Installing new wiper b lades ......... 88
Washer reservoir . . . . . . . . . . . . . . . . . 291
Winter driving Windows . . . . . . . . . . . . . . . . . . . . . . . 258
Winter operation
Battery .. .... ....... ...... .... .. 285
Coolant system .................. 280
Ti res ....... .. .... .... .... ... ... 242
Winter tires .............. .......... 310
All -whee l drive ... .... ....... ..... 310
Wiper and washer system .. .... .... ... 85
Intermittent wiping ...... ....... ... 85
One-tap wiping ...... ...... .... ... 85
Rear window wiper .......... .. .... 86
Wiper blades Installing new wiper blades ....... .. 88
Replacing rear window wiper blades . 89
Worn brake pads .. ........ ... .... .... 34
X
Where can I find the tire pressures for my Xenon headlights ..... .... .... .... ... 79
car? ...... ... .... .... .... .... . 299 Xenon-L ights ... .. ...... .... ... .. ... 328