tow AUDI A4 CABRIOLET 2009 User Guide
[x] Cancel search | Manufacturer: AUDI, Model Year: 2009, Model line: A4 CABRIOLET, Model: AUDI A4 CABRIOLET 2009Pages: 340, PDF Size: 77.32 MB
Page 106 of 340
• .___S_ e_a _ t_ s_ a_ n_ d_ s_t _o _r_ a...; g==- e ________________________________________________ _
& WARNING (continued)
• Sharp edges on the load must be covered for protection.
Always fasten the belt tightly around the sack and its contents
~ page 103, fig. 118 .
[ i ] Tips
Never stow the ski sack away if it's wet or damp (for example, snow
melting from skis). Let it dry completely before you stow it away. •
Cupholder
Cupholder in the center consol e
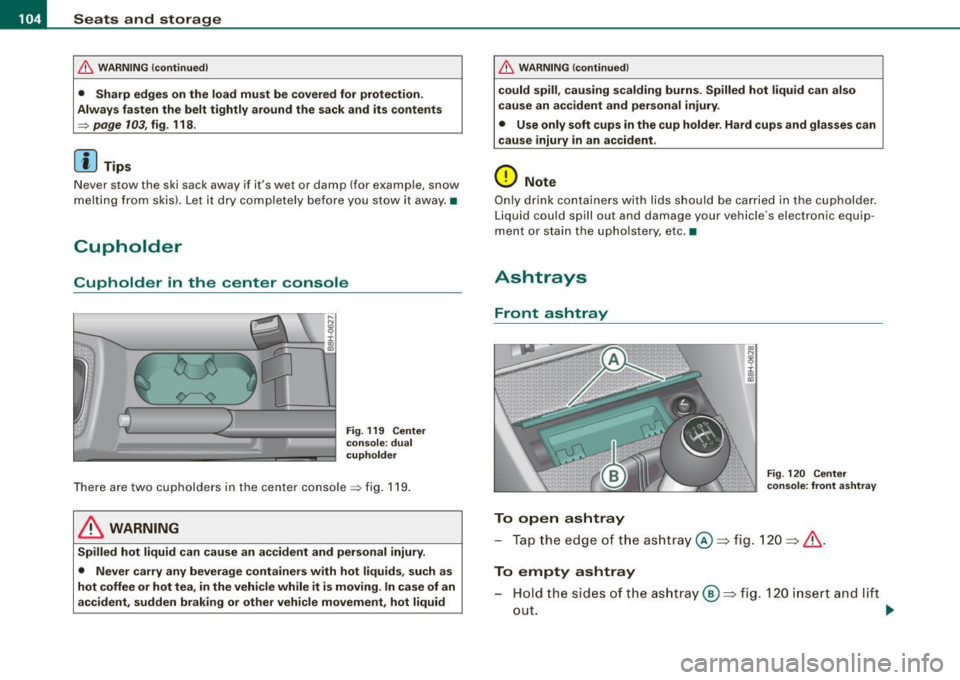
Fig. 119 Center
console : dual
cupholder
There are two cupholders in the center console~ fig. 119 .
& WARNING
Spilled hot liquid can cause an accident and personal injury.
• Never carry any beverage containers with hot liquids, such as
hot coffee or hot tea, in the vehicle while it is moving. In case of an
accident, sudden braking or other vehicle movement, hot liquid
& WARNING (continued)
could spill, causing scalding burns. Spilled hot liquid can also
cause an accident and personal injury.
• Use only soft cups in the cup holder . Hard cups and glasses can
cause injury in an accident.
0 Note
Only drink containers with lids should be carried in the cupholder.
Liquid could spill out and damage your vehicle 's electronic equip
ment or stain the upholstery , etc. •
Ashtrays
Front ashtray
To open ashtray
Fig. 120 Center
console: front ashtray
-Tap the edge of the ashtray@::::, fig . 120 ::::, &.
To empty ashtray
Hold the sides of the ashtray@::::, fig. 120 insert and lift
out.
~
Page 120 of 340
• .___O_ n_ t_h _e _ r_o _a_ d __________________________________________________ _
On the road
Steering
Adjusting the steering wheel column
The height and reach of the steering wheel can be
adjusted.
First, adjust the driver's seat correctly.
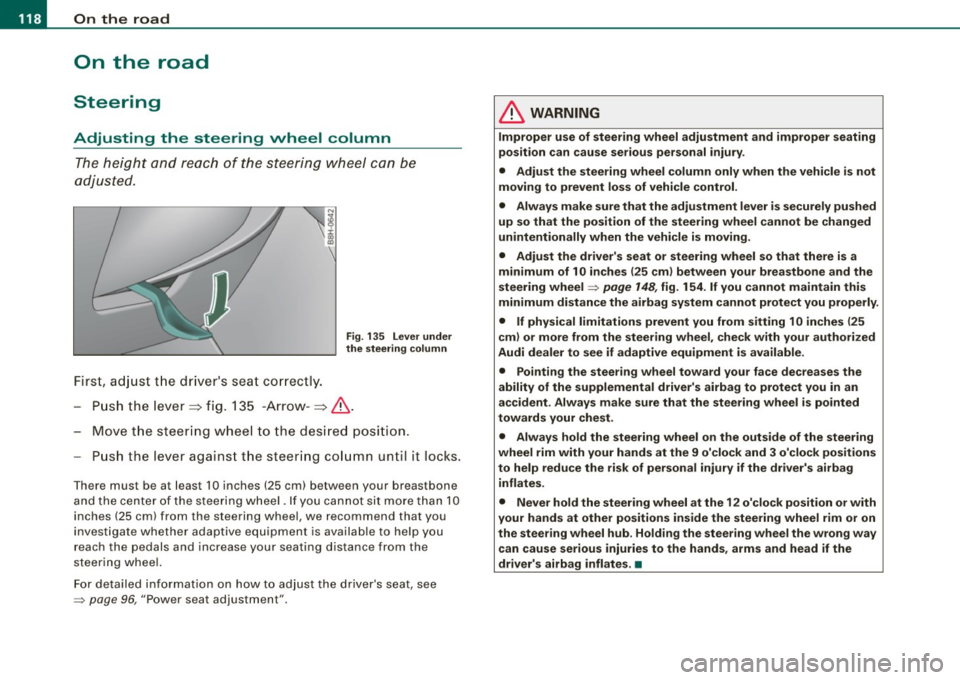
Fig . 135 Lever under
the steering column
-Push the lever~ fig. 135 -Arrow- ~& .
- Move the steering wheel to the desired position.
- Push the lever against the steering column unt il it locks.
Th ere mus t be at least 10 inches (25 cm) betw een your br eastbone
and the center of the steering wheel. If you cannot sit more than 10
inches (25 cm) from the steering wheel, we recommend that you
investigate whether adaptive equipment is available to help you
reach the pedals and increase your seating distance from the
steering wheel.
For detailed information on how to adjust the driver's seat, see
=> page 96, "Power seat adjustment" .
& WARNING
Improper use of steering wheel adjustment and improper seating
position can cause serious personal injury .
• Adjust the steering wheel column only when the vehicle is not
moving to prevent loss of vehicle control.
• Always make sure that the adjustment lever is securely pushed
up so that the position of the steering wheel cannot be changed
unintentionally when the vehicle is moving.
• Adjust the driver's seat or steering wheel so that there is a
minimum of 10 inches
125 cm) between your breastbone and the
steering wheel=> page 148, fig.
154. If you cannot maintain this
minimum distance the airbag system cannot protect you properly.
• If physical limitations prevent you from sitting 10 inches
125
cm) or more from the steering wheel, check with your authorized
Audi dealer to see if adaptive equipment is available.
• Pointing the steering wheel toward your face decreases the
ability of the supplemental driver's airbag to protect you in an
accident. Always make sure that the steering wheel is pointed
towards your chest.
• Always hold the steering wheel on the outside of the steering
wheel rim with your hands at the 9 o'clock and 3 o'clock positions
to help reduce the risk of personal injury if the driver's airbag
inflates.
• Never hold the steering wheel at the
12 o'clock position or with
your hands at other positions inside the steering wheel rim or on
the steering wheel hub. Holding the steering wheel the wrong way
can cause serious injuries to the hands, arms and head if the
driver's airbag inflates. •
Page 122 of 340
• .___O_ n_ t_h _e _ r_o _a_ d __________________________________________________ _
Starting and stopping the engine
Starting the engine
The engine can only be started with your original Audi
key.
- Set the parking brake.
- Move the selector lever to the neutral position (automatic
transmission: selector lever in P or N)
=> &.
- On vehicles with manual transmission, fully depress the
clutch pedal.
- Turn the ignition key to position
0 => page 119, fig. 136
- do not depress the gas pedal when starting the engine!
- Let go of the key as soon as the engine starts.
A cold engine may at first be loud after it has been started. This is
due to the hydraulic valves building up the oil pressure. This normal
and no need for concern.
If the engine does not start immediately, stop trying after 10
seconds and then try to restart the engine about 30 seconds later.
What to do if the engine does not start
• ~ page 304, "Starting with jumper cables"
• ~ page 306, "Emergency towing with commercial tow truck".
& WARNING
Never start or let the engine run in a confined or enclosed area .
Exhaust fumes from the engine contain carbon monoxide, a color
less and odorless gas. Carbon monoxide can be fatal if inhaled.
• Never leave the engine idling unattended. An unattended
vehicle with a running engine poses a danger of personal injury or
theft.
0 Note
• Avoid high engine speeds, fast acceleration or heavy engine
loads while the engine is still cold. This could damage the engine.
• The engine cannot be started by pushing or towing the vehicle.
~ For the sake of the environment
To avoid unnecessary engine wear and to reduce exhaust emis
sions, do not let your vehicle stand and warm up. Be ready to drive
off immediately after starting your vehicle. Maintain moderate
speed until the engine is completely warm. Remember, the engine
performs best at operating temperature.•
Stopping the engine
- Turn the ignition key to position (D => page 119, fig. 136.
& WARNING
• Never turn off the engine until the vehicle has come to a
complete stop.
• The brake booster and servotronic only work when the engine
is running . With the ignition turned off, you have to apply more
force when steering or braking. Since you cannot steer and stop
normally, this can lead to accidents and serious injuries.
• The radiator fan can continue to run for up to 10 minutes even
after you have turned off the engine and removed the ignition key.
The radiator fan can also turn on again if the engine coolant heats
up because of intense sunlight or heat build-up
in the engine
compartment. _,.
Page 124 of 340

-L___:O~ n'.... t ~h~ e~r ~o~a ~ d:...._ _______________________________________________ _
-Swit ch off the e ngine an d rem ove the ignitio n key f rom
t h e ig nition loc k.
What else you should do when parking your vehicle on
an i ncline o r de clin e
Turn the s teering wheel so that if the vehic le sh ould start to ro ll, it
wi ll ro ll into the curb .
I f you are parking on a
decline (the fron t of your vehicle facing
downhil l), turn the front wheels to the right so that they point
toward the curb.
If you are par king on an incline (the font of your vehic le fac ing
uphill), turn the front whee ls to the lef t so that they point
away from
the curb .
Move the selector lever into the P position.
LJ}. WARNING
This is how you can redu ce the r isk of injury when leaving your
vehicle .
• Never par k the vehi cle where it c an come i n contact with dry
gra ss, spilled fuel or any other flammable materials .
• Never allow an yone -especi ally s mall ch ildren -to remain in the
vehicle when it i s locked . Locked doors make it more difficult for
res cuer s to acce ss the pas senger compartment in the e vent of a n
emergency _ Danger to life!
• Never leave children unsupervised in the vehicle . Children
c ould release the parking brake or move the gear shift lever out of
gear . The vehi cle could st art to roll awa y and cau se an a ccident .
• No matter wha t the sea son i s, the temperature in a parked
vehi cle can reach d angerous levels . •
Acoustic park assist
A pplies to vehicles : with 4 -ch an nel a co ustic park ass is t
Rear acoustic park assist
The rear acoustic park assist warns you of obstacles or
objects behind your car.
How it works
The acoustic park assist warning system (4-channel acoustic park
assist) uses ultr asonic sensors to warn yo u when you are
backing
your vehicle close to an obstacle . The system 's 4 sensors are located
inside the rear bumper .
Acti va ting
The rear acoustic park assist is ac tivated whenever you shift into
Reverse . You will hear a warn ing tone when the system is on .
Reverse
With the car backing up in reverse gear, the col lision warning sound
sets in at the fol lowing
approximate d istances to obstacles :
straight aft 5ft(1.5m)
angling aft off vehicle corners 2 ft (0
.6 m)
As the dis tance shr inks, the time interva l between the audible tones
grows shorter.
The sound changes to a continuous tone as soon as the remaining distance to an obstacle closes to less than about 1 ft. (0 .3 ml. The
steady tone cautions you that you have backed up hazardously
close and you ris k co llision by backing up any further .
Malfunctions in the system
If a warning tone is audible for about five seconds when you turn on
the ignit ion, there is a malfunction in the system . Have the prob lem
corrected by your authorized Audi dea ler. _,.
Page 126 of 340
• .___O_ n_ t_ h _e _ ro_ a_d __________________________________________________ _
Storing a sp eed
You must set and then store a vehicle speed using the
cruise control.
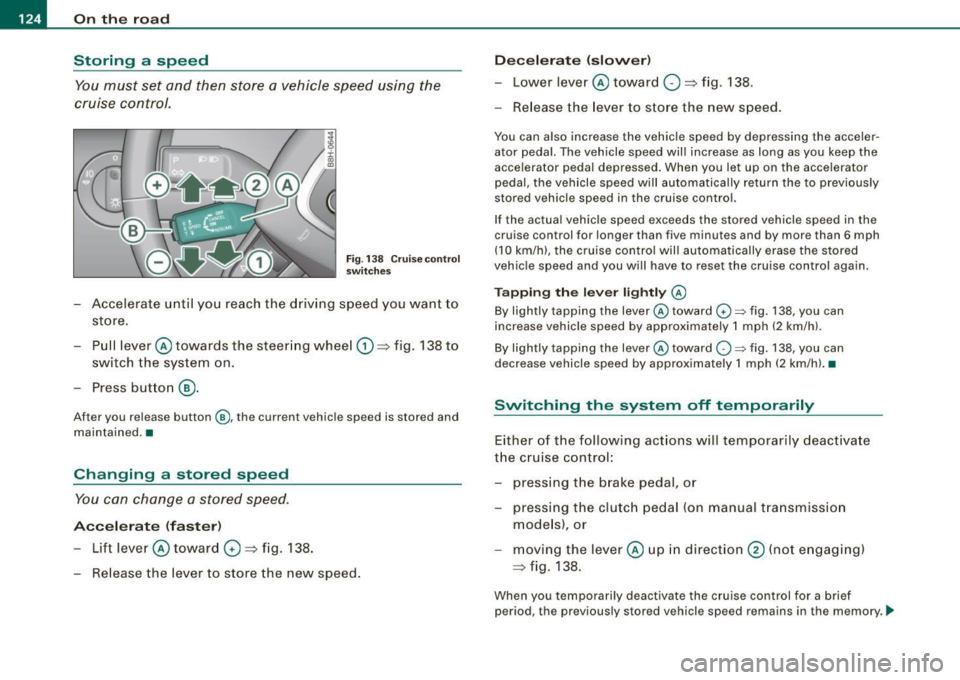
Fig . 138 Cruise control
switches
- Accelerate until you reach the driving speed you want to
store.
Pull lever @ towards the steering wheel
G) => fig. 138 to
switch the system on.
Press button
® ·
After you release button@, the current vehicle speed is stored and
maintained. •
Changing a stored speed
You can change a stored speed.
Accelerate (faster)
-Lift lever @ toward 0 => fig. 138.
Release the lever to store the new speed.
Decelerate (slower)
-Lower lever@ toward O => fig. 138.
- Release the lever to store the new speed.
You can also increase the vehicle speed by depressing the acceler
ator pedal. The vehicle speed will increase as long as you keep the
accelerator pedal depressed. When you let up on the accelerator
pedal, the vehicle speed will automatically return the to previously
stored vehicle speed in the cruise control.
If the actual vehicle speed exceeds the stored vehicle speed in the
cruise control for longer than five minutes and by more than 6 mph
(10 km/h), the cruise control will automatically erase the stored
vehicle speed and you will have to reset the cruise control again.
Tapping the lever lightly @
By lightly tapping the lever@toward G) ~ fig. 138, you can
increase vehicle speed by approximately 1 mph (2 km/h).
By lightly tapping the lever @toward
O ~ fig. 138, you can
decrease vehicle speed by approximately 1 mph (2 km/hl. •
Switching the system off t emporarily
Either of the following actions will temporarily deactivate
the cruise control:
- pressing the brake pedal, or
- pressing the clutch pedal (on manual transmission
models), or
moving the lever@ up in direction
@ (not engaging)
=>fig .138.
When you temporarily deactivate the cruise control for a brief
period, the previously stored vehicle speed remains in the memory. -.,
Page 127 of 340
On the road -
----------------
To resume the previously stored vehicle speed, re lease the brake (or
clutch) pedal, or you pull lever © toward the steering whee l
G).
If no veh ic le speed was stored when you switched off the system
temporarily, you must reset a new vehicle speed : Acce lerate to the
des ired speed and press button @ (SET) =>
page 124, fig. 138.
& WARNING
Do not use the cruise control if the stored vehi cle speed i s faster
than exi sting traffic condition s permit . •
Switching off the cruise control system
While driving
- Move lever © into pos ition @ until it engages
=> page 124, fi g. 138 .
When the vehicle is at a standstill
- Sw itch off the ignit ion. •
Controls and equip
ment
Page 151 of 340
__________________________________________________ D _r_iv _ in_ g=- S_ a_f _e _l..:.. Y _ ....... 911
& WARNING (continued)
• Always adjust the driver's seat and the steering wheel so that
there are at least 4 inches 110 cm) between the knees and the
lower part of the instrument panel.
• Always hold the steering wheel on the outside of the steering
wheel rim with your hands at the 9 o'clock and 3 o'clock positions
to help reduce the risk of personal injury if the driver's airbag inflates .
• Never hold the steering wheel at the 12 o'clock position or with
your hands at other positions inside the steering wheel rim or on
the steering wheel hub. Holding the steering wheel the wrong way can cause serious injuries to the hands, arms and head if the
driver's airbag inflates
• Pointing the steering wheel toward your face decreases the
ability of the supplemental driver's airbag to protect you in a colli
sion .
• Always sit in an upright position and never lean against or
place any part of your body too close to the area where the airbags
are located.
• Before driving, always adjust the front seats and head
restraints properly and make sure that all passengers are properly
restrained.
• Never adjust the seats while the vehicle is moving. Your seat
may move unexpectedly and you could lose control of the vehicle.
• Never drive with the backrest reclined or tilted far back! The
farther the backrests are tilted back, the greater the risk of injury
due to incorrect positioning of the safety belt and improper
seating position.
• Children must always ride in child seats
=> page 190. Special
precautions apply when installing a child seat on the front
passenger seat
=> page 168. •
Controls and equip
ment Safety first
Vehicle operation
Proper seating position for the front
passenger
The proper front passenger seating position is important
for safe, relaxed driving.
For your own safety and to reduce the risk of injury in the
event of an accident, we recommend that you adjust the
seat for the front passenger to the following pos ition:
- Move the front passenger seat back as far as possible.
There must be a minimum of 10 inches (25 cm) between
the breastbone and the instrument panel =>
&.
- Adjust the angle of the seatback so that it is in an upright
position and your back comes in full contact with it
whenever the vehicle is moving.
- Adjust the head restraint so that the upper edge is as
even with the top of your head as possible but not lower
than eye level and so that it is as close to the back of your
head as possible =>
page 151.
-Keep both feet flat on the floor in front of the front
passenger seat.
- Fasten and wear safety belts correctly=>
page 163.
For detailed information on how to adjust the front passenger's
seat, see => page 92.
LJ}. WARNING
Front seat passengers who are unbelted, out of position or too
close to the airbag can be seriously injured or killed by the airbag
as it unfolds. To help reduce the risk of serious personal injury :
jll,,
Vehicle care Do-it-yourself service Technical data
Page 155 of 340
________________________________________________ D_r_iv _ i _n_, g,::._ S_ a_ fe__, ly'-------.J"'
Only use floor mats that leave the pedal area free and can be
secured with floor mat fasteners.
If a brake circuit fails, increased brake pedal travel is required to
bring the vehicle to a full stop.
& WARNING
Pedals that cannot move freely can cause loss of vehicle control
and increase the risk of serious injury.
• Never place any objects in the driver's footwell. An object could
get into the pedal area and interfere with pedal function . In case
of sudden braking or an accident, you would not be able to brake
or accelerate!
• Always make sure that nothing can fall or move into the
driver's footwell. •
Floor mats on the driver side
Always use floor mats that can be securely attached to
the floor mat fasteners and do not interfere with the free
movement of the pedals.
-Make sure that the floor mats are properly secured and
cannot move and interfere with the pedals~&.
Use only floor mats that leave the pedal area unobstructed and that
are firmly secured so that they cannot slip out of position. You can
obtain suitable floor mats from your authorized Audi Dealer.
Floor mat fasteners are installed in your Audi.
Floor mats used in your vehicle must be attached to these fasteners.
Properly securing the floor mats will prevent them from sliding into
positions that could interfere with the pedals or impair safe opera
tion of your vehicle in other ways .
Controls and equip
ment Safety first Vehicle operation
& WARNING
Pedals that cannot move freely can result in a loss of vehicle
control and increase the risk of serious personal injury.
•
Always make sure that floor mats are properly secured .
• Never place or install floor mats or other floor coverings in the
vehicle that cannot be properly secured in place to prevent them
from slipping and interfering with the pedals or the ability to control the vehicle.
• Never place or install floor mats or other floor coverings on top
of already installed floor mats. Additional floor mats and other
coverings will reduce the size of the pedal area and interfere with
the pedals.
• Always properly reinstall and secure floor mats that have been
taken out for cleaning .
• Always make sure that objects cannot fall into the driver foot
well while the vehicle is moving. Objects can become trapped
under the brake pedal and accelerator pedal causing a loss of
vehicle control . •
Stowing luggage
Loading the luggage compartment
All luggage and other objects must be properly stowed
and secured in the luggage compartment.
Loose items in the luggage compartment can shift
suddenly, changing vehicle handling characteristics. Loose
items can also increase the risk of serious personal injury in
a sudden vehicle maneuver or in a collision.
- Distribute the load evenly in the luggage compartment . ..,
Vehicle care Do-it-yourself service Technical data
Page 157 of 340

• The tire pressure must correspond to the load -see the tire pres
s ur e s tick er on d river 's s ide B-p ill ar o r insid e t he f uel fill er fla p.•
Reporting Safety Defects
Applicable to U.S.A.
If you believe that your vehicle has a defect
which could cause a crash or could cause injury or death, you should immediately inform
the National Highway Traffic Safety Adminis
tration (NHTSA) in addition to notifying Audi of
America, Inc.
If NHTSA re ceives similar complaints, it may
open an investigation, and if it finds that a
safety defects exists in a group of vehicles , it
may order a recall and remedy campaign.
However , NHTSA cannot become involved in
individual problems between you , your dealer,
or Audi of America , Inc.
To contact NHTSA , you may call the Vehicle
Safety Hotline toll -free at:
Tel.: 1 -888 -327 -4236 (TTY: 1 -800 -424 -9153)
or write to:
Admini strator
NHTSA
1200 New Jersey Avenue , SE
Controls and equip
ment Safety first Vehicle operation
Driving Safely 1111
Washington
, D.C. 20590
You can also obtain other information about motor vehicle safety from:
http: //www.safercar.gov
Applicable to Canada
Canadian customers who wish to report a
safety -related defect to Tran sport Canada ,
Defect Investigations and Recall s, may tele
phone the toll free hotline:
Tel.: 1 -800 -333 -0371
or conta ct Transport Canada by mail at:
Road Safet y and Moto r Veh icle Regulation
Directorate
Transport Canada
Tower C, Place de Ville, 330 Sparks Street
Ottawa, ON K1 A 0N5
For additional road safety information , please
vi sit the Road Safety web site at:
http:/ /www.tc.gc.ca /roadsafety /menu.htm •
Vehicle care Do-it-yourself service Technical data
Page 167 of 340
& WARNING (continued)
• Always read and heed all WARNINGS and other important infor
mation
=> page 162. •
Pregnant women must also be correct ly
restrained
The best way to protect the fetus is to make sure that
expectant mothers always wear safety belts correctly·
throughout the pregnancy.
Fig . 169 Safety belt
position during preg
nancy
To provide maximum protection, safety belts must always
be posit ioned correctly on the wearer's body=>
page 164.
-Adjust the front seat and head restraint correctly
=>
page 92, "General recommendations".
- Hold the belt by the tongue and pull it evenly across the
chest and pelvis=> fig. 169, =>
&.
- Insert the tongue into the correct buckle of your seat
until you hear it latch securely=>
page 163, fig. 167.
- Pull on the belt to make sure that it is securely latched in
the buck le.
Safety first
Safety belts
& WARNING
Improperly positioned safety belts can cause serious personal
injury in an accident.
• Expectant mothers must always wear the lap portion of the
safety belt as low as possible across the pelvis and below the
rounding of the abdomen.
• Always read and heed all WARNINGS and other important infor
mation =>
& in "Fastening safety belts" on page 163. •
Unfastening safety belts
Unbuckle the safety belt with the red release button only
after the vehicle has stopped.
Fig . 170 Releasing the
tongue from the buckle
- Push the red release button on the buckle=> fig. 170. The
belt tongue will spring out of the buckle =>
&.
- Let the belt wind up on the retractor as you guide the belt
tongue to its stowed position.
& WARNING
Never unfasten safety belt while the vehicle is moving. Doing so
will increase your risk of being injured or killed. •
~ehicle care irechnical data