set clock AUDI A4 CABRIOLET 2009 Owners Manual
[x] Cancel search | Manufacturer: AUDI, Model Year: 2009, Model line: A4 CABRIOLET, Model: AUDI A4 CABRIOLET 2009Pages: 340, PDF Size: 77.32 MB
Page 14 of 340
Instruments and warning/indicator lights
Instruments and warning/indicator lights
Instruments
Instrument cluster and controls
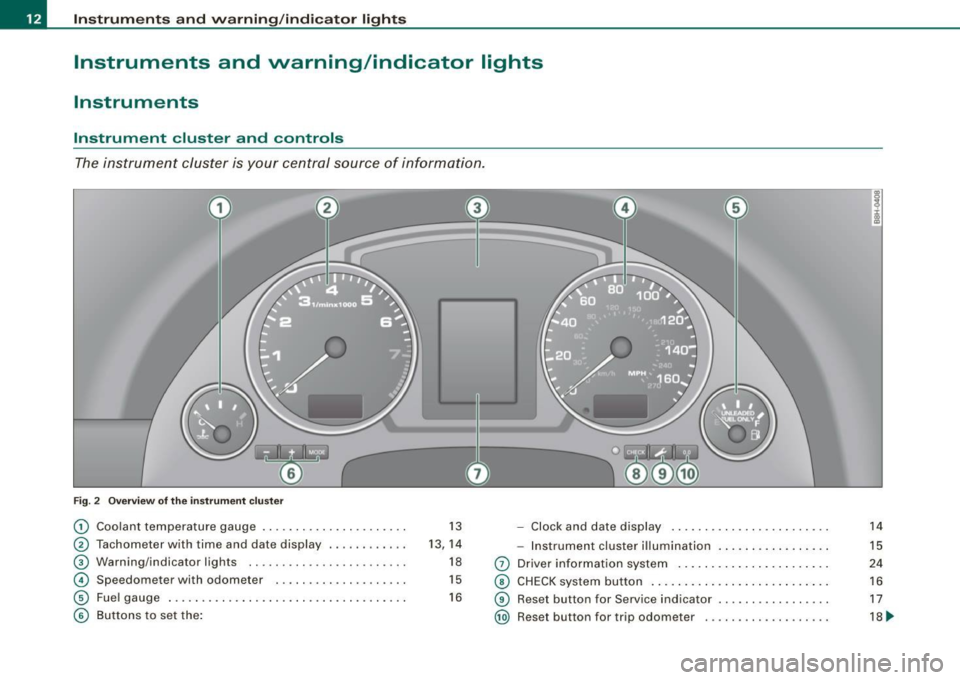
The instrument cluster is your central source of information.
Fig. 2 Overview of the instrument cluster
G) Coolant temperatu re gauge .. ..... ... ... .... ... . . 13 - Clock and date display .. .... ........ .... ... .. .
® Tachometer with time and date display . ....... ... . 13, 14 -Instrument cluster illumination ... .... .... ... .. .
® Warning/indicator l ights .. ... ....... ... ........ . 18 0 Driver information system ...... .... ....... .... . .
© Spe edometer with odometer . .... ...... ..... .. . . 15 © CHECK system button .......... ........... ..... .
© Fuel gauge ...... .... ....... ........ ........ .. . 16 © Reset but ton for Service indicator ................ .
© Buttons to set the: @ Reset button for trip odome ter .................. .
14
15
24
16
17
18 ~
Page 16 of 340
Instruments and warning/indicator lights
ffi For the sake of the environment
Upshifting early saves fuels and reduces engine noise .•
Digital clock with date display
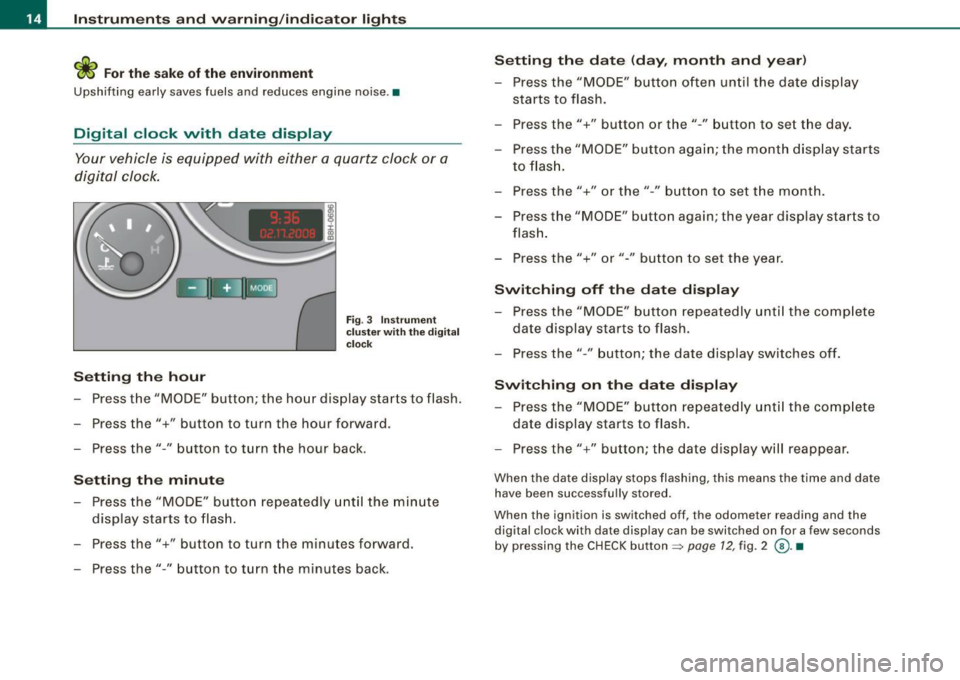
Your vehicle is equipped with either a quartz clock or a
digital clock.
Setting the hour
Fig. 3 Instrument
cluster with the digital
clock
- Press the "MODE" button; the hour display starts to flash.
- Press the"+" button to turn the hour forward .
- Press the"-" button to turn the hour back.
Setting the minute
- Press the "MODE" button repeatedly until the minute
display starts to flash.
- Press the"+" button to turn the minutes forward.
- Press the"-" button to turn the minutes back.
Setting the date (day, month and year)
-Press the "MODE" button often until the date display
starts to flash.
- Press the"+" button or the"-" button to set the day.
- Press the "MODE" button again; the month display starts to flash.
- Press the"+" or the" -" button to set the month.
- Press the "MODE" button again; the year display starts to
flash.
- Press the"+" or"-" button to set the year.
Switching off the date display
-Press the "MODE" button repeatedly until the complete
date display starts to flash.
- Press the" -" button; the date display switches off.
Switching on the date display
- Press the "MODE" button repeatedly until the complete
date display starts to flash.
- Press the"+" button; the date display will reappear.
When the date display stops flashing, this means the time and date
have been successfully stored .
When the ignition is switched off, the odometer reading and the
digital clock with date display can be switched on for a few seconds
by pressing the CHECK button =>
page 12, fig. 2 @ . •
Page 39 of 340
Saving a maximum sp eed
- Turn off the ignition .
Fig. 22 Wiper arm :
fu nc tio n se lec to r
switches
- Briefly press the CHECK button in the instrument cluster
=> page
36, fig. 21 . The odometer and the digital clock
will now be illuminated.
Press the CHECK button for at least two seconds. The
currently stored maximum speed
o r the crossed out
symbol for warning 2 wi ll appear in the display if a
maximum speed has not yet been set.
Press the function se lector switch in the wiper arm@
=> fig. 22 up or down to change the set value . The values
increase or decrease in increments of 6 .2 mph (10 km/h).
R ese tting th e m aximum sp eed
- Turn off the ignition .
- Briefly p ress the CHECK button in the instrument cluster
=> page 36, fig. 21. The odometer and the digital clock
will now illuminate briefly .
- Press the CHECK button for at least two seconds. The
cu rrently stored maximum speed will appear in the
disp lay.
Contro ls and eq uip
ment
Dri ver informa tio n di spl ay
- Press the rese t button in the wiper arm@=> fig. 22 until
t h e d isplay shows the symbol for spe ed warning 2
crossed out w ith a line .
The odometer and the digital clock disp lays wi ll go out again a few
seconds after this adjustment is completed .•
Trip computer
Introduction
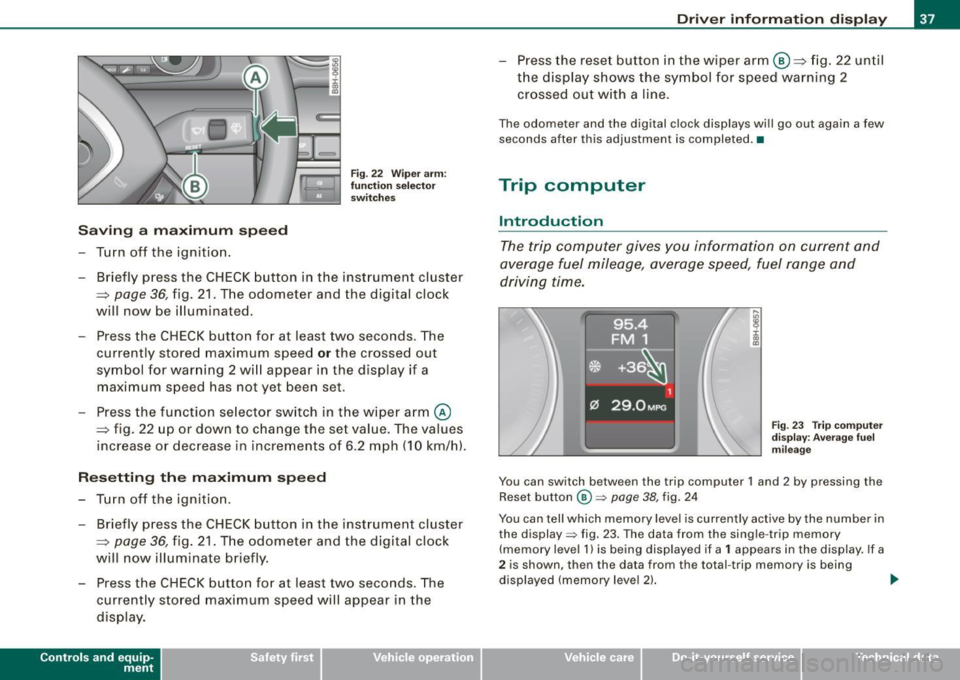
The trip computer gives you information on current and
average fuel mileage, average speed, fuel range and
driving time.
F ig . 23 Tr ip co mput er
d is pl ay : Ave ra ge f uel
mi leage
You can switch between the trip computer 1 and 2 by pressing the
Reset button
@ => page 38, fig. 24
You can tell which memory level is currently active by the number in
the display => fig. 23. The data from the single -trip memory
(memory level 1 l is being displayed if a
1 appears in the display. If a
2 is shown, then the data from the total -trip memory is being
displayed (memory leve l 2) . ..,_
~ehicle care Technical data
Page 42 of 340
Driver inf orma tion d ispl ay
Some functions in your vehicle can be set, activated, and controlled
by
M enu s (e.g. Acoustic Park Assist*). With these menus you can
a lso select the information shown in the DIS disp lay, which operates
only with the ignition switched on. Operation is controlled by the
!Reset) button and the rocker switch on the wiper lever~
page 39,
fig. 25.
The
Start m enu shows you the different disp lay types :
Set
Check
Menu off
H el p
Each display type in the Start menu contains a submenu with addi
tional options.
S et
Check
Me nu off
H elp
Clock ~ page40
Computer
Speed alarm (speed
~ page35
warning)
Language (6 languages)
=> page40
Units (distance, fuel con-~ page40
sumption, temperature)
Service
~ page 17
All of the messages shown in vehicles without menu disp lay appear on the display screen.
The Help function helps you to make the right selection.
•
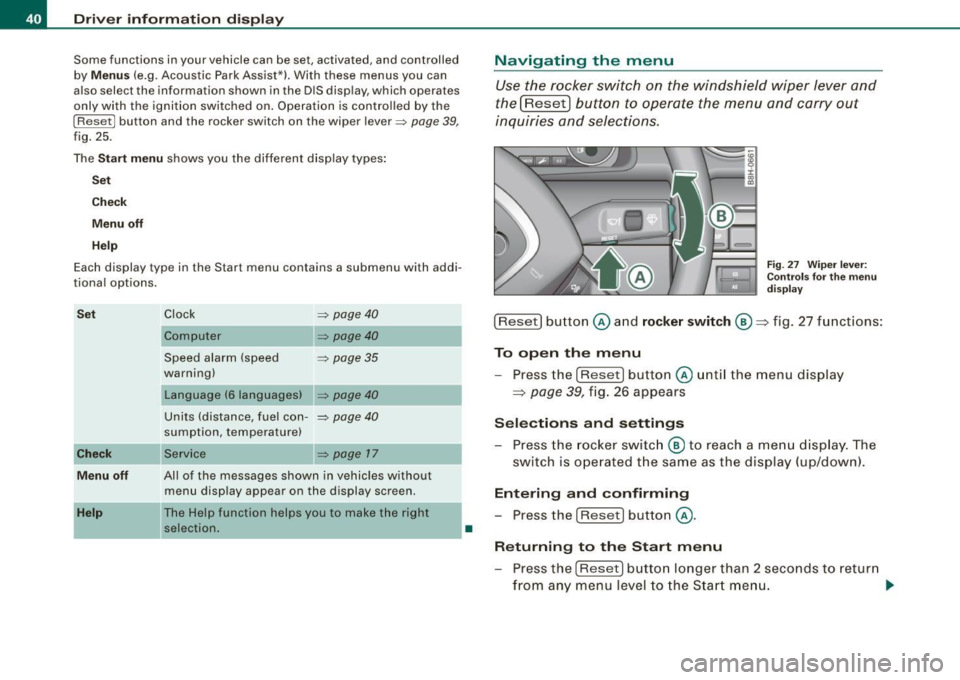
Navigating the menu
Use the rocker switch on the windshield wiper lever and
the[ResetJ button to operate the menu and carry out
inquiries and selections.
F ig . 27 Wipe r leve r:
Con trols for t he m en u
d is pl ay
!Reset] button @and rocker switch @=> fig. 27 functions:
To op en th e menu
- Press the
!Reset! button @unti l the menu display
=> page 39, fig. 26 appears
Sele ctions and setting s
- Press the rocker switc h
@ to reach a me nu display . The
switch is ope rated the sam e as the display (up/down).
Entering and confirming
- Press the
I Reset I button @.
R eturning to th e Start menu
- Press the
[Reset) butto n longer than 2 seconds to retur n
from any menu level to the Star t m en u. •
Page 71 of 340

forward goes much easier when done by two people. However, if no
assistance is available, you may find it easier to position yourself on
the rear seatbench and lift the power top up by grabbing it at the
center. •
Where is the manual release key stored?
The special key for manually opening the power top
storage bay is located in a compartment behind the fuse
cover.
Fig. 64 Left end-face of
dash panel
Fig. 65 Left end-face of
dash panel: location of
manual release key
-Remove the fuse cover using the ignition key or a screw
driver=:> fig. 64.
- Take the manual key out of its compartment=:> fig. 65. •
Controls and eq uip
ment
Power top
How does the manual release key work?
The manual release key has two distinct configurations
for insertion and actuation.
g
9 :c: ., a,
j ., m
Fig . 66 Release key:
configured for inser
tion
Fig. 67 Release key:
configured for actua
tion
Turn the red handle counter-clockwise as far as poss ible
to configure the release key for insertion =:> fig. 66.
The release key is inserted and engaged in the power top locking
mechanism with the key handle raised. Once inserted and engaged
the key is reset for actuation to lock and unlock the mechanism. •
~ehicle care Technical data
Page 75 of 340

- Press down the storage bay to close it=> page 72, fig. 76.
The storage bay cover will slide back into its catches
=>& .
Do not use force when pressing down the storage bay cover. The
cover will not close completely at this stage of the procedure : there
will still be a gap between the body and the storage cover.
& WARNING
Take care that neither you nor any other person get caught with
the hands below the storage bay cover when closing it. Careless
handling can result in injuries to hands and fingers! •
Step 6: Locking the top cover
You must now Jock the storage bay again.
Controls and eq uip
ment
Fig . 77 Locking the
storage bay cover
Locking the storage bay cover
N
! Cl) ID
Power top
Fig. 78 Taking the
manual release key out
-Turn the release key clockwise as far as it will go
=> fig. 77. The storage bay cover will now settle down and
lock in position.
Taking the manual release key out
- Turn the red handle segment on the release key counter
clockwise to the stop.
Turn the entire release key counter-clockwise and then pull it down and out of the mechanism
=> fig. 78. The
storage bay cover is now fully locked. •
~ehicle care irechnical data
Page 260 of 340

___ C_h_ e_ c_k _in --== g'-- a_n _d_ f_il _li _n ..::g=-- --------------------------------------------
0 Note
• Before winter sets in, have the coolant checked to see if the
coolant additive in your vehicle is sufficient to meet the climate
conditions. This is especially important if you live in a region where
the winter is extremely cold . If necessary, increase the proportion of
coolant additive to 60% .
• When adding coolant additive to your cooling system,
remember:
-We recommend using only coolant additive G12+ + (check the
label) for your vehicle. This coolant additive is available at autho
rized Audi dealers. Other types of antifreeze can significantly
reduce corrosion protection . The resulting corrosion can cause a
loss of coolant and serious engine damage.
• Do not add any type of radiator leak sealant to your vehicle's
engine coolant. Adding radiator repair fluid may adversely affect the
function and performance of your cooling system and could result
in damage not
covered by your New Vehicle Limited Warranty. •
Checking the engine coolant level
The engine coolant level can be checked with a quick
glance.
Fig . 202 Engine
compartment: Coolant
expansion tank
Before you check anything in the engine compartment,
always read and heed all WARNINGS~ & in "Working in
the engine compartment" on
page 250.
Turn off the ignition.
- Let the eng ine cool down.
Place a thick rag over the coolant expansion tank
~ fig. 202 and carefully twist the cap counter-clockwise
~& .
Read the engine coolant level in the open coolant expan
sion tank~ fig. 202. With a cold engine, the coolant level
should be between the "min" and "max" markings. When
the engine is warm, the level may be slightly above the
"max" marking .
The location of the coolant expansion tank can be seen in the
engine compartment illustration=>
page 252.
To obtain an accurate reading , the engine must be switched off .
The expansion tank in your vehicle is equipped with an electric
coolant level sensor.
When the coolant l evel is too low, the warning light in the Auto
Check System :::::,
page 31 will blink until you add coolant and the
level has been restored to normal. Even though there is an electric
coolant level sensor, we still recommend you check the coolant level
from time to time .
Coolant loss
Coolant loss may indicate a leak in the cooling system. In the event
of coolant loss, the cooling system should be inspected immedi
ately by your authorized Audi dealer . It is not enough merely to add
coolant.
In a
sealed system, losses can occur only if the boiling point of the
coolant is exceeded as a result of overheating. ..,.
Page 328 of 340

ll'JI Alphabetical index _ __,__ ___ ____;_...::.:...::... ___________________________ _
Changing engine oil ...... ... ... .. ... 256
Chassis Undercoating ........ ...... .... .. 237
CHECK button . . . . . . . . . . . . . . . . . . . . . . . 16
Checking Battery acid level . . . . . . . . . . . . . . . . . 264
Engine coolant level .. ............ 258
Checking tire pressure ............... 274
Child restraint Danger of using child restraints in the
front seat . . . . . . . . . . . . . . . . . . . . . . 170
Child restraints What types of chi ld restraint anchors are
available? ..................... 203
Where can I get additional information
about child restraints? ... .... .... 204
Child safety .. ........ ....... ... 190, 195
Booster seats . . . . . . . . . . . . . . . . . . . . 198
Convertible child safety seats . . . . . . 196
Convertible locking retractor . . . . . . . 200
Guidance fixtures for lower anchorages 206
Important safety instructions for using
child safety seats .. ...... ....... 193
Important things to know when driving
with chi ldren ............. ...... 190
Infant seats . . . . . . . . . . . . . . . . . . . . . 195
Installing a child restraint using the
LATCH system .... ... .... ...... . 208
Lower anchorages .... .... ... ... . 205
Mounting and releasing the anchorage
hook ...... ...... .... .......... 209
O lder children and safety belts ... .. 199 Safety belts and oldler children
... .. 199
Which restraint system should my older chi ld wear? ........ .... ... .. ... 199
child safety seat LATCH system . .... .... .... ...... 208
Childsafetyseats .... ........ .... ... 195
Convertible locking retractor .... ... 200
How do I properly install a child safety seat in my vehicle? .. ...... .... .. 193
Installing .... .... ... .. .... .... .. 200
Safety instructions .............. .
Cigarette lighter .......... .... ..... .
Cleaning Alcantara (synthetic suede) ....... .
E . ngine compartment . .... ... .. .. .
Fabrics and fabric coverings ... ... .
Instrument panel ....... .... ..... . 193
105
241
242
238
239
I . ntenor ......................... 238
Leather .... ...... ... .. .... ...... 240
Plastic and vinyl . .... .... ... .. ... 234
P lastic parts ........... .... ... ... 239
Safety be lts ...... ............ ... 242
Trim strips ............. ... .... .. 234
trim strips ... .. ...... .... ..... ... 235
Cleaning and protection .......... ... 230
Climate controls .. .... ......... ..... 11
O
Air distribution . . . . . . . . . . . . . . . . . . 114
Air outlets . . . . . . . . . . . . . . . . . . . . . . . 115
Air recirculation .... .... .... .... .. 113
AUTO (standard setting) .... .... ... 112
Automatic air recirculation ... .. ... 114
Contro ls . . . . . . . . . . . . . . . . . . . . . . . . 111
Defrosting / Defogging . . . . . . . . . . . . 116
Description . . . . . . . . . . . . . . . . . . . . . . 11
O
ECON ... .. .. .. .... .... ..... .. ... 113
Fan .. ............ .... ... .... ... 114
Key coded setting ................ 11
O
Recommended settings ........... 11 O
Setting the temperature ........... 112
Switching between Fahrenheit and Centigrade ... .... .... ...... .... 113
Switching the air conditioning on or off .
113
Using the climate control economically . .
116
Warm and cold .................. 110
Clock .. ........... ........... .... ... 14
Closing Power top . . . . . . . . . . . . . . . . . . . . . . . . 62
Cold tire inflation pressure .. .... ..... 271
Coming -home -function .. ............. 80
Compartments in the door trims ... ... 109
Compass mirror .. .... ...... ... ..... . 90
Comp liance .......... ....... .... ... 320
Consumer Information ........... 155, 316
Contacting NHTSA .................. 155
Continuously Variable Transmission (CVT)
See multitronic® ........ ... ...... 131
Convenience close/open feature Power top . . . . . . . . . . . . . . . . . . . . . . . . 63
Windows ......................... 53
Convertible child seats How do I properly install a convertib le
chi ld seat in my vehic le? ...... ... 196
Safety instructions .. ...... .... ... 196
Page 329 of 340

Alph ab eti ca l ind ex --------------=-----
Convertible locking retractor
Activating ...... ... .. .... ...... .. 202
Deactivating .. ... ..... ..... .. ... . 203
Using to secure a child safety seat 200 ,
202
Convertible top ........ .... .... .... .. 61
Coolant system
Cooling System 257
Expansion tank ... .... ...... .... .. 258
cornering light . .......... .. .... .... .. 79
Cruise control .. ... ... ...... ...... .. 123
Changing a stored sp eed . .... .... . 124
Setting and storing a vehicle speed . 124
Switching off .................... 125
Switching off temporari ly .. ........ 124
Switching on .... .... .... ...... .. 124
Warning/indicator lights ... ... .... .. 20
Cruising range .. .... .... .... ...... ... 37
Cupholder . ... .. ...... ..... .. .. .... 104
D
Data . .... ... . ... .. ... ... .... ..... . 314
Data recorder ... .... ...... ..... .... . 212
Date dis play . . . . . . . . . . . . . . . . . . . . . . . . . 14
Daytime running lights ... .. ... .. ... ... 78
Declaration of compliance Cell phone package .. .. .... .... ... 320
Elect ronic immobilizer . ..... .. .... 320
Homelink® universal remote con trol 320
Remote control key .. .... .... .... . 320
Tire pressure monitoring system ... 320
Controls and equip
ment Safety first
def
Dublicate key ... ...... ... .. . ... .... .. 47
What does this mean when it appears in
Dynamic shift program ....... ... ... . . 136
the trip odometer display? .. ...... . 15
Defogging the windows . ....... ..... . 116
E
Defrosting the windows .. ... ..... ... . 116
Determining correct load lim it ... .... . 276 ECON
Digi tal clock ............. .. ... ... .... 14 When should I use ECON?
... .... .. . 113
Setting the time ......... .... .... .. 14 EDL
Digital compass . ... ... . ... ... .. .... .. 90 See Electronic differential lock (EDU . 213
Dimensions ..... .... .... .... .... ... 313 Electric roof .
..... ... ..... .. .... .... . 61
Dipstick Electrically heated front seats .
.. .... .. 116
Reading the dipstick properly ...... 254 Electronic differential lock
Distance ... .... ... ... .. ... .... .... .. 38 Warning/indicator
lights ..... ... .... 20
Doors, power locks ........ ....... .... 53
Driver Electronic differ
ential lock (EDU
How the system works ...... .. .... 213
See S eating position .. ... ... ... ... 148 Electronic immobilizer ..
.. .. . .. .. .. 15, 49
Driver information dis play
Miles (kilometers) to empty .. .. ... .. 26 Electronic power control
EPC warning/indicator light ......... 22
Parking brake warning ... ... ..... .. 30 Electronic sp
eed limiter ..... .. .... .... 28
D river information sys.tern . .... ...... .. 24 Electronic stabilization program (ESP)
Driver information messages .. .... .. 29 How the system works ...
..... .. .. 212
Fuel filler cap . .. . ........ ....... .. 27 Elec
tronic stabiliza tion program (ESP)
Menu button .... . .. .. .... .... .... . 40 Warning/indicator lights
.... ...... .. 22
Menu display .... ... .... .... . ... .. 39 Emerg
ency flasher ... .... ... .. ....... 82
Open door or rear lid warning ...... . 26 Warning/indicator
lights .... ...... .. 21
Outside temperatu re disp lay ... ..... 25
Emergency locking . .... .... ... .. .. . .. 55
Sound system display .... .... .... .. 25
Emergency starting ..... ....... .. .... 304
Driver's seat memory ... .... .... ..... 101
Emergency towing . .. ... .. .. .... .... 306
Recalling a seat position .... .... ... 102
Engine
Storing a seat position ... ... .... .. 102
4-cylinder (200 hp) . ... .. .. .... .. .. 251
Driving messages ...... ........ ..... . 29
6-cylinder (255 hp) . ... .. .. .... .. .. 252
Driving safely . ... .. . ... .. .... .... ... 146
Compartment .... ... .. ...... .... . 251
Driving time . .... ...... .... ... .. .... . 37 Coolant ...
.. ... .... .... .... ..... 257
Vehicle operation Vehicle care Do-it-yourself service Technical data
Page 334 of 340
llffl _ __:._A..:.:IL: p :...:h..:.: a== b:..:e :...:t:.:..ic =-= a..:..l ..:..in :..:..:: d:...:e :.:x-=-----------------------------------------------
Opening and closing the windows 53
Operating locks with the fold-out key 53
Rear lid .......................... 55
Remote control ................ 48, 51
Un locking and locking vehicle ....... 51
Power outlets . . . . . . . . . . . . . . . . . . . . . . 106
Power seats Adjusting the seatback ............. 97
Adjustment . ...... .... .... .... ... 96
Folding the seatback forward ...... . 99
Power steering . . . . . . . . . . . . . . . . . . . . . 217
Power top . . . . . . . . . . . . . . . . . . . . . . . . . . 61
Care and cleaning ...... .... .. .... 233
Closing ........................ .. 62
Convenience close/open feature .. ... 63
Conven ience opening/closing ....... 63
Correcting a malfunct ion . . . . . . . . . . . 65
Display messages . . . . . . . . . . . . . . . . . 64
Genera l information . . . . . . . . . . . . . . . 61
Malfunction ...... ..... .. .... .... . 64
Manual operation . .... .... ...... .. 68
Opening ..................... .... 62
Variable storage bay . . . . . . . . . . . . . . . 64
Warning/indictor lights ........ .... 21
Wind deflector . . . . . . . . . . . . . . . . . . . . 66
Power window switches . . . . . . . . . . . . . . 59
In the driver's door ... .... ... ...... 59
In the front passenger's door . . . . . . . 60
Reactivating the system . . . . . . . . . . . . 60
Pregnant women Special considerations when wearing a safety belt . . . . . . . . . . . . . . . . . . . . . 165 Programming
the Homelink® universal re-
mote control . . . . . . . . . . . . . . . . . . . 139
Proper occupant seating positions .... 148
Proper safety belt position . . . . . . . . . . . 164
Proper seat ing position
Front passenger . . . . . . . . . . . . . . . . . 149
Occupants . . . . . . . . . . . . . . . . . . . . . . 148
Rear passengers 150
a
Quartz
clock . . . . . . . . . . . . . . . . . . . . . . . . . 14
quattro®
See All Wheel Drive ............... 218
Question
R
What happens to unbelted occupants? ..
161
Why safety belts? . . . . . . . . . . . . . . . . 159
Radiator fan ......... ............ ... 260
Radio Replacing . .... ... .... ........ ... 319
Rain sensor defective .. .... .... ....... 33
Reading lights .... ............. ...... 84
Rear ashtray . . . . . . . . . . . . . . . . . . . . . . . 105
Rear lid Locking/unlocking ............. ... . 55
Rear light
Defective ... .. ........ .... .... ... 35
Rear view mirror Inside rear view mirror .. .... ....... 88 Rear window defogger
..... .. ... .... . 116
Rearview mirror
See Mirrors ............ .... .... ... 88
Red symbols .. .... .... ... ........ ... 30
Refuelling .......................... 246
Release lever for engine hood ......... 249
Remote control ........ ...... .... . 48, 51
Resetting remote control ... .... .... 52
Un locking and locking . .... .... .... 51
Remote control garage door opener (Homelink®) ...... ... ..... .... . 139
Remote master key Battery replacement ..... ....... ... 48
Check light ....................... 48
Remote rear lid release ........... .... 56
Repair manuals ....... .... .... ...... 316
Repairs Airbag system
Replacing 182
Wheel rims ..... ................. 281
Replacing a fuse ...... .... .... ...... 300
Replacing a sound system .. .... ...... 319
Replacing light bulbs ...... .... .... .. 302
Replacing tires and wheels . ....... ... 280
Reporting Safety Defects ... .... ...... 155
Reset button . . . . . . . . . . . . . . . . . . . . . 15, 18
Resetting remote control ...... .... .... 52
Retractor . . . . . . . . . . . . . . . . . . . . . . . . . . 163
Rims Cast a lloy .. ........... .... ...... 237
Replacing .. ........... ........ .. 281
Stee l rims ...... .... ......... .... 236